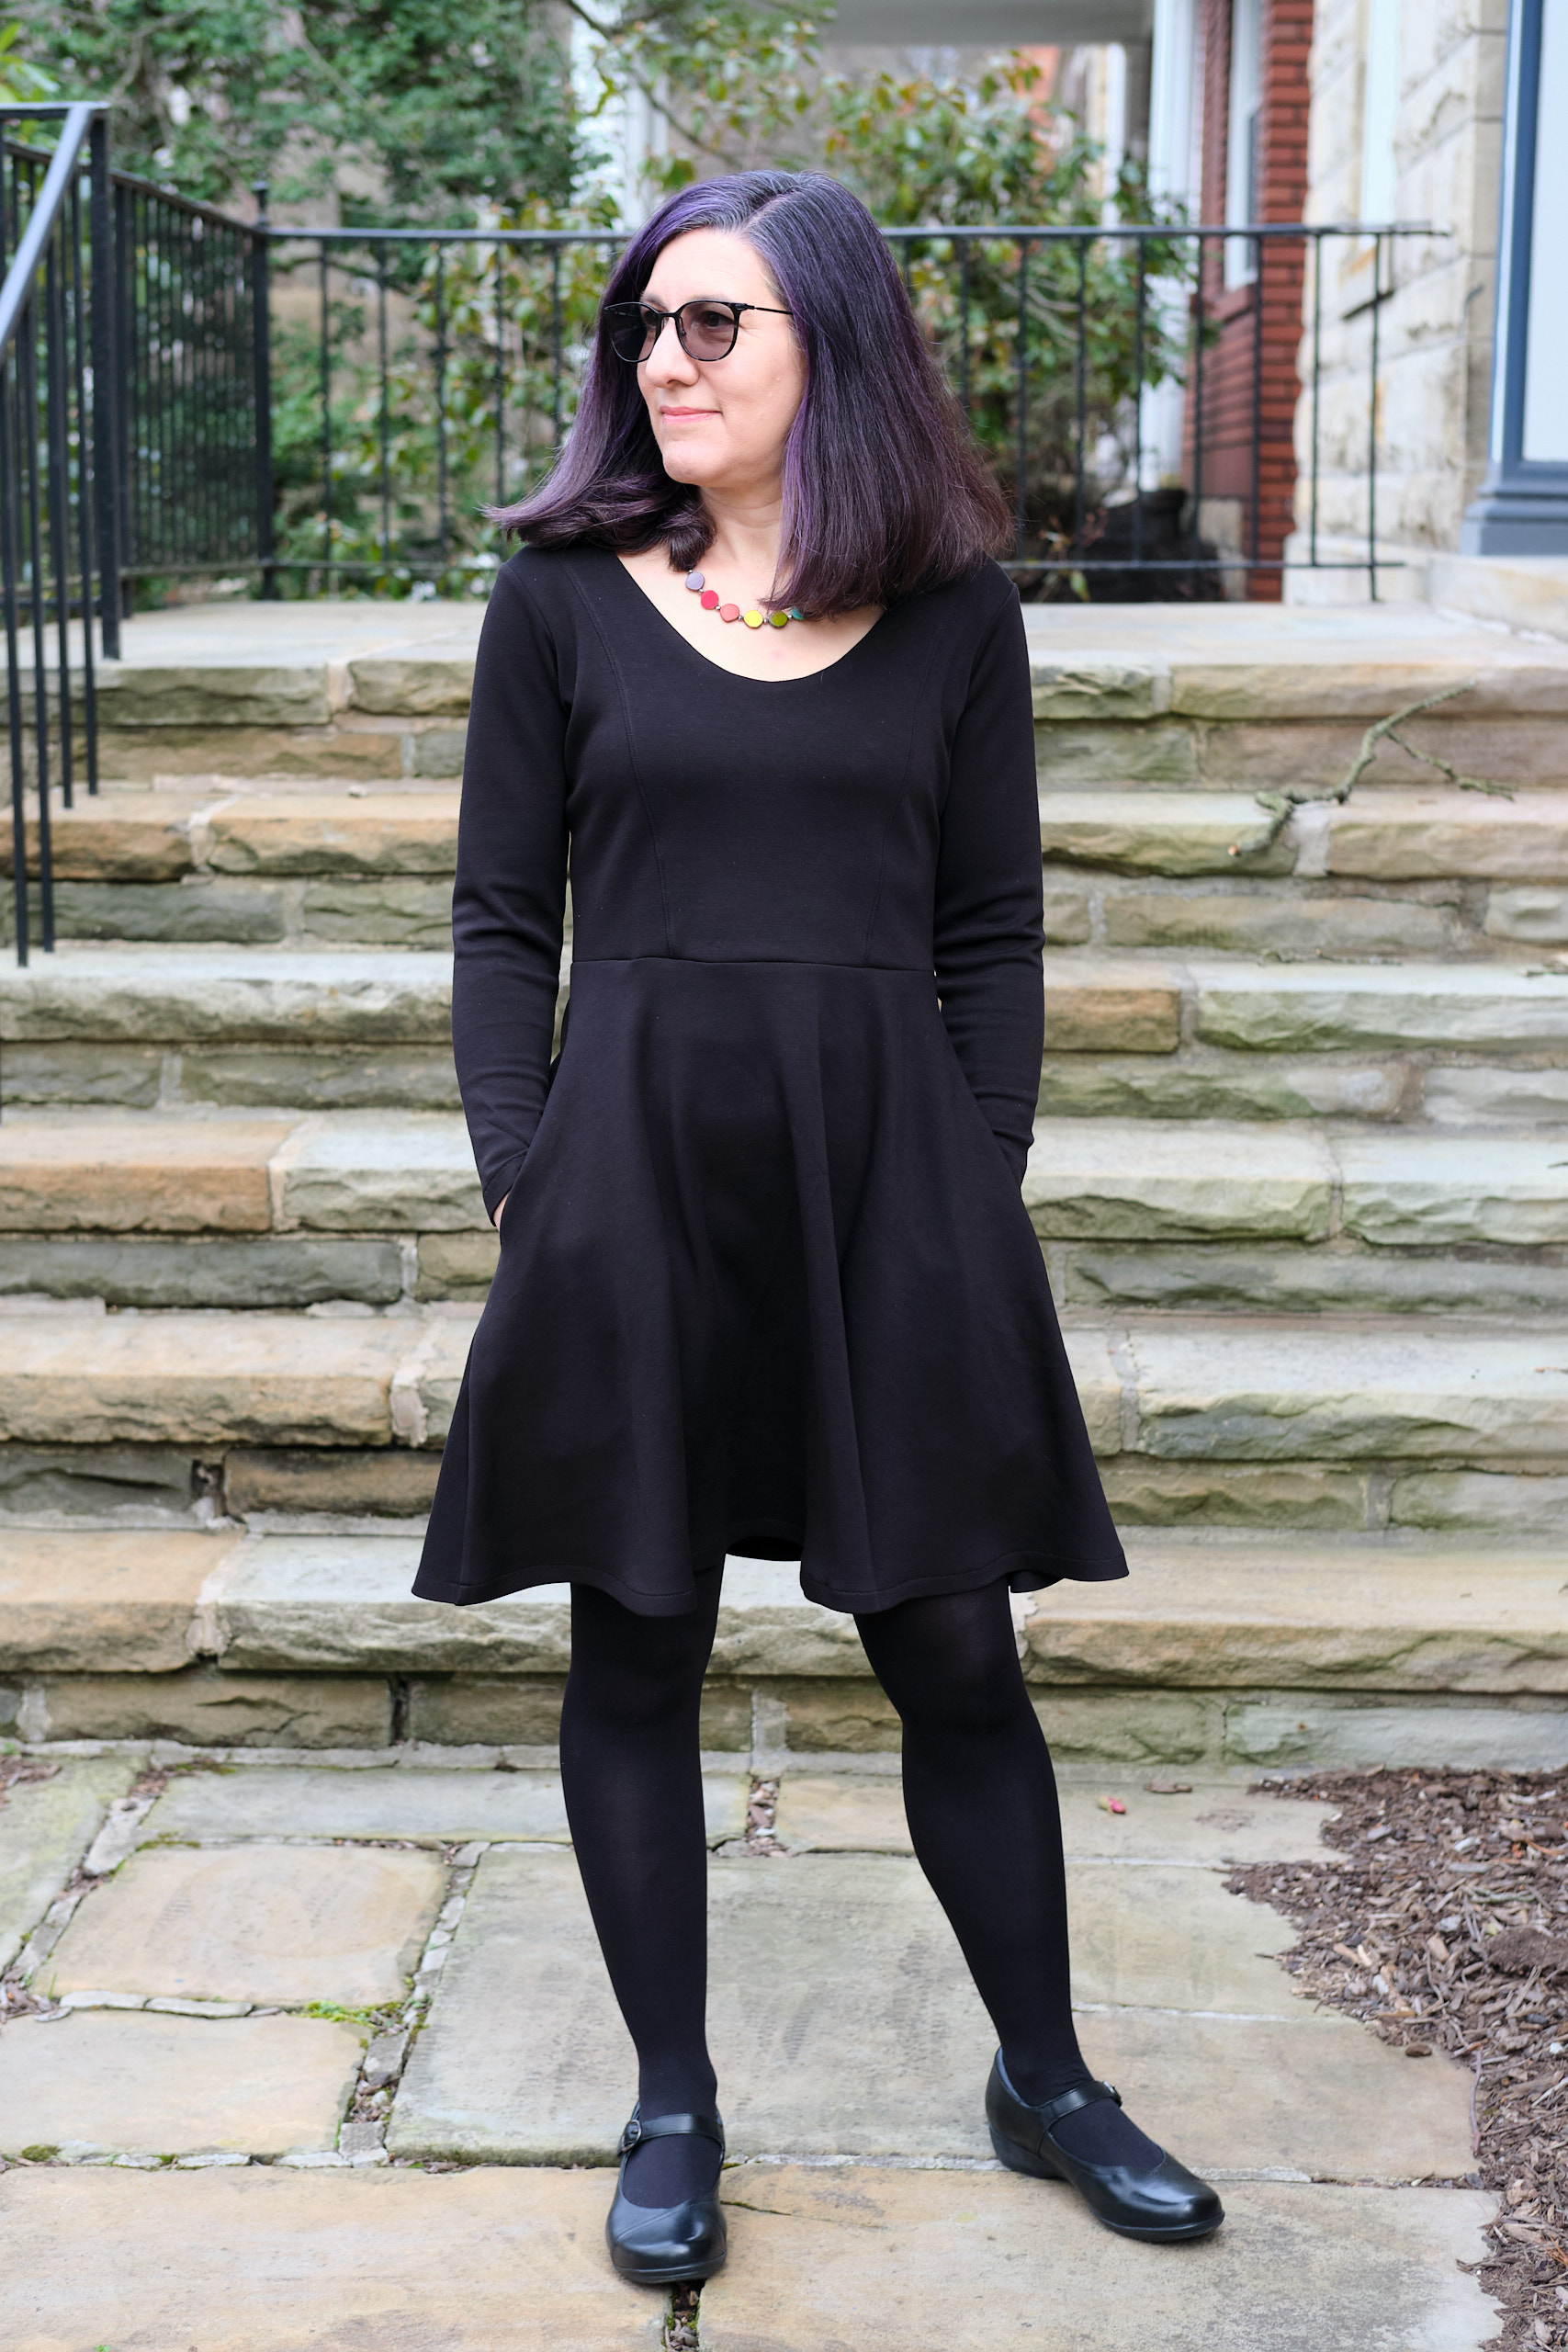
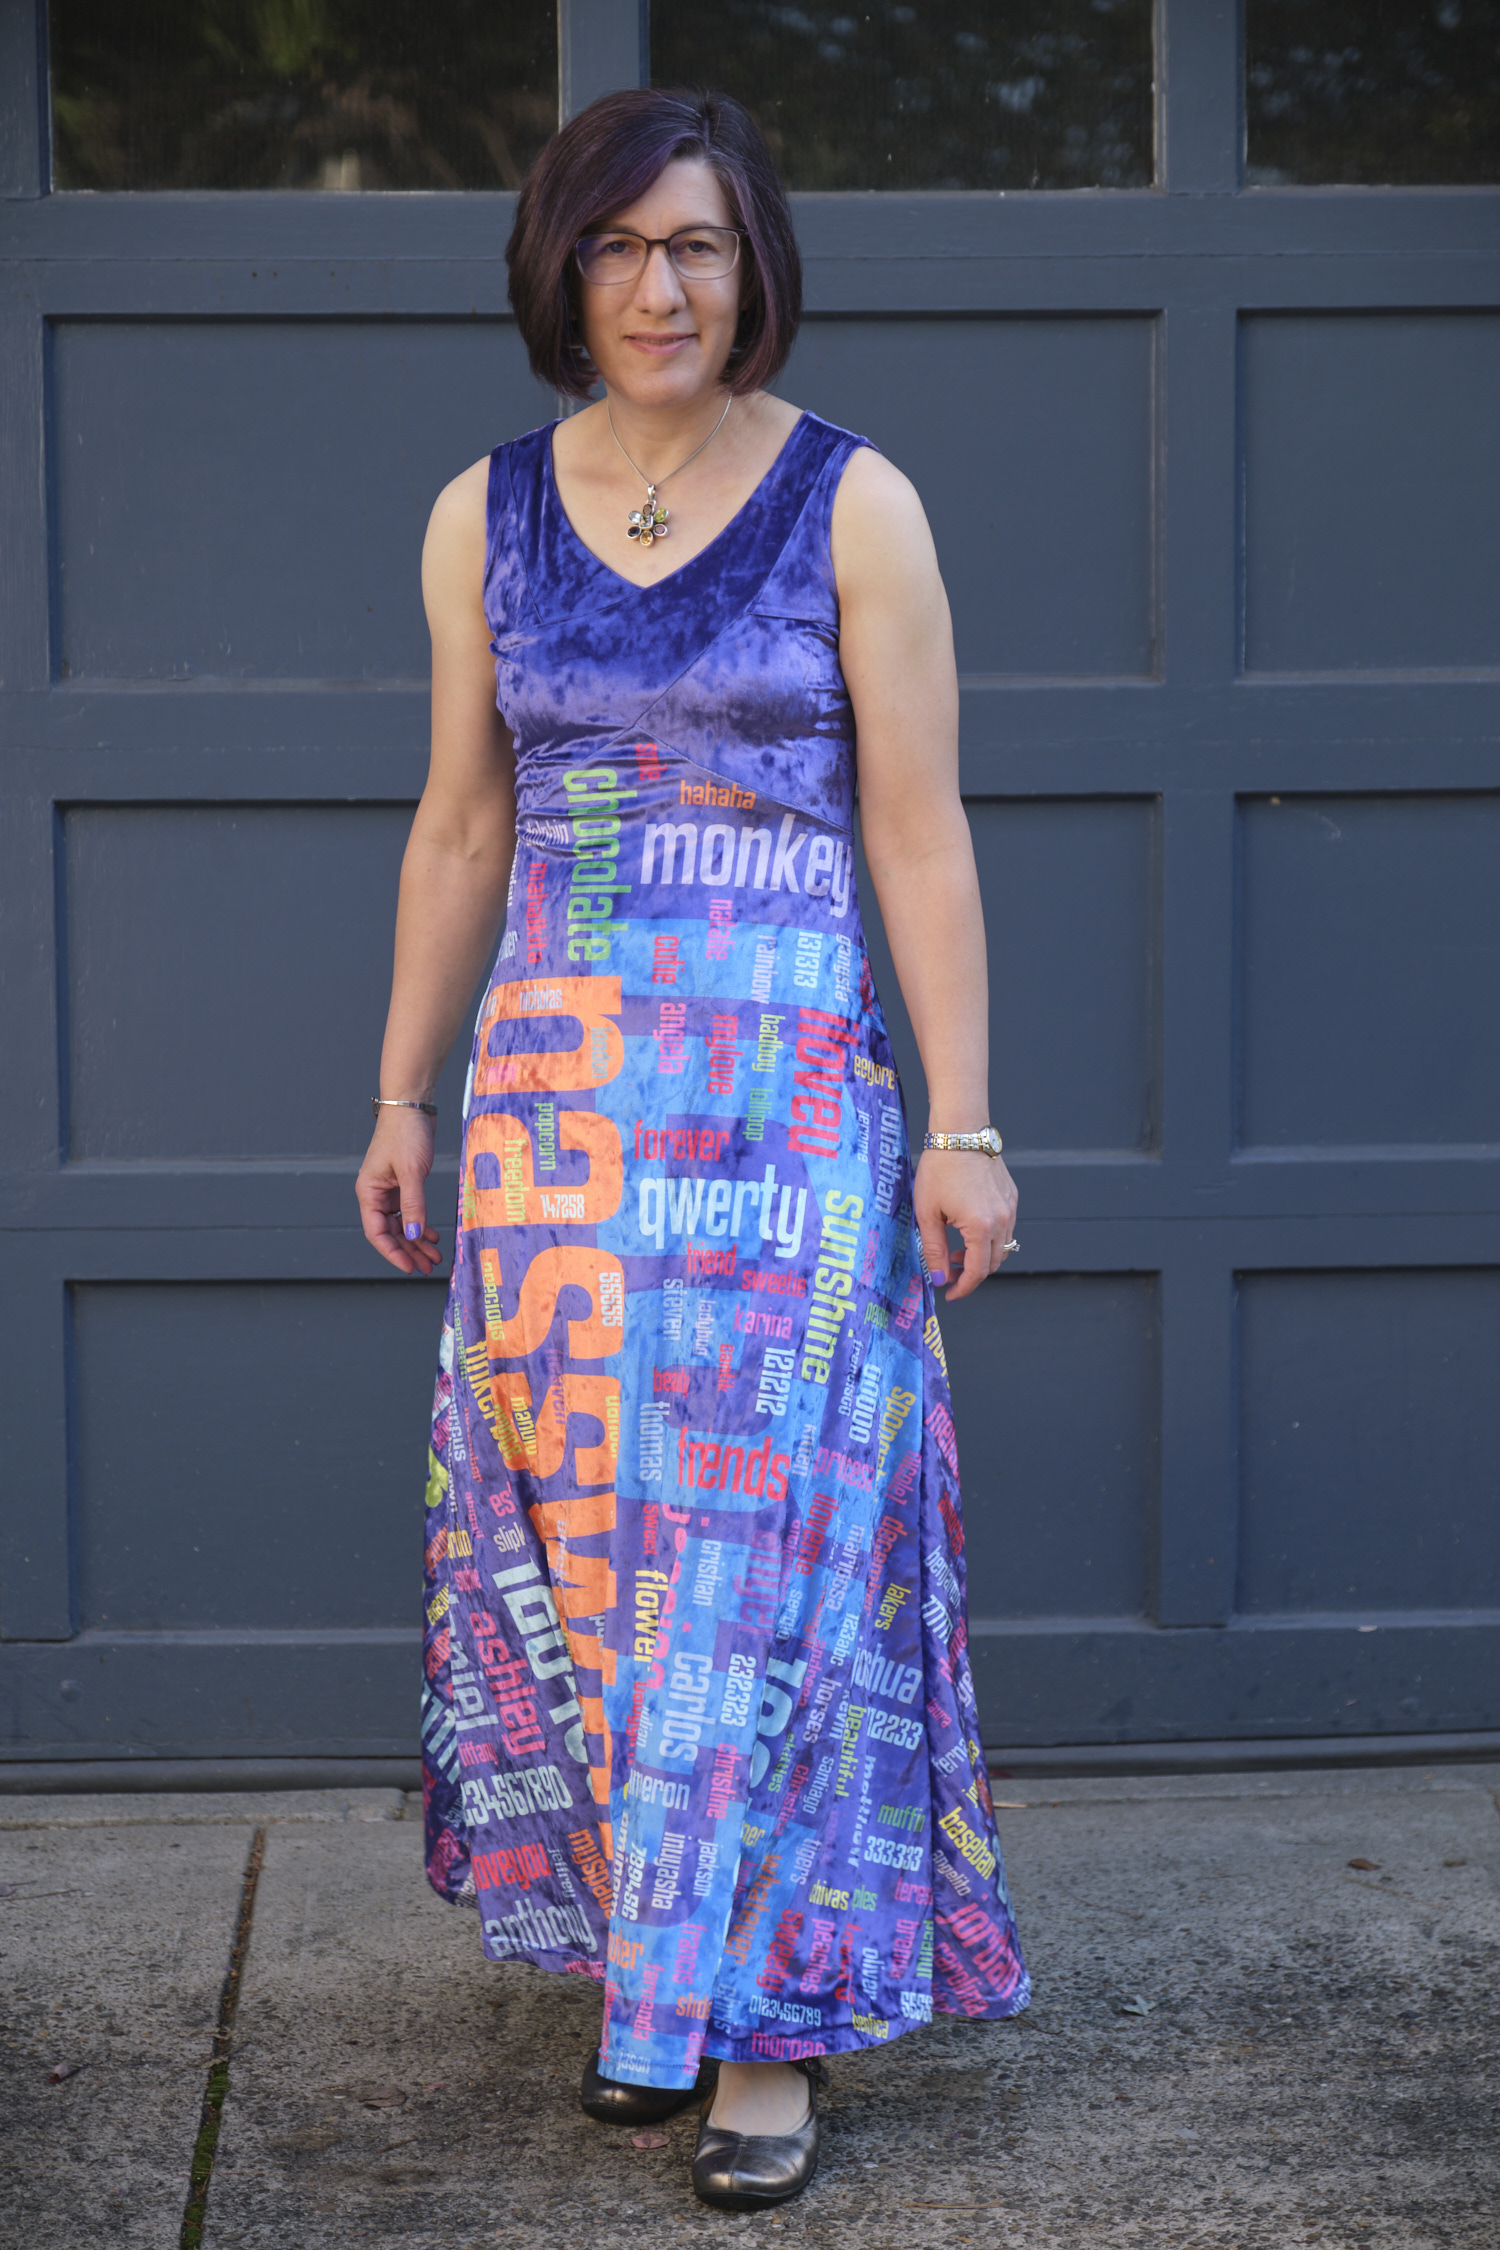
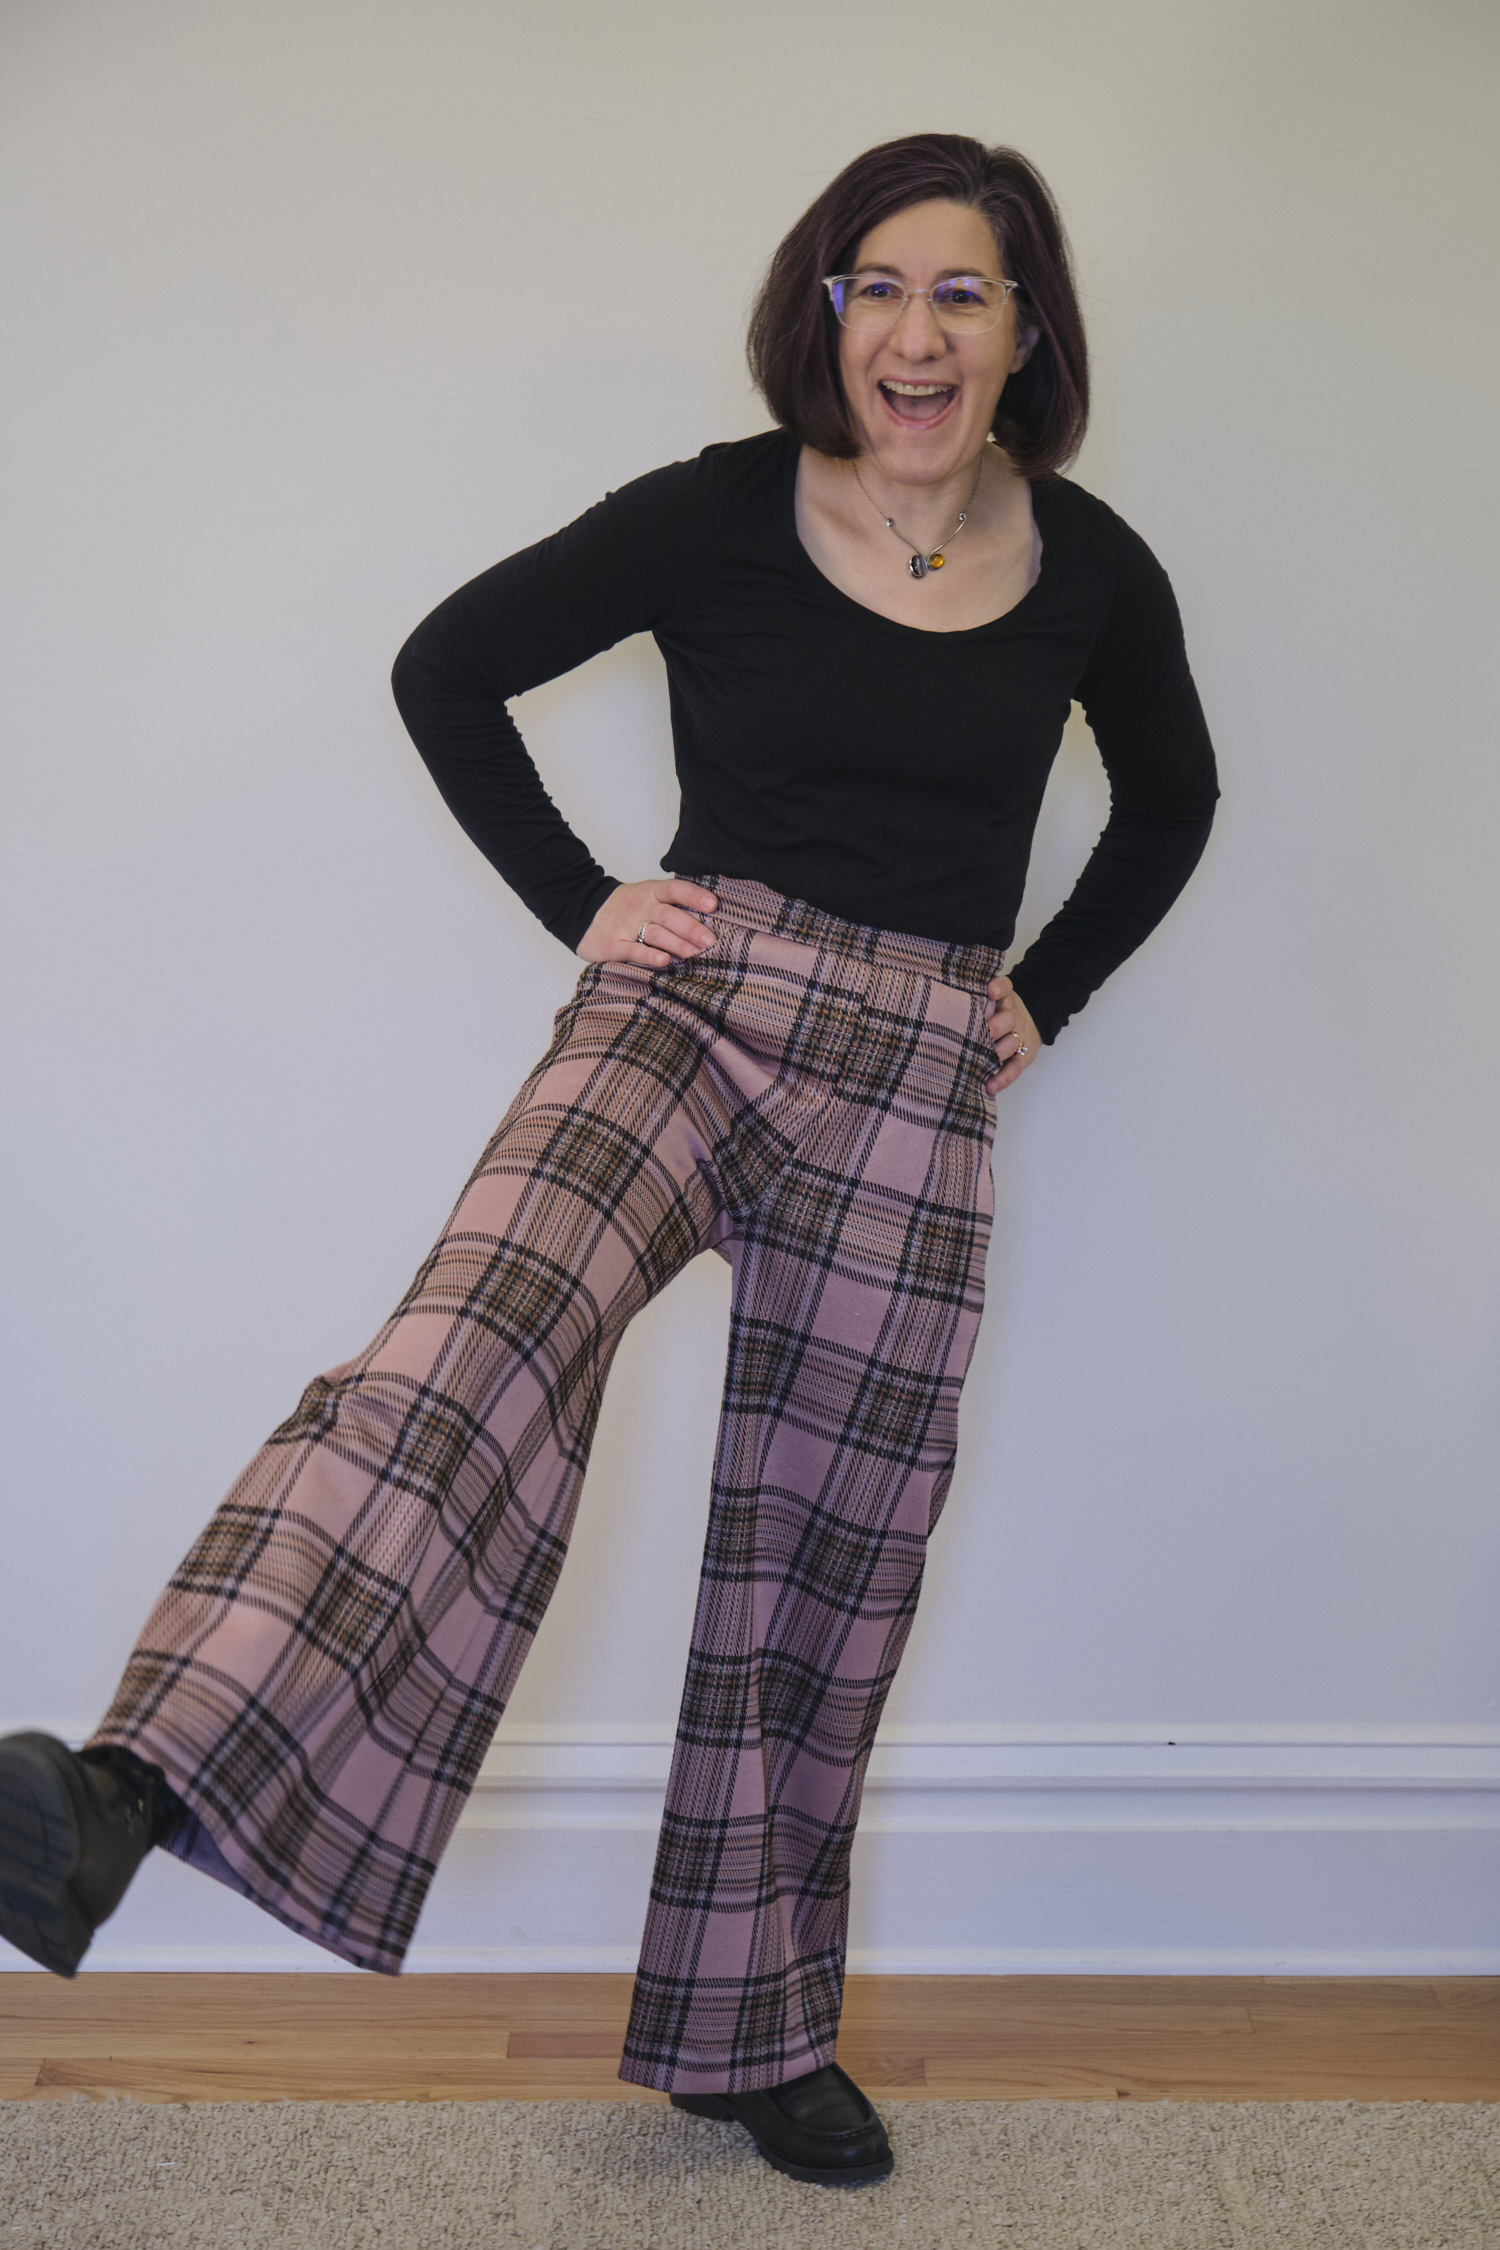
Boo & Lu Periwinkle Dress, size 4, dress skirt shortened 1 inch, long sleeves shortened 2-inches, 2 yards black butter scuba with black ITY lining.
I have plans to make a long gown with a stretch lace overlay and was looking for the right pattern. I wanted a princess-seamed lined bodice without a neck band and a flared long skirt, but not a full circle skirt. I was thinking about using the Patterns for Pirates Gala Gown, which has a 3/4 circle skirt with an optional slit. I was hoping for a pattern that used less fabric in the skirt and was a little bit sleeker, but without being a fitted skirt. I thought about just modifying the Gala skirt, but then I noticed the Boo & Lu Periwinkle Dress, which I hadn’t previously considered because I wasn’t interested in the bodice flounce, which, while actually pretty cute, reminds me too much of dresses I wore in the 80s. But when I noticed that the bodice flounce was optional, I looked at the pattern again more closely. Periwinkle has half-circle skirt and for the maxi version it is closer to a one-third-circle skirt, which was exactly what I was looking for. I’m sure I’ll sue the Gala pattern for something else, but I think Periwinkle will work better for this particular project.
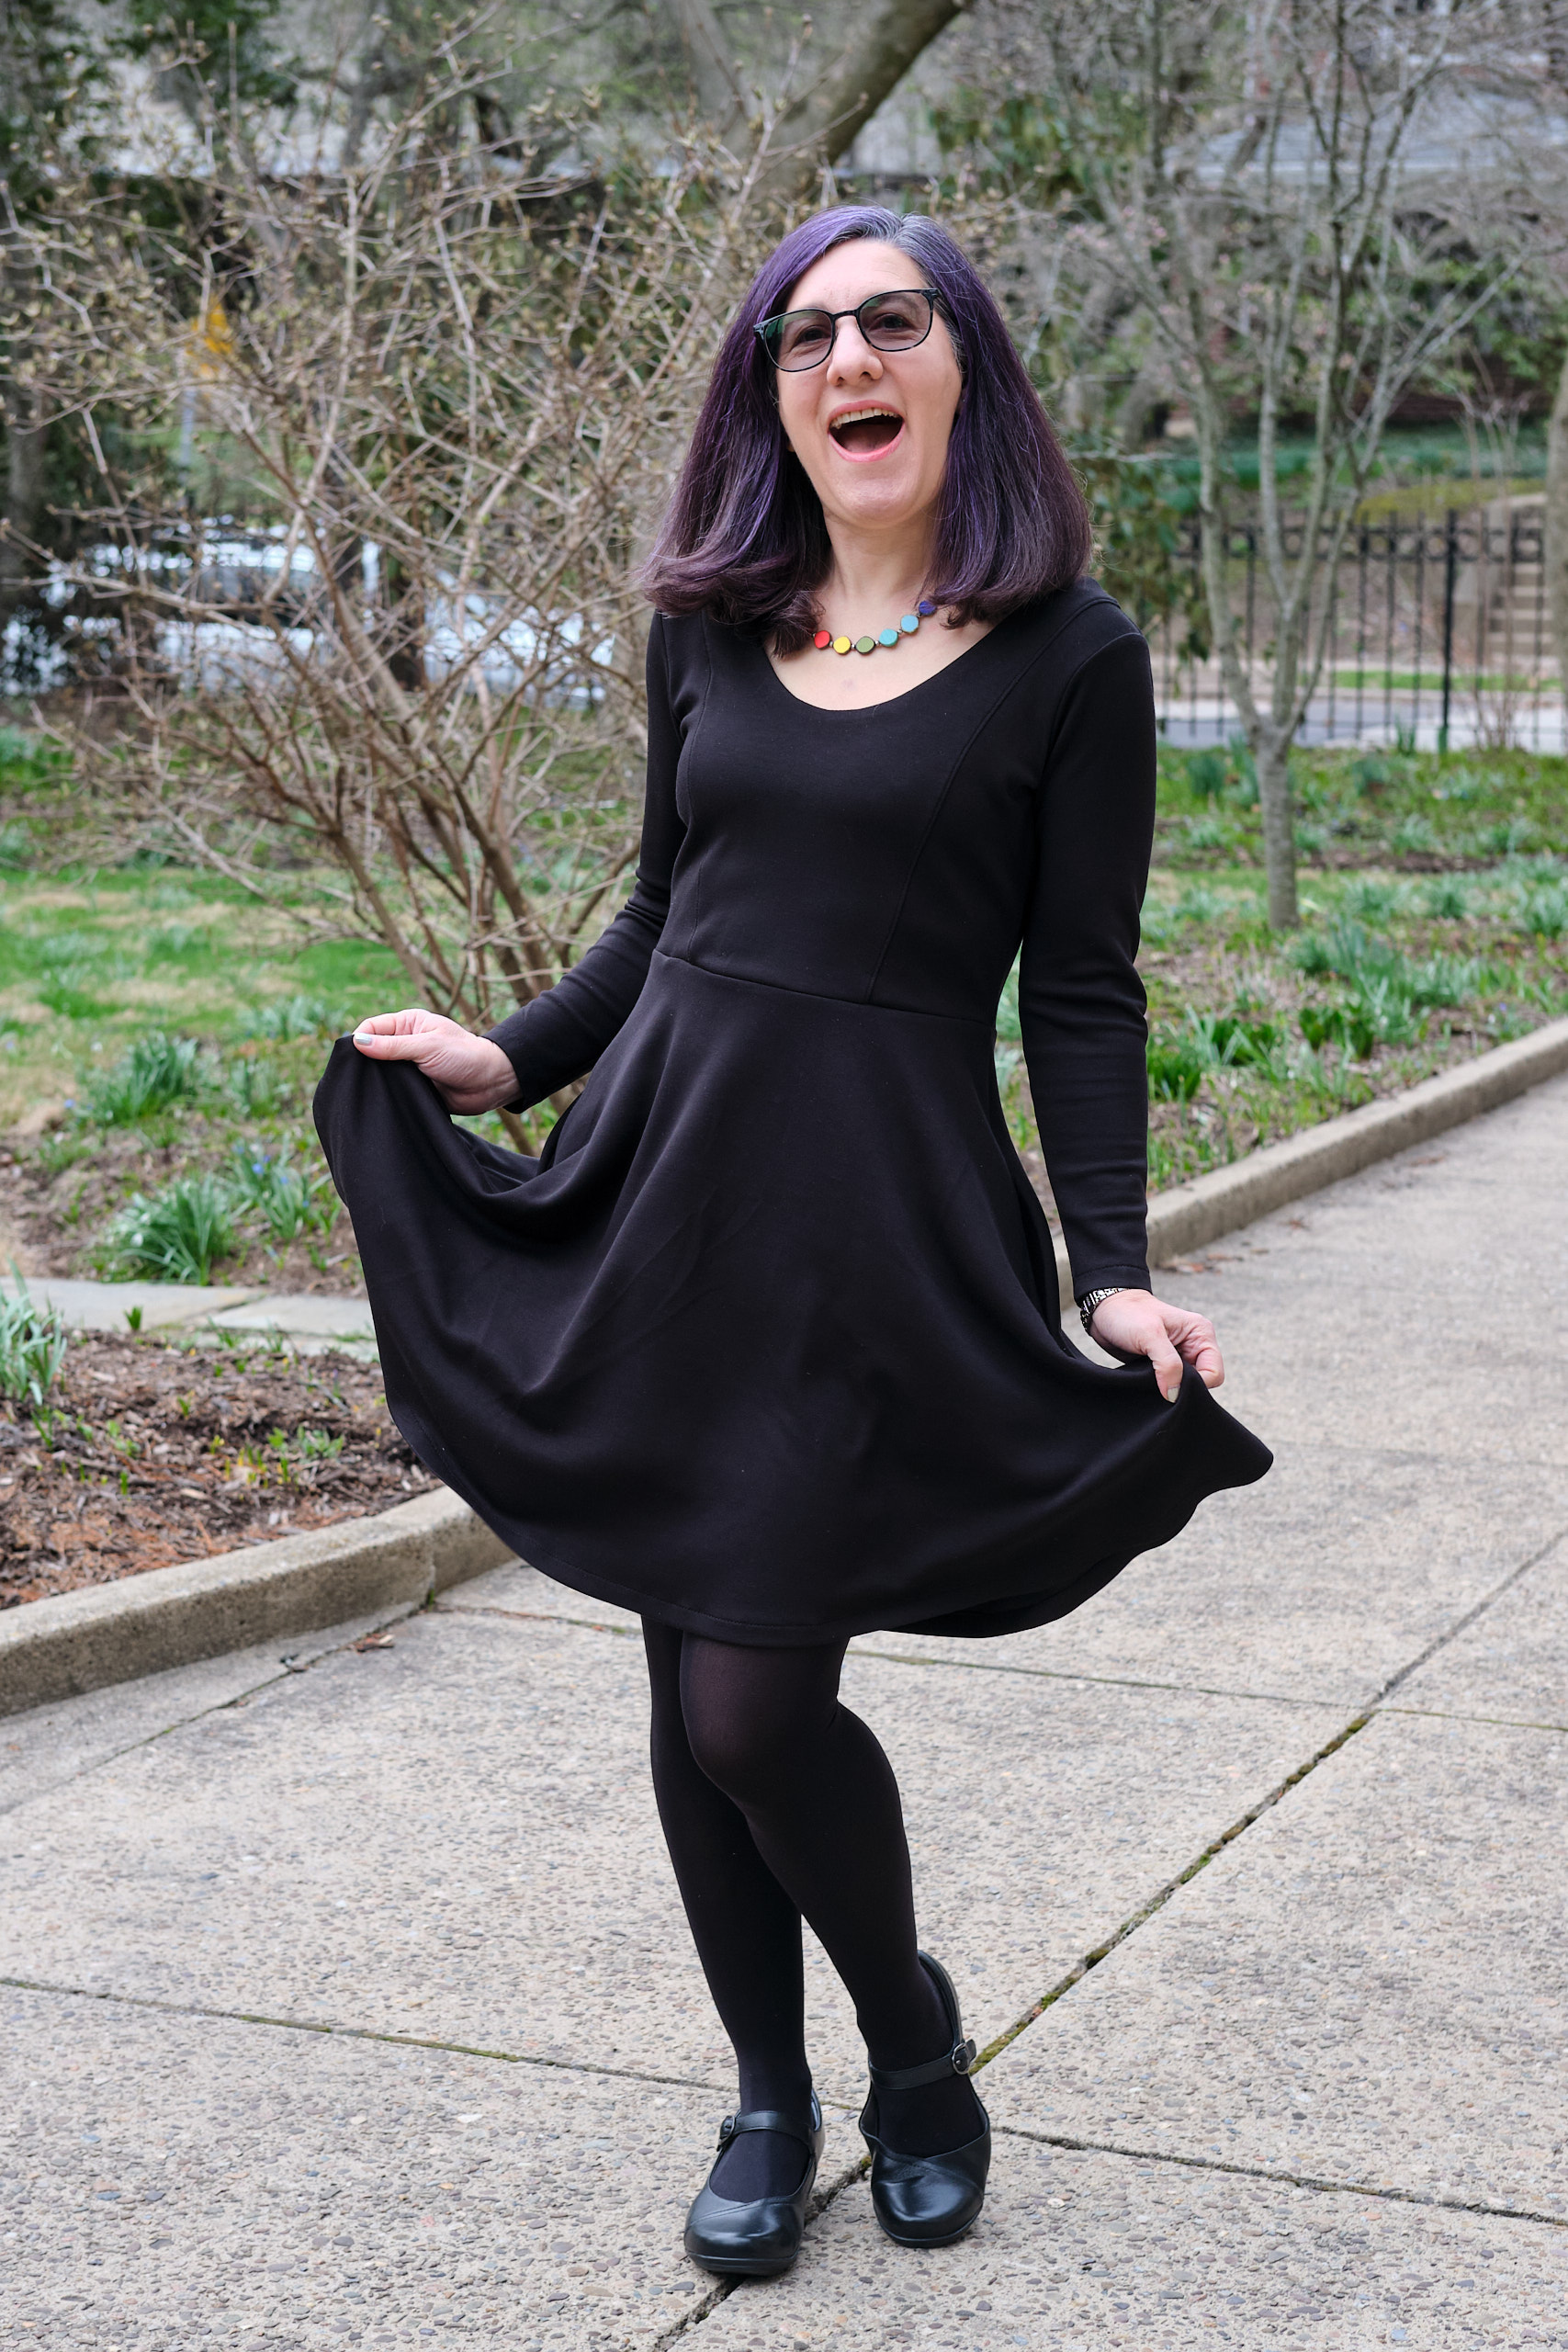
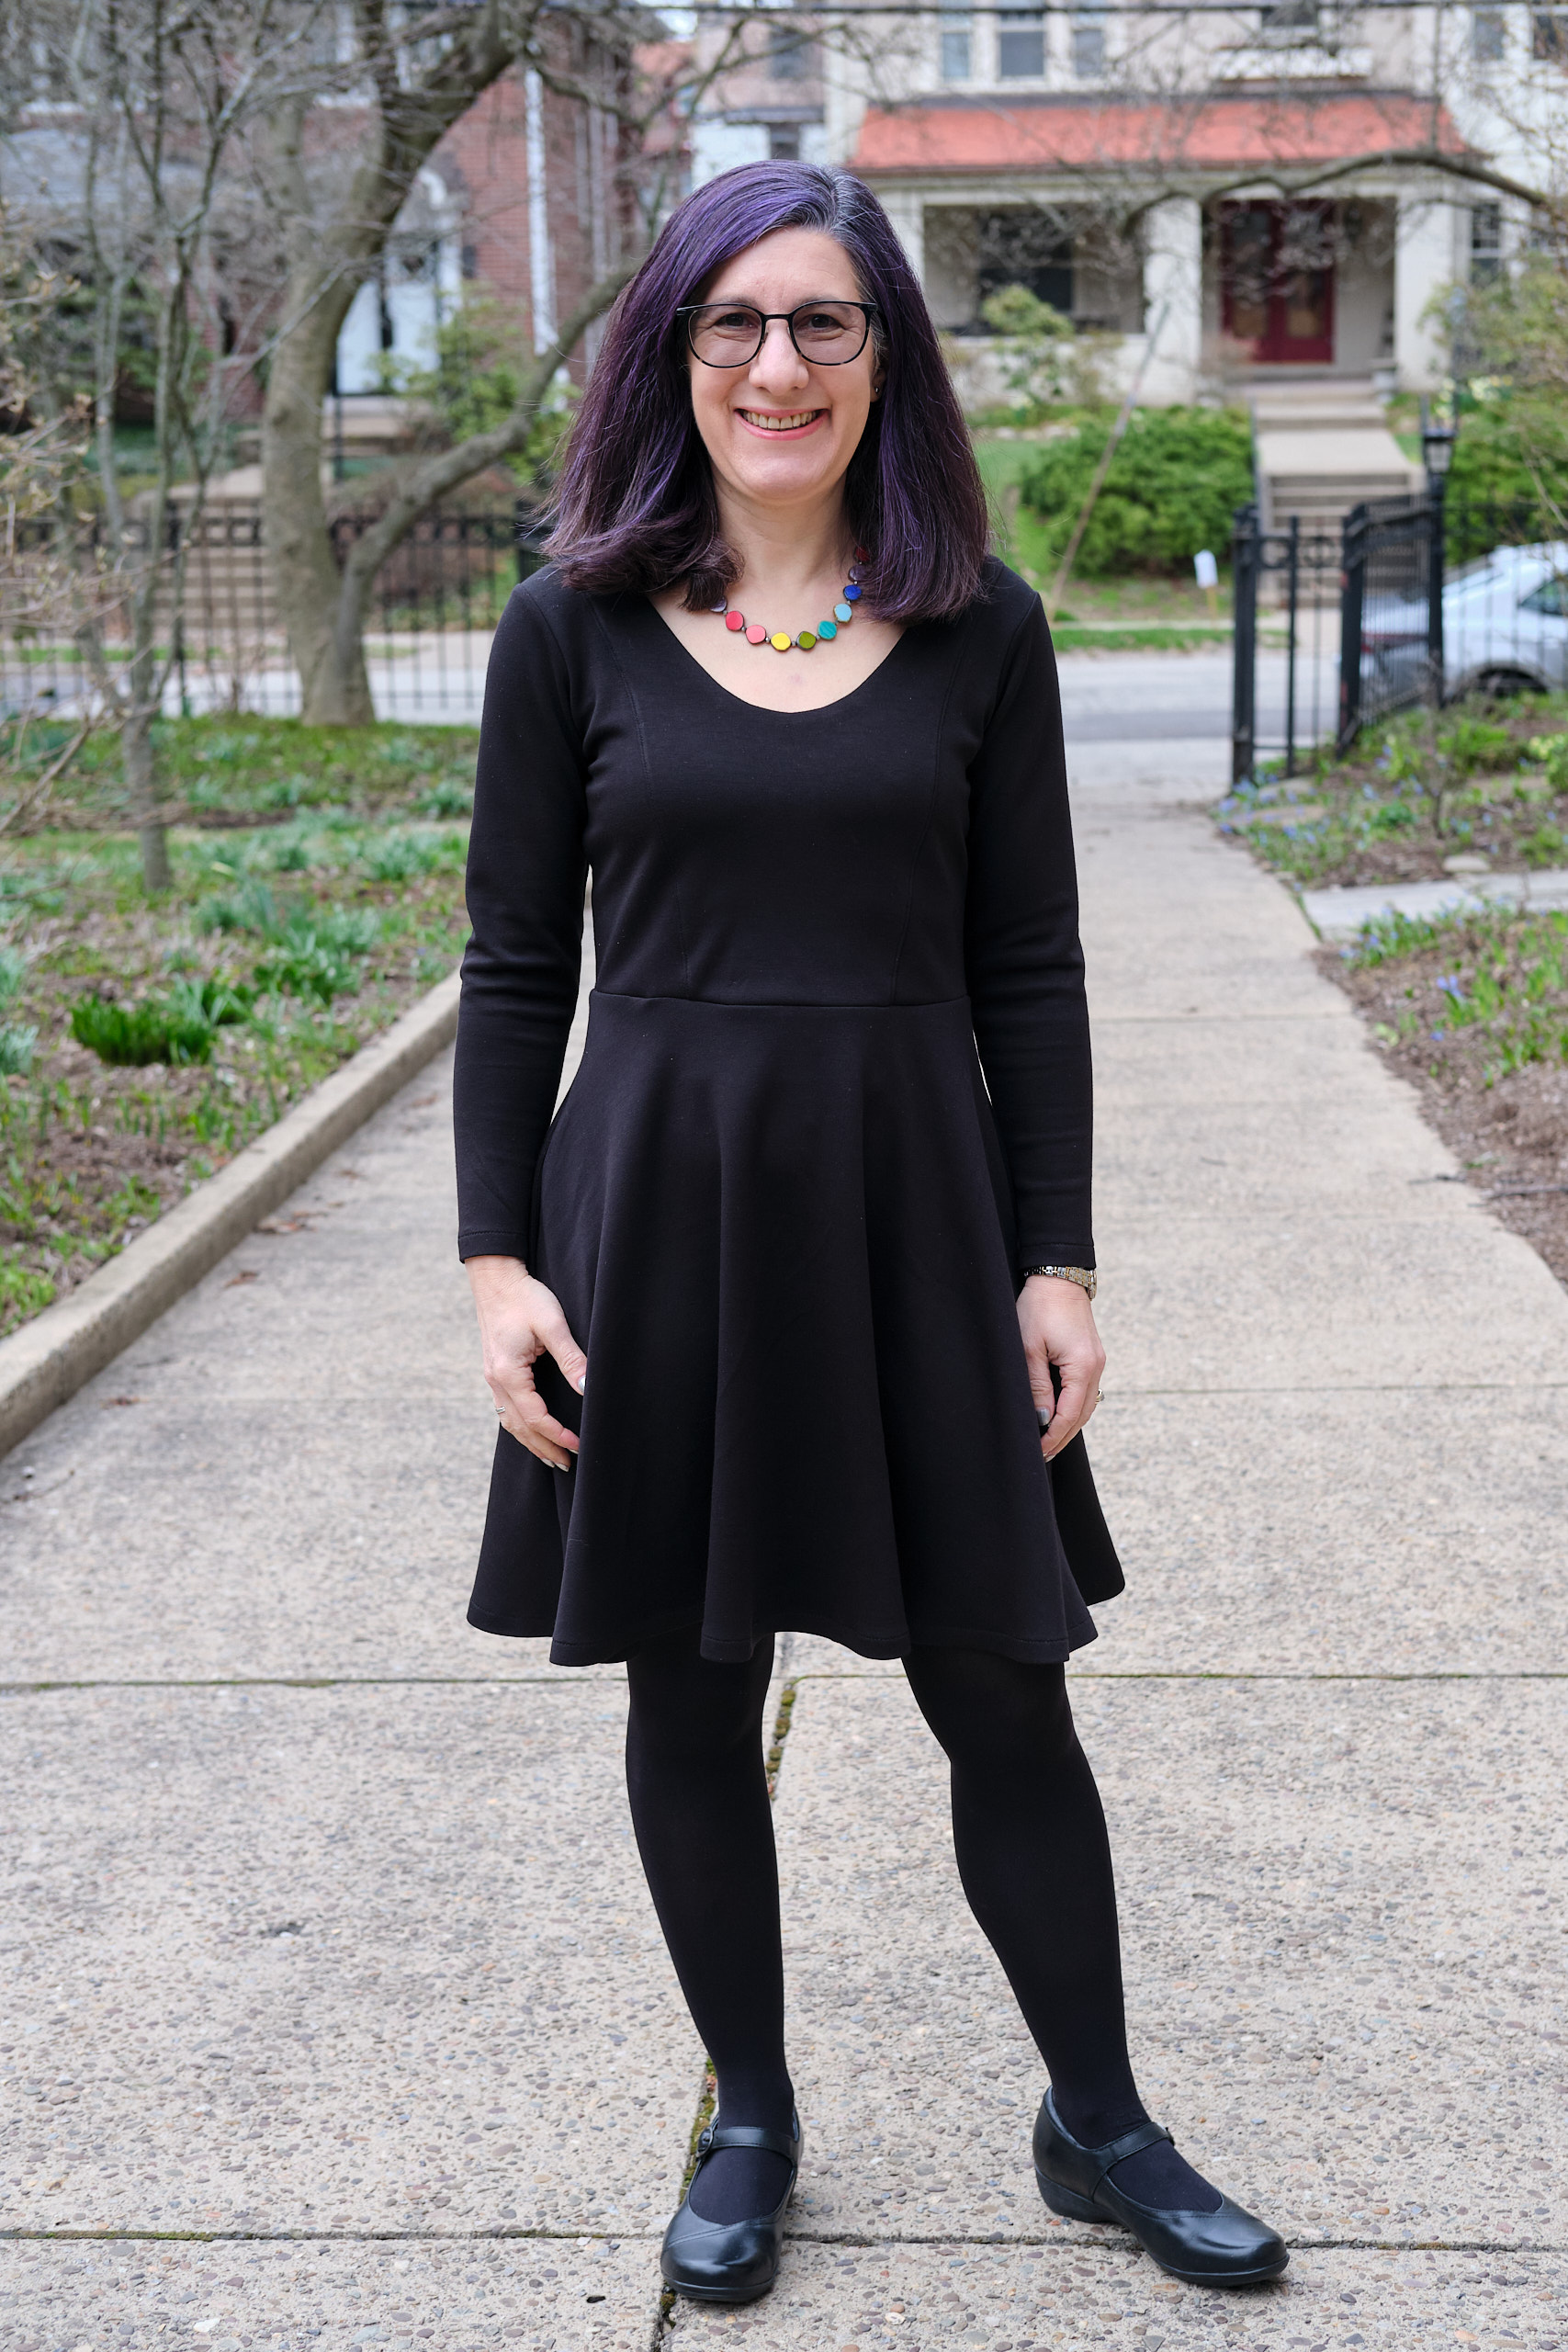
Before I make the gown, I decided to try out Periwinkle in the regular dress length for a basic little black dress. I used Mily Mae black butter scuba, which is a medium-weight rayon/poly/spandex that has a smooth “buttery” texture on the right side and a very smooth and shiny texture on the wrong side. I previously used this fabric to make a pair of black wide-leg pants. I used about 2 yards of the scuba for the dress and lined the bodice with black ITY for a nice lightweight lining. I made the pattern as written except or shortening the skirt by 1 inch and the sleeves by 2 inches and using pocket bags I have used previously on other dresses.
The pattern was fairly easy to understand and sew. The princess seams and lining were pretty straightforward. I did all top-stitching with a shallow zigzag. The pocket instructions say to baste the pocket seam before topstitching, and I decided to actually sew it because just basting it doesn’t make sense to me. Also, the pocket instructions fail to suggest sewing up part of the pocket bag opening to keep things from falling out of your pocket. But I went ahead and did that anyway.
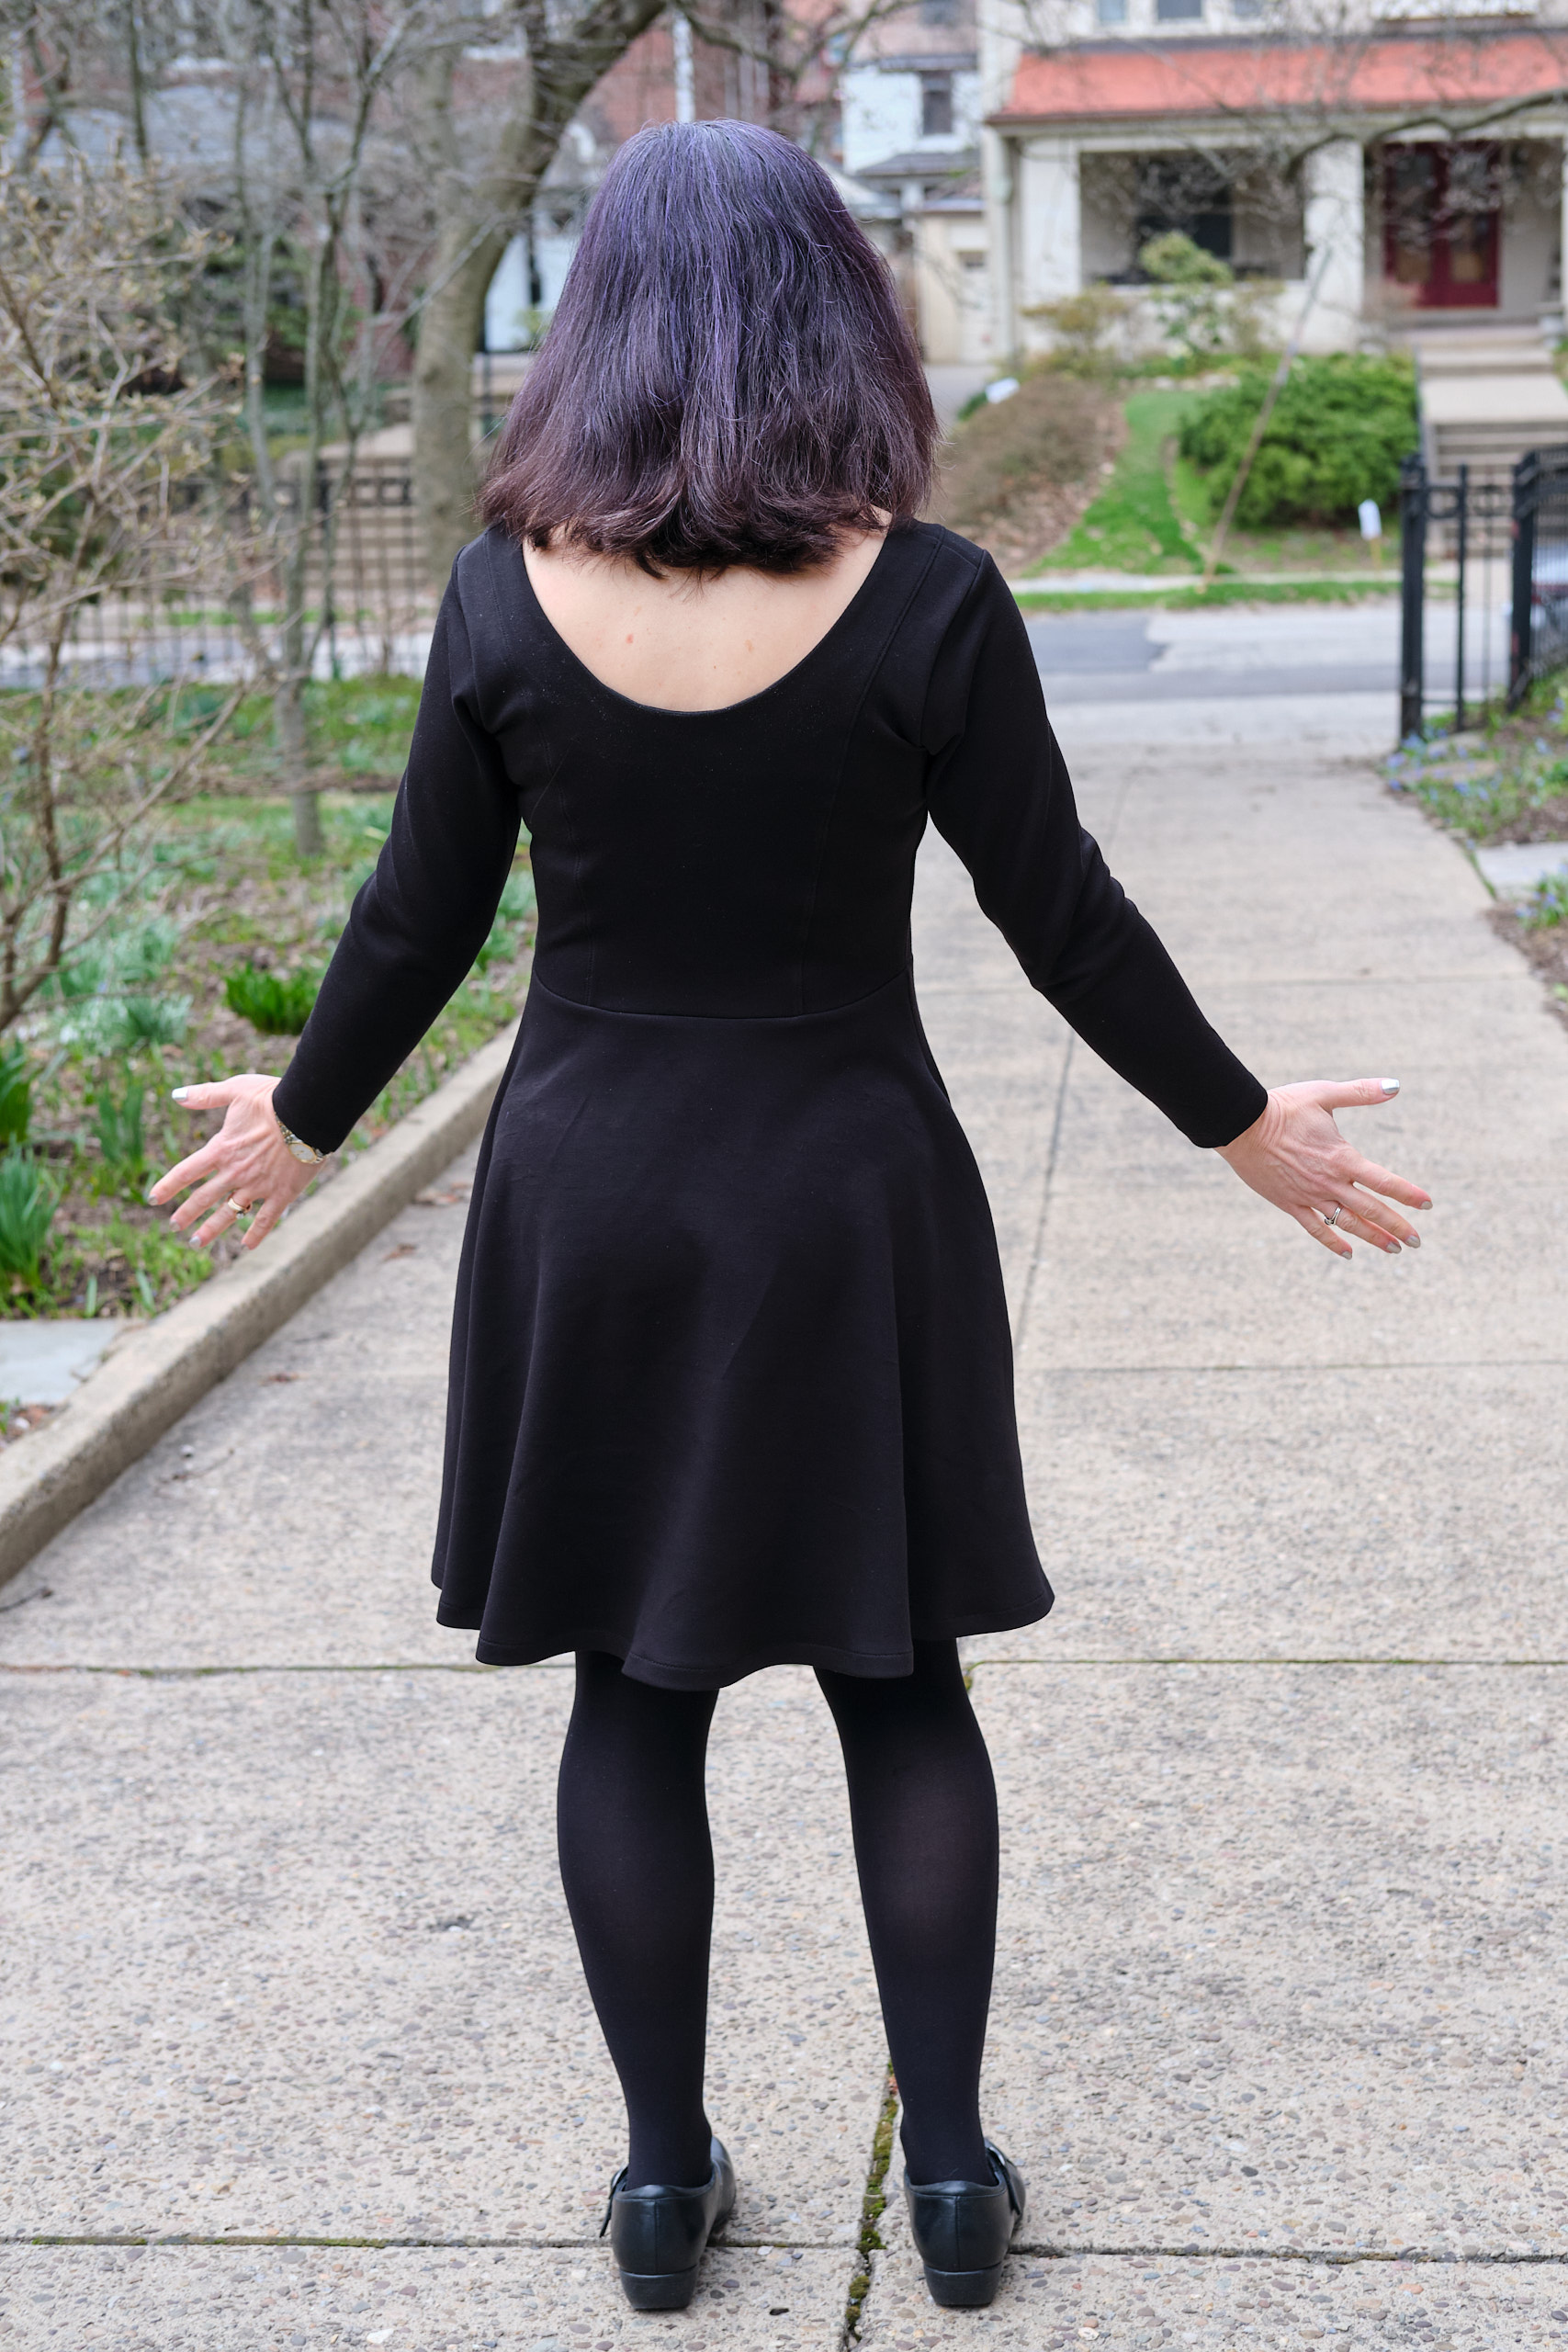
The front and back neckline plunge pretty deep on me, more than I was expecting, but I think they look good. I can still wear this dress with a normal bra, but my back may be chilly in the winter without a sweater or jacket. After looking at the photos of the back, I think I accidentally swapped the front and back center bodice pieces. If I had sewn them correctly, I think the front would be a little shallower and wider and the back would be a little narrower and deeper, not pull towards the shoulders so much, and the little bit of bunching in the back armscye would go away. Next time I will try to sew it correctly, but I also think I may raise the back scoop a tad. But these are minor issues. I think the pattern elevates my basic black dress to a not-so-basic level. I can dress it up or down for work or dressy occasions. I’m pretty happy with how it came out despite the oops, and I expect I will use this pattern for the lace-overlay gown when I get around to making it.
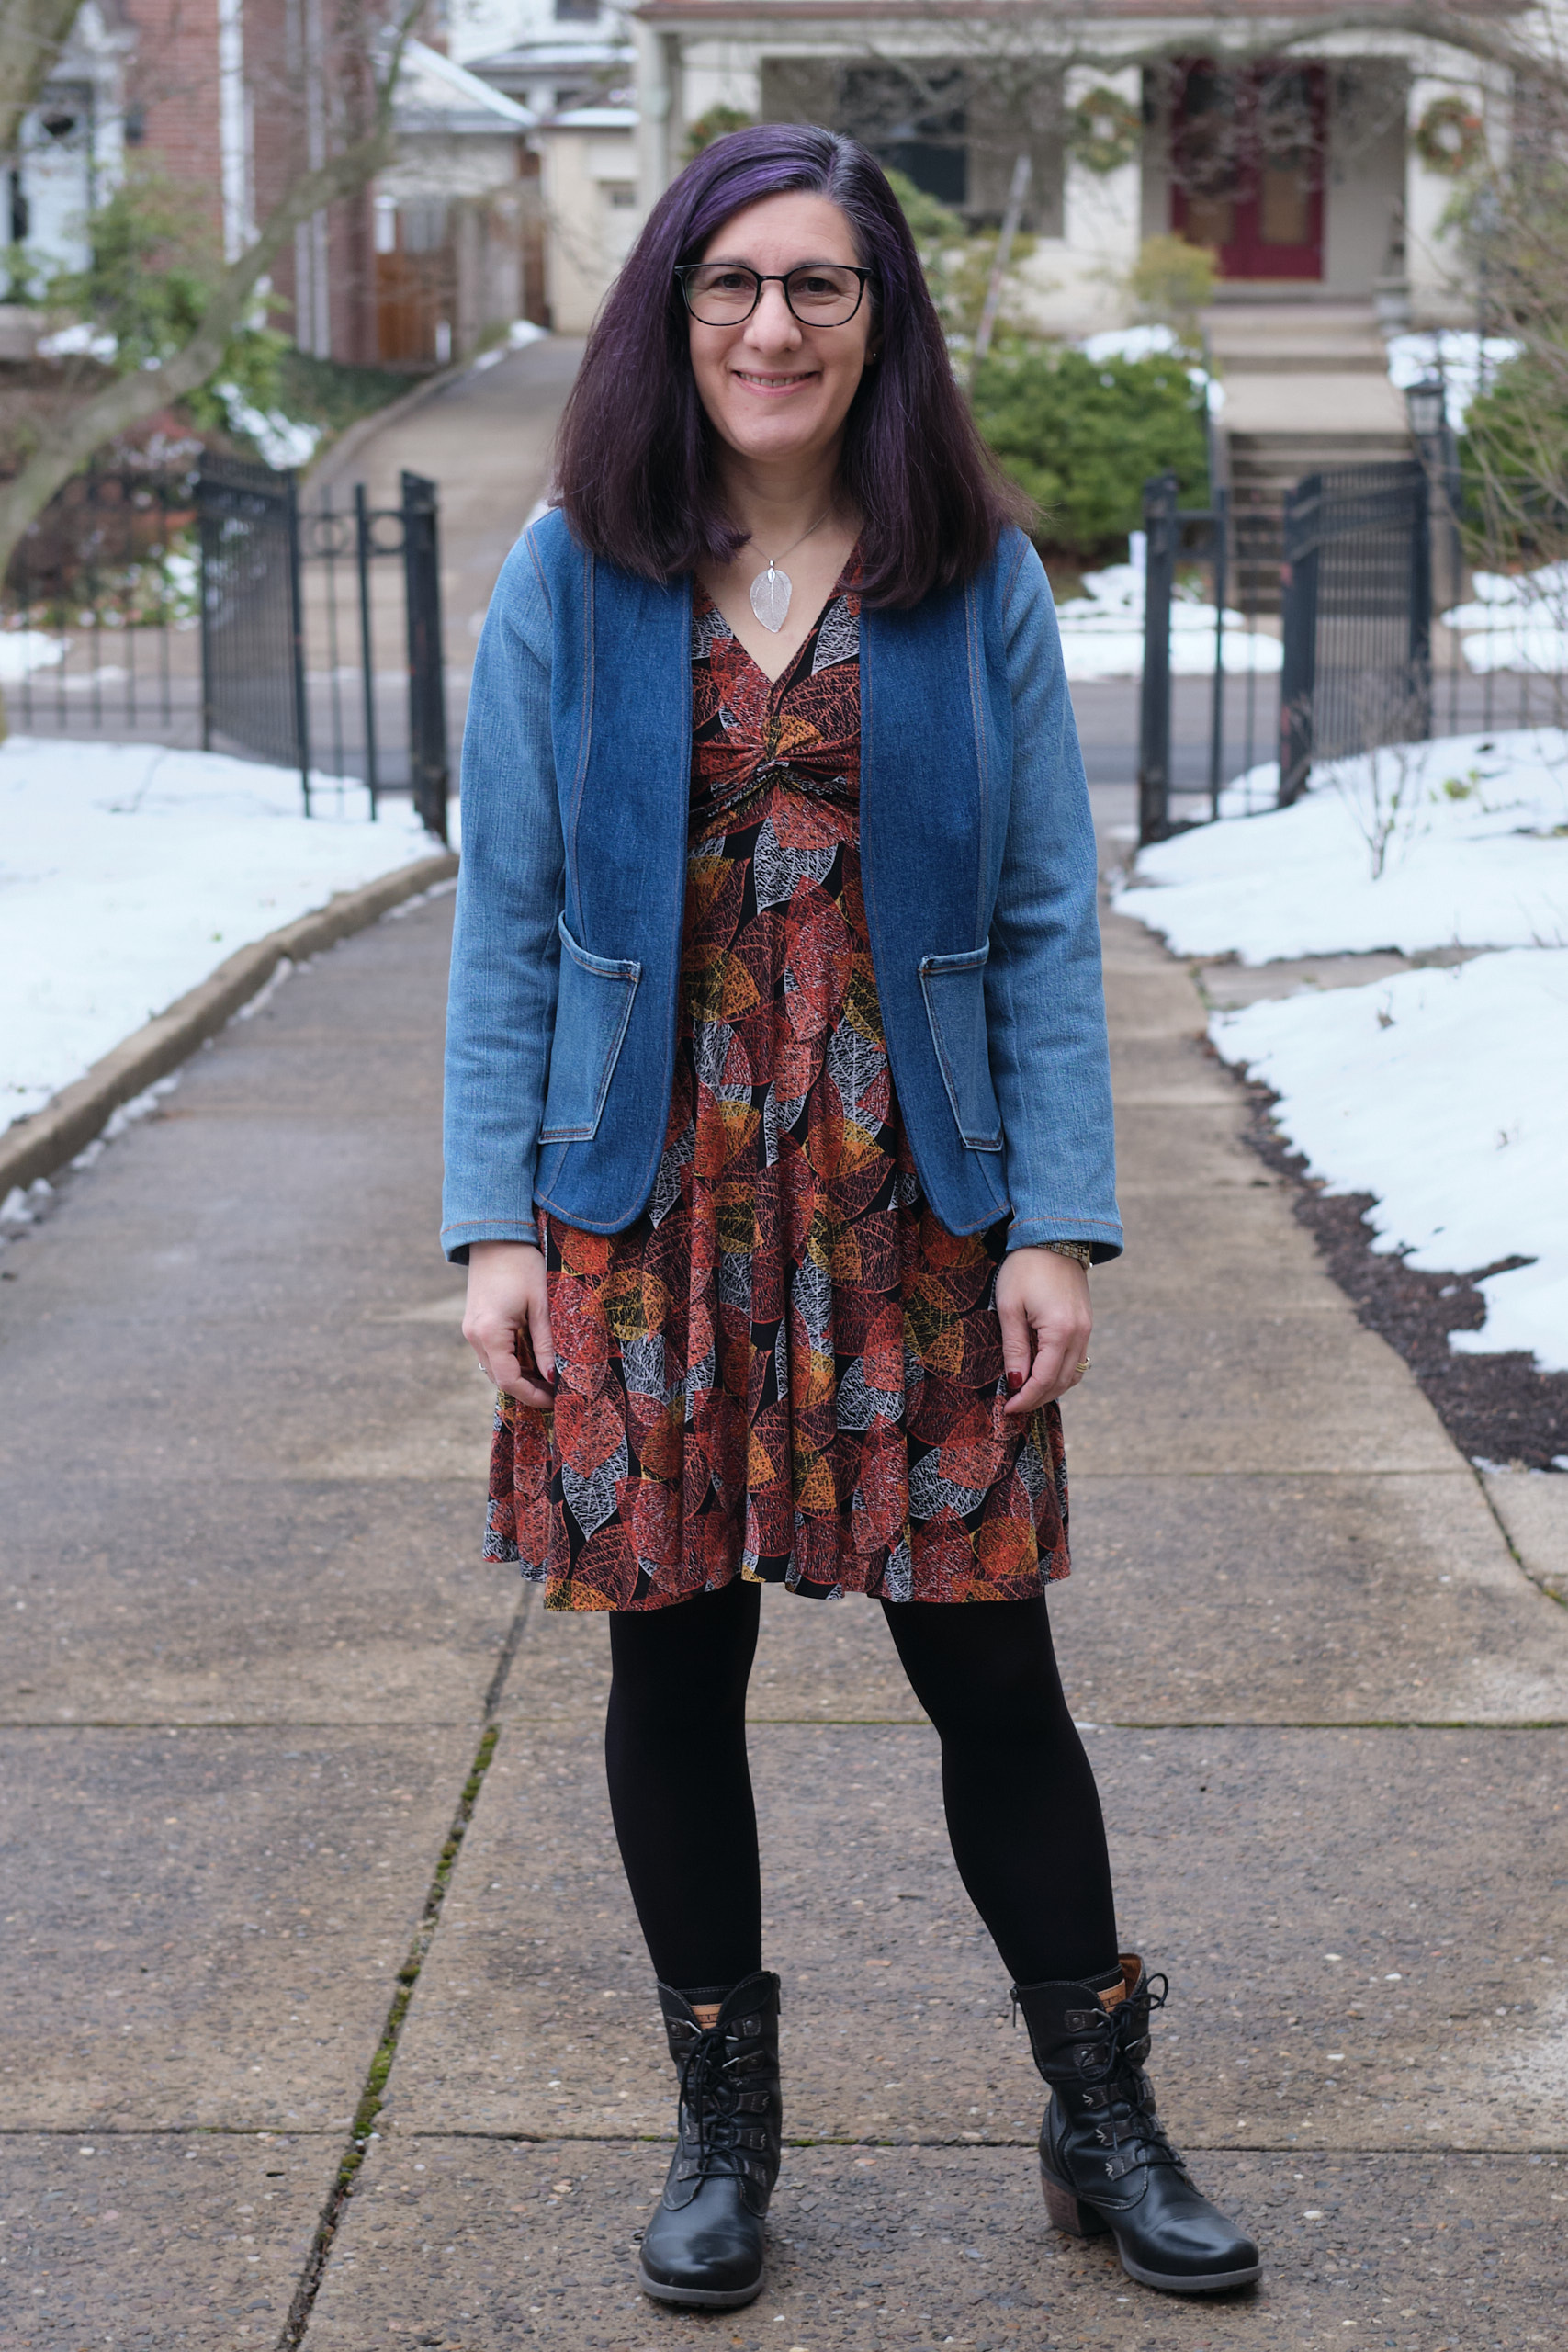
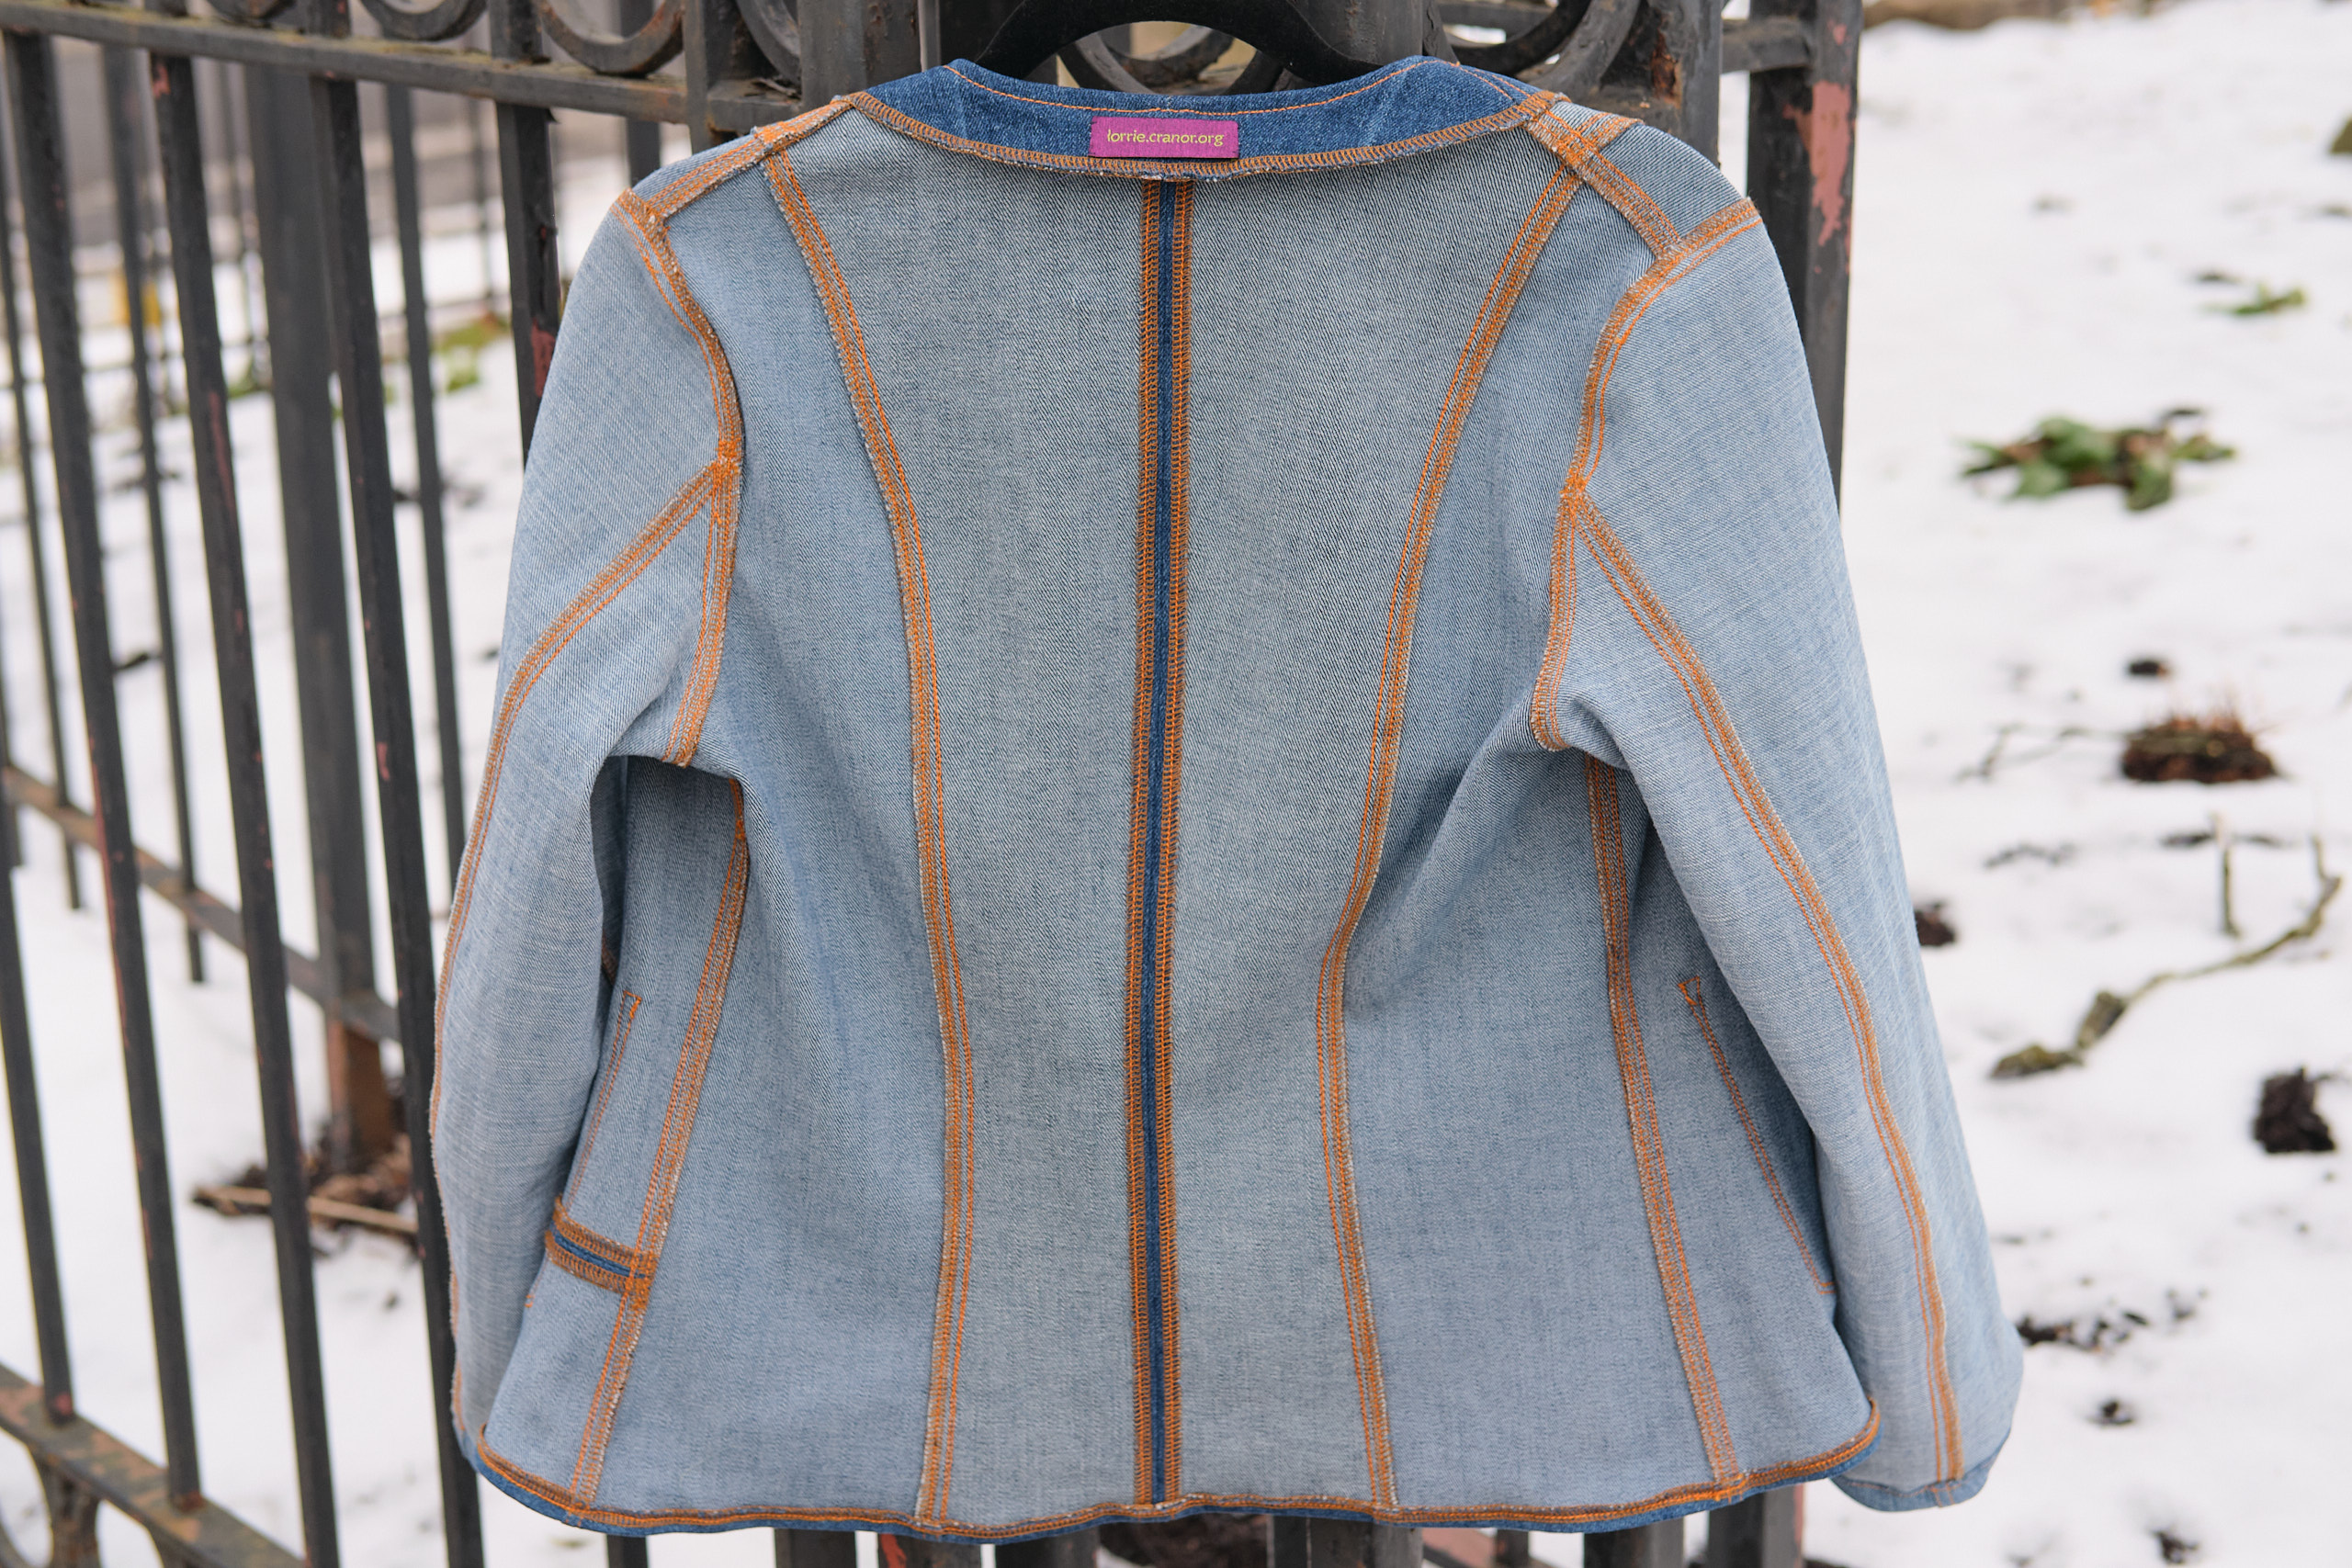
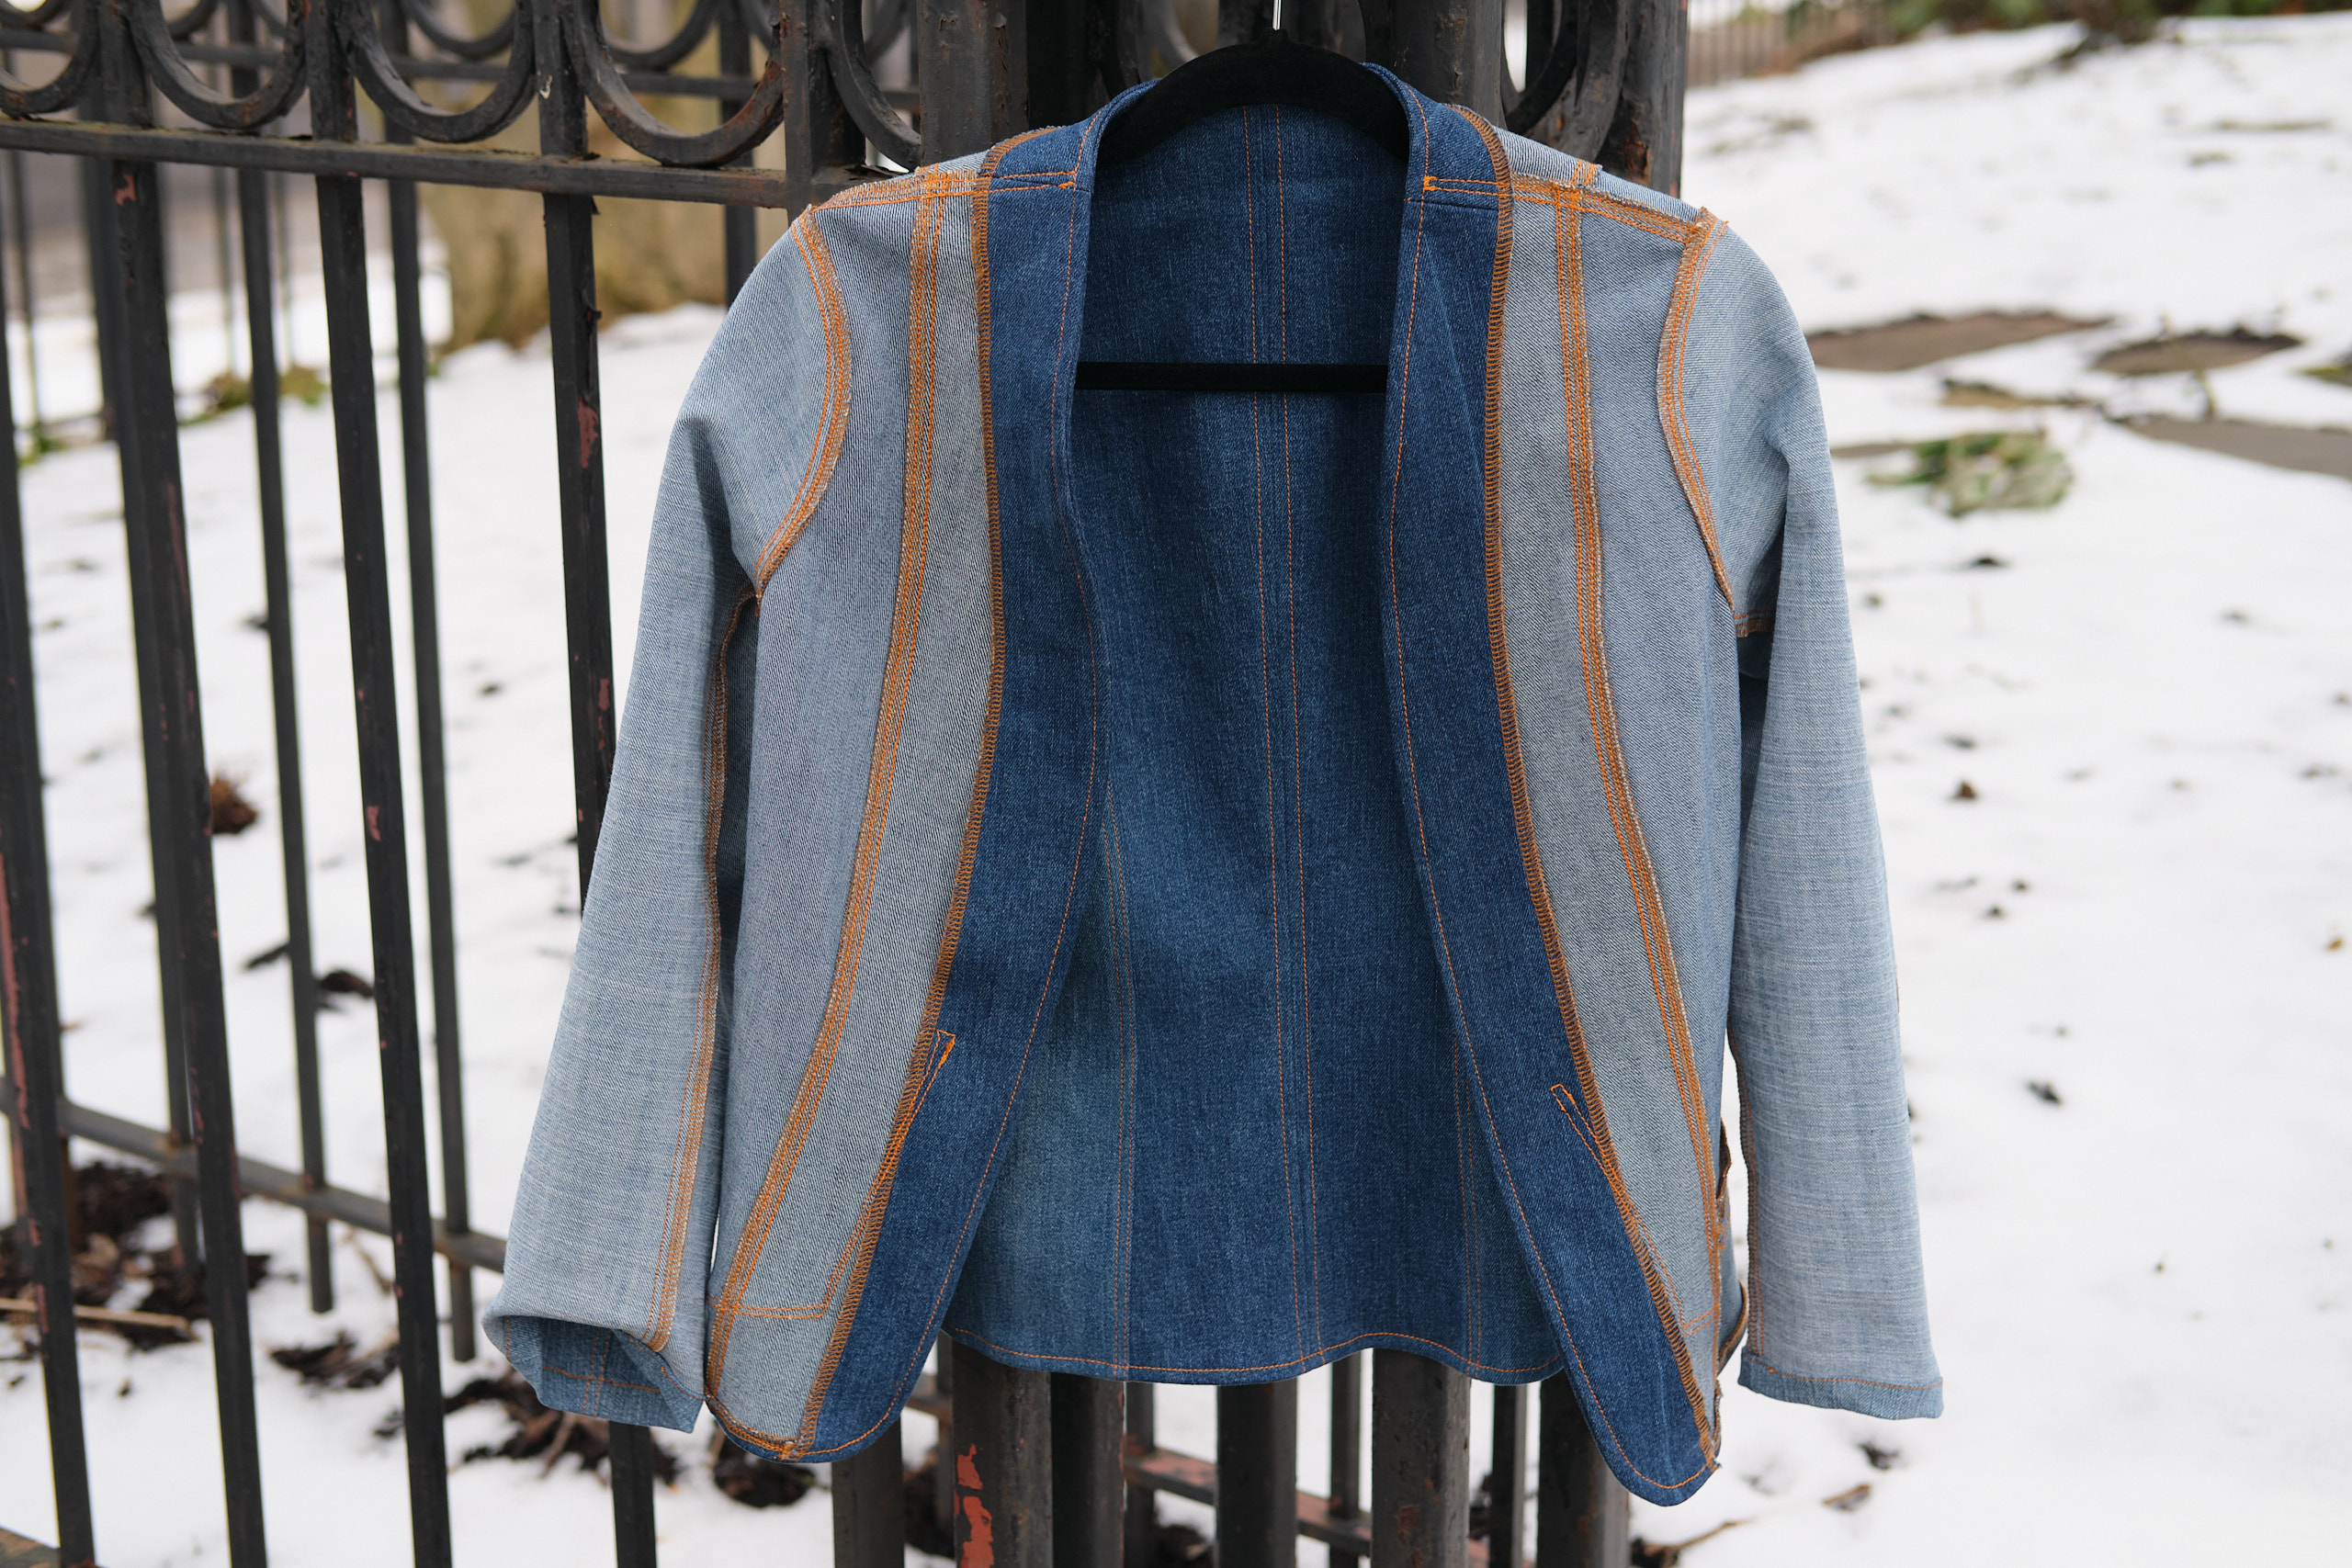
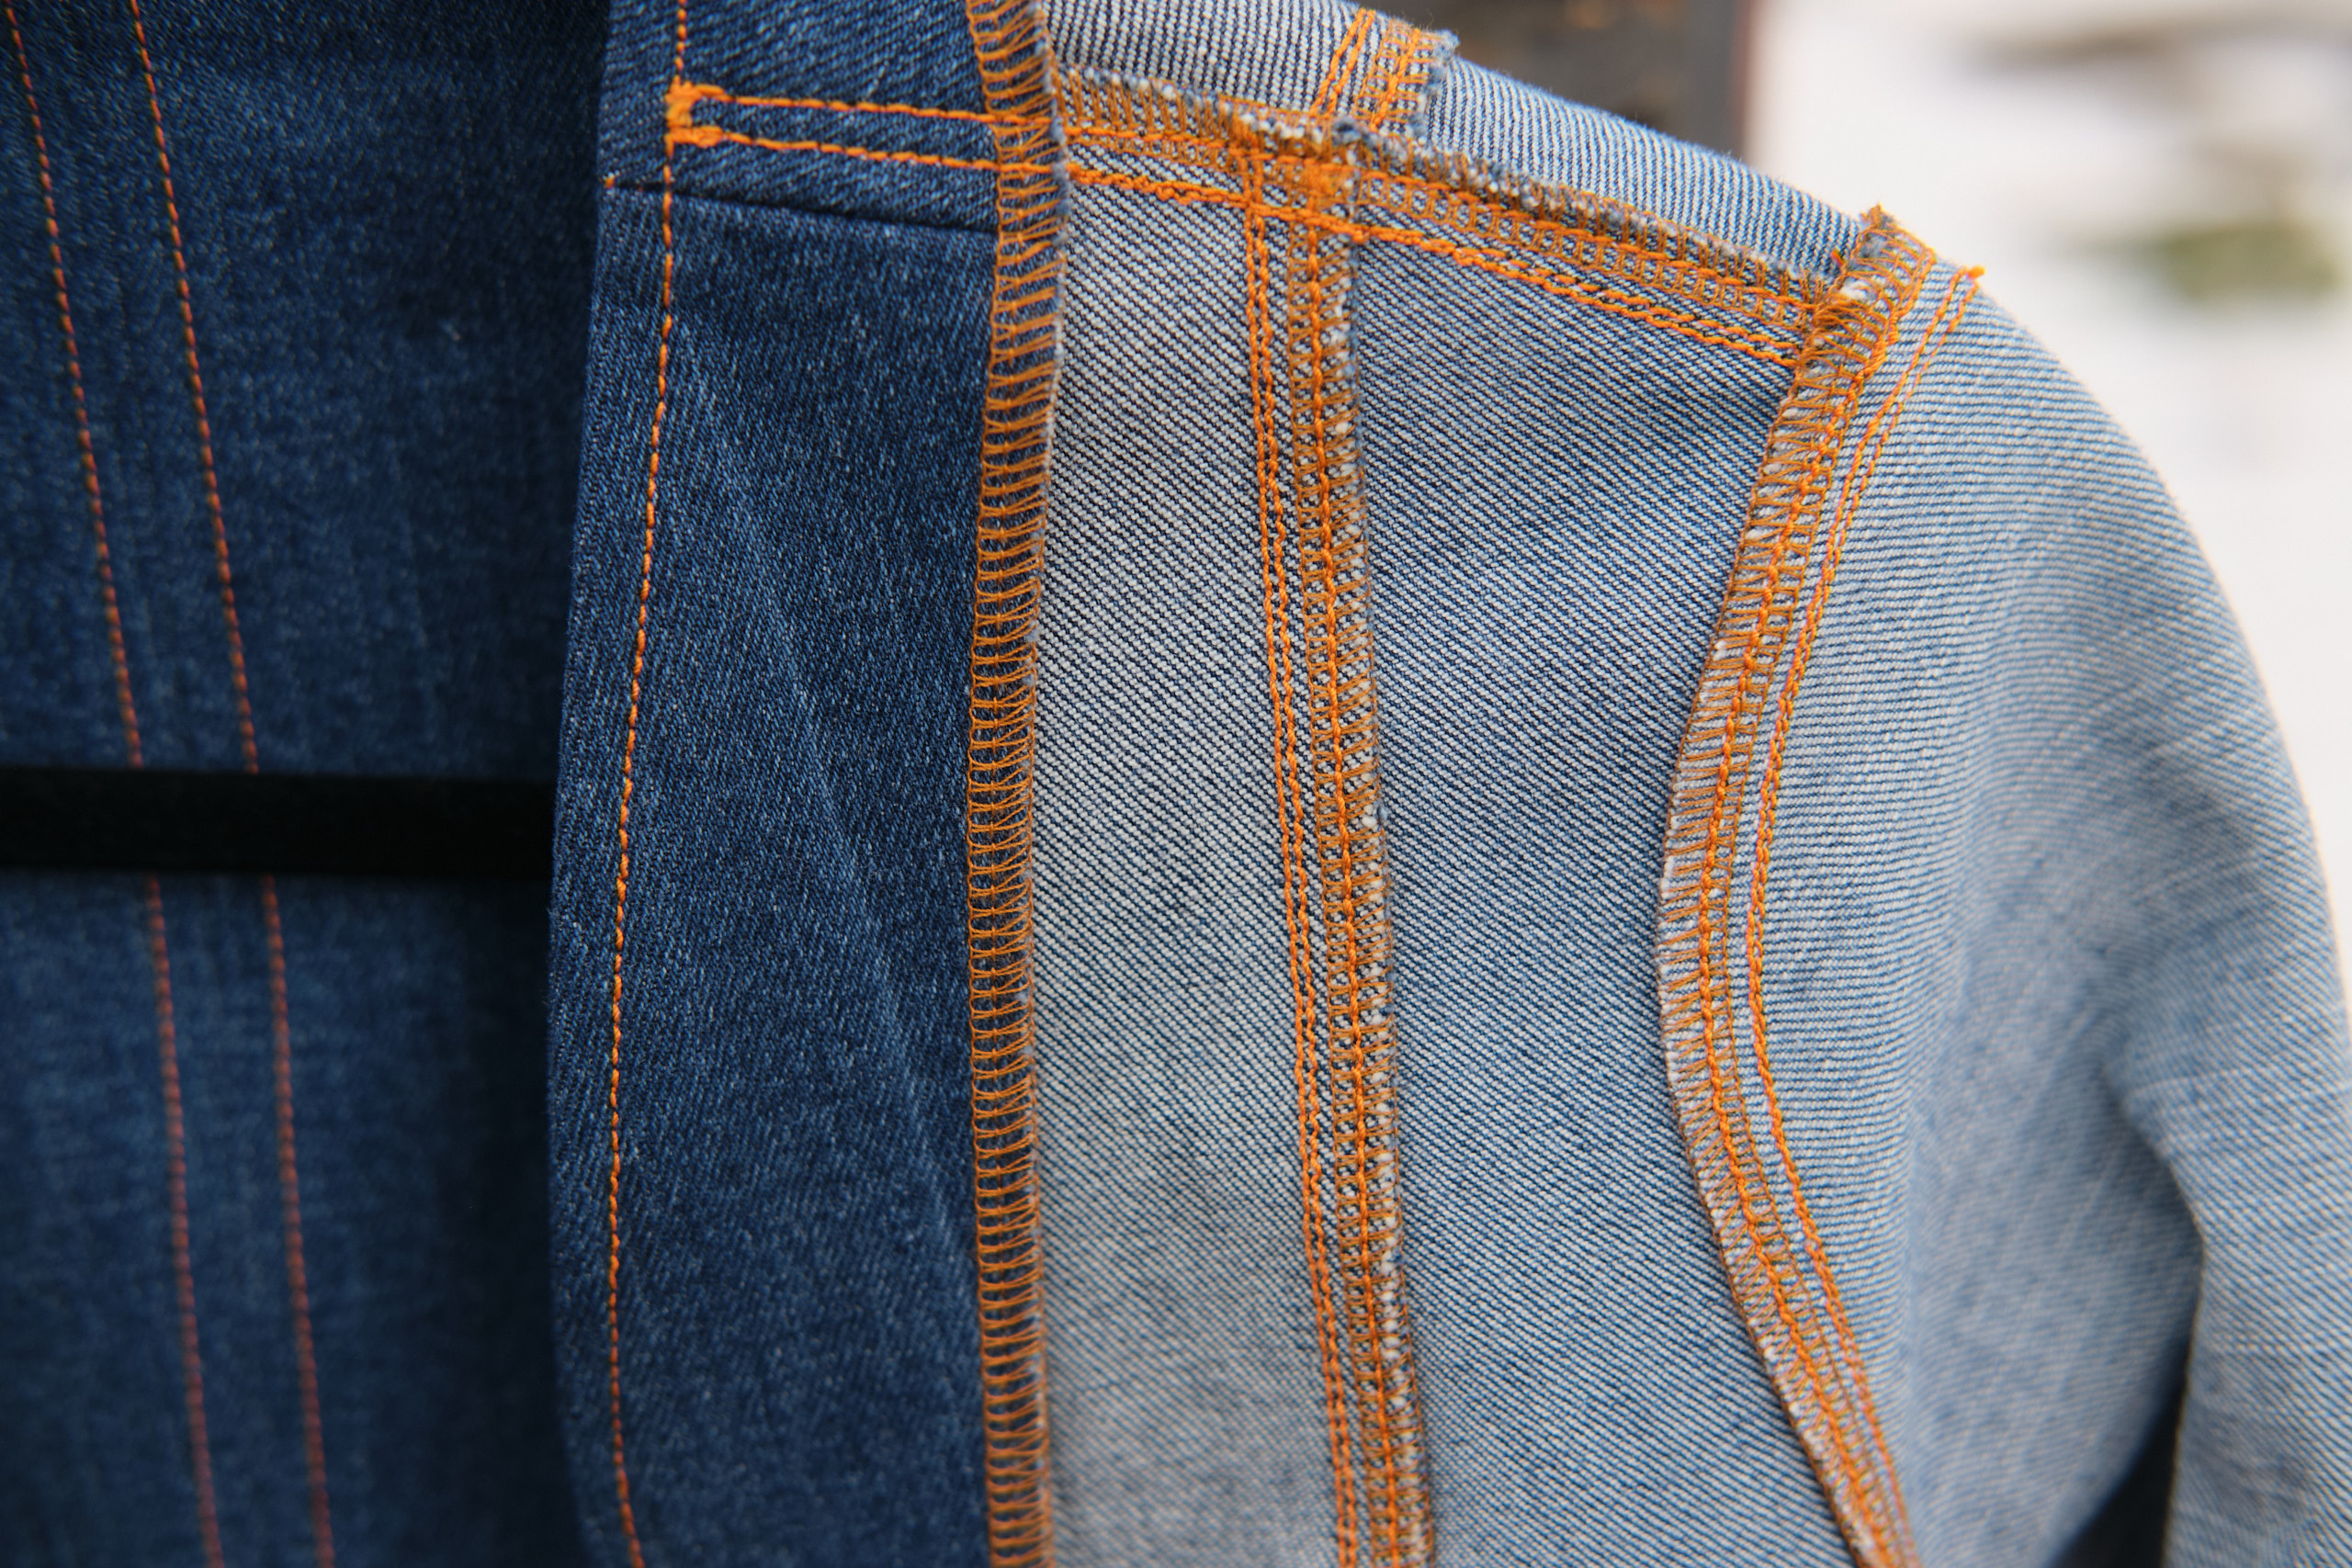
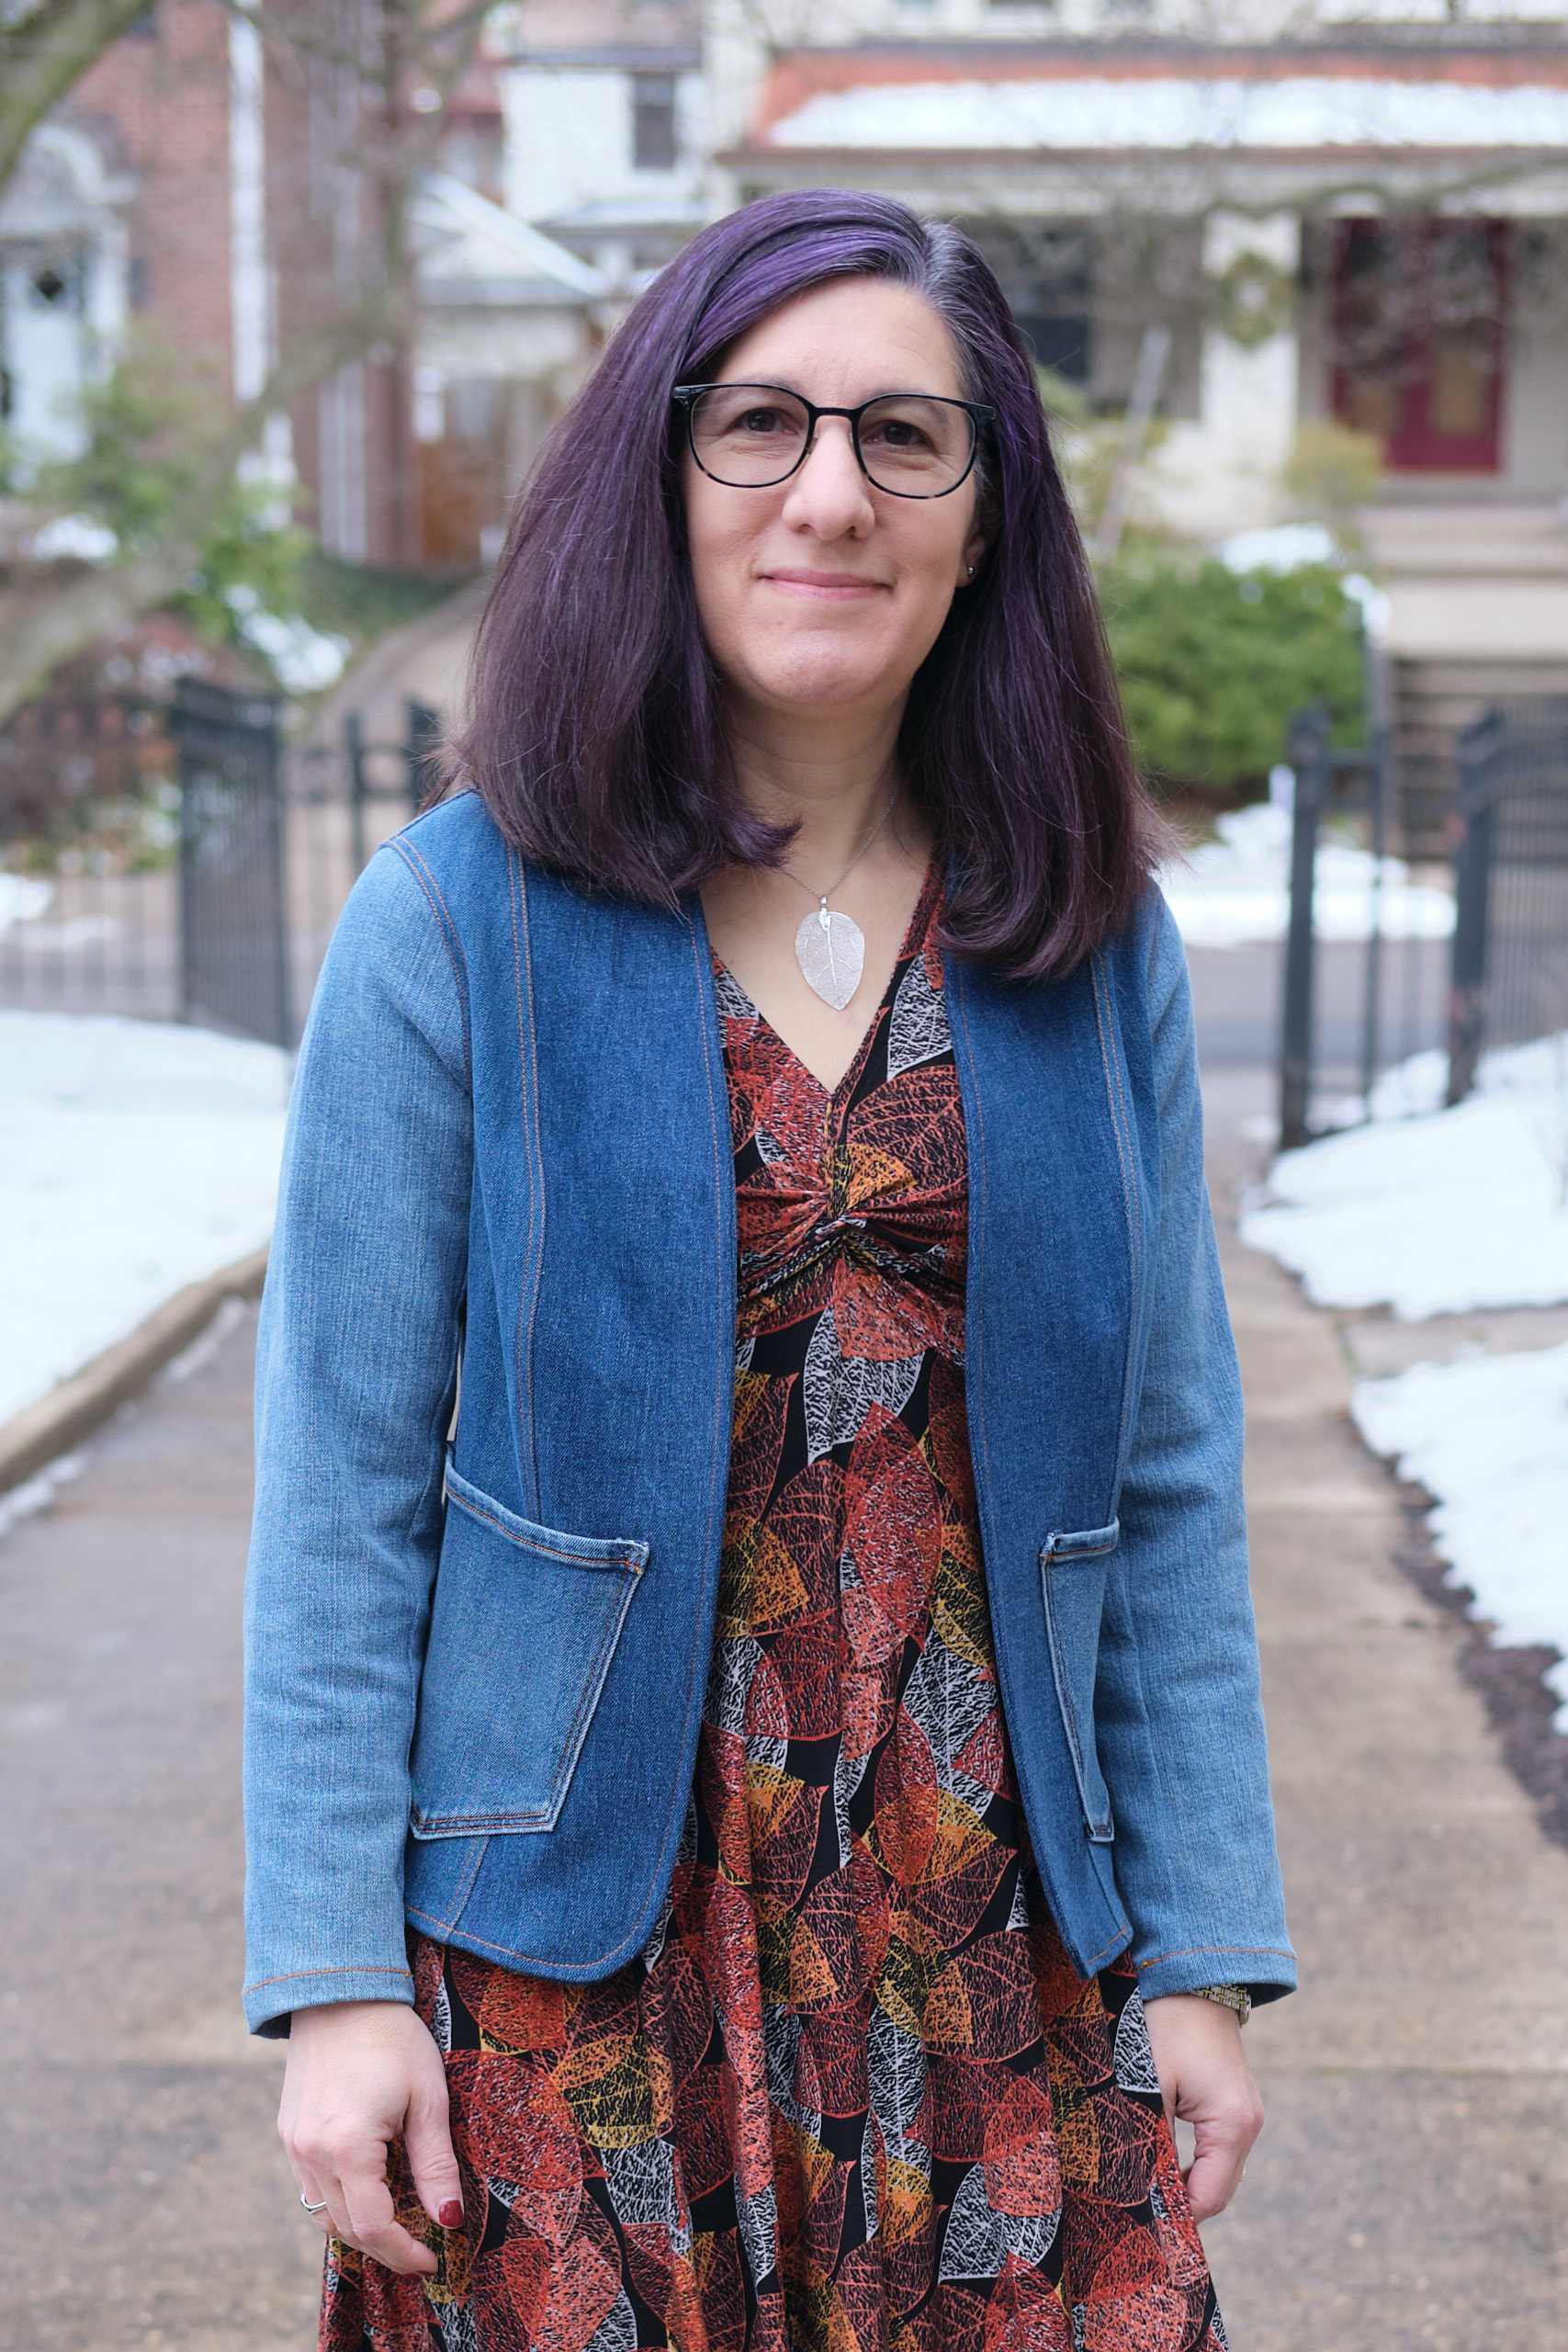
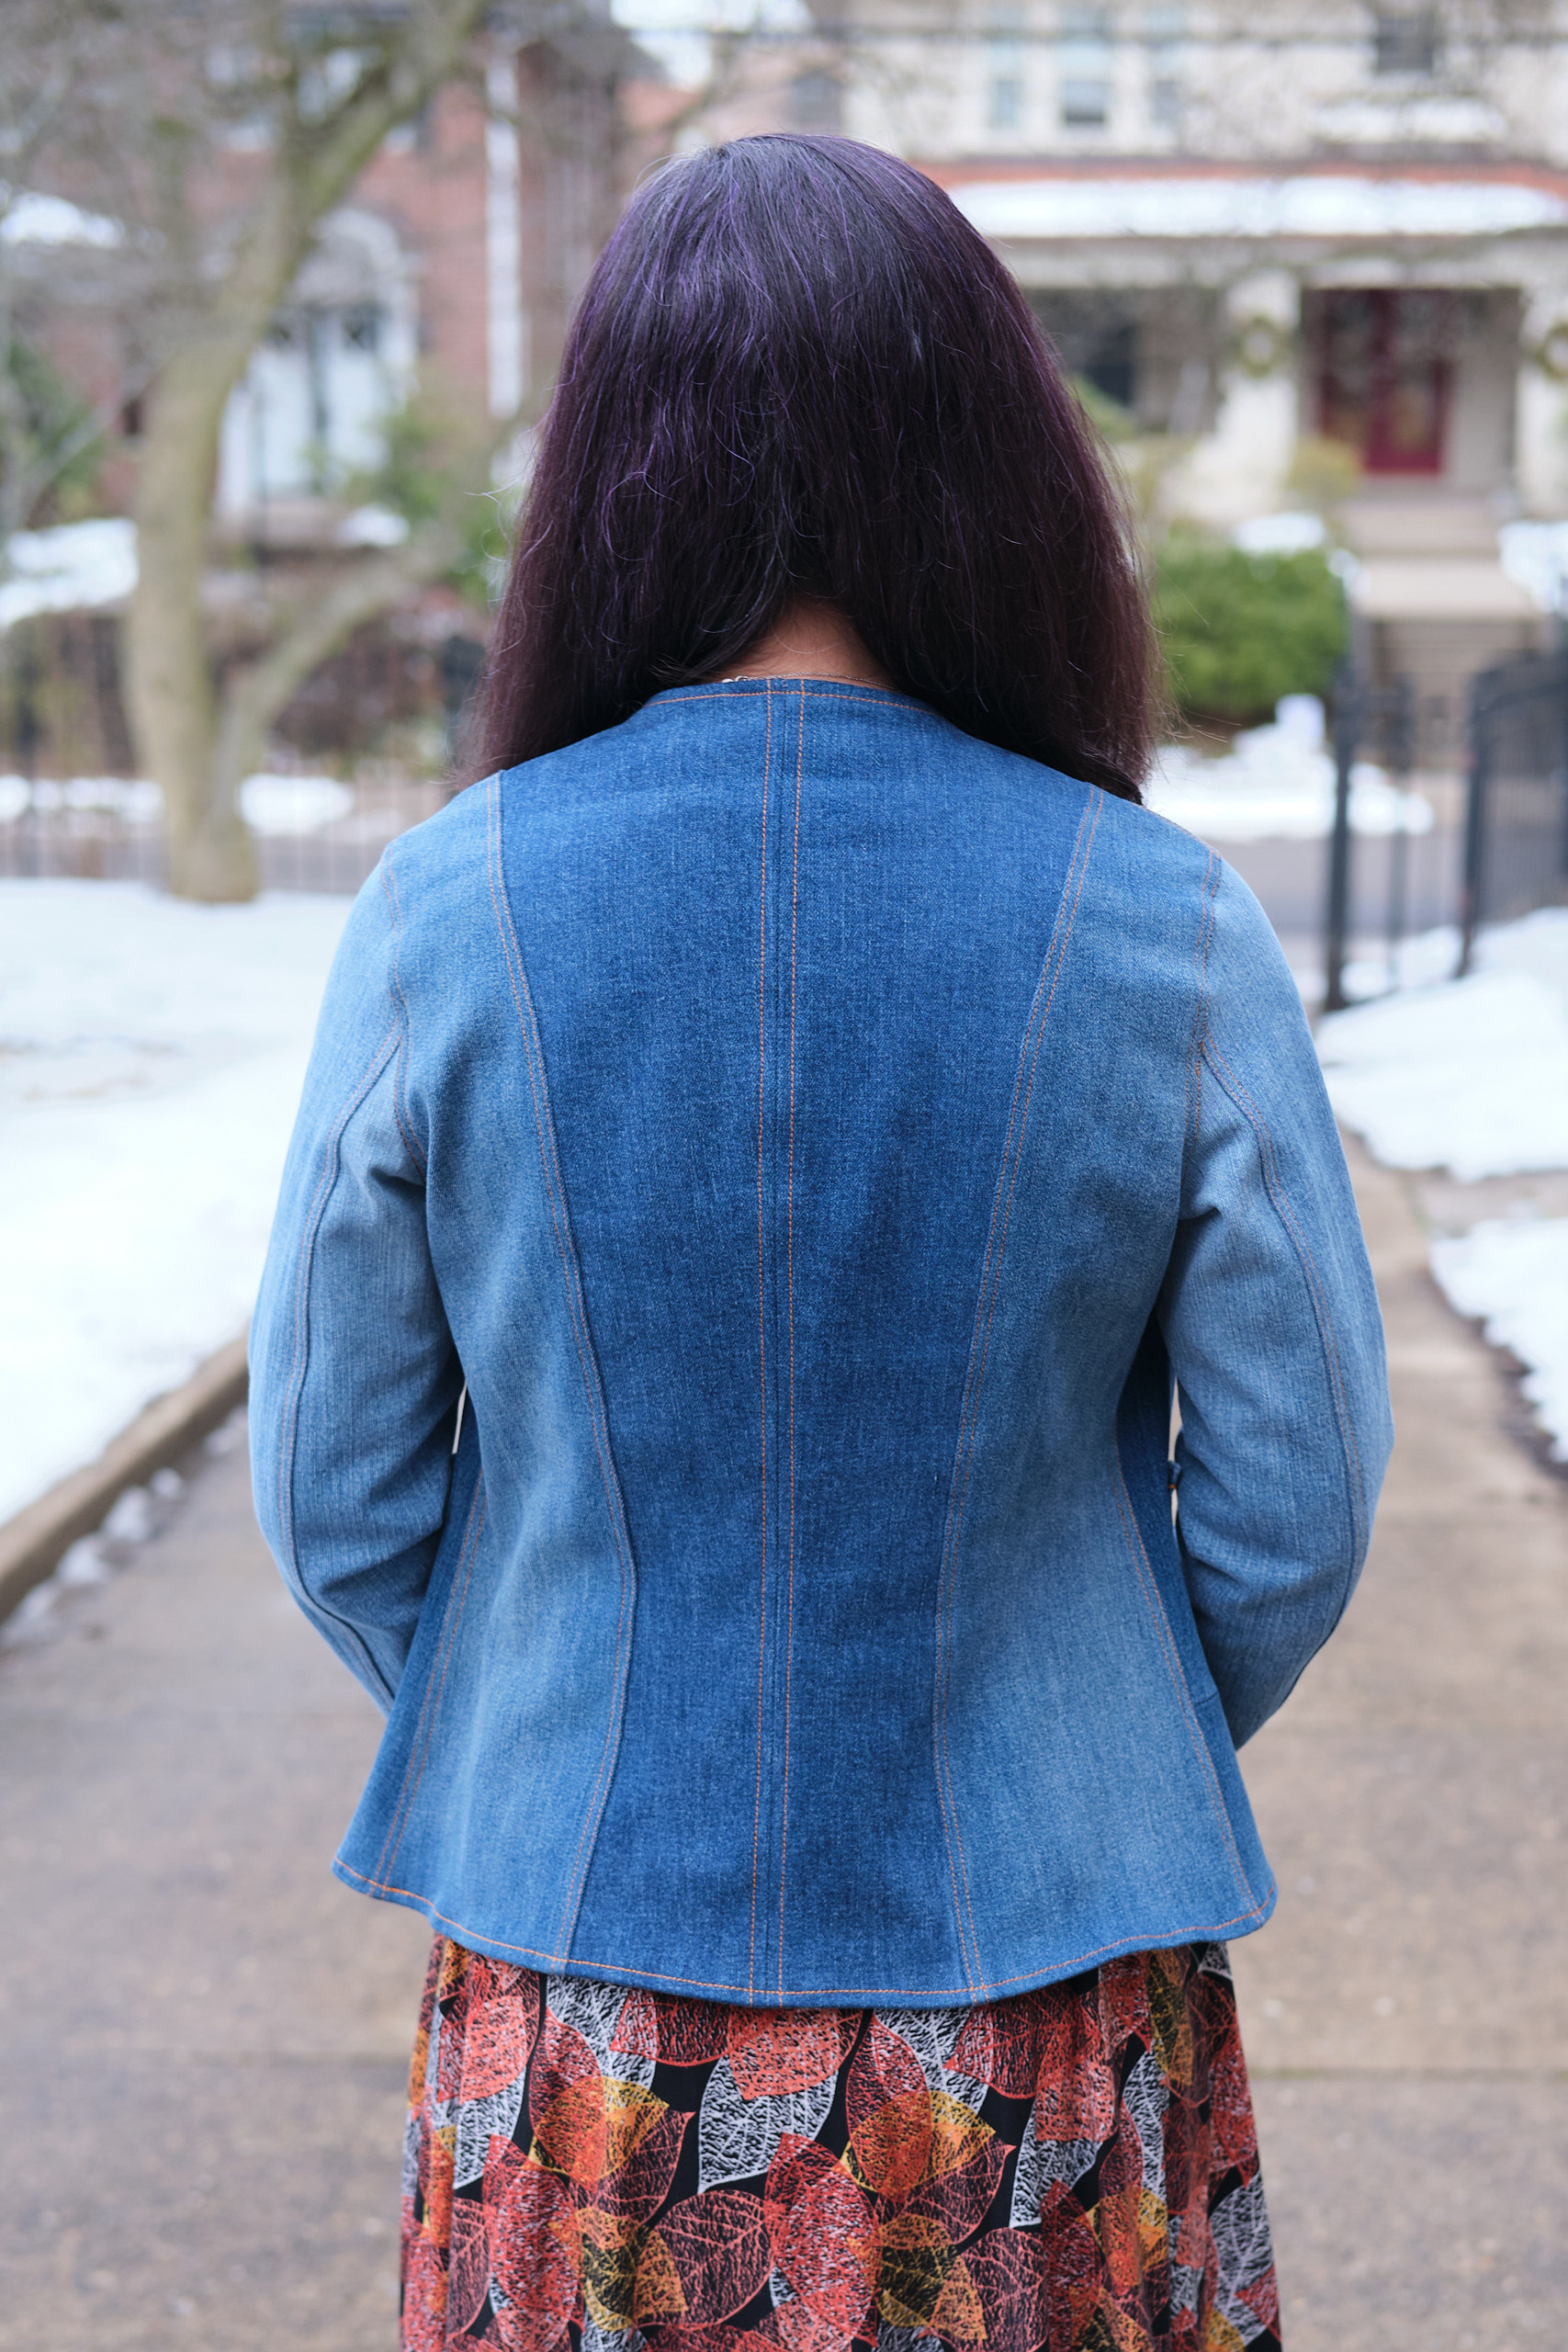
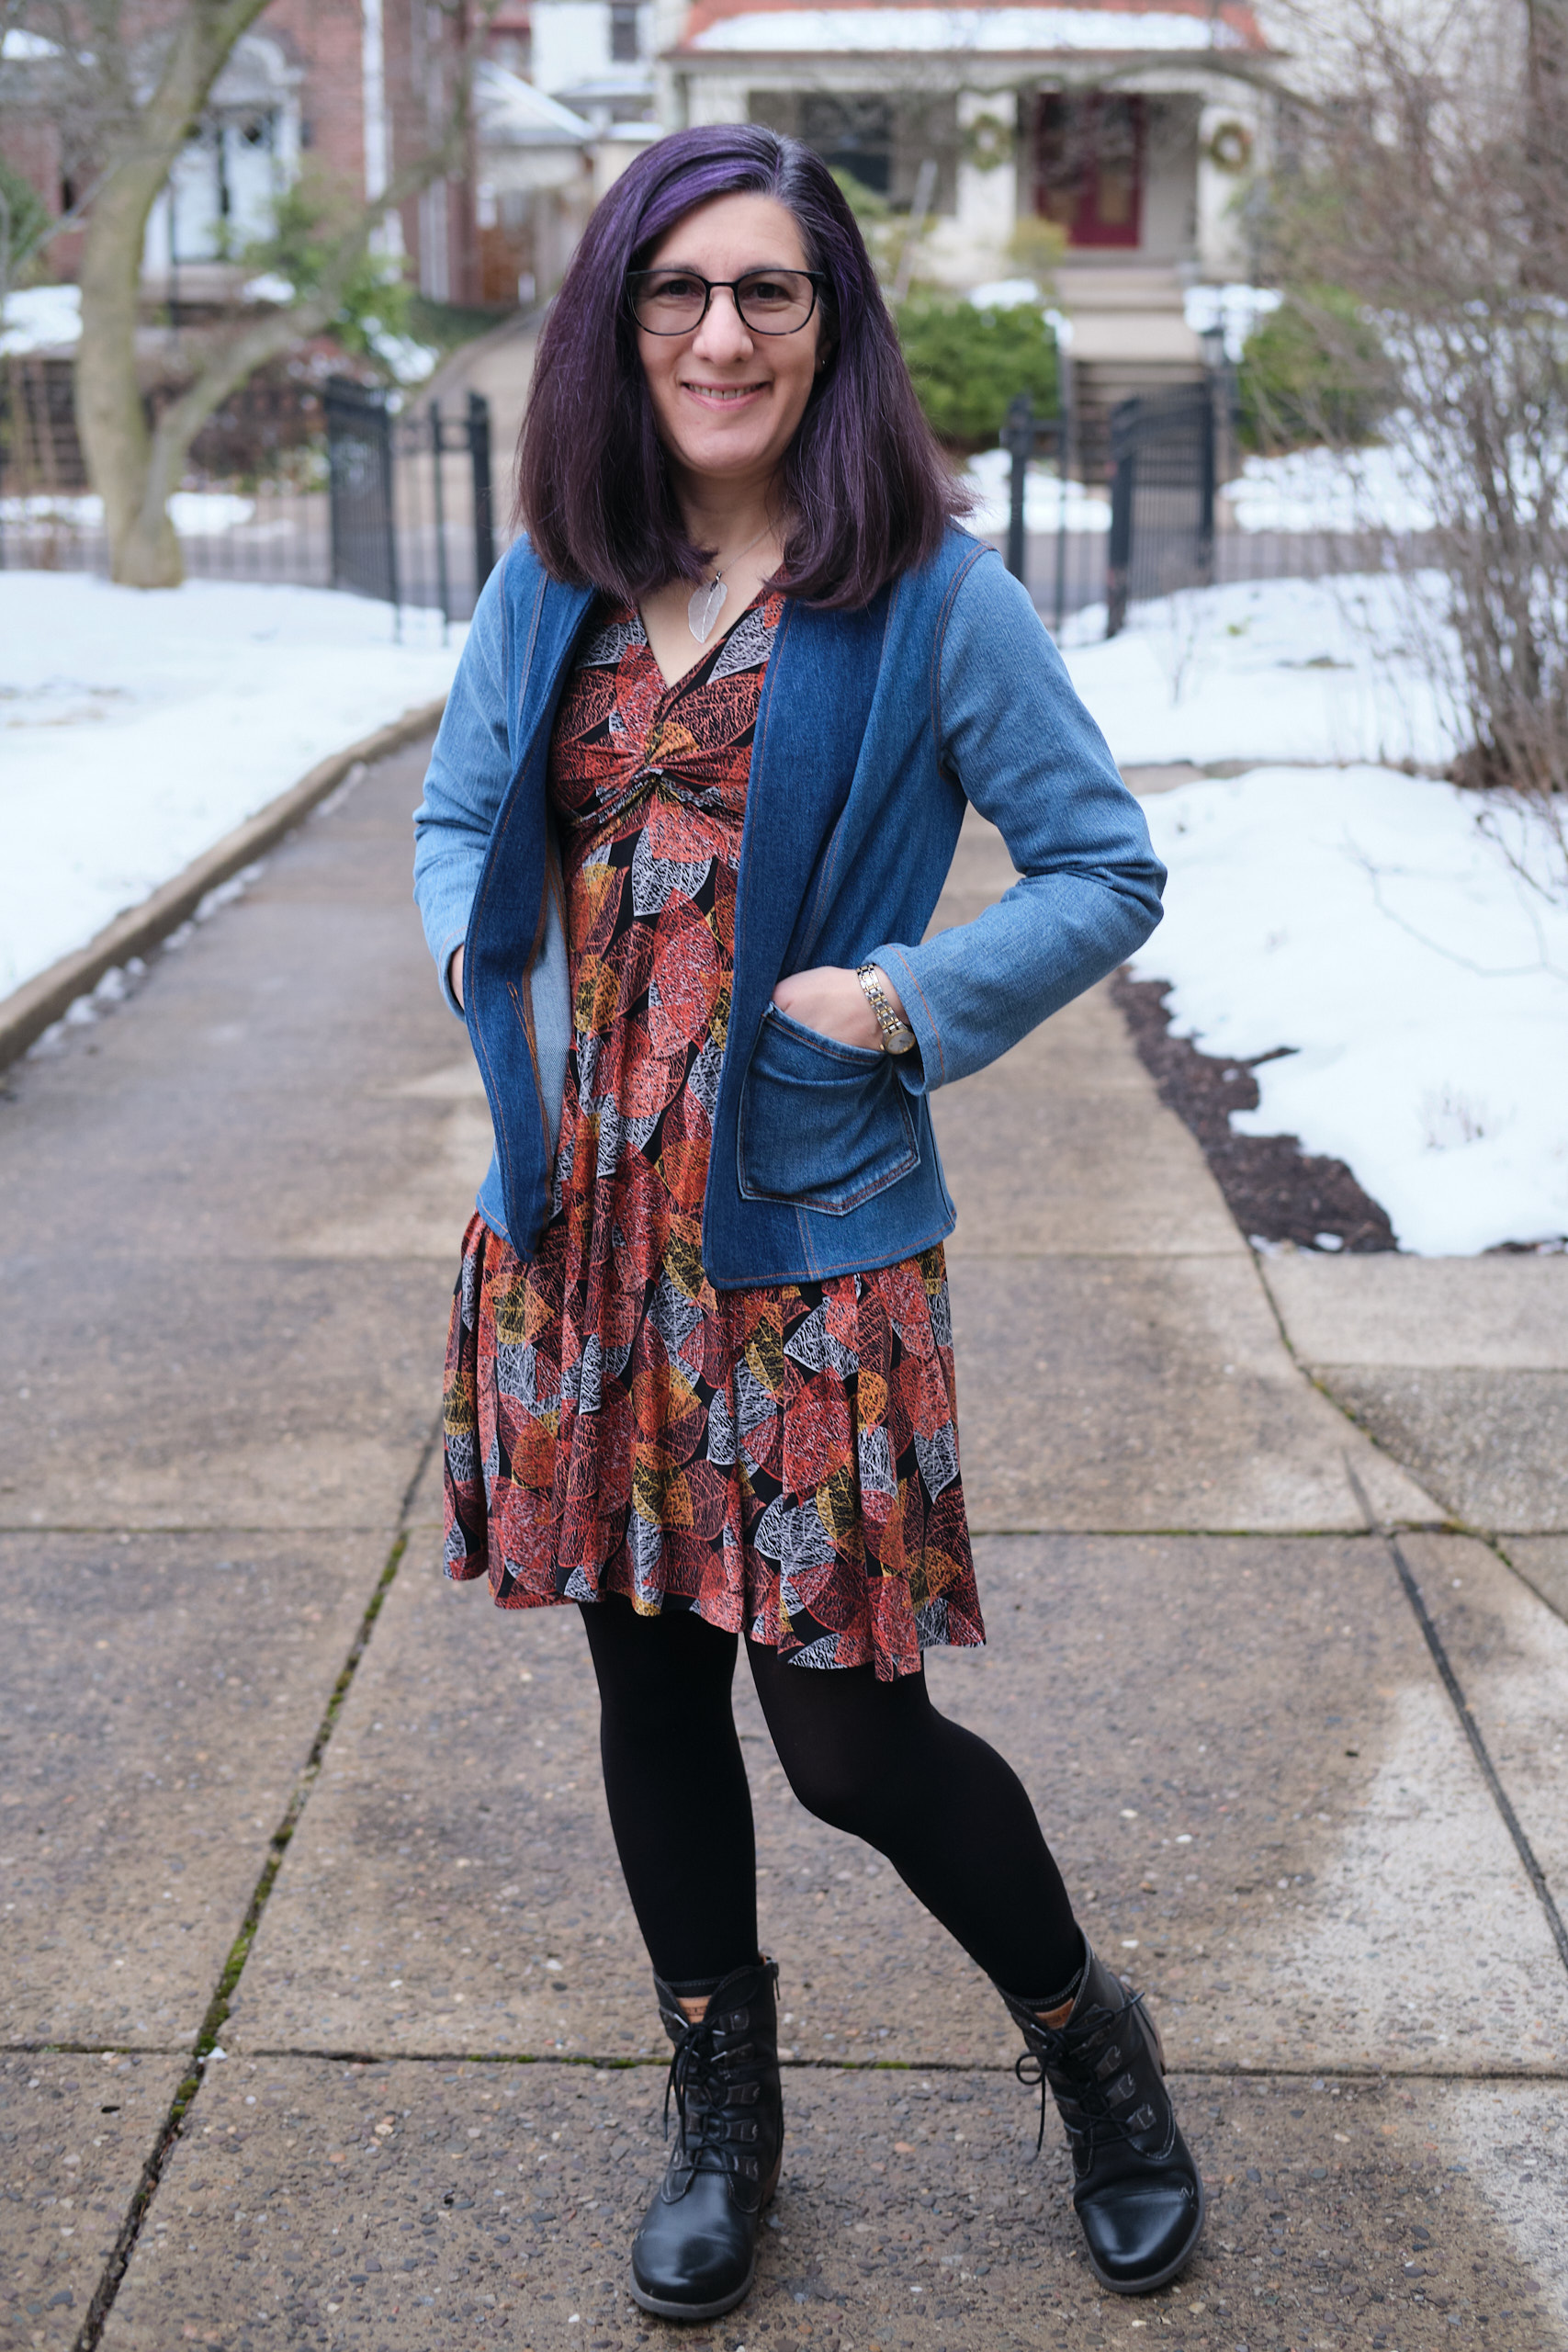
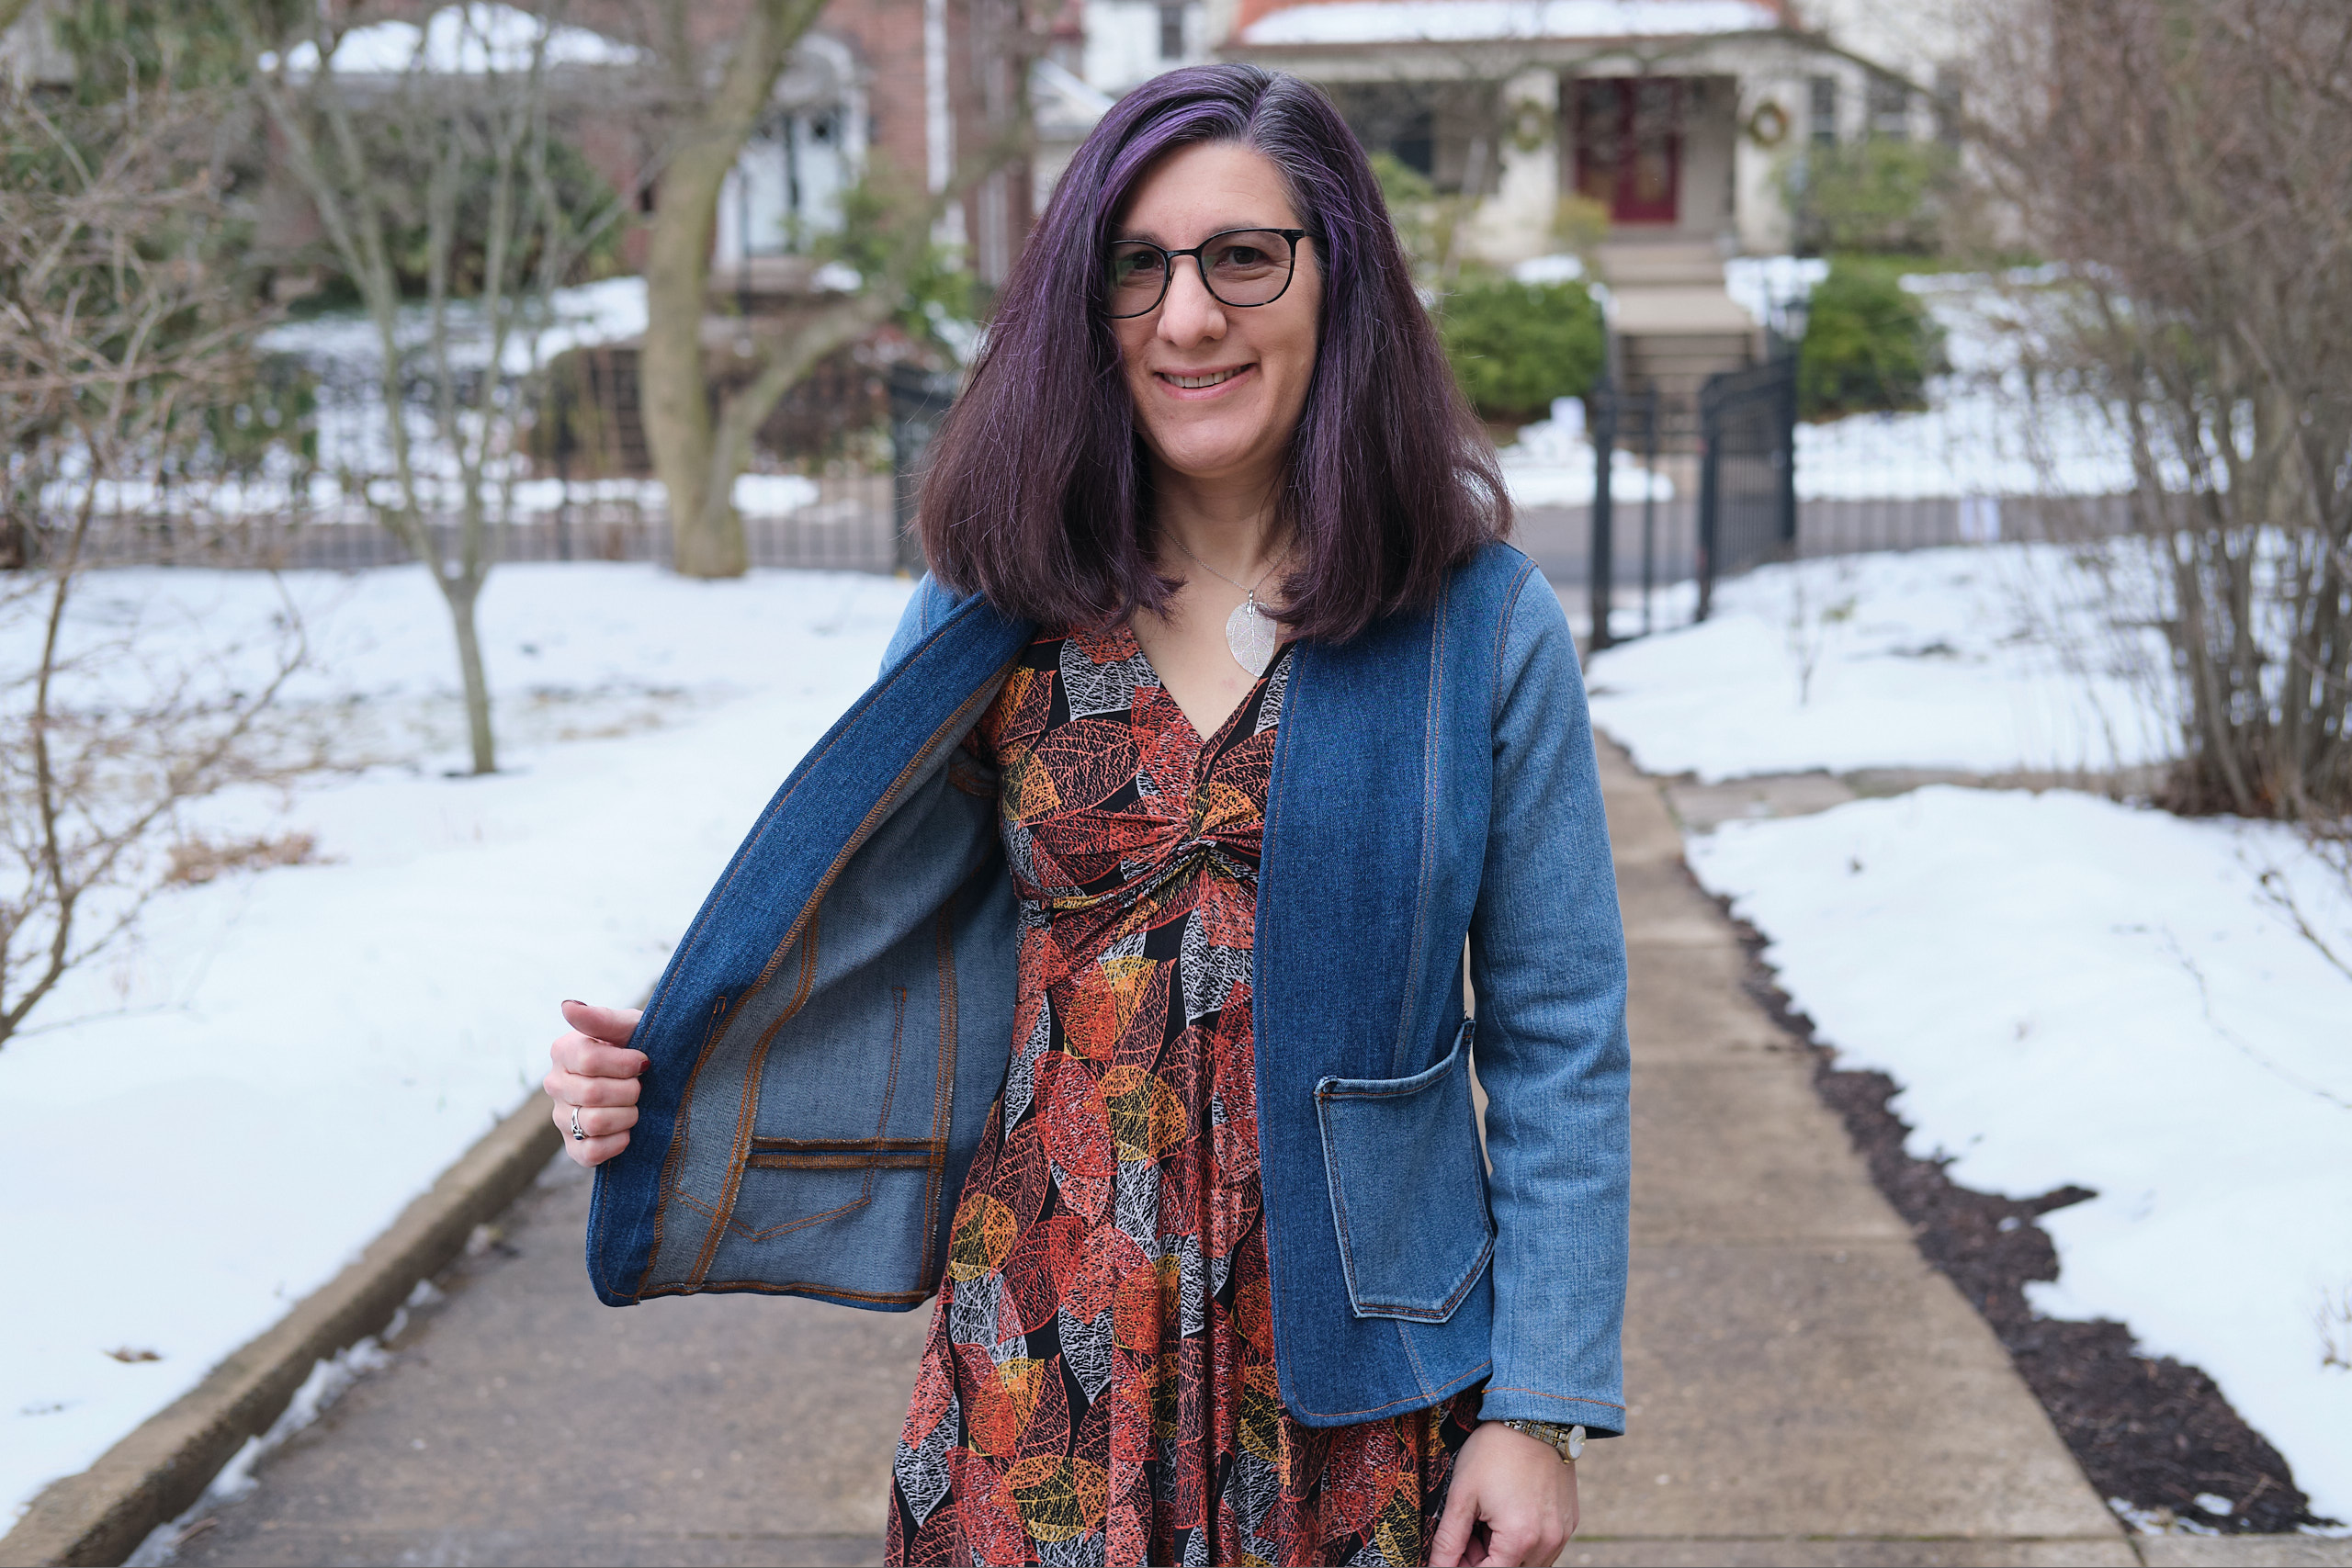
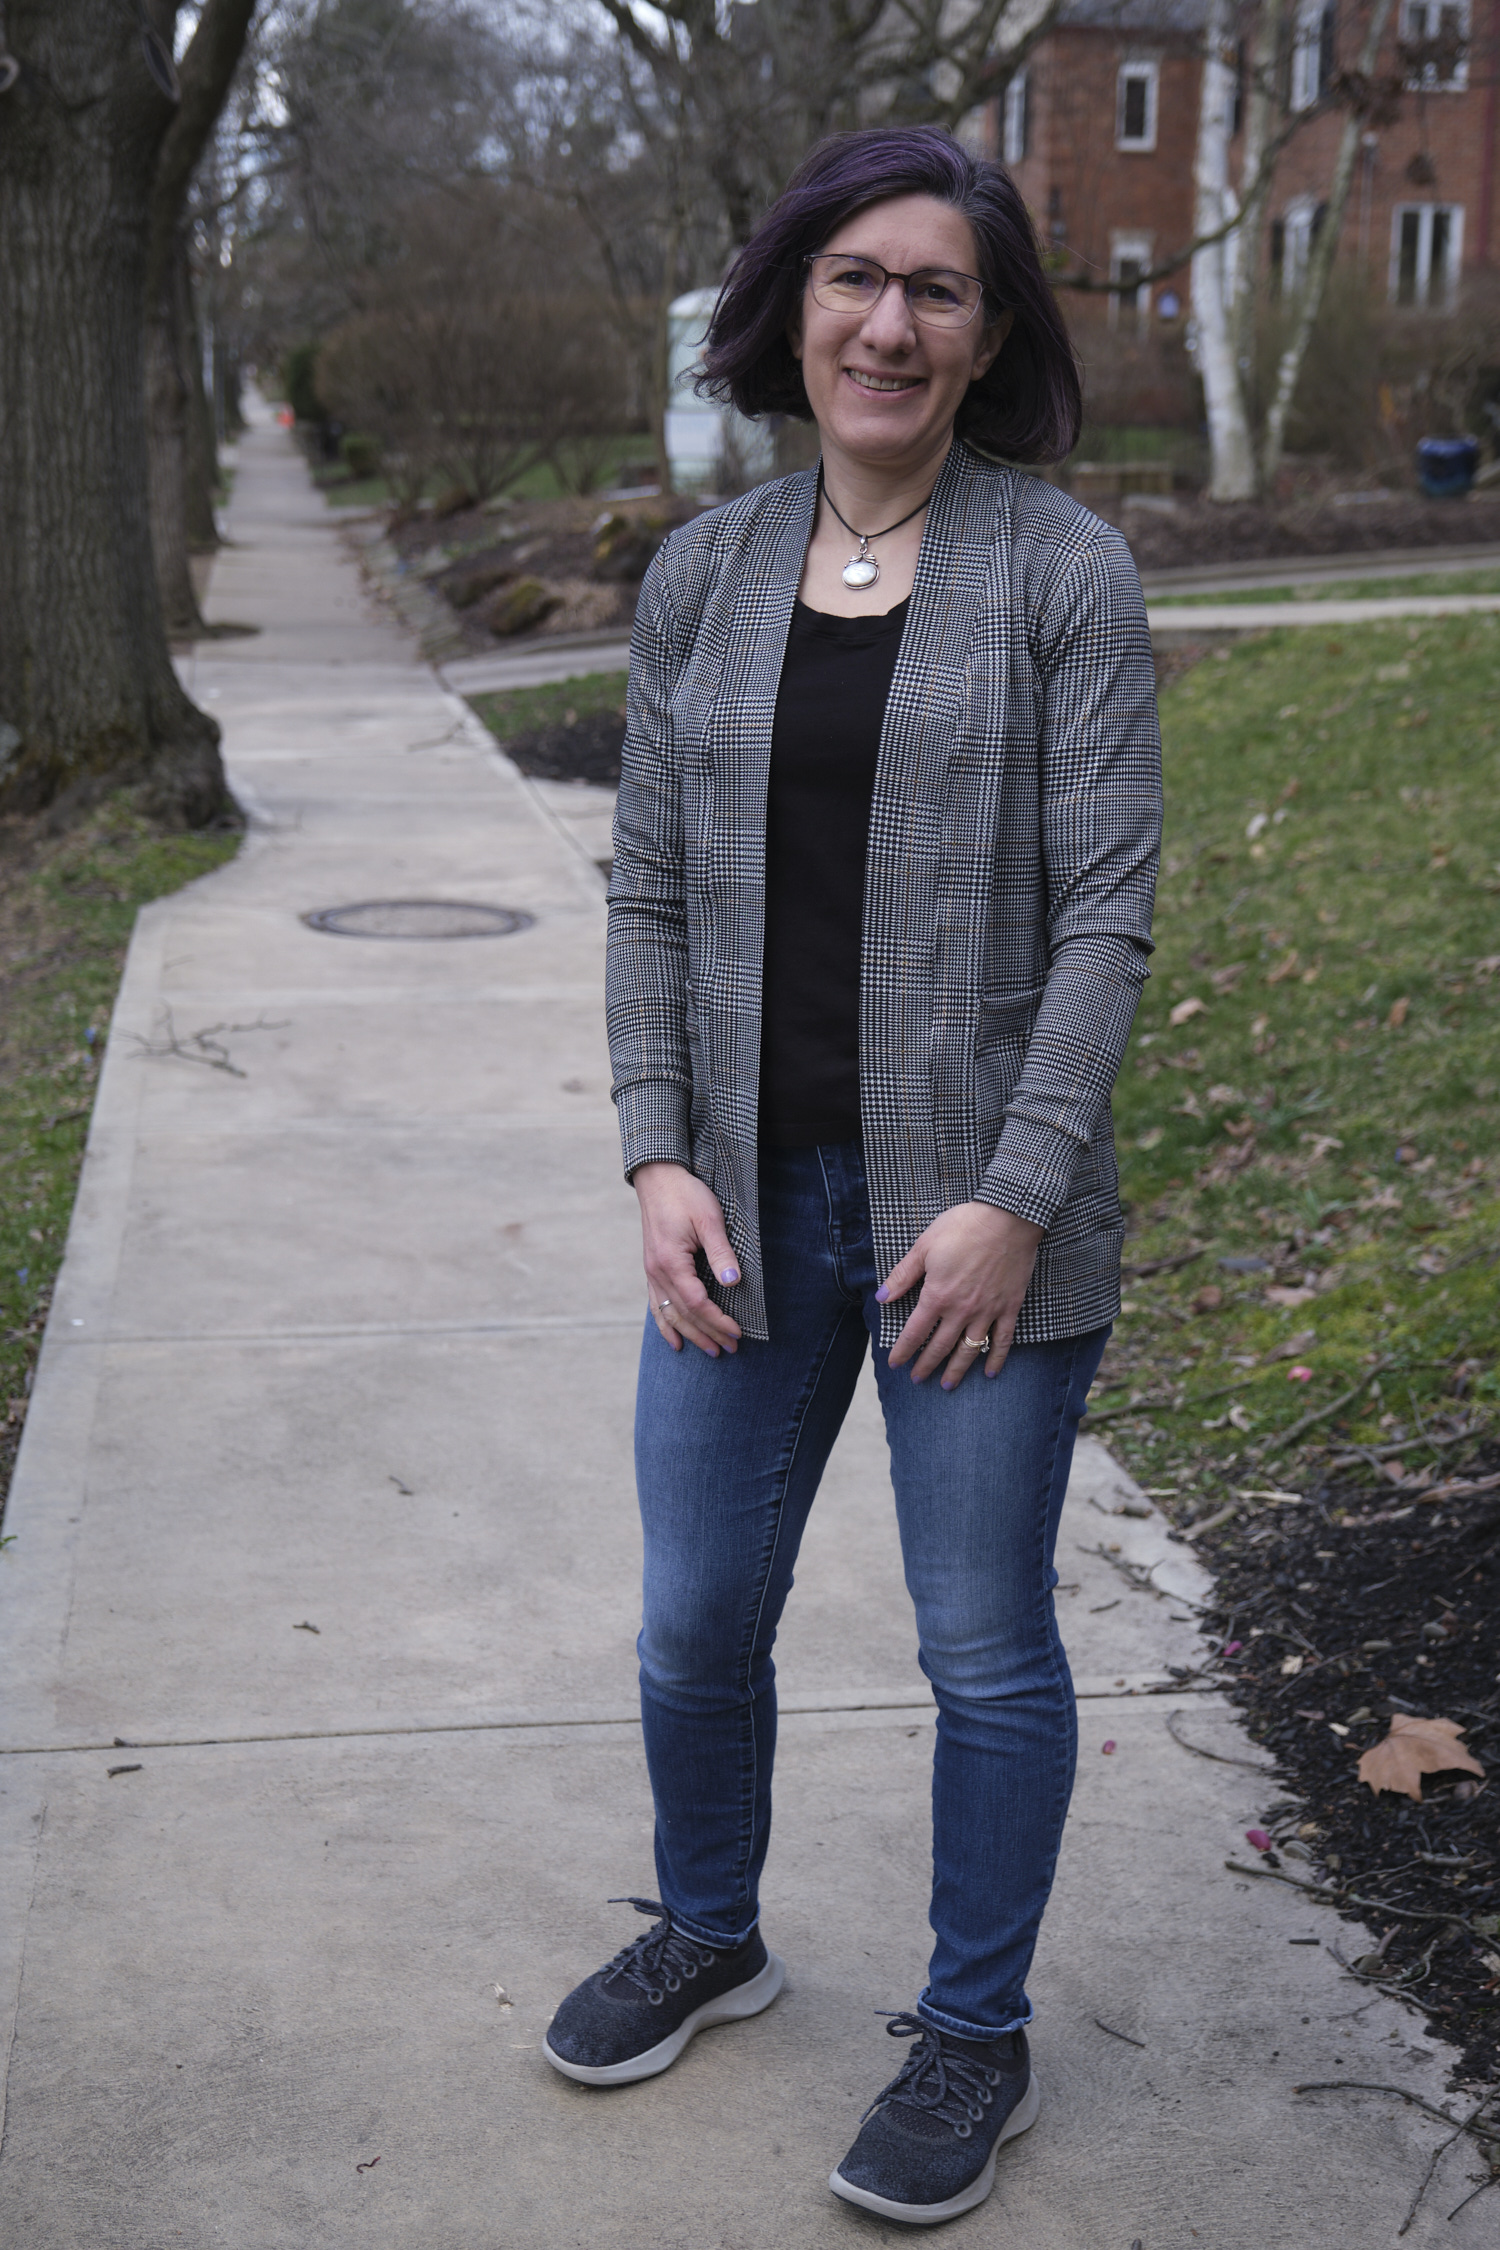
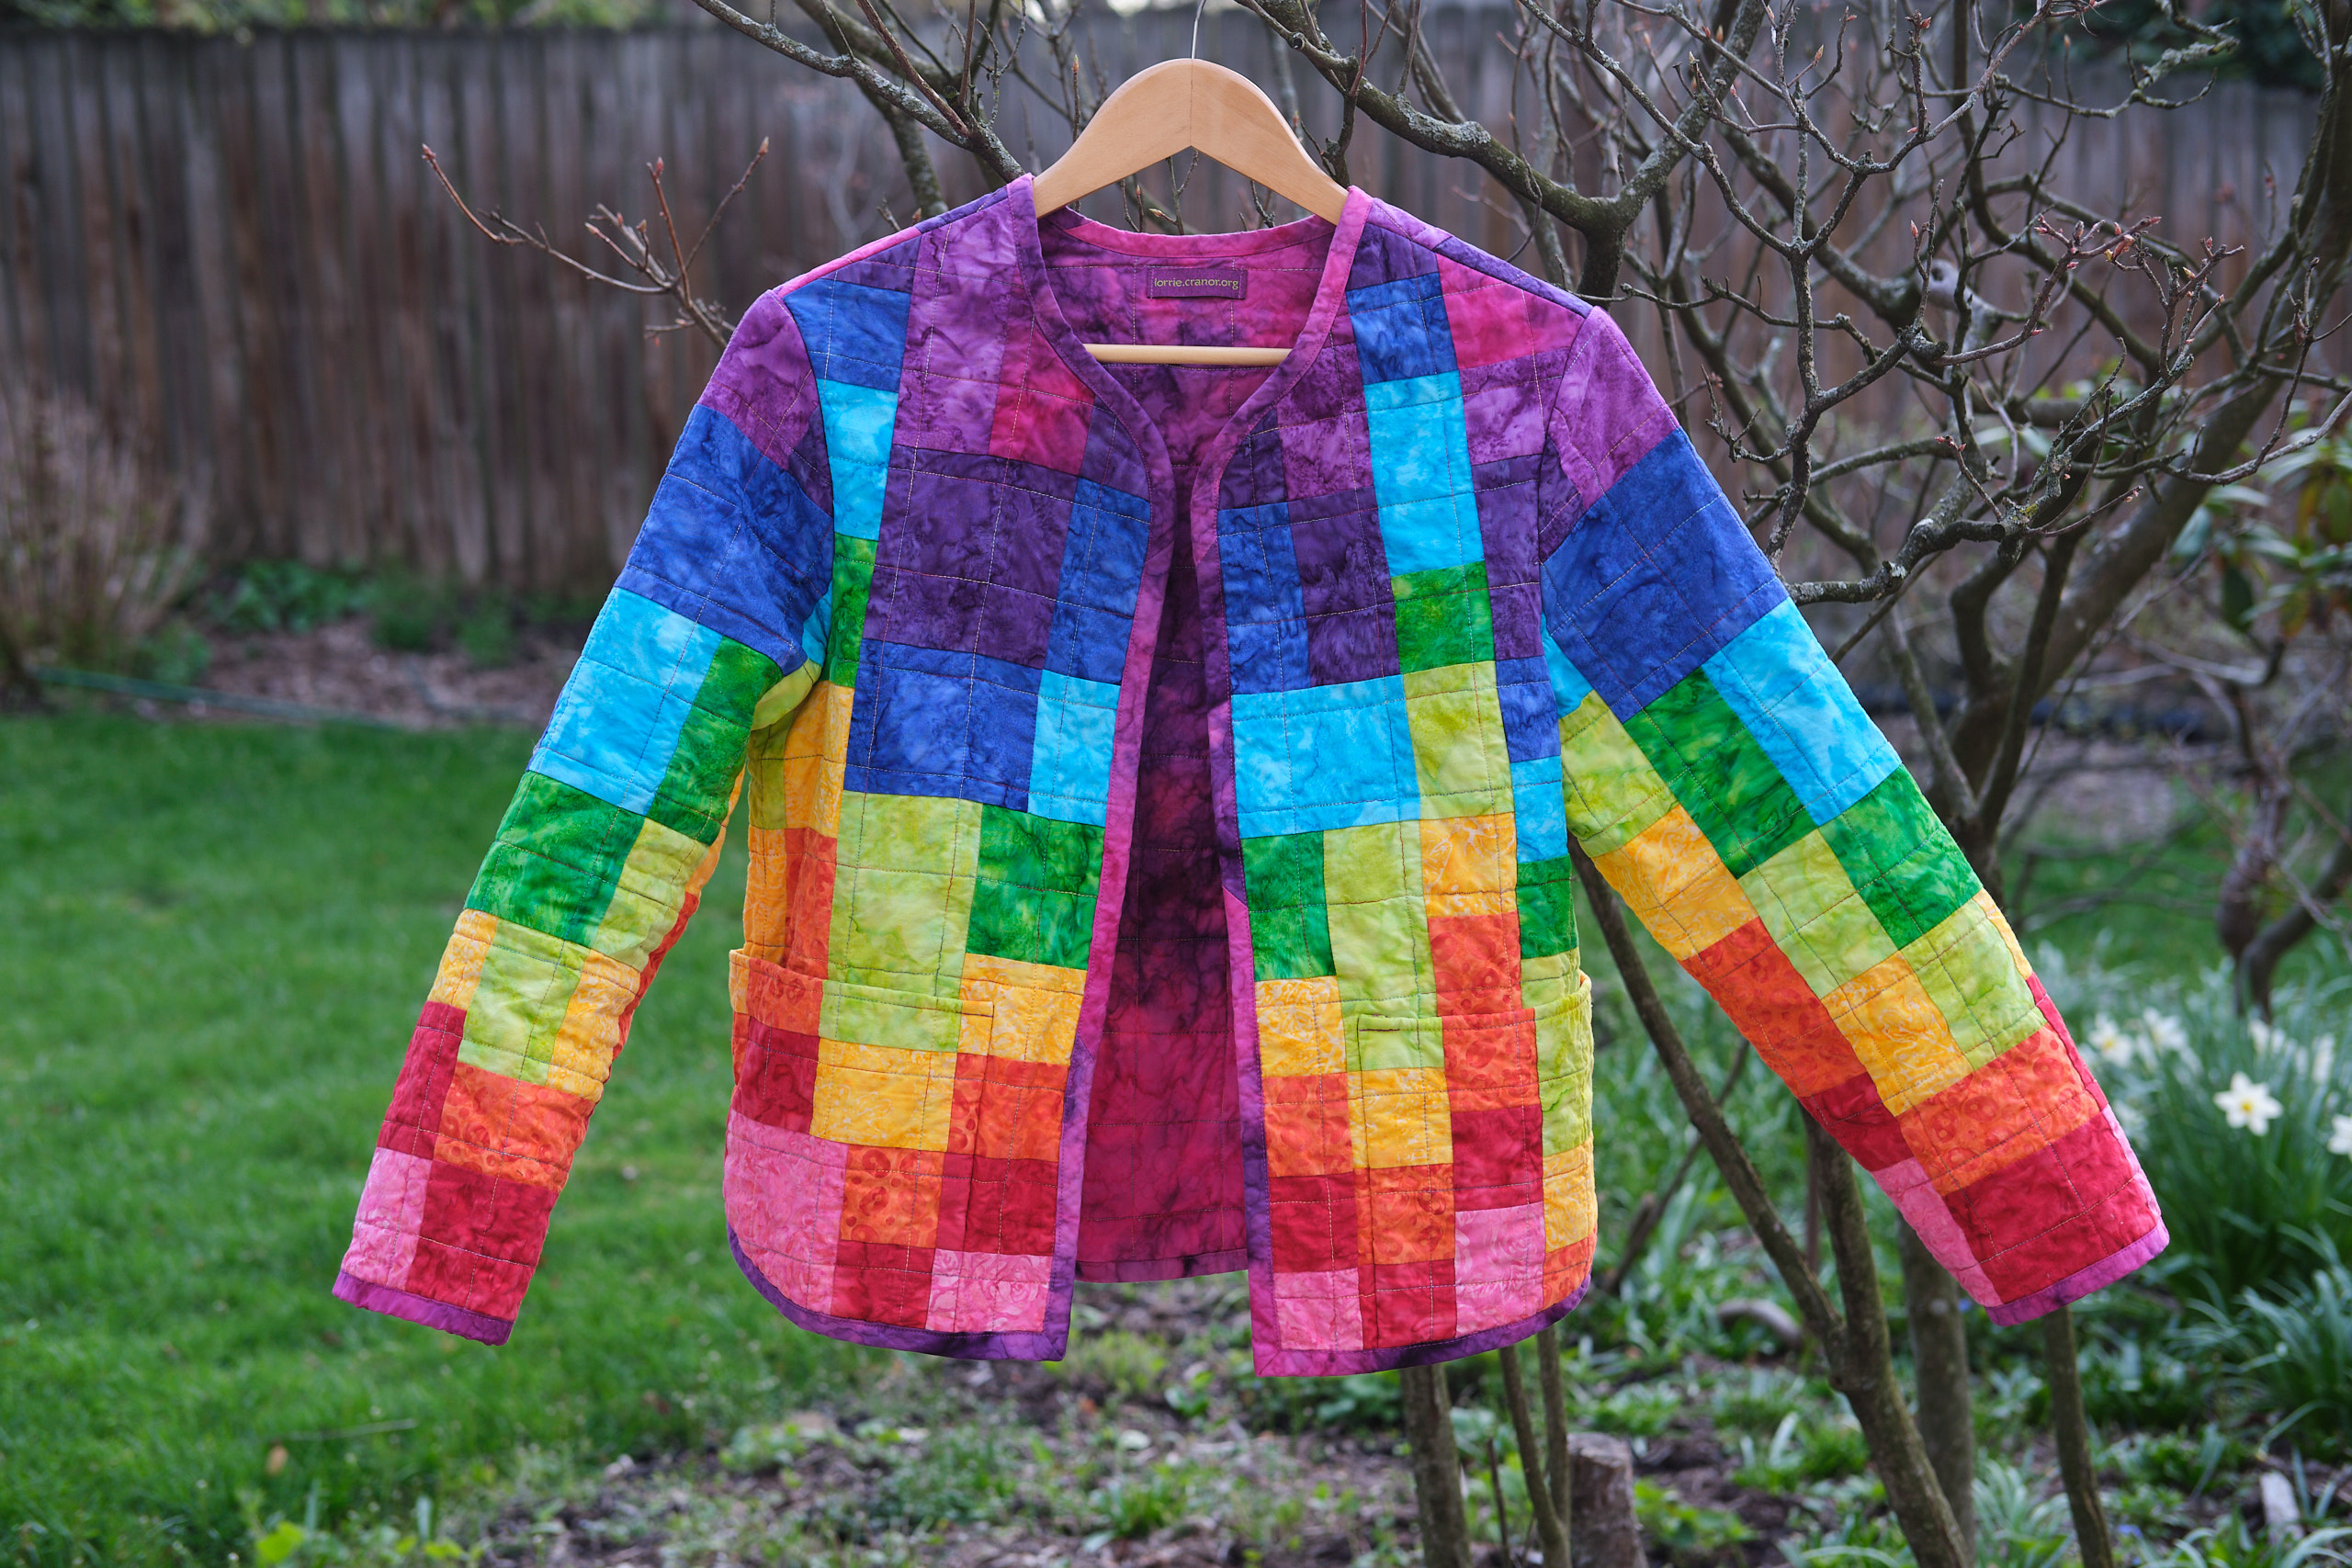
Boo & Lu Onyxblazer, size 4 with small bust adjustment, shortened waist and sleeves, lower back neck facing, repurposed jeans pockets. Made from three pairs of thrifted jeans.
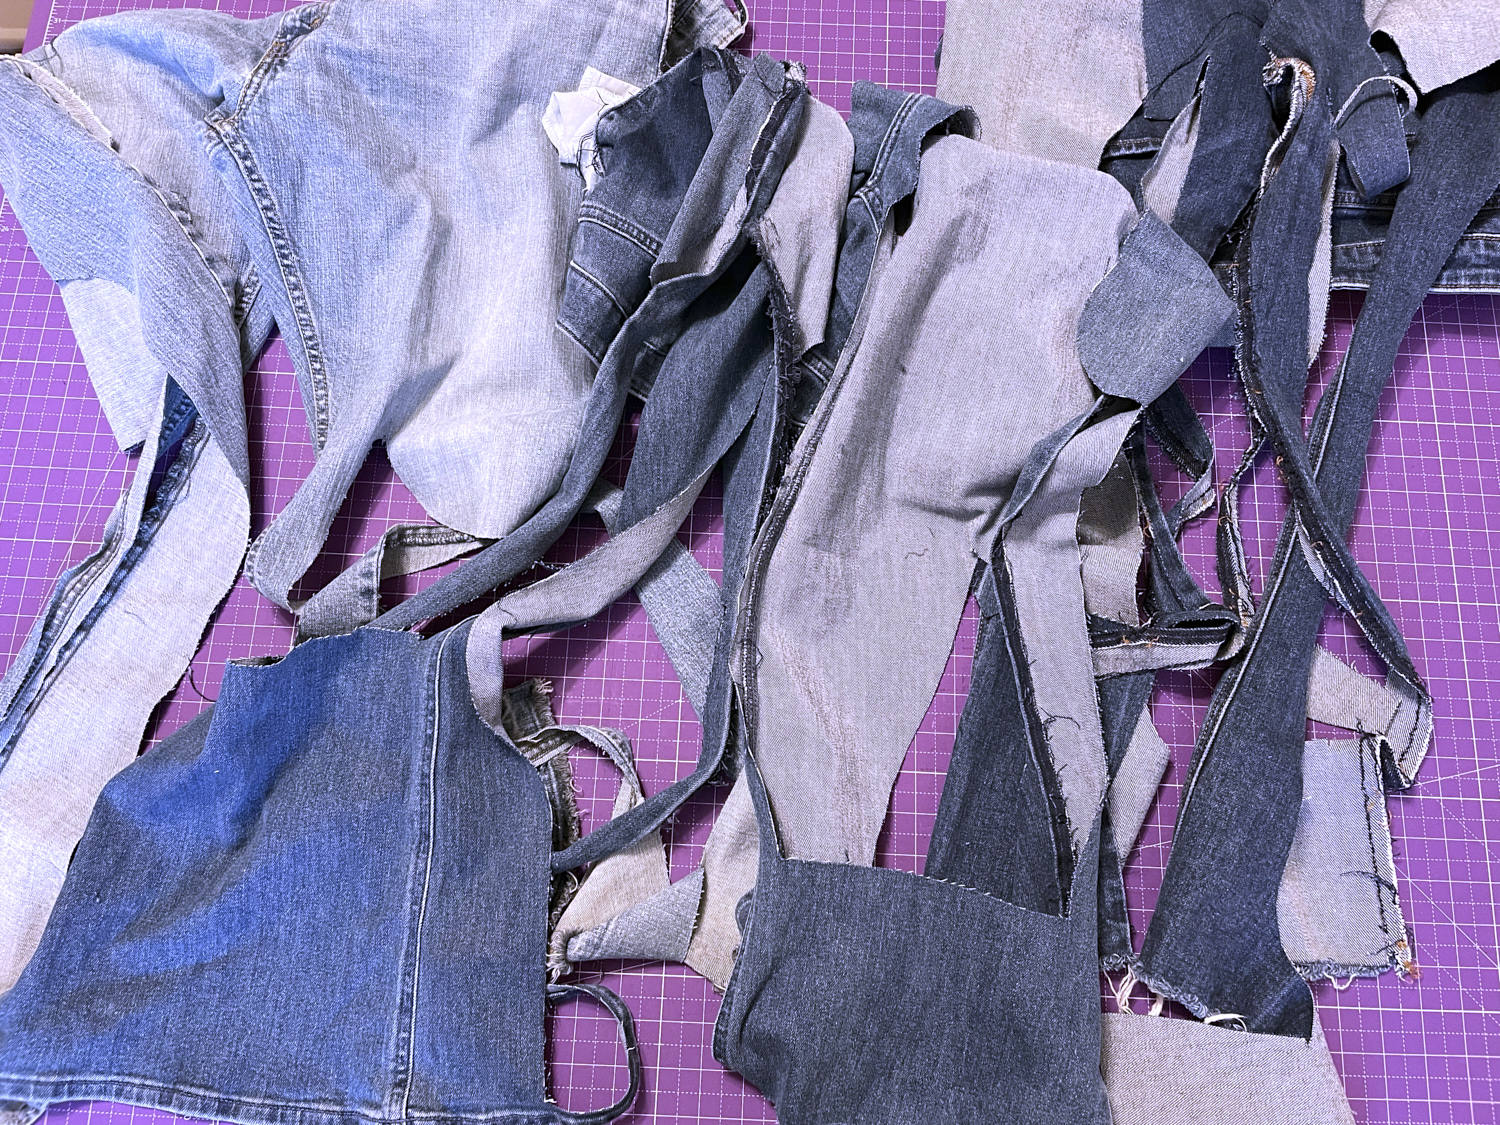
I used to love wearing denim jackets, which seem to go with just about everything, but I’ve found their collars increasingly uncomfortable. So the thought of a collarless denim jacket in a bit dressier blazer style was appealing. Unfortunately, I seem to have already given away most of the discarded jeans in my household and those that I could find were either full of holes and paint spots or ridiculously skinny and thus had very little fabric to work with.
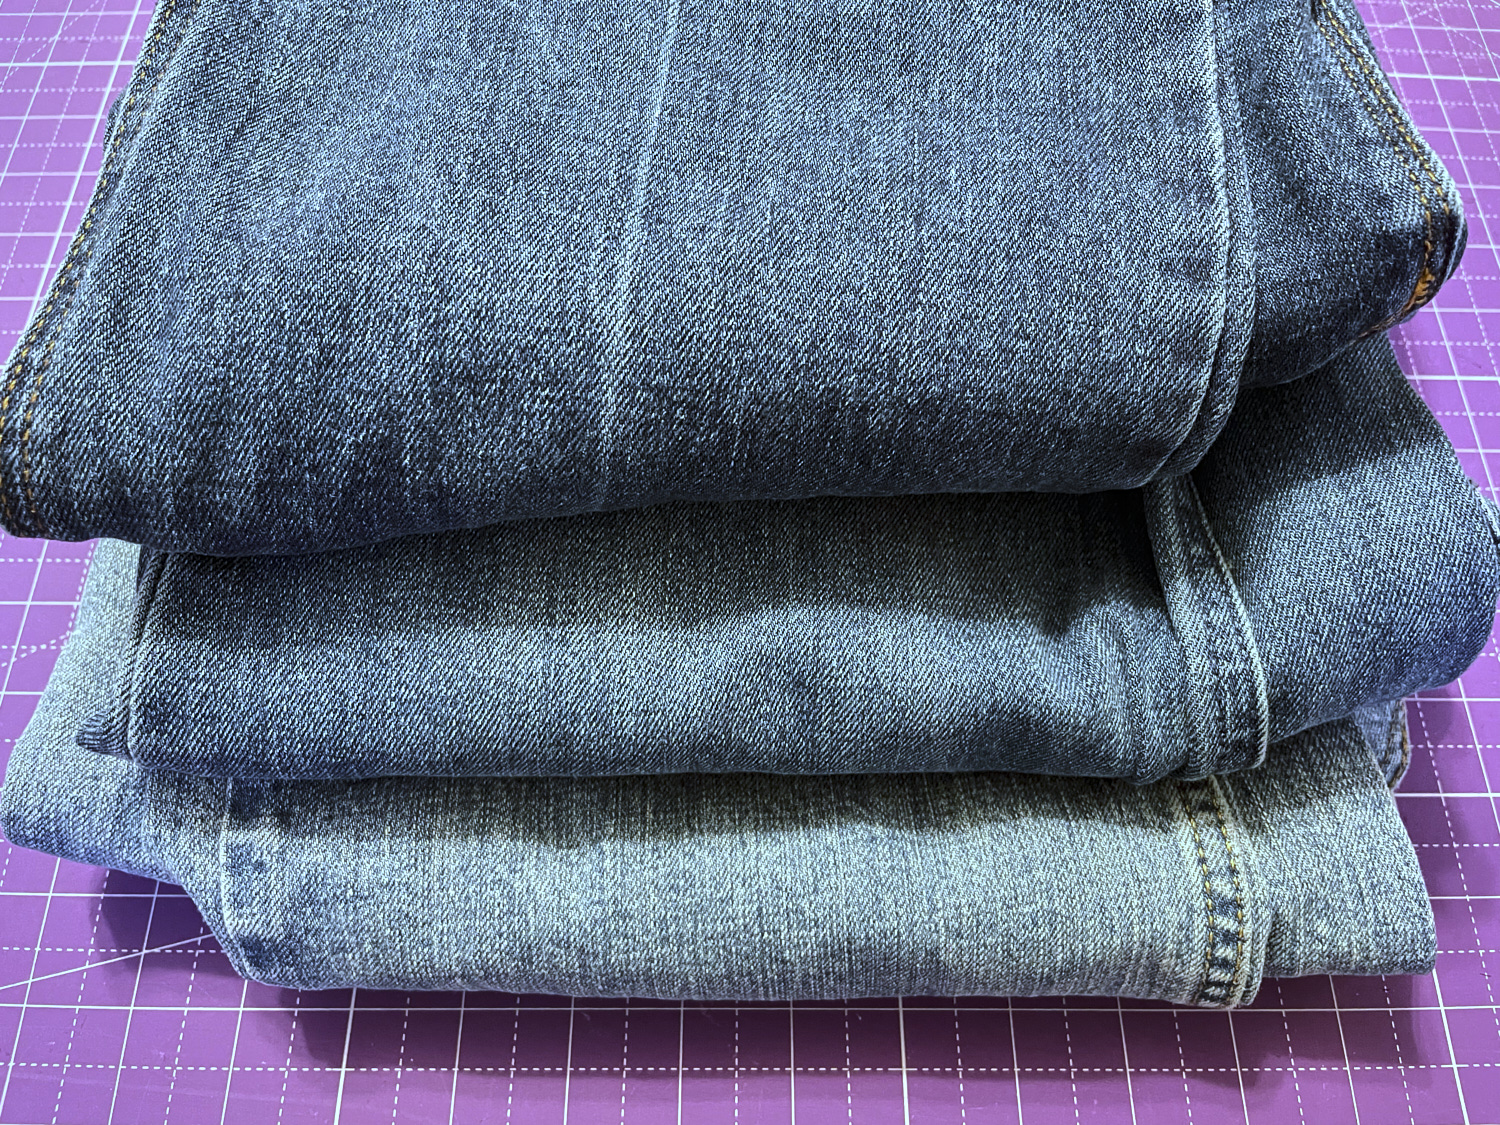
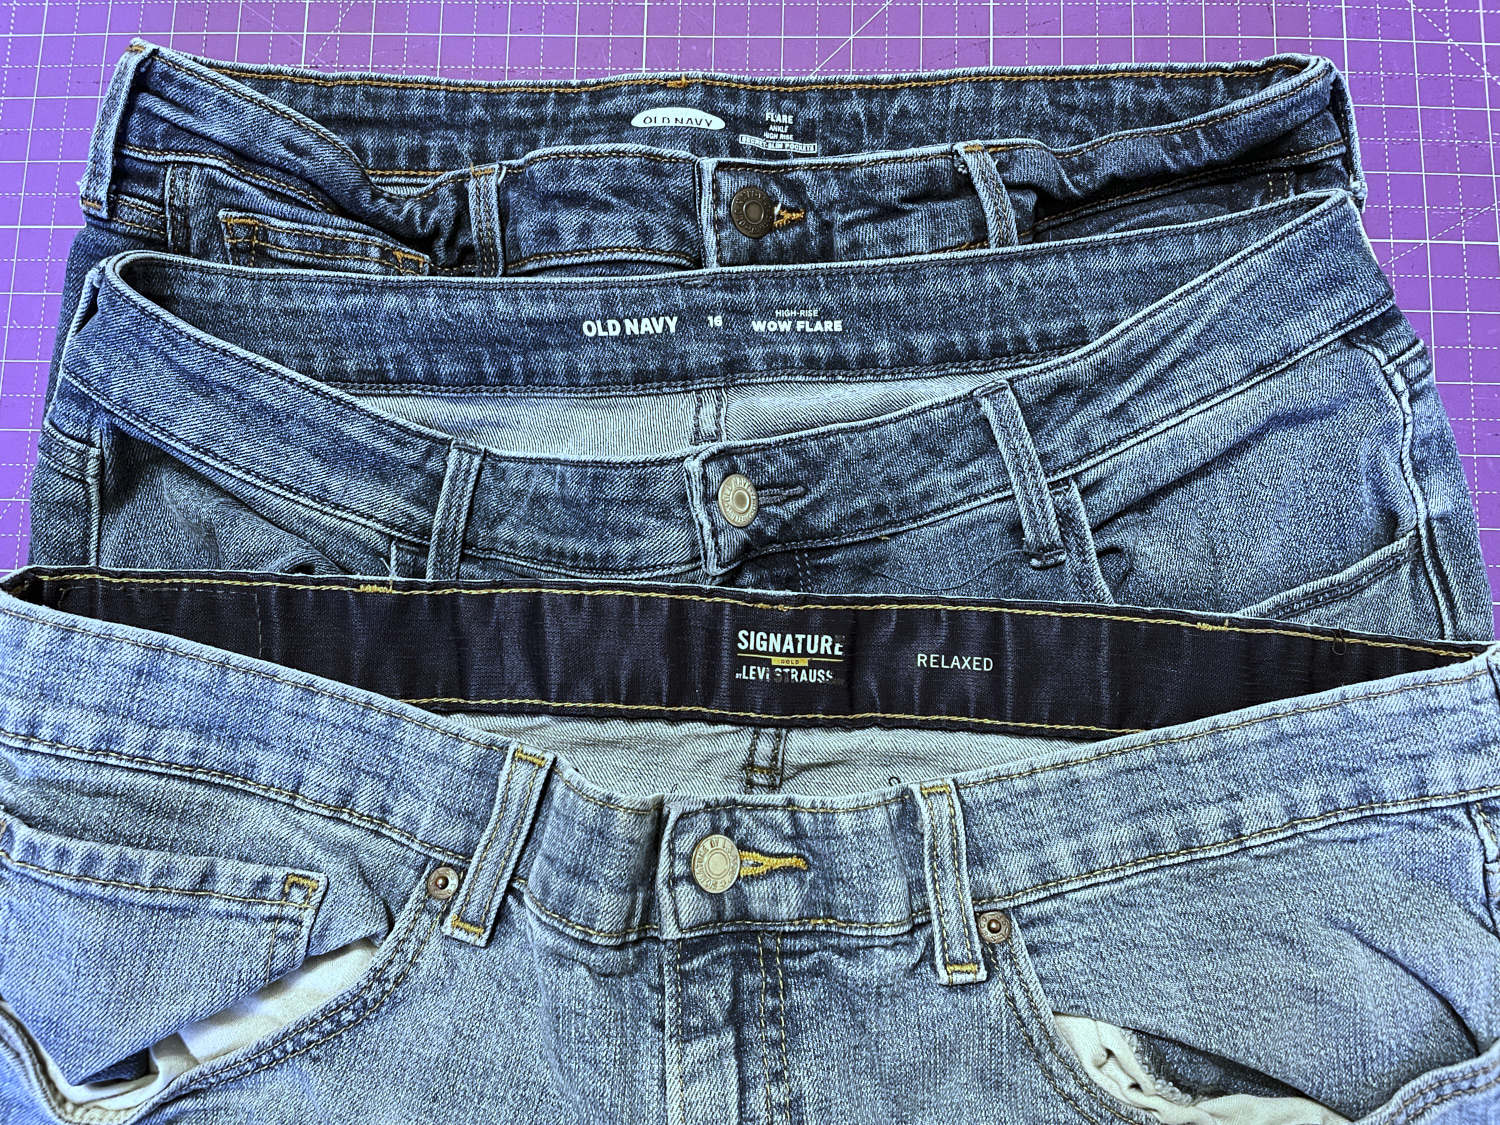
Last fall, when I was visiting my daughters in Boston, we went to a thrift shop and I asked them to help me find three pairs of inexpensive jeans I could cut up. I looked for jeans that were less than $10 a pair, medium-weight, slightly stretchy denim, in large sizes. I collected a pile of jeans that met these criteria and sorted them from lightest to darkest. Then I selected three pairs with distinctly different shades of blue that went well together. They were $6 each and with the $6 coupon I picked up on my way into the store, I paid a total of $12 for all three pairs.
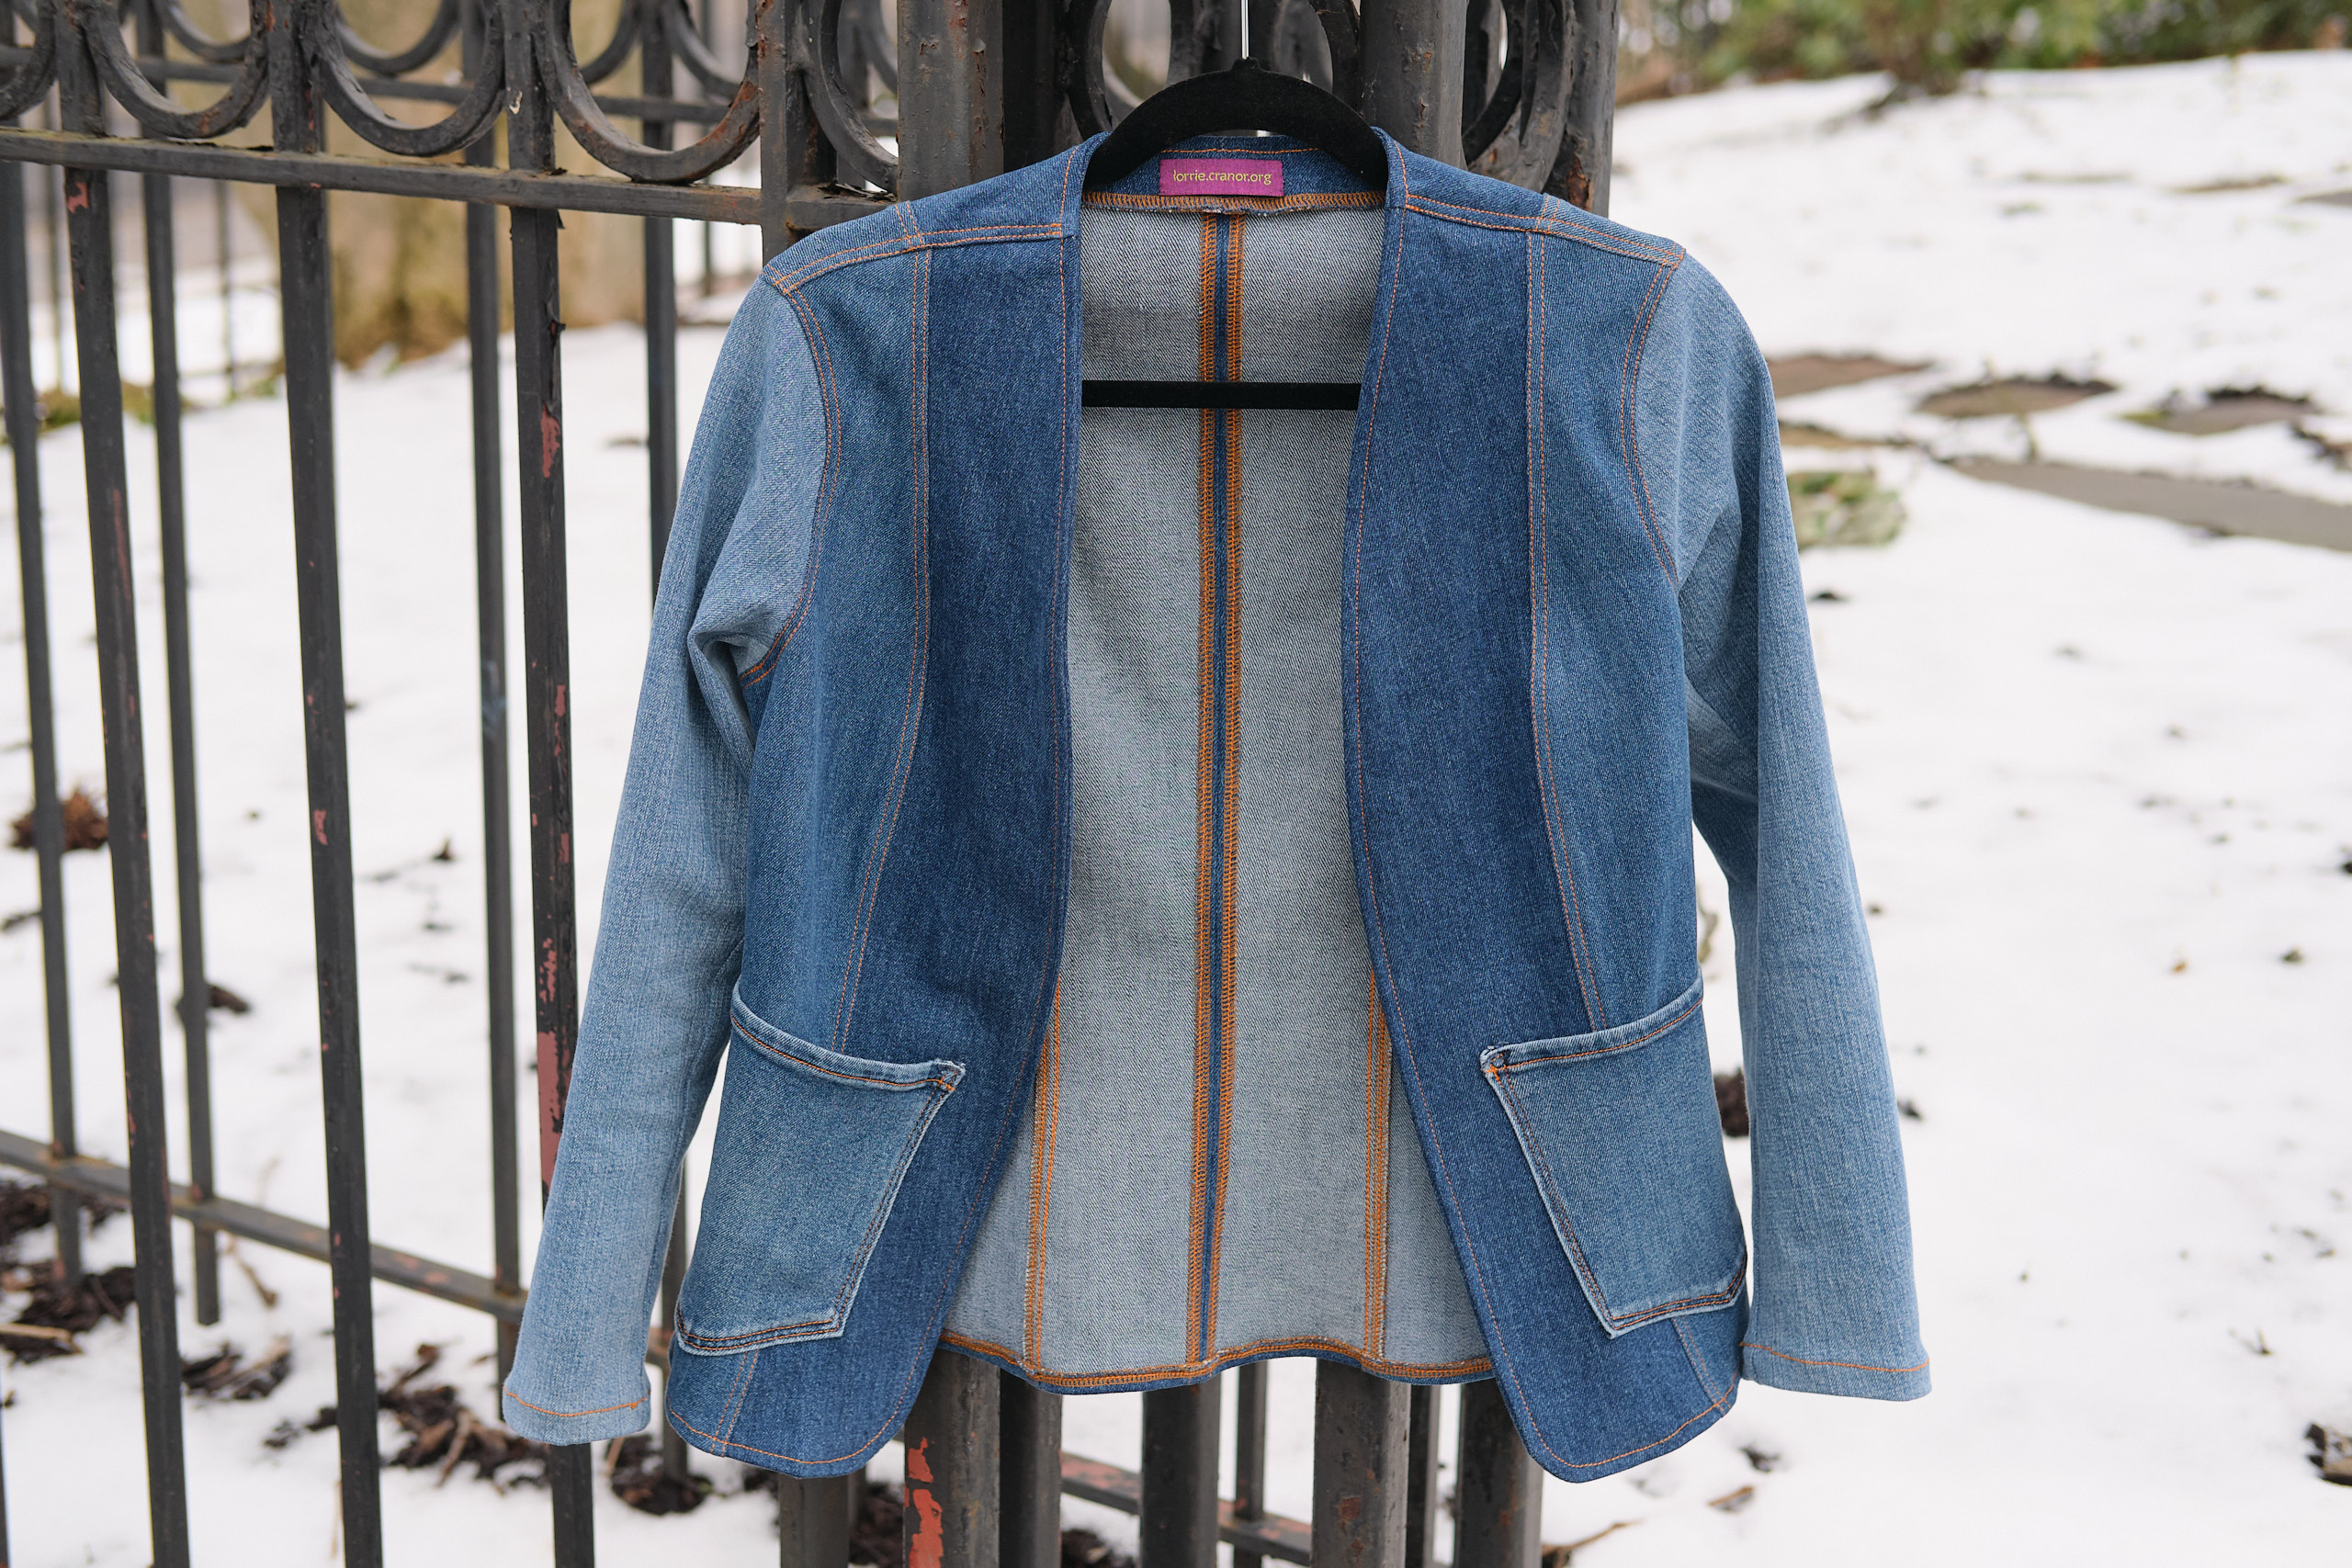
I didn’t get around to working on the jacket project until New Year’s Day. First, I spent a lot of time debating the color placement and where to place each pattern piece. I decided to go with a symmetrical color arrangement and place the pieces from the darkest in the center to the lightest on the sleeves.
I previously spent a lot of time working out adjustments to the size 4 hip length version of the jacket pattern to fit me better. These worked great on my grey and magenta ponte jackets so I used the same pattern file I had already prepared with all of these adjustments: small-bust adjustment (performed by redrawing the inner curve on the side-front pieces to have less of a contour and then shortening the center front pieces to match the length of the new curve), sloped-shoulder adjustment (3/4 inch), round-back adjustments (two 5/8-inch adjustments near top and bottom of arscye), back neckline lowered by about 3/4 inch, bottom hem and sleeves shortened by 2 inches. The only thing I did differently was using the jeans pockets rather than the pattern pocket pieces and using the normal pattern facings rather than the wider facings I used previously. There’s always a risk that a pattern fitted with one type of fabric won’t fit right when cut from a very different type of fabric. Thankfully, my denim version seems to fit pretty much the same way as the ponte.
I carefully cut out all the pieces, making sure to pair pieces from the left and right legs of each pair, cut at approximately the same height on the leg. I accidentally cut one of the front side pieces too short and wasn’t going to be able to cut a piece of a similar color at the full size so I just cut the missing part and spliced them together. I knew most of this seam would be under a pocket and hardly noticeable.
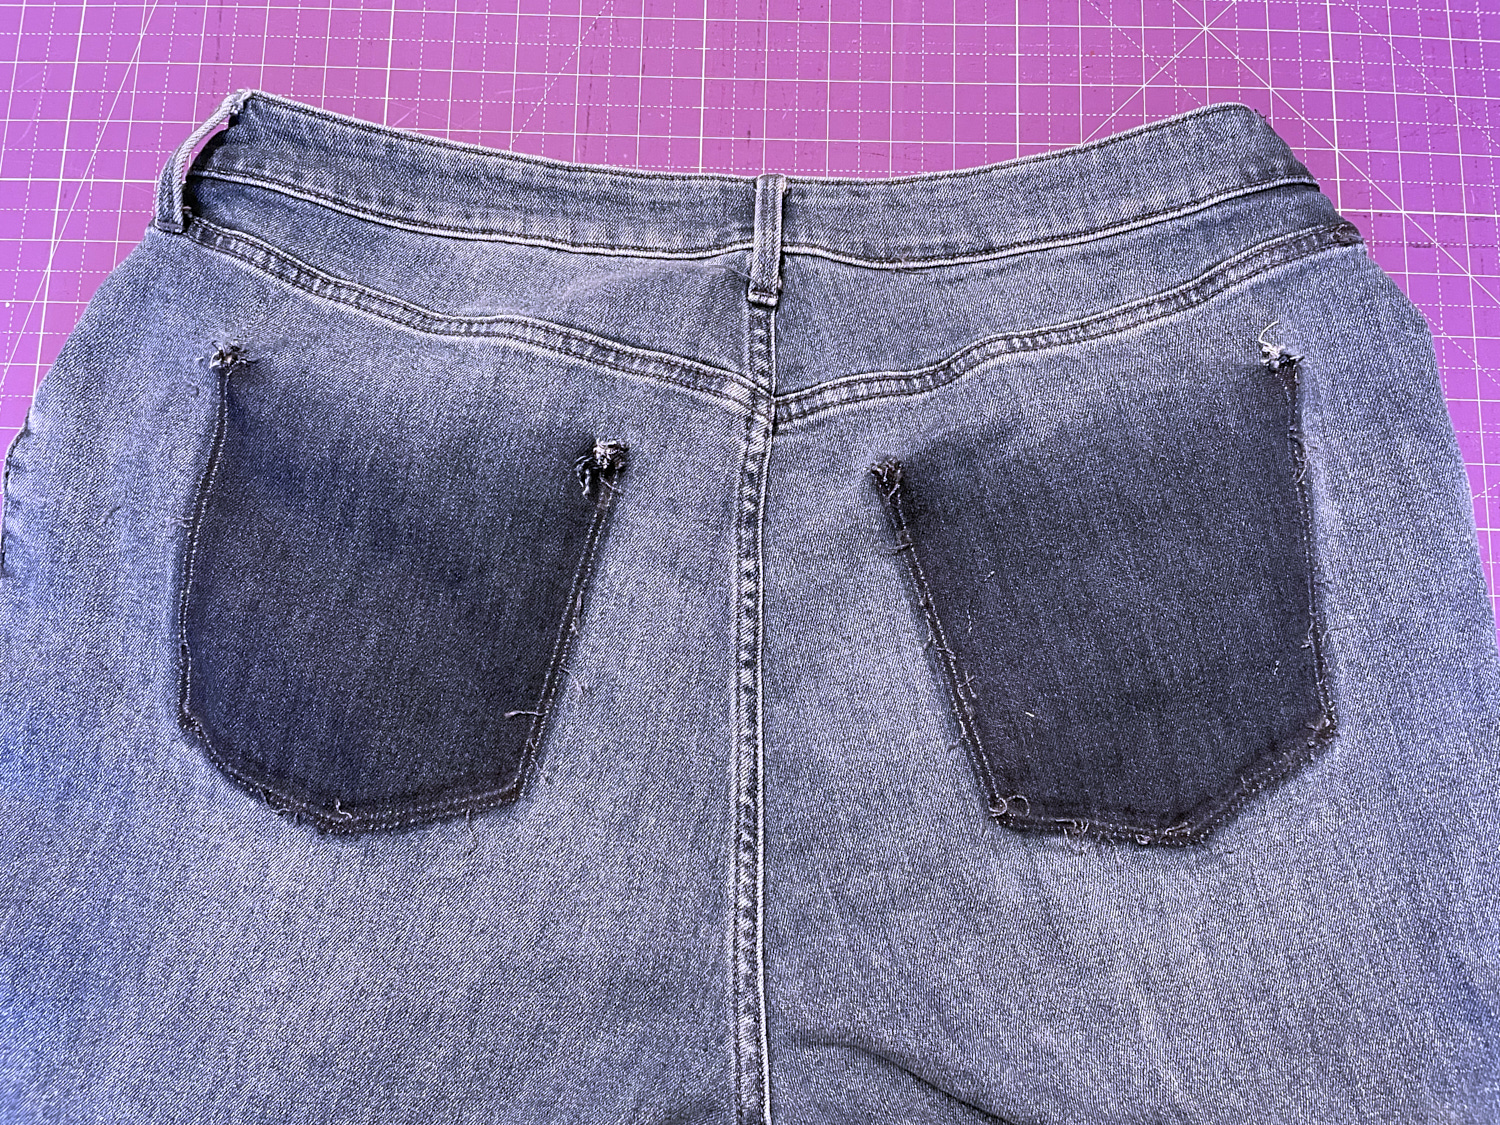
Rather than using the pocket design included in the pattern, I decided to use the rear pockets from one pair of jeans. I carefully unpicked them and removed all the top stitching. Unpicking pockets from jeans is mostly easy as they are attached with a chain stitch that easily unravels – except for the corners, which are thoroughly attached with a bartack and require some effort and a bit of elbow grease to remove. I ended up using most of the legs of all three pairs of jeans. There is still a little bit of leg fabric and seat fabric that might be used for other projects that can use smaller pieces.
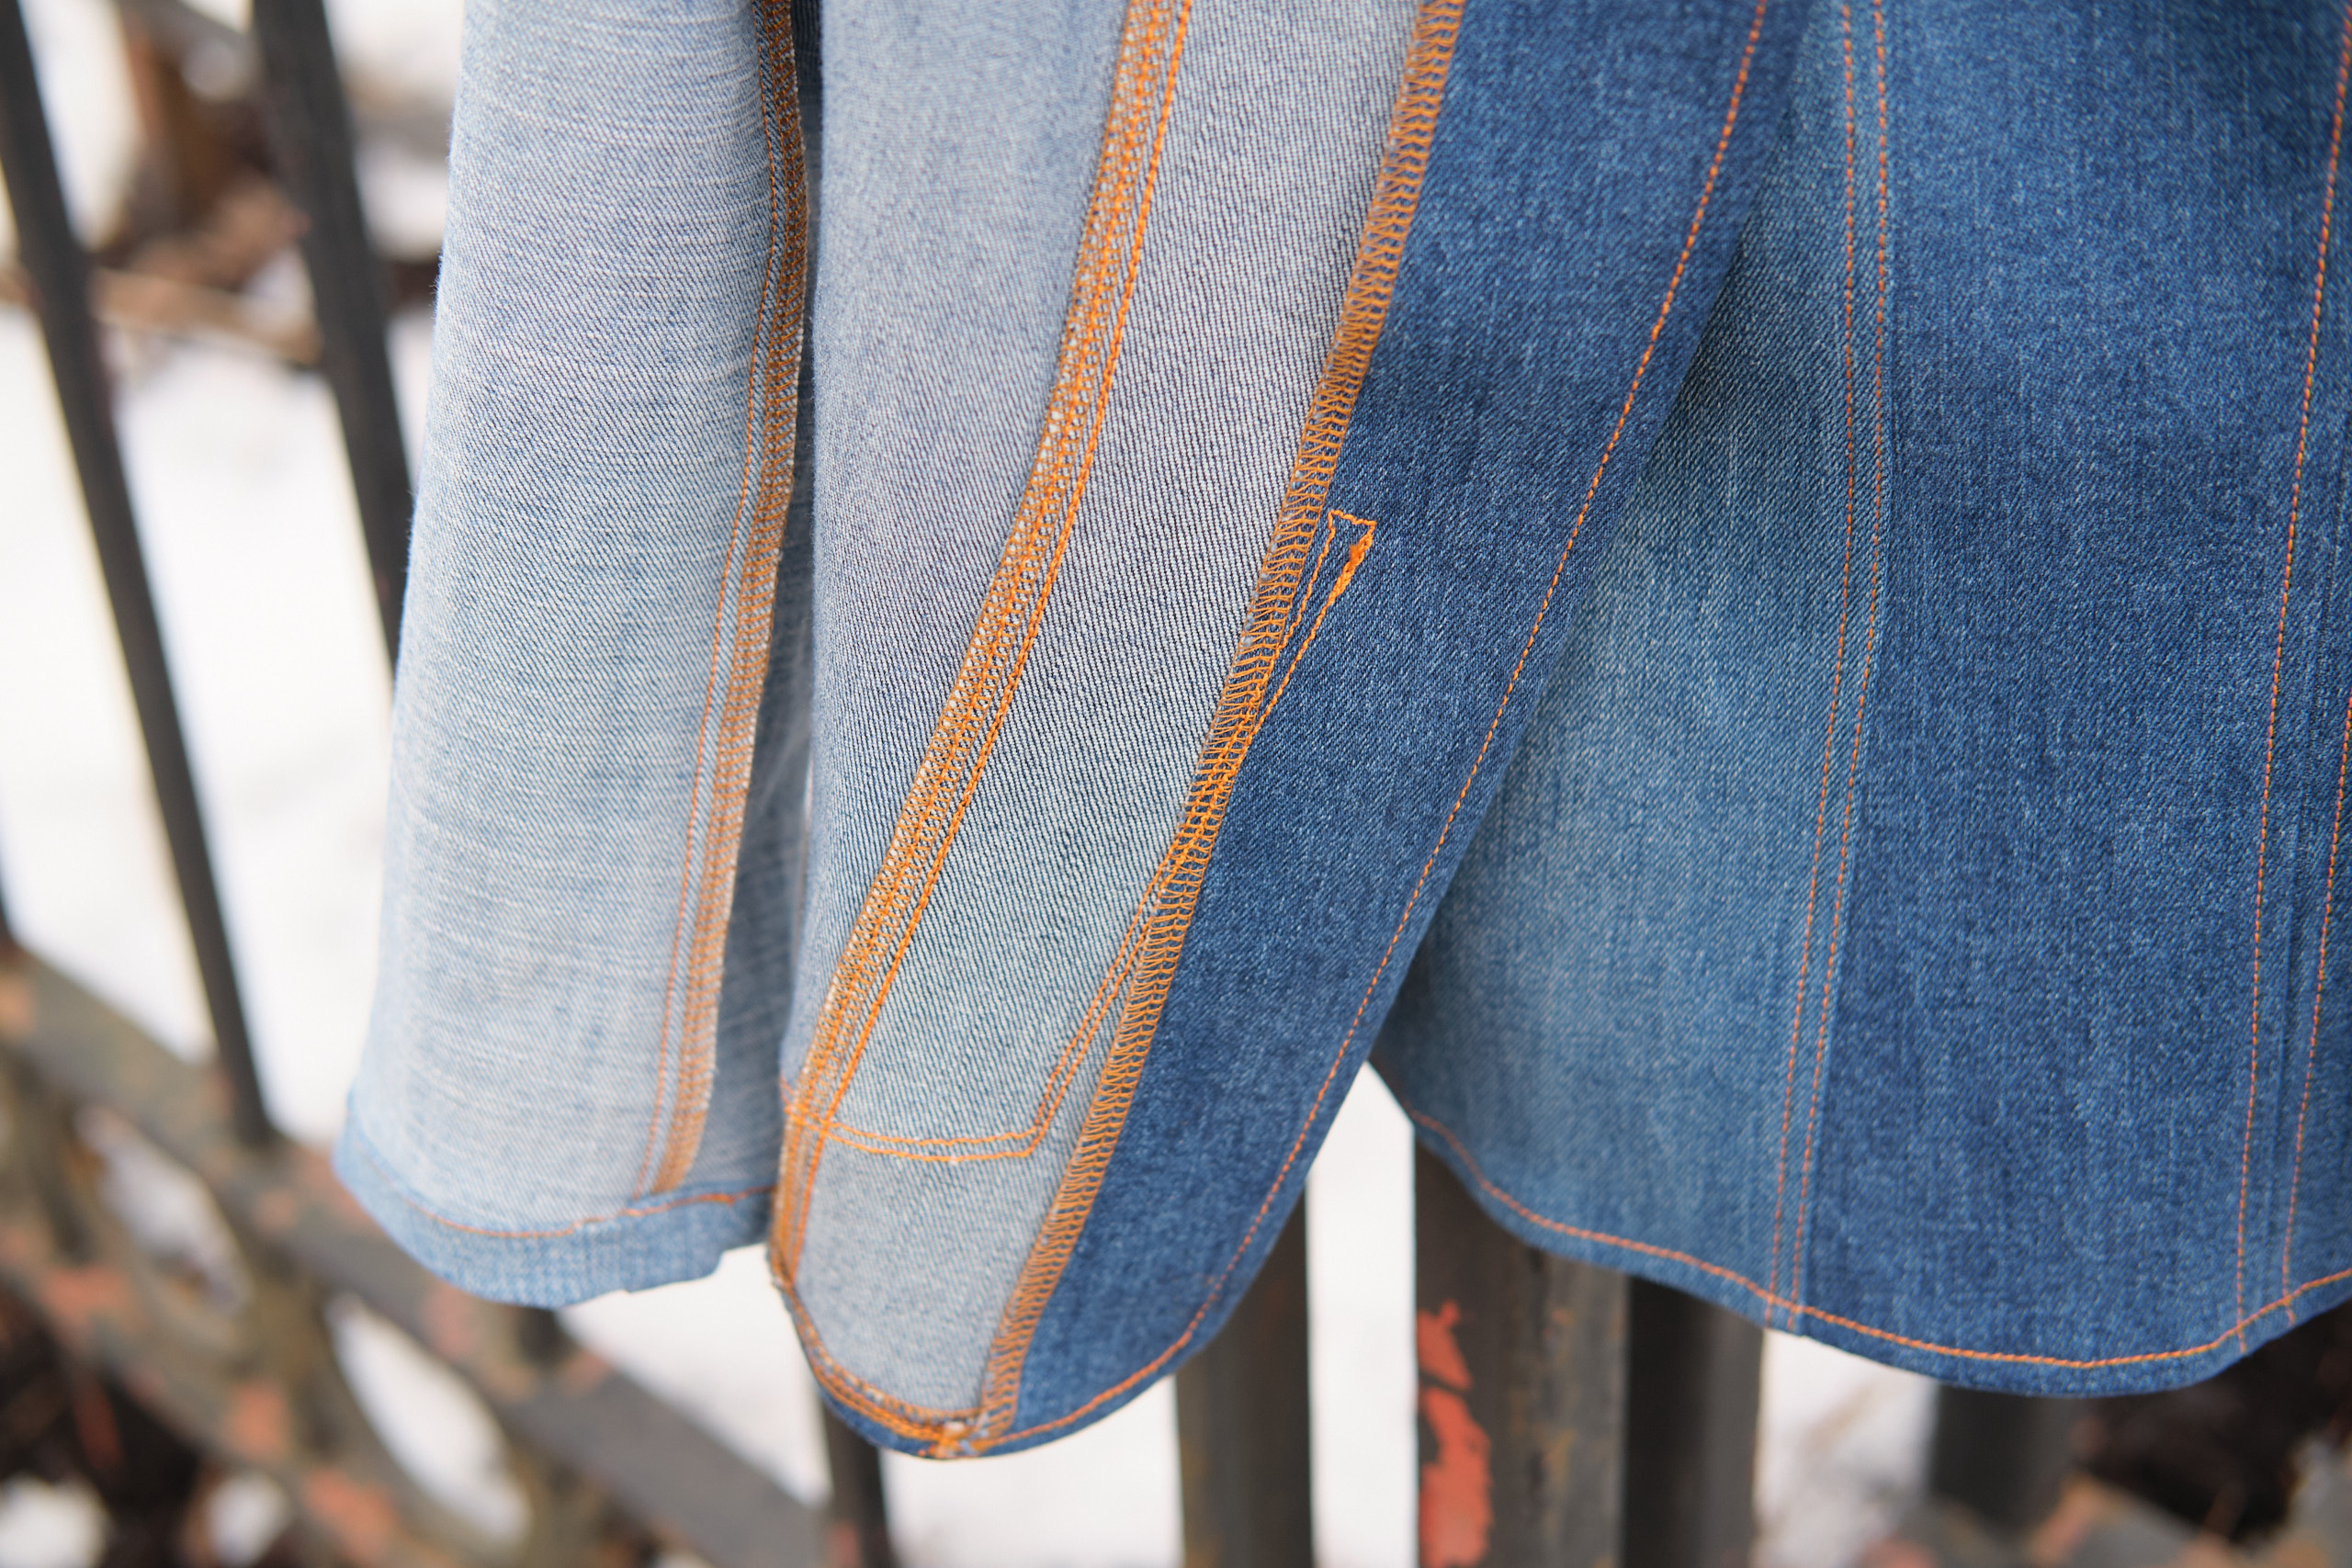
I also spent some time studying the stitching on different brands of jeans and denim jackets to see what color top stitching thread is used and where the top stitching is placed. I also read some blog posts on jeans anatomy. Some jeans match the top stitching to the denim color, others use a light yellow gold, and still others a more orangy gold. I’m sure there are other variations too. I observed that most jeans top stitching is done in two parallel lines, and generally as a chain stitch. Of course, it can’t be done everywhere because once you close both sides of a pant leg or sleeve, it is no longer possible to topstitch. Thus, one side is topstitched while the leg or sleeve is still open and the other side doesn’t get topstitched. I noticed that jackets don’t usually have topstitching on the side seams, but there is no practical reason not to do it so I decided to do it anyway.
I threaded my sewing machine with 30 weight polyester topstitching thread in a golden orange color that I thought would nicely “pop” against the blue denim. After some tests on denim scraps, I decided I would use the topstitching thread for piecing as well so as to avoid lots of thread changes. I set a slightly longer-than-normal stitch length of 3. I did not opt for chain stitching as that would have required lots of resets on my serger. I found I could achieve the parallel topstitching lines by stitching very close to the seam with my edge foot with the needle shifted 3 clicks, and then a quarter inch over using my quarter-inch quilting guide foot. I threaded the serger with four spools of regular polyester overlocking thread in a similar color as the topstitching thread.
The pieces of the jacket were easy to sew together and the topstitching looked awesome. It took a while as I stitched most seams four times: first I joined the fabric with a 3/8-inch seam allowance on my sewing machine, then I cleaned up and overlocked the edges (without trimming fabric, just stray threads) on my serger, then pressed the seam with steam, then I sewed the two parallel lines of topstitching. It was a lot of work, but also somewhat meditative to sew.
The facing pieces were more problematic. I debated whether the fusible interfacing was needed and also whether I should make the facing out of denim or a lighter fabric. I eventually opted for denim with the fusible interfacing, as recommended in the pattern instructions. I cut the facings as the pattern specified and did not make them wider as I had with the last two jackets. I had previously had trouble using non-stretch interfacing with stretchy ponte knit fabric. This time I didn’t think that would be a problem since I was using woven fabric. However, the denim I used has a bit of stretch. I don’t fully understand how it happened, but after fusing the interfacing onto the facings and sewing the three facing pieces together, the facings ended up slightly longer than the jacket front pieces they were supposed to attach to. I decided to sew them on anyway and figured I could trim the bottoms. But I noticed as I was sewing with the interfacing side on the bottom, the jacket was stretching to match the size of the facings. But I could see if I was not careful it would stretch too much. With some careful flipping and a bit of unpicking I was eventually able to get the jack front and facings to match each other. This was a complete trial and error approach and not the ideal way to do it. There are some very thick layers where the interfaced pieces join. I’m still not sure what approach would have been better, but probably not what I did. Nonetheless, it all came together, I was able to iron it all flat, and it looks fine. I top stitched across the shoulder seam, which helped hold the facing in place. The pockets also ended up holding the facing down and so far I haven’t had the problem I had with the ponte jackets where the facing doesn’t lie flat and requires gluing.
I followed the pattern steps a bit out of order and sewed the whole jacket together before I started working on the sleeves. The order really doesn’t matter and I just wanted to be able to try it on without the sleeves and see how it was coming together. The sleeves went together easily. I topstitched the outer sleeve edge. I was also able to easily set the sleeve heads into the armscye without any need for ease stitches. I sewed a 3/8-inch seam on my sewing machine and then overlocked the edges of the armscye. I then topstitched all the way around the armscye. I hemmed the sleeves by folding under 1/4 inch and then again at 3/4 inch and top stitched.
The final step was adding the pockets. First I topstitched the top edge of the pocket where they had been previously topstitched (but I had removed all the thread). I tried on the jacket and pinned the pockets where I wanted them. Then I took off the jacket and measured carefully and repositioned slightly so they would be symmetrical. I followed the dark line from where the previous top stitching had been and top stitched a pair of parallel lines around the pocket edges. Then I pressed everything again and I was done!
The topstitching thread is heavy, and a bobbin doesn’t hold a lot of it. I had to reload my bobbin twice. I also used a lot of steam when pressing my seams. I lost track of how many times I had to refill my iron. I managed to get through the whole project without breaking a needle, which was good because I was using my last topstitching needle.
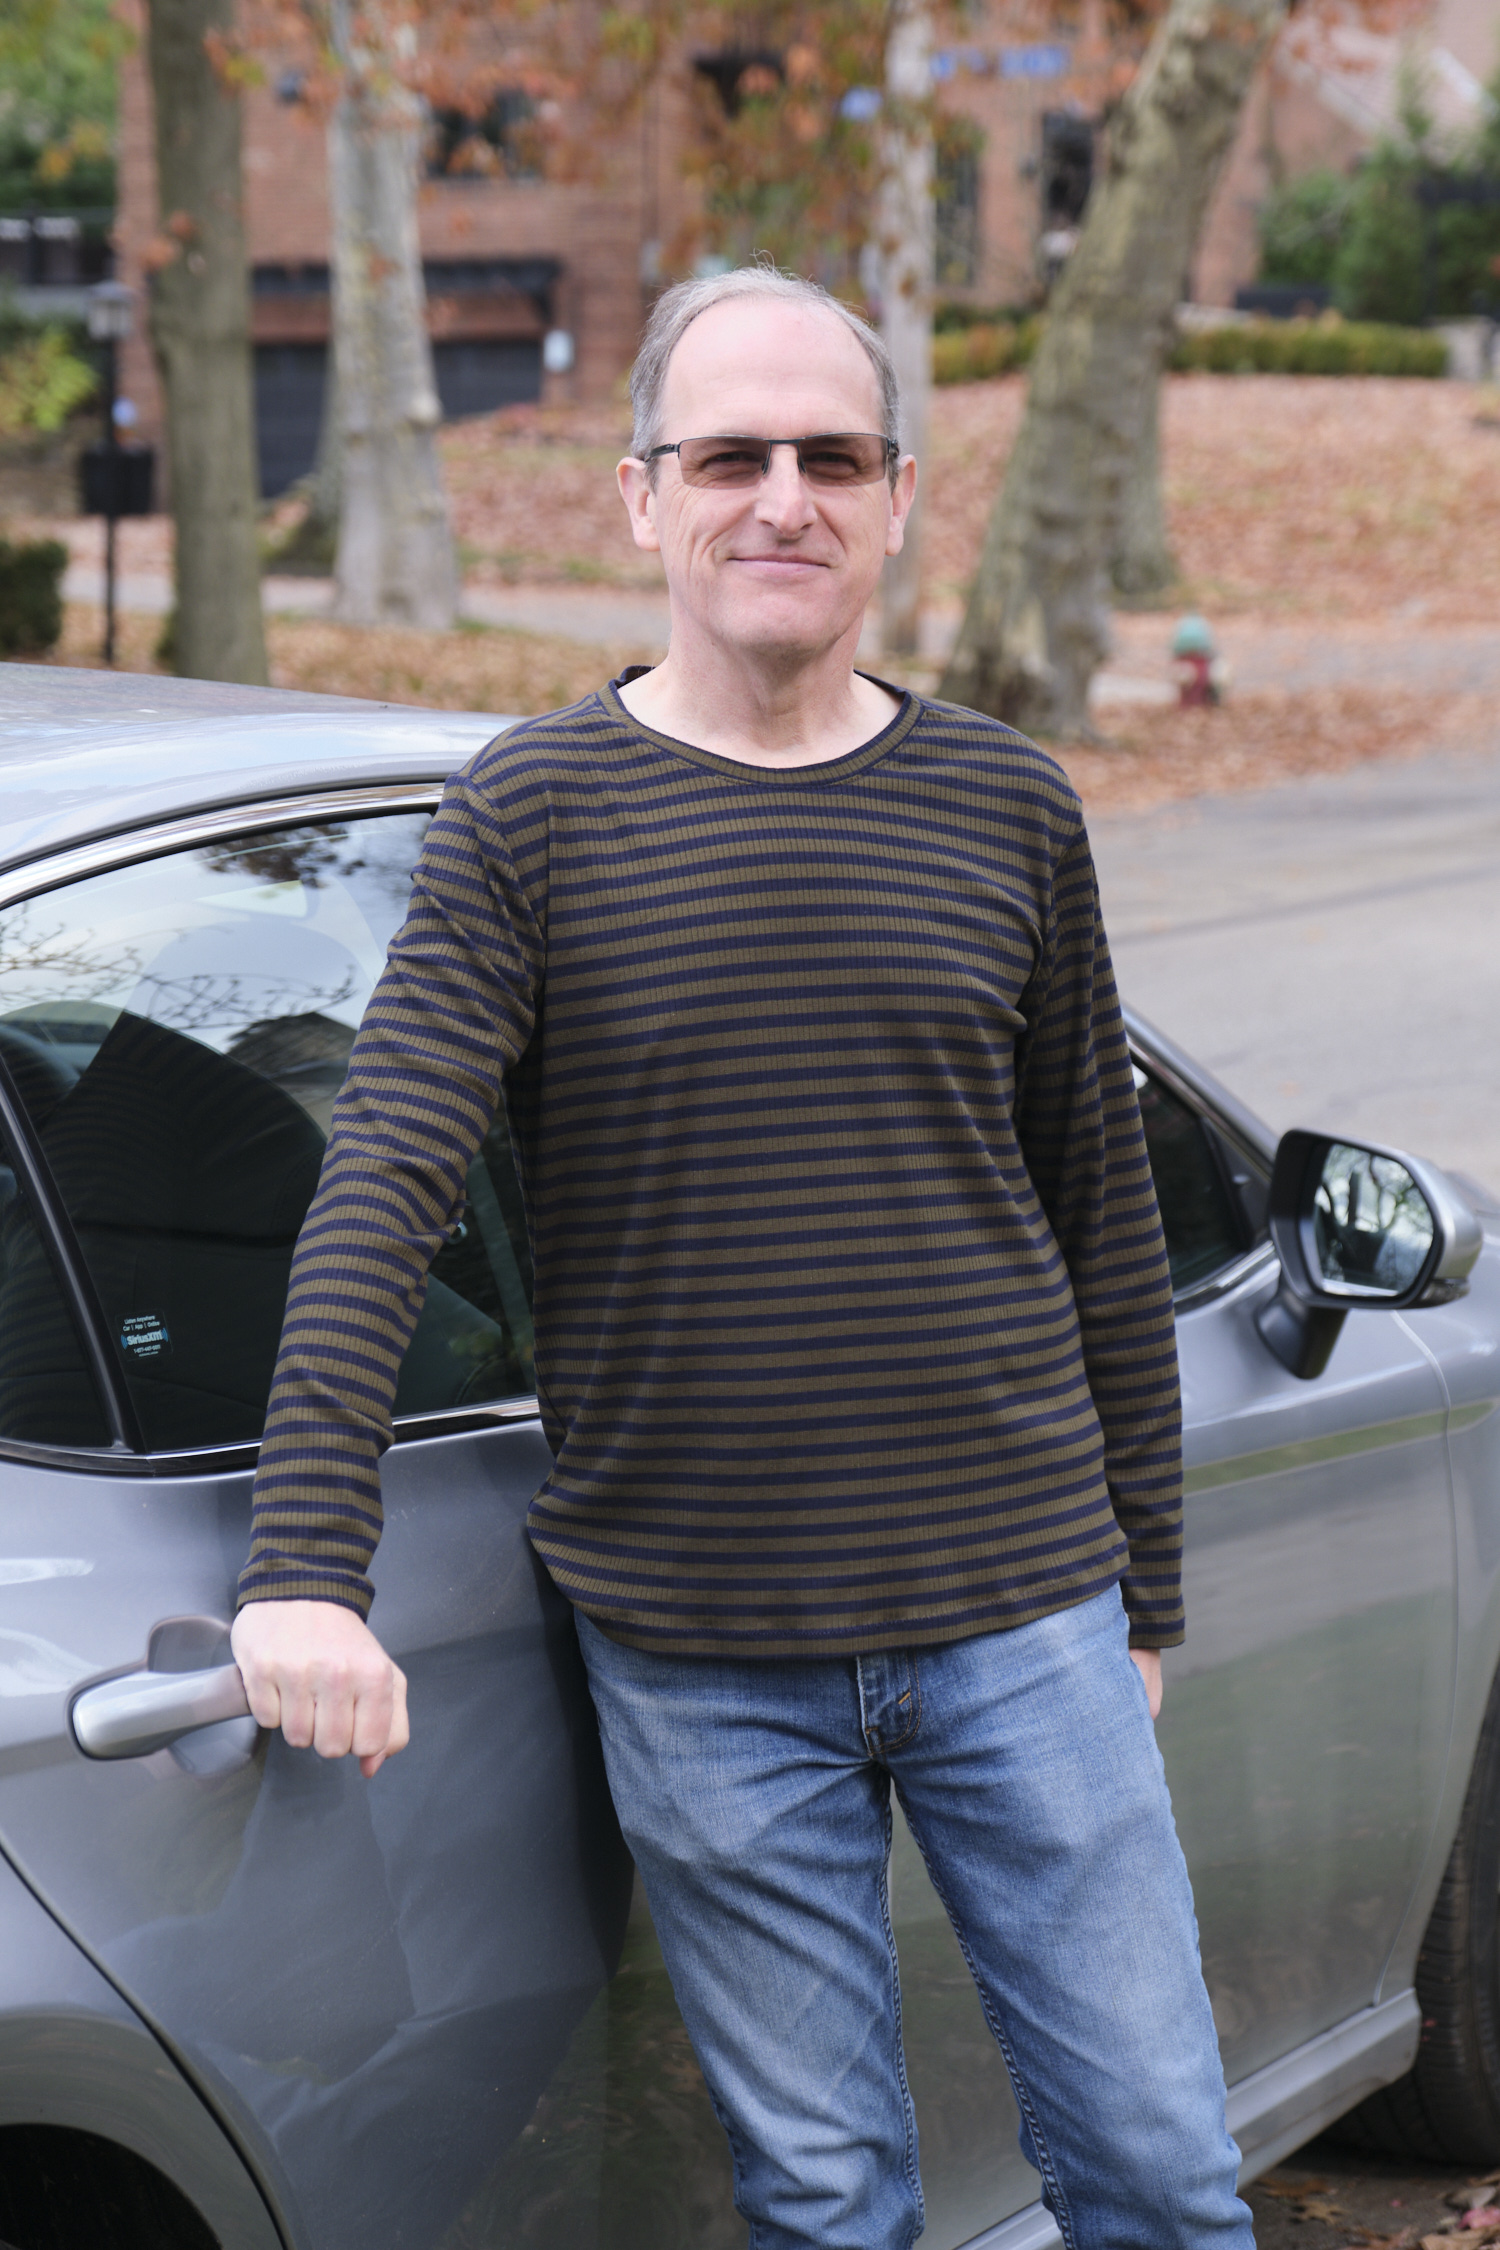
I’m really happy with how this came out and I know I will wear this jacket a lot! I’m modeling it here with my Boo & Lu Blizzard dress, but it also looks great with pants, and even jeans.
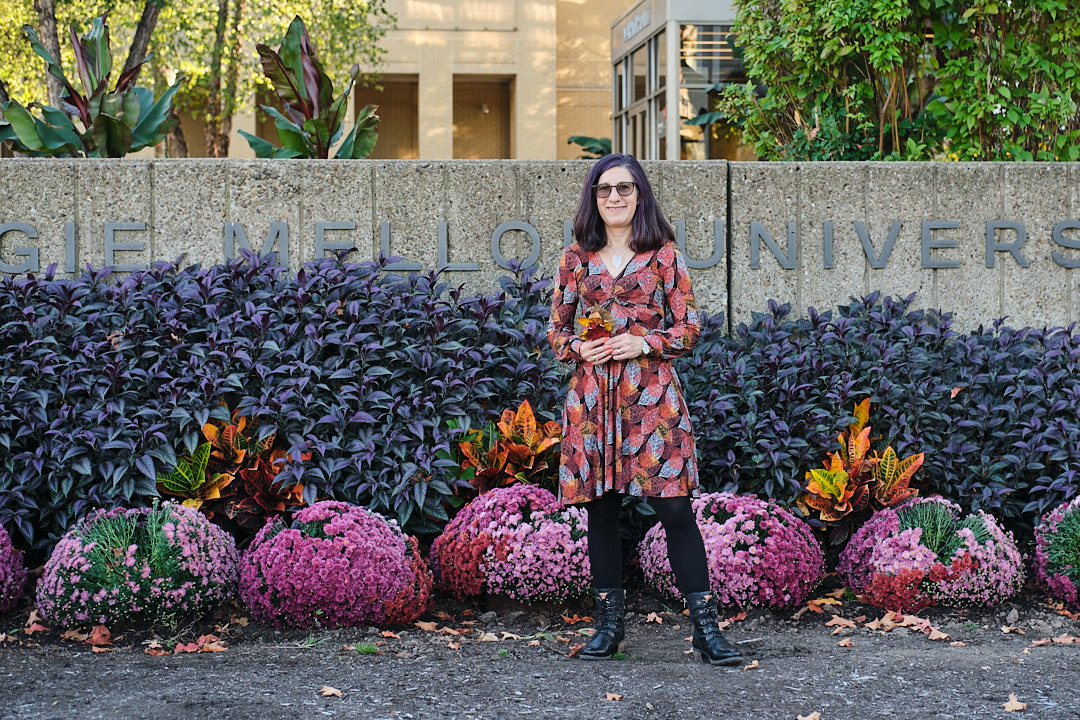
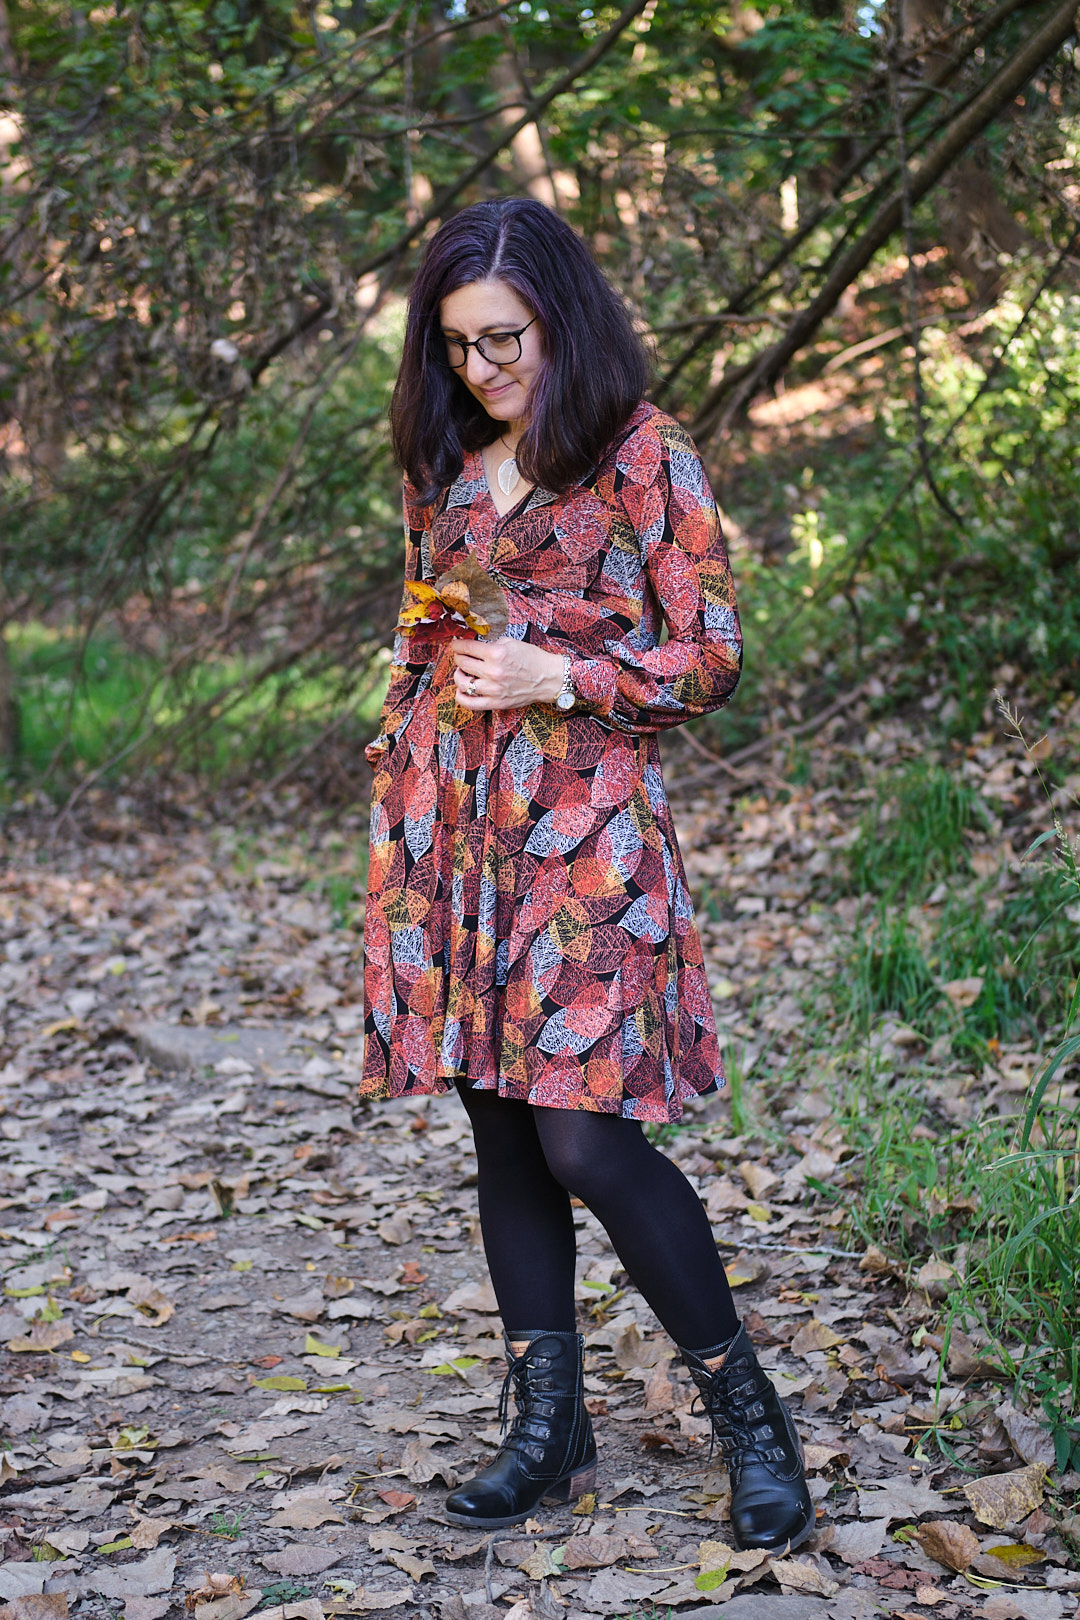
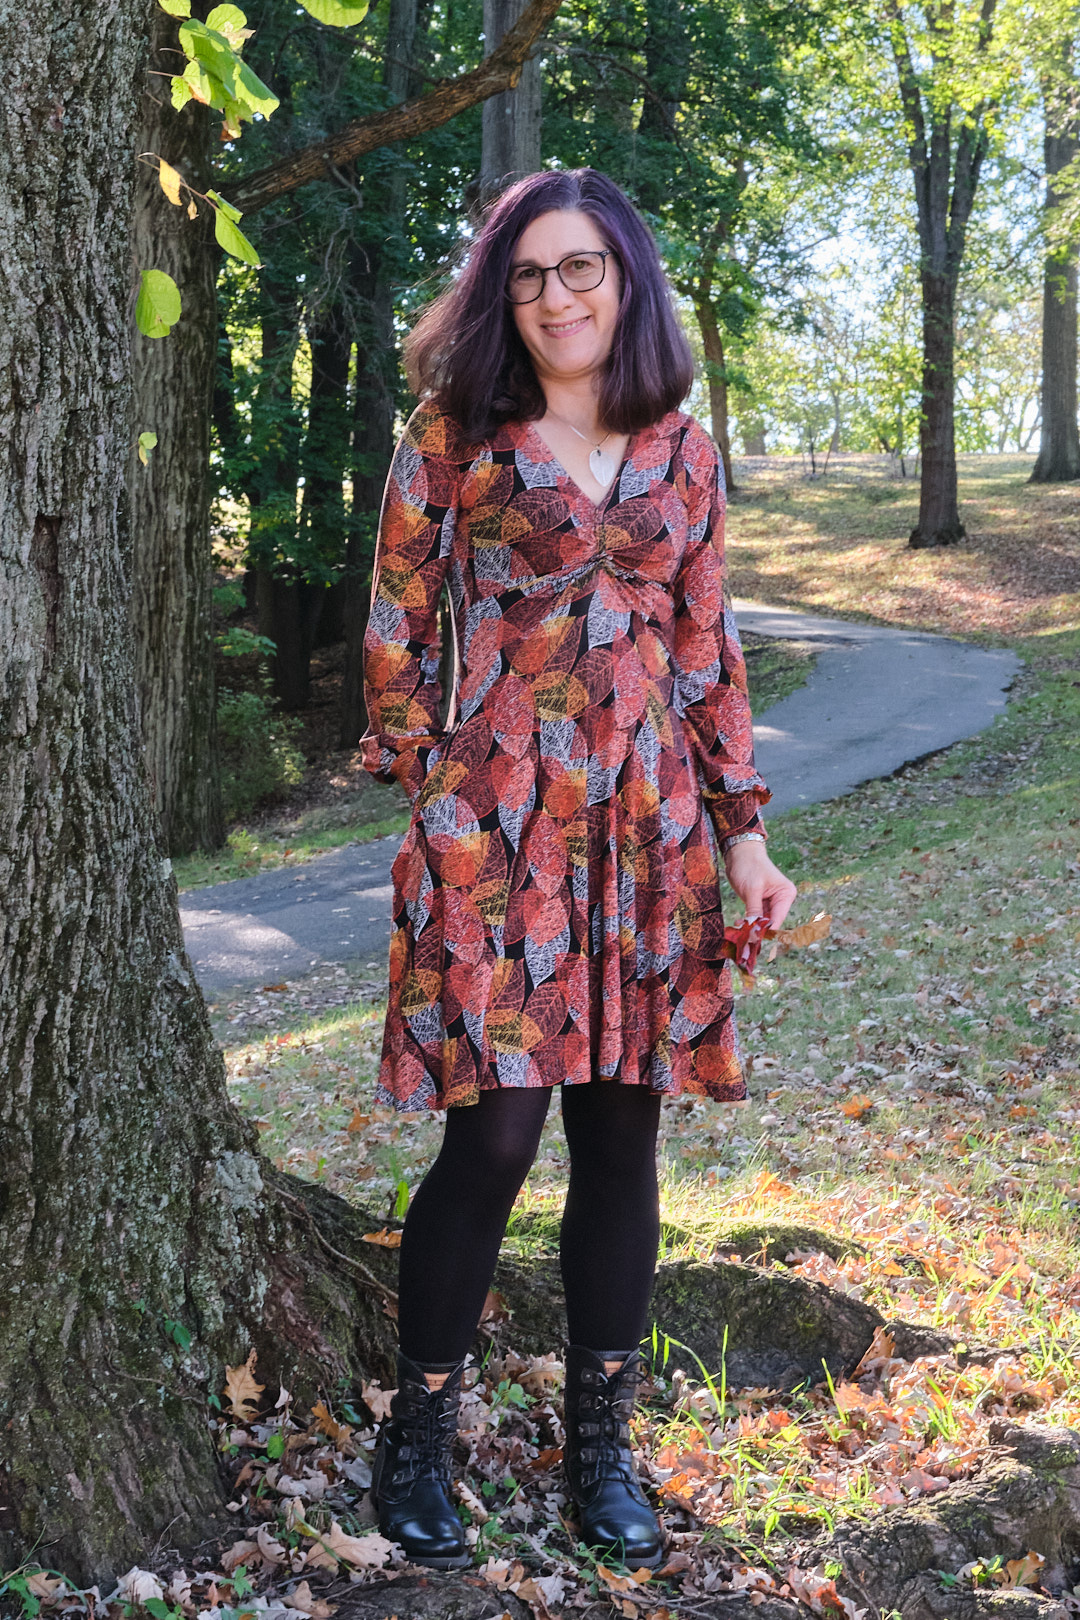
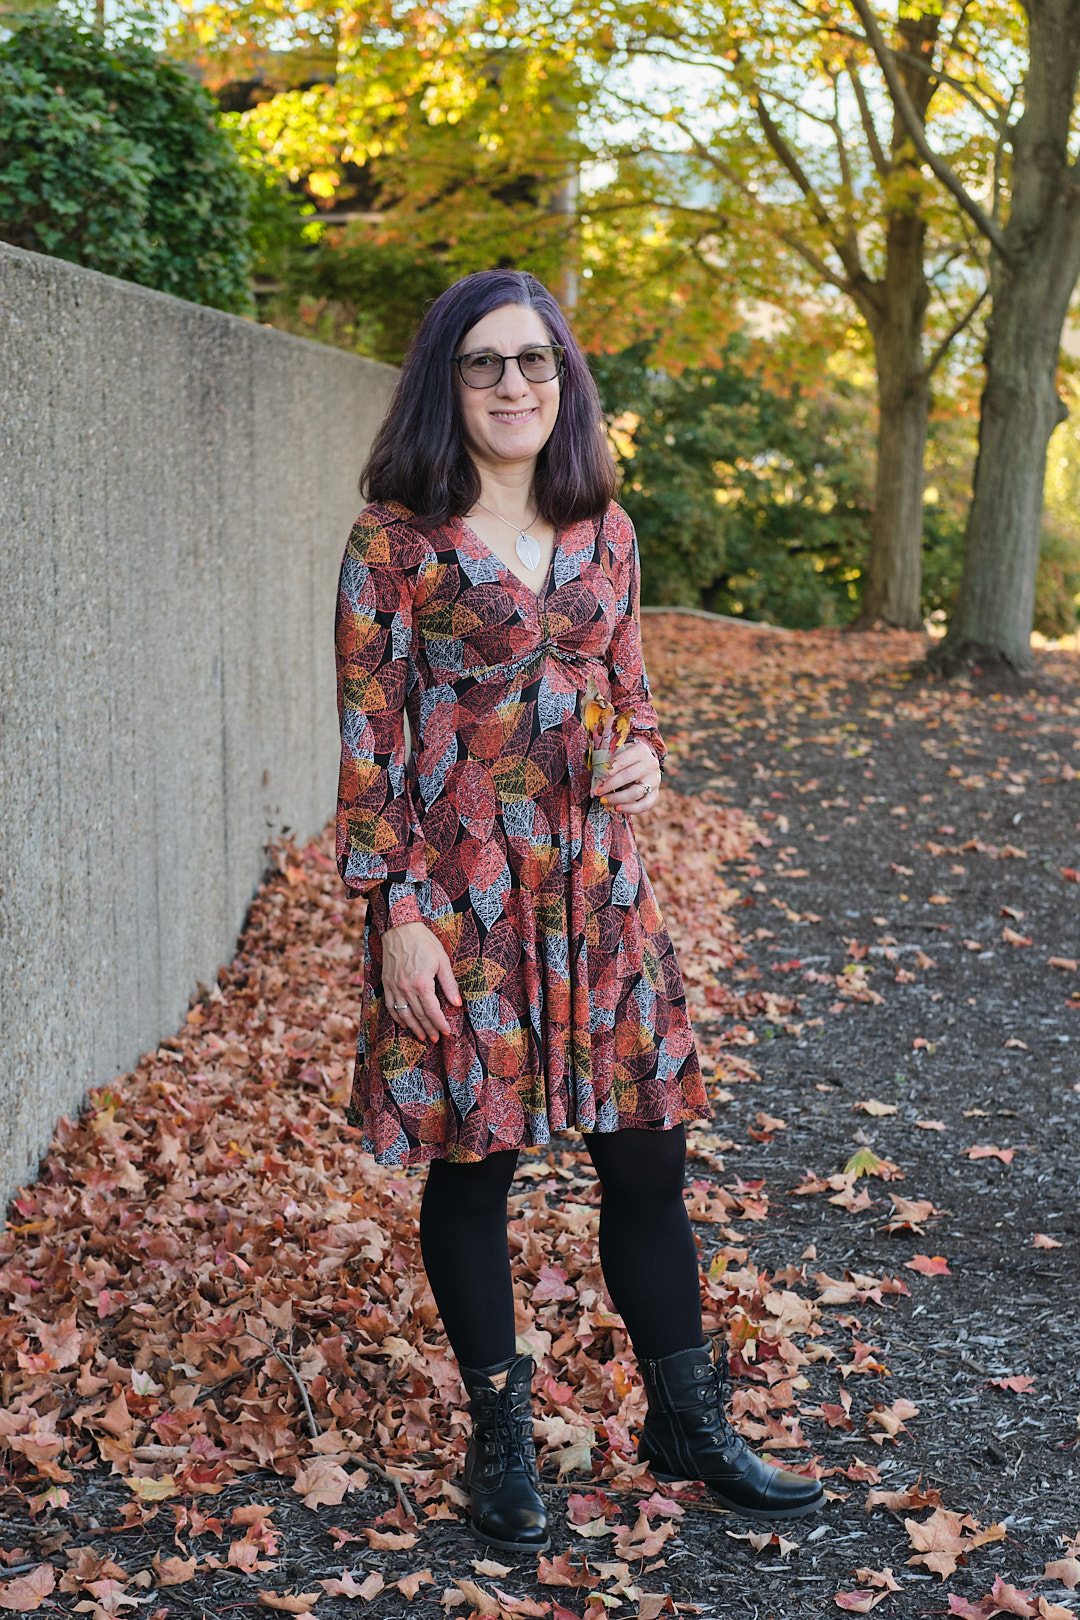
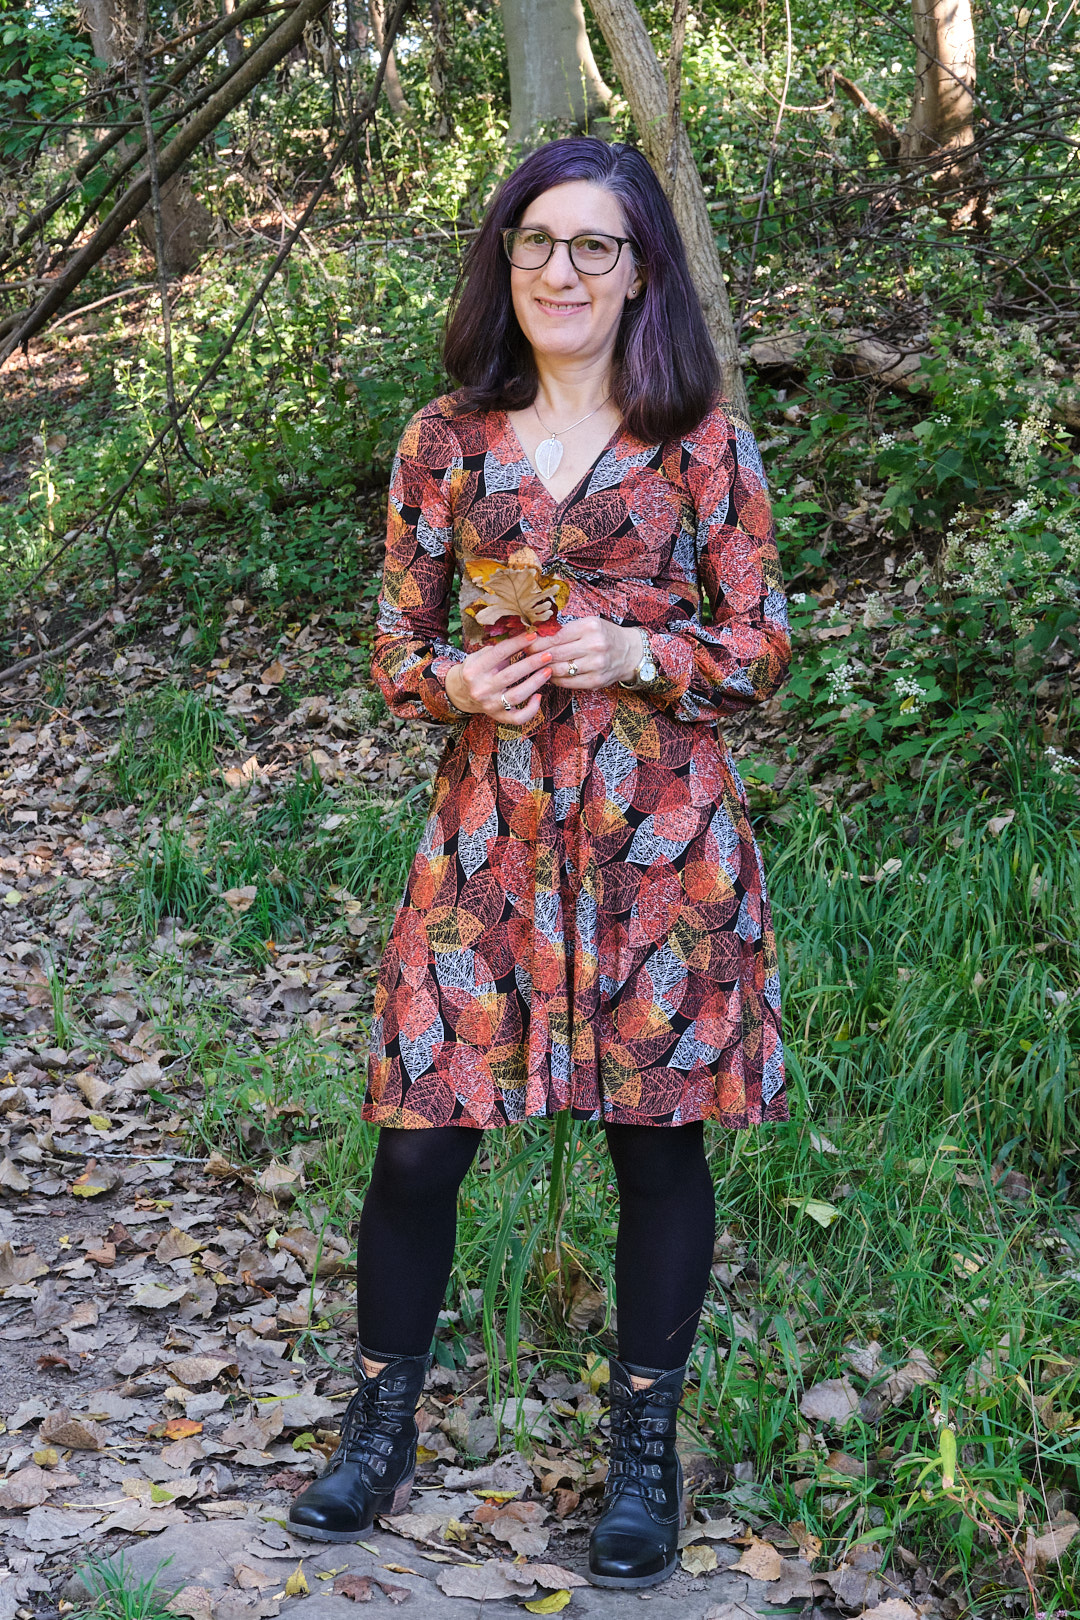
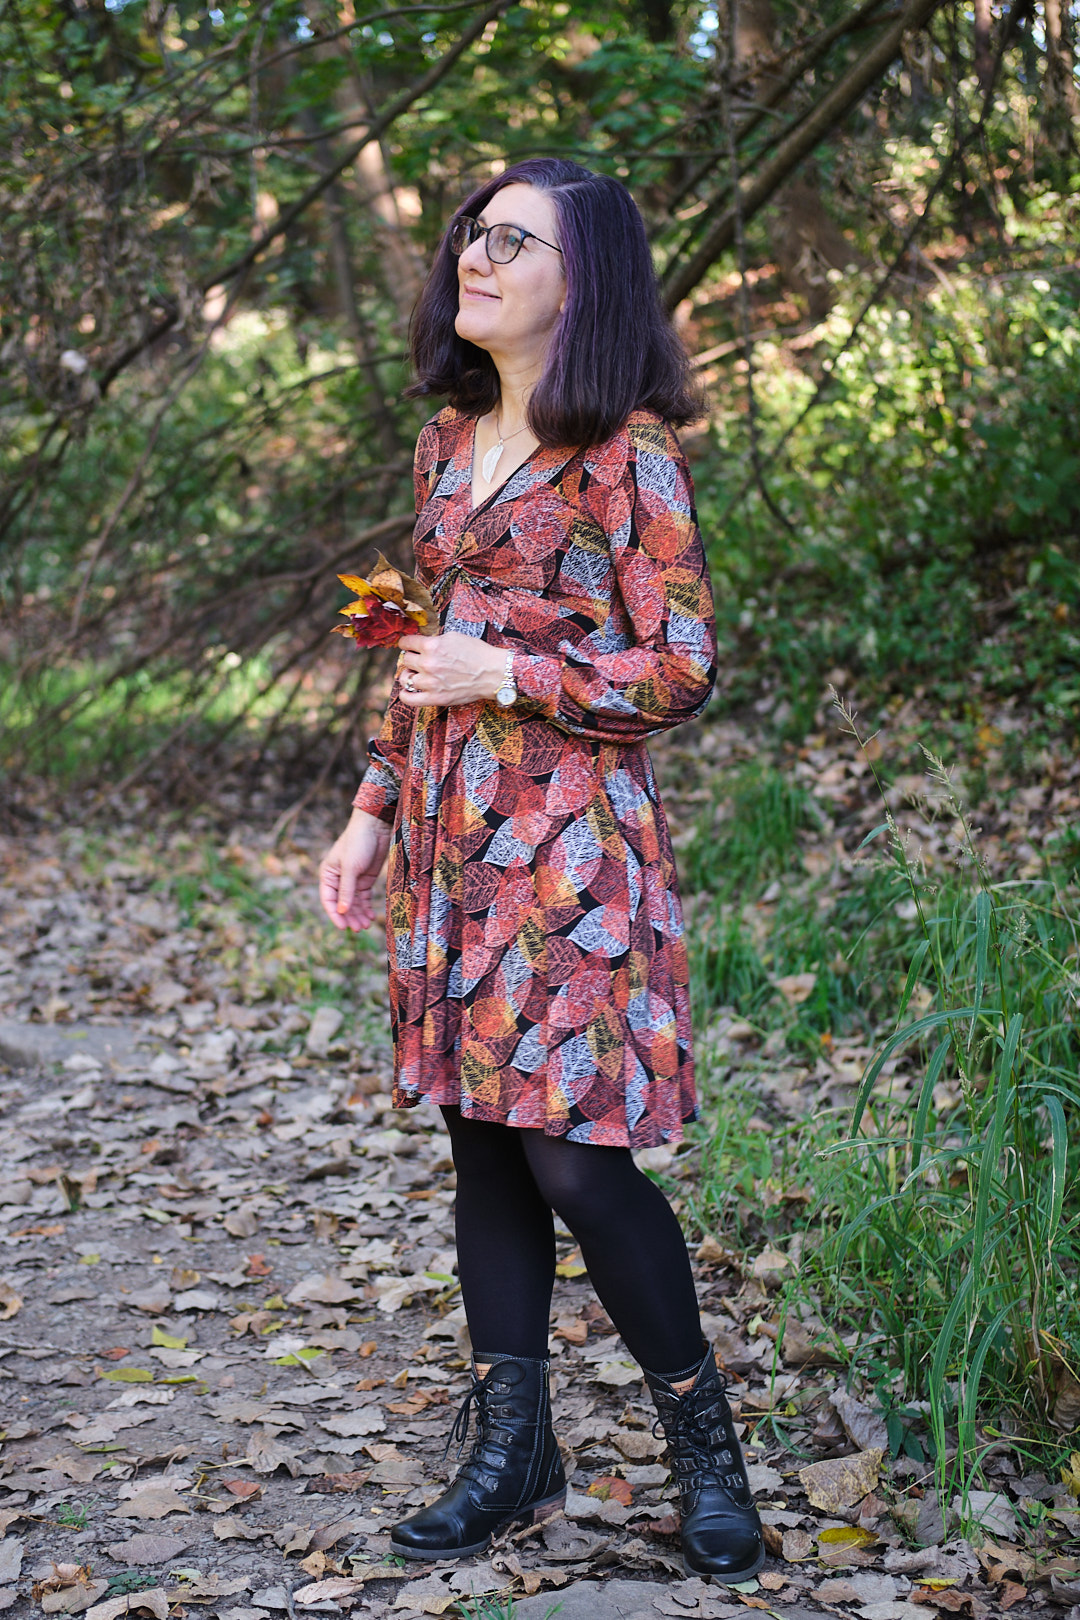
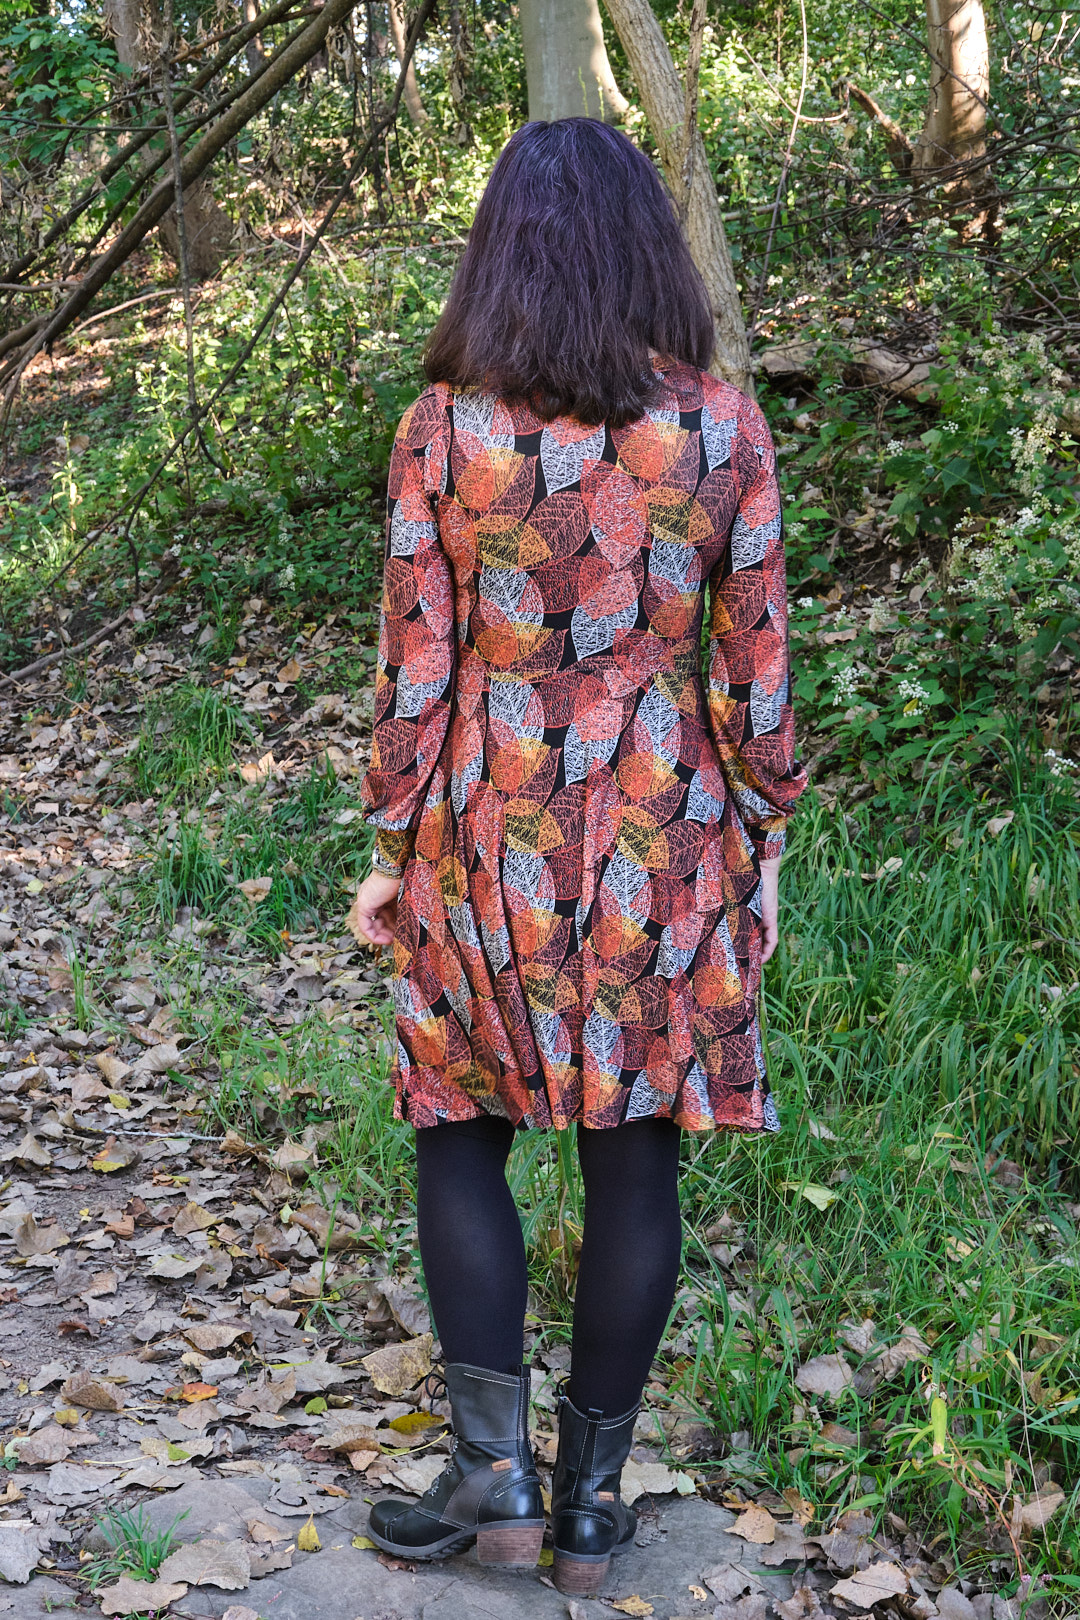
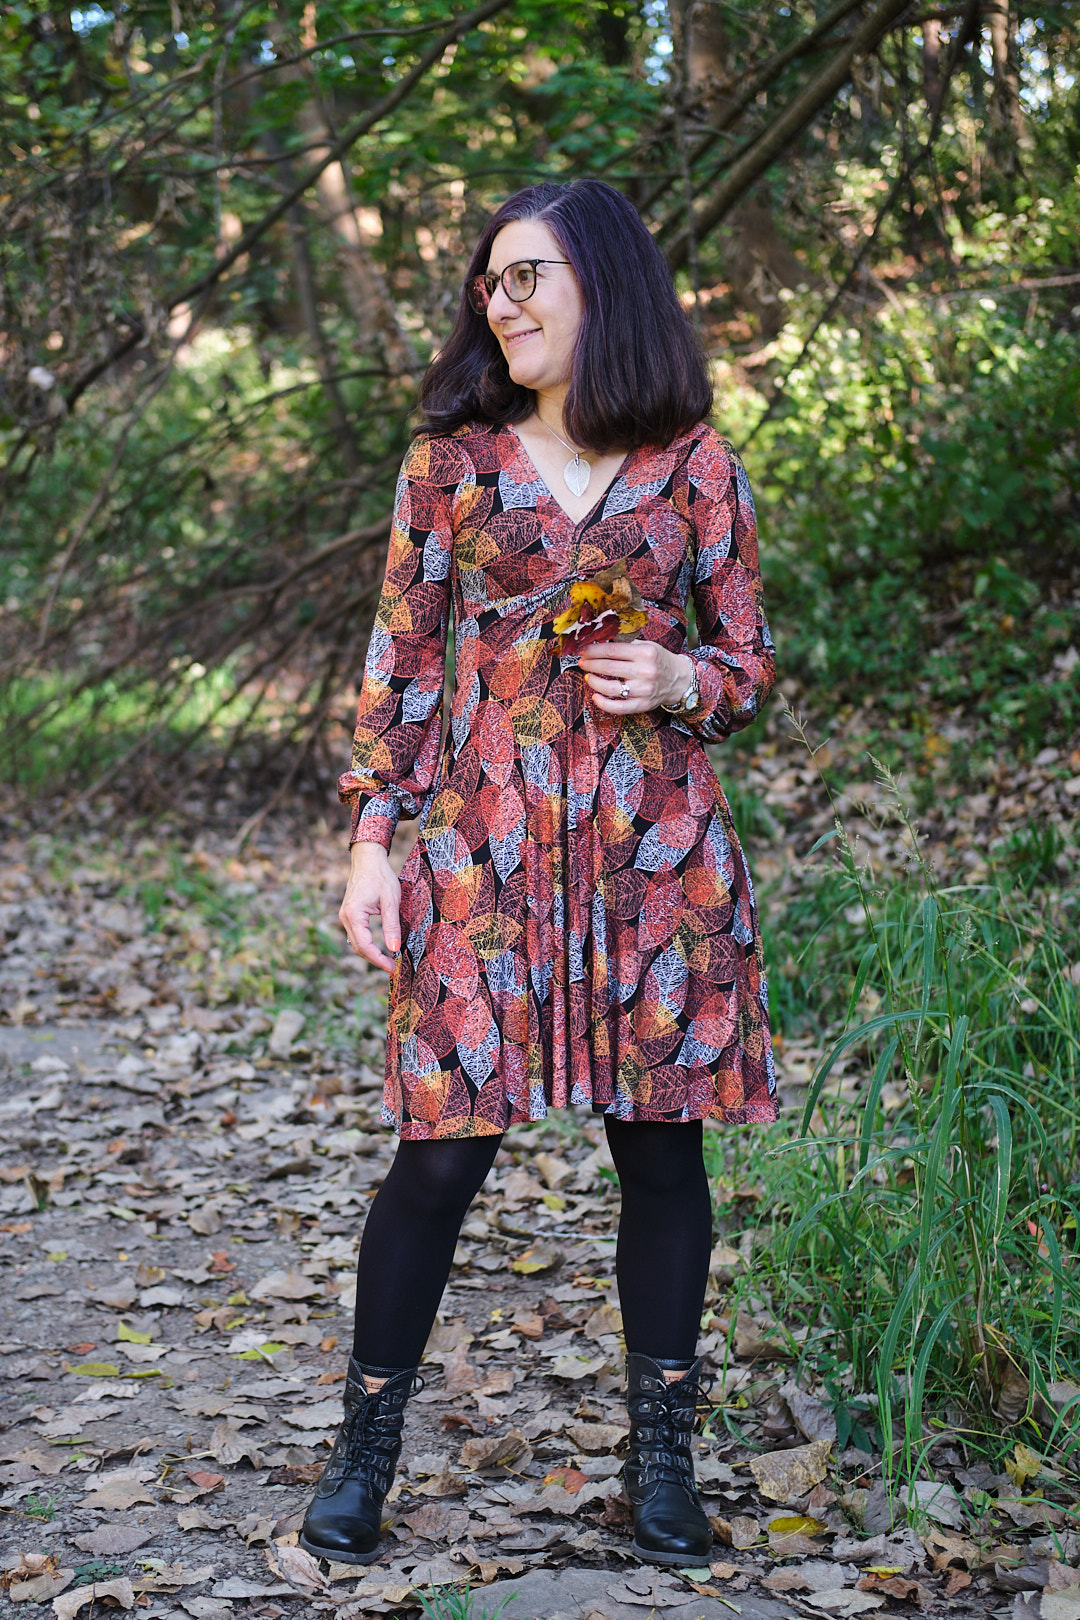
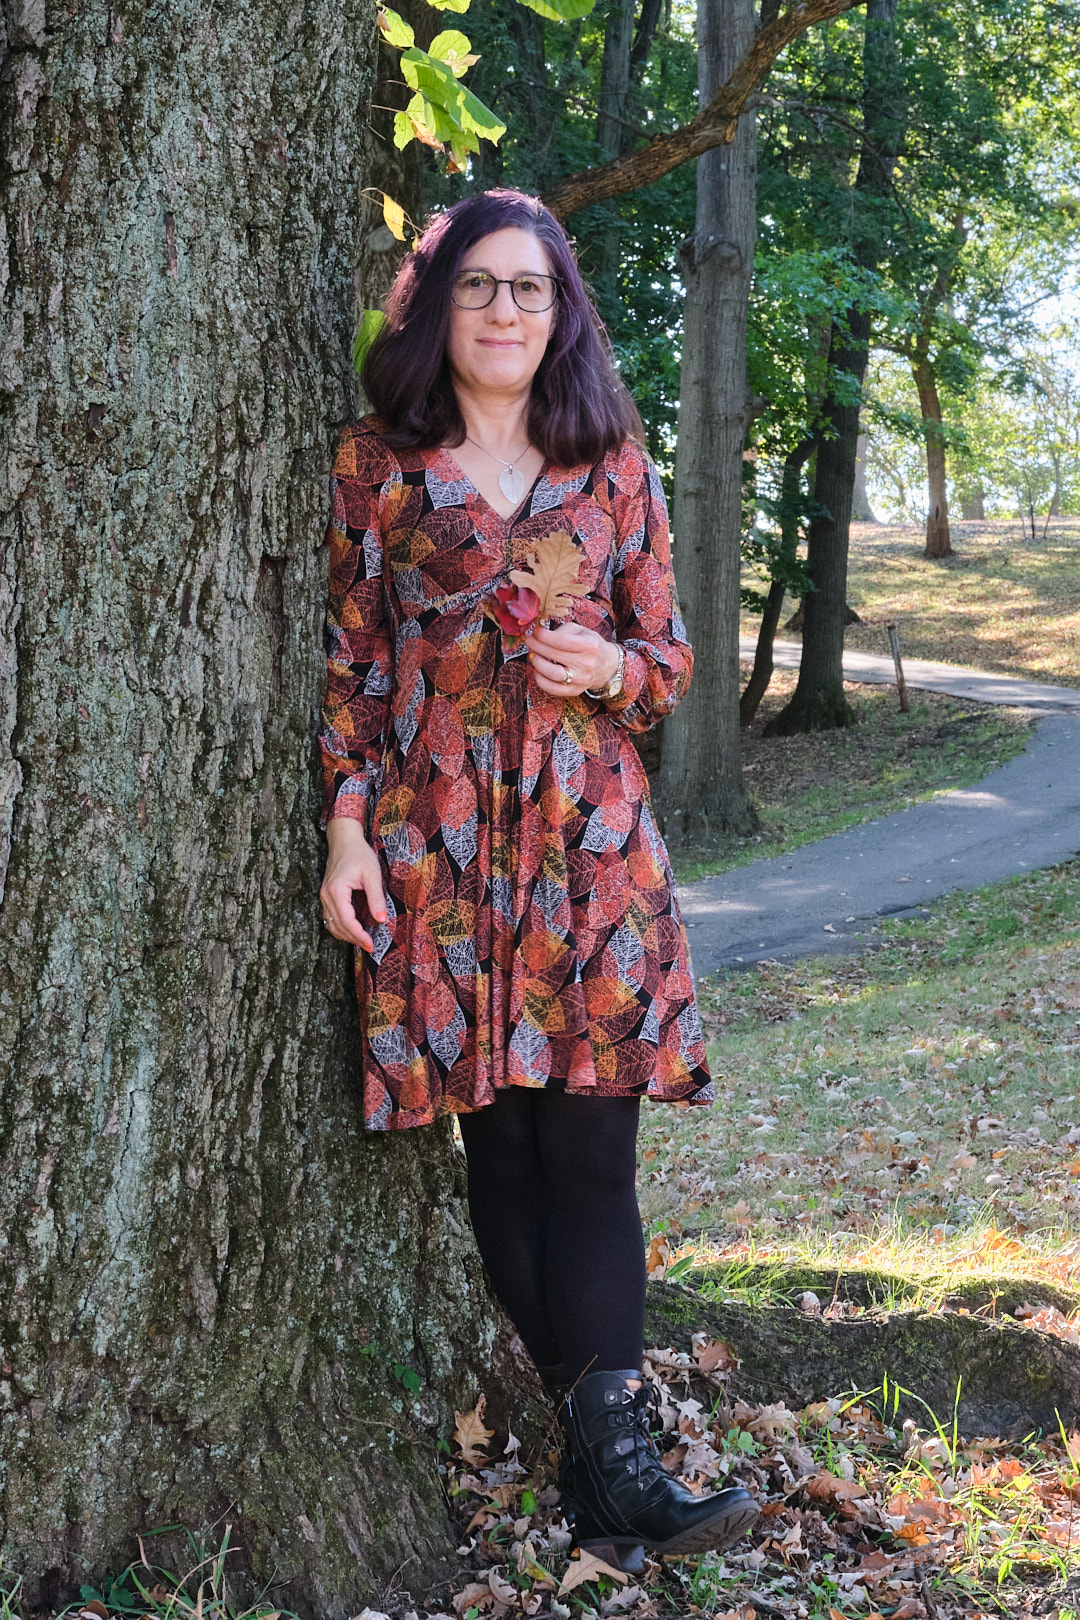
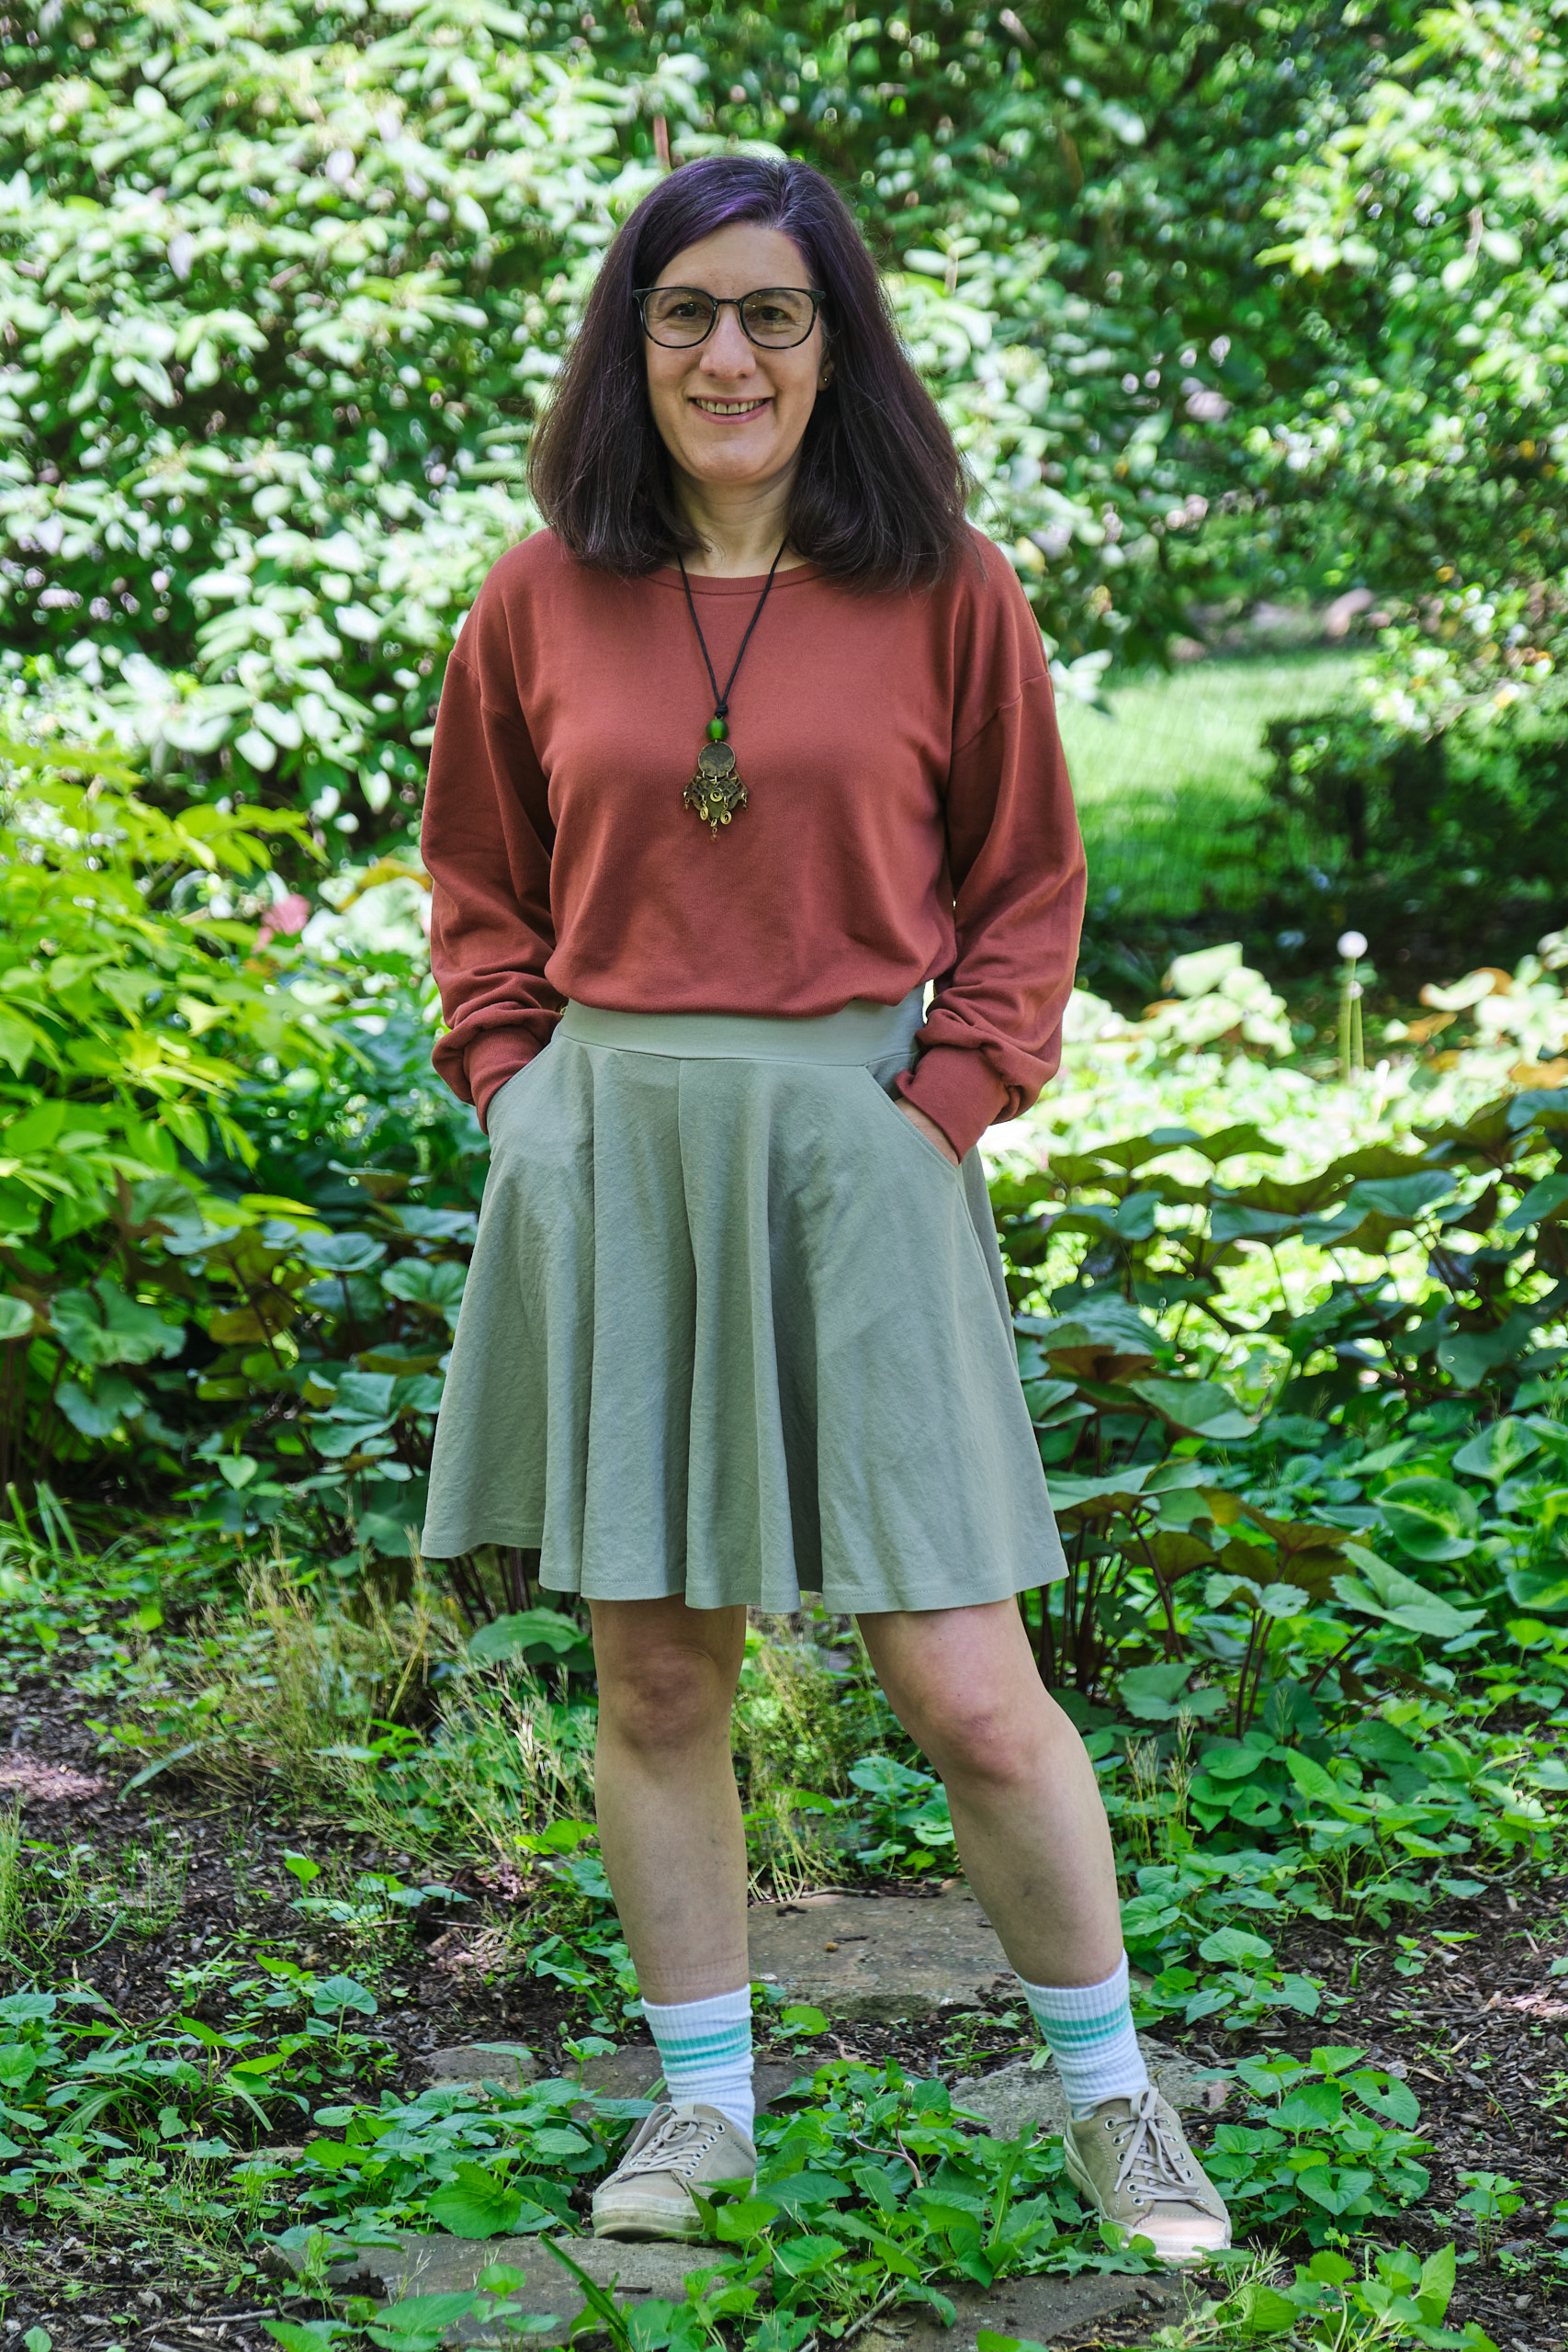
Boo & Lu Blizzard dress with half-circle skirt and raised V-neck instead of modesty panel, size 4, 2 yards ITY, bishop sleeves shortened 1.5 inch
No, it didn’t snow in Pittsburgh. Actually, the weather has been delightful and more like Summer than Fall. Nonetheless, it’s starting to feel a little bit like Fall. In anticipation of more Fall weather coming this week, I made a Boo & Lu Blizzard dress from the most Fall-like fabric in my stash, a lightweight leaf-print ITY fabric. This cracked leaves fabric from Surge Fabrics is more light and drapey than a typical ITY, and appears to be slightly brushed on the front of the fabric and smooth and silky on the back. Unlike most other ITYs I’ve worked with, the edges on this one tend to roll a bit.
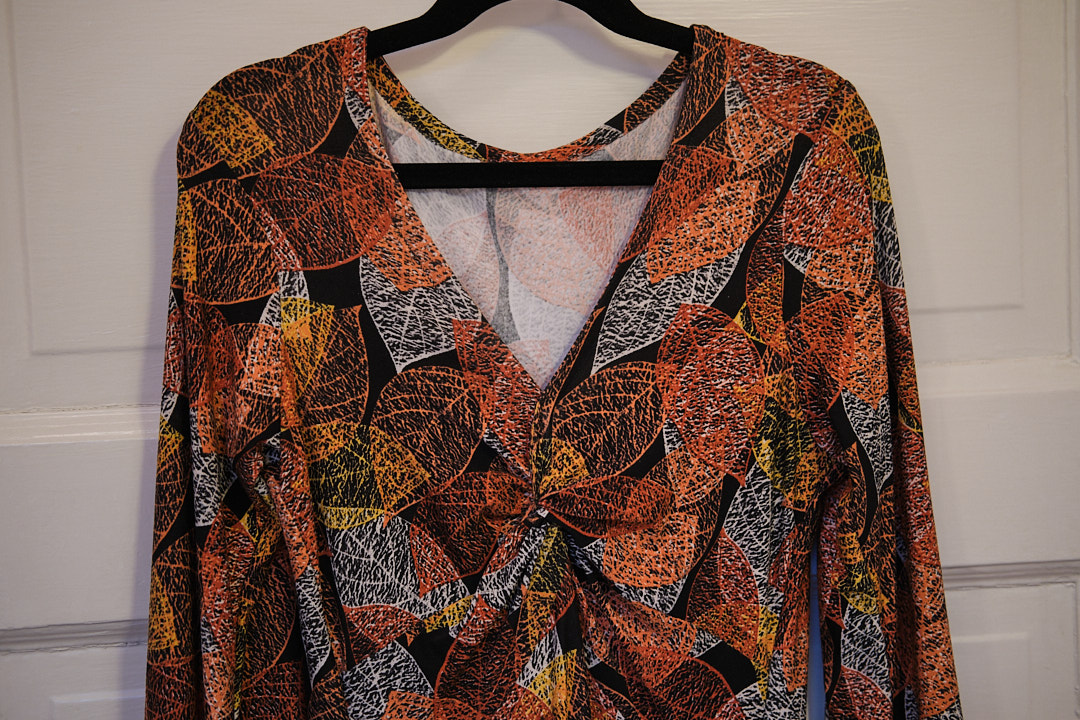
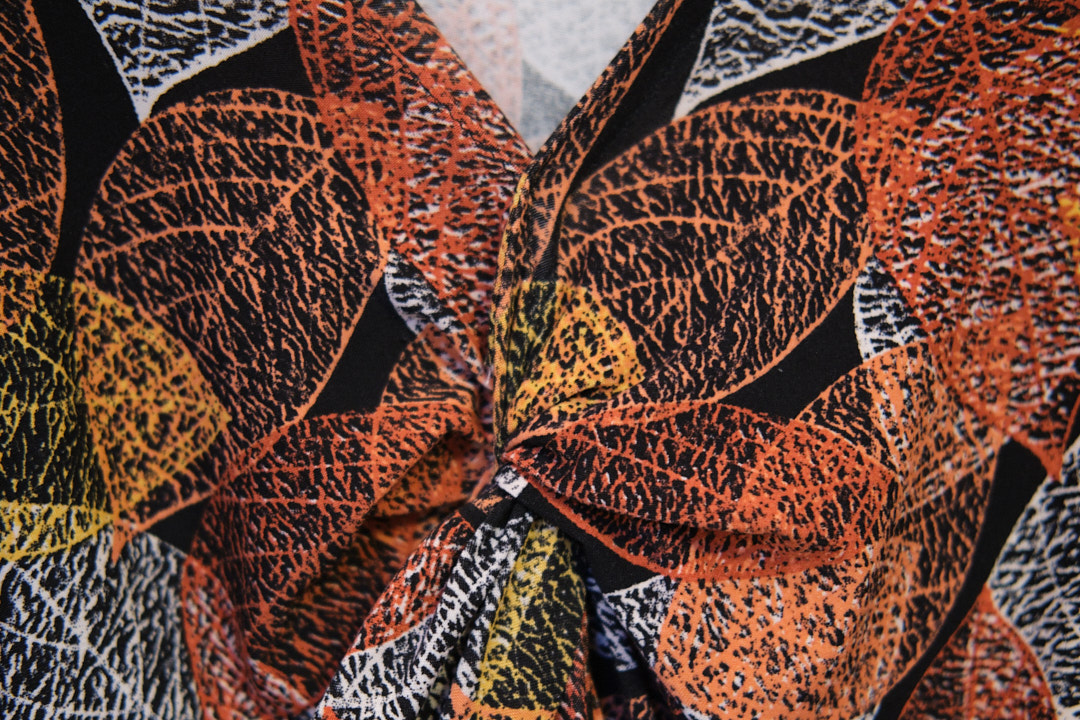
When the Blizzard adult top and dress pattern was released last year, I really liked the knot-front detail, but was less excited about the modesty panel (to cover the plunging V) and the squared hem on the skirt. I decided to buy the pattern anyway, with the plan to alter it to suit my preferences. I cut a size 4 without the modesty panel and I cut the hem of the skirt using a regular half-circle skirt pattern (size 4P from the Sinclair Valley Skater skirt add-on pack, cut 1 inch longer than above-knee length). I used the bishop sleeves but shortened them by 1.5 inch at the lengthen/shorten line. I also added pockets using a self-drafted inseam pocket bag I’ve used on other skirts without waistbands (or if I don’t want to attach it to the waistband).
The knot detail looks complicated and it was a bit confusing to figure out. I was disappointed not to find a video demonstration. But I followed the instructions and photos in the pattern, and once I understood what I needed to do, it went together very quickly.
I assembled the dress and then tried it on before hemming to see whether I could wear it without the modesty panel. It was definitely wearable, but the knot hit a bit lower than I really wanted for a dress I planned to wear to work. I thought about sewing in a smaller modesty panel, but any modesty panel would break up the V-neck line. I realized if I pinched together the V about 1.5 inches above the knot I could raise the neckline and still have a V-neck. So I pinned it in place and then sewed it down. since my fabric was a fairly busy print, I just zigzagged it in place with black thread that you can hardly see on the finished dress. Had I not had fabric that would camouflage the seam so easily, I would probably have hand sewn it in place from the back.
Most knit patterns I sew have 1/4-inch seam allowances, which means you can sew them with a serger without the need to trim the edges. This pattern has 3/8-inch seam allowances, which is sometimes used when you are supposed to serge the edges and then sew the seam with your sewing machine. But that is not what is suggested in the instructions so I just trimed 1/8-inch as I serged a 1/4-inch seam. It’s not a big deal, but not my preferred approach.
The bishop sleeves include a band at the wrist so no need to hem them. I used fusible seam tape to tack down a 5/8-inch hem seam and then zigzagged the hem on my sewing machine. Again, the fabric hides the zigzag so well that I didn’t bother cover stitching.
The dress bodice fits like a glove, which works well for this light, stretchy fabric. If I were sewing a heavier or less stretchy fabric, I would probably size up. I have a top I bought many years ago with a similar knot front design, but it is looser and has a center front seam. I’m pondering how to adjust this pattern to reproduce that look as well.
The dress looks great with tights and ankle boots. I’ll probably wear it with a black tie-front sweater when it gets cooler. I accessorized with an inexpensive leaf pendant that matches the fabric perfectly.
We had beautiful weather this weekend, and my photographer was willing to follow me around in search of leafy backdrops for a photoshoot, so I have lots of photos to share. We aren’t anywhere near peak leaf color here, but we still found some nice Fall backdrops.
Wow, I’ve sewn a lot of clothes! To make it easier to find my makes, I’ve put together this index page. You can look for garments by type, or by pattern maker. You can also use the search box in the upper right corner of this page to find more specific items.
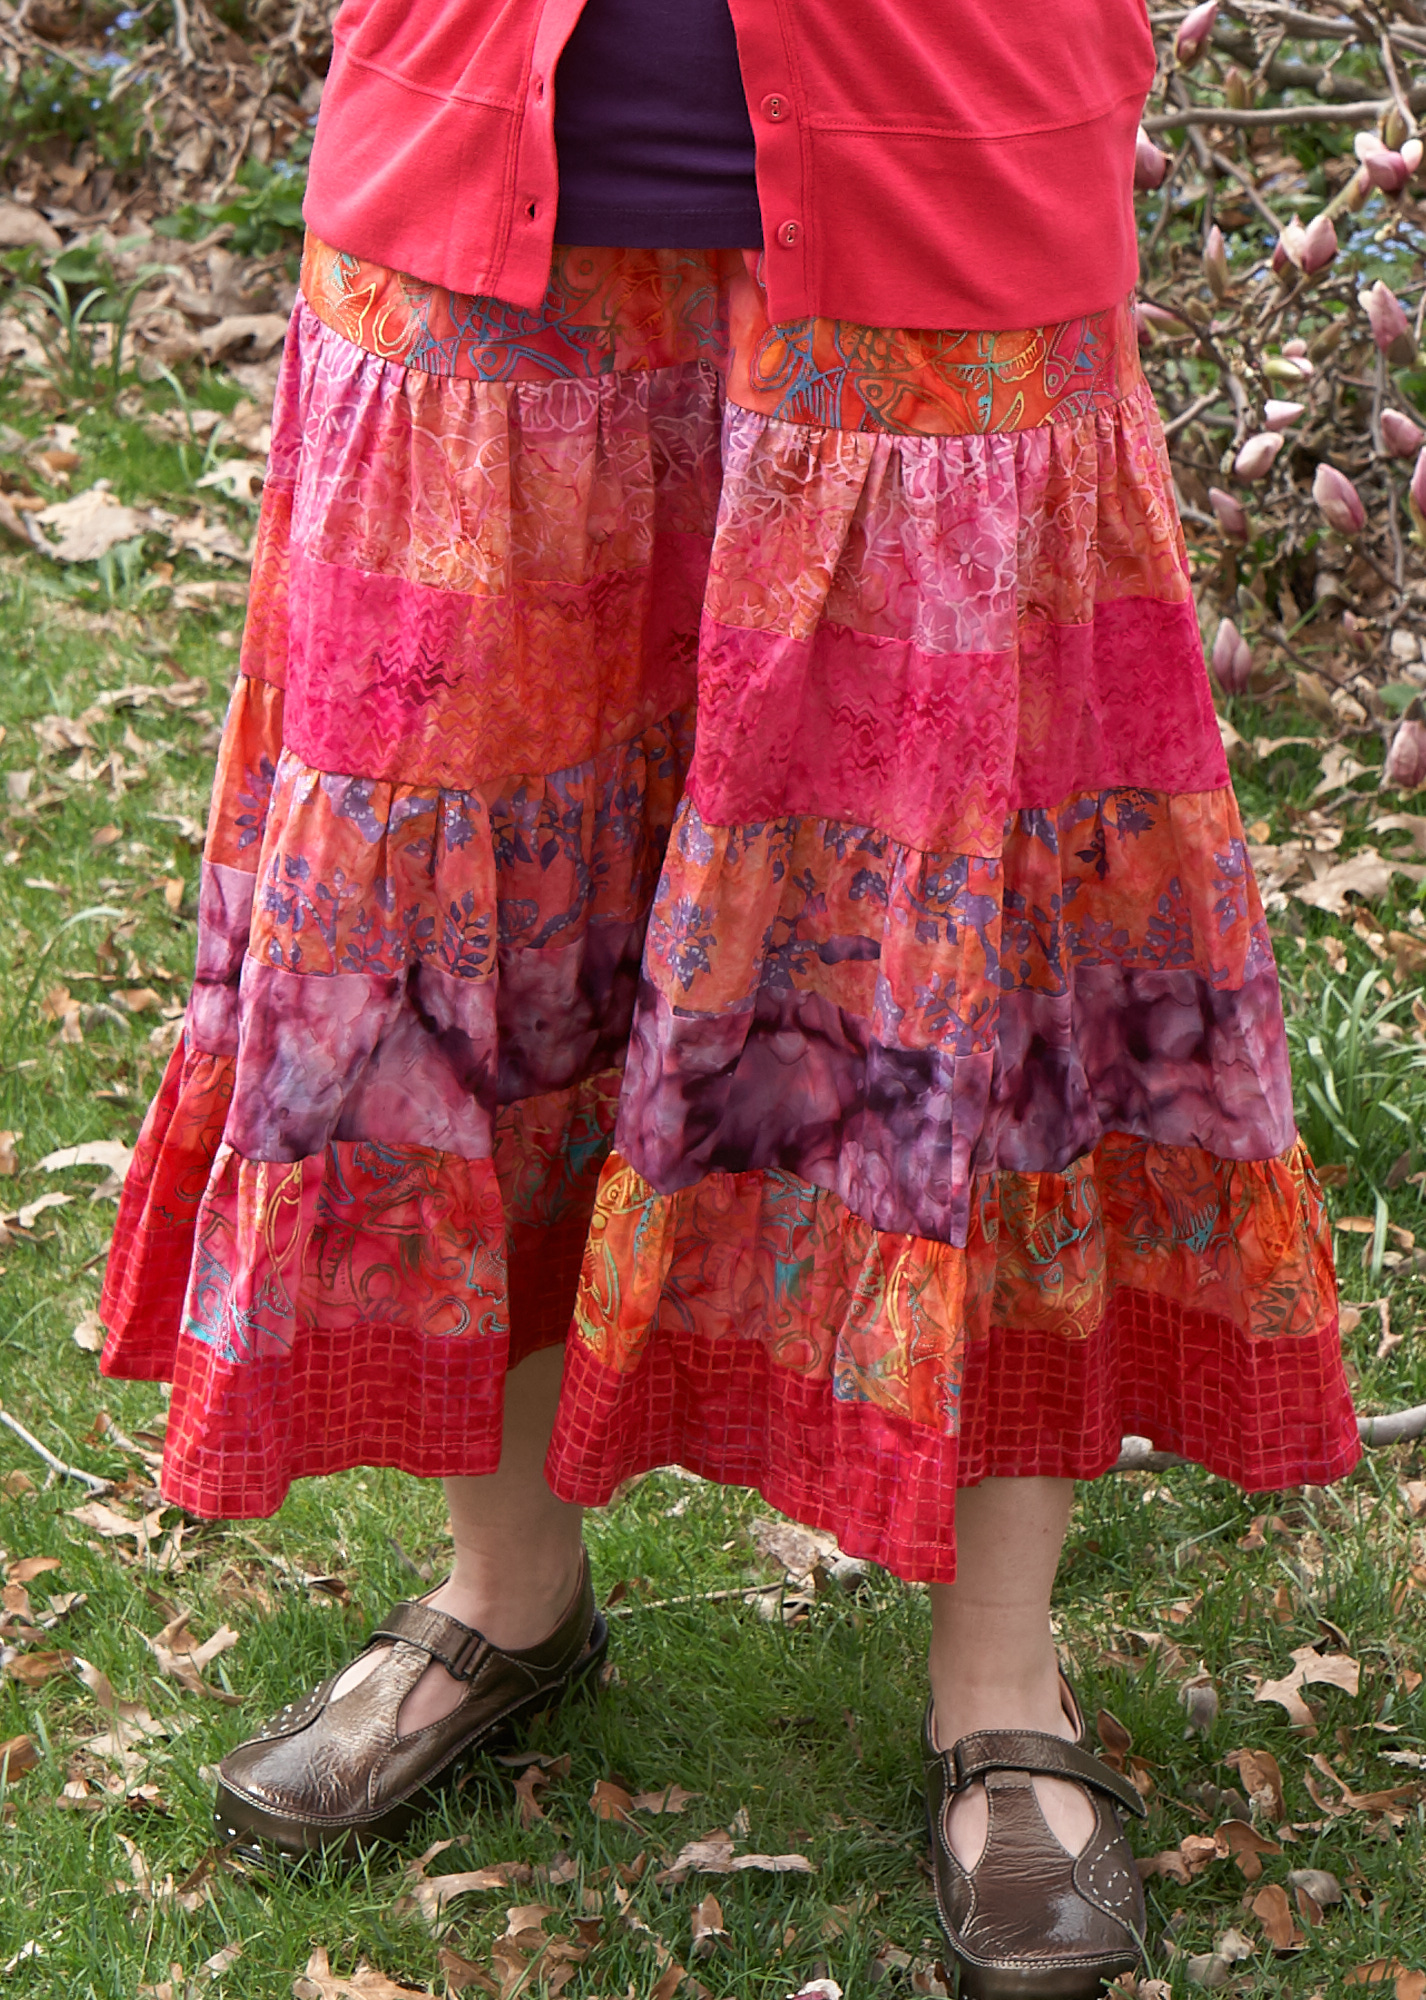
I bought three yards of a beautiful magenta ponte fabric from Mily Mae last year because I love the color (it matches the highlights in my hair) and I love working with this kind of ponte (67% Rayon/28% Nylon/5% Spandex). I thought about making a dress out of it, but eventually decided on a magenta suit. I already have a (store-bought, me altered) purple suit, but I don’t have a pink suit. Magenta is on the more purply side of pink, which means it can be interpreted either as pink or purple.
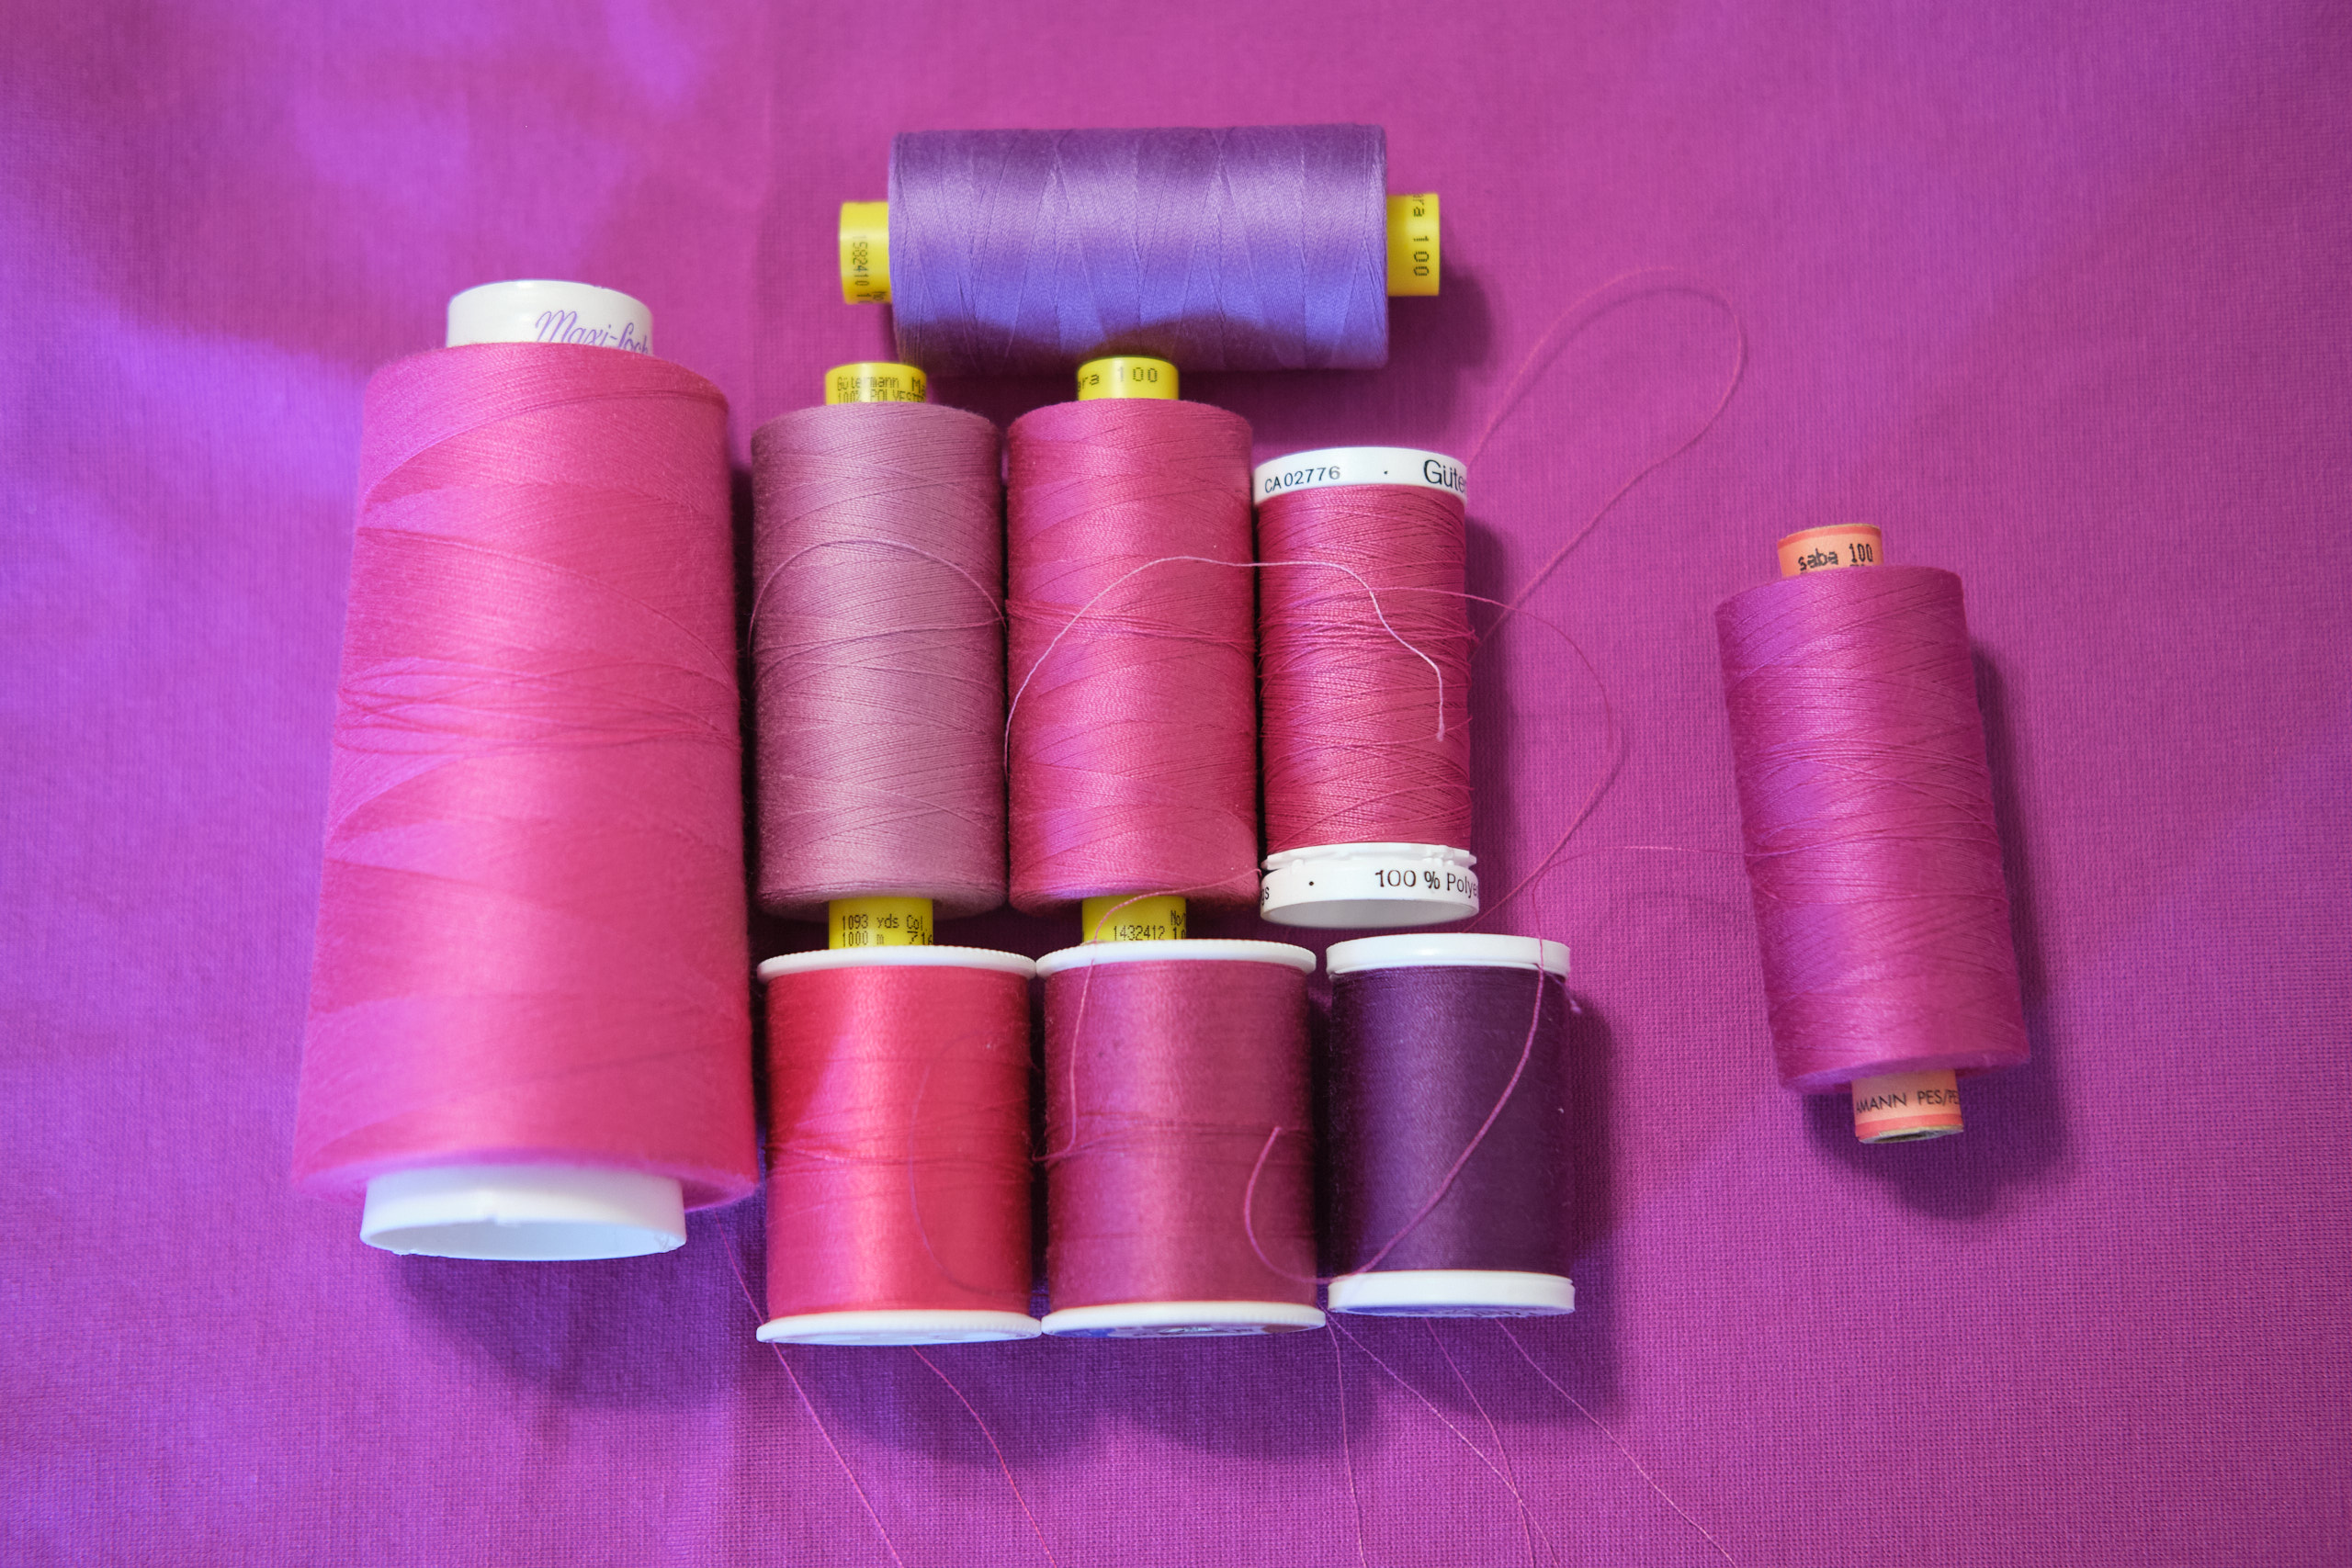
Unfortunately, magenta doesn’t seem to quite match either pink or purple threads, so I had to order several threads online until I found a close match that I could use for top stitching that would blend into the fabric. None of the Gutermann or Coats & Clark threads I ordered were quite right, but Amann Saba all purpose poly wrapped poly core thread tex 30 color 1059 did the trick.
I used the Boo & Lu Onyx blazer pattern for my magenta suit jacket, with the same modifications I used for my hip length grey ponte version with pockets. I had hoped to get the facings interfaced and catching in the top stitching properly this time, but still ran into problems that required extra gluing and fusing to resolve. I still feel there must be a better way to make the facings, and if I make another Onyx maybe I will figure out what it is.
I used the Pattern Emporium Urban Wide Leg pants pattern to make magenta pants to go with the jacket. I haver previously made three tapered and three wide-leg pants with this pattern (plus a few mashups with this pattern and the PE Walk Boldly pants). I made these size AU10 low-rise (which ends up being high-rise on me), with the waist graded in and the waistband modified to be a contour waistband lined in athletic knit and with elastic added. I added front jeans pockets with straight pocket openings.
Last winter I also bought some super soft purple 86% Poly/12% Rayon/2% Spandex Monaco Rib fabric from Mily Mae, and it turns out to be almost the exact same color as the magenta ponte. Why they don’t call them both by the same name is a mystery to me, but regardless, I clearly needed to make a rib-knit sweater to go with my suit. I used my favorite Sinclair Bondi classic fitted t-shirt patten in size 4p hip length with a screwp neck, adjusted slightly for a broad and sloped shoulder. I cover stitched the hems, using the magenta thread spool and a bobbin wound with the same thread for the needle threads.
The whole outfit looks great together, and I will wear it as a suit with my matching magenta booties! I expect I will also wear the pieces as separates. Although this is a color I wear year round (I also have a cashmere sweater and a winter parka in this color), to me it is really a spring color.
April update: I couldn’t resist some magenta jacket photos with the magnificent magnolia trees in front of my house!
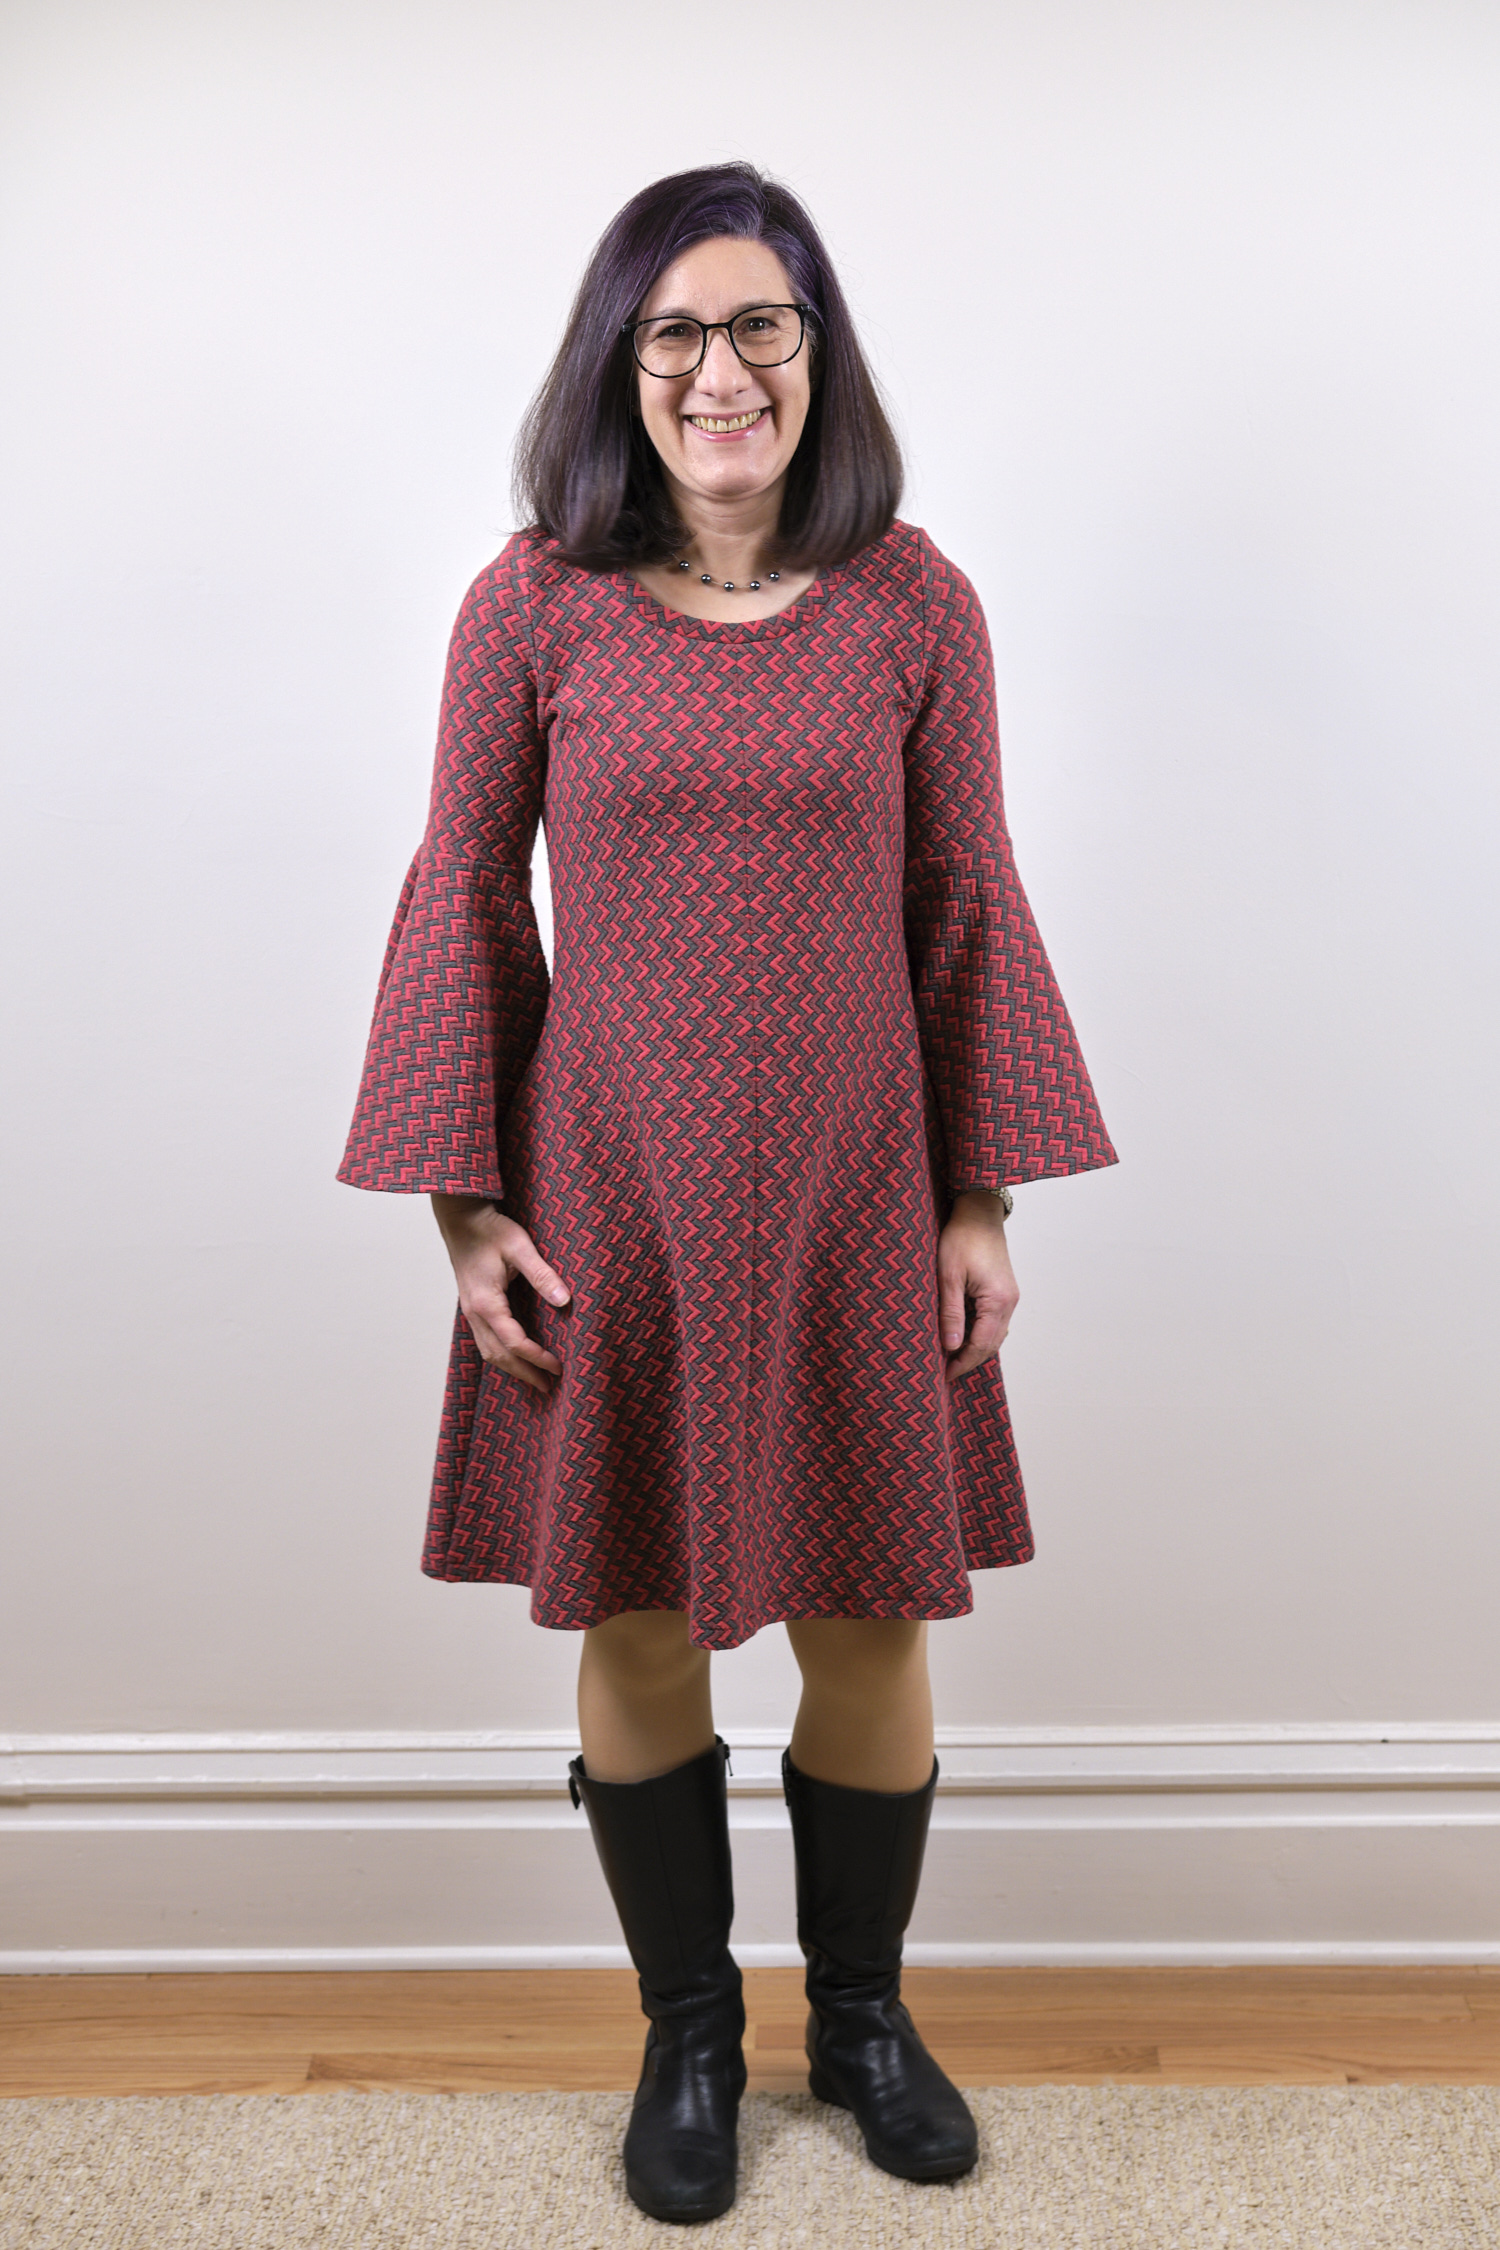
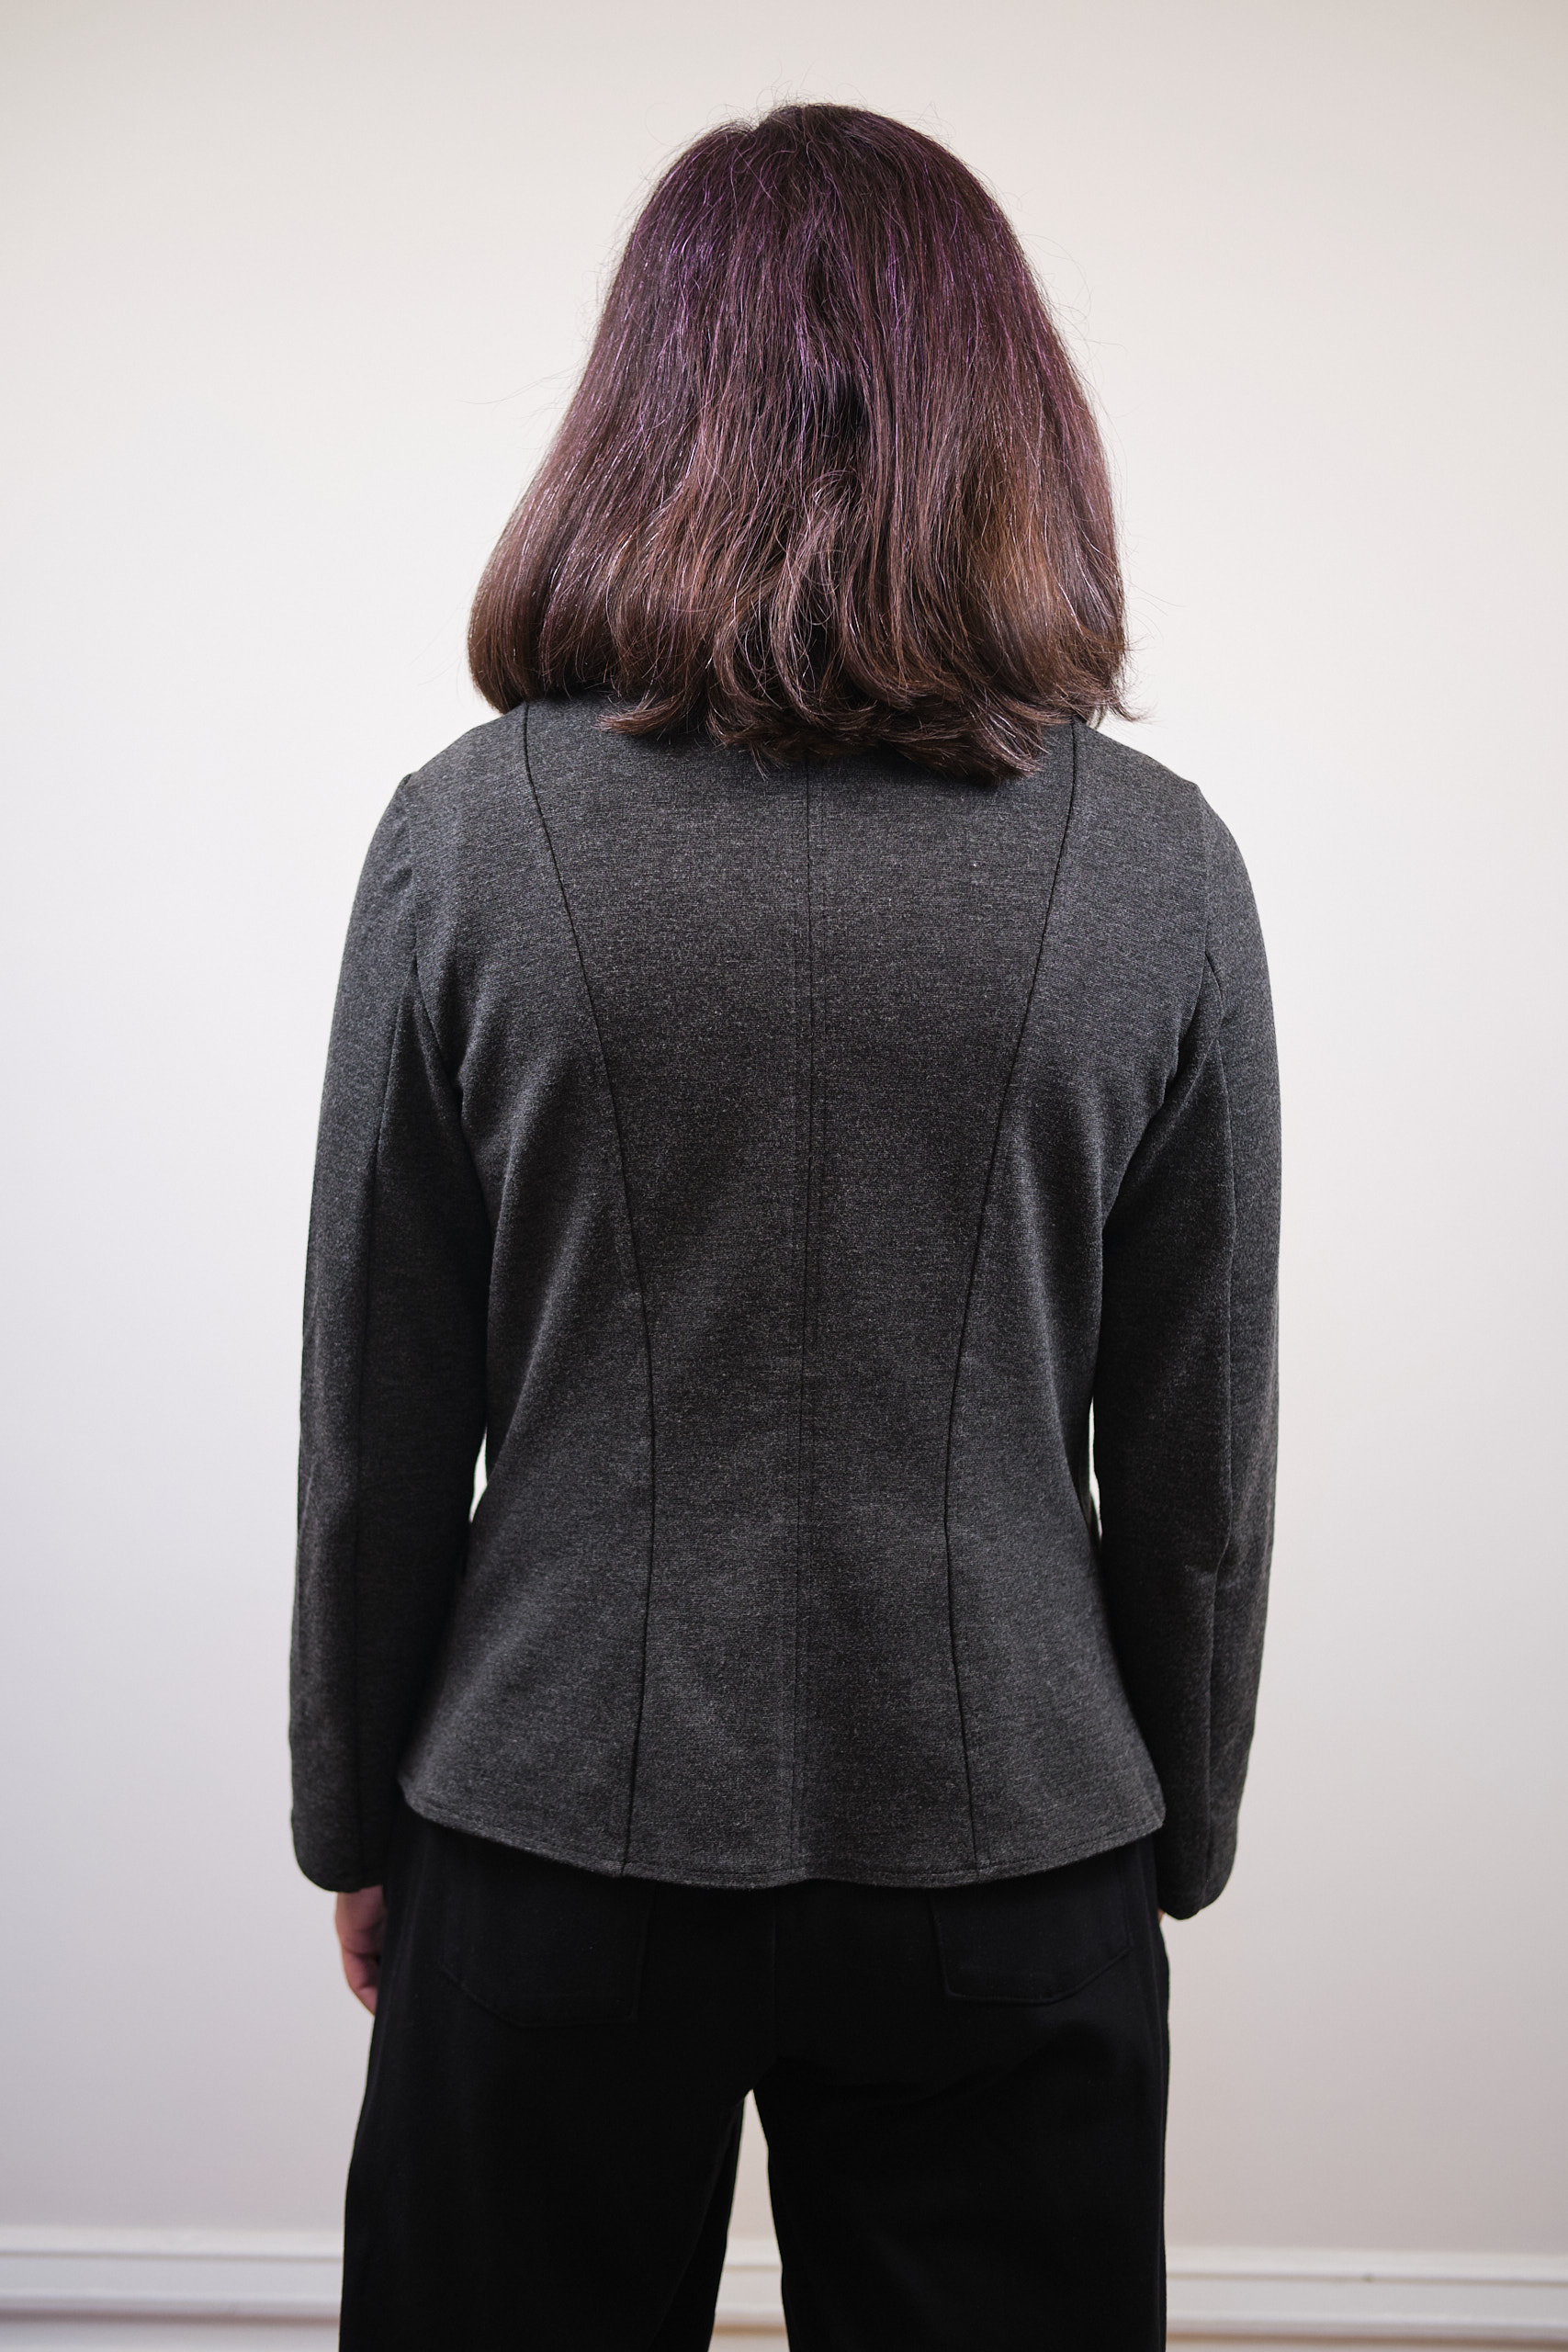
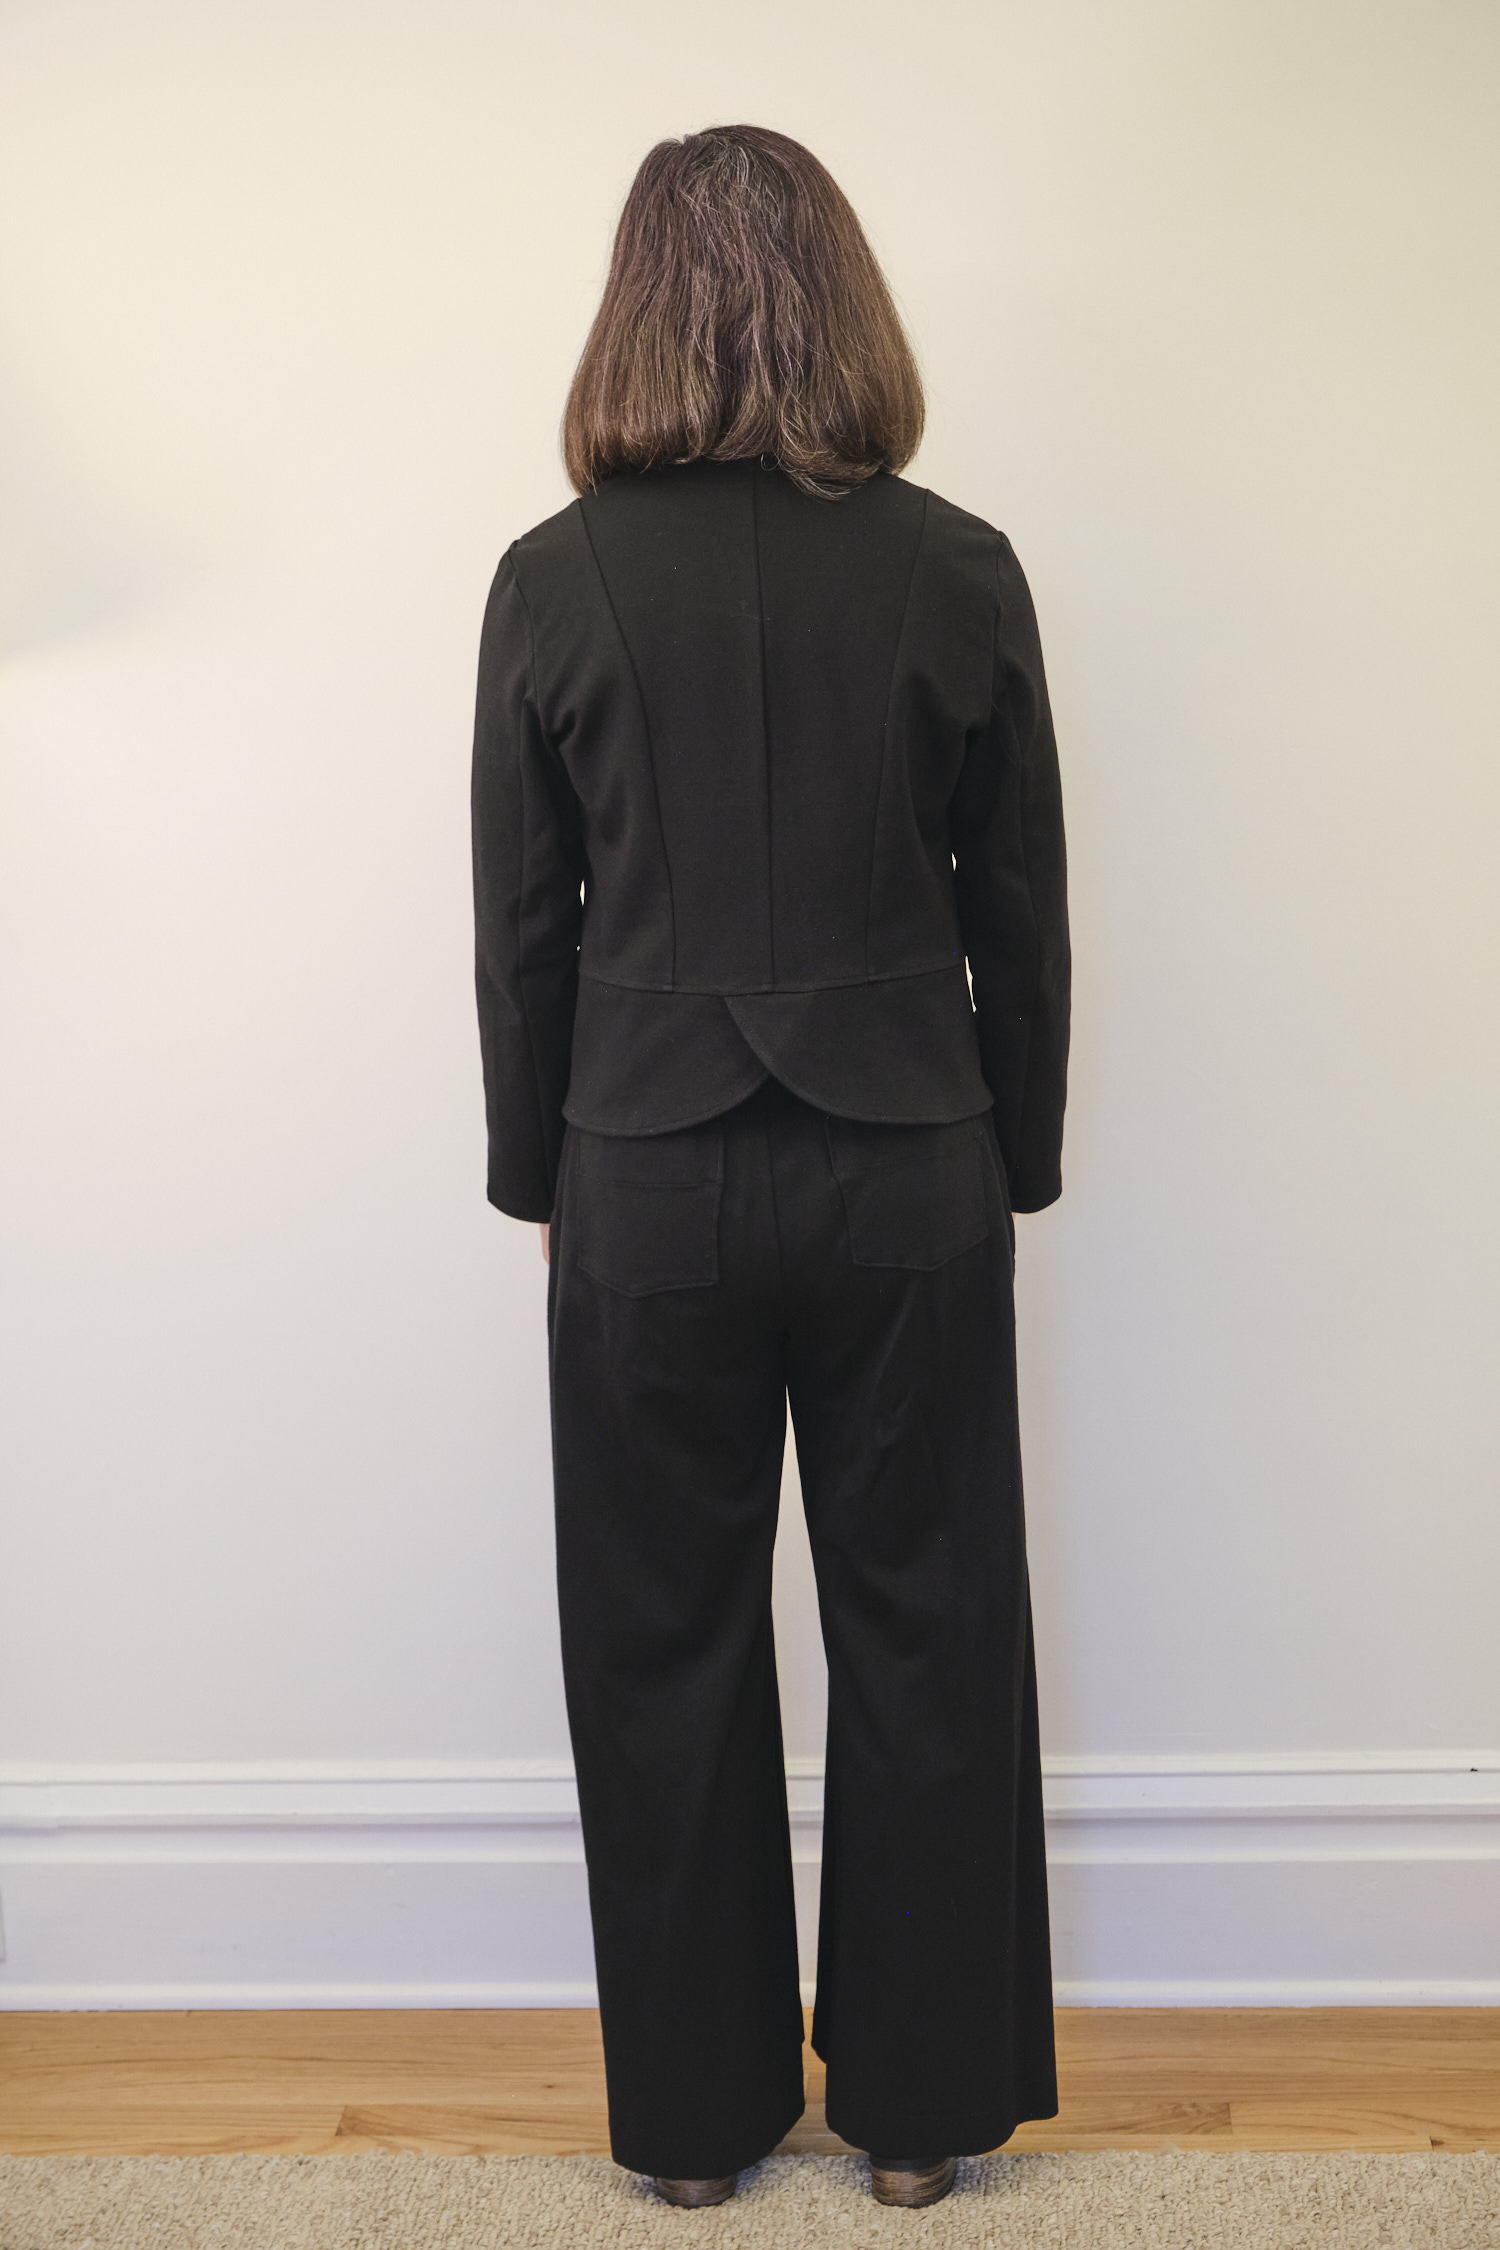
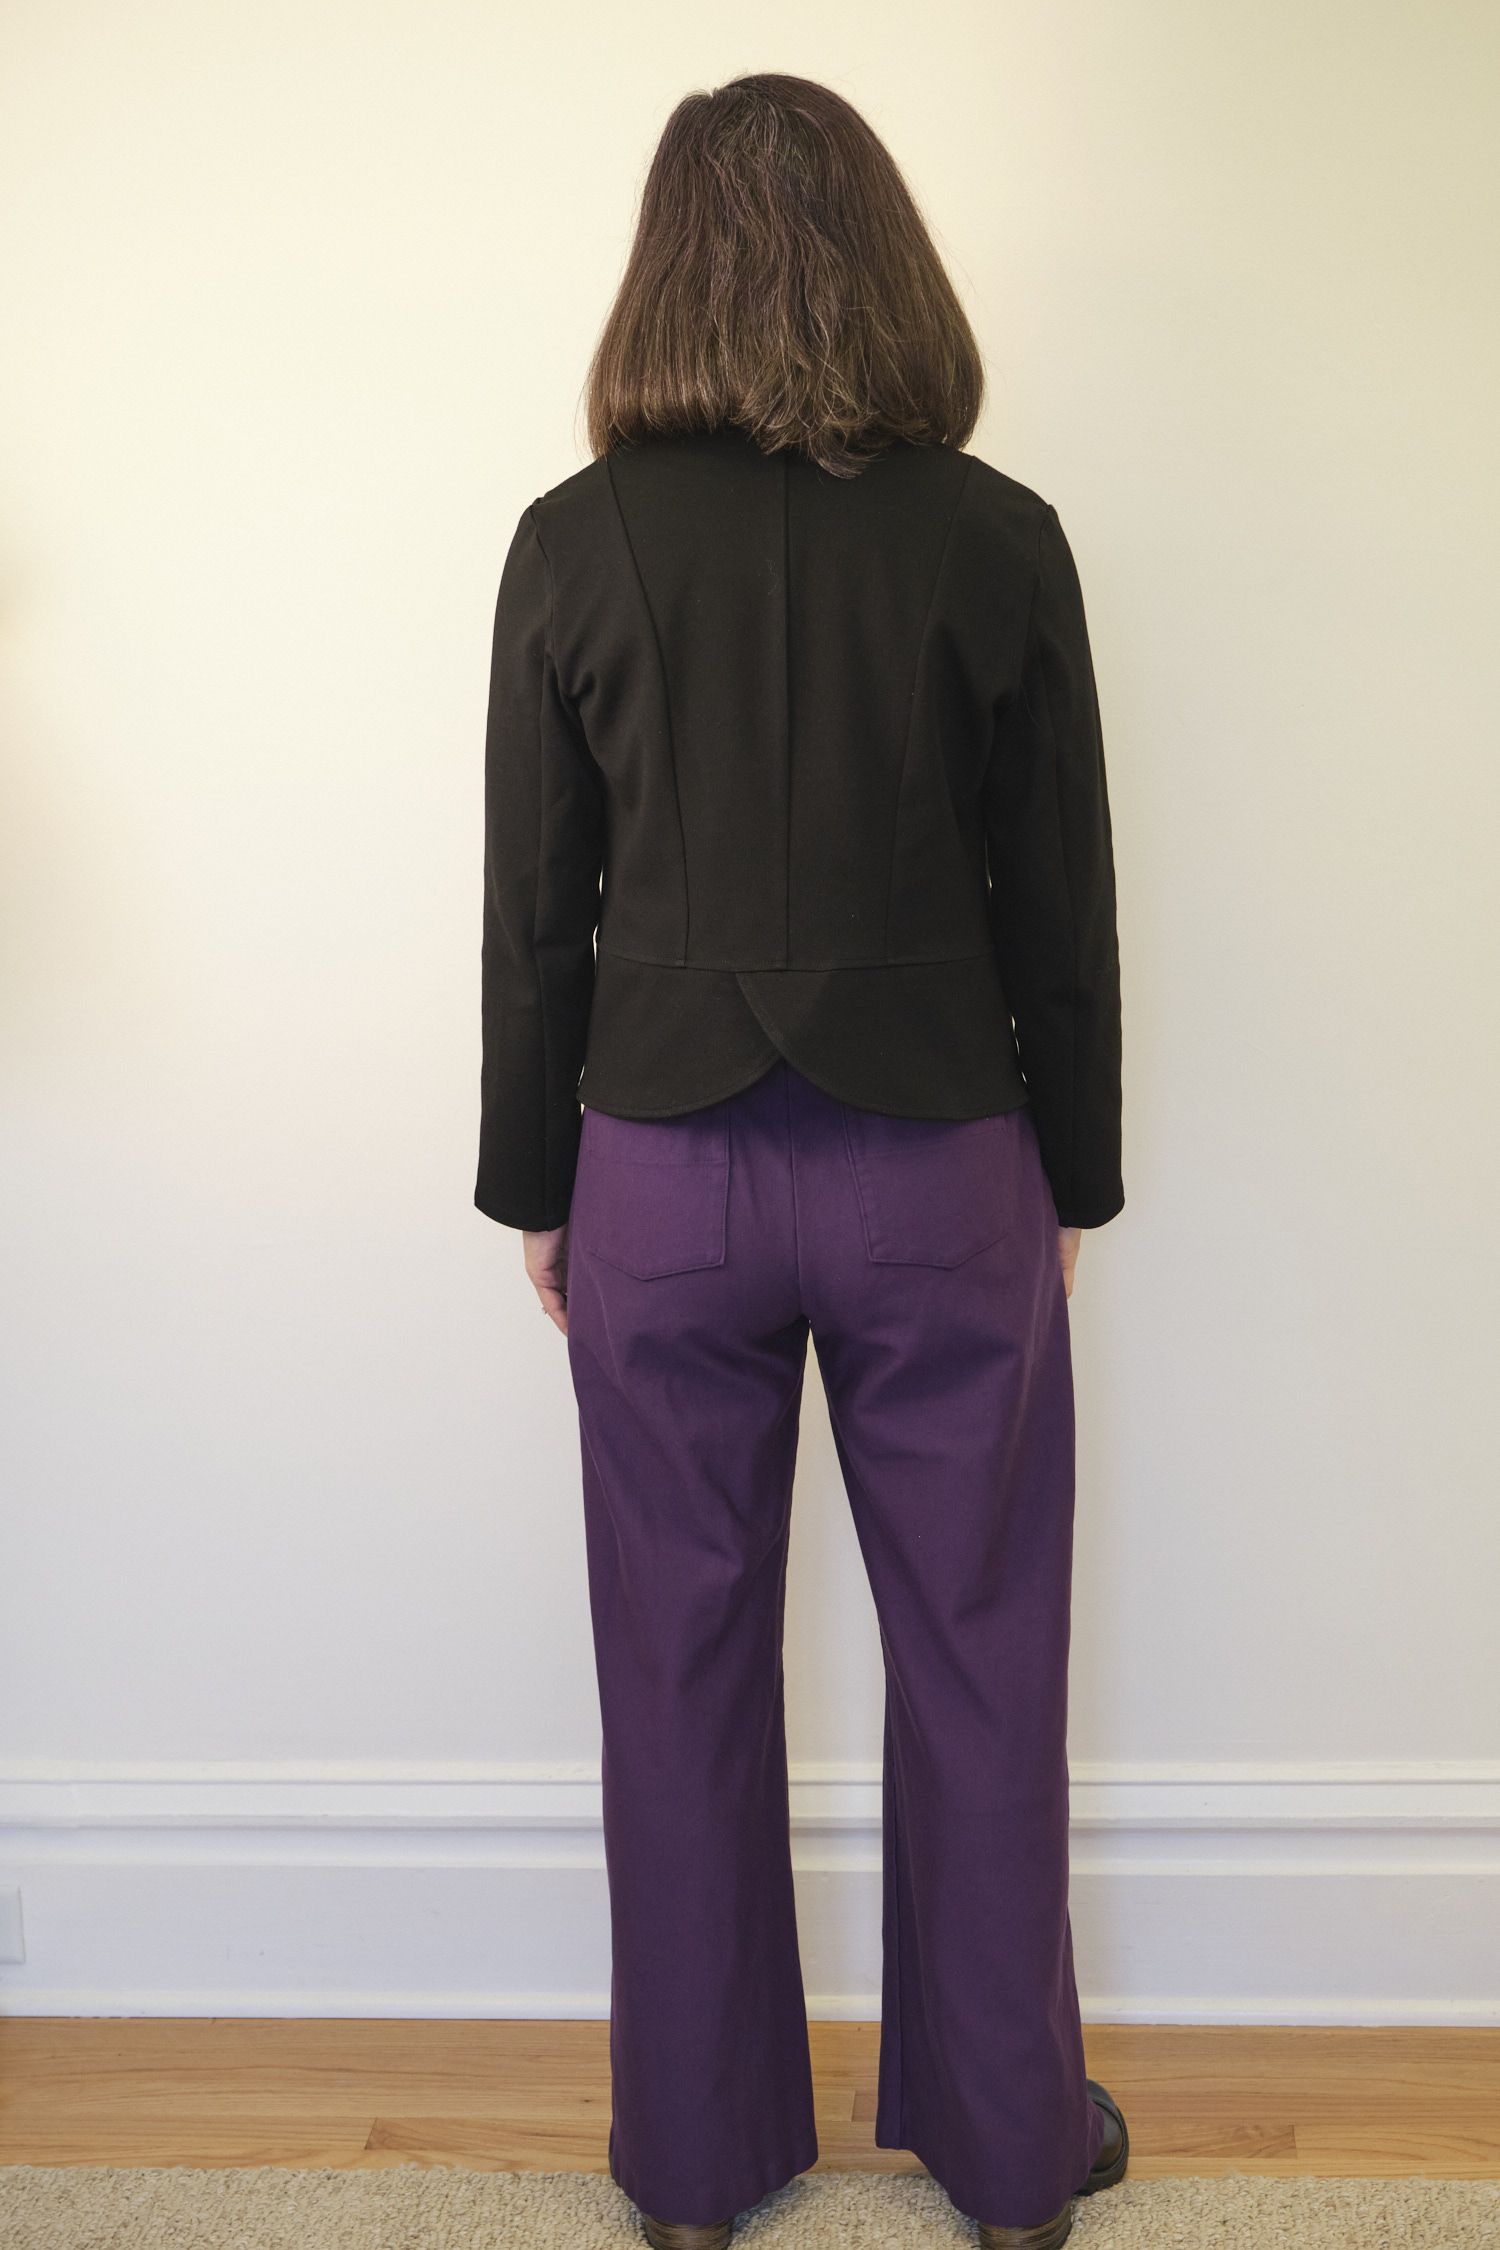
I made another Onyx blazer, this one hip length in charcoal grey ponte (charming heather legacy ponte from Zelouf) with pockets. I tweaked the pattern some more before I cut it out, this time to add a simple sloped shoulder adjustment (in addition to the round-back adjustment and small-bust adjustment I made on my purple cropped Onyx). I noticed that when I raised my shoulders (as in a shrug) the drag lines I saw on the back of my purple Onyx mostly disappeared. So I lowered the outside point of the shoulder by .75 inch and adjusted the shoulder line on the center and side front and back pieces accordingly. Then, I lowered the armscyes to meet the lowered shoulder point, ensuring that the size of the arm openings did not change. This reduced the excess fabric from the shoulder area that had been pooling around the armscye and helped reduce drag lines on the back. The fit of the back is now about as good as I’m going to get so I will stop tweaking and use this going forward. I made a size 4 hip length, shortened by two inches. I reduced the height of the pockets by only about .5 inches and made them a tad narrower to fit the shortened side-front pieces.
For the purple Onyx, I cut the facing pieces using the front-center pattern piece so that I could sew them down when I top stitched the front seams. I used a lightweight fusible interfacing with no stretch. I noticed that the interfaced facing shrunk a little bit, making it more difficult to attach smoothly, but I made it work. However, on the grey ponte, the lightweight interfacing was a complete disaster. When I clipped the facing to the front center pieces, I found the facing was about an inch shorter. I tried to make it work but it was clearly not happening. Then I remembered that I had tricot interfacing (Superpunch Fusi-Knit White HTC1300), which has some stretch to it. So I cut new facing pieces and fused the tricot interfacing on, with the stretch running vertically. This time the facing did not shrink and everything went together the way it was supposed to! This was a great lesson in selecting the right interfacing for the job.
I did most of the sewing on my serger but I used my sewing machine with my quarter-inch edge foot to do the stay stitching, basting, and top stitch the front and back seams. I used my regular edge foot to top-stitch the tops of the pockets. I sewed the arms to the bodice with my sewing machine before serging, and I made sure to start and stop the serged seam in the armpit. As with the purple Onyx, I sewed the center back seam with my sewing machine, pressed it open, and then topstitched a quarter inch on either side of the back seam. This makes for a nice flat seam that looks very nice.
I used fusible hem tape on the bottom hem and sleeve hems before sewing. I also used it to hold the facing edge in place before top-stitching. I used a glue stick in a few places to keep pieces aligned before sewing.
Ponte is a comfortable fabric to wear, washes well, and resists wrinkles, snags, and pills. The charcoal grey should go well with a lot of things and I expect I will wear this one a lot. The pockets are a nice convenience too, although I probably won’t routinely put my phone or anything heavy in them as it will stretch the ponte. The hip length is just long enough to cover an untucked shirt, which makes it a pretty versatile length to wear with a lot of things. Here I am modeling it with black ponte PE Urban Wide leg pants and a Sinclair Bondi top in plum brushed sweater knit. The jacket also looks great with the PE Urban Wide leg pants I made previously in the same charming heather ponte fabric.
Summary of modifications to size 4 hip-length pattern with pockets:
Small-bust adjustment (performed by redrawing the inner curve on the side-front pieces to have less of a contour and then shortening the center front pieces to match the length of the new curve)
Sloped-shoulder adjustment (3/4 inch)
Round-back adjustments (2 5/8-inch adjustments near top and bottom of arscye)
Deepen back neckline by about 3/4 inch and adjust back facing
Shorten bottom hem by 2 inches
Shorten sleeves by 2 inches
Shorten pockets by 1/2 inch and adjust width to match width at hem line
Cut facing and interfacing from front-center pieces instead of facing pieces
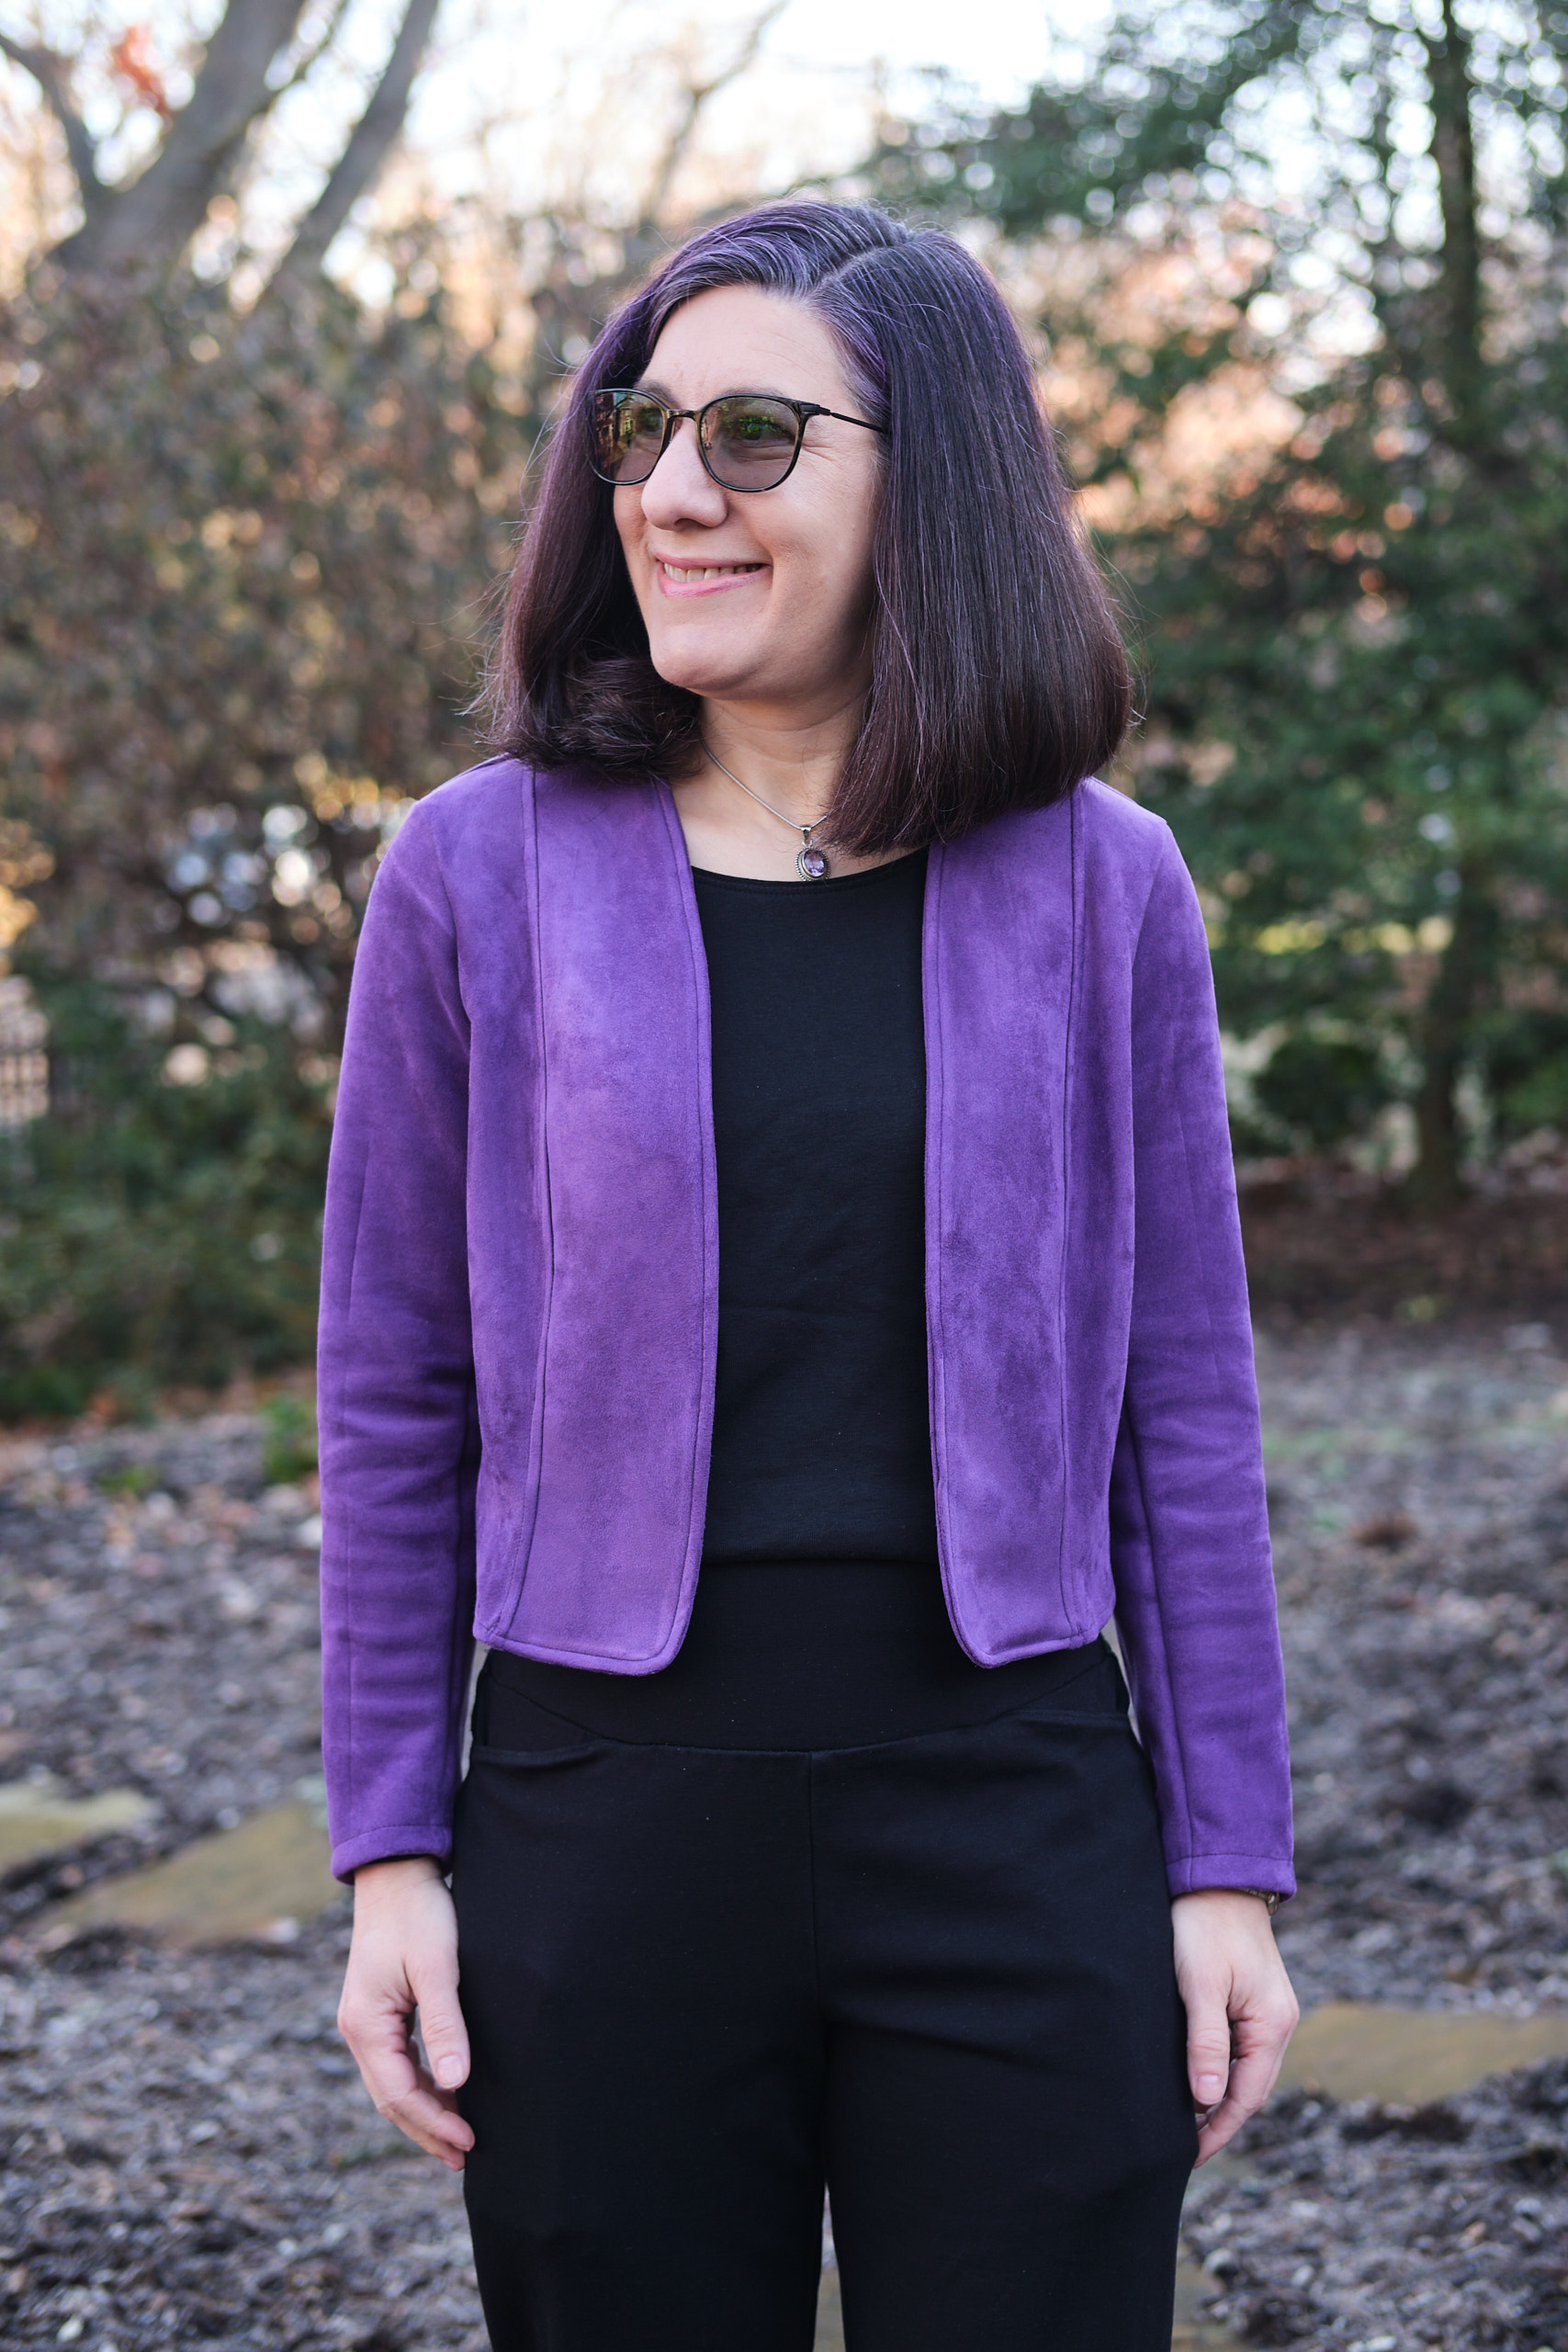
After making my tulip Onyx Blazer, I went down a rabbit hole of fitting adjustments. My first Boo & Lu Onyx fit reasonably well, but seemed too loose in the back. After much experimentation and sewing up an entire muslin of the hip-length version with pockets out of an old couch cover, I came to the conclusion that 1) a size 4 would fit me better than the size 6 that I sewed and 2) I need a round back adjustment. Although I have recently also discovered that I need sloped shoulders, broad shoulders, and sway back adjustments on some patterns, it wasn’t clear that these were needed here so I decided to proceed with my cropped purple scuba suede Onyx without these adjustments, although now I am reconsidering.
I finished the blazer yesterday and it was warm enough this morning to snap a few photos outside before I walked to work.
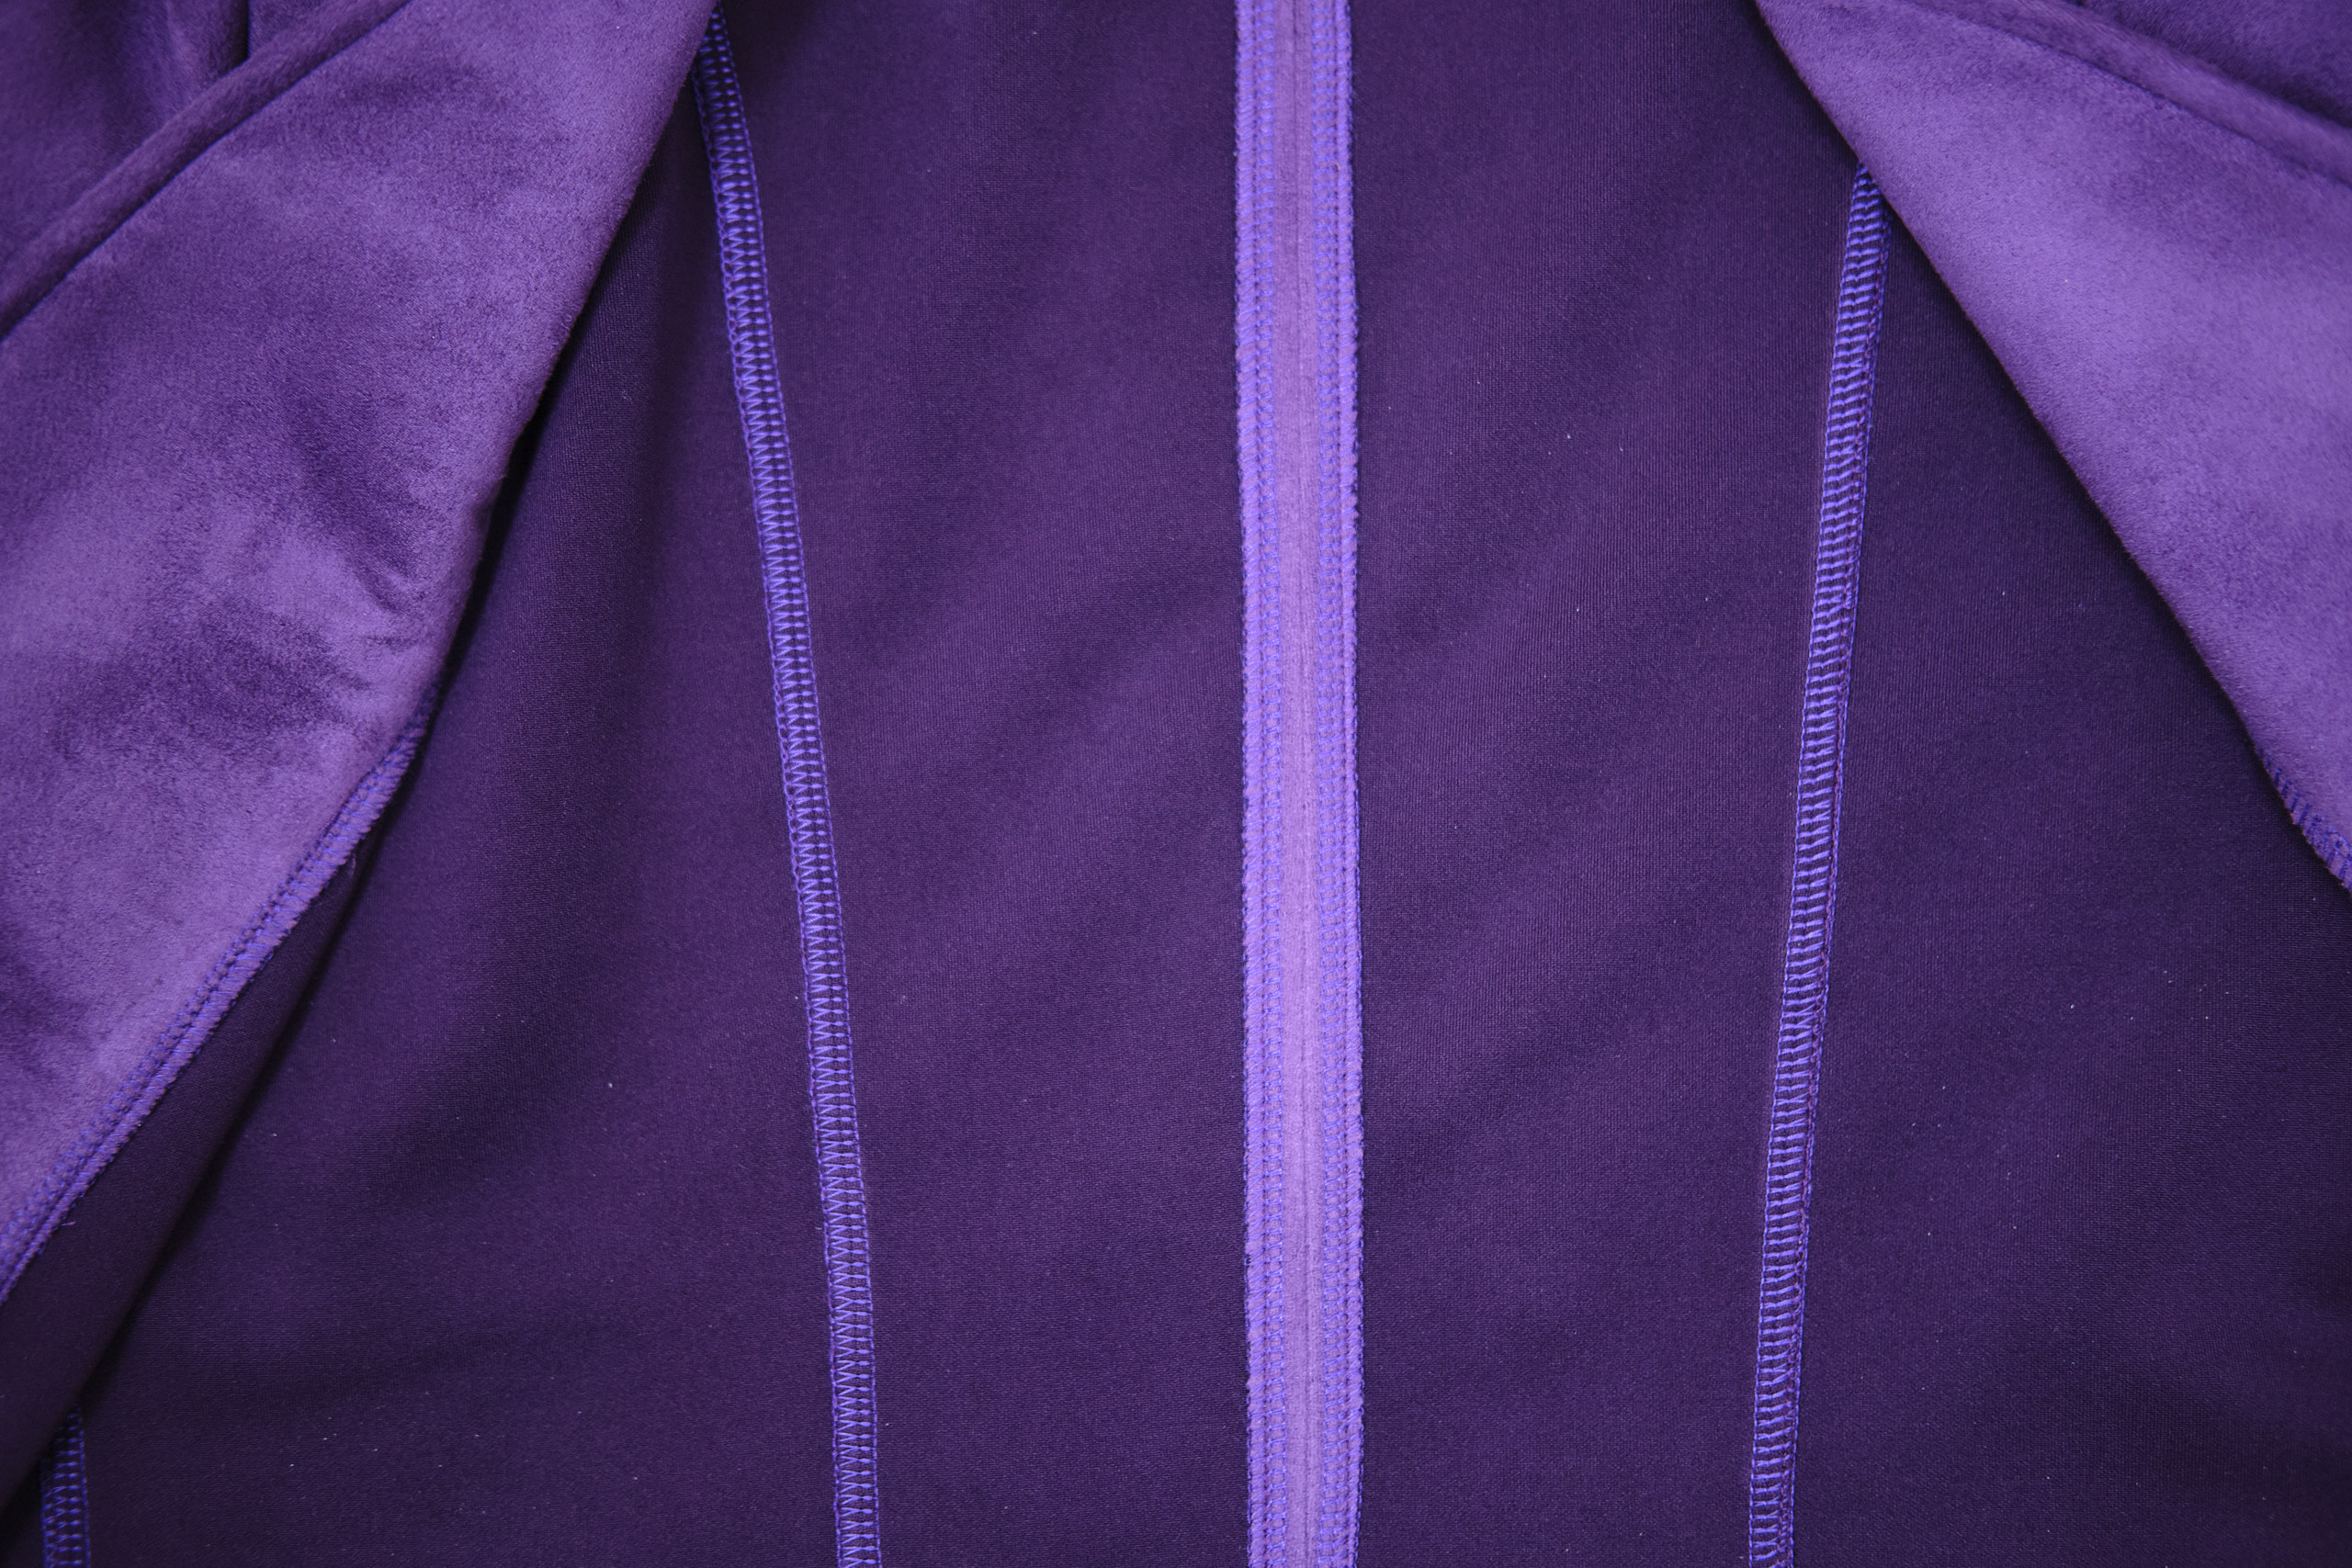
I started with the size 4 pattern, opened it in Affinity Designer, and added two 5/8-in round back adjustments near the top and bottom of the armscye. I had added a small-bust adjustment to the size 6 version that was a bit difficult to execute and did not result in the contour I really wanted. I read in the Boo & Lu Facebook group about an alternative SBA that involved simply redrawing the inner curve on the side-front pieces to have less of a contour, and then shortening the center front pieces to match the length of the new curve. This was easy to implement. I also slightly lowered the back neck line (I find this more comfortable, in part due to the round back issue) and adjusted the neck facing accordingly. I used the crop length and extended it by two inches so that it wouldn’t be quite so short. I shortened the sleeves by two inches because I am short and have short arms. Finally, instead of using the front facing pieces, I cut extra center front pieces to use as facing. This allowed me to solve the problem of the front facings not lying flat by stitching them down when I top stitched all the seam joining the side and center front pieces.
I cut out my cropped onyx from leftover purple scuba suede I had used to make a Sinclair Alana dress two years ago. This fabric is thick and stretchy, so wasn’t the easiest to work with. I fused ultra-light interfacing to the facing pieces, which stabilized them. However, even though I had stay-stitched as recommended, it was still difficult to join the facing pieces to the front pieces that did not have interfacings as the front pieces had a tendency to stretch more than the facing pieces I was trying to match them with. I had to unpick and resew one side twice until I got it right. I also wasn’t able to achieve a really sharp edge. After it was all sewn together I topstitched along the front and back seams, using my quarter-inch edge foot as a guide. My first attempt at this was a mess — the lines weren’t straight and the facing didn’t fully catch in the stitching. I unpicked the top stitching and used Steam-a-Seam 2 fusible tape to glue the edge of the facing to the inside seam it was supposed to align with. Then I carefully redid the stitching and it came out much better.
I’m pretty happy with the end result. It fits better than my first Onyx and the fabric is fun. The length works really well with dresses, but as you can see here it also works with pants. I don’t think this length looks as good with shirts not tucked in though, so I’ll probably make a longer one. It does go perfectly with the dress I made from the same fabric. The rounded back adjustment and lower back neck were a good improvement that makes the blazer more comfortable to wear and keep the back closer to my body. I feel like there is still something more I should be doing on the side back pieces to reduce the drag lines pointing to my armpits (which were not as prominent on my muslin, but maybe because it was made from a woven fabric with less drape). Maybe I do need a sloped shoulder adjustment? Also note that the front is fairly open in the photos and so you can see some fabric bunching under the right arm. When I pull the front pieces closer together that goes away.
Even though I didn’t do any of the fancy seam finishes, I do like how the seams look on the inside, sewn with my serger and neatly top-stitched in place. I did sew the center back seam on my sewing machine and serged the edges so that I could press it open.
Now that I have a collarless blazer pattern that fits pretty well, I want to make more! (But maybe keep trying to address the back drag lines with a sloped shoulder adjustment?) Next up, the hip-length version with pockets.
I’ve collected a few Boo & Lu PDF sewing patterns but had not gotten around to sewing any of them until now. I’ve been thinking about sewing up the Onyx blazer since it came out because it has princess seams for nice shaping, can be made in either knit or woven fabrics, and it is collarless. I have a closet full of blazers with collars, but over the past few years have found that blazer collars are increasingly uncomfortable on the back of my neck so I’m looking to expand my collection of collarless blazers, which it seems are harder to find (both ready made and in patterns). The Onyx also has several options, including a hip-length version with optional pockets, a peplum version, a tulip-bottom version, and a cropped version. I may eventually try them all. The pattern also includes options for bows on the back of the blazer. While they are cute, I am less likely to add them to a blazer for me to wear. There is a kid’s version of this pattern and I think the bows would be super cute on a blazer for a child.
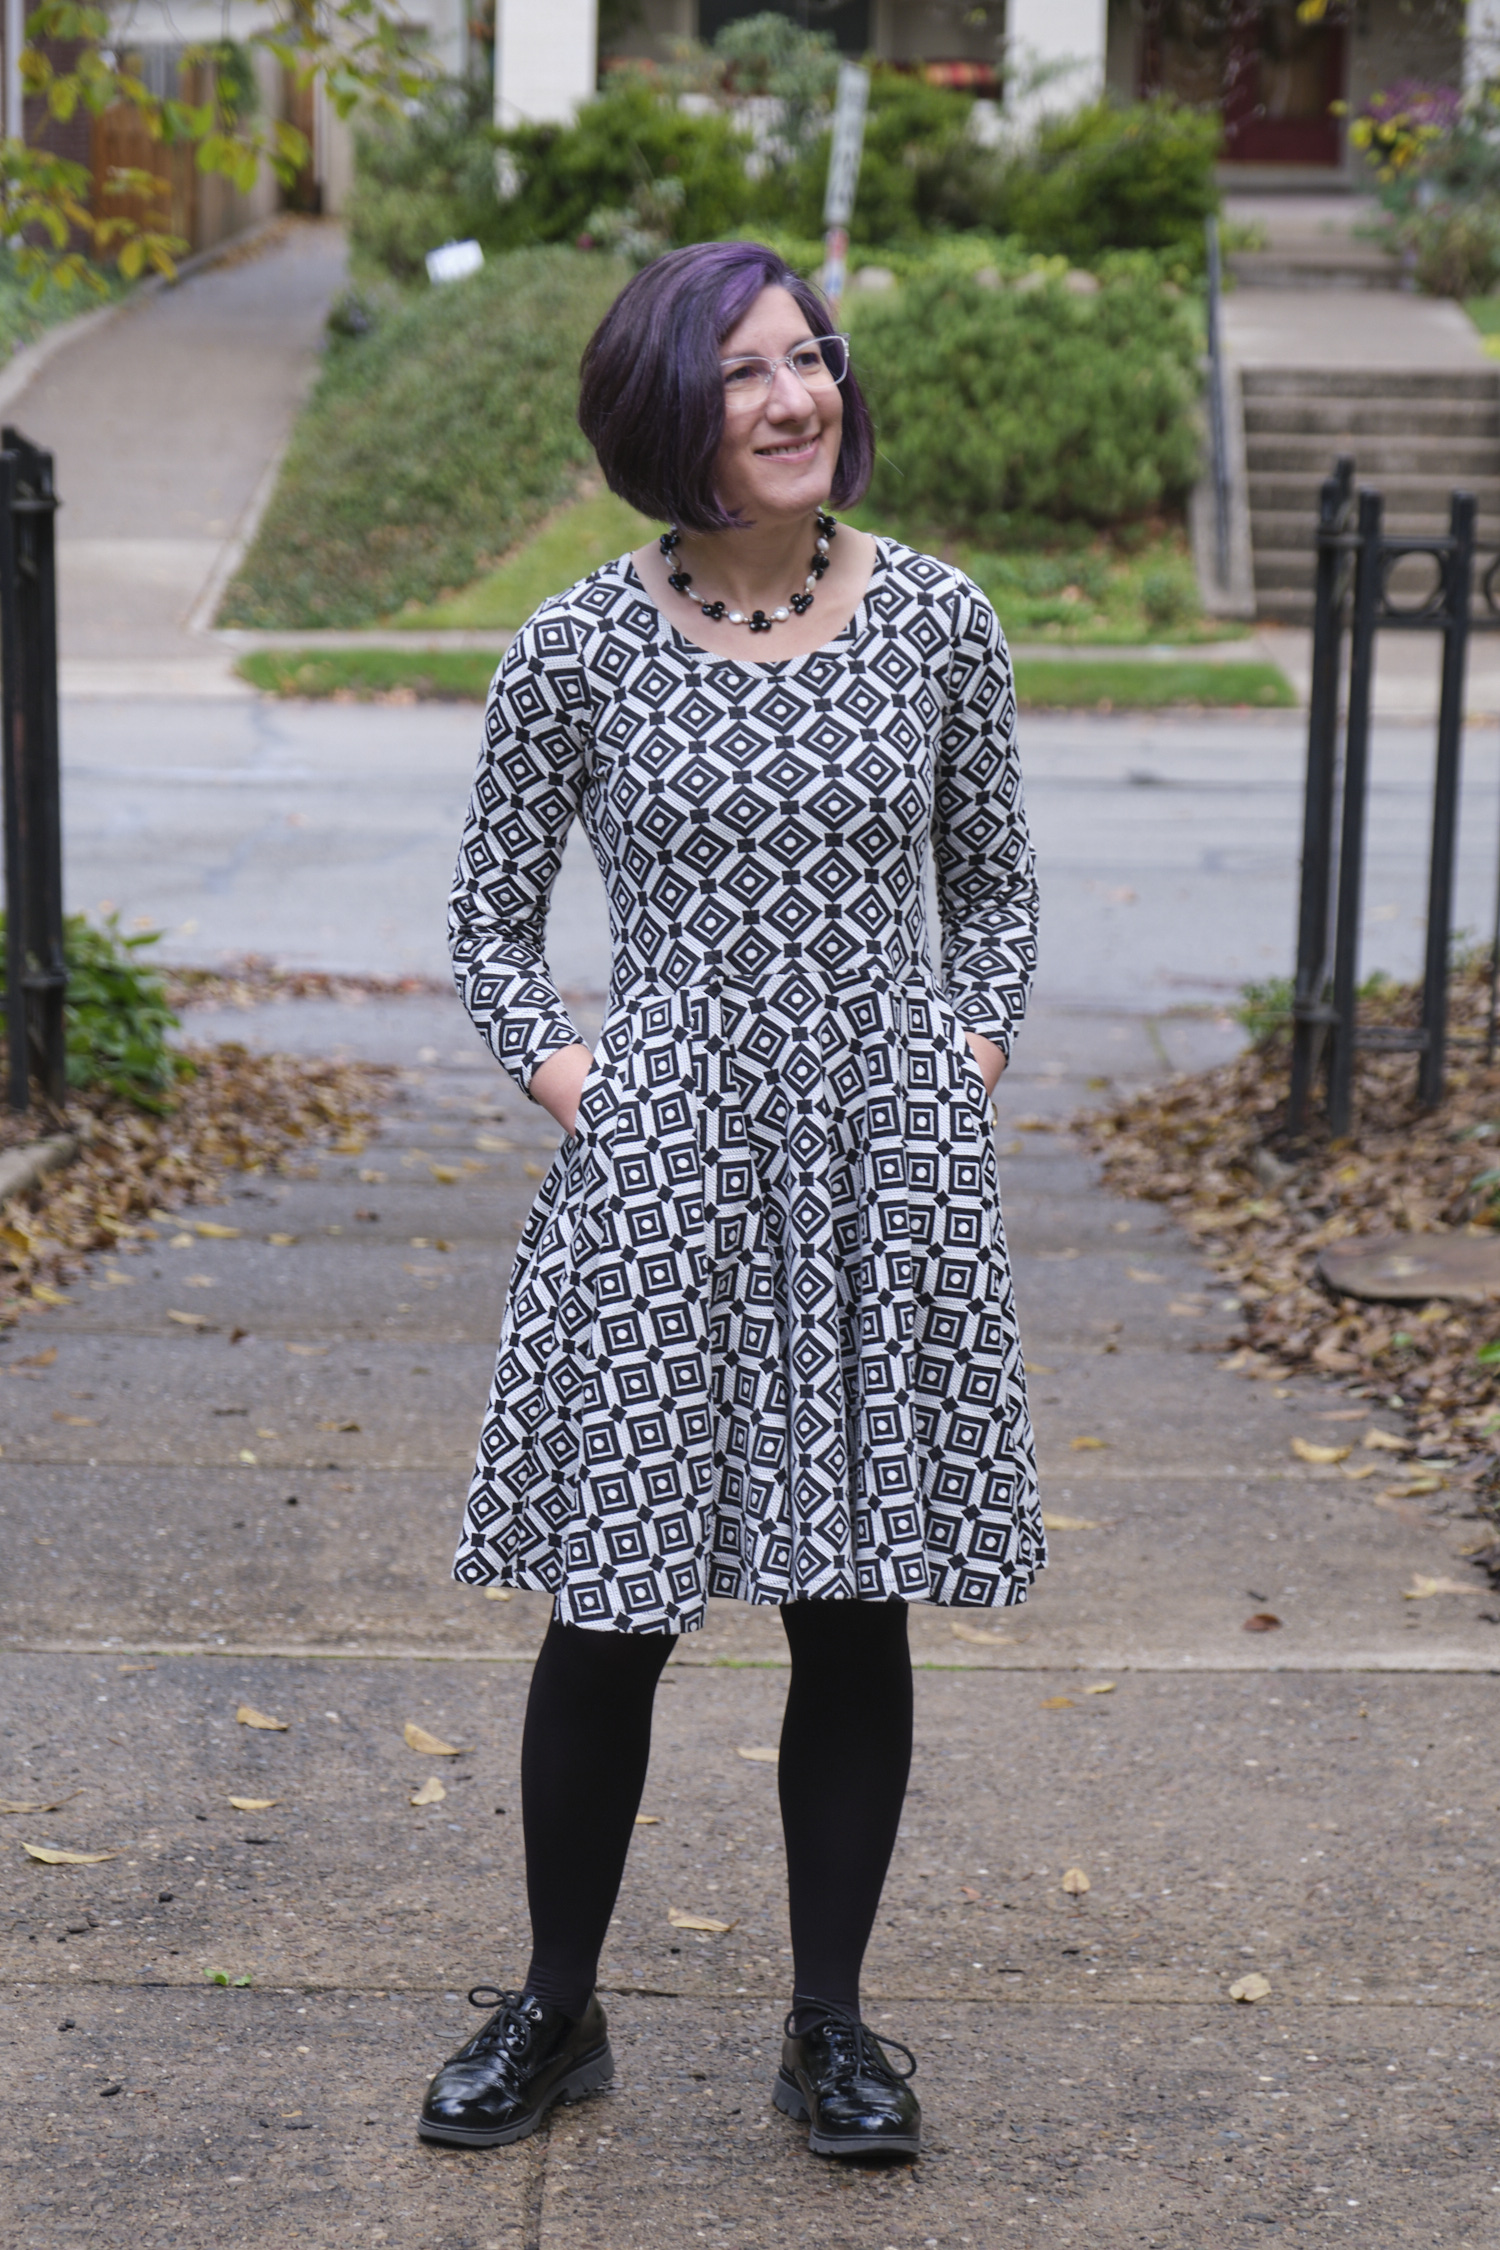
I started with the tulip version since it looked like a style I would likely wear a lot and it looked like I had enough leftover black ponte fabric from a pair of pants to make it. It has a lot of pieces, but they are all fairly small, so I was able to make good use of some of the scraps. This version requires only a little bit more than a yard of fabric (assuming ~58 inch width) in my size. I made a size 6, with a 1/2-inch small bust adjustment and sleeves shortened by 2 inches. (And it matches the pants — PE Walk Boldly — so now I have a suit!)
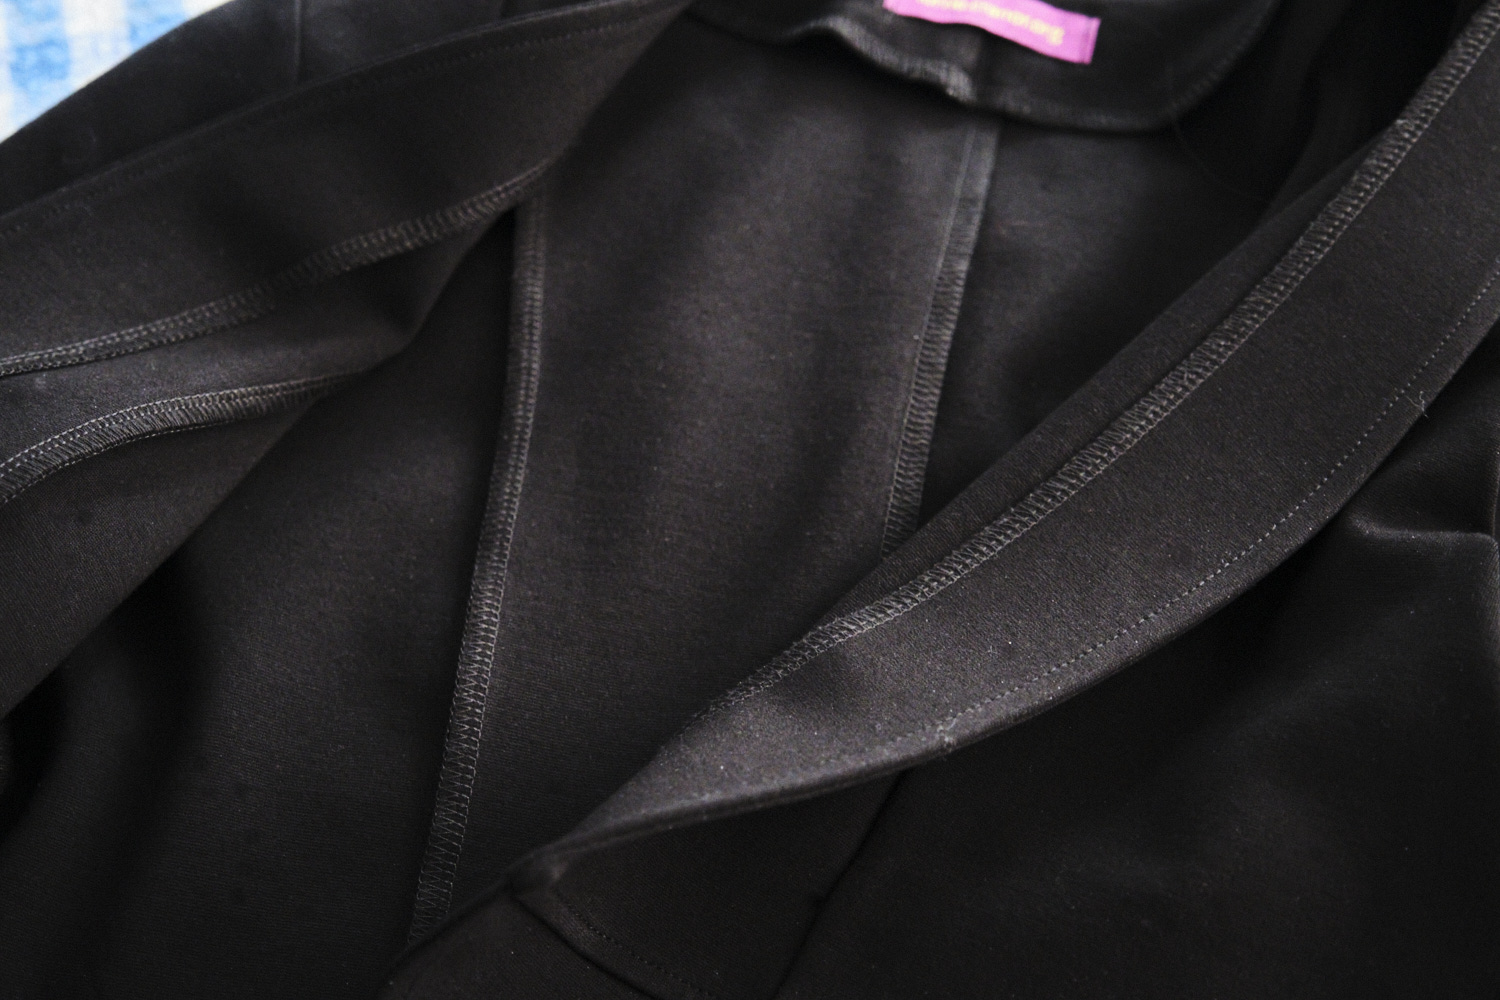
Boo & Lu Onyx blazer, size 6 with tulip bottom in black ponte, modelled with Sinclair Bondi top and PE Walk Boldly pants
The pattern includes a lot of instructions and notes, including suggestions for a full bust adjustment and small bust adjustment. In my case, I needed a small bust adjustment, something I had never attempted previously. The pattern has step-by-step instructions for the full bust adjustment, and then suggests doing the opposite for a small-bust adjustment. Most online tutorials take a similar approach. Bust adjustments are somewhat complicated as they involve making adjustments to a flat pattern piece designed to fit a round part of the body. Generally, you take paper pattern pieces and cut them apart and tape them back together. Since I am working with projected PDF files, I figured I should be able to do this electronically in Affinity Designer. I found an AD tutorial that explained how to do full bust adjustments. After watching the tutorial I attempted to follow the steps on my own, except the opposite. I realized that my AD skills are still fairly poor, but I learned quite a few things about using AD in the process — I should really watch more AD tutorials when I get a chance! I had trouble getting my head around how to execute this adjustment in the opposite direction, but after a lot of puzzling, I eventually figured it out and completed an adjustment that seems to have worked out ok.
I projected my pattern pieces with the adjustment and cut out the Onyx tulip pattern with no other adjustments. I knew the sleeves would be too long (they always are unless the pattern comes in petite sizes) but decided to cut the full length and adjust the sleeves on the finished garment after I tried it on.
The pattern has 3/8-inch seam allowances and offers five options for finishing the seam allowances. I chose the easiest, which was to just surge all the seams with a 1/4 seam allowance, trimming off 1/8-inch as I went. Since ponte is a knit, this works well and with all black fabric and black thread, it looks fairly neat too, although of course not nearly as nice as a bound seam allowance. The main downside is that ponte is fairly thick fabric and it would have been nice to be able to press some of the seams open rather than having them pressed together to one side. I think if I make another Onyx in ponte or other heavy fabric I might take the time to serge all the edges (without trimming) that will be seamed and then sew the 3/8-inch seam allowance on my sewing machine. But I am somewhat of a lazy sewist, so then again I might not!
For the most part, the blazer went together fairly easily, but I struggled a bit with attaching the sleeves. The pattern has great instructions and everything is nicely marked, but I still somehow clipped everything together backward, but realized something was off before sewing. I eventually figured it out, clipped everything together properly, and basted it with my sewing machine. Then I serged it together, but made the mistake of starting and stopping at the shoulder, which made it more difficult to smooth out the shoulder line. Next time I will start and stop in the armpit — or maybe just do this on my sewing machine and skip the serging.
Another problem I ran into was one of the front princess seams not lying as smoothly as I wanted. At first I thought it was a pressing issue, but after pressing again I realized one of my seams actually had an unwanted dip in it — it was only off by about an eighth of an inch, but it was enough to cause a noticeable bump in the princess seam right in the middle of the bust line. I resewed about 3 inches of seam on the correct seam line and that fixed the problem.
The instructions noted that the facings might not stay smoothly in place, and indeed mine did not. I tried their suggestion of fusing them in place with a few small pieces of fusible hem tape, and that did the trick. The interfacing I used on my facings was some leftovers from another project that I grabbed, and it was more of a medium weight than a lightweight interfacing. Next time I might try a lighter-weight interfacing.
Attaching the tulip pieces was fairly straightforward except for lining the corner of the tulip up with the front facing. Perhaps due to my heavy fabric and interfacing, I could not get the tulip corner aligned perfectly. I did try unpicking a few stitches at the bottom of the facing and clipping the corner, but it is not aligned as well as I would have liked. This is one downside of the tulip version that should not be an issue in the cropped or hip-length version of this pattern.
I made good use of several feet on my Bernina sewing machine. The patchwork foot with guide made the quarter-inch top stitching around the edges very easy. I also used my darning foot to stitch in the ditch to hold the facings down and my edgestitch foot for the sleeve hems.
Overall, I liked the instructions in the pattern and found the suggestions and photos helpful. I did find a couple of things that are probably errors. On page 11 the finished measurements for the four variations appear to be mislabelled. The crop version has the longest length, but clearly it should be the shortest. Even accounting for that, my finished garment was about an inch shorter than the measurements would suggest. The other error is on page 71 where dark lines are drawn on a photo of the facing to show the raw edges finished with a serger. I believe the lines on the top of the neck facing should be on the bottom of the neck facing.
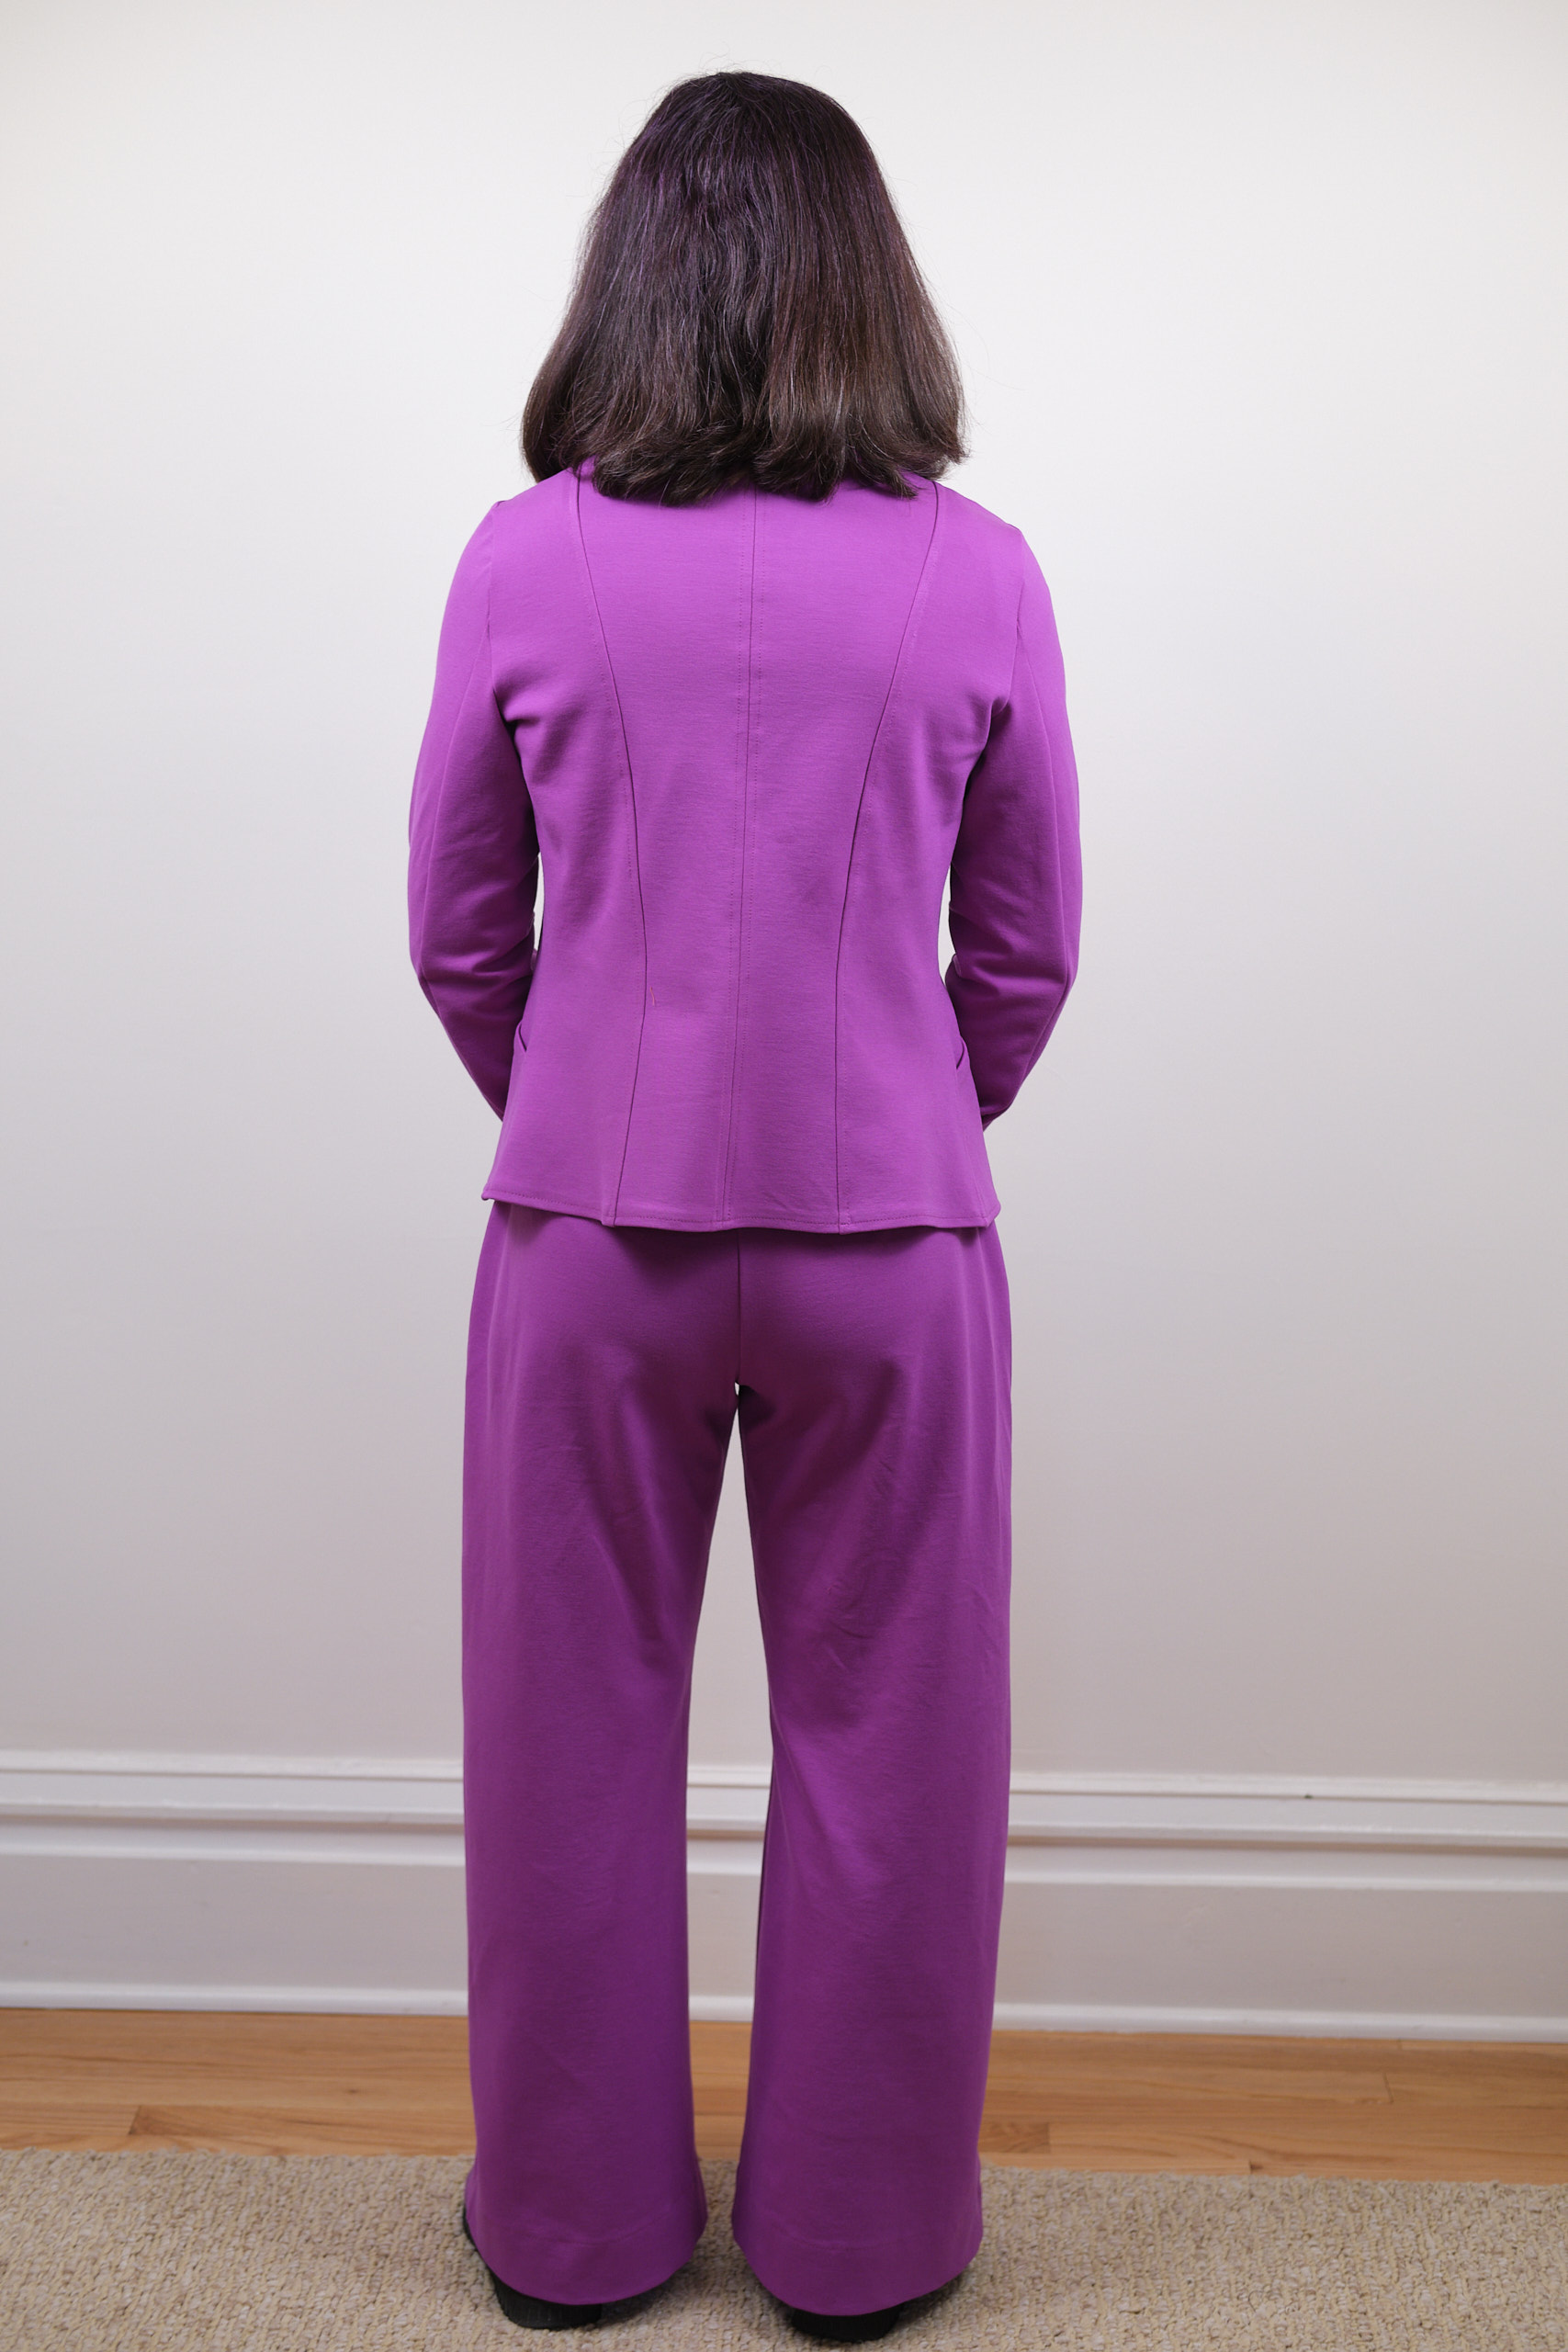
The blazer fits me well and goes well with both pants and dresses. It has a really nice tailored look, but is less work than a fully lined tailored blazer. I expect I will wear it a lot. When I took photos of the back (see below with PE Walk Boldly pants in black and PE Urban Wide Leg pants in purple, Sinclair Bondi top) I did notice some drag lines beneath the back shoulders. After pondering the cause, I believe it is likely a shoulder slope issue so I plan to try a muslin with a sloped shoulder adjustment and see if it helps before I make another one.
I’m looking forward to making more Onyx blazers. I’m planning out a ponte suit in a bright color with matching wide-leg pants. I’ve already worked out how to cut the blazer and the pants out together from 3 yards of fabric. I love the length on the tulip version, but would also like to try the hip-length with pockets (I will certainly have to shorten it though). The cropped length is fairly short, but I might make it specifically to wear with a dress, and I might round the front corner more similar to the tulip version. The peplum version is also cute, although wonder if it will be too poofy around my waist. I could also see lengthening the cropped version to be the same length as the tulip version…. so many options!
(It’s too cold outside for outdoor photos now so will have to make due with indoor fashion shoots. I’ll try to improve the lighting though.)


