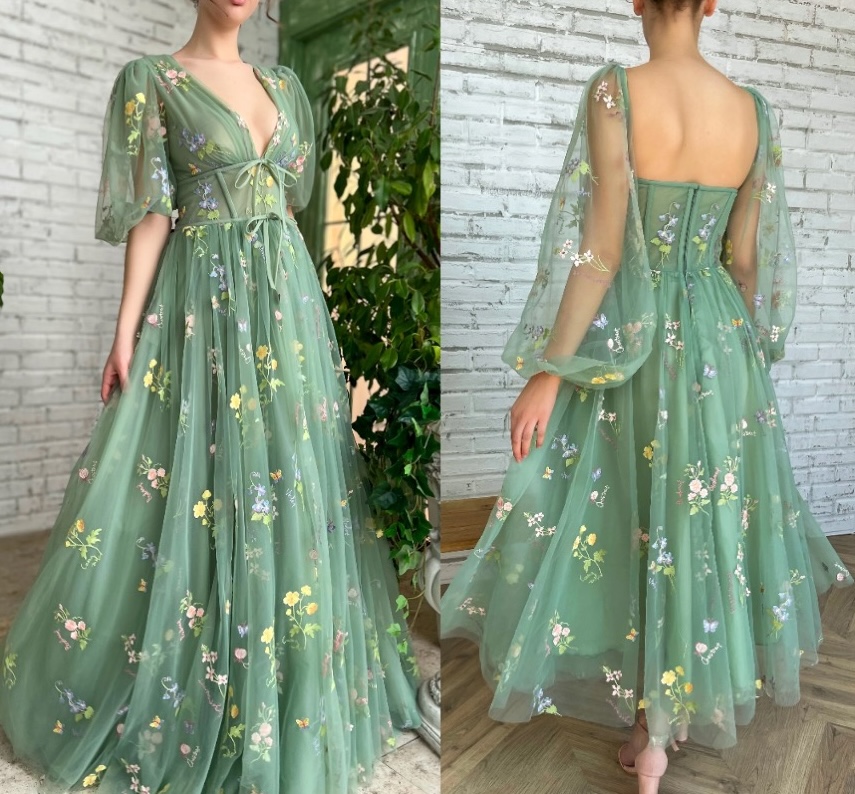
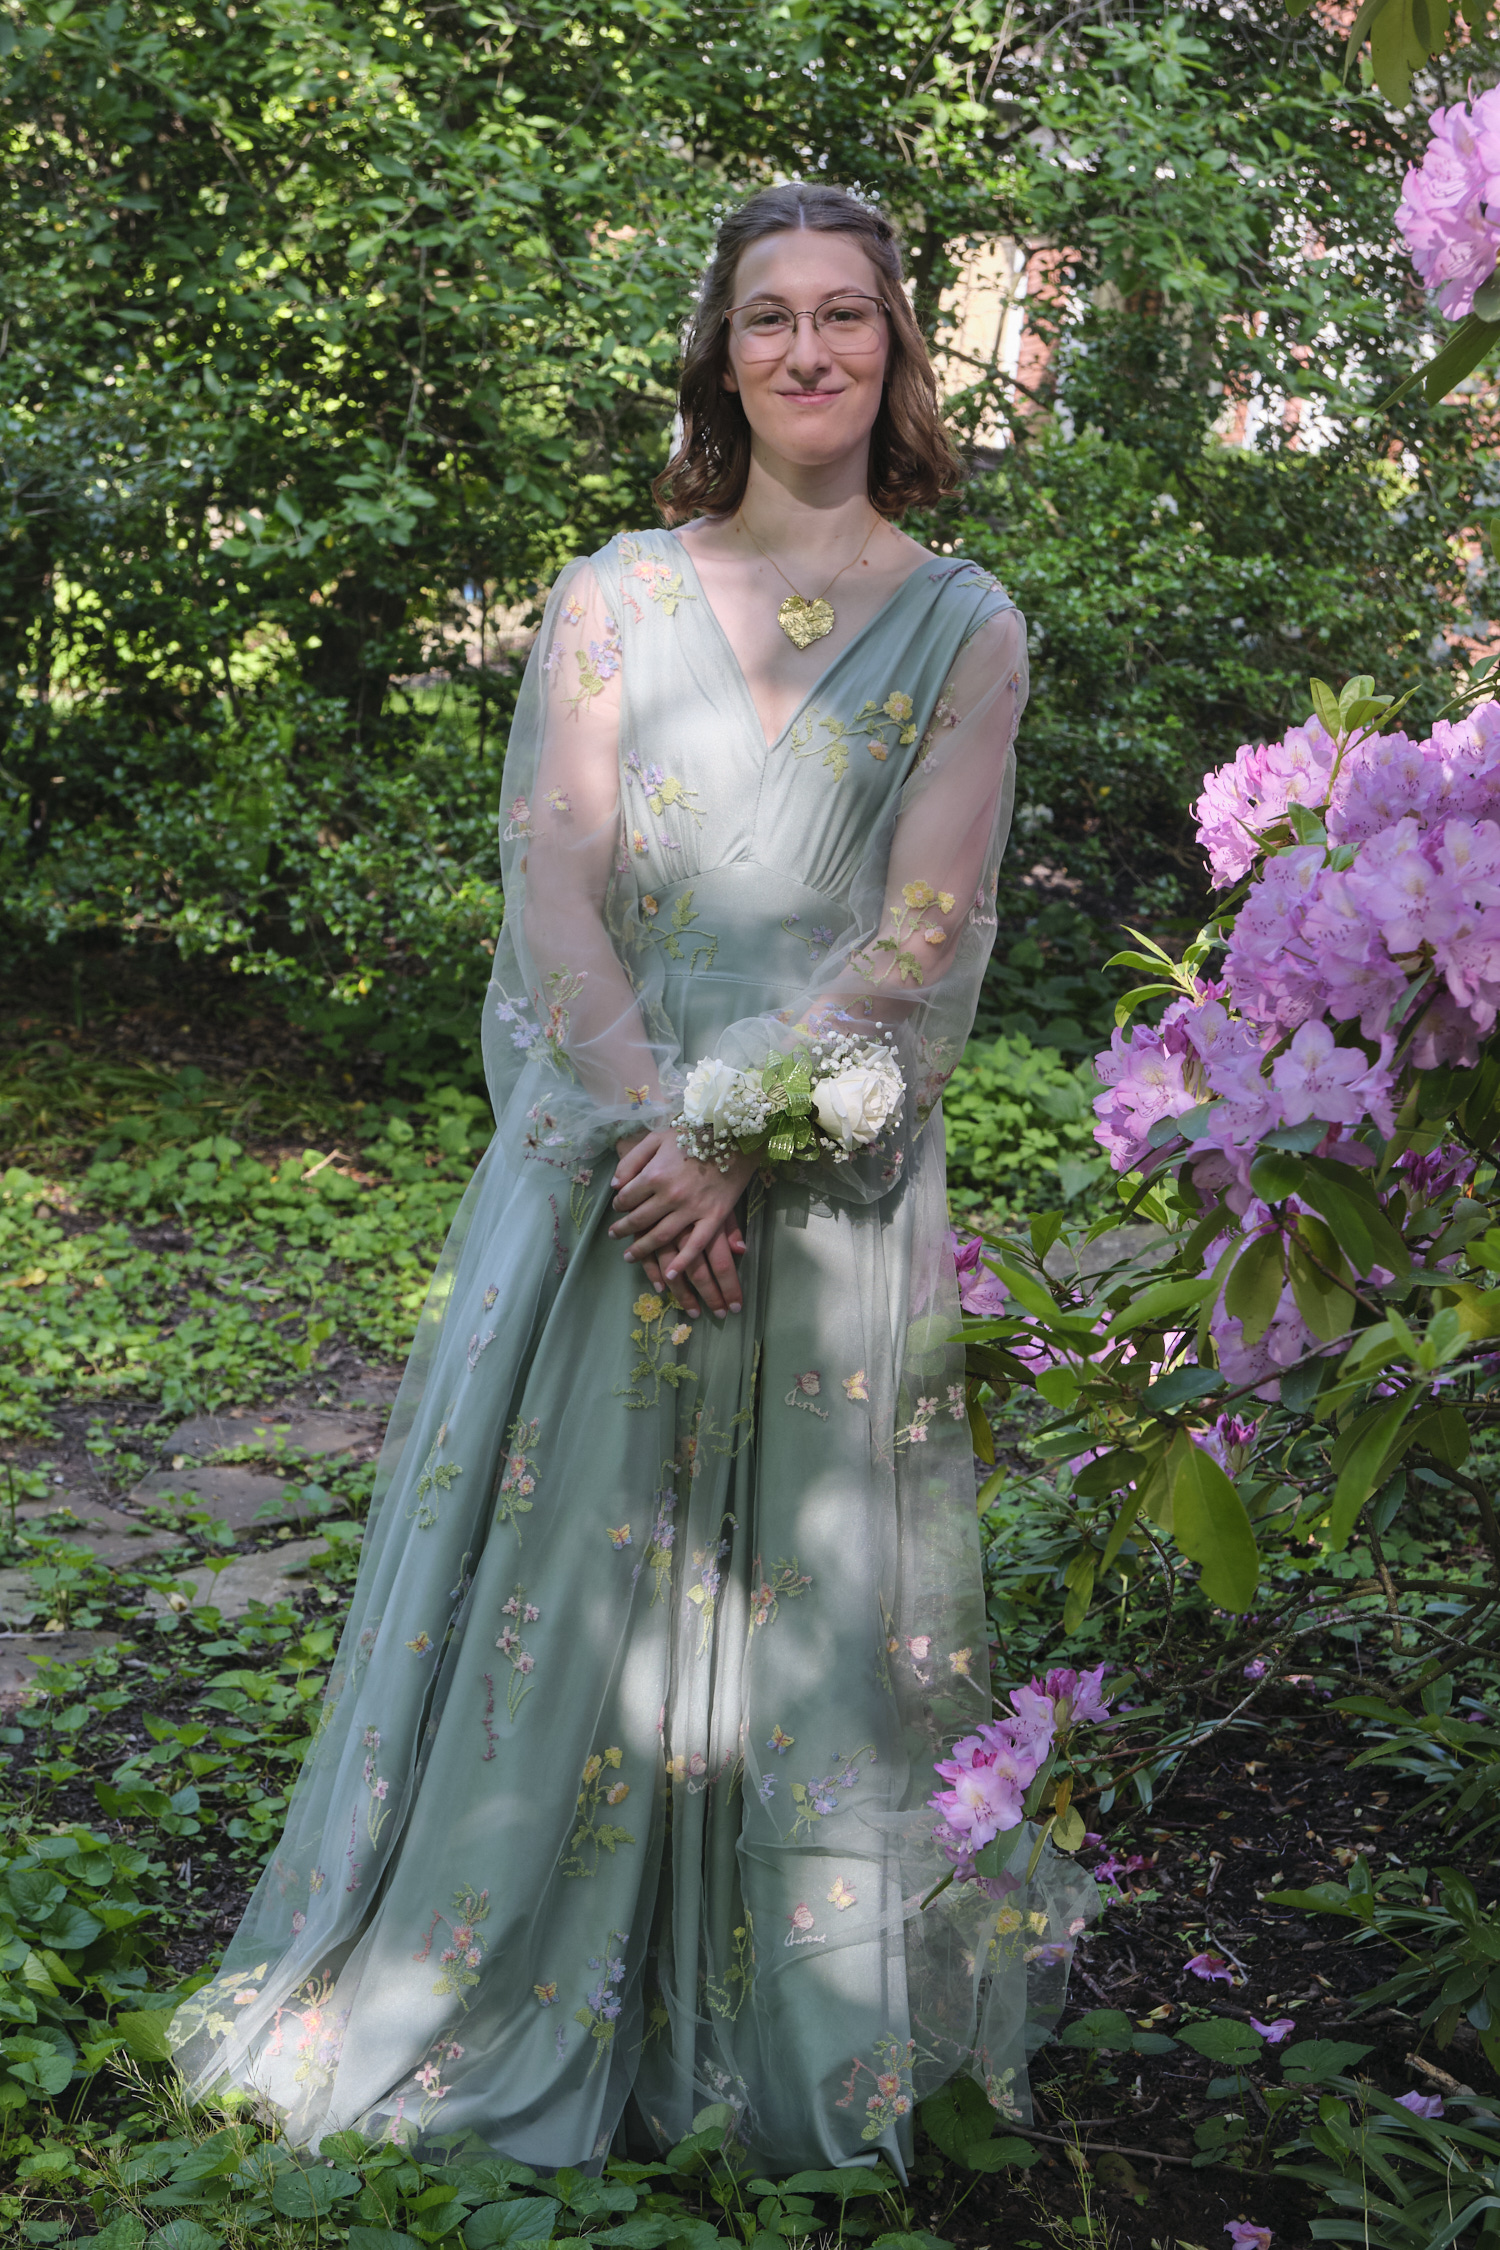
Last winter my daughter was browsing online looking for prom dress inspiration when she found the dresses of her dreams: Teuta Matoshi’s Flourishing Meadow Corset Dress, Flourishinig Meadow Midi Dress, and Flourishing Meadow Gown. She loved the sage green embroidered tulle, full skirt, and enormous tulle puff sleeves. She preferred the long sleeves on the corset dress and the V neck on the gown (but maybe not cut quite that low). What she didn’t like was the $850-$1050 price tag. Just in case, she showed me the dresses. When I suggested that we could try sewing something similar she objected that reproducing the embroidery on the tulle would be difficult and time consuming. I assured her that we could buy the tulle already embroidered.
I asked my daughter to look at online pattern shops for a suitable dress pattern (ideally with projector PDF files), and to check online fabric stores and Etsy for embroidered tulle. Over winter break she got to work and emailed me a list of URLs for dress patterns and tulle. The dress patterns were designed with zippers for woven fabrics, and all would require some modification to get the look she was going for. It occurred to me that one of my favorite indie pattern companies Sinclair Patterns had a knit dress in a similar style. I wondered whether the Sinclair Yasmin dress might be adapted to have deep front and back Vs (but not so deep as to preclude wearing a normal bra), a full skirt, and a tulle overlay. I remembered seeing a post from a sewist on Sinclair’s Facebook group in which she had used the Yasmin pattern to reproduce the Internet famous Lirika Matoshi strawberry dress, which also has a tulle overlay. I decided the Yasmin pattern could work.
My daughter debated which tulle to use at length, and eventually selected tulle that appears to be exactly the same as the tulle used in the original flourishing meadow dresses. The embroidery might be a little bit looser than in the original, but otherwise it seems to be the same. We ordered the tulle from an online lace store in Hong Kong that sells on Etsy.
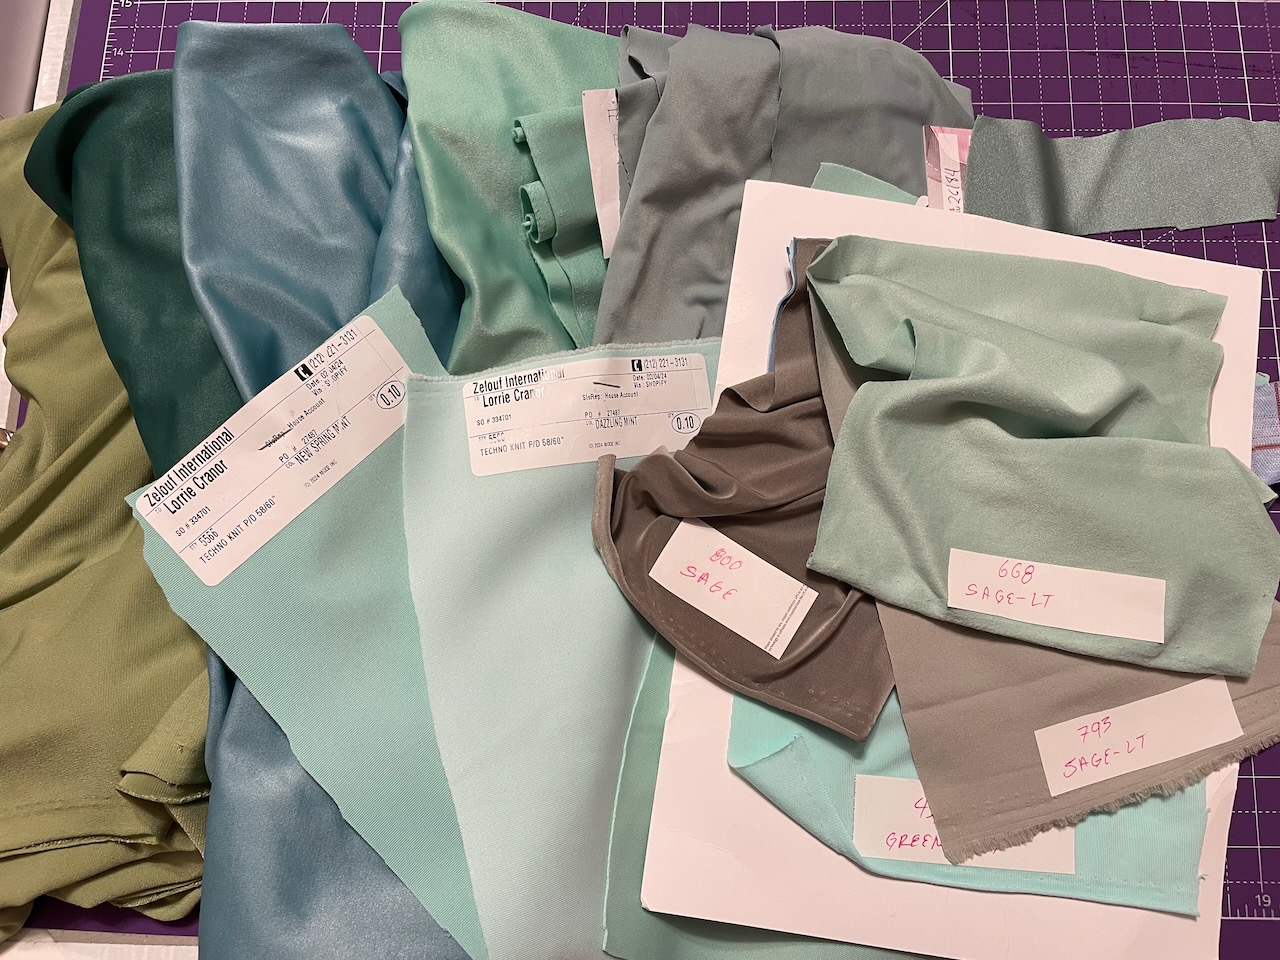
Once we settled on the pattern and the tulle, we needed to find light green fabric that matched the tulle. It is really difficult to shop for fabric by color online as the color looks different on different monitors and different lighting conditions impact the fabric photos. I also wasn’t entirely sure what kind of fabric I wanted. I knew I wanted a knit, something with some sheen to it, and ideally a bit of structure but also fairly drapey. I ordered about 20 different green fabric samples from four different online fabric stores. I tried scuba, ITY, tricot, and various other fabrics with combinations of spandex, polyester, nylong, and rayon in their fiber content. I ordered variations on sage green, light green, mint green and “greeninsh” (yes that’s what one fabric store call it) colors. You can see most of the samples in the photo below. Note how much variation there is in the fabrics, including those that have the same color name.
The winner was Sage Sparkle Nylon/Spandex from Califabrics, which was the perfect color and weight for this project (and a little lighter than the green in the original dress). This is a fabric that might be used to make leotards or bathing suits, but also has a nice drape for a dress. When I went back to the website to order five yards of it, I discovered they had only one yard left. As it was a designer deadstock, I feared it might not be possible to get more, but I emailed the store to find out. About a week later, Ron from Califabrics emailed me to say he had found another 15 yards of this fabric (Thank you Ron!). I was so excited I ordered it immediately!
Before cutting into the beautiful prom dress fabric, I decided I would do some prototyping first. I sewed myself a Yasmin dress out of floral ITY fabric without alterations and then sewed my daughter a Yasmin top modified to have front and back deep Vs. Finally, I sewed myself a lovely baby blue knee-length dress with the V alterations, a full-circle skirt, and a tulle overlay with embroidered daisies. I learned a lot in the prototyping process and got a really lovely dress for myself that I probably would not have otherwise attempted (and I wore it a couple of weeks ago to perform with my flute choir).
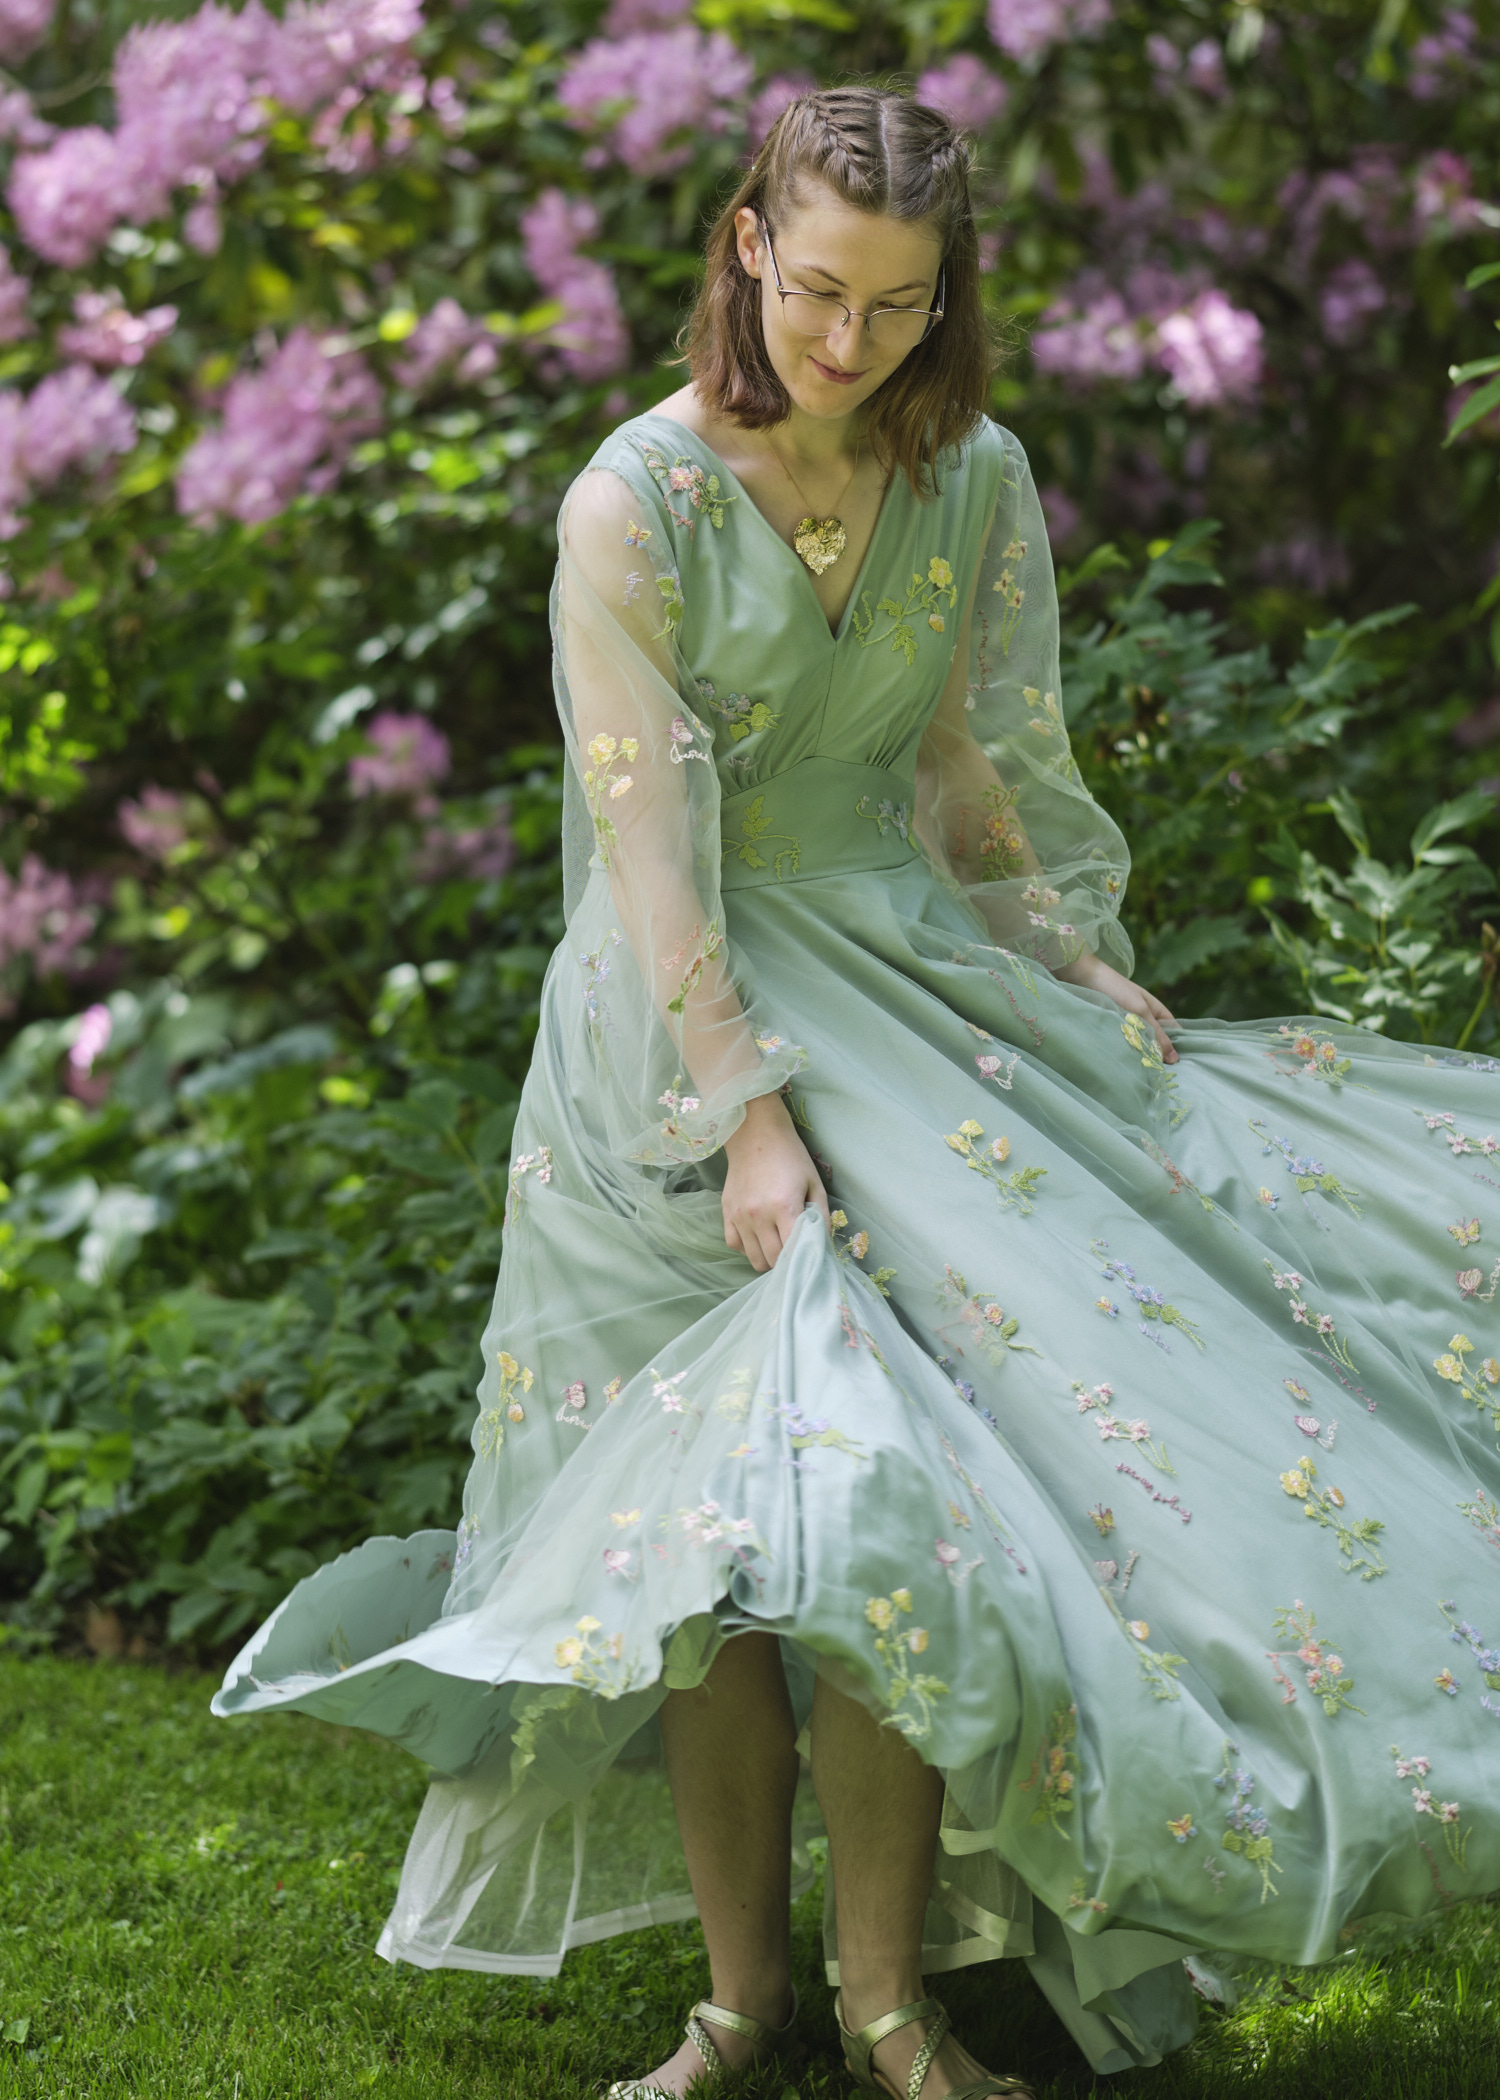
After my extensive prototyping, I opened the Yasmin pattern in Affinity Designer and modified it for this final prom project. I started with the 2R size and drew in a square shoulder adjustment (that I had discovered my daughter needed when I made her the modified top) and the modified front and back Vs from my prototyping. I moved all the dots for marking the pleats closer to the seam allowance so that I could mark them on the fabric without fear of them showing up on the finished garment. Having learned from making my blue dress that the tulle overlay substantially reduces the bodice ease, I added about an inch to the side seams of both the front and back bodice pieces, starting at the bottom and tapering up to a quarter of an inch at the armscye. I also added about an inch to each side of the front and back waistband pieces, effectively adding almost 4 inches of ease. (That seemed like a lot to add, but I needed it for the blue dress and I figured if it turned out to be unnecessary I could always trim it off and resew the side seam.) I further modified the bishop sleeves I used in the blue dress to make them even wider and puffier, including stretching out the top of the sleeve so that it needed to be gathered before being attached. Finally, I drafted a full-length (40 inch) full-circle skirt pattern based on the Sinclair flared skirt add-on pack for the Valley Skater Dress. I then opened a new Affinity Designer file and made a a page the size of my 5-yard fabric piece. I copied the pattern pieces onto this page and laid them out so everything would fit. The big puffy sleeves just barely fit (I had considered making them even bigger to more closely match the original, but this was all I could do with the fabric I had). I decided I could cut the skirt as two giant semi-circles and avoid the center seam.
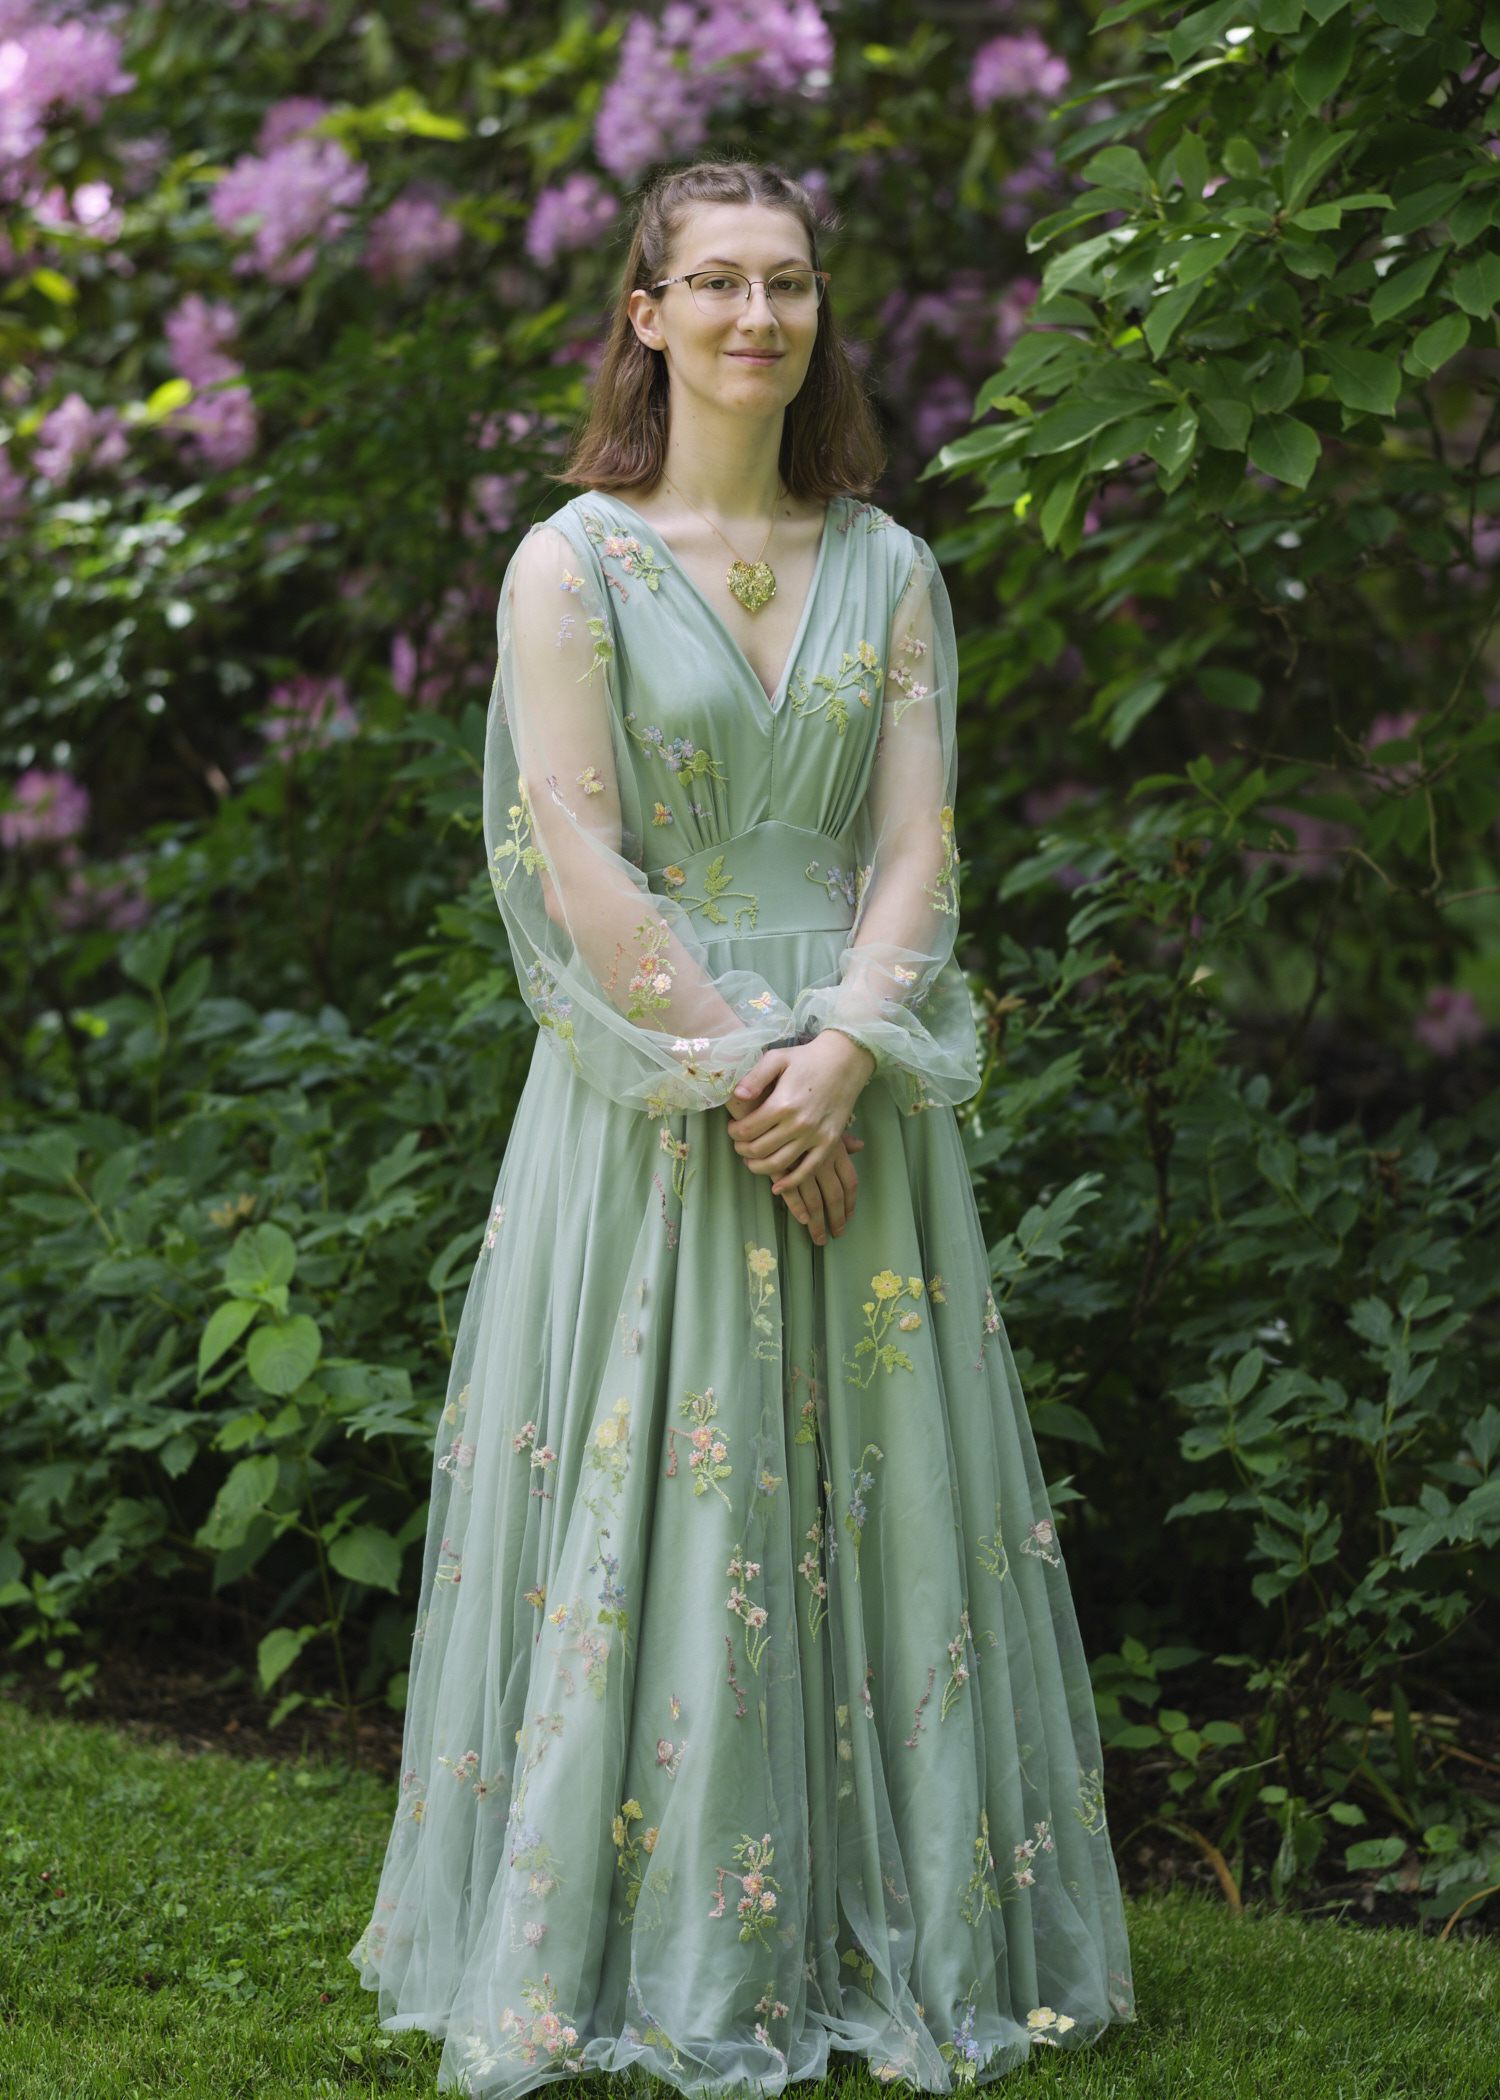
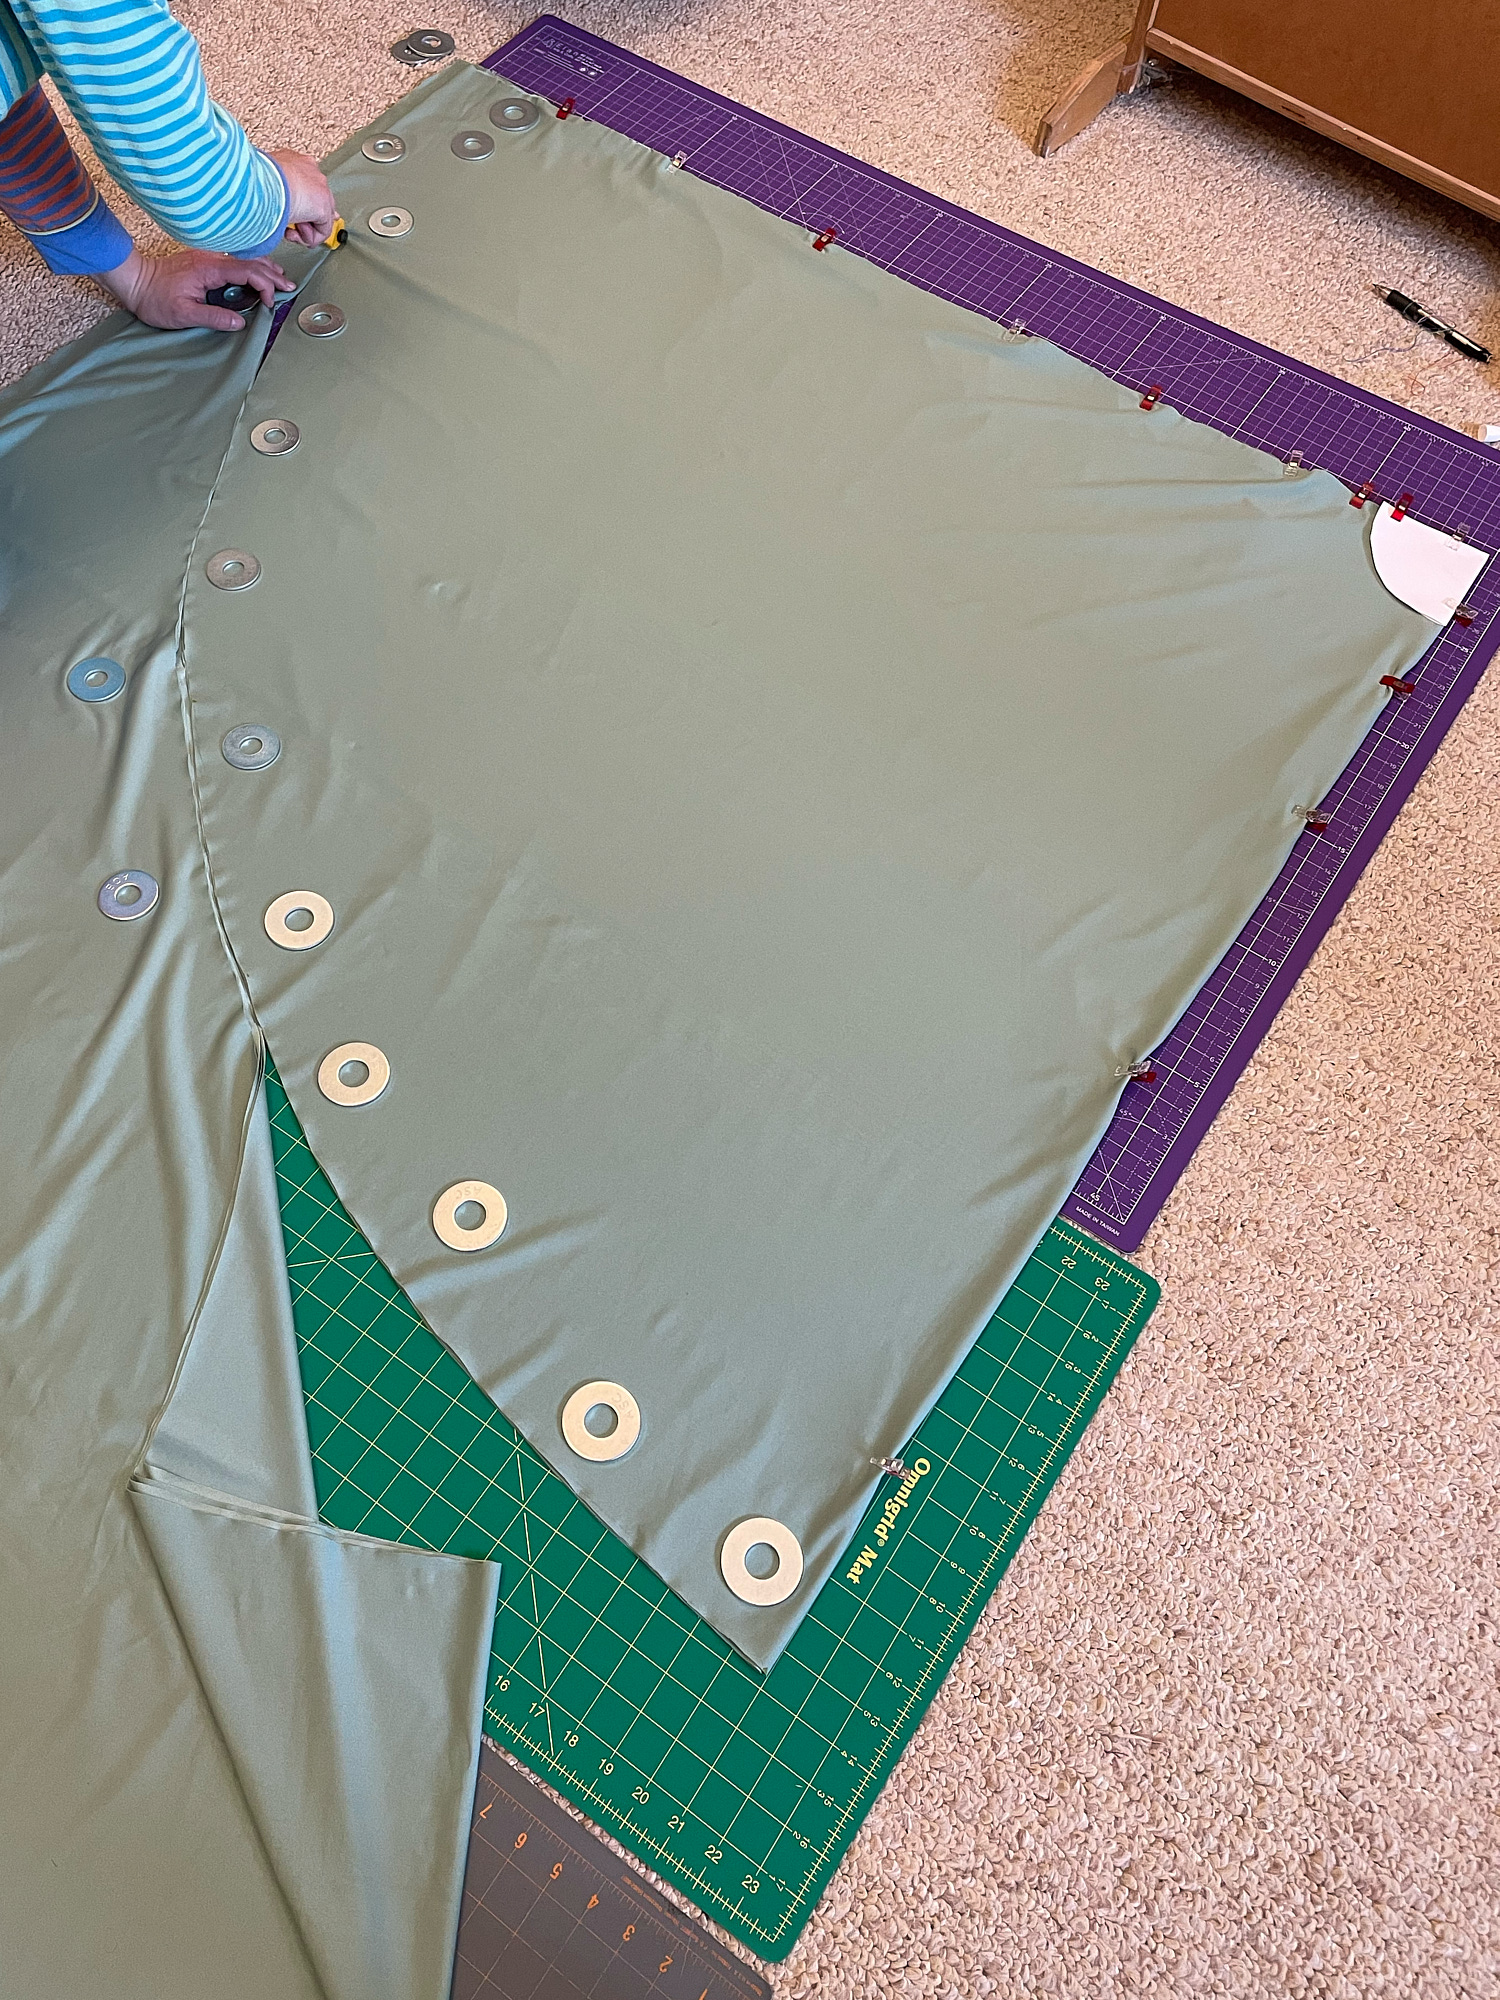
I realized that the projector wasn’t going to be much help for cutting the full-length full-circle skirt. So instead of projecting I moved all my cutting mats to the floor and spread the green lining fabric out on them. Then I enlisted my husband to assist me in making a giant compass out of a pencil and a piece of string to draw the semi-circles on the fabric (you never know when things you learned in geometry class may come in handy!). I then cut the semi-circles with a rotary cutter. I used the lining semi-circles as a template to cut the tulle semi-circles. I then moved my cutting mats back to my sewing room and projected the bodice and pocket pieces as usual. I cut the bodice pieces on the bias to maximize the stretch I could get out of the tulle in both directions. The waistband needed the most horizontal stretch, so I cut that entirely in the horizontal stretch direction. You can see this in the finished dress if you look at how the flowers are angled in the bodice. The flowers on the skirt are vertical in the center and horizontal on the sides due to the semi-circle construction.
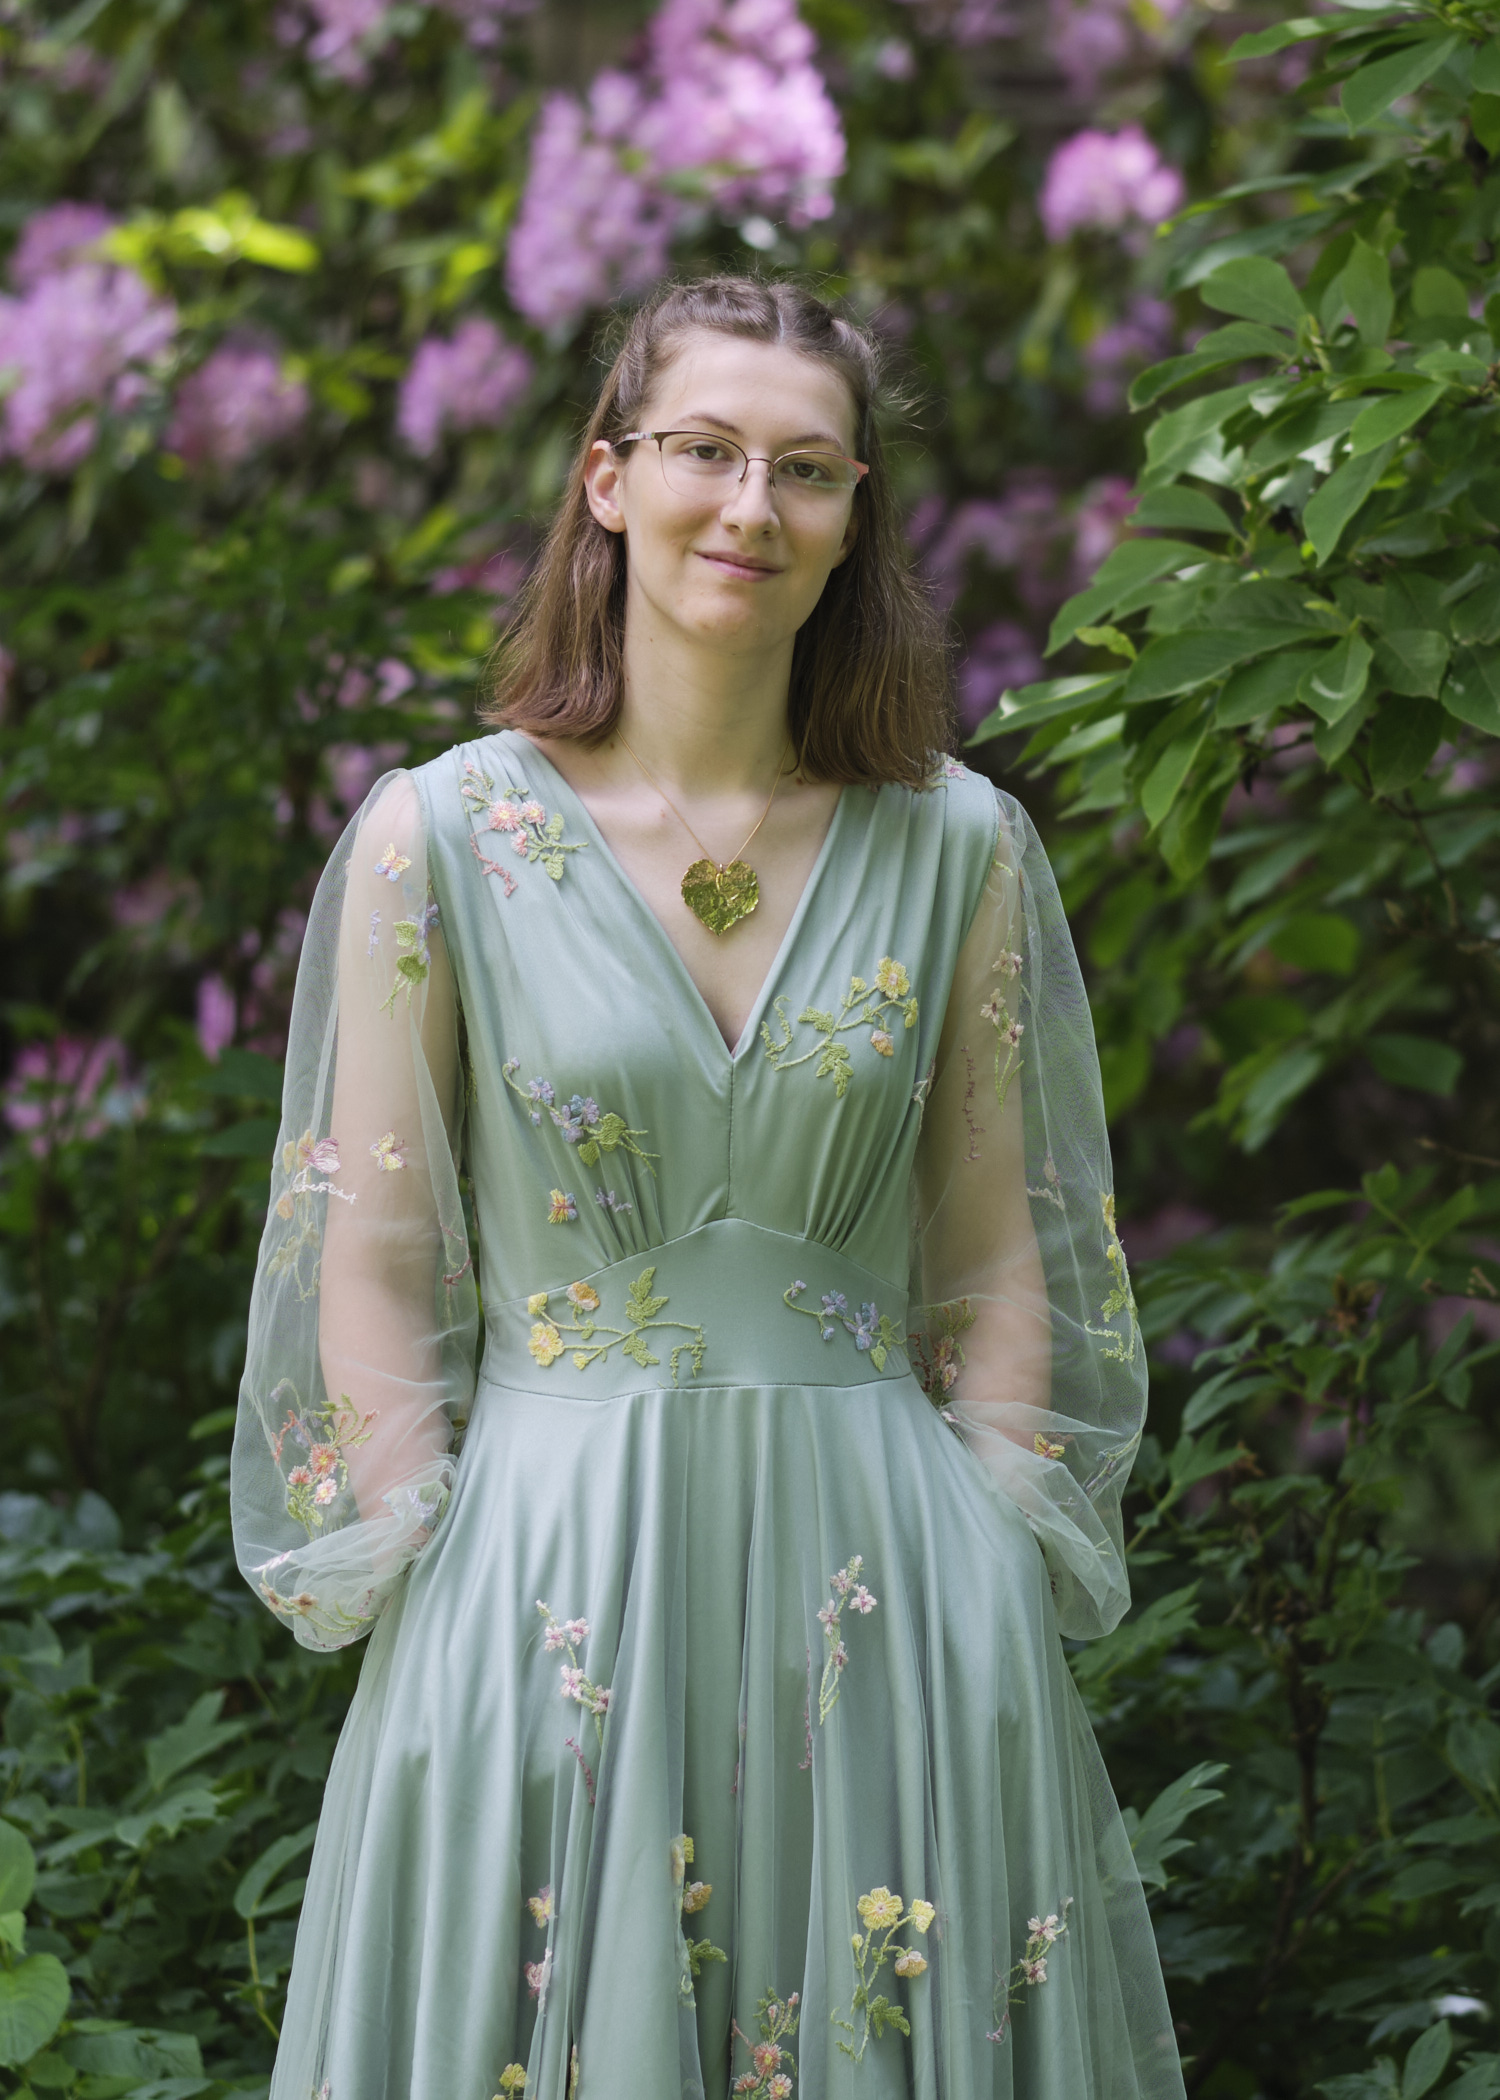
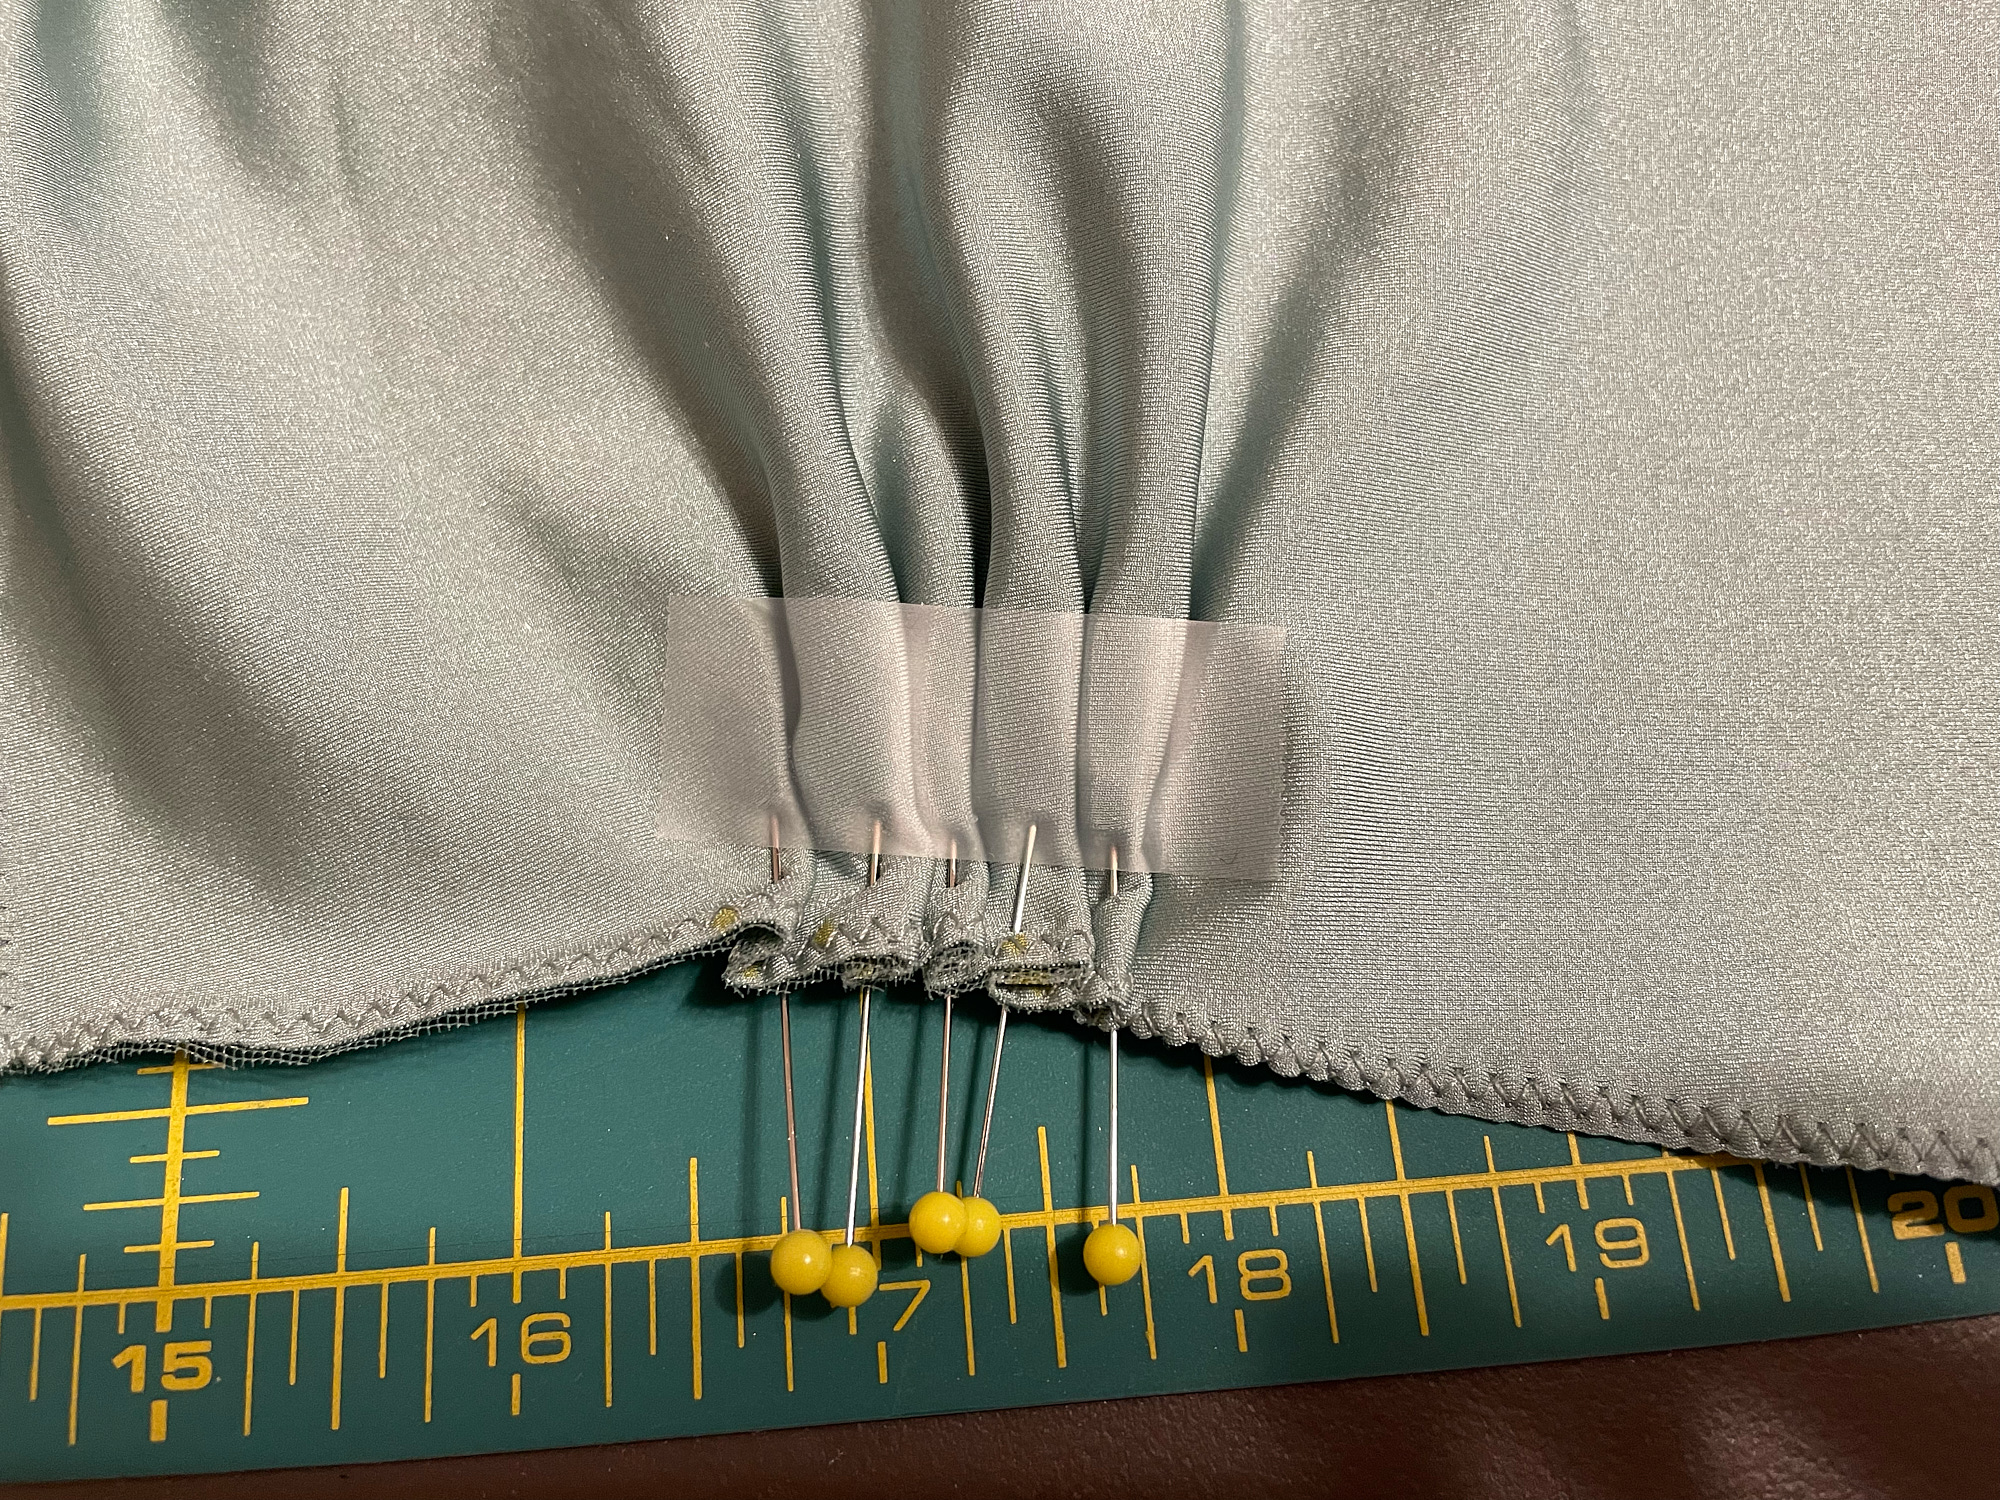
Once everything was cut out, I zigzagged all the tulle pieces for the bodice to their corresponding lining pieces so that I could sew the two layers as one (flatlining). Then I started working on the pleats, first pinning and taping on both sides them before zigzagging them in place. Then I sewed together the bodice and checked the fit on my daughter. It fit well without any further modification, so I went ahead and attached the sleeves and made a casing at the wrists for 1/4-inch elastic. I checked the fit again on my daughter and she approved.
Next, I moved on to sewing the skirt. I sewed the to tulle pieces together with a shallow zigzag and a quarter-inch seam allowance. I left a 5.5-inch opening in the side seams to align with the pocket opening in the lining. I attached the pockets to the lining with my sewing machine and understitched them. Then I used my serger to sew the lining side seams in place. To help keep things from slipping out of the pockets I sewed the pockets partially closed from the top down 1.5 inches, left a 5.5-inch opening, and then sewed to the bottom of the pockets.
The next step was to join the two skirt layers and attach them to the bodice. I sewed the tulle to the lining at the waist with a shallow zigzag stitch and a 1/8-inch seam allowance. I then machine-basted the bottom of the waistband layers together with a 1/8-inch seam allowance. And then I basted the bottom of the waistband to the skirt layers. I had to remove some of the basting when I realized some of the layers had slipped out, but eventually I had everything securely basted together. Finally, I sewed the waistband (with bodice already attached) to the skirt layers with a shallow zigzag and 1/4-inch seam allowance.
At this point the dress was ready to try on and probably finished except for minor adjustments and possibly hemming. However, I had to wait two days for my daughter to return from a college visit before she could try it. You can see it here on a hanger both with and without a long crinoline underneath.
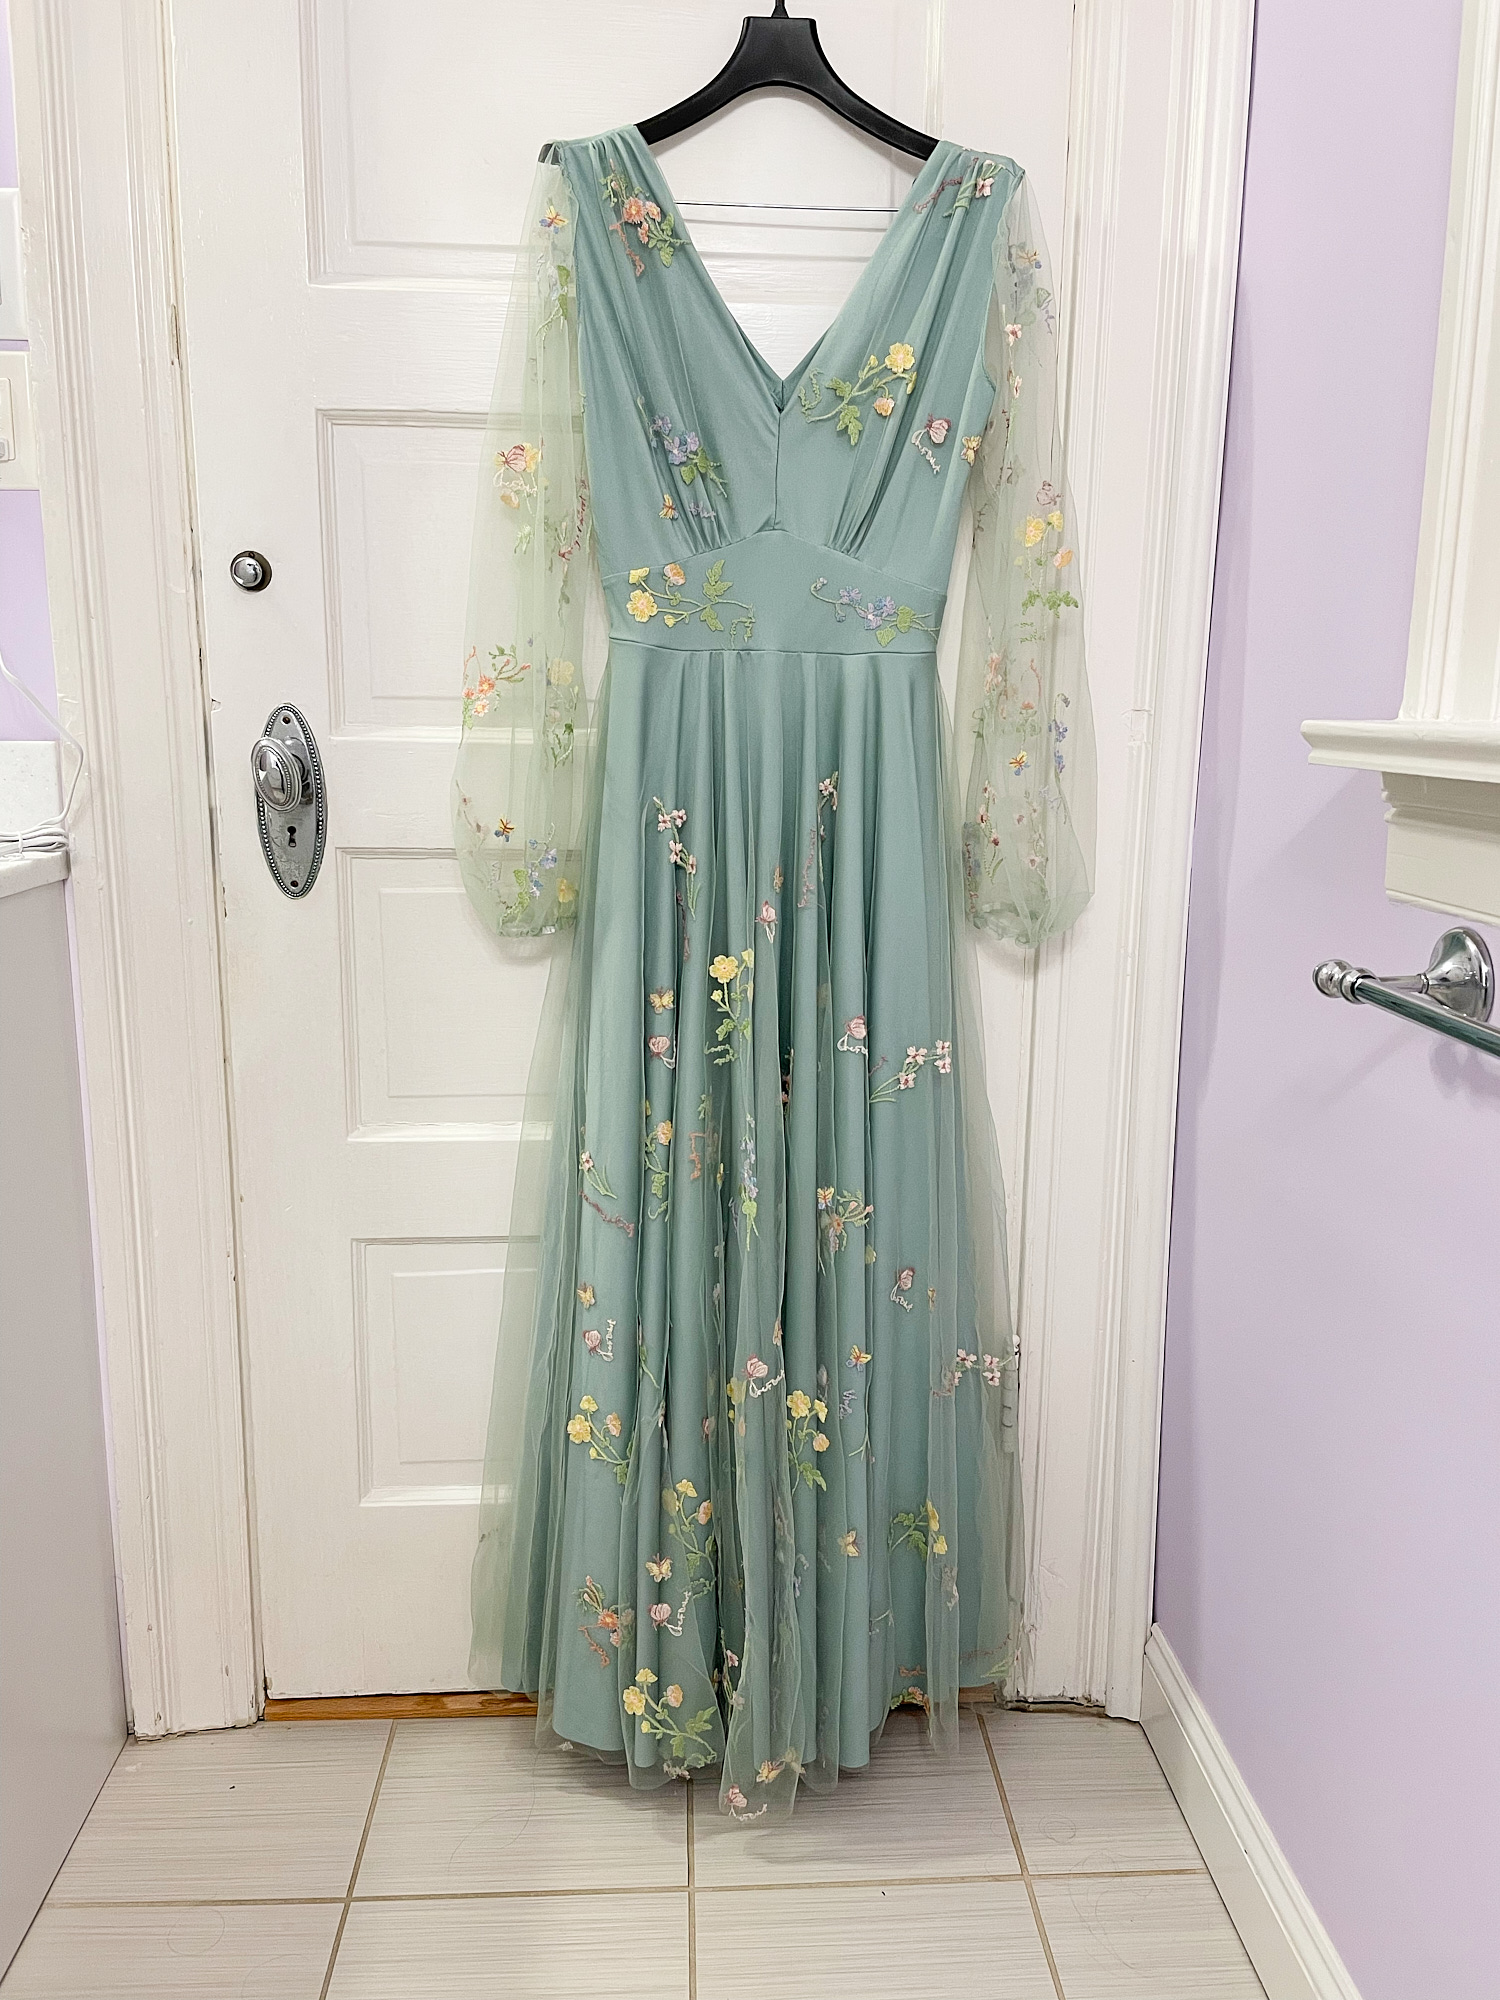
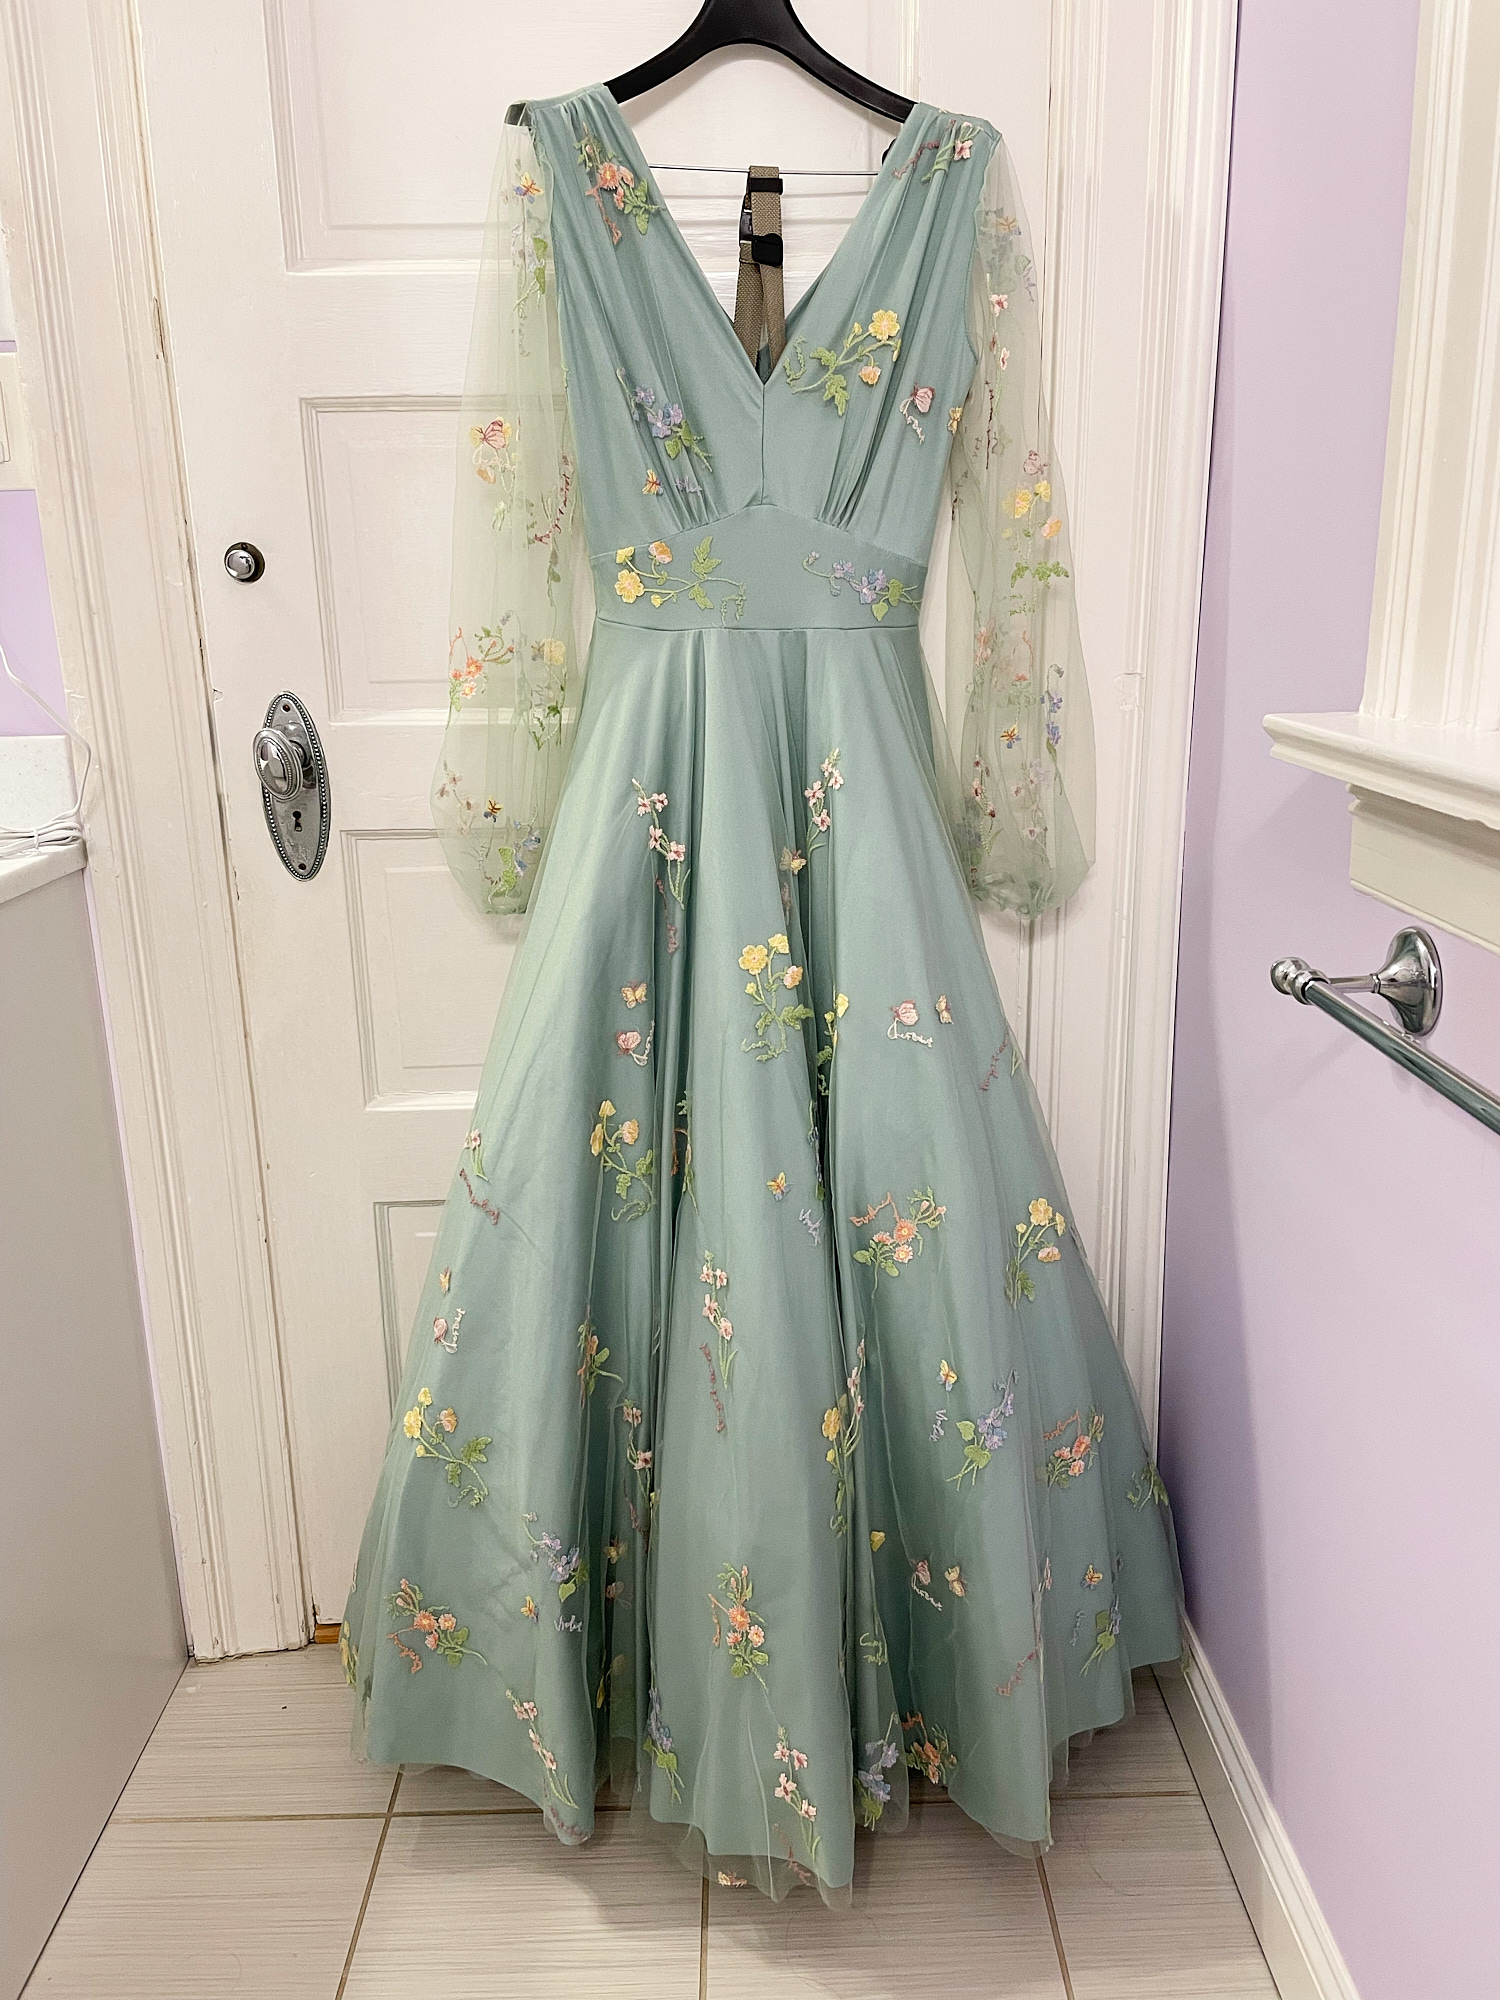
I think it looks nice both ways… more princessy with the crinoline and more sophisticated elegance without. After my daughter tried it on we decided to leave it unhemmed as the length looks about right with the heels she is going to wear to prom. I cut a pretty clean edge on the circle skirt and it is not going to unravel. This probably saved me an hour or two of hemming, even with my folded hem foot. In the end my daughter cut a layer off the crinoline to make it a little less poofy and not as hot to wear.
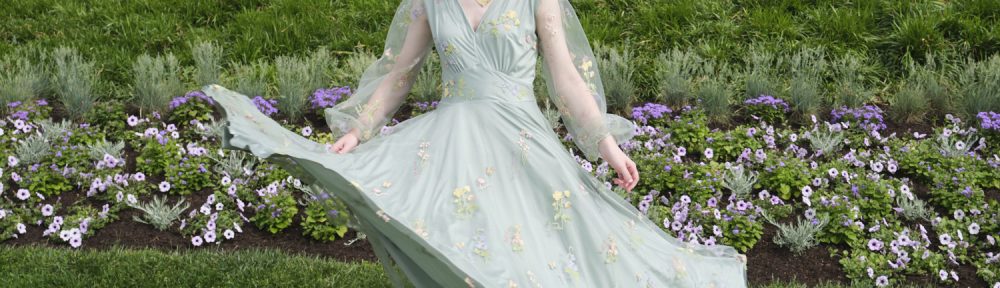
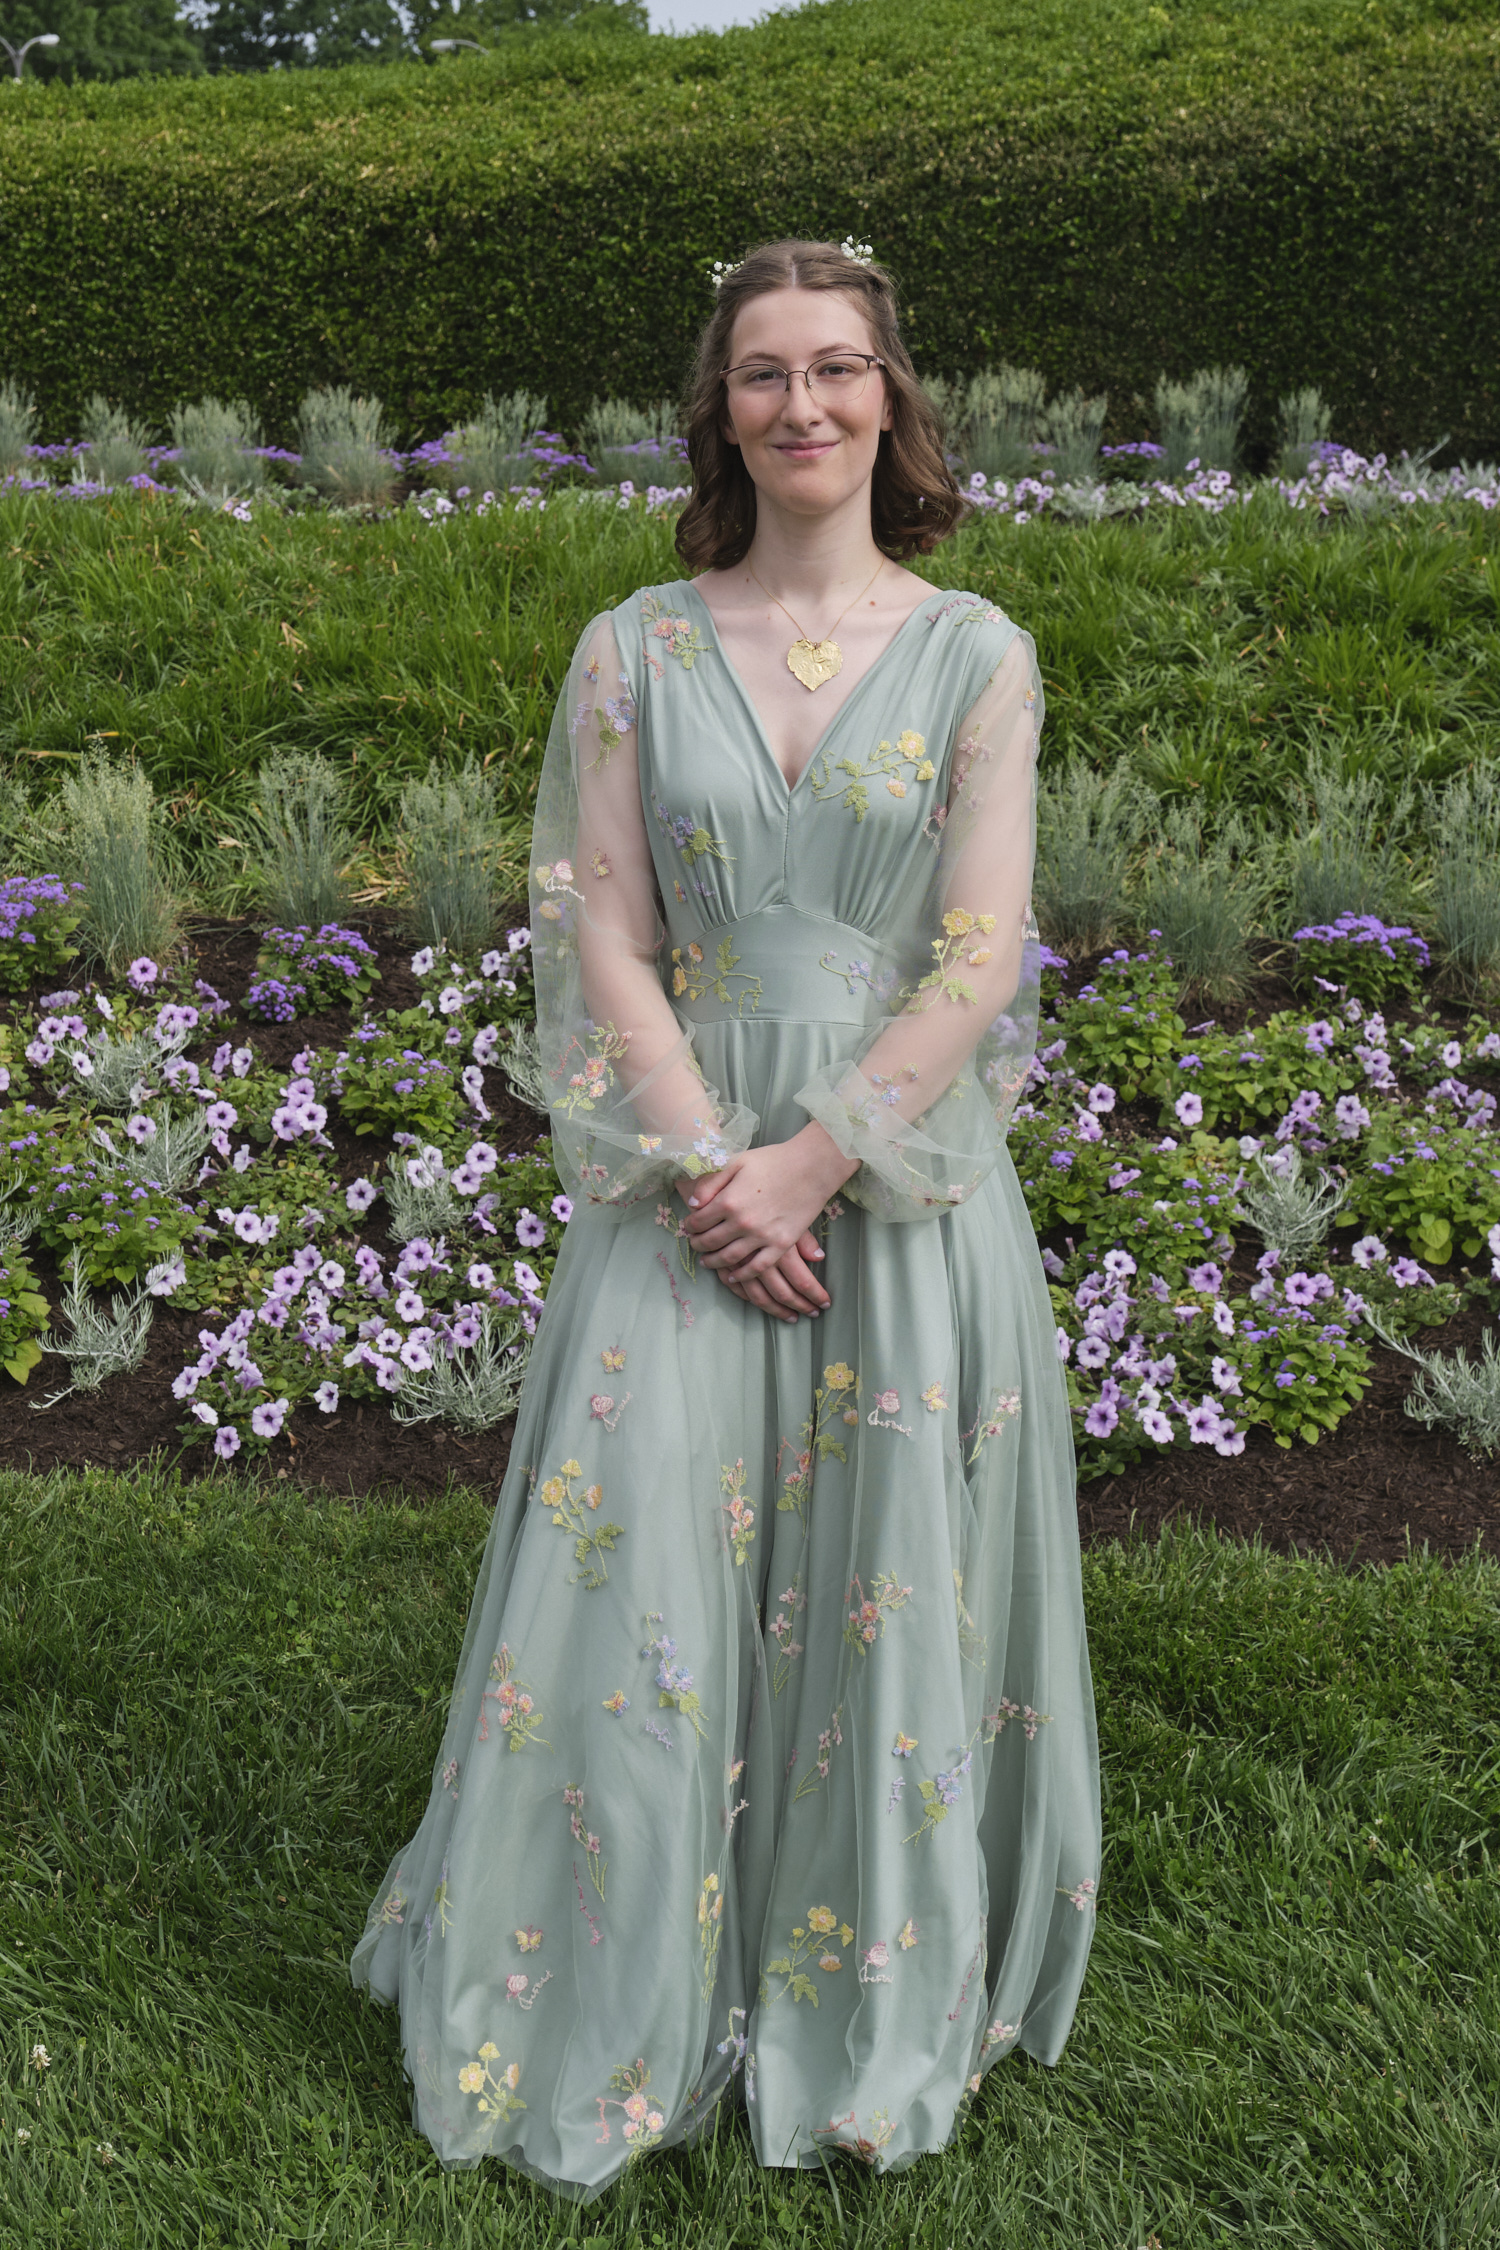
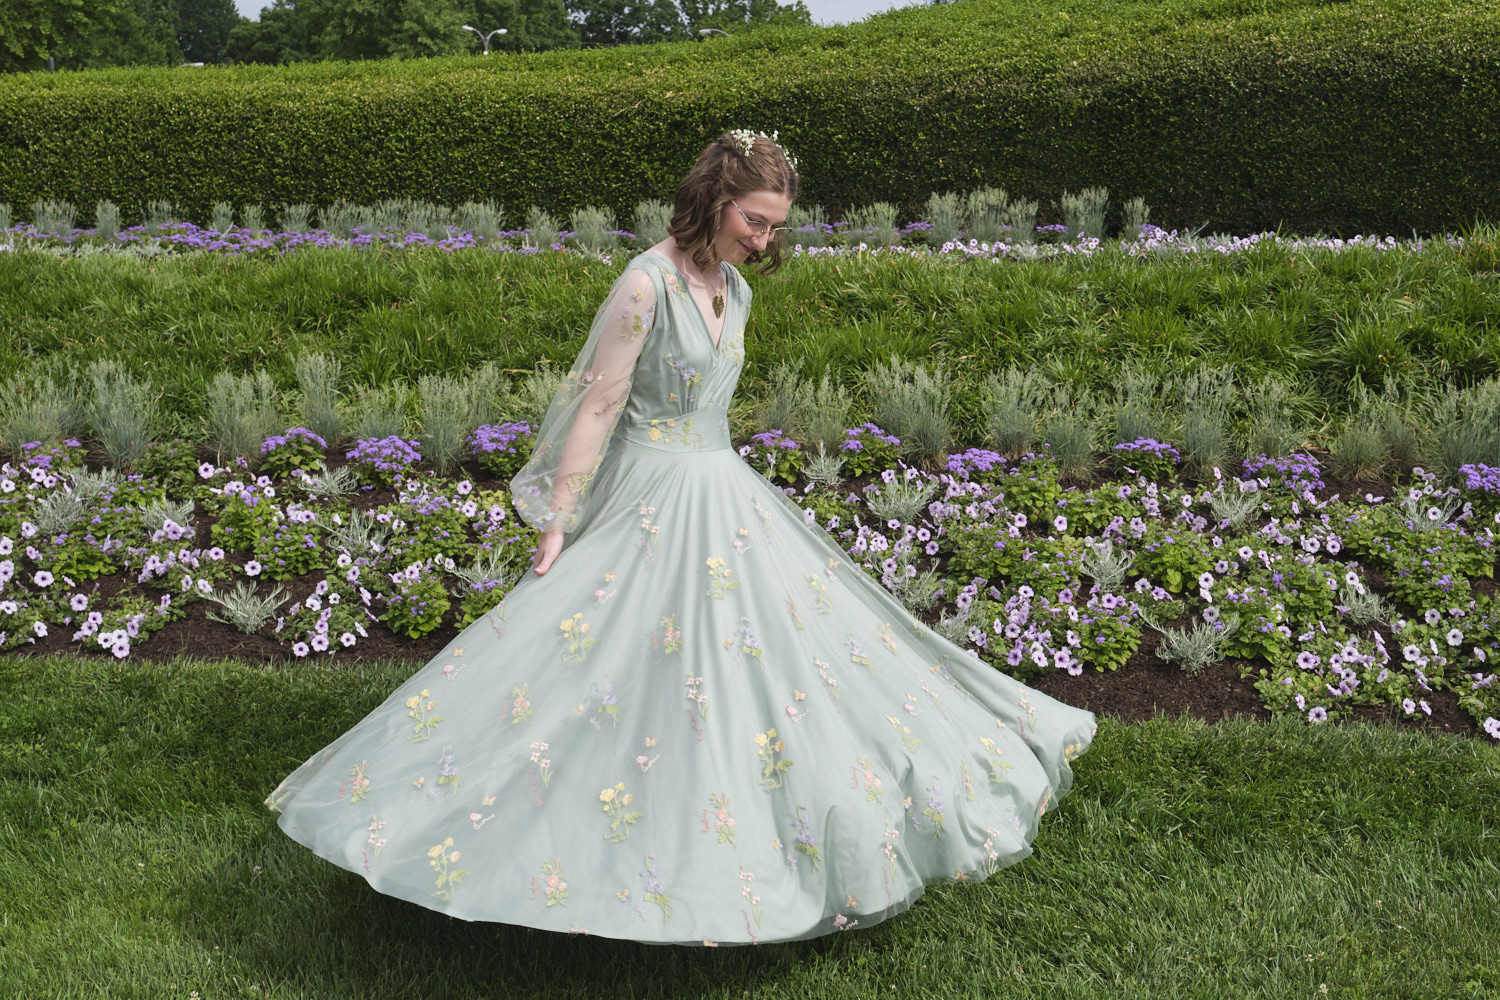
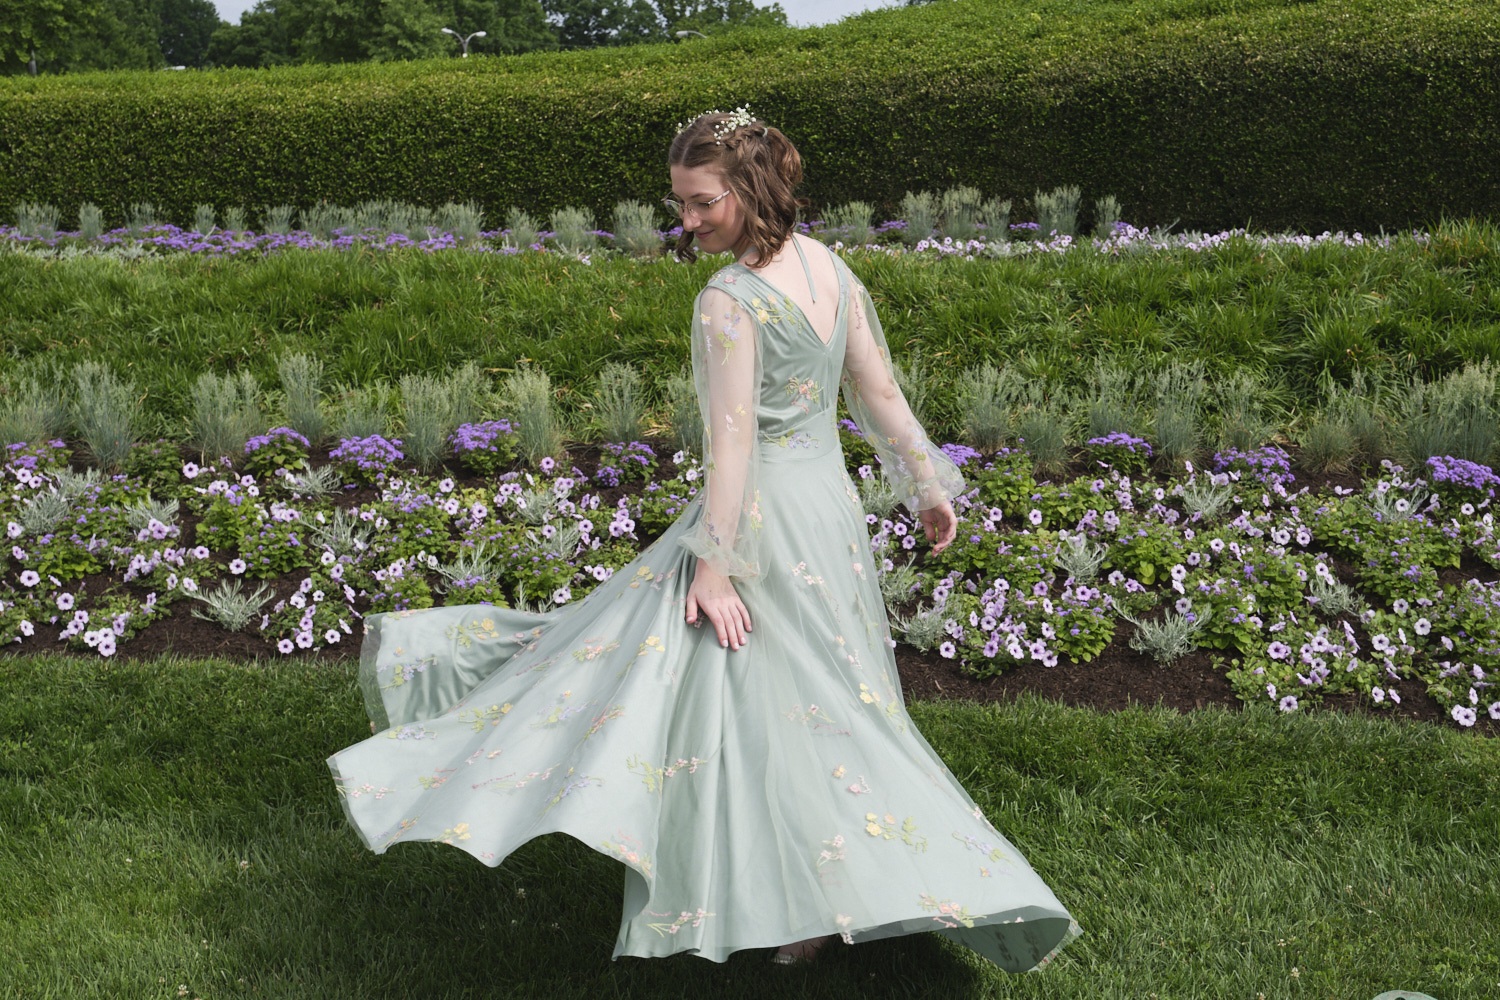
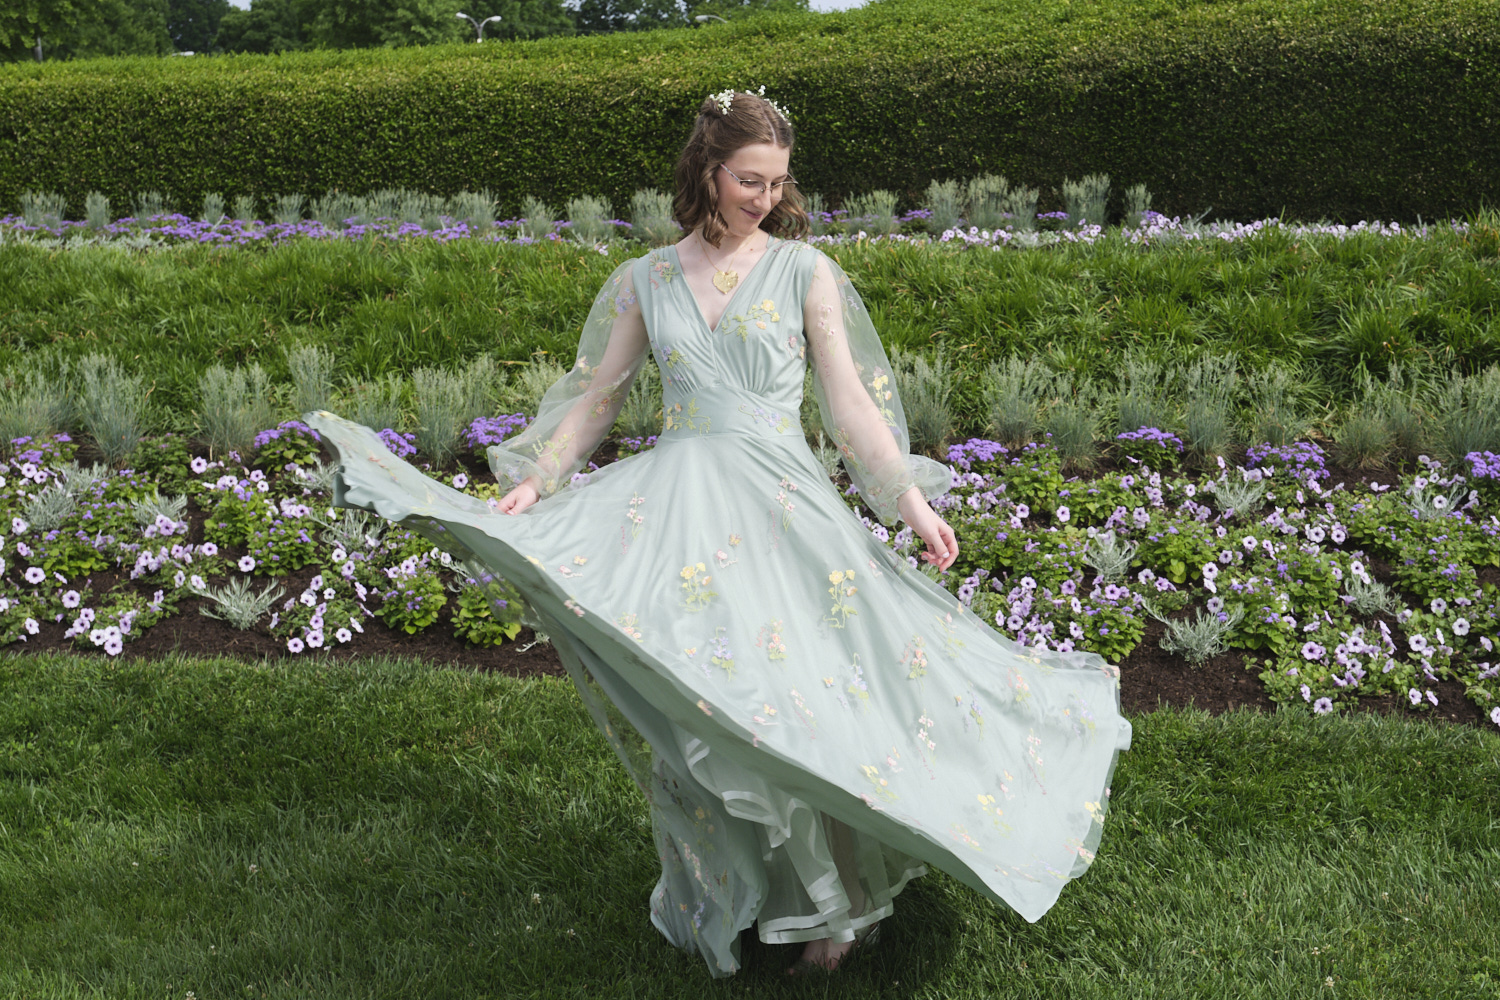
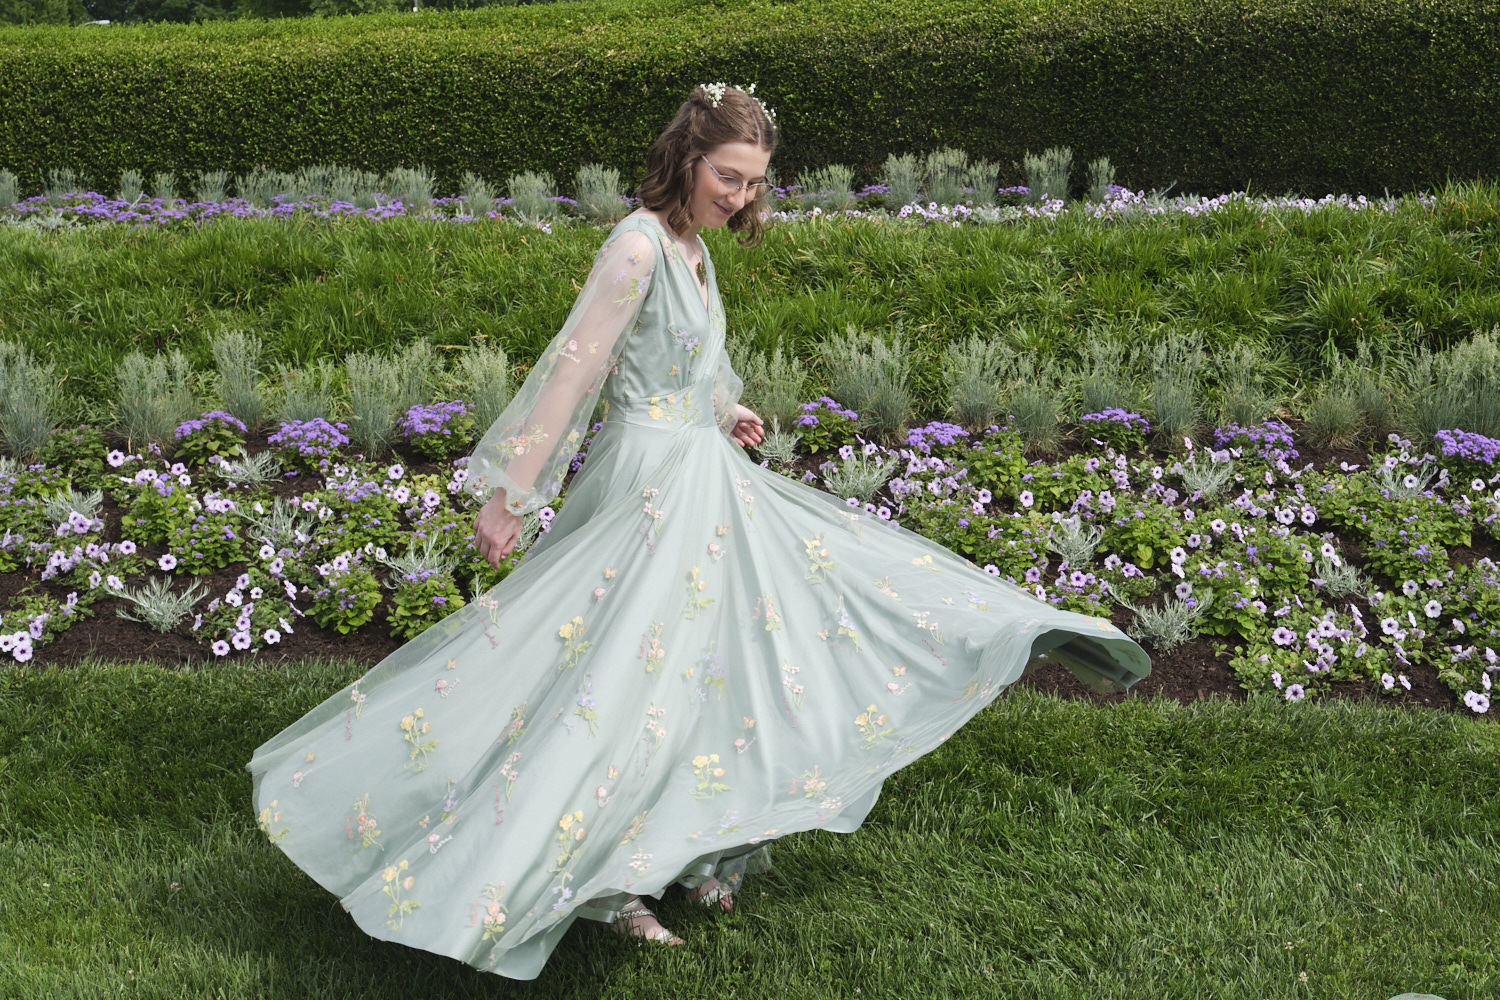
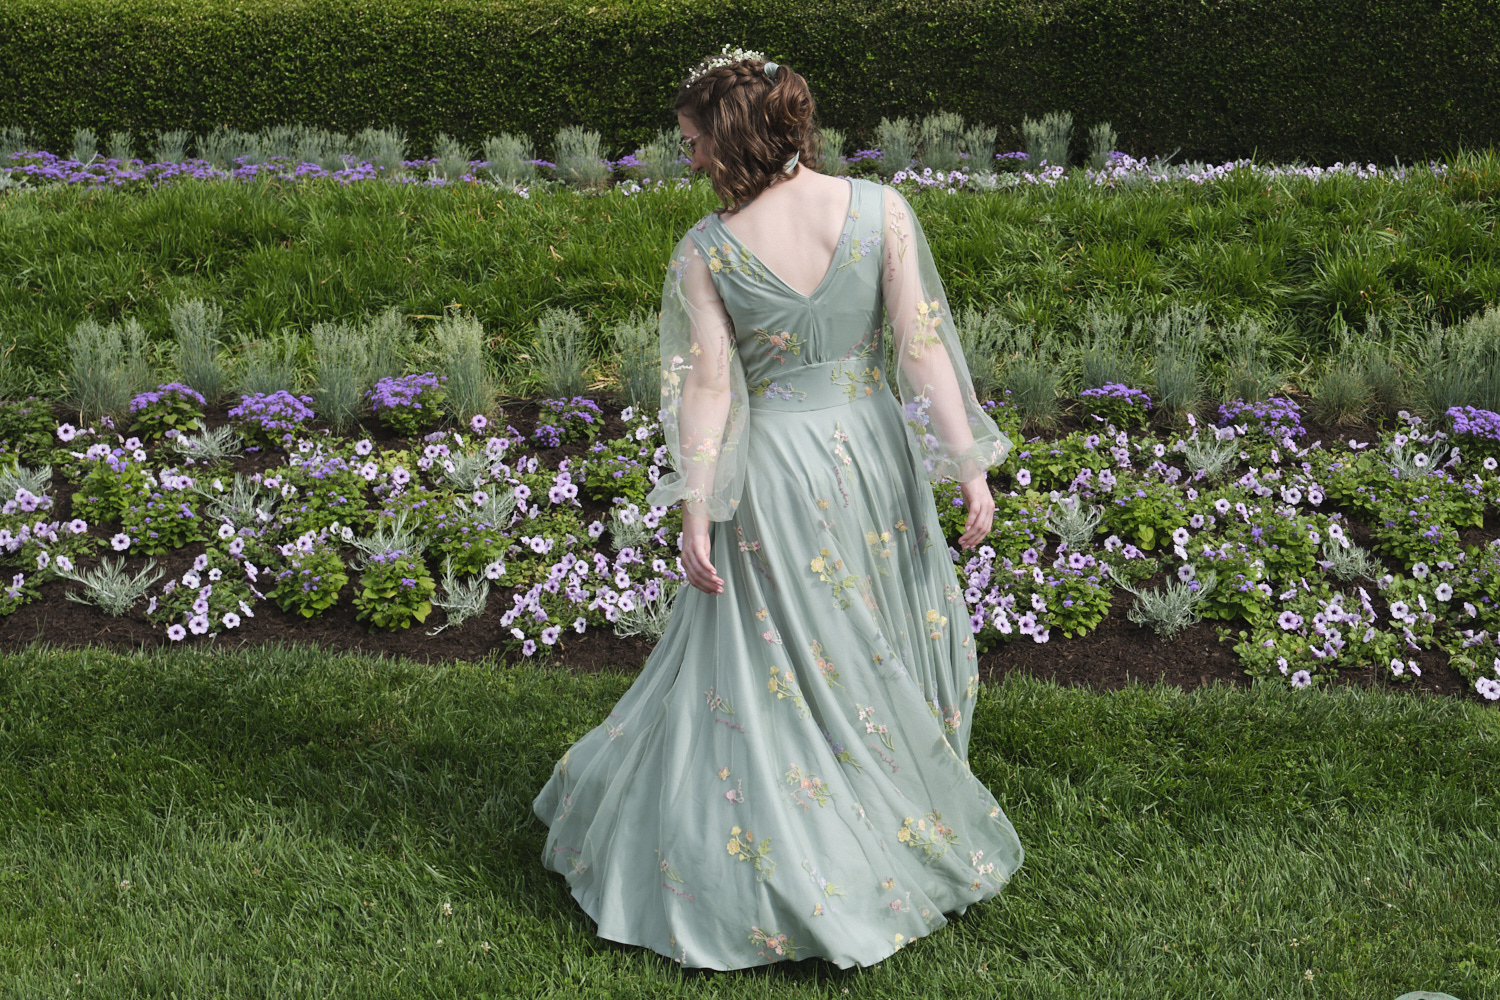
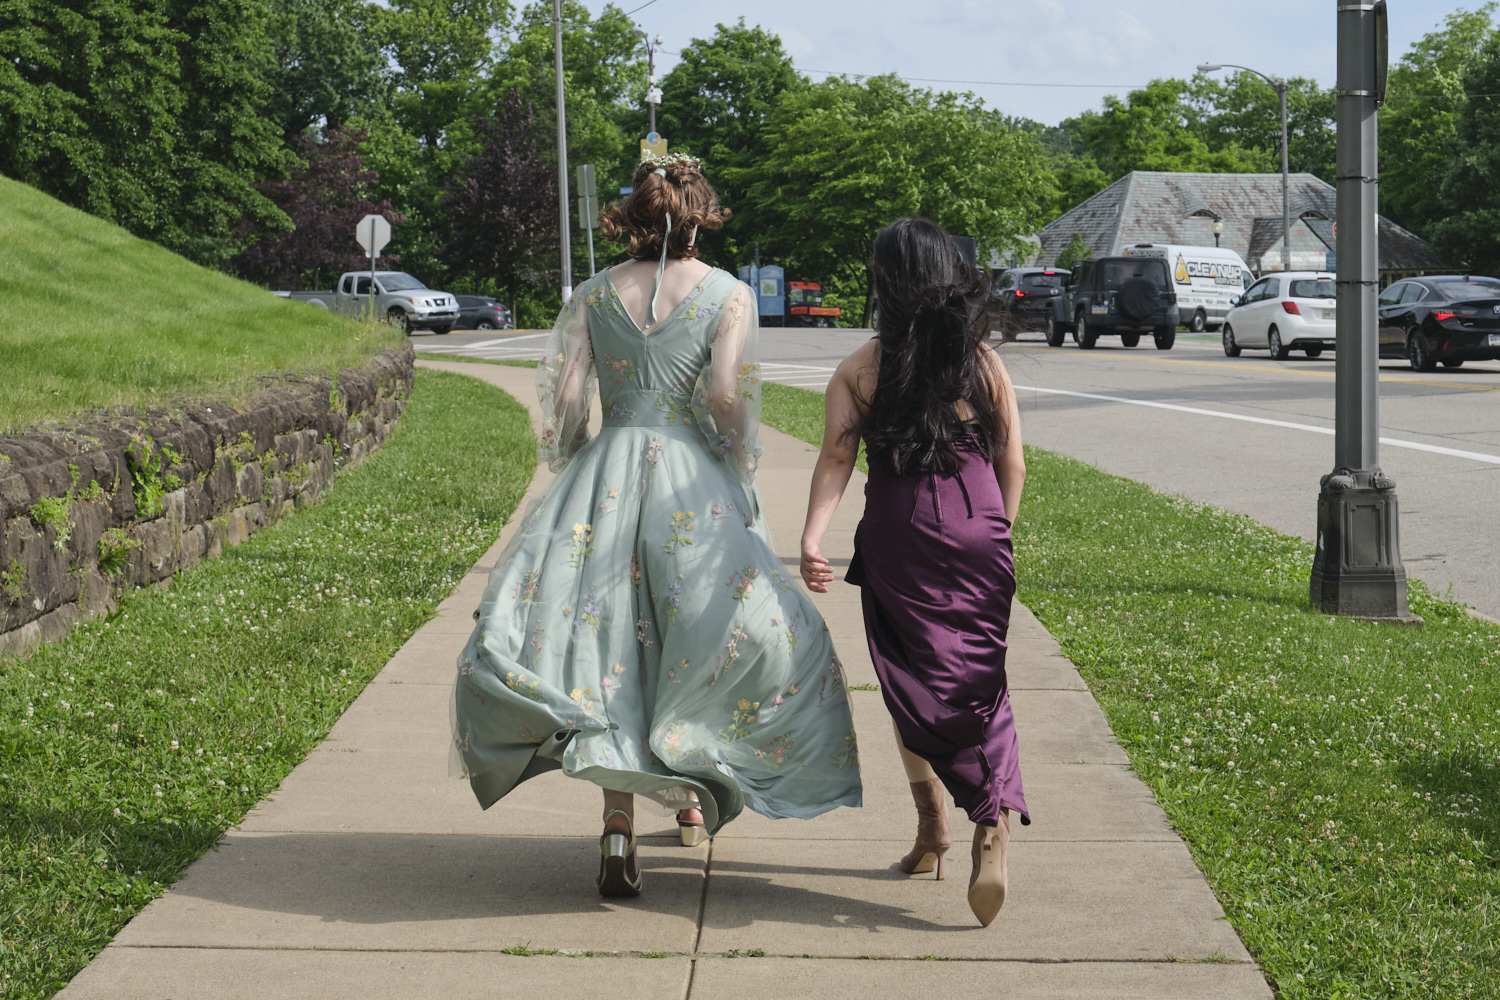
And here she is all dressed up and ready for prom. We did a photoshoot outside of Phipps. I got some good twirl photos and a nice back view, but forgot to take pictures of the pockets… you can’t see them but they are there, and she was quite pleased to go to prom with her wallet and phone in her pockets and no need to carry a purse.
So in case you are wondering… how much did it cost me to make a $1000 prom dress? The cost of the fabric, pattern, and thread for the dress was about $120. I probably spent another $50 or so on fabric for the two prototype dresses (the prototype top was made from scraps from a previous project) and about $50 on fabric samples (and some of the larger samples will get used in other projects). I didn’t add up the amount of time I spent on this, but it was a labor of love and a lot of fun!

Update: She went to her second prom a week later since the friend she went to prom with goes to a different school. I came home from work early to do her hair and makeup and her “tax” was she had to pose for more photos in our yard. This time I got some pocket photos too.