Flounced!

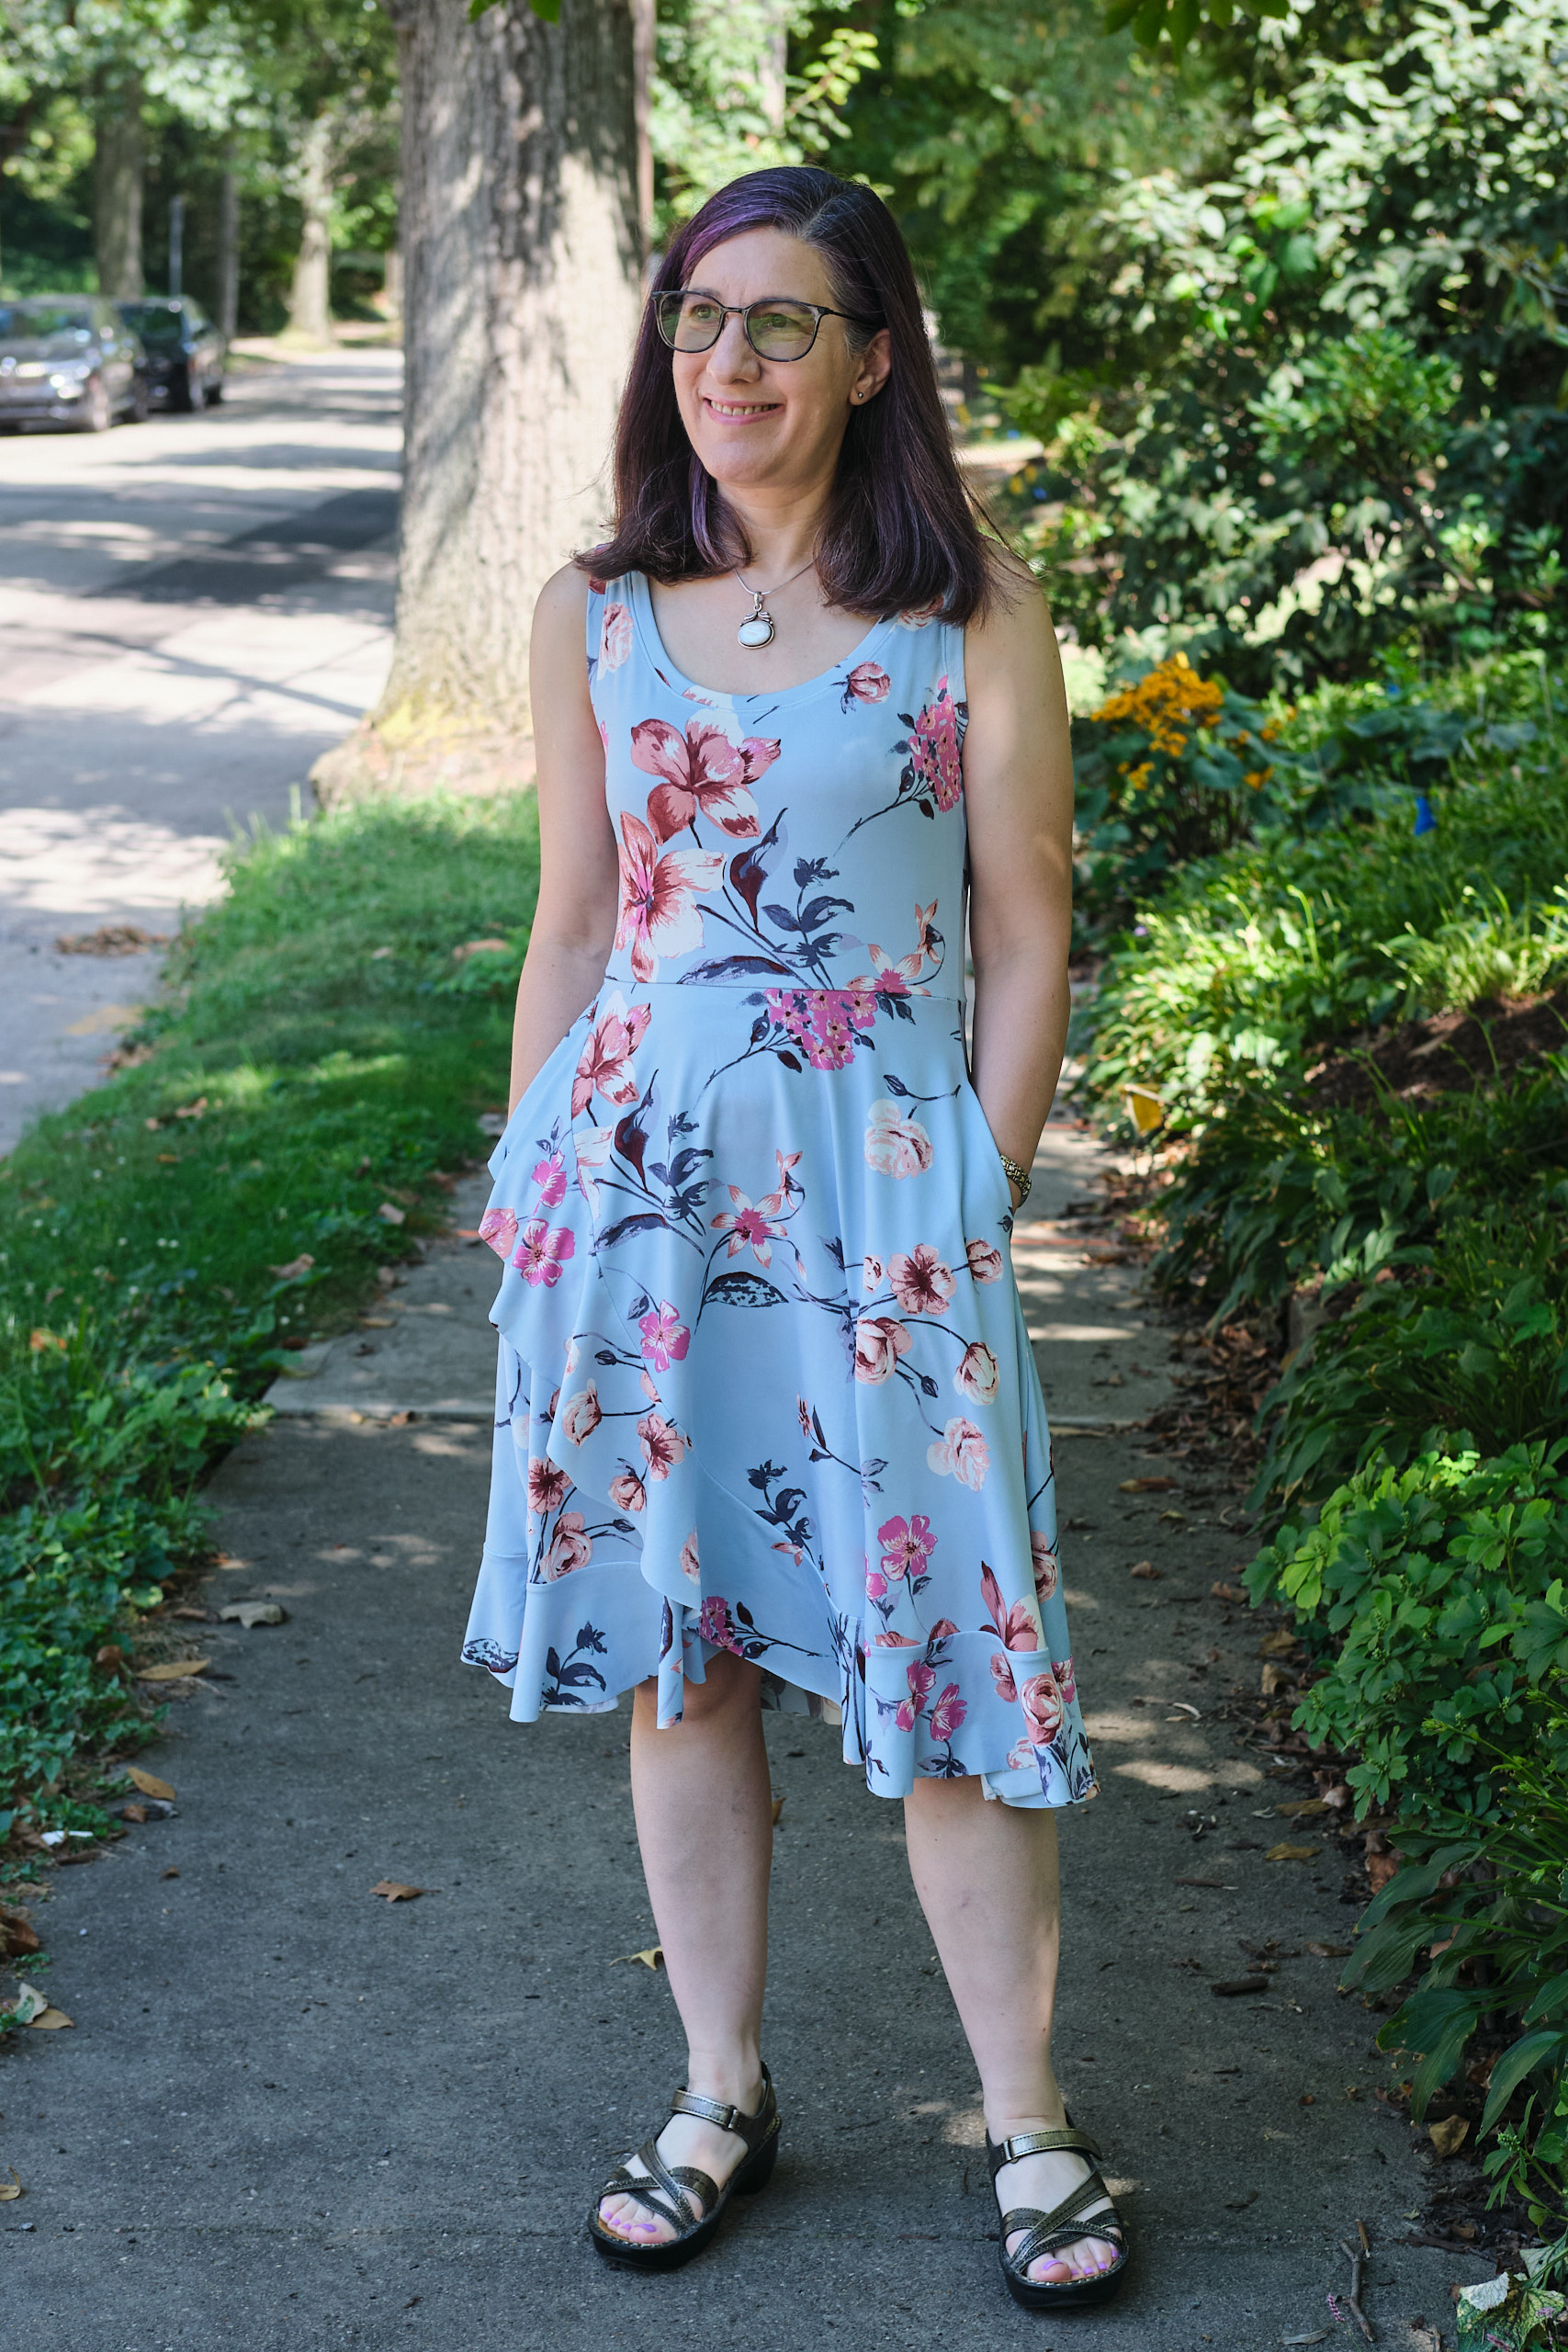
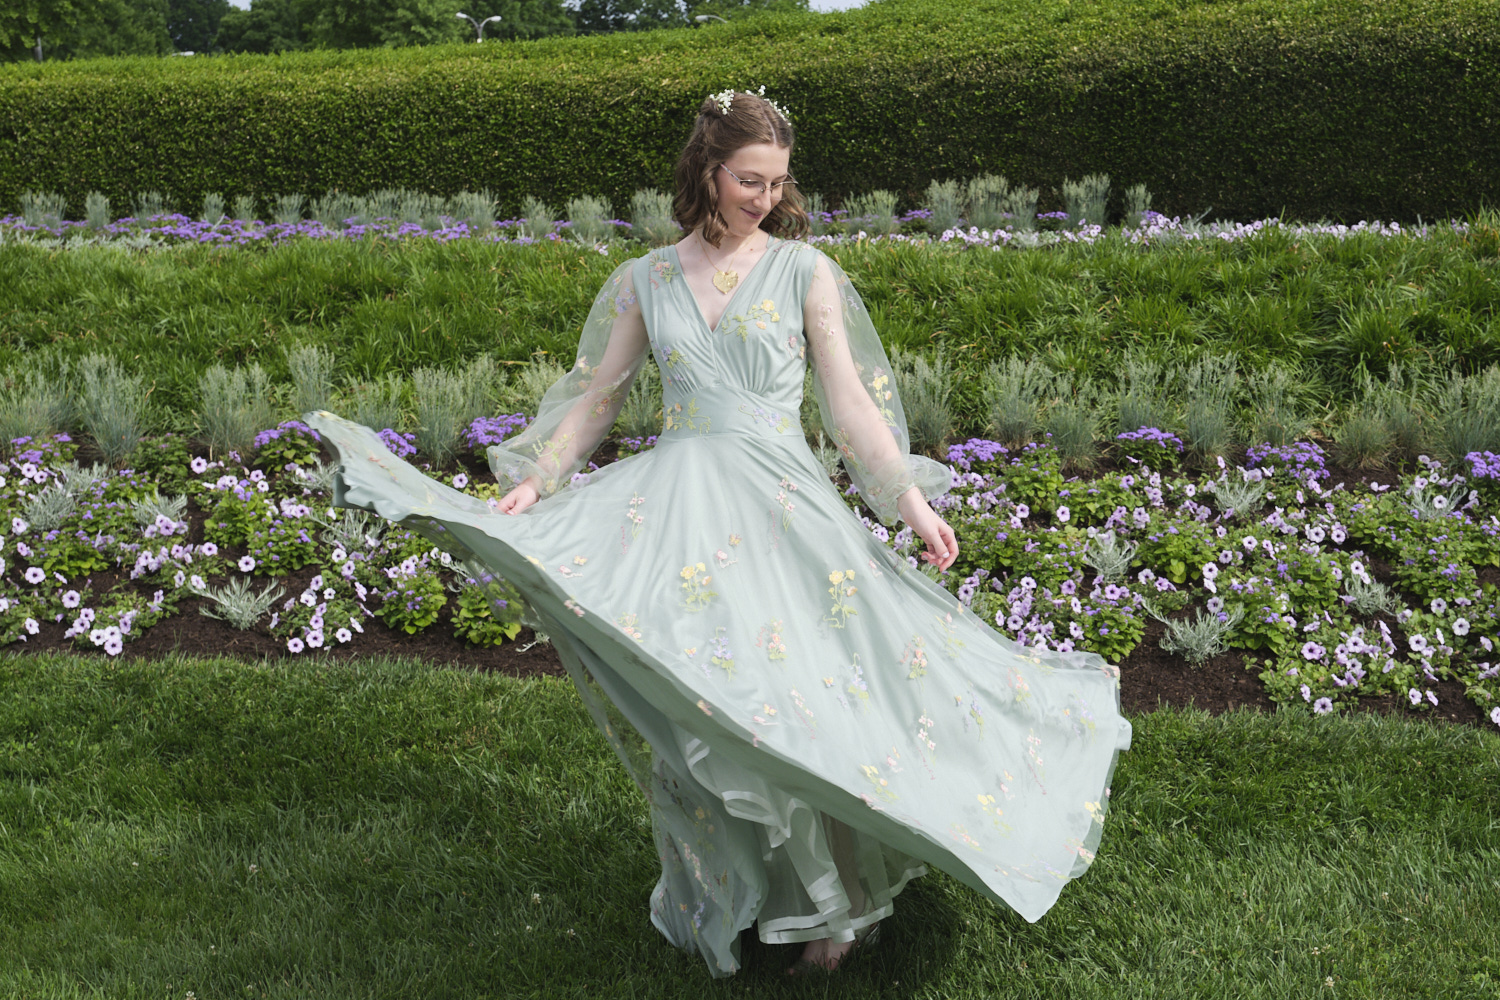
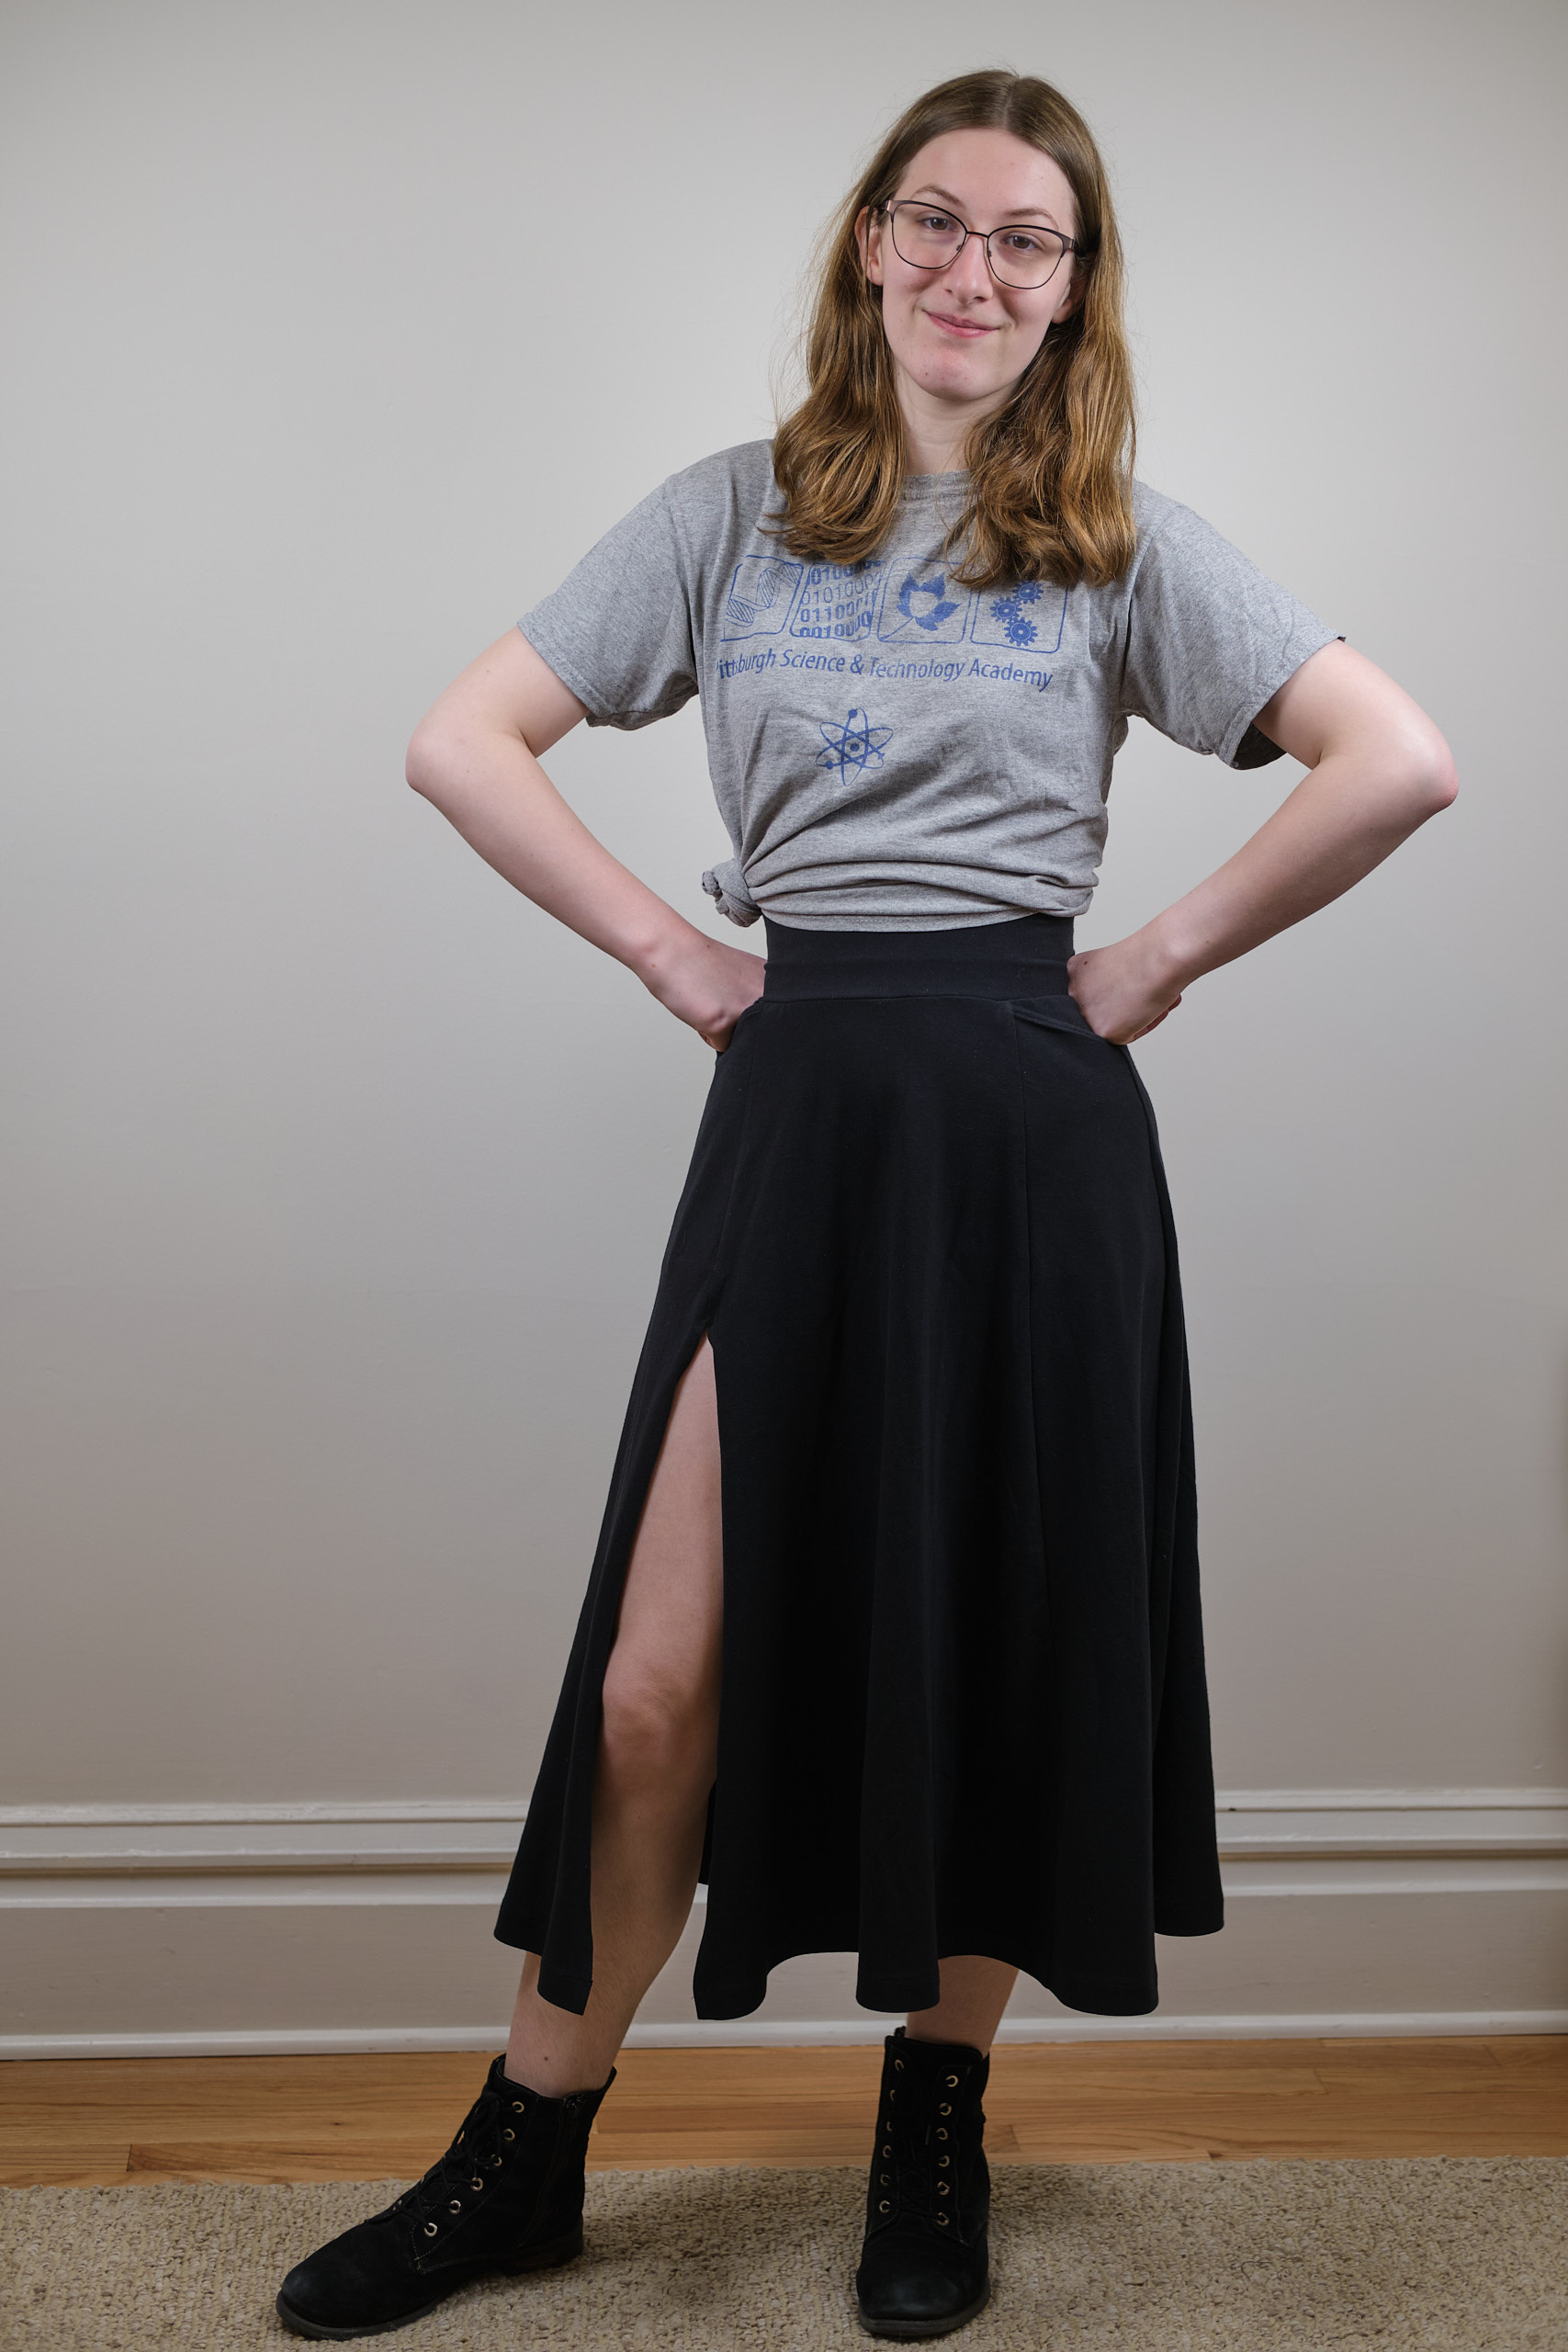
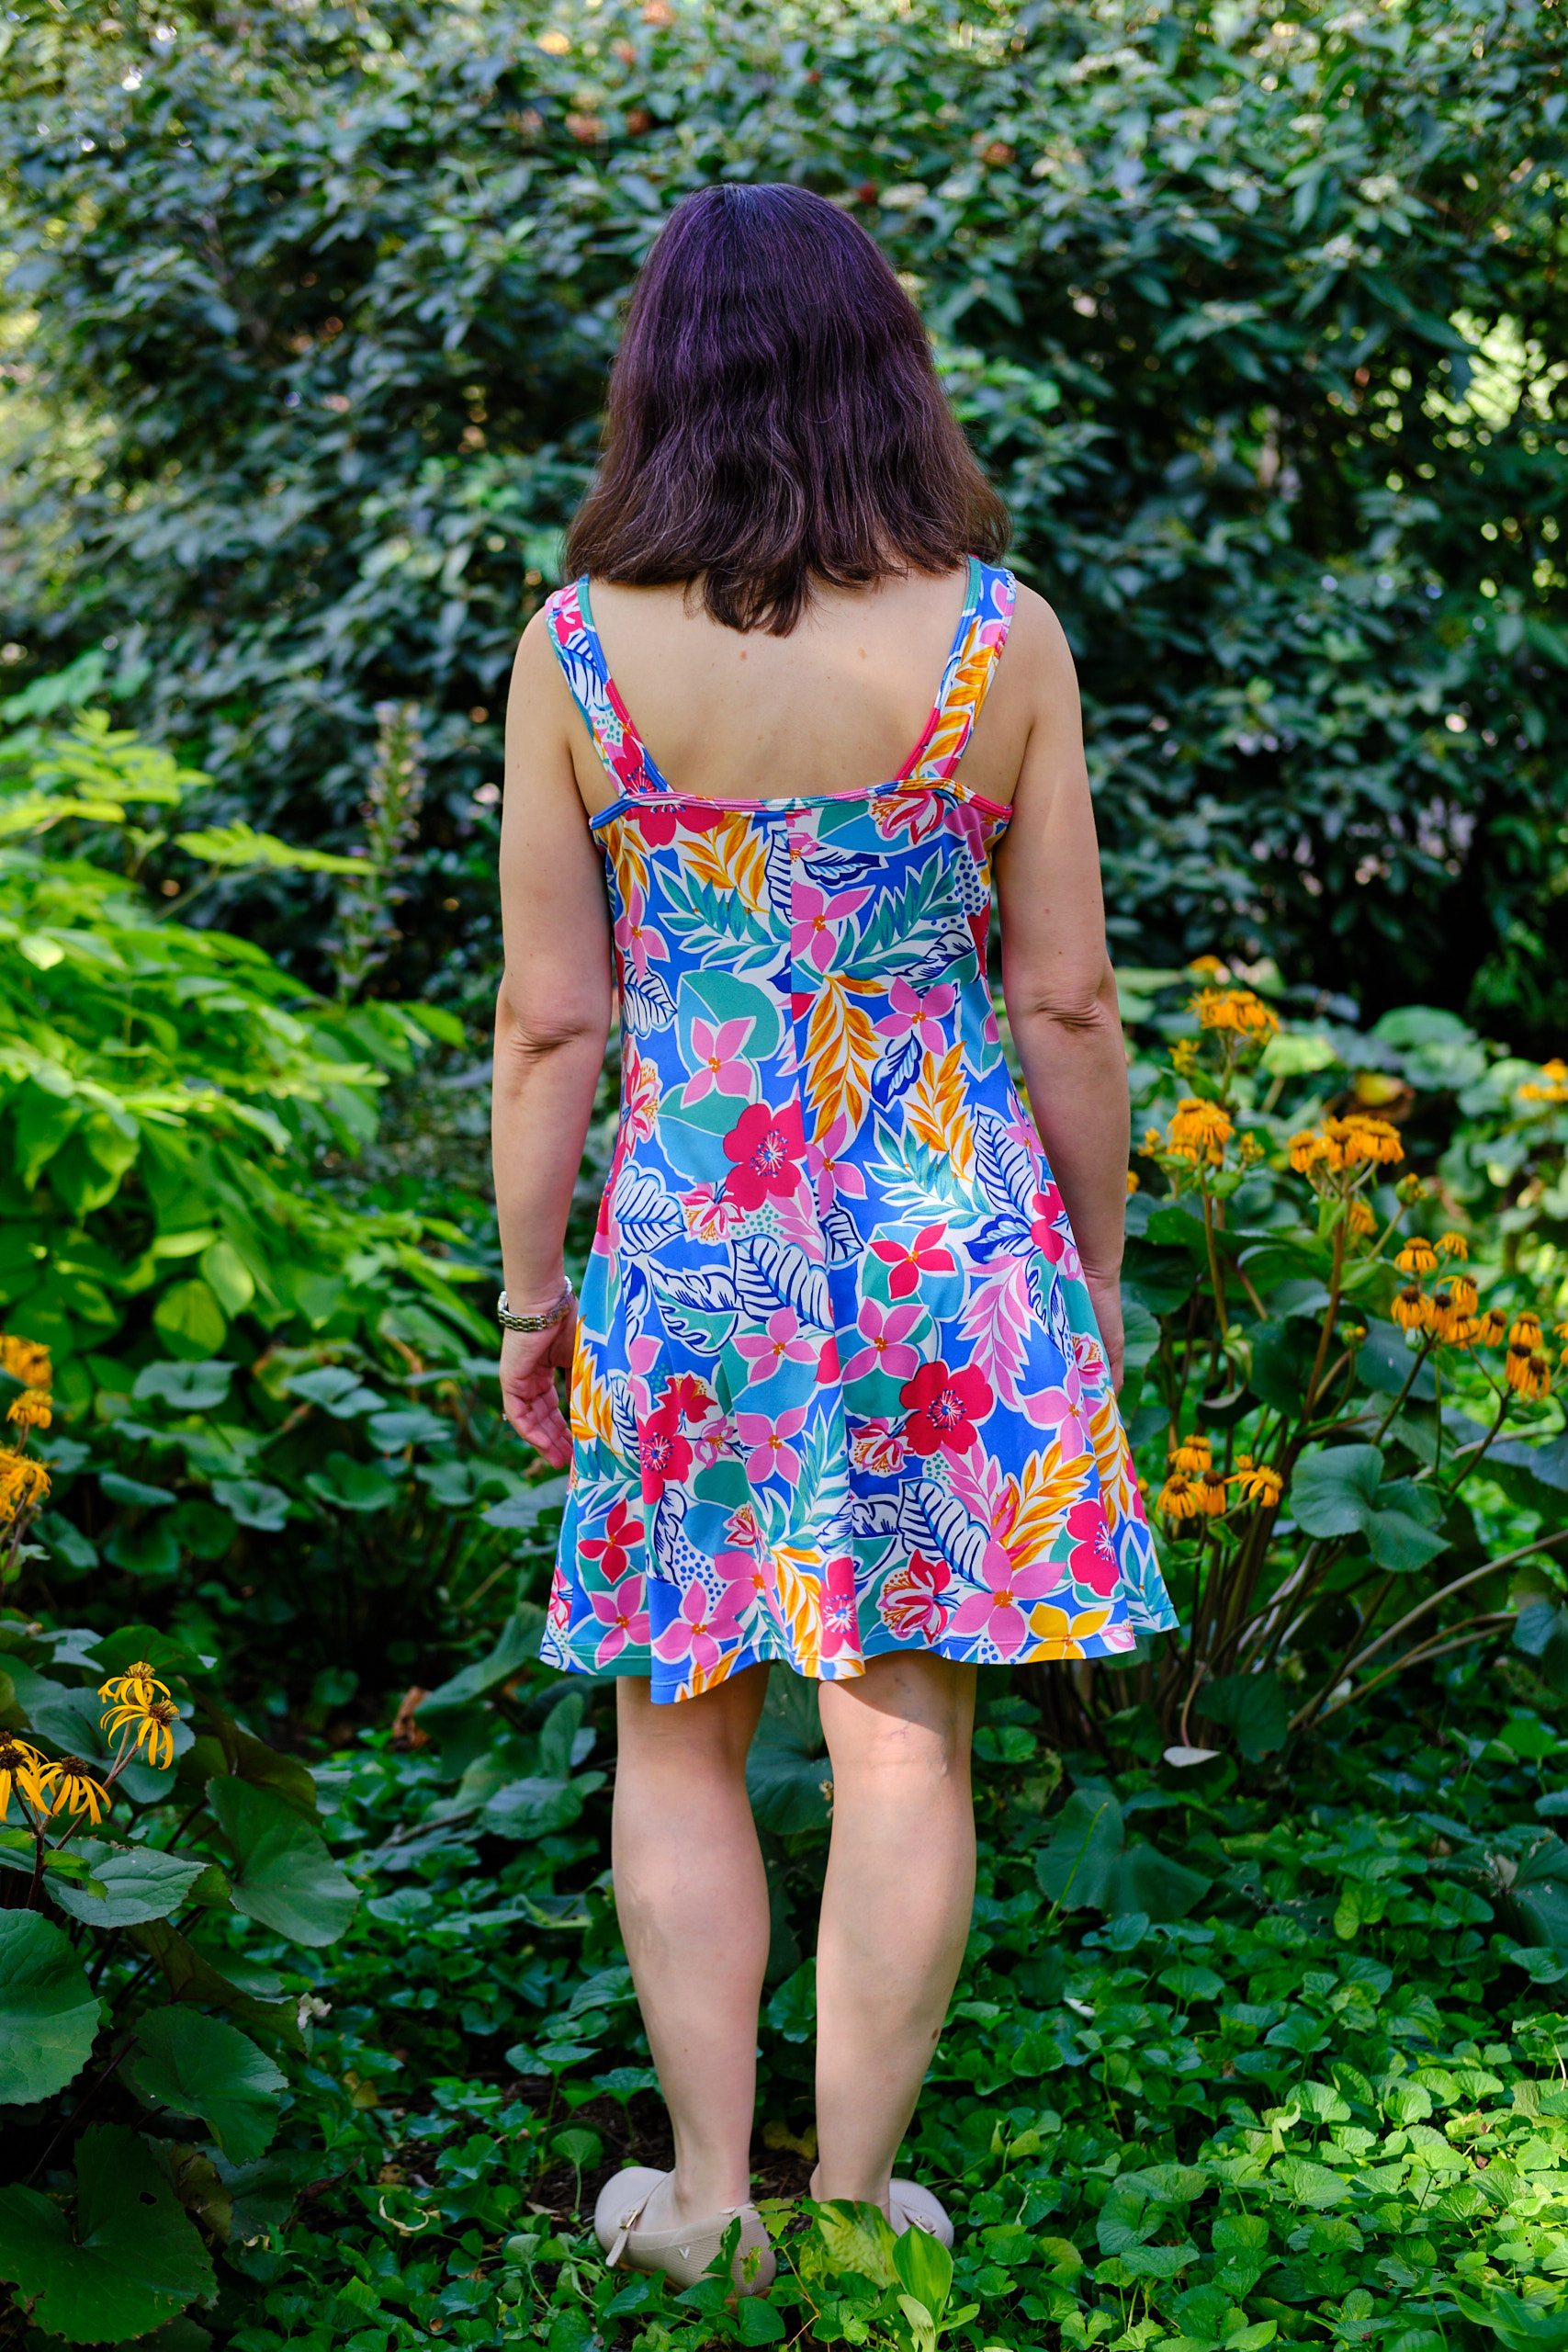
Sinclair Valley Knit Skater Dress with faux wrap flounce skirt from Flared skirts ADD-ON, size P4, pockets modified so as not to attach to waist, scoop neck, without a waistband and bodice extended 1.25 inch, made from 2 yards of 60″-wide ITY.

I’ve had the idea for this dress in my head for a while. I bought the Flared skirts ADD-ON for the free Sinclair Valley Knit Skater Dress two years ago and initially used it to make three half-circle skirt dresses (two short-sleeve, one long sleeve). I followed up with a 3/4 sleeve full-circle skirt dress, and more recently a short-sleeve half-circle PETS conference dress. But I had planned all along to try a sleeveless Valley dress with a faux-wrap flounce skirt.

Inspired by Bernice’s sleeveless light blue floral faux-wrap flounce Valley Skater dress that appears in the pattern tutorial, when I saw this light blue ITY fabric last summer at Surge Fabrics, I decided to make the same dress. (Bernice’s fabric is actually a thin slub knit, not an ITY.) I bought the fabric in Summer 2024 and didn’t manage to make it before the end of the summer. I wasn’t inspired to make a sleeveless dress last winter. Now that we are heading towards the end of Summer 2025 I decided it was time to make the dress before another summer passes.

The design for the faux wrap skirt is pretty clever. I love the way the flounces are cut out as donuts with the inner edge attaching to the skirt hem. With this approach, there is no need for gathering the fabric to create ruffles. The main downside is that it uses more fabric this way.

This is an older Sinclair pattern and it is not written and tested as thoroughly as the more recent patterns. I found a few errors, including pattern pieces labelled 4 that were shown as being labelled as 3 in the tutorial. More critically, for view F (the flounce wrap skirt) the instructions say to cut two of piece 8, but in fact only one piece 8 is needed (which I didn’t realize until I was sewing it together and wondered why I had an extra piece). The instruction for overlapping and securing the panels for view D should also mention that it applies to view F. A diagram of the assembly with flounce would have been helpful too (although the diagram showing where to attache the flounce pieces on the bottom of page 14 is quite helpful). Despite these issues, the skirt went together fairly easily.

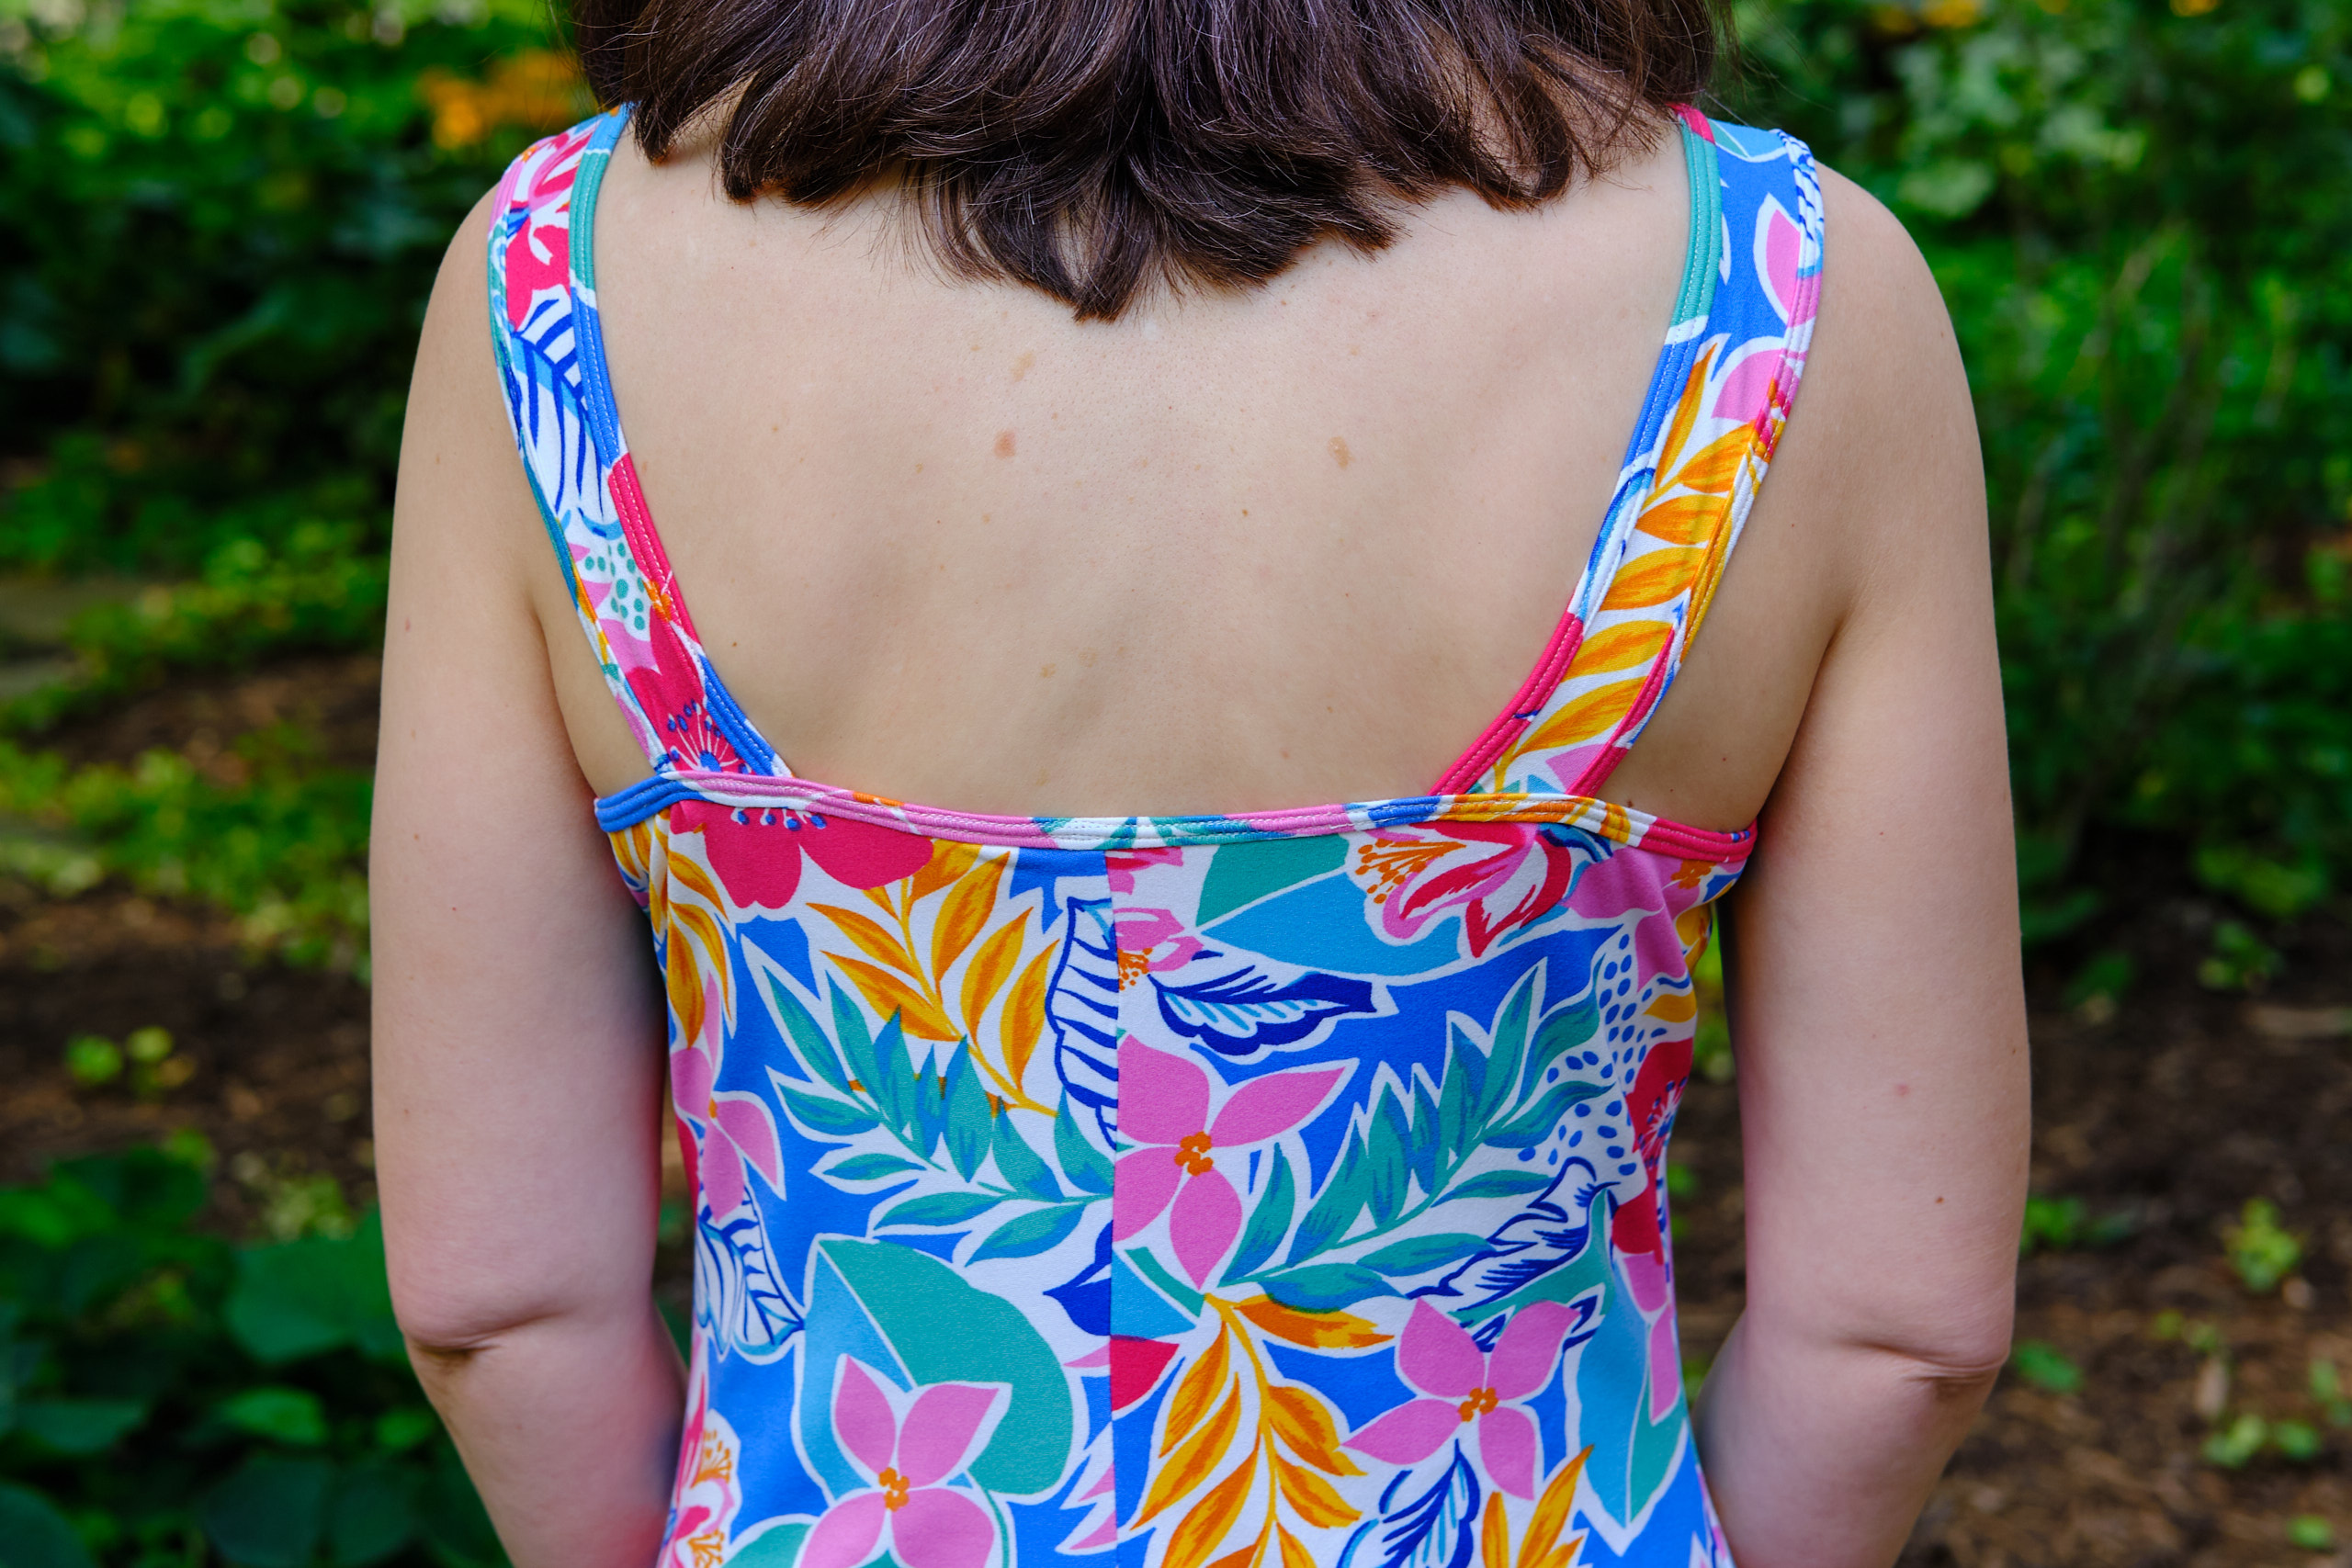
I added pockets to the skirt using the same pocket construction technique as I used for my other Valley dresses. I altered the pocket design slightly so it connects only on the side seam and not the waistband to prevent dragging the waistband down when I put my phone in my pocket. I also extended the bodice by 1.25 inches, as suggested, since I did not add a separate waistband.

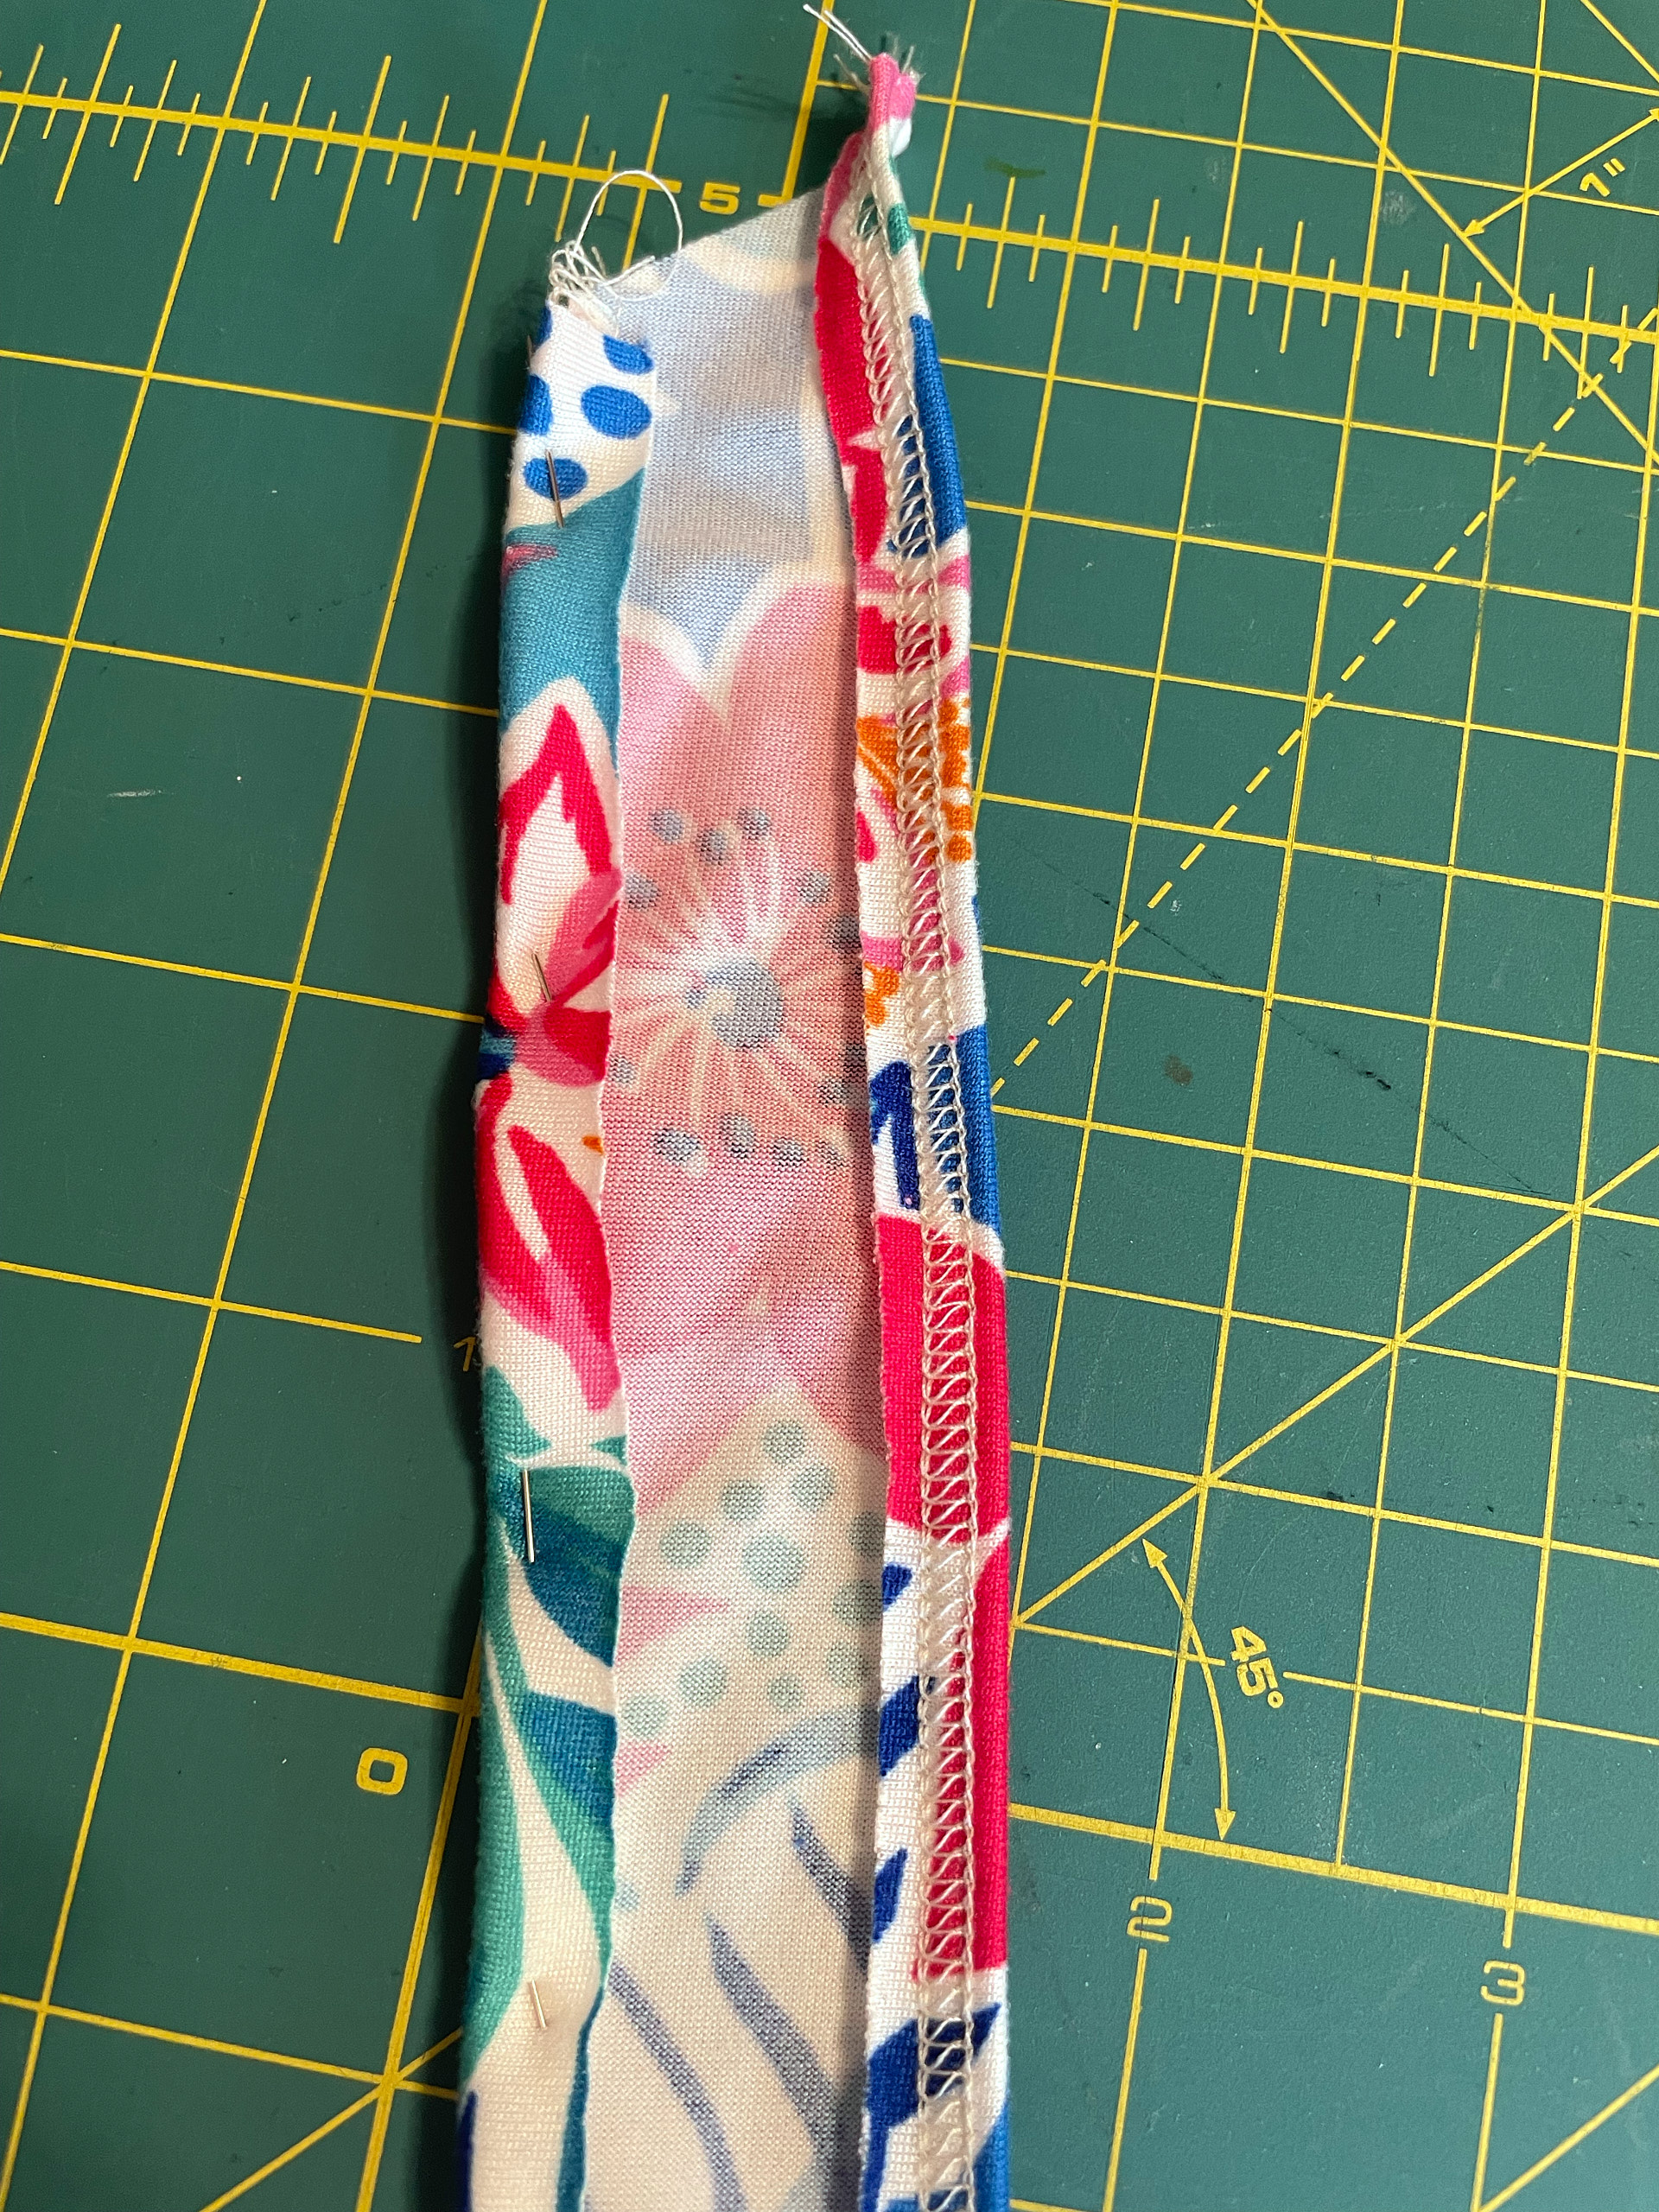
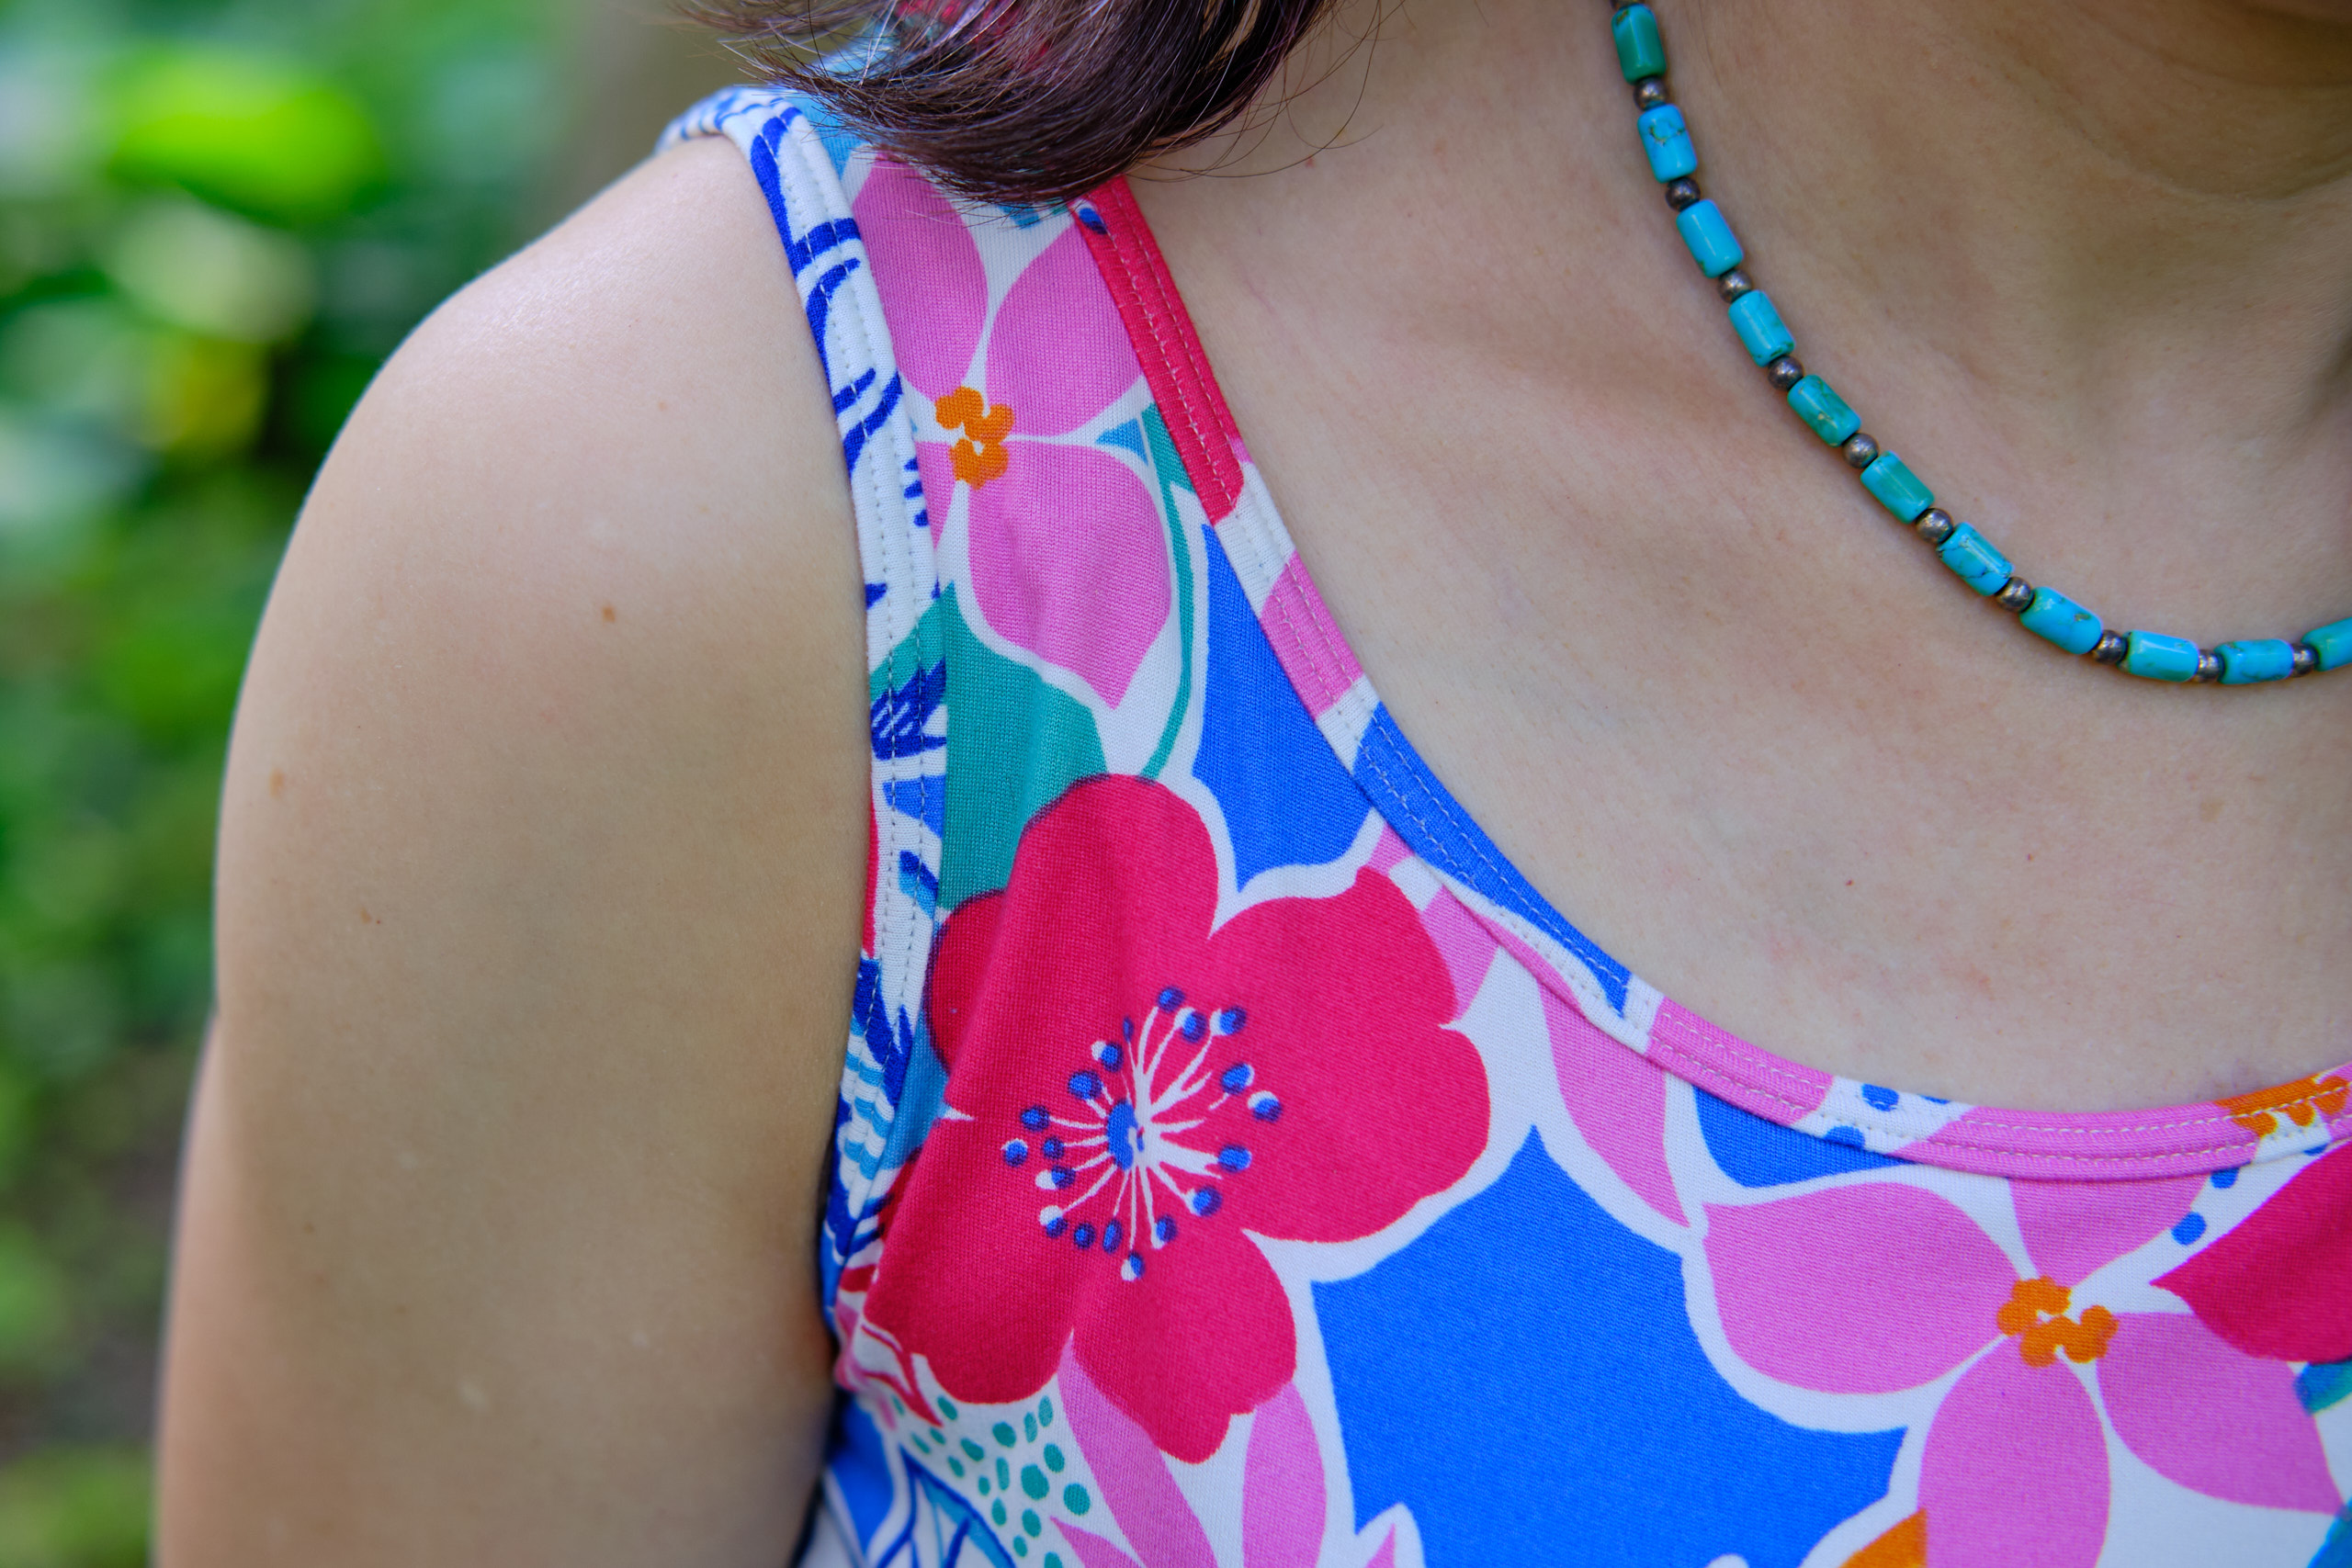
I made this dress in a petite 4, my usual size for Sinclair dresses. I recently sized up to a petite 6 for a Valley dress in less stretchy fabric, but that wasn’t needed for this ITY. This was my first time making a sleeveless Valley dress and I was a bit skeptical of the very narrow shoulder seam for the sleeveless scoop neck. But I resisted the urge to alter it and was pleased to see it came out just fine after adding the neck and arm bands.

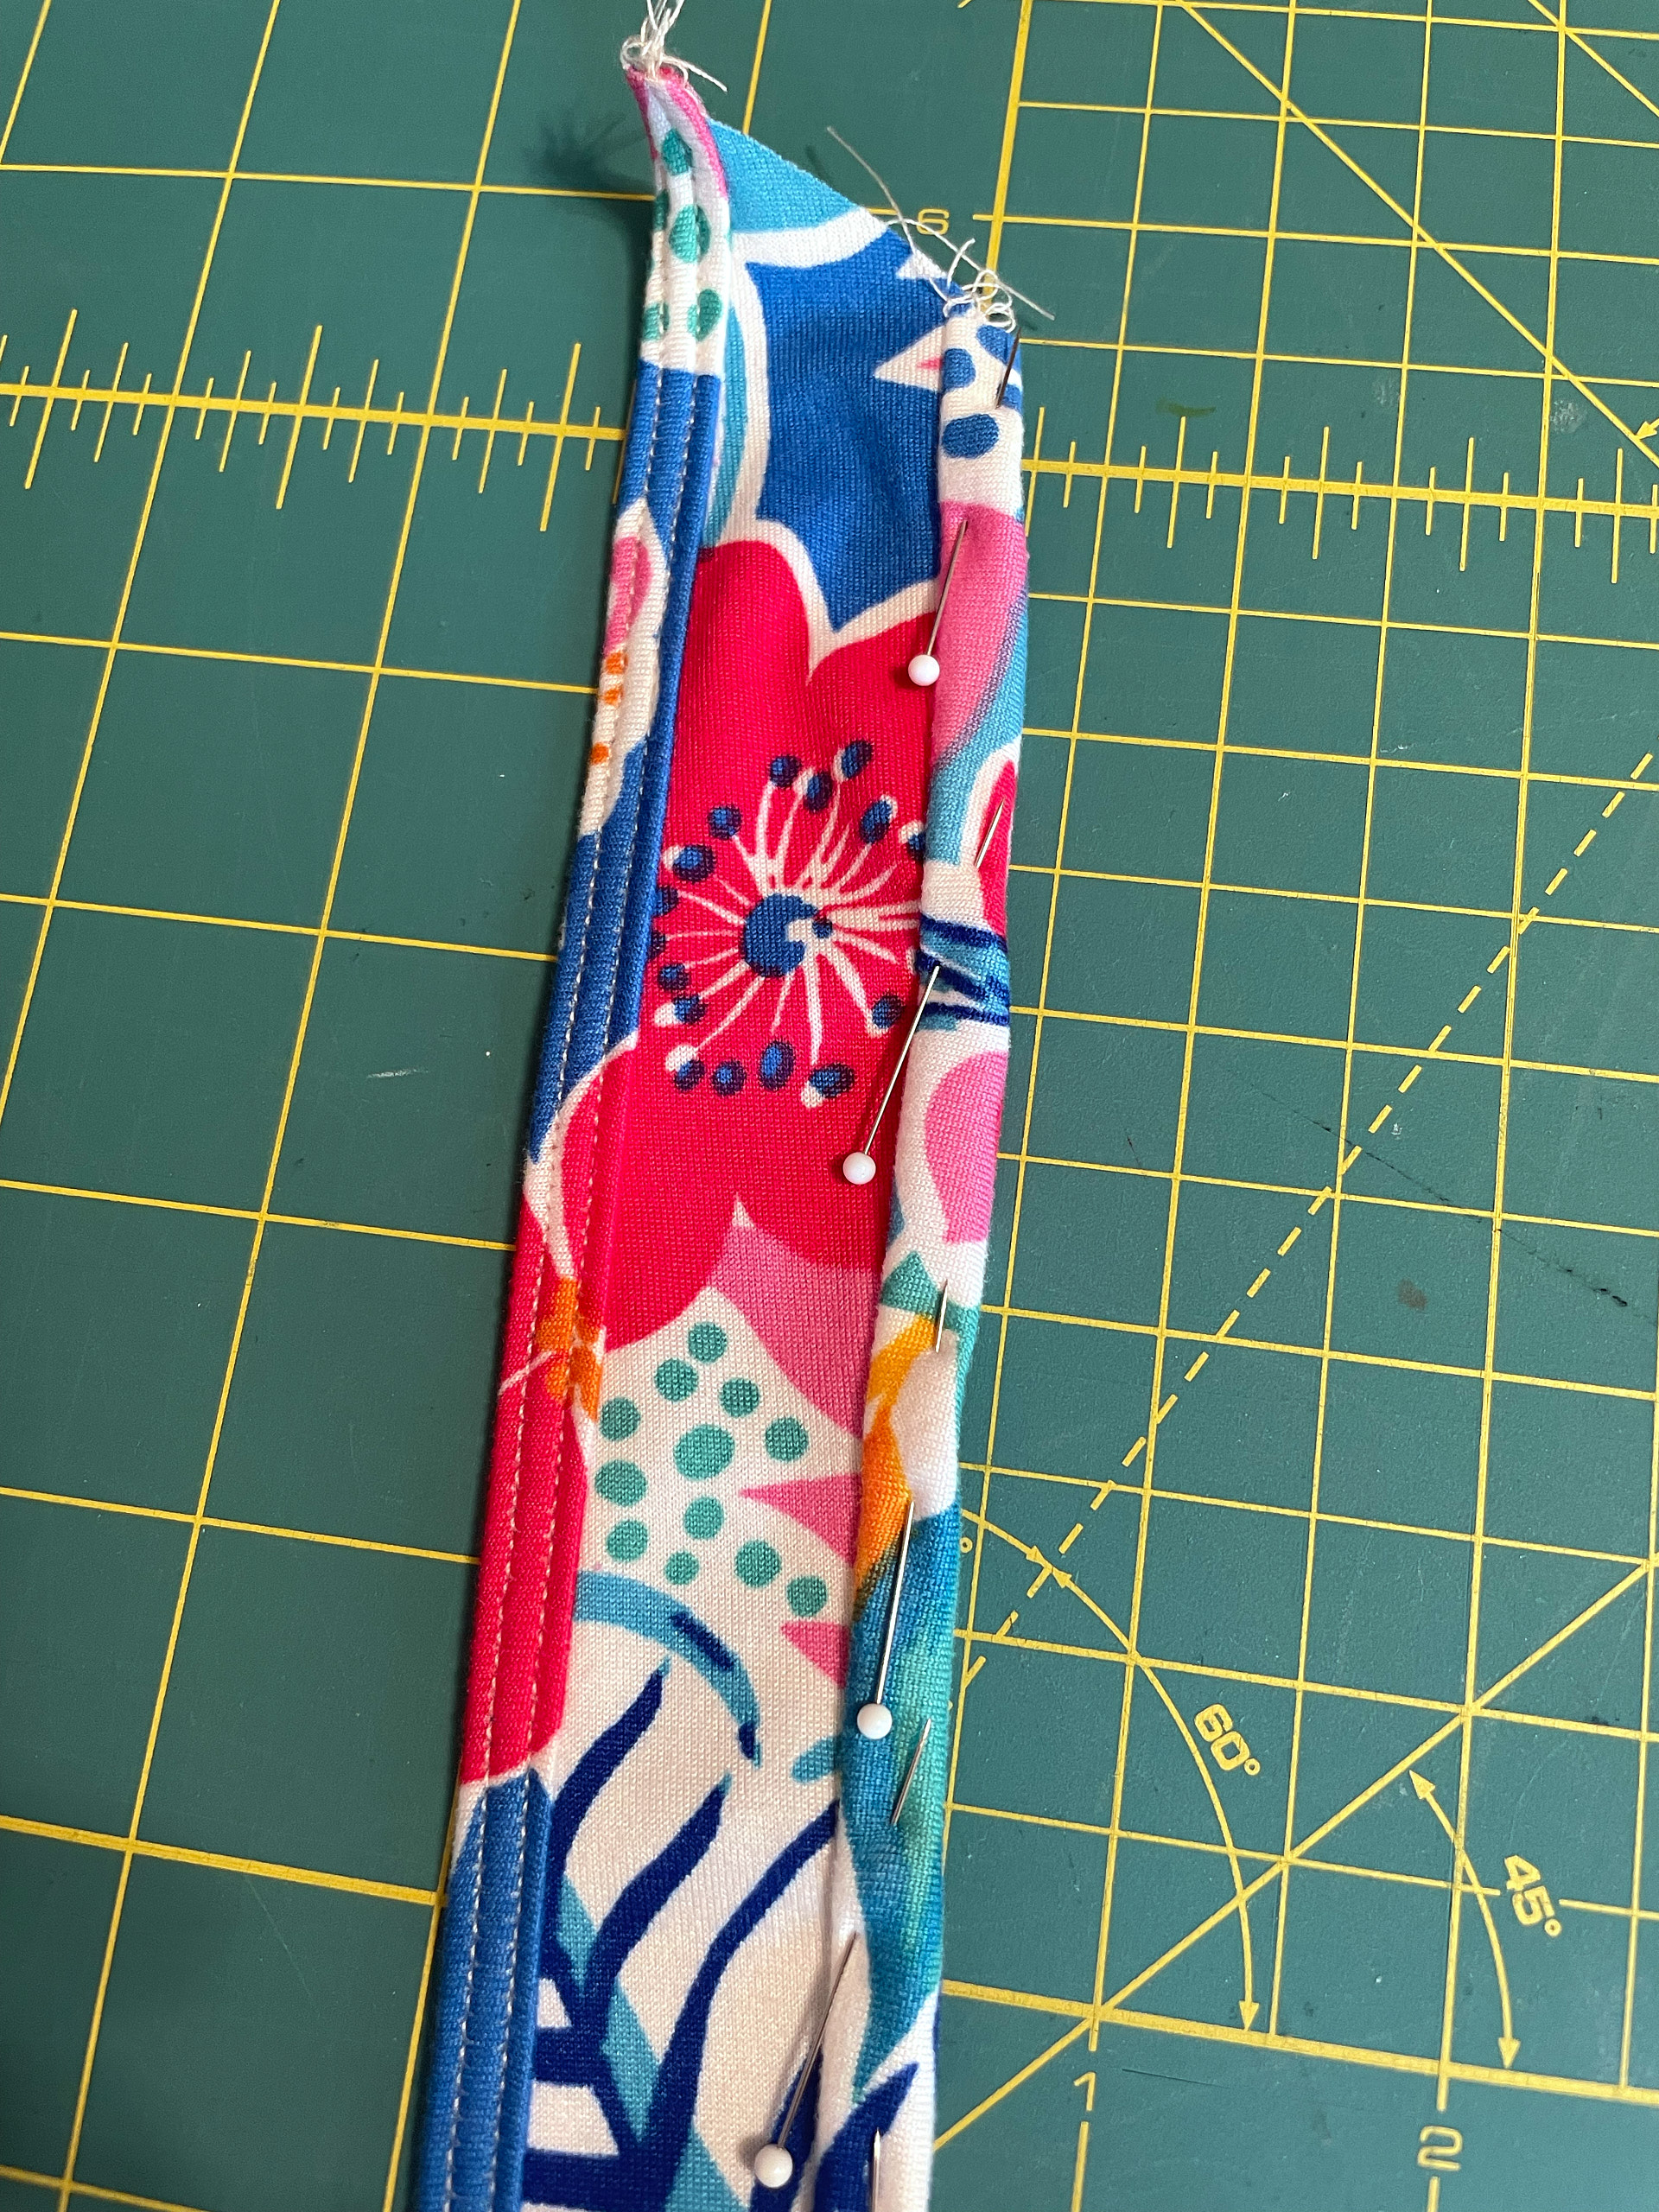
I followed the neck and arm band instructions but took a few extra steps to make sure they came out well. First I zigzagged over the edges of the bands after folding them so that the layers of the slippery fabric wouldn’t shift. Then I used the “quarter method” for marking and pinning the neck band. I then basted it on with a wide zigzag stitch on my sewing machine, removed all the pins, and finally sewed it on with my serger. I did basically the same thing for the arm bands, but did not use the quarter method since the pattern included a mark for positioning the shoulder seam.

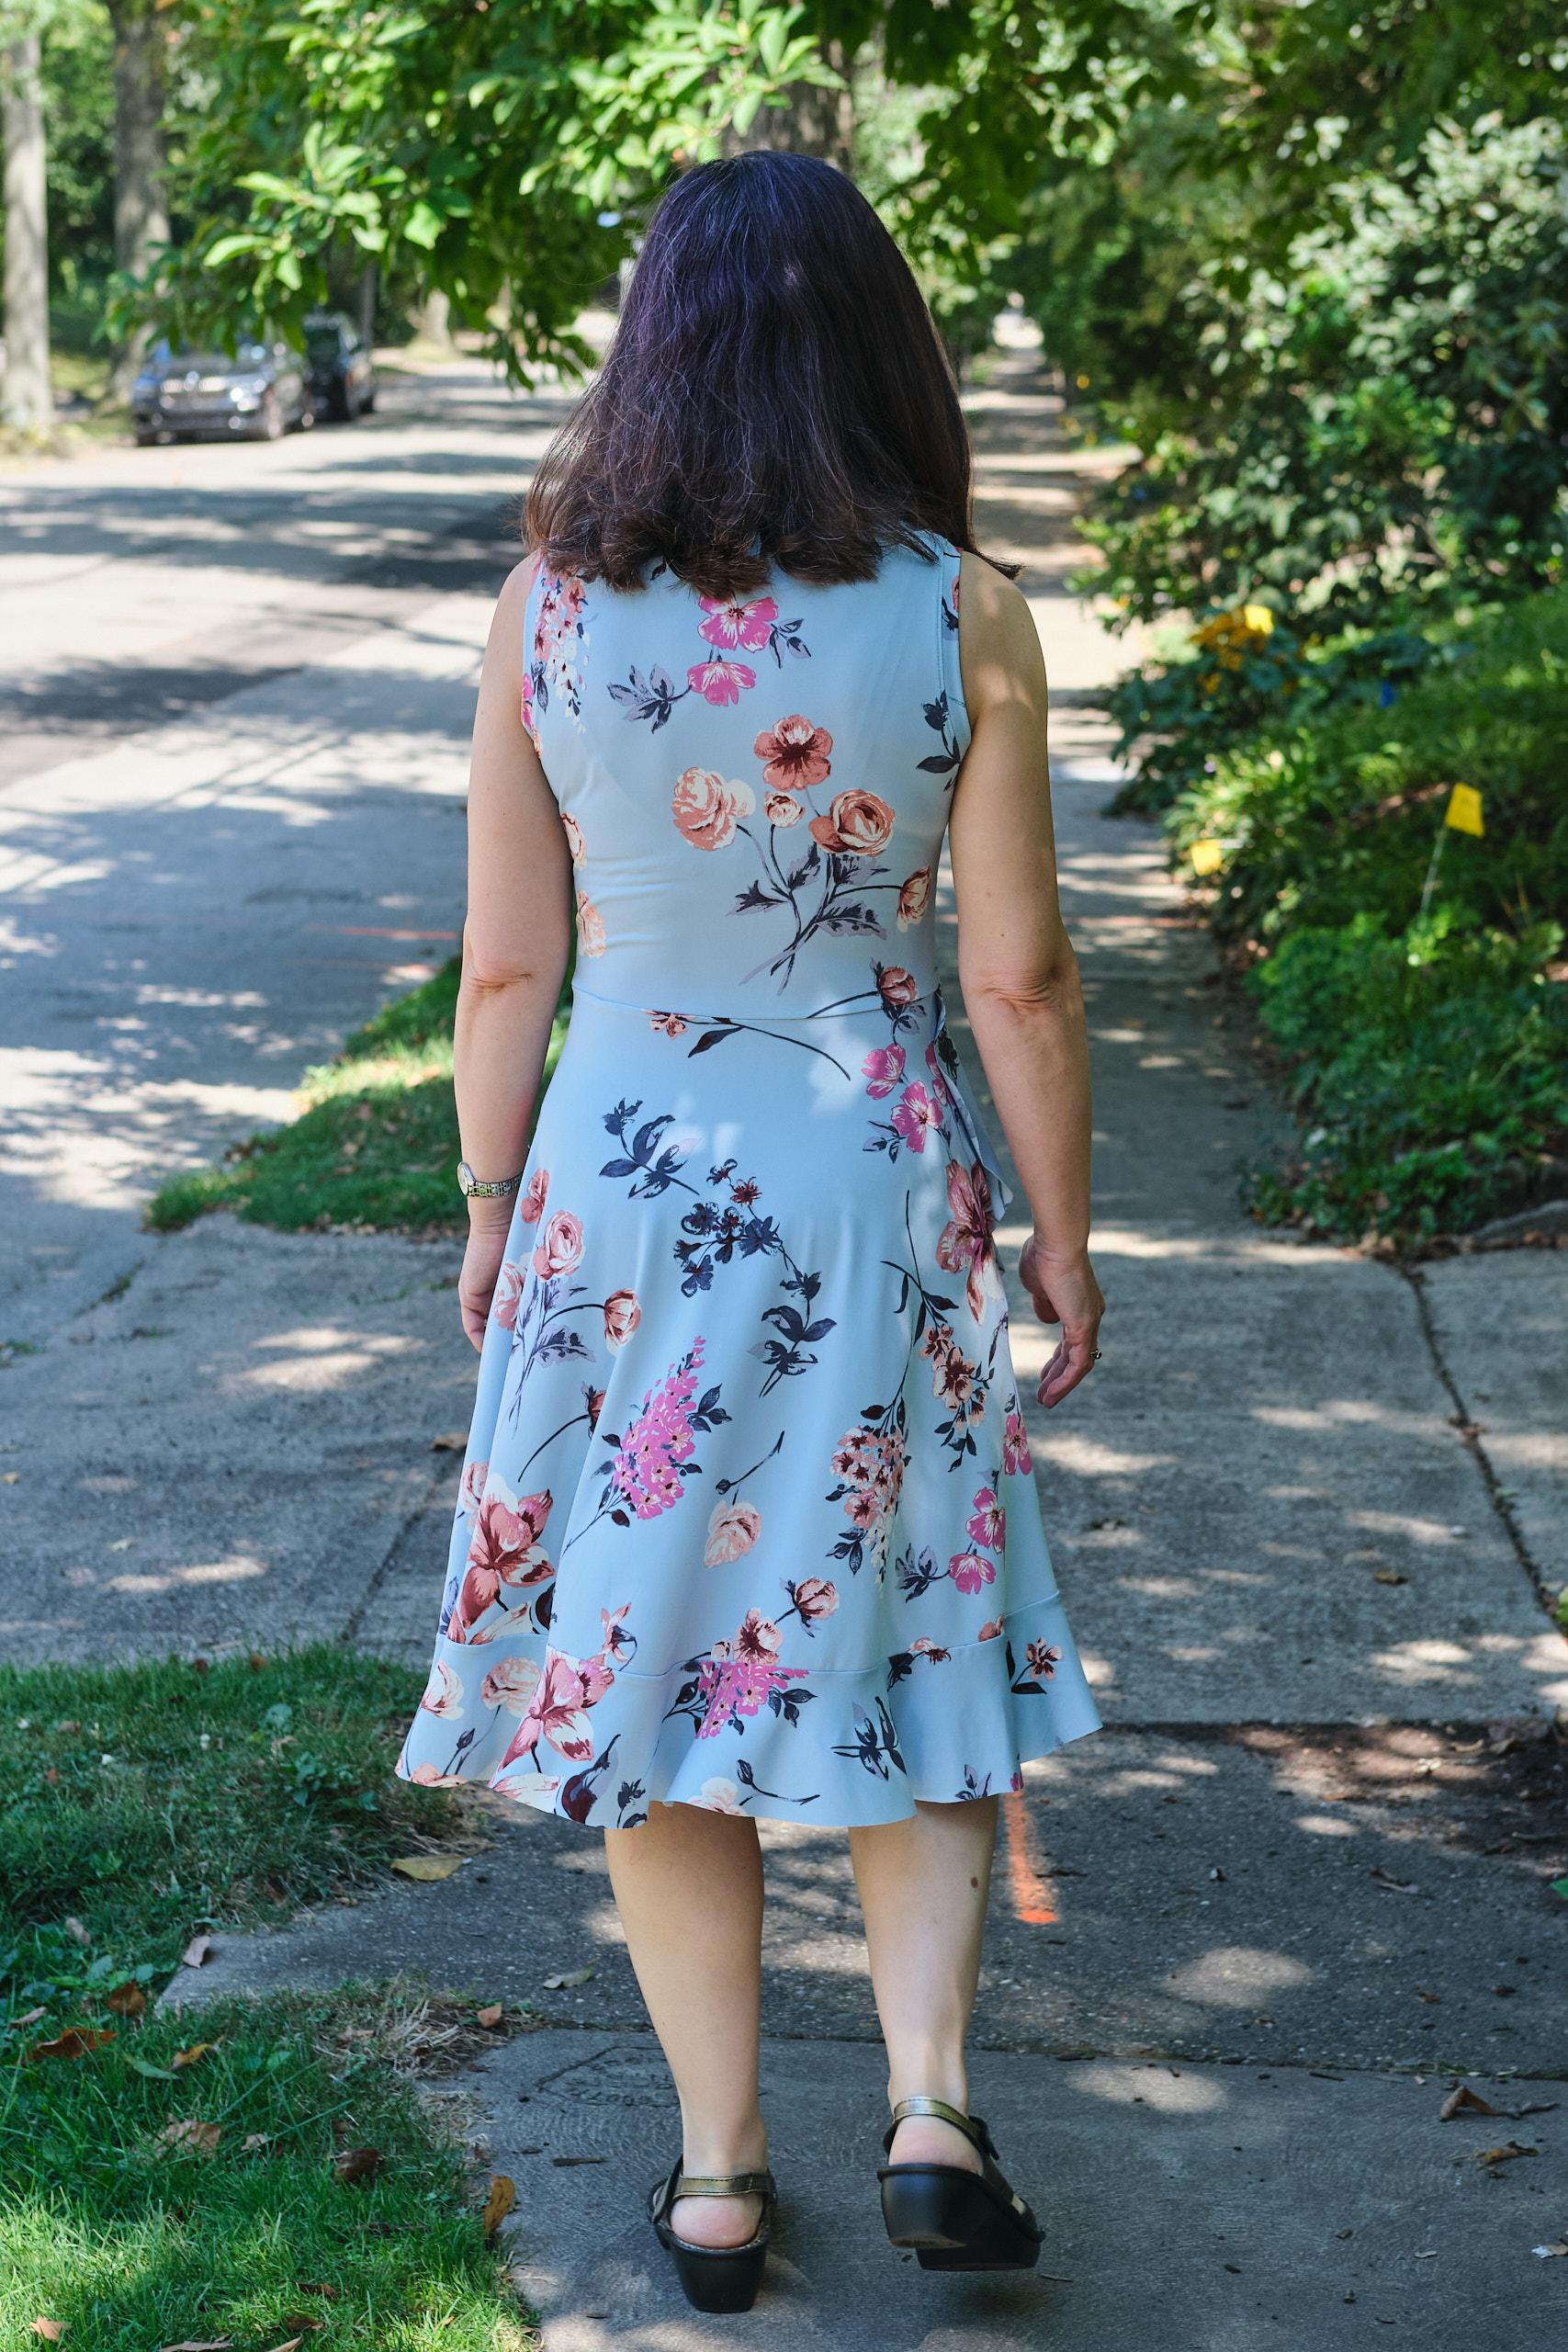
Since the ITY fabric has a nice clean cut edge that doesn’t fray or curl, I decided not to hem my flounces. This saved time and gave the flounces a nice drape.

I finished the dress before lunch and then put it on to wear to our block party this afternoon in the street in front of my house. While I normally wear shorts and a t-shirt to this event, I couldn’t wait to wear my new dress, and it was pretty comfortable to wear in our hot and humid weather. I love the look of this dress from both the front and back! I was also pleased that despite the fact that the inner wrap is connected only at the waistband, it stayed suitably wrapped.

Cassie V2 top for woven fabrics, also works for stable knit

Sinclair Cassie V neckline top and dress for woven fabrics made of 1.5 yards of 58” wide burgundy PyLos LiKnit, size 4p, long sleeves shortened by 2 inches.

I tested Cassie V1 but was traveling when the V2 pattern released and didn’t get back until after the testing period was over. So here’s my V2, better late than never.

Cassie is a v-neck pattern for woven fabrics. In the original V1 pattern the neckline crossed over, but too many sewists complained about gaping, so the final V2 was switched to a v-neck without the crossover, but including a pair of cute notches. I decided to try the pattern in PyLos LiKnit, a stable knit fabric made from 55% Rayon/45% Nylon. It has about 25% stretch horizontally, but minimal vertical stretch. I treated it as a woven when I sewed. I think it behaved pretty well for this pattern, although it has a little bit more thickness than a woven and it stretches a bit, so it made it harder to get sharp points in the notches and a crisp V. However, the stretch also made the top more comfortable to wear and easier to get on and off.

I cut out a 4p AB cup top with long sleeves and made no pattern modifications. I top stitched all the optional places where it was suggested. My original attempt at sewing down the neck binding was a bit off and caused the v-neck to be uncentered. Fortunately it was pretty easy to unpick and resew (although looking at the finished product now I realize it still isn’t perfectly centered… oh well).

After I sewed the first sleeve on I tried it on and was disappointed to see the sleeve hanging well past my wrist. I’m used to sleeves that are too long on me, but was surprised the sleeve was too long on a petite pattern. Since this sleeve is gathered and the band added before you sew it to the garment, there is no opportunity to check the sleeve length before it is finished. I went back and looked at photos posted by other sewists and noticed that most opted for the 3/4 length rather than the long sleeve. It looks to me like the long sleeves in this pattern just run long. The sleeve bands took a while to construct and I didn’t want to take them apart. So instead I unpicked the sleeve head and cut two inches off the top of the sleeve head. I was able to mark my cutting line by using a ruler to draw dots every inch or so two inches from the top edge of the sleeve. Then I connected the dots. I cut along the line and reattached the sleeves. This time it worked much better. (Warning for other sewists, unless you have particularly long arms, if you sew the long-sleeve version you will likely need to shorten the sleeves!)

Overall, I’m happy with this top. This is not a style I normally wear, and it may be more difficult to layer than my typical long-sleeve tshirts. But it goes well with both wide and skinny jeans as well as black dress pants, and it should not require ironing. I really like this long-sleeve version (now that I shortened the sleeves) but I also like the sleeveless and 3/4 length versions other sewists made.

There’s also a nice video on this pattern from Lifting Pins and Needles.

Cassie V1

Sinclair Cassie V1 made of 43” of 52” wide dark sage cotton double gauze, size 4p, modified to remove gathers and wrap sleeve bindings.

My first time doing a pattern test for Sinclair I ended up being the pattern cover girl for the Linda pattern. I haven’t had time to sign up for a pattern test since, but when the Cassie top and dress was announced, it appeared I would have time to make it before heading out on a trip. 

Cassie is a woven pattern, and I don’t have a lot of woven fabric in my stash besides the 18 yards of cotton double gauze I bought on clearance last year and a lot of quilting cotton. I was worried that the quilting cotton would be too stiff for this pattern, so I went with dark sage double gauze. But I waited for other sewists to post some initial photos of their makes before cutting. I wasn’t sure I would like the fit of the dress, which appeared to be fairly loose, so I made the top version in a size 4P.

I initially tetrised the pattern in Affinity Designer to fit in 1 yard of 58” fabric before realizing that my fabric was actually 52”. At that width it takes more than a yard of fabric, but i made it all fit in 43″.

The pattern was released for testing with only partial instructions, as the pattern designer made some last minute changes. She updated the instructions a couple of times to add the missing information, but never released the full instruction set. As I worked on my top, I periodically checked the Facebook group for the pattern test to see whether new updates had been released.

The top has a crossover V-neck with cute notches. I wasn’t sure from the line drawing that I would like the notches and was tempted to leave them out. But I’m glad I kept them as they are a really nice and unique detail. The instructions for facing the crossover pieces was pretty easy to follow. The double gauze was a bit of a challenge because it is fairly fluffy and thus hard to get nice sharp points, but I made it work. I regretted trimming the facing to 1/8 inch (as instructed), as it made understitching the gauze more difficult — next time I think I would clip the curve but not trim.

Other sewists complained that the V-neck gaps open — this seemed to be a big problem for larger sizes. Besides the gaping problem, people were complaining that the top was too loose, and some who tried adding the optional ties did not like the look. In addition, there were some complaints about the cap sleeve being too pointy. I suggested that the pattern designer offer a sleeveless option to address the cap sleeve problem, a suggestion she adopted. The pattern designer polled testers about some possible changes and a couple days later posted some new line drawings while she worked on revising the pattern.

I could see from the new drawing that I would need to start over to make the revised design. So I decided to go ahead and finish the top I had started in the mean time. I sewed on the “skirt” and was not happy with the look of the gathered front and back, which looked to me like a maternity top. So I took it apart and cut the gathered pieces down so they would fit  in place without gathering. I also graded in the waist a bit and trimmed the point off the cap sleeves. 

As the top stitching on the neck facing stands out in the double gauze I decided to mirror the look by making a hem of similar width. I serged the bottom of the top, folded it up .25 inch and then another 1.25 inch, and top stitched it from the front.

The last bit to figure out was the sleeve binding. The pattern included narrow bias binding strips, but the instructions did not detail how to attach them. Having done this sort of binding before for double gauze necklines (on my purple Alva top and my orange Meet You There dress) I had a good idea of how to do the binding and I knew it would be difficult with double gauze. Therefore i cut wider bias binding (1.75 inch) and attached it wrapped around the armscye edges.

I finished my Cassie V1 top before leaving town, and even managed to do a photo shoot. It looks great with my matching PE Vacation Vibes pants, but also looks good with other pants and shorts. it was fun to try out a new pattern and be involved in the discussion of what worked well and what needed improvement. I uploaded photos to the Facebook group right before the pattern designer posted the V2 pattern, but making V2 had to wait until I got back into town a week later.

Photos below of my hacked Cassie V1. The final Sinclair Cassie pattern is now available, and as you will see, no longer includes the crossover front or the horizontal seam in the back. But it still has the cute notches on the neckline and now comes with multiple sleeve options. I’ll post the top I created with the final pattern next.

=

Garment sewing index

Wow, I’ve sewn a lot of clothes! To make it easier to find my makes, I’ve put together this index page. You can look for garments by type, or by pattern maker. You can also use the search box in the upper right corner of this page to find more specific items.

Garment types: accessories, cardigans, dresses, jackets and blazers, mens, shorts and skorts, skirts, tops

Pattern makers: Boo & Lu, Ellie & Mac, Greenstyle, Love Notions, Pattern Emporium, Petite Stitchery, Sinclair, Styla


Accessories


Cardigans


Dresses


Jackets and Blazers


Mens


Pants


Shorts and skorts


Skirts


Tops

More double gauze Vacation Vibes

Pattern Emporium Vacation Vibes Palazzo Pants, made of 65” of 52” wide dark sage cotton double gauze, size AU8 short, low rise, modified foxy pockets.

I’m still not going on vacation, but I made a second pair of Pattern Emporium Vacation Vibes Palazzo Pants. I made my first pair of Vacation Vibes last summer in purple cotton double gauze. That was my first time sewing with double gauze and I wasn’t sure whether to iron it or not. I found conflicting advice online and decided to go with those who advised against ironing since that seemed like the easy way out. However, I learned that if you cut and sew double gauze without ironing it, it stretches and grows quite a bit as you wear it. My pants ended up being too big. I had cut the high-rise version because generally I prefer high-rise pants. However, I’ve found that, as a petite person, PE high rise seems to be too high on me, and that was even more the case when I used double gauze. So after wearing them, I removed the waistband and about 2 inches from the rise before reattaching it. They are still too baggy, especially in the seat, but quite wearable and I do wear them (but I’m considering taking them apart and cutting them down further).

After sewing a PE Be Mine top (modeled with the pants in the photos in this post), I decided to make a pair of green double gauze pants to match. I had a little less than 2 yards of 52” wide gauze left from another project (I’ll post about that one soon) so I did some pattern piece tetrising in Affinity Designer and discovered I could get the pattern into 65” if I rotated it 90 degrees and cut the pants legs along the width of the fabric rather than the length. My gauze doesn’t appear to be directional, so this worked out ok.

This time I thoroughly pressed the gauze, sized down from an AU10 to an AU8, and cut the lower rise. I used the pocket opening line from the high rise so that the pocket opening would not be as low when I added the foxy pockets (I’ve done this with other PE patterns as well to keep things from falling of pockets). I sewed according to the pattern except for the pocket opening modification and adding a second row of topstitching around the pocket bag as a decorative design detail.

As I was sewing I discovered that despite my best efforts, I had managed to stretch the gauze as I was cutting it. This resulted in one of the pants legs being abut an inch shorter than the other. I evened them out before hemming, which meant I could not do the full 2-inch hem I had planned. I serged the hem, folded under .25 inch and then .75 inch and top stitched.

I think these fit a lot better than my pruple paints, although they are still a little baggy in the seat and the fabric slides around on the waistband a bit. I wonder if they might be better with a shirred waist band. Nonetheless, they look pretty good, especially with my Be Mine top. I also made a sleeveless top from the same fabric as part of a new pattern test, but I can’t show you until the new patten releases. These pants are very comfortable to wear and work with both tucked and untucked shirts. One of these days I will make a pair of Vacation Vibes in some other woven fabric.

Going to the tropics

Pattern Emporium Going Places Fit-Flare and Fitted dress, made of 1.5 yards of tropical print DBP, size AU8 top graded to AU10, knee length ballet neck, sway back adjustment, pockets added

No, I’m not going on vacation, but I made a Pattern Emporium Going Places dress in a tropical print, and with some of the warm weather we’ve had lately in Pittsburgh, when I stand next to the flowers in my front yard I feel somewhat tropical.

I picked up this pattern a few weeks ago when it was on sale (it originally came out in 2019). This dress has both a fitted and flt & flare option and several different necklines (including a low cut “babe” option). But what is distinctive about this dress is that regardless of which option you choose, you have cute sundress straps in back that are designed to cover bra straps. I chose the ballet neck and flit & flare options, cut to knee length, with side seam pockets added (not part of the pattern). I used a soft and lightweight double-brushed polyester print that I bought on clearance last year from Milly Mae.

The fit & flare version of this dress is basically the same dress as the PE Wanderlust dress but with straps instead of sleeves and binding instead of a neck band. Having previously made and adjusted three Wanderlust dresses, I knew I would need a sway back adjustment, so I went ahead and copied the adjustment I already worked out for the Wanderlust pattern. I also had already worked out how to add pockets to this pattern. I decided to use the AU 8 for the bodice and then graded the waist and skirt to an AU 10. After sewing it together I decided it was too long and shortened it by 2 inches (I should have anticipated needing to shorten it as I usually shorten PE patterns by 2 inches). I turned under the hem 5/8 inch and cover stitched with off-white thread.

The dress is a pretty fast sew, but it took me a bit longer due to adding the pockets and sewing neck binding with my cover stitch machine for the first time. I had never does this binding technique so I practiced on scrap fabric, but once I figured it out it was pretty easy, although does take some (and a lot of pins) to pin in place before sewing. I opened up my Triumph suitcase and got out my cover stitch foot and used it for the first time.

The bra-strap covering straps are great, but they do take some work to position properly. The pattern instructions suggest where to pin the straps in place as a starting point, but they were set too wide and too long for me. I had to repeatedly shift them and try the dress on again, and I finally enlisted the help of an assistant who could more easily see my back. Once I was happy with the positioning I sewed them in place with my cover stitching on top of the cover stitching on the binding. The binding is a nice polished finish in both the front and back.

I’m very happy with this dress and my husband really likes it too. I like the fact that I can wear a sweater or jacket with it and wear it to work too. I’m looking forward to trying other neck options, and maybe a maxi version in some fancy fabric. The pattern can also be truncated to make a tank top, which I may try as well.