Pants fitting with slim pants, two ways

Having now successfully made several pairs of wide-leg and palazzo pants, I decided to give slim pants a try. I made two pairs of grey slim pants this week, with two different types of fabric and patterns. Neither came out quite as I had hoped they would, but they are wearable and I learned a lot about pants fitting in the process, and also why I should probably just stick with wide-leg pants.

Take 1: Pattern Emporium Urban Pants Collection

I was so happy with my Pattern Emporium Walk Boldly pants, that I wanted to check out other Pattern Emporium pants. I saw the Urban Pants Collection for knit fabrics, which includes in a high rise with back darts, similar to Walk Boldly, and decided to give the pattern a try. The collection includes wide leg, tapered, and flared pants patterns, all with yoga waist bands and a jeans pocket option.

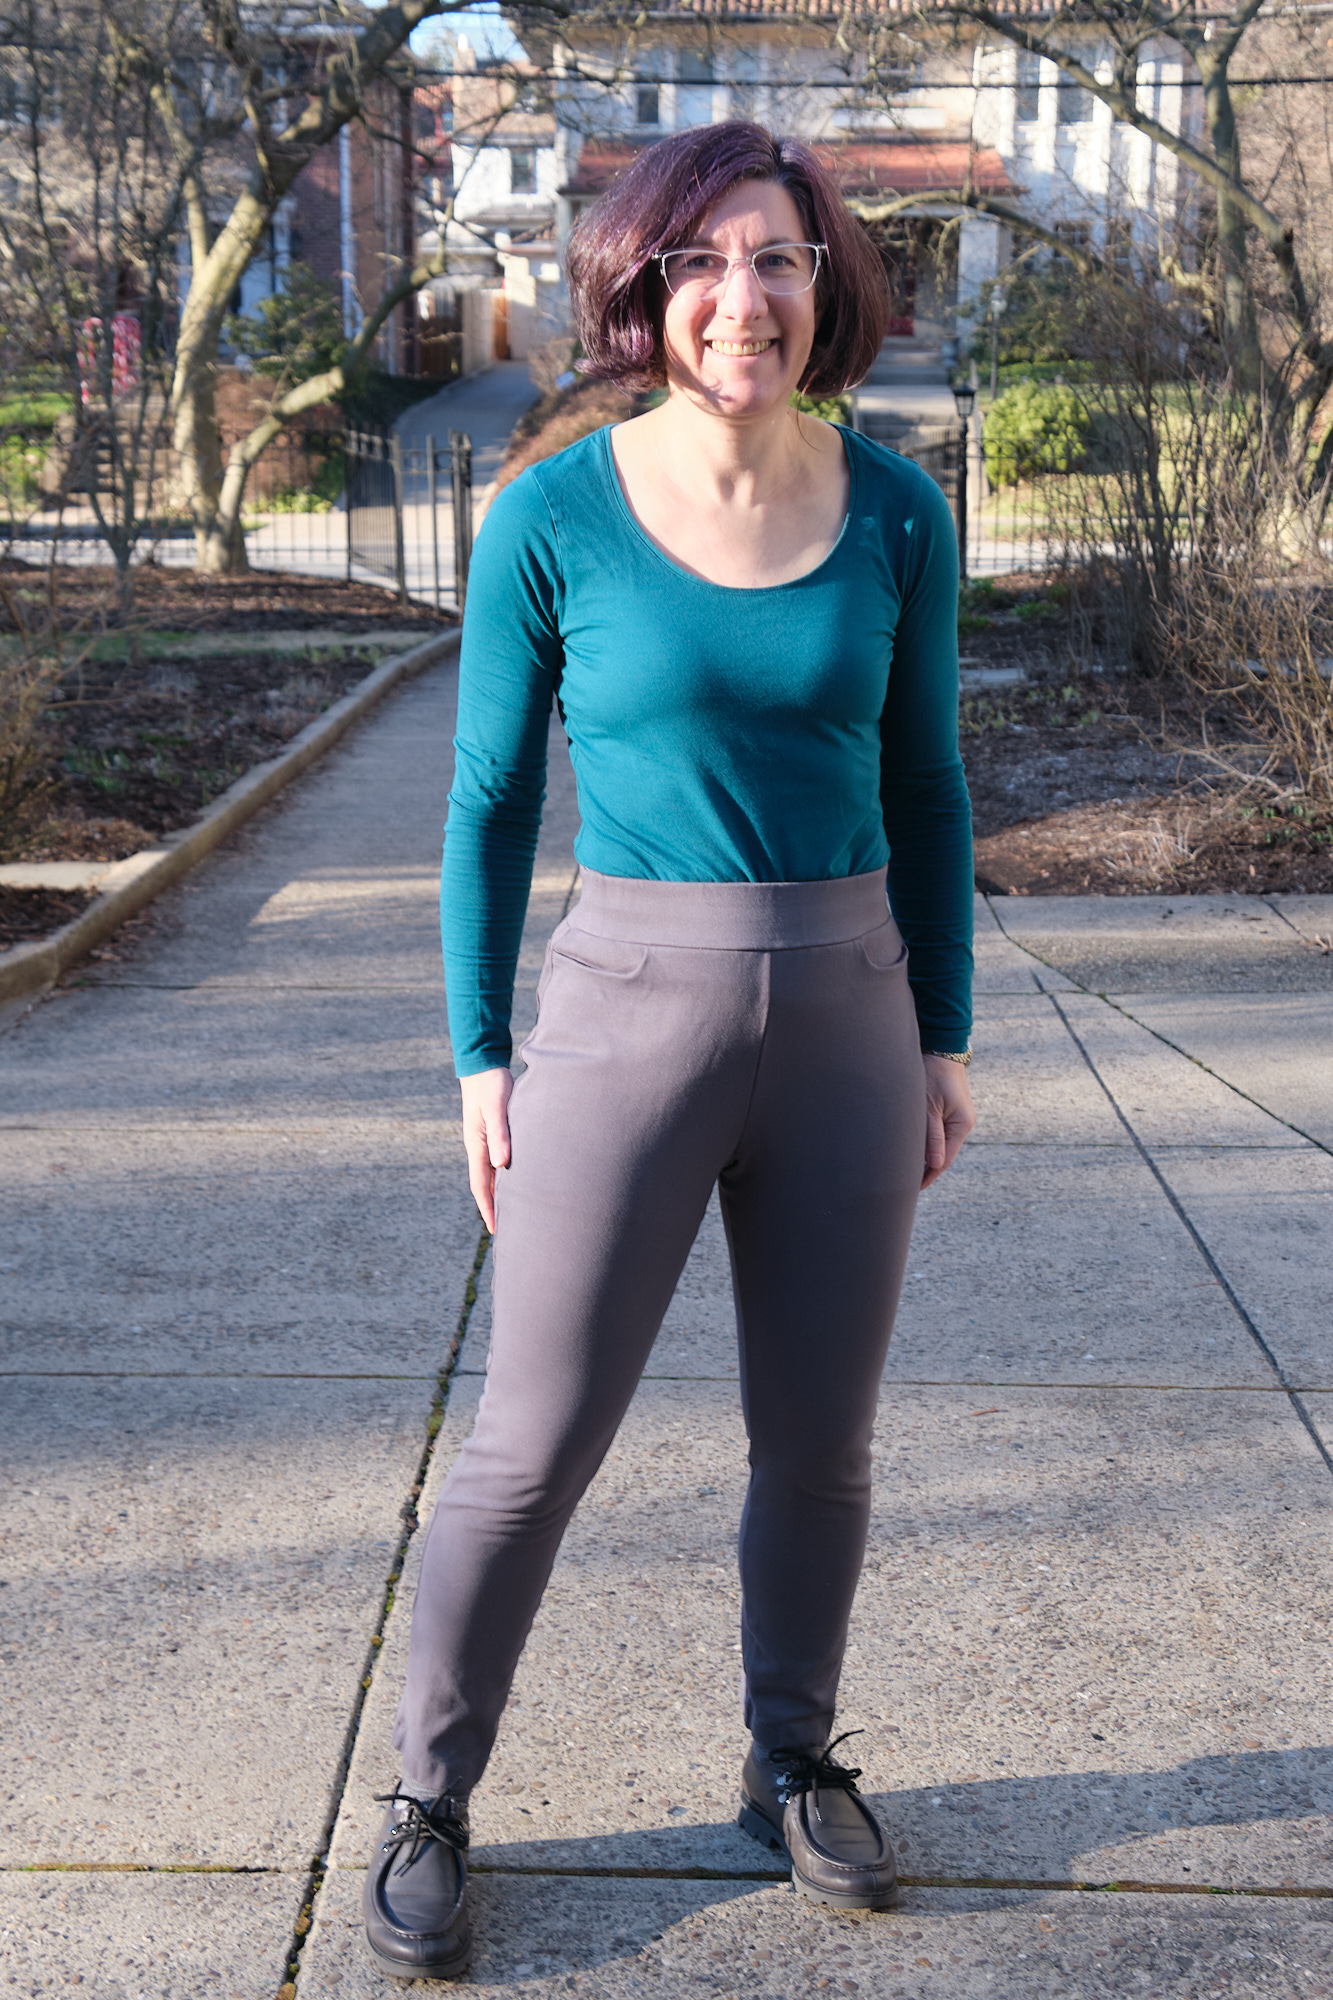
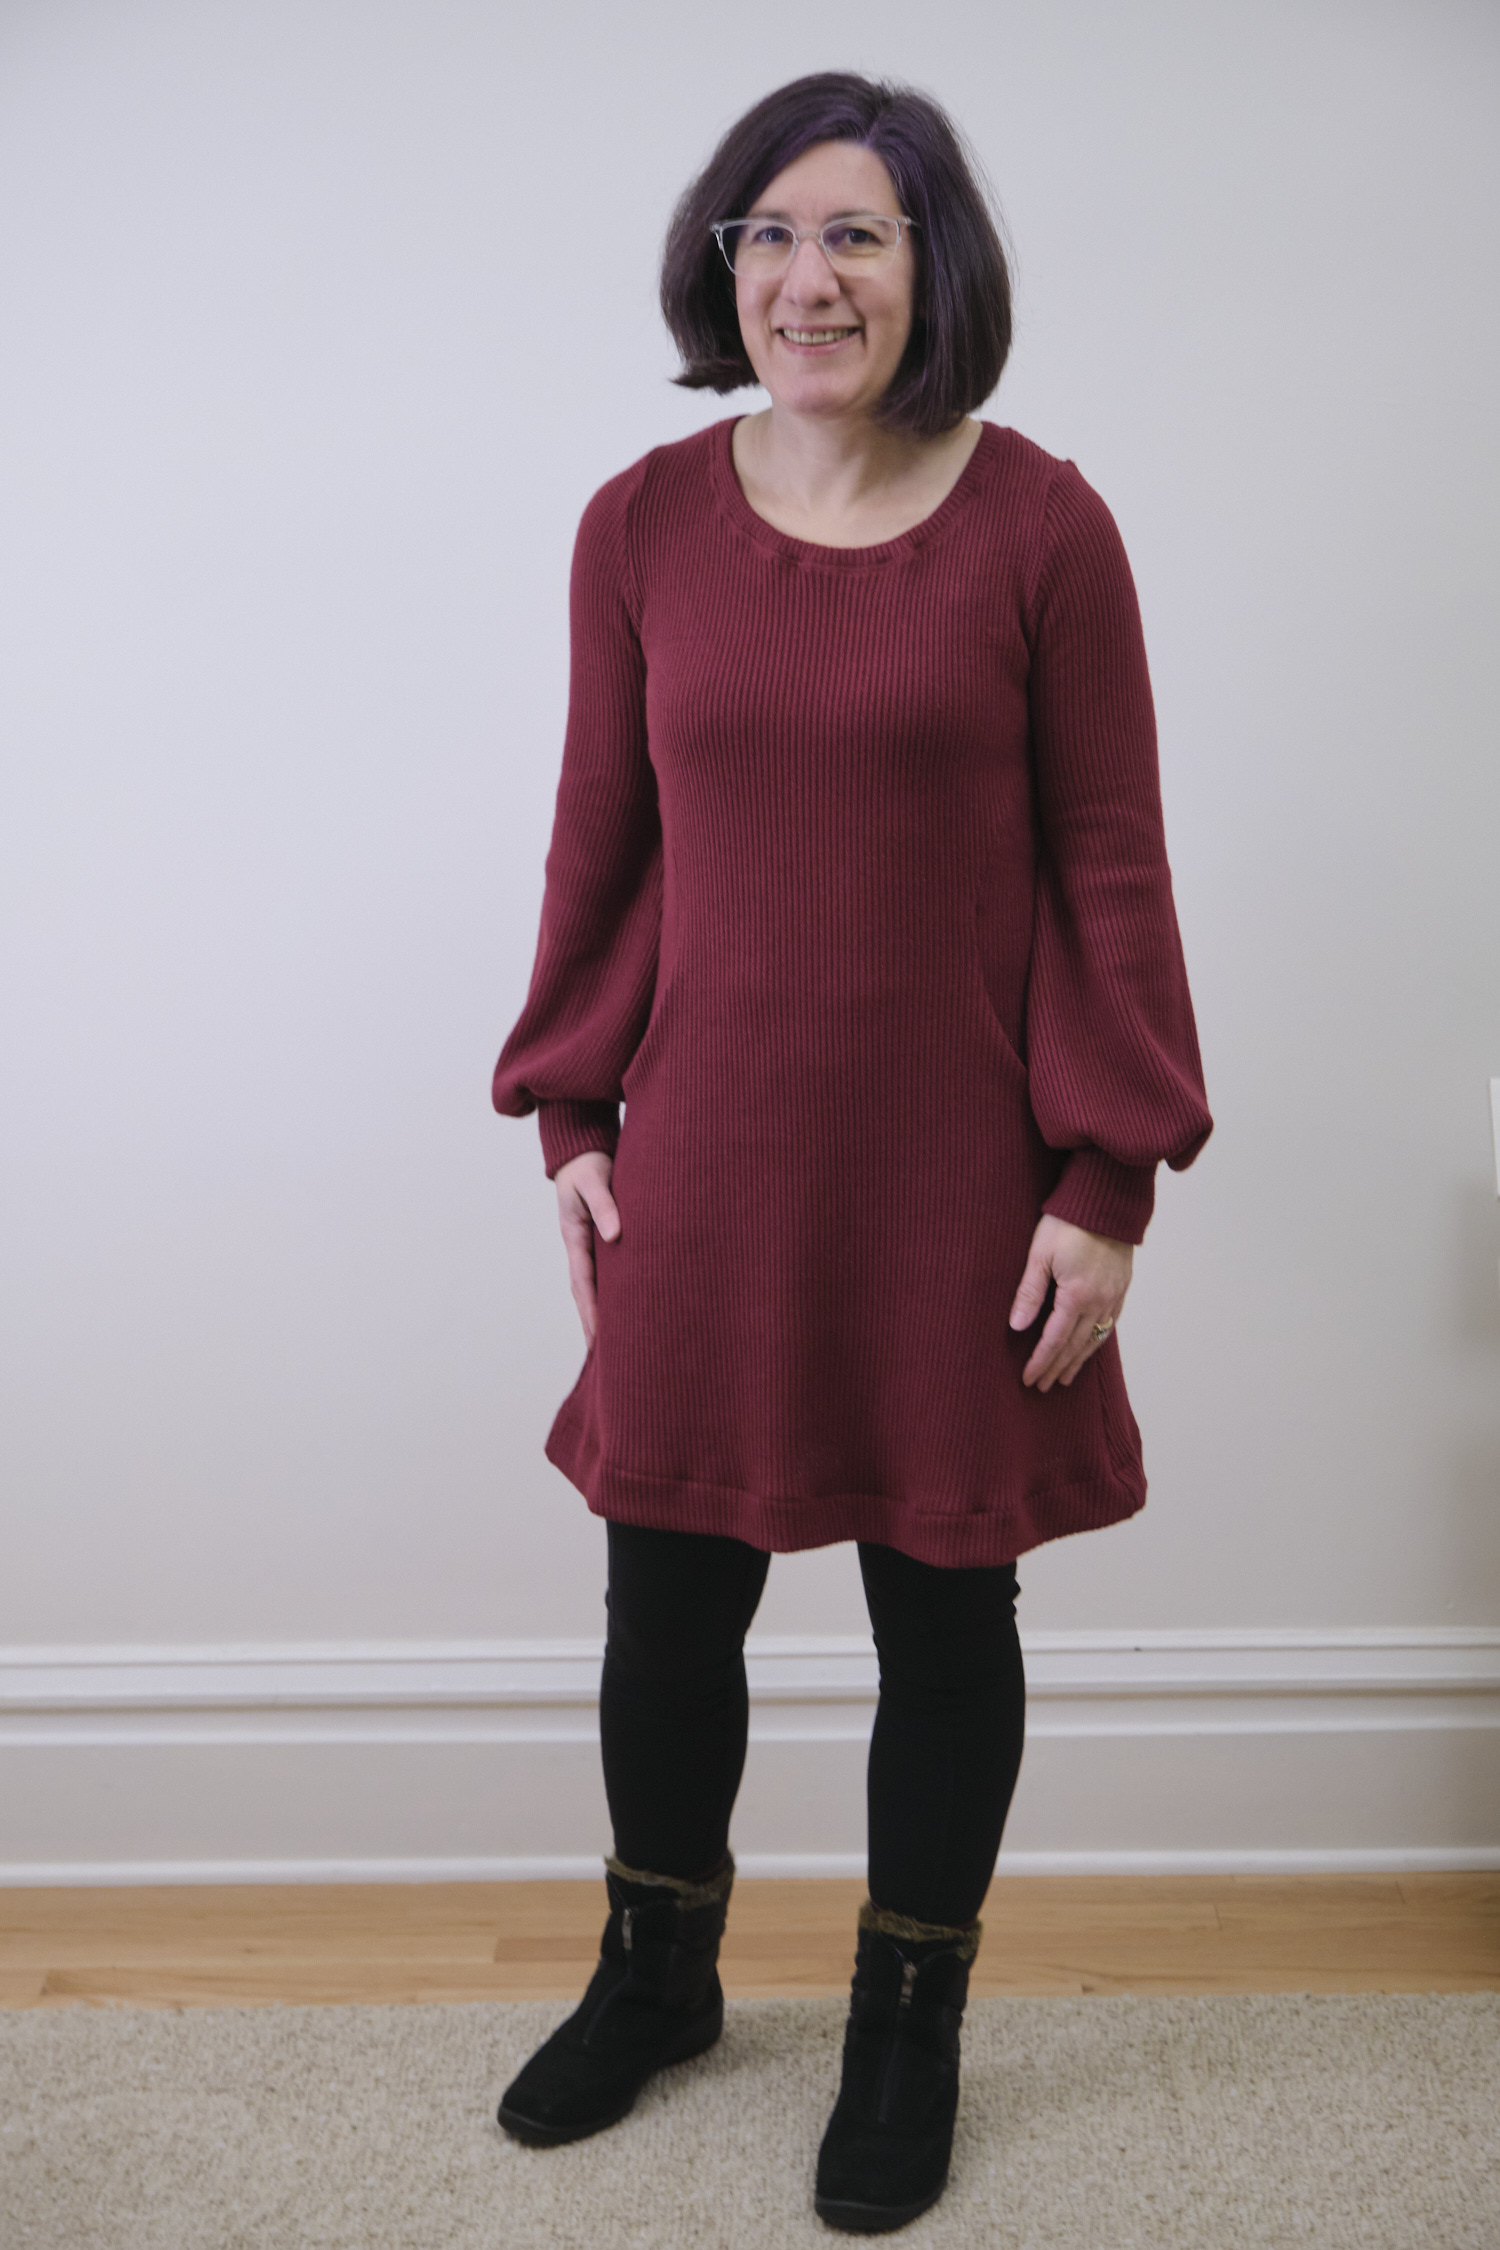
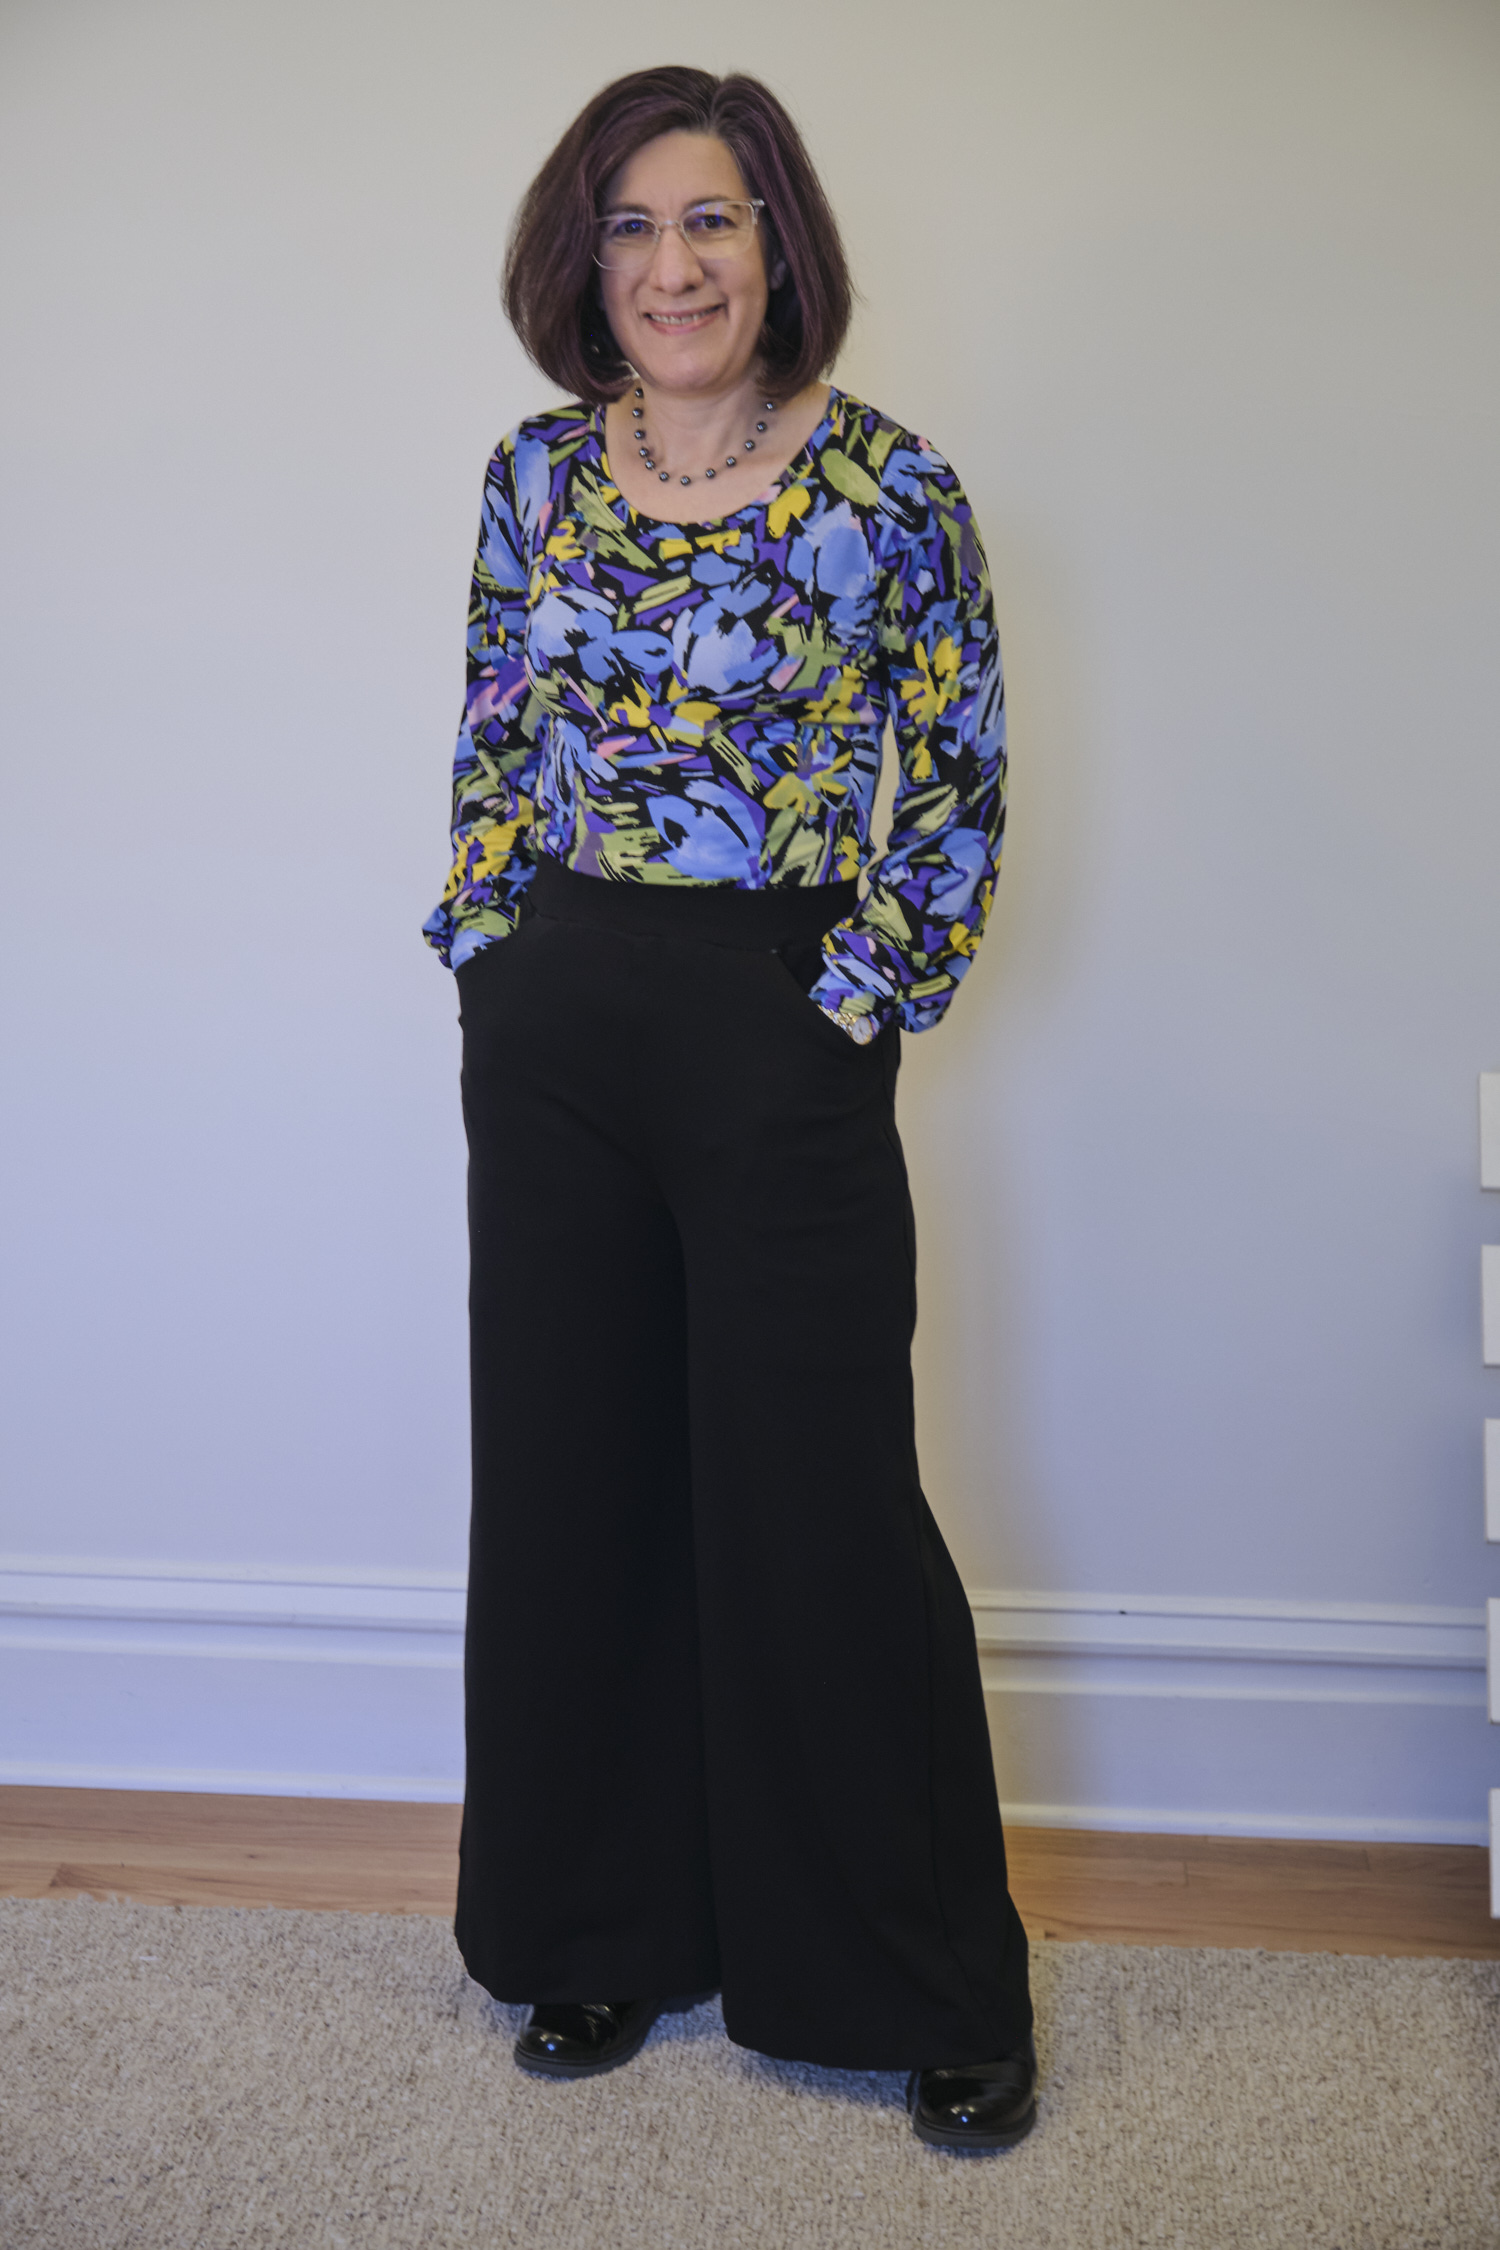
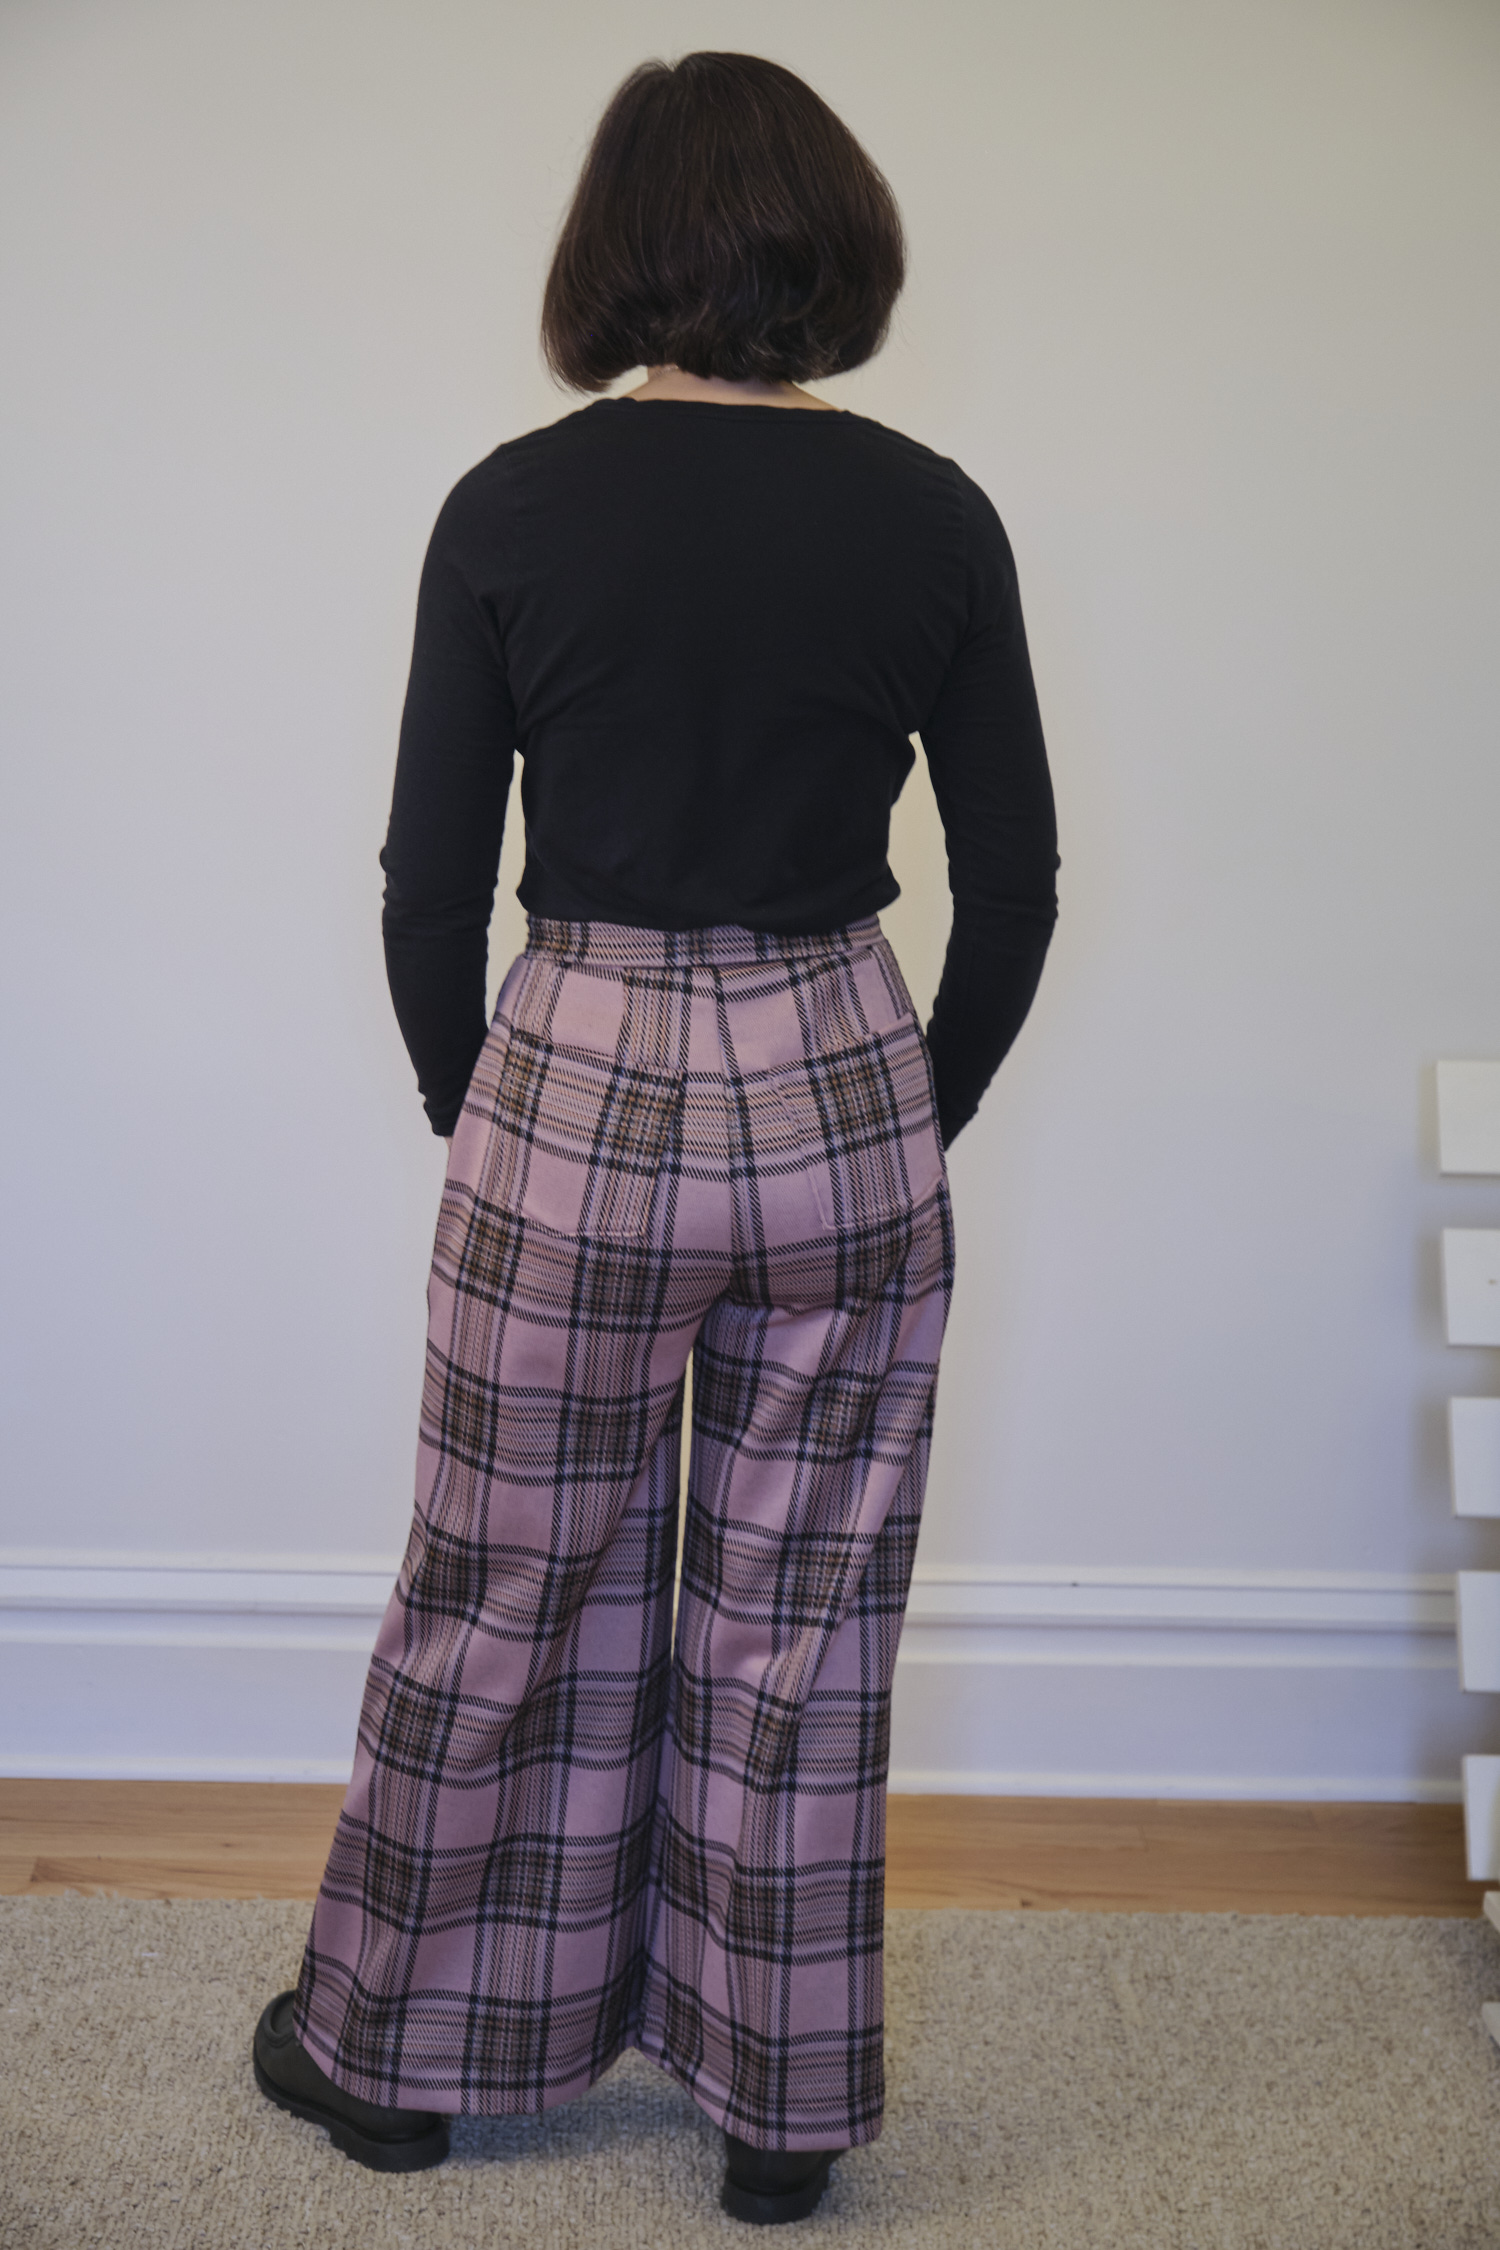
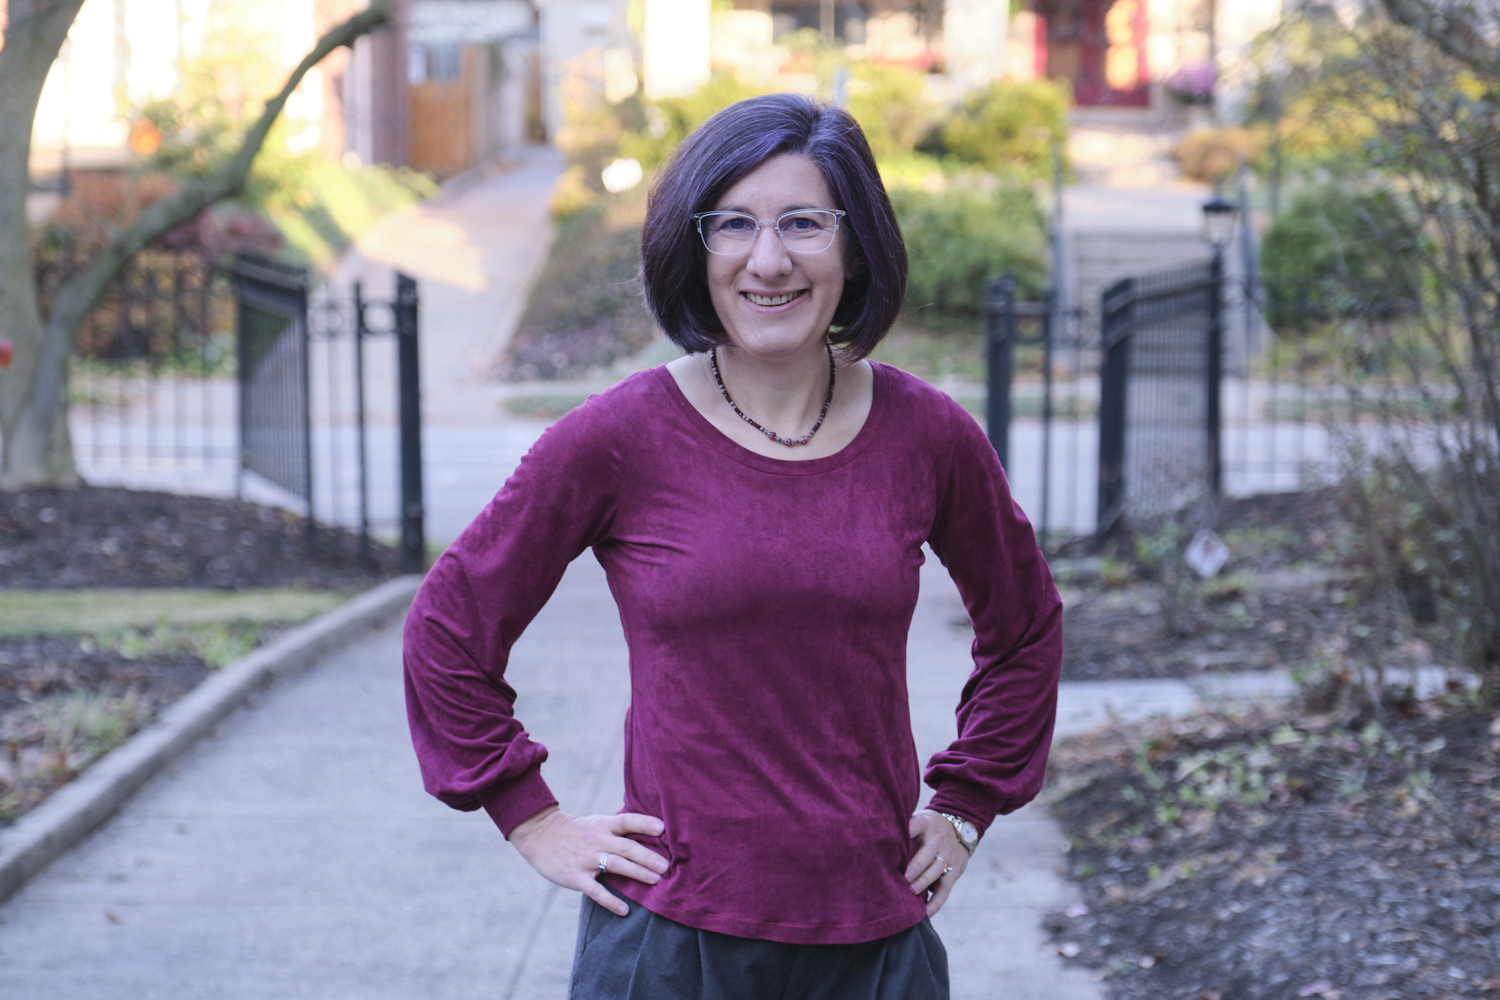
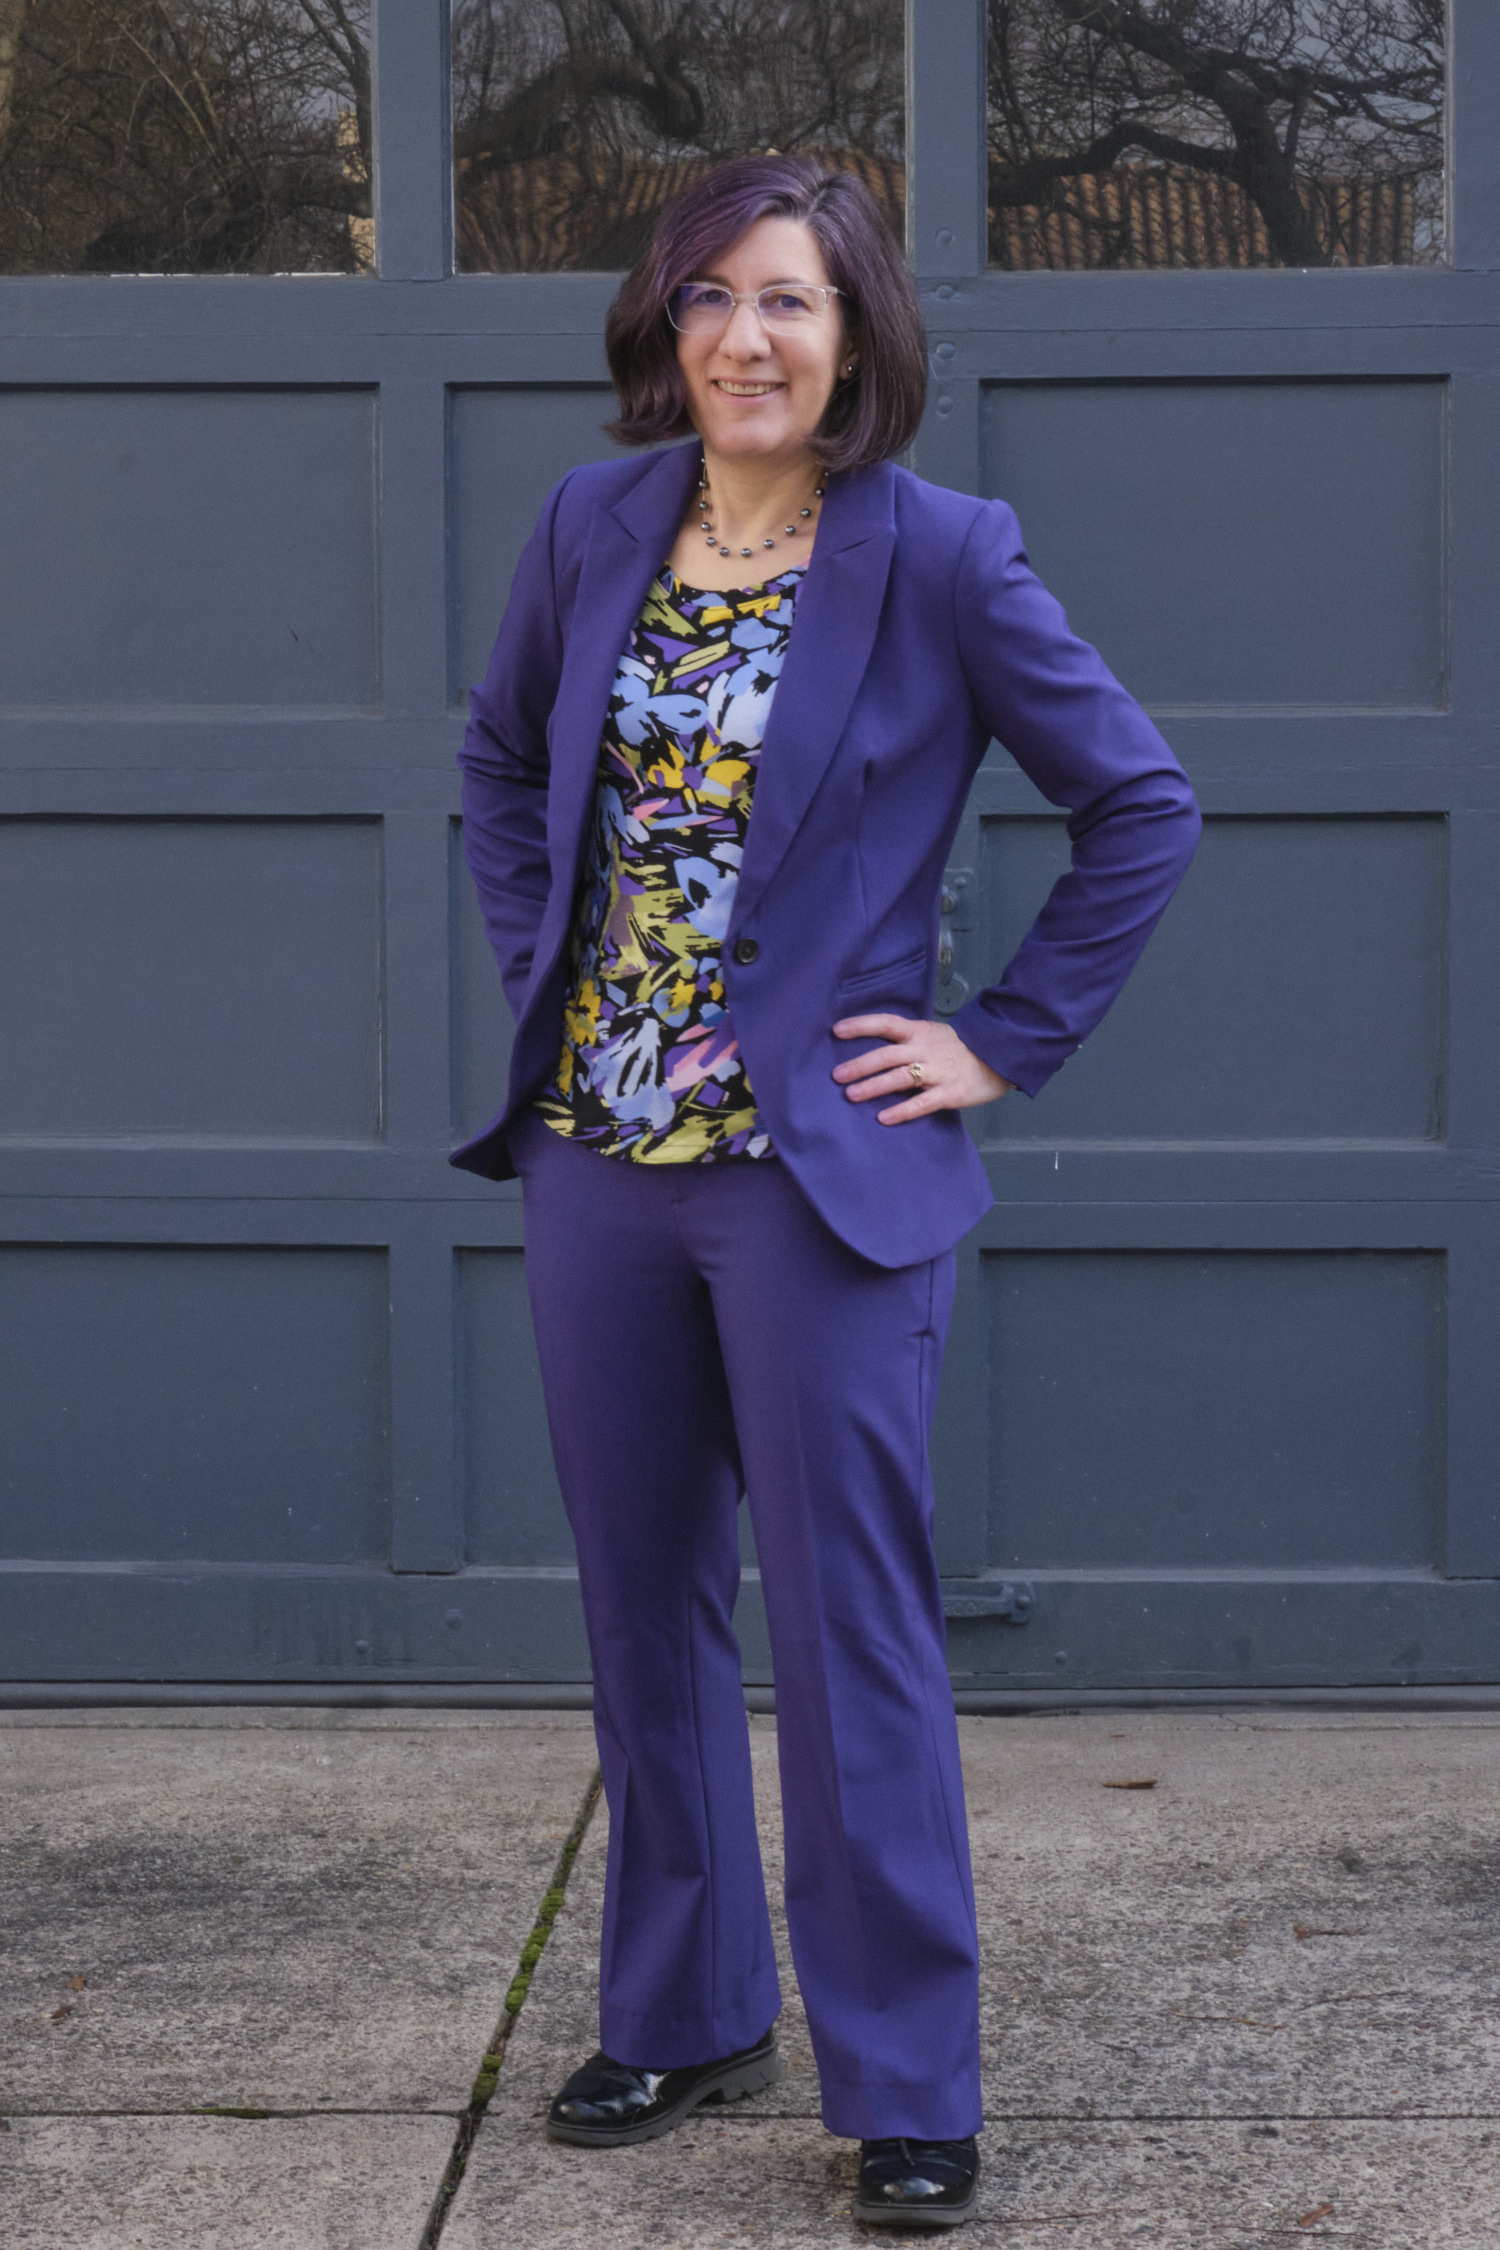
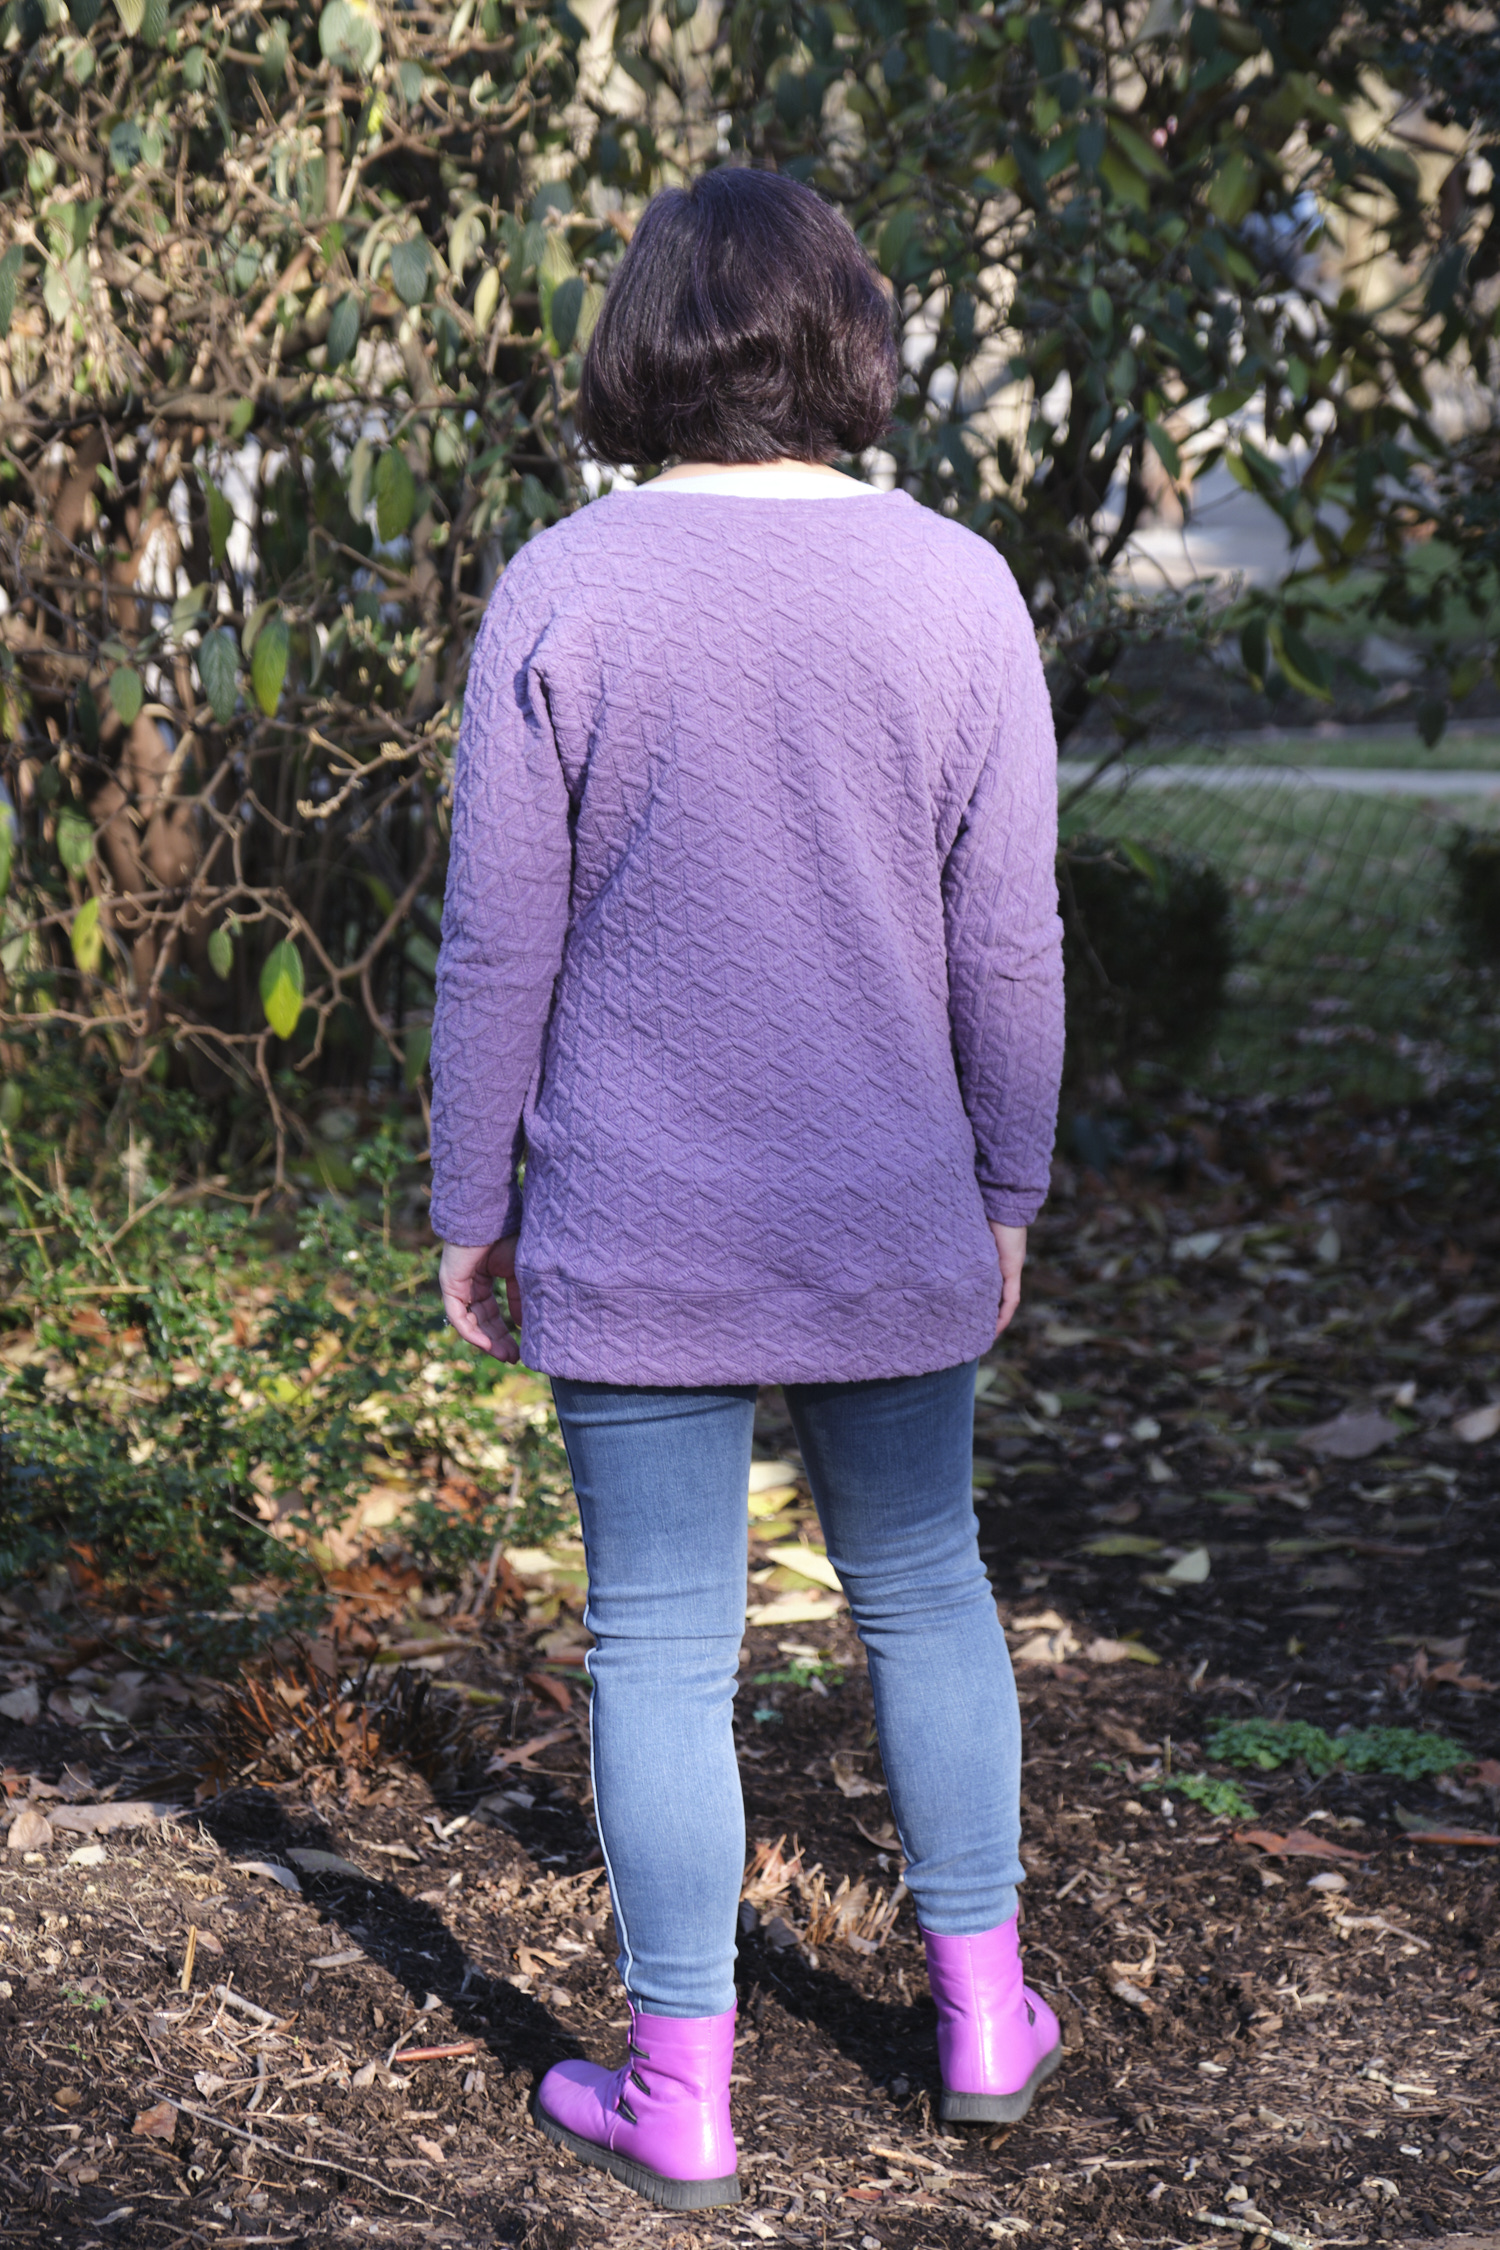
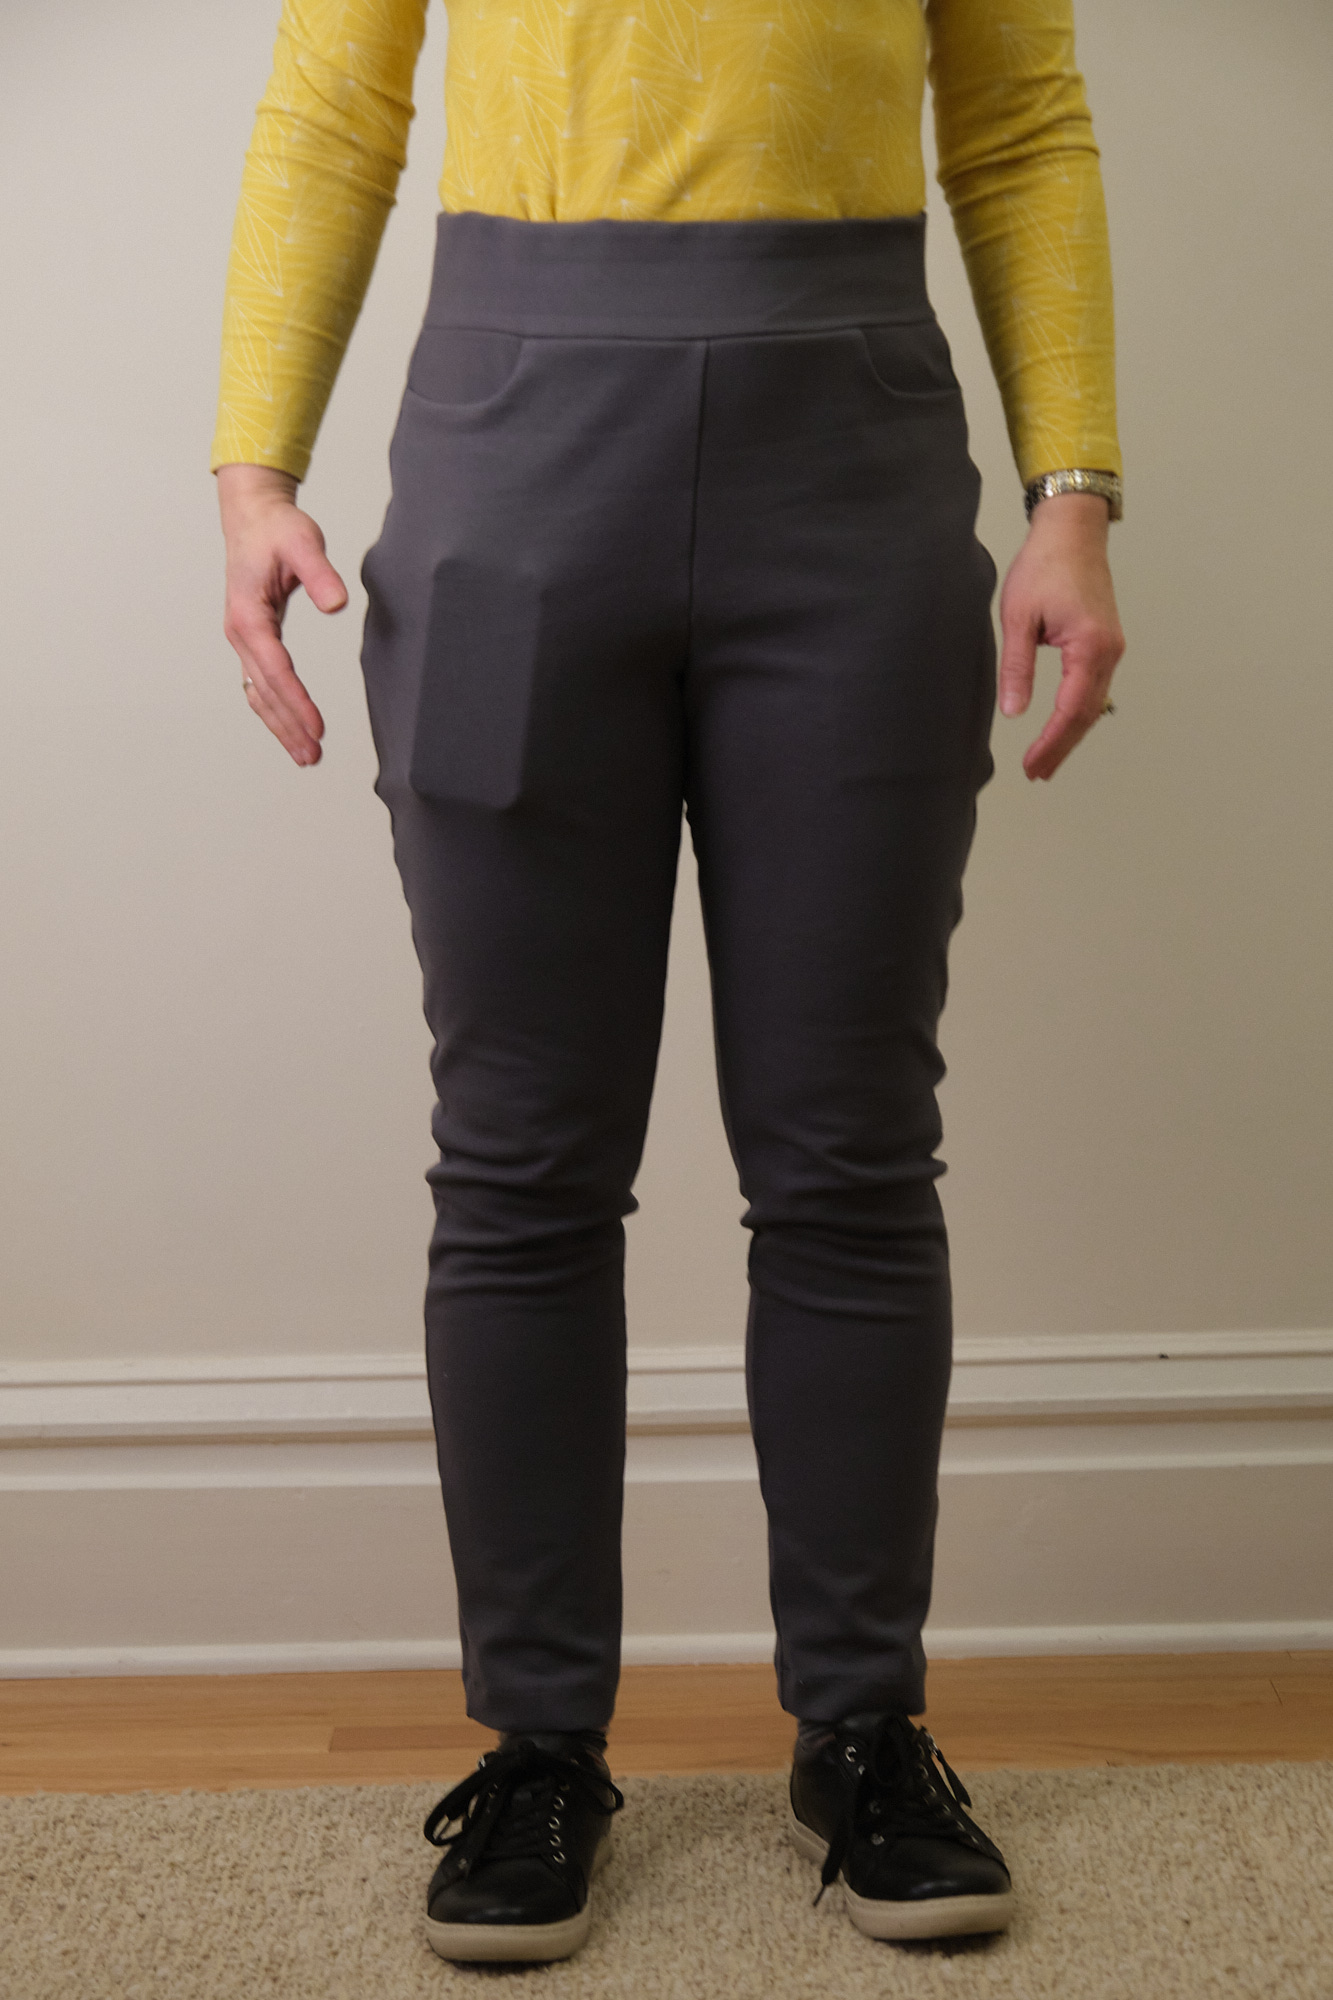
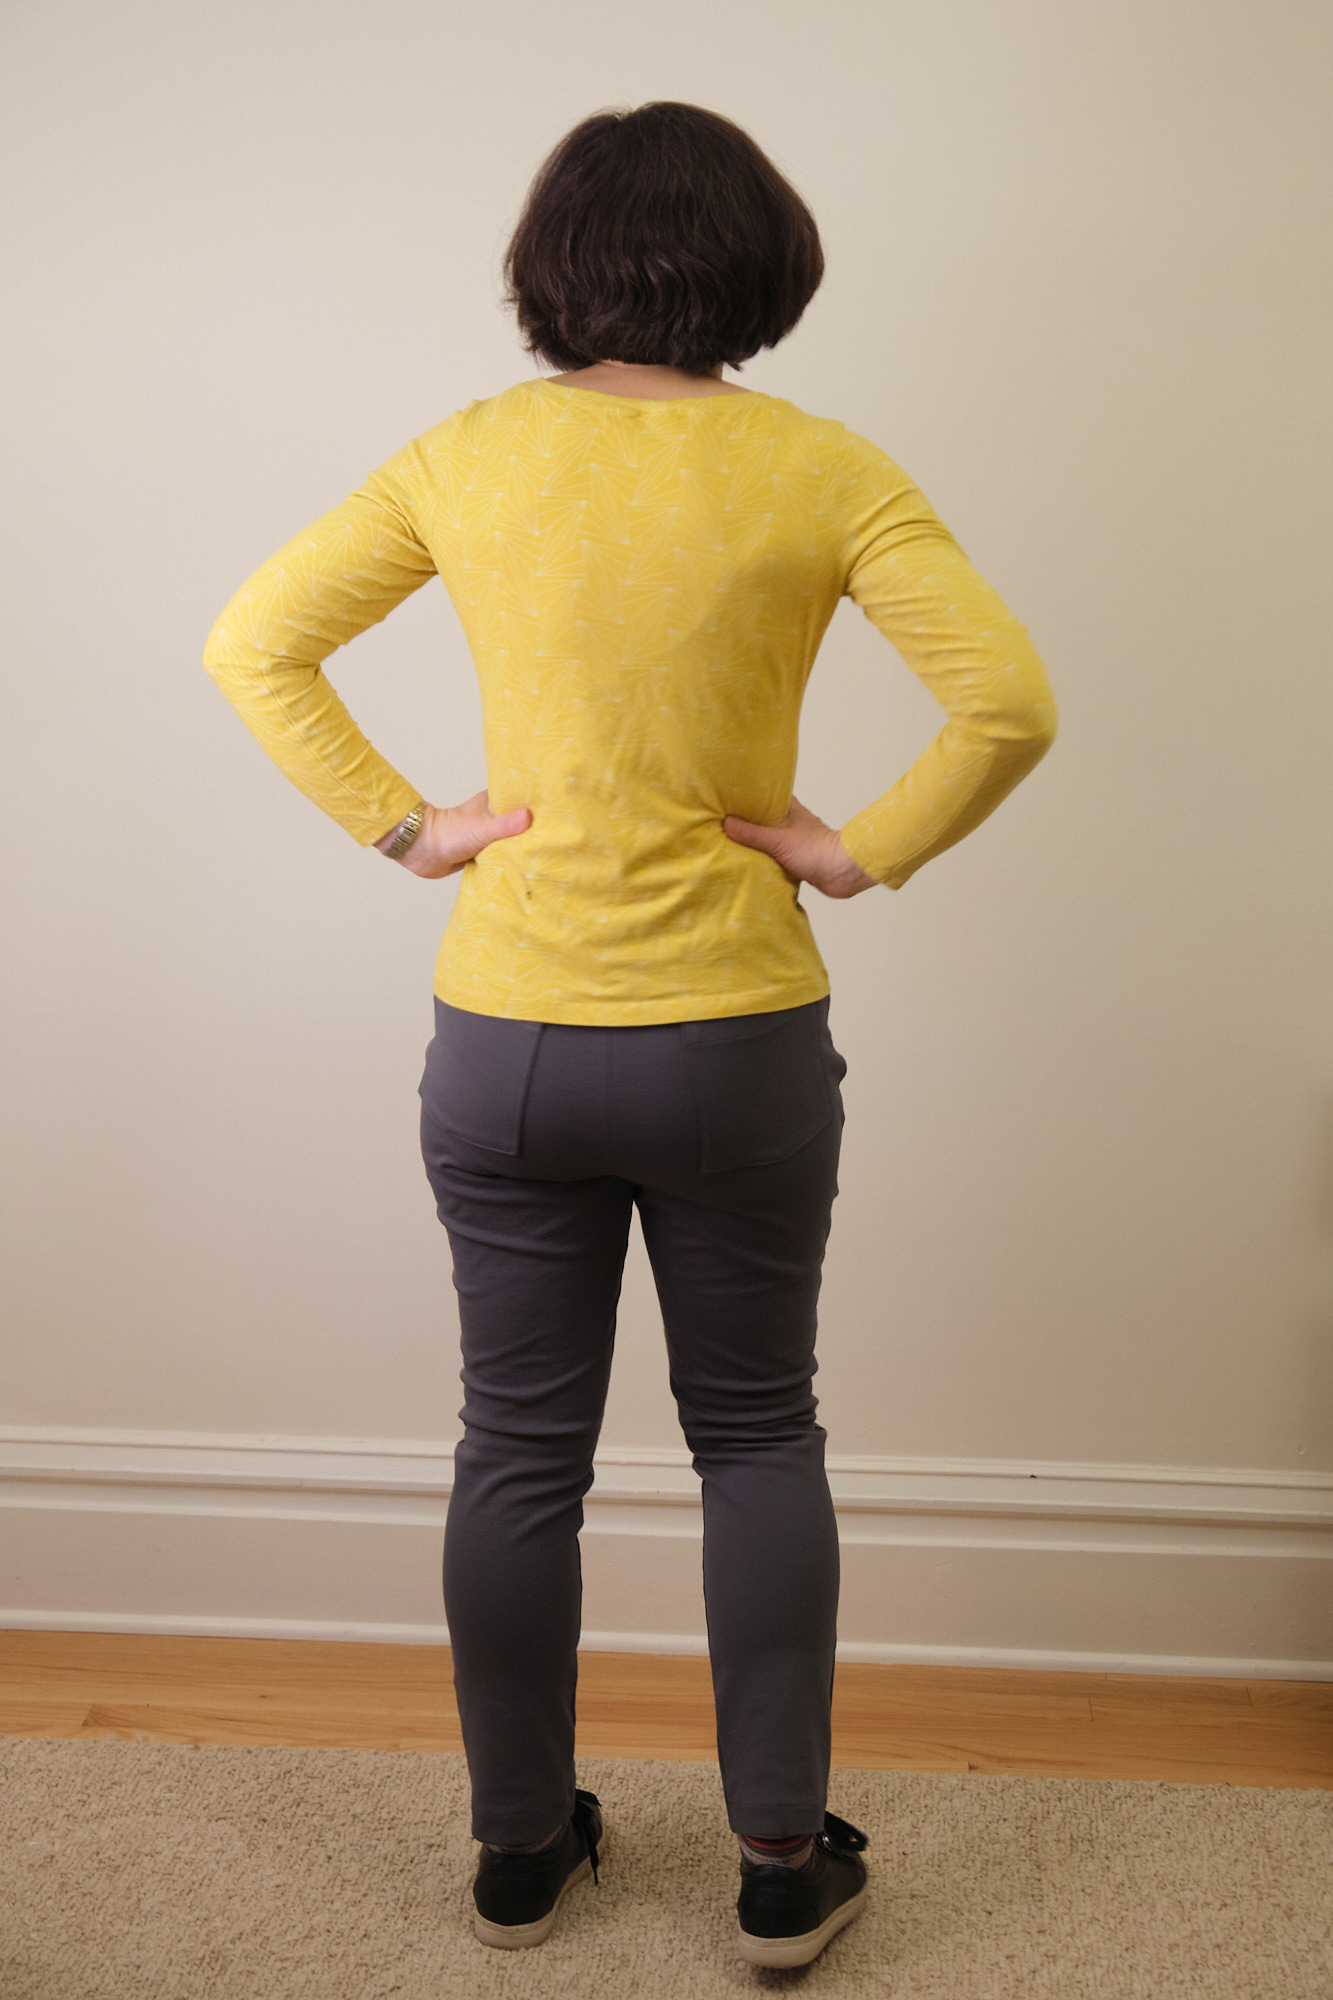
I selected the tapered style for my first pair. I was originally going to use a grey ponte fabric, but read the warning about the pattern not working well with some pontes, and I decided not to take the chance. Also, the pattern designer highly recommended doing a fit test. So I used some grey cotton lycra from my stash that is soft and comfy but doesn’t have great recovery, so I’ve been reluctant to use it for anything I really care about. I figured it would at least make a comfy pair of PJ pants.

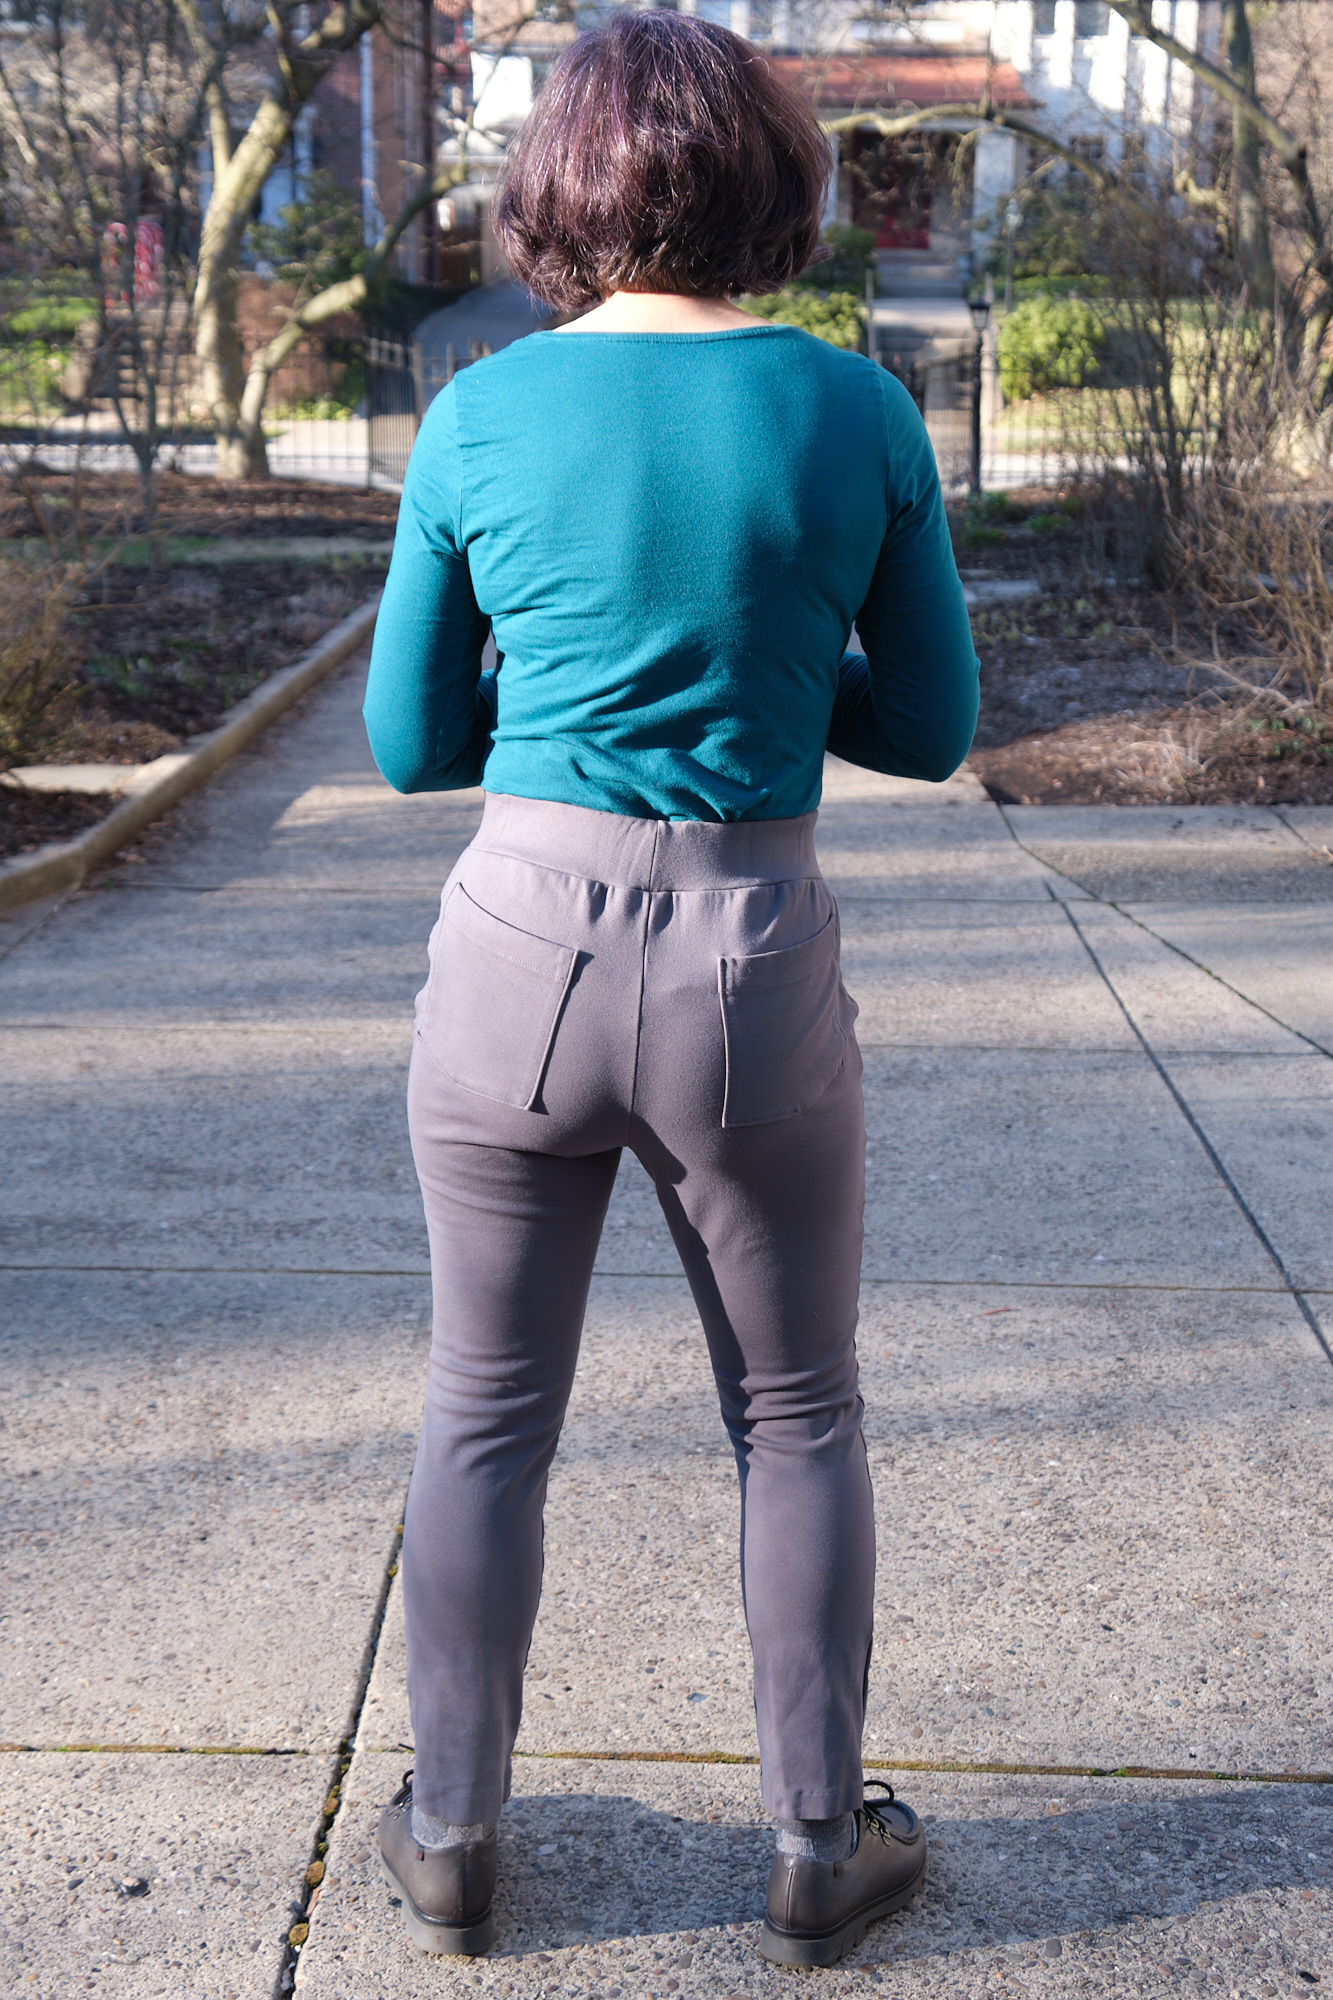
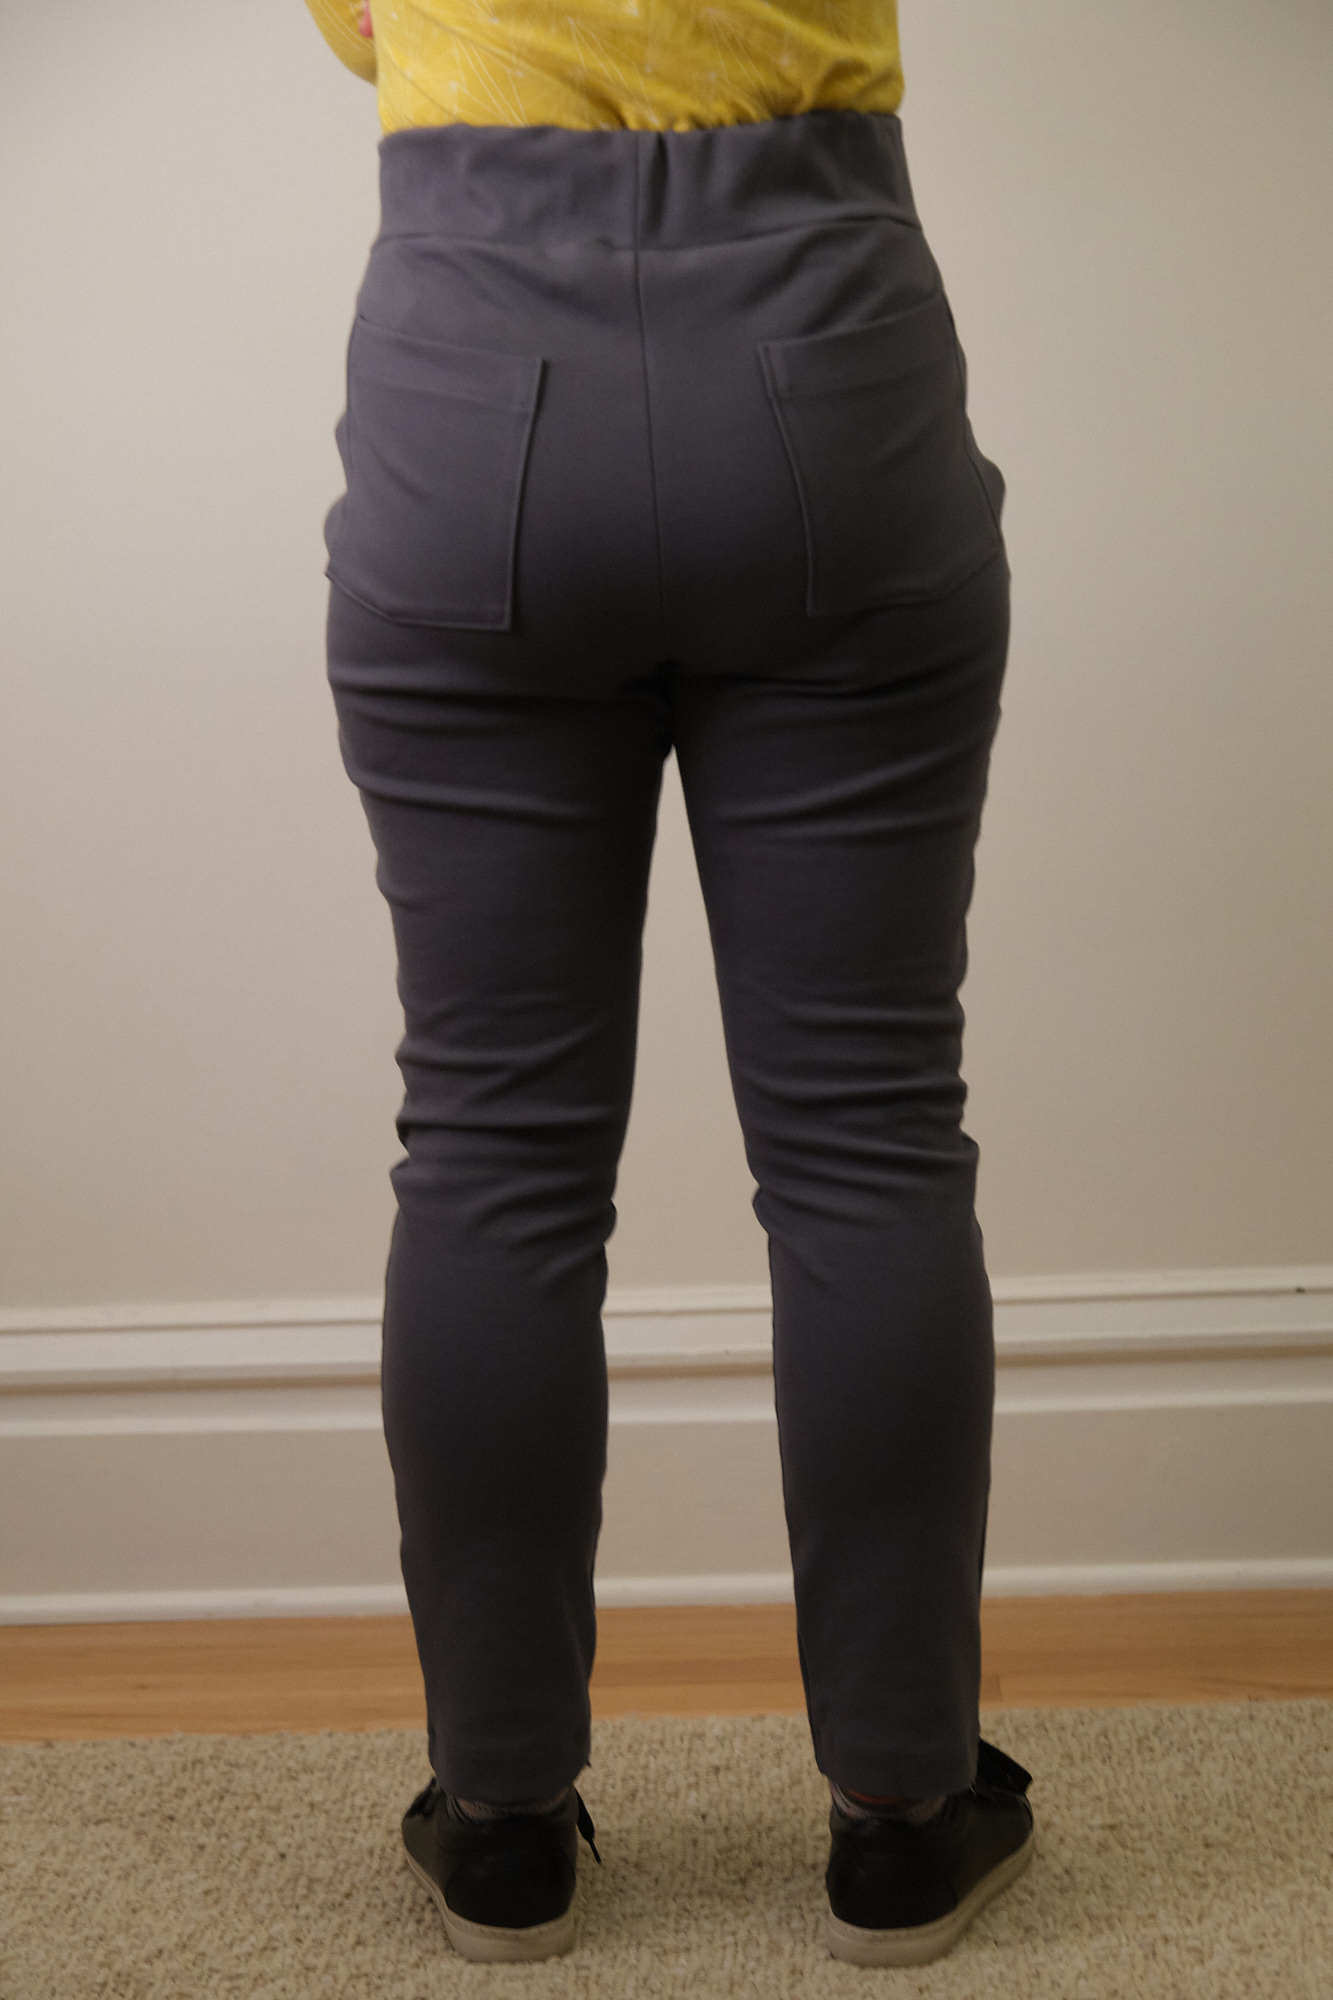
I cut out the pants in size 10 with a size 8 waist band. Since I’m 5’2 I shortened the pants by 2 inches, and because I love big pockets, I added 2 inches to the length of the pocket bags. I also zigzag stitched a circle of half-inch elastic inside the waistband fold because I often have trouble with yoga waistbands staying in place when I put things in my pockets and I prefer the feel of a snug waistband to feeling like my pants are falling down all the time.

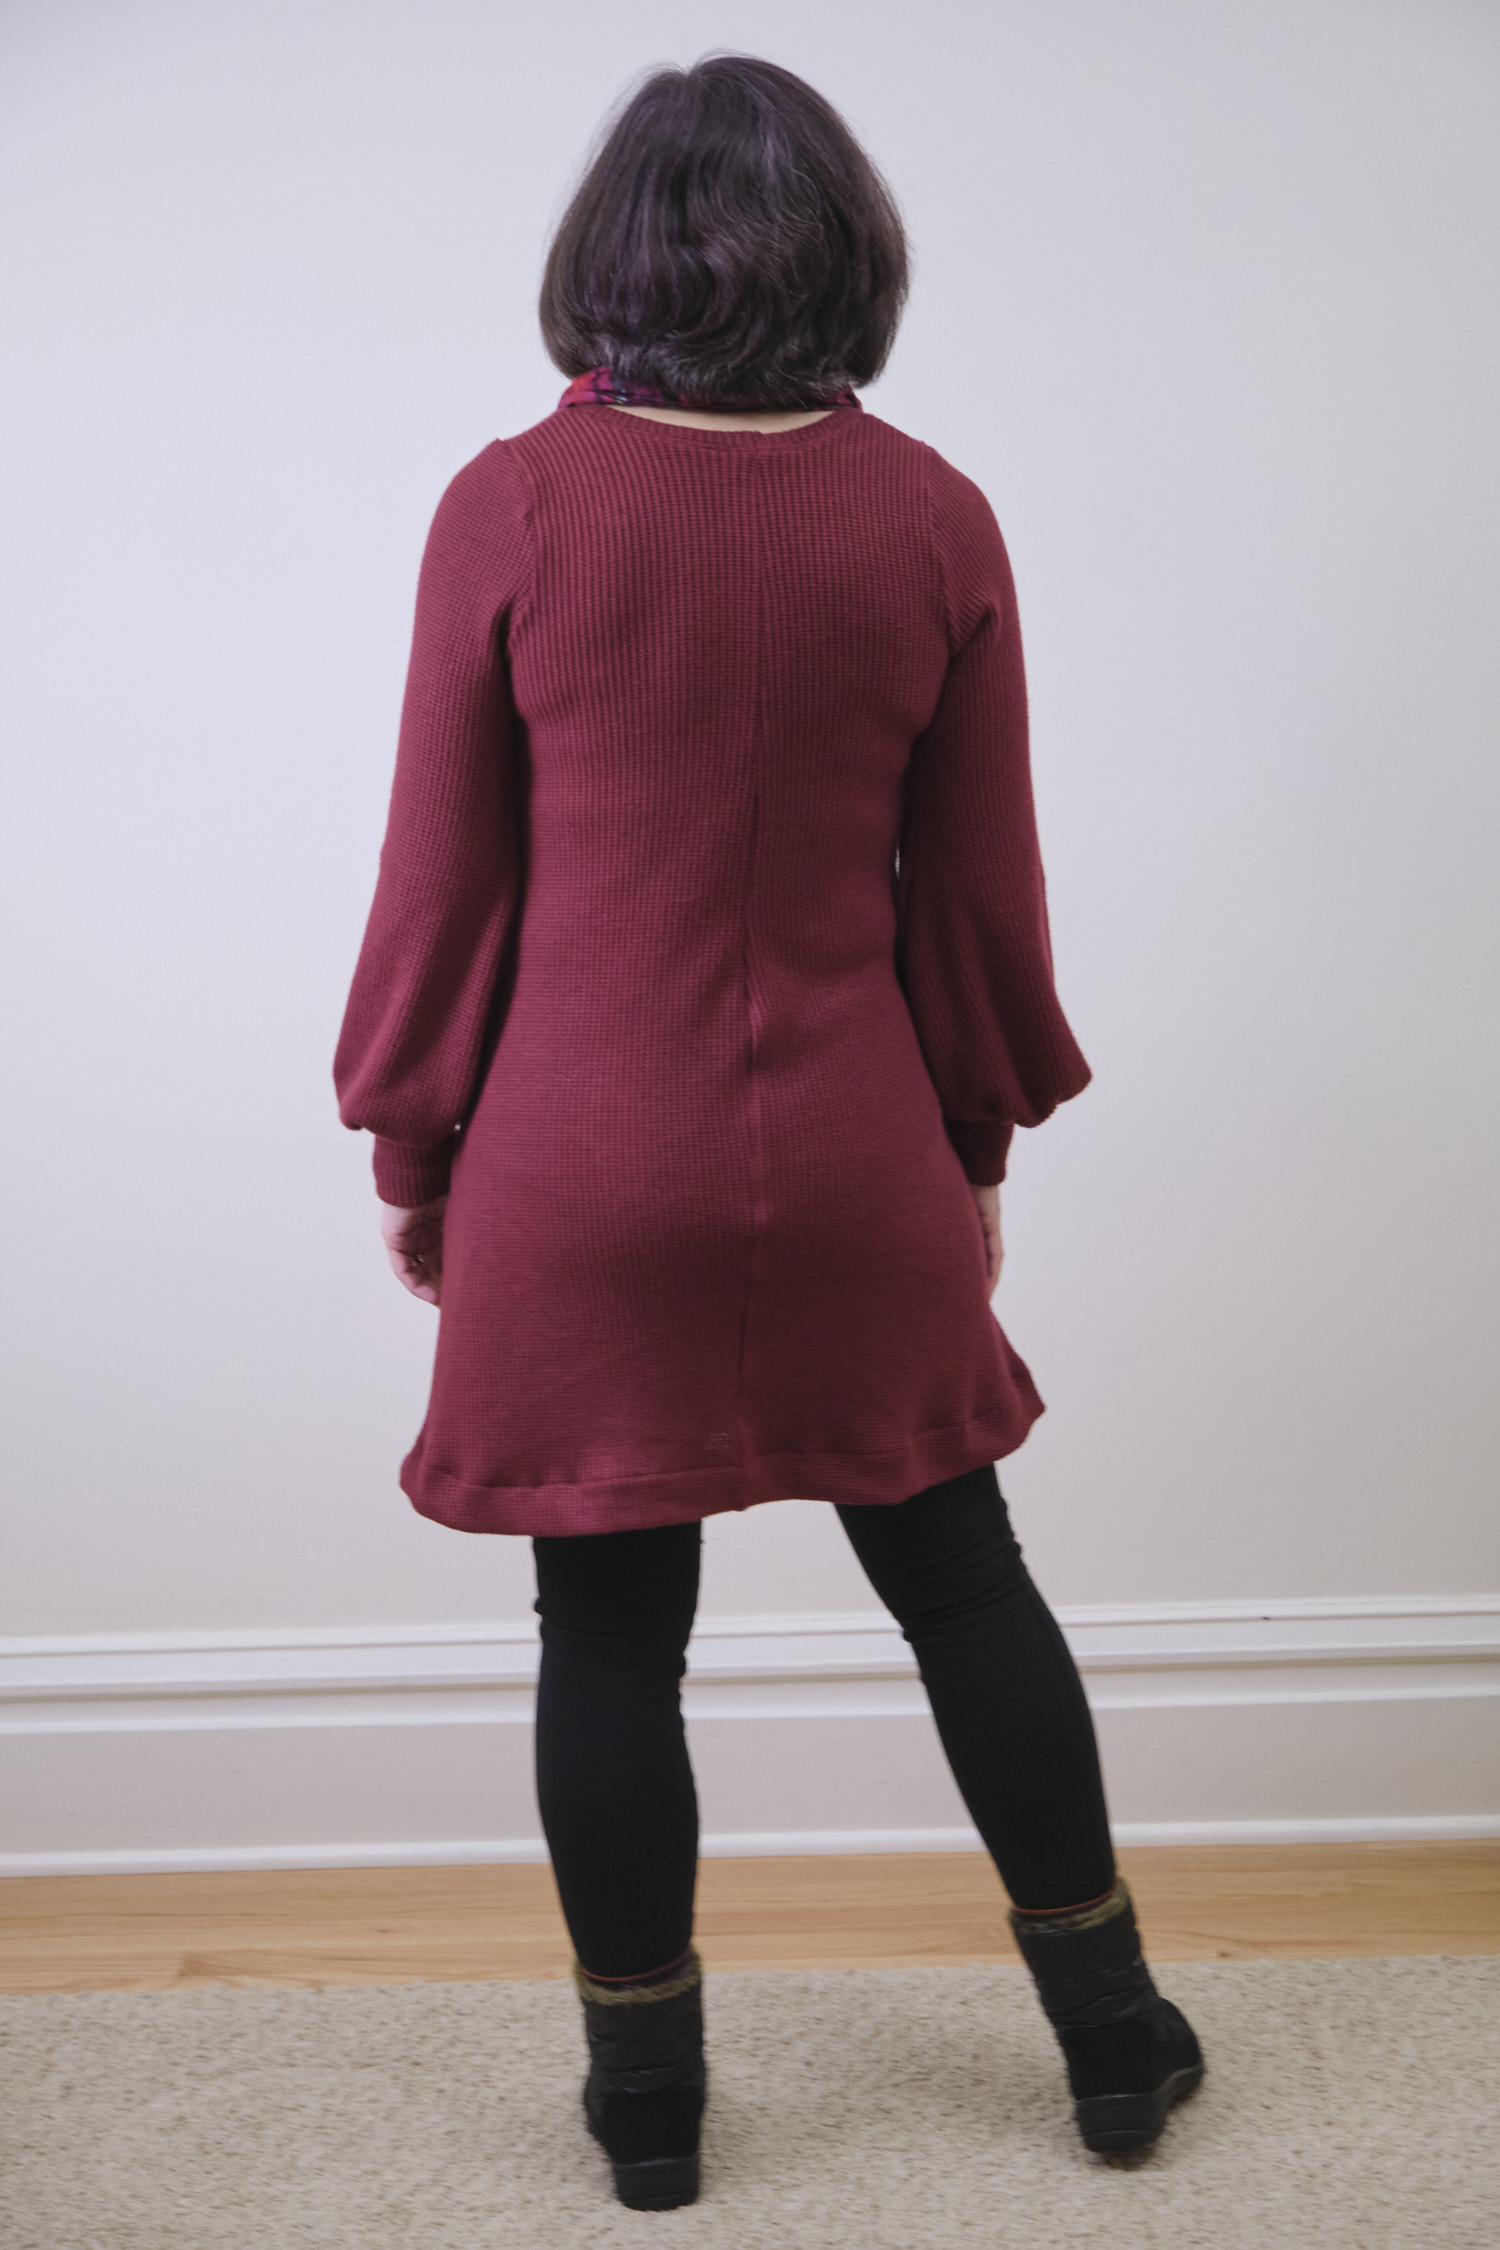
The pants went together pretty quickly and easily, and the pattern was easy to follow. The bad-recovery fabric made the pocket construction a little finicky, and cause the top of the pockets to stretch out a bit. My 2-inch pocket extension was probably over kill on these pants and 1 inch would be sufficient. The length ended up maybe a tad short, but they look ok with a 5/8-inch hem (held in place with fusible hem tape and then finished with a narrow zigzag stitch). I could probably have shortened by 1 inch instead of 2.

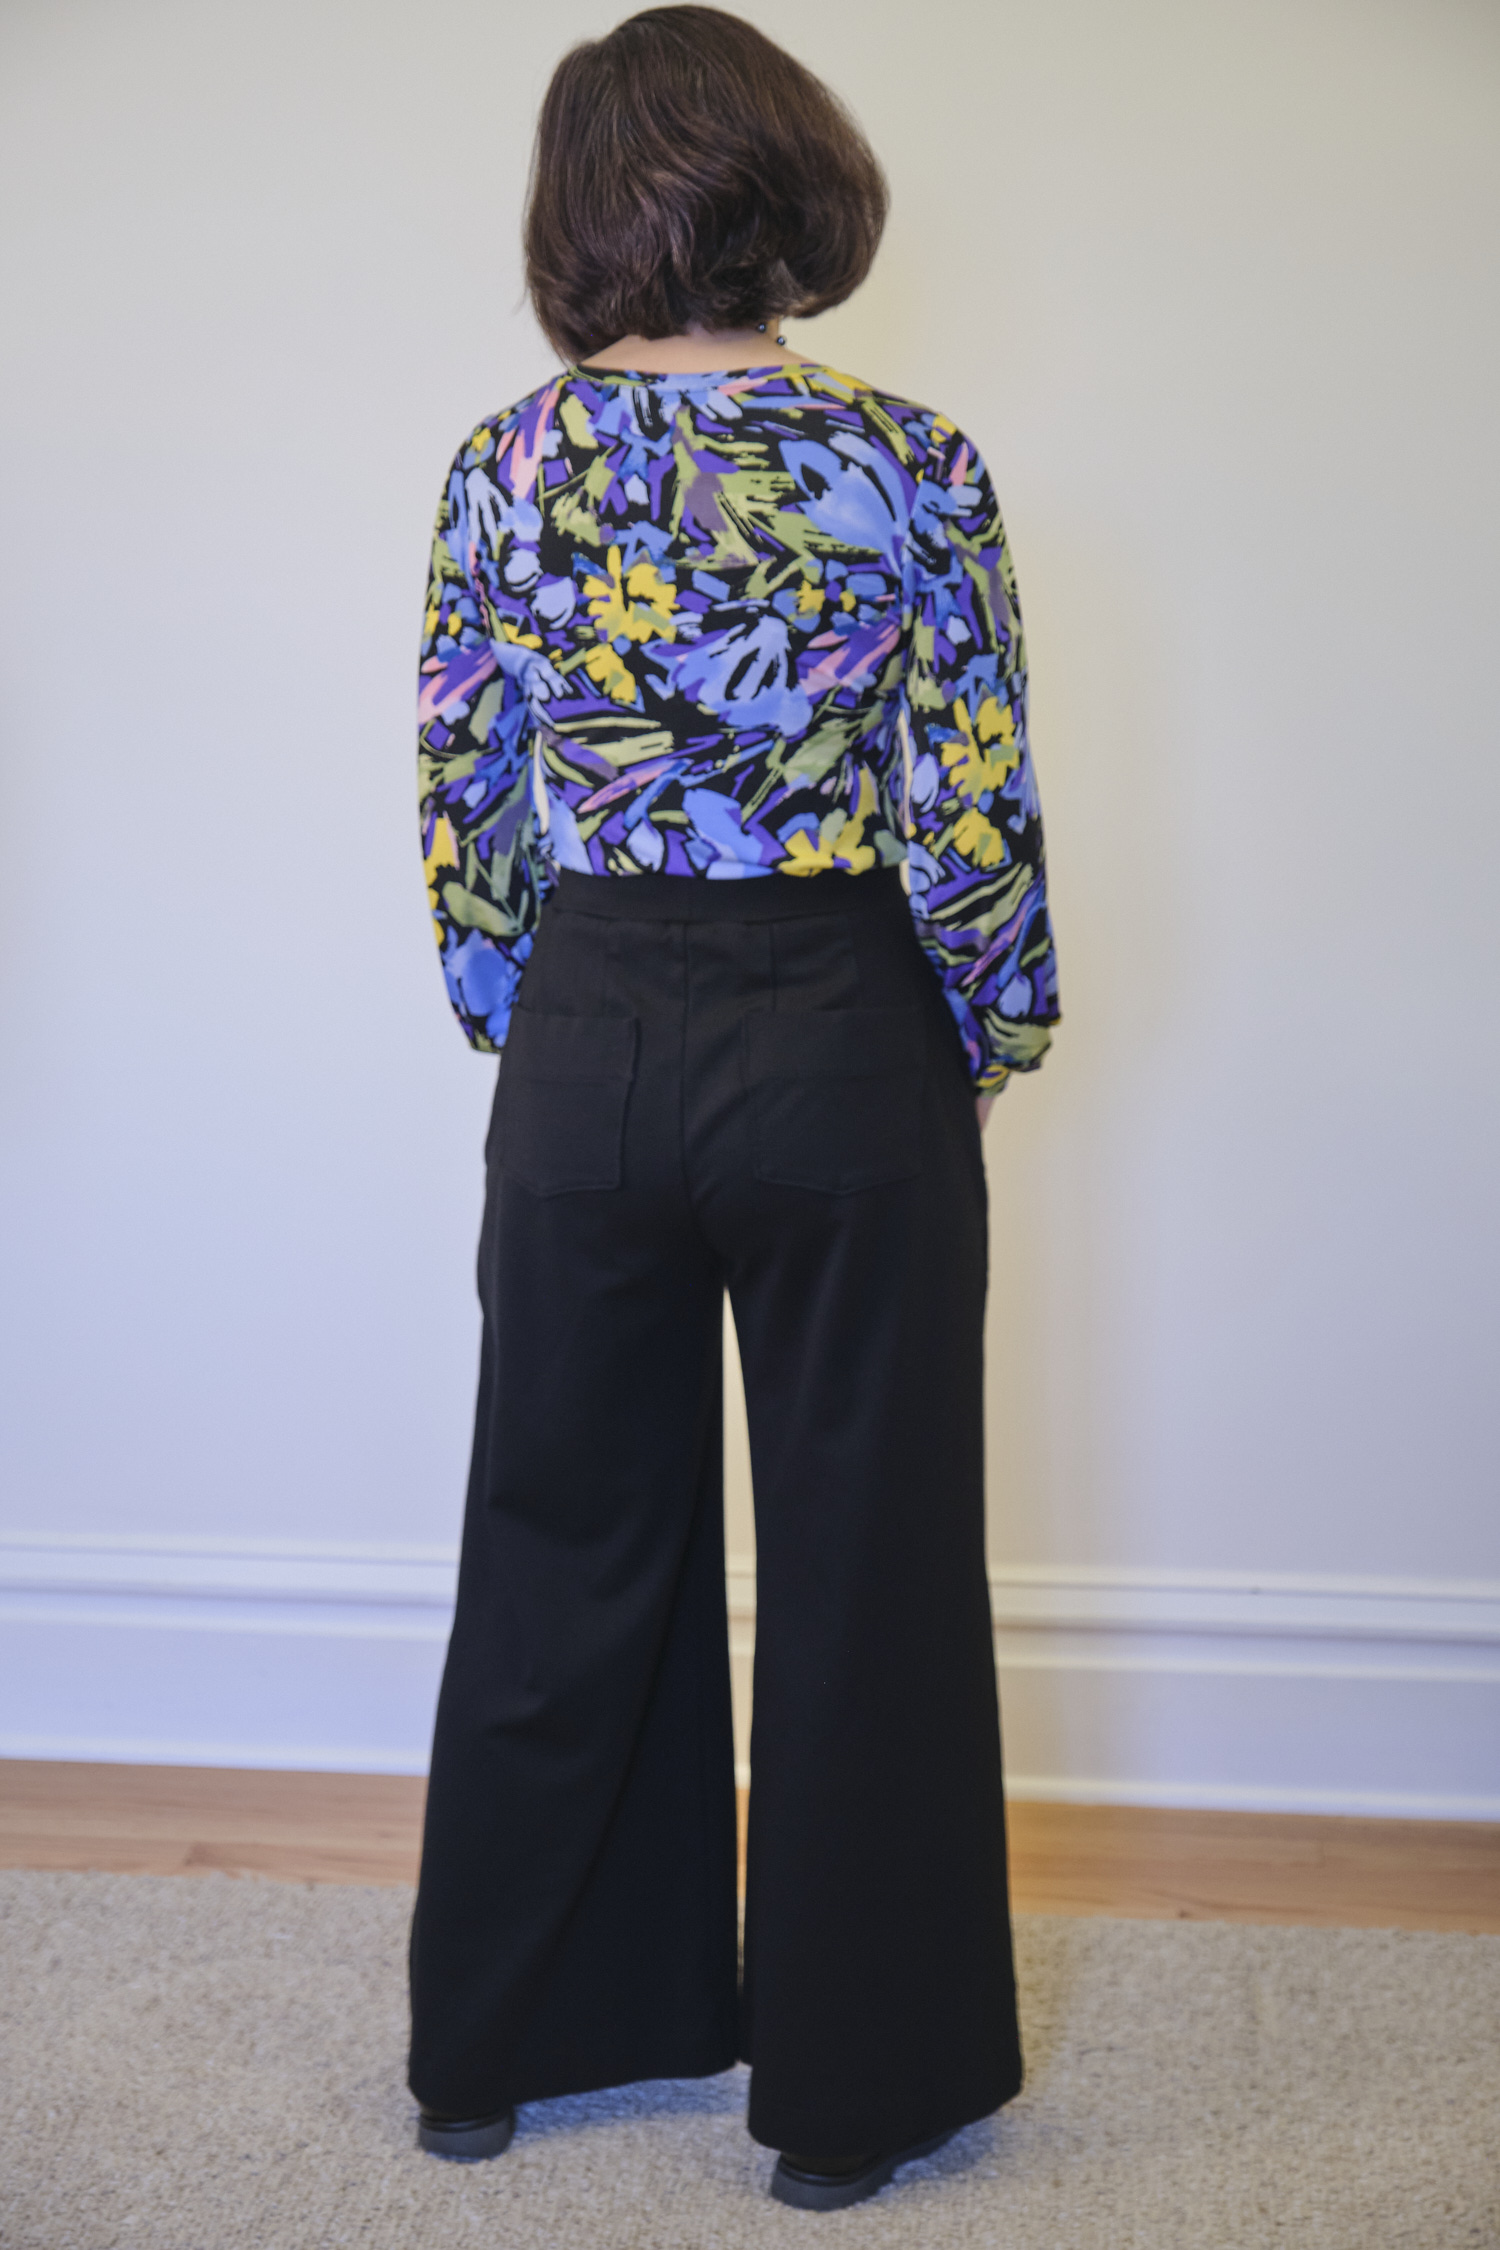
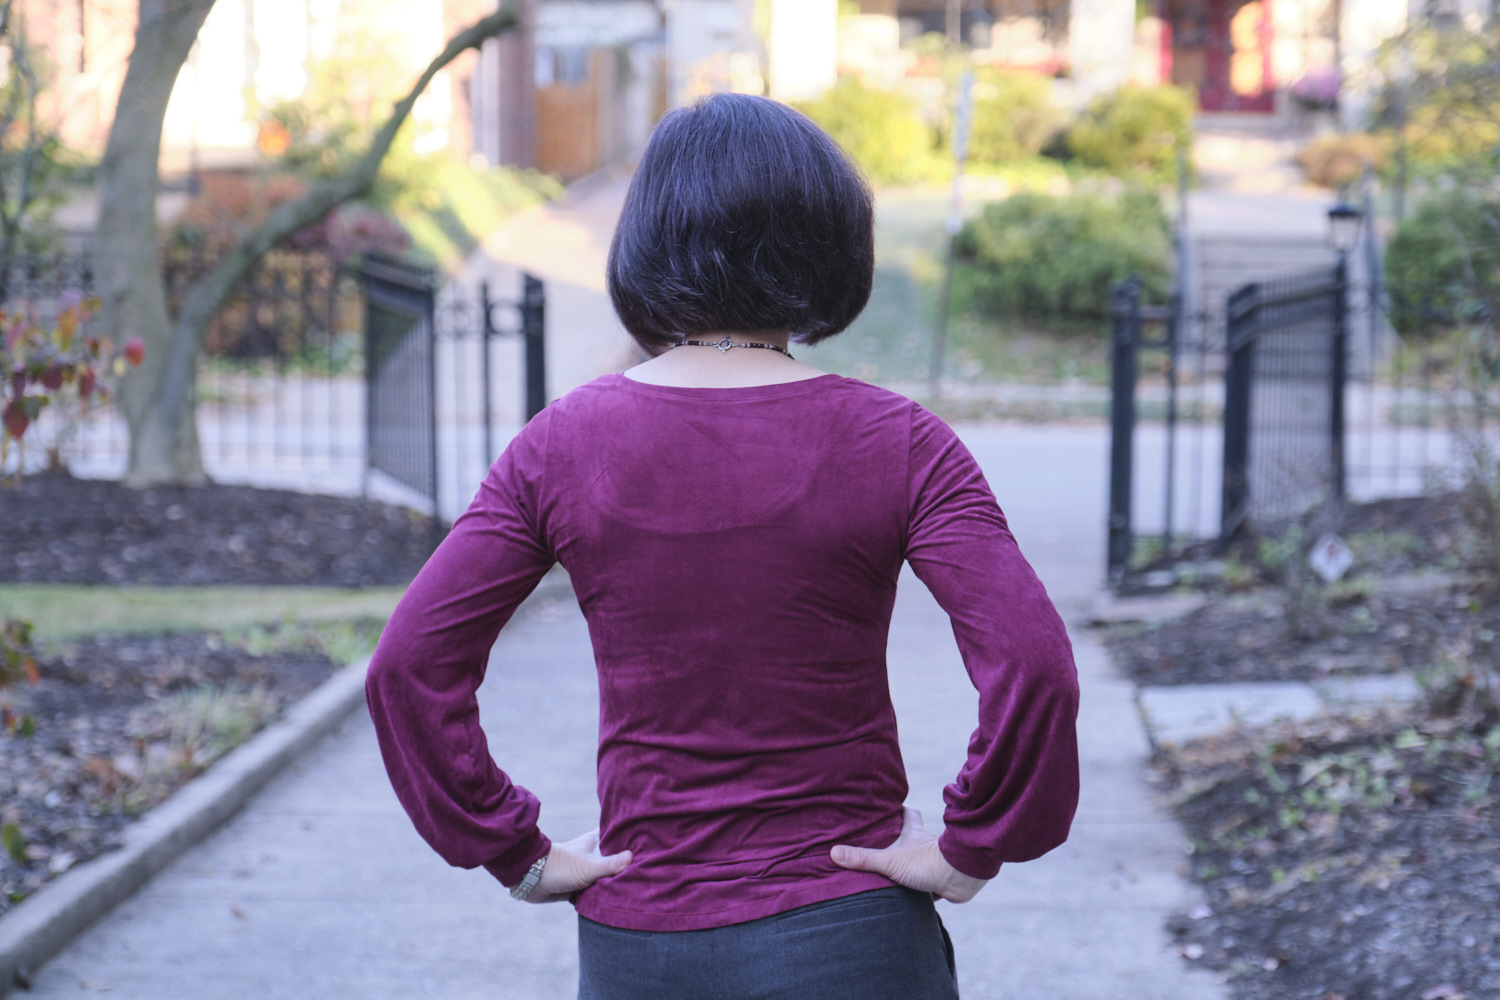
I struggled a bit with stretching the waistband as I sewed it to the pants with my serger. I ended up with a couple of unwanted puckers, so I unpicked part of the waistband and sewed it again. It worked better the second time, but it wasn’t quite as smooth as I would like. I had pinned it in 8 places, and clearly next time I should add more pins (as the pattern designer recommended). Another option I might consider next time is to split the waistband into two pieces and angle the sides so the bottom is a size 10 and the top is a size 8, which means there is less stretching of the bottom needed. Adding a contour to the waistband could also work.

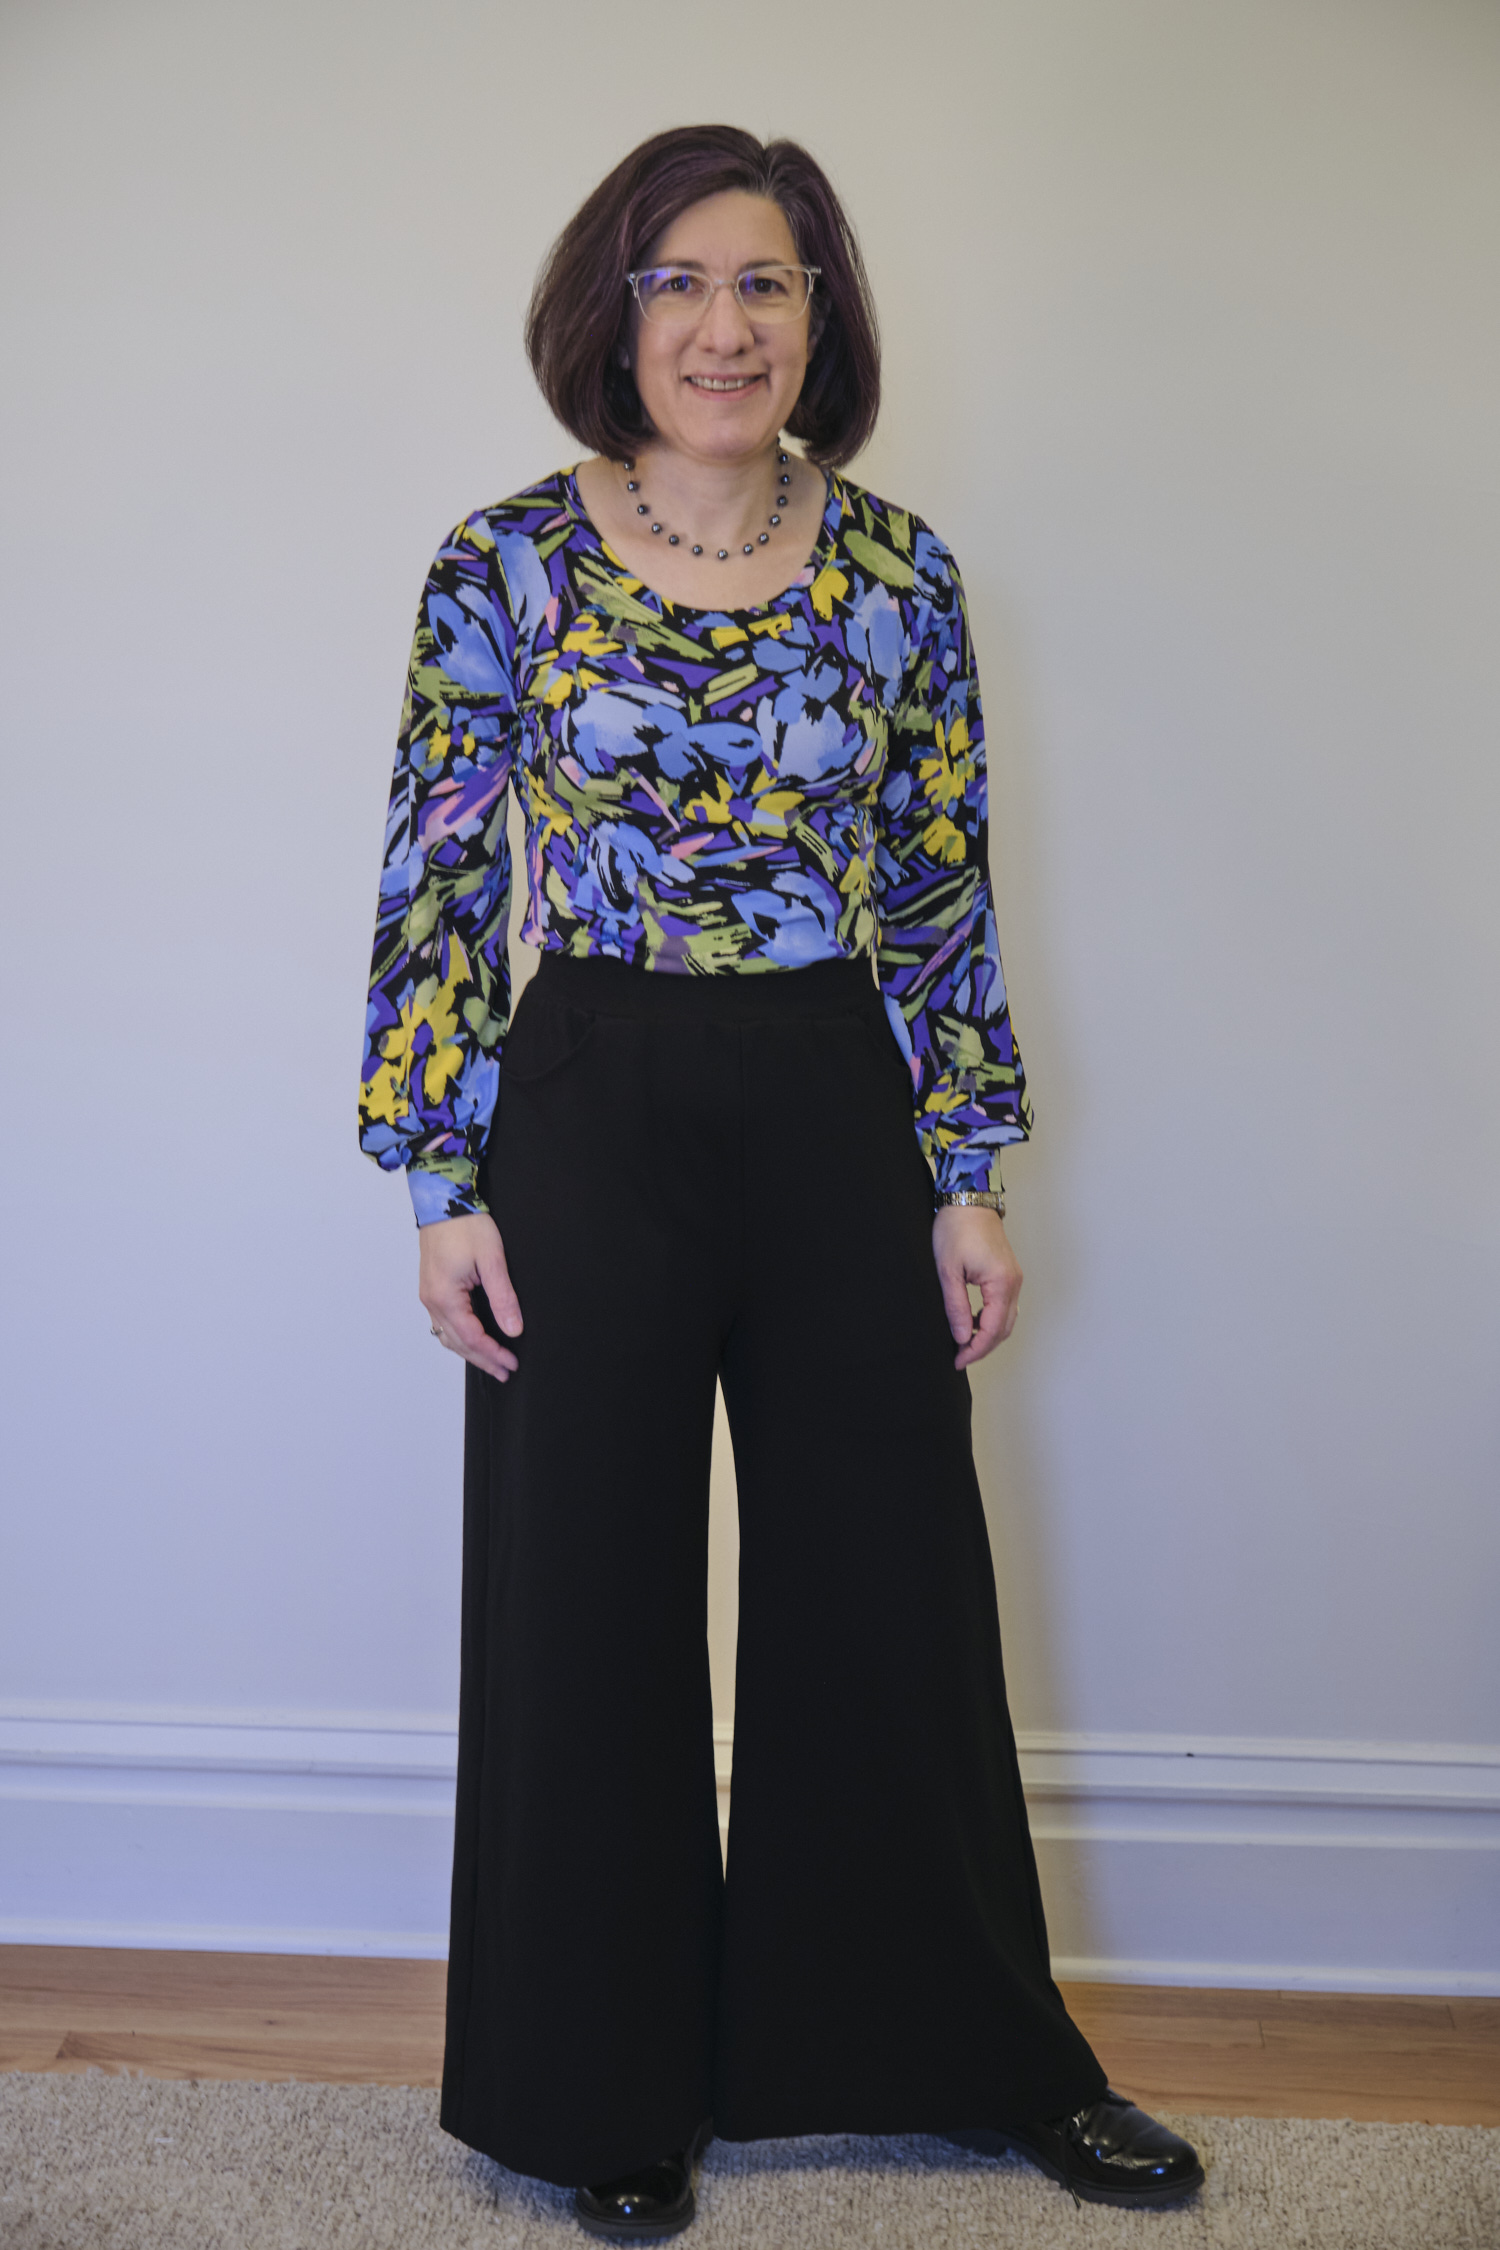
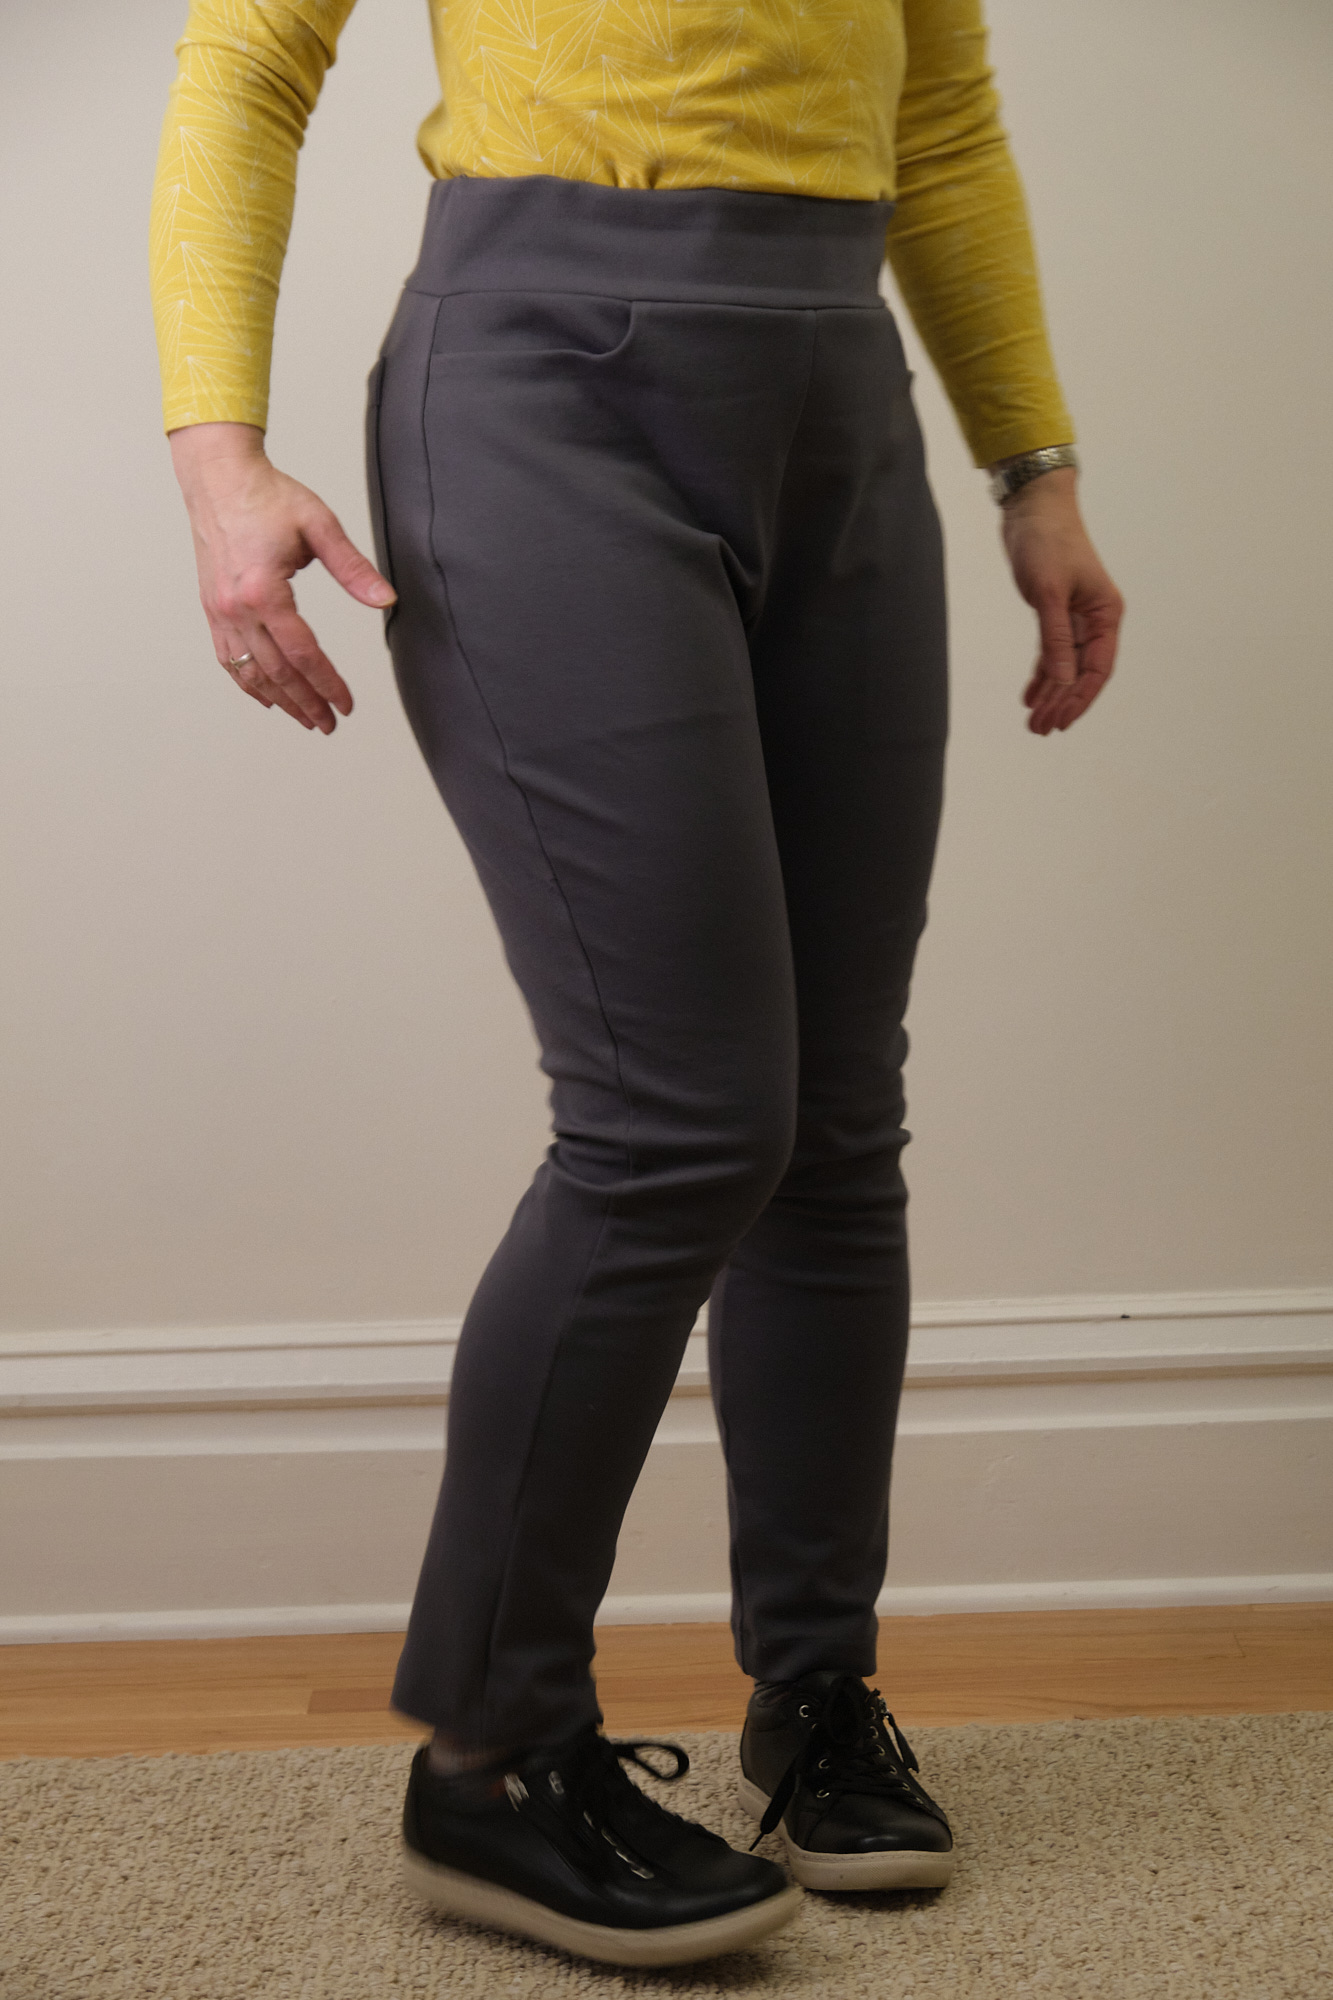
After finishing the pants, I scrutinized the fit to see if any of the extensive modification described in the pattern tutorial were needed. I thought it looked pretty good as-is, and my husband (who is not afraid to tell me the dress I just sewed looks like a sack) agreed. They don’t cling too much to my bottom or hips. They do cling to my calves a bit, which causes some wrinkling at the knees, so perhaps I should adjust a bit for wider calves.

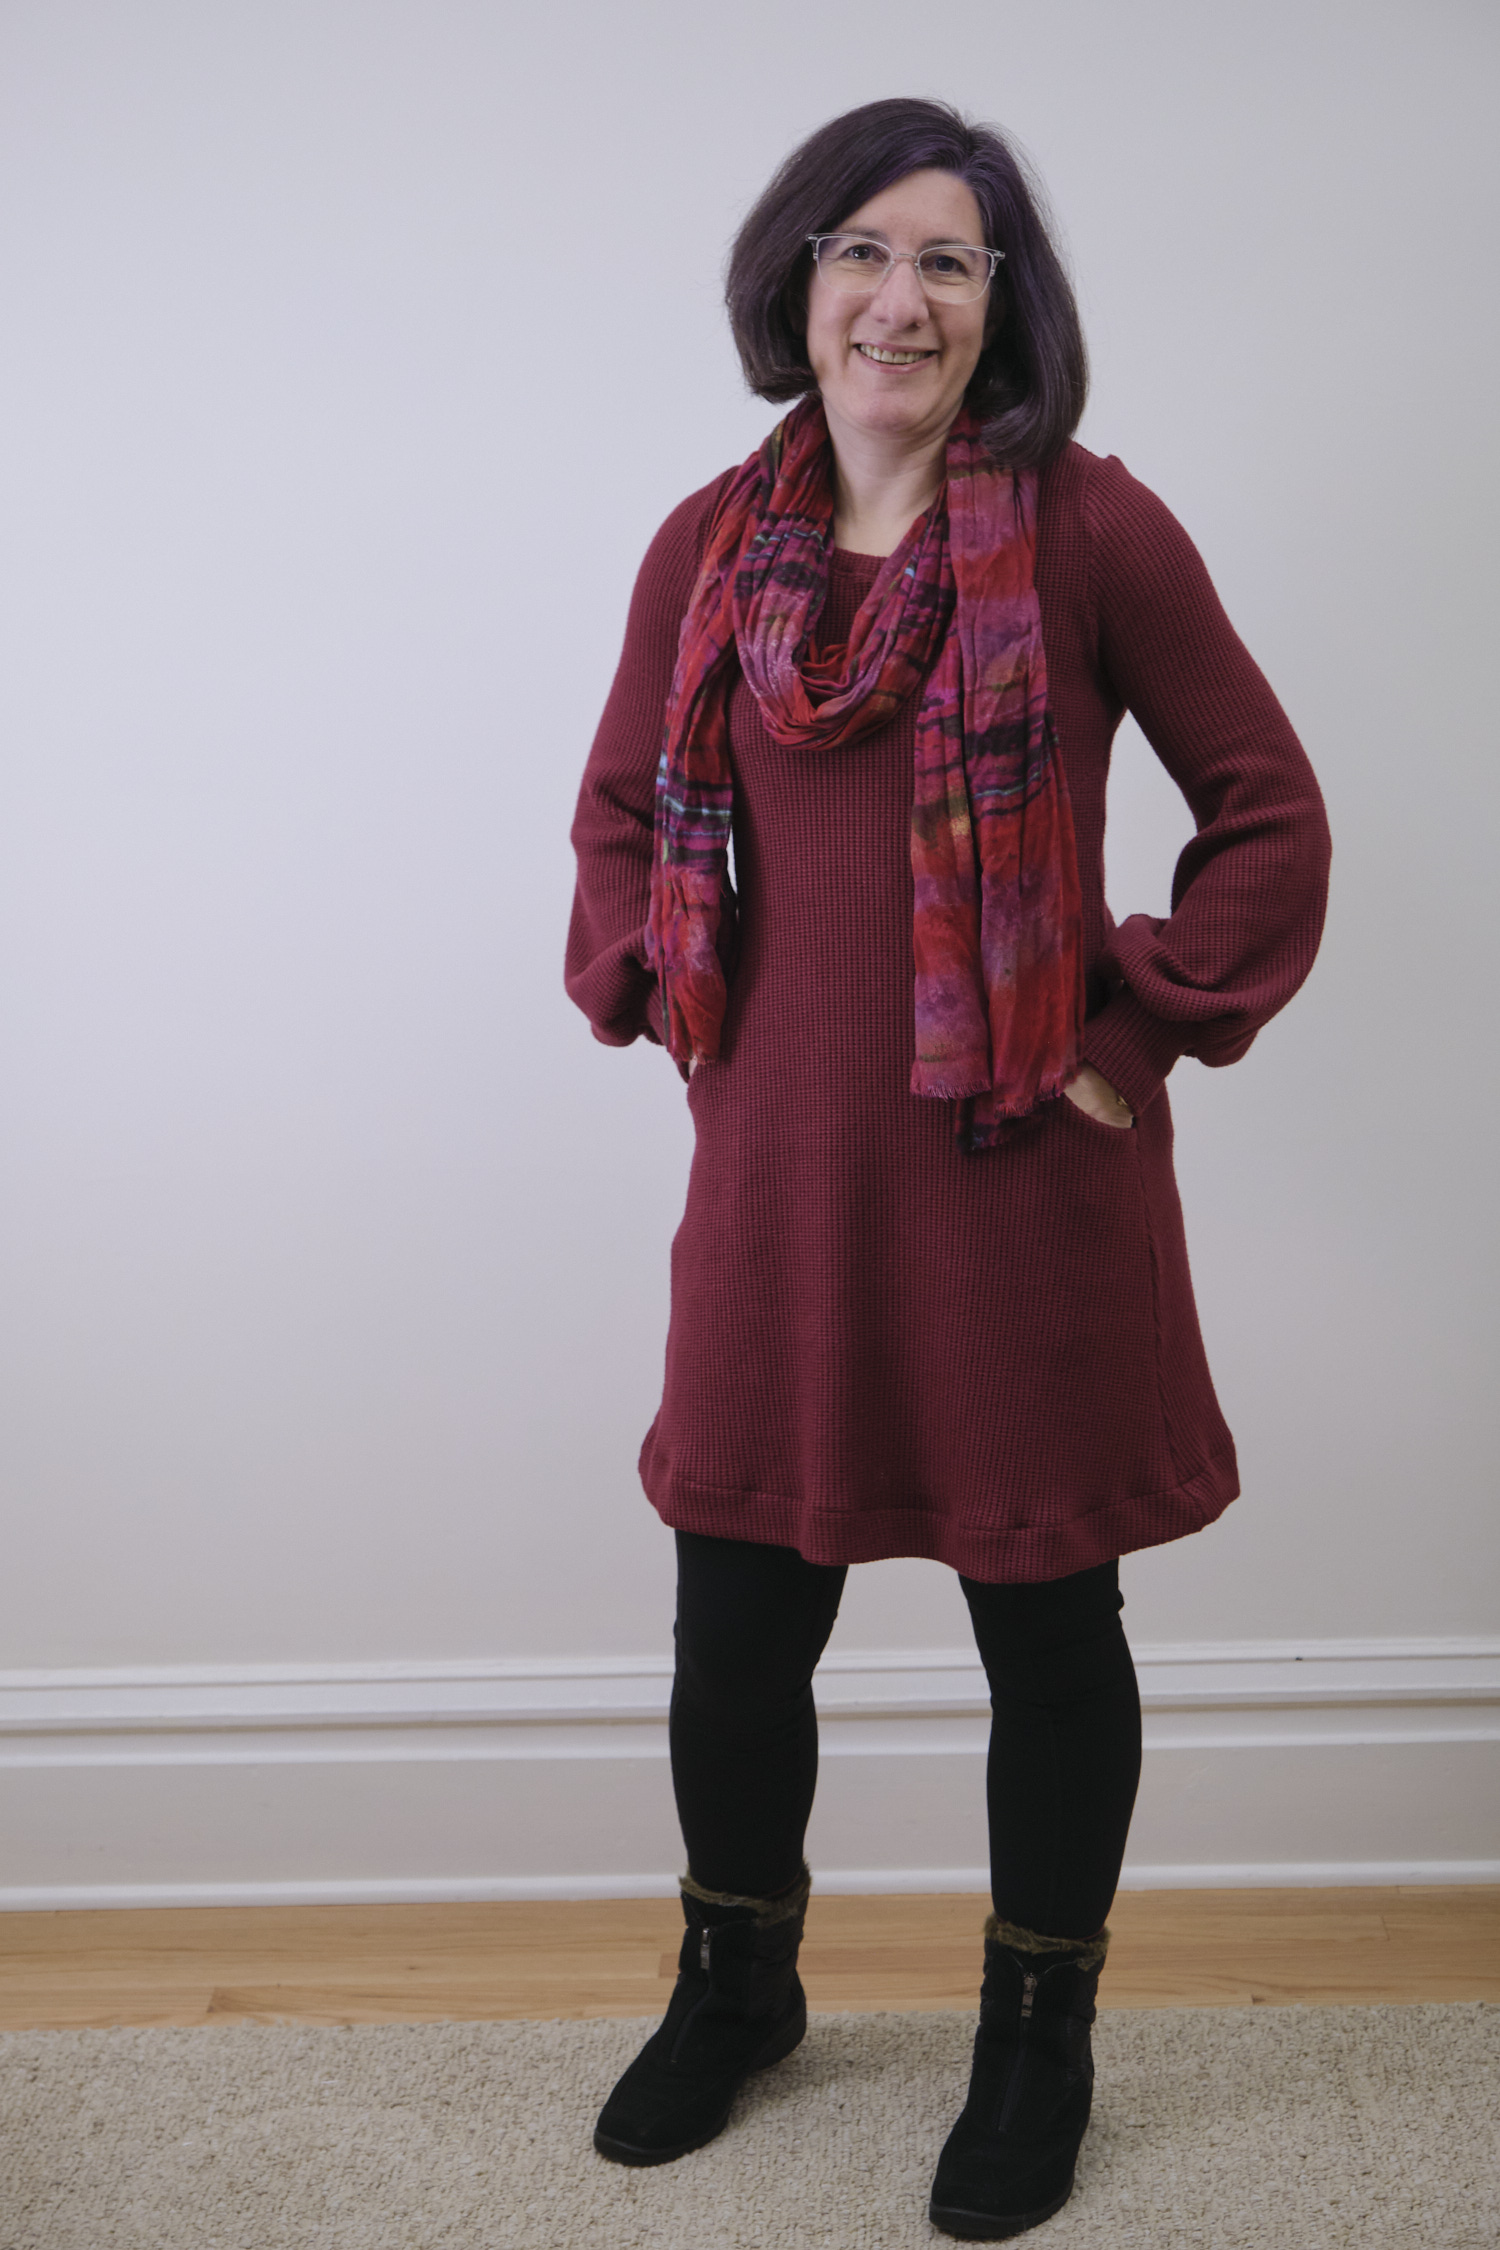
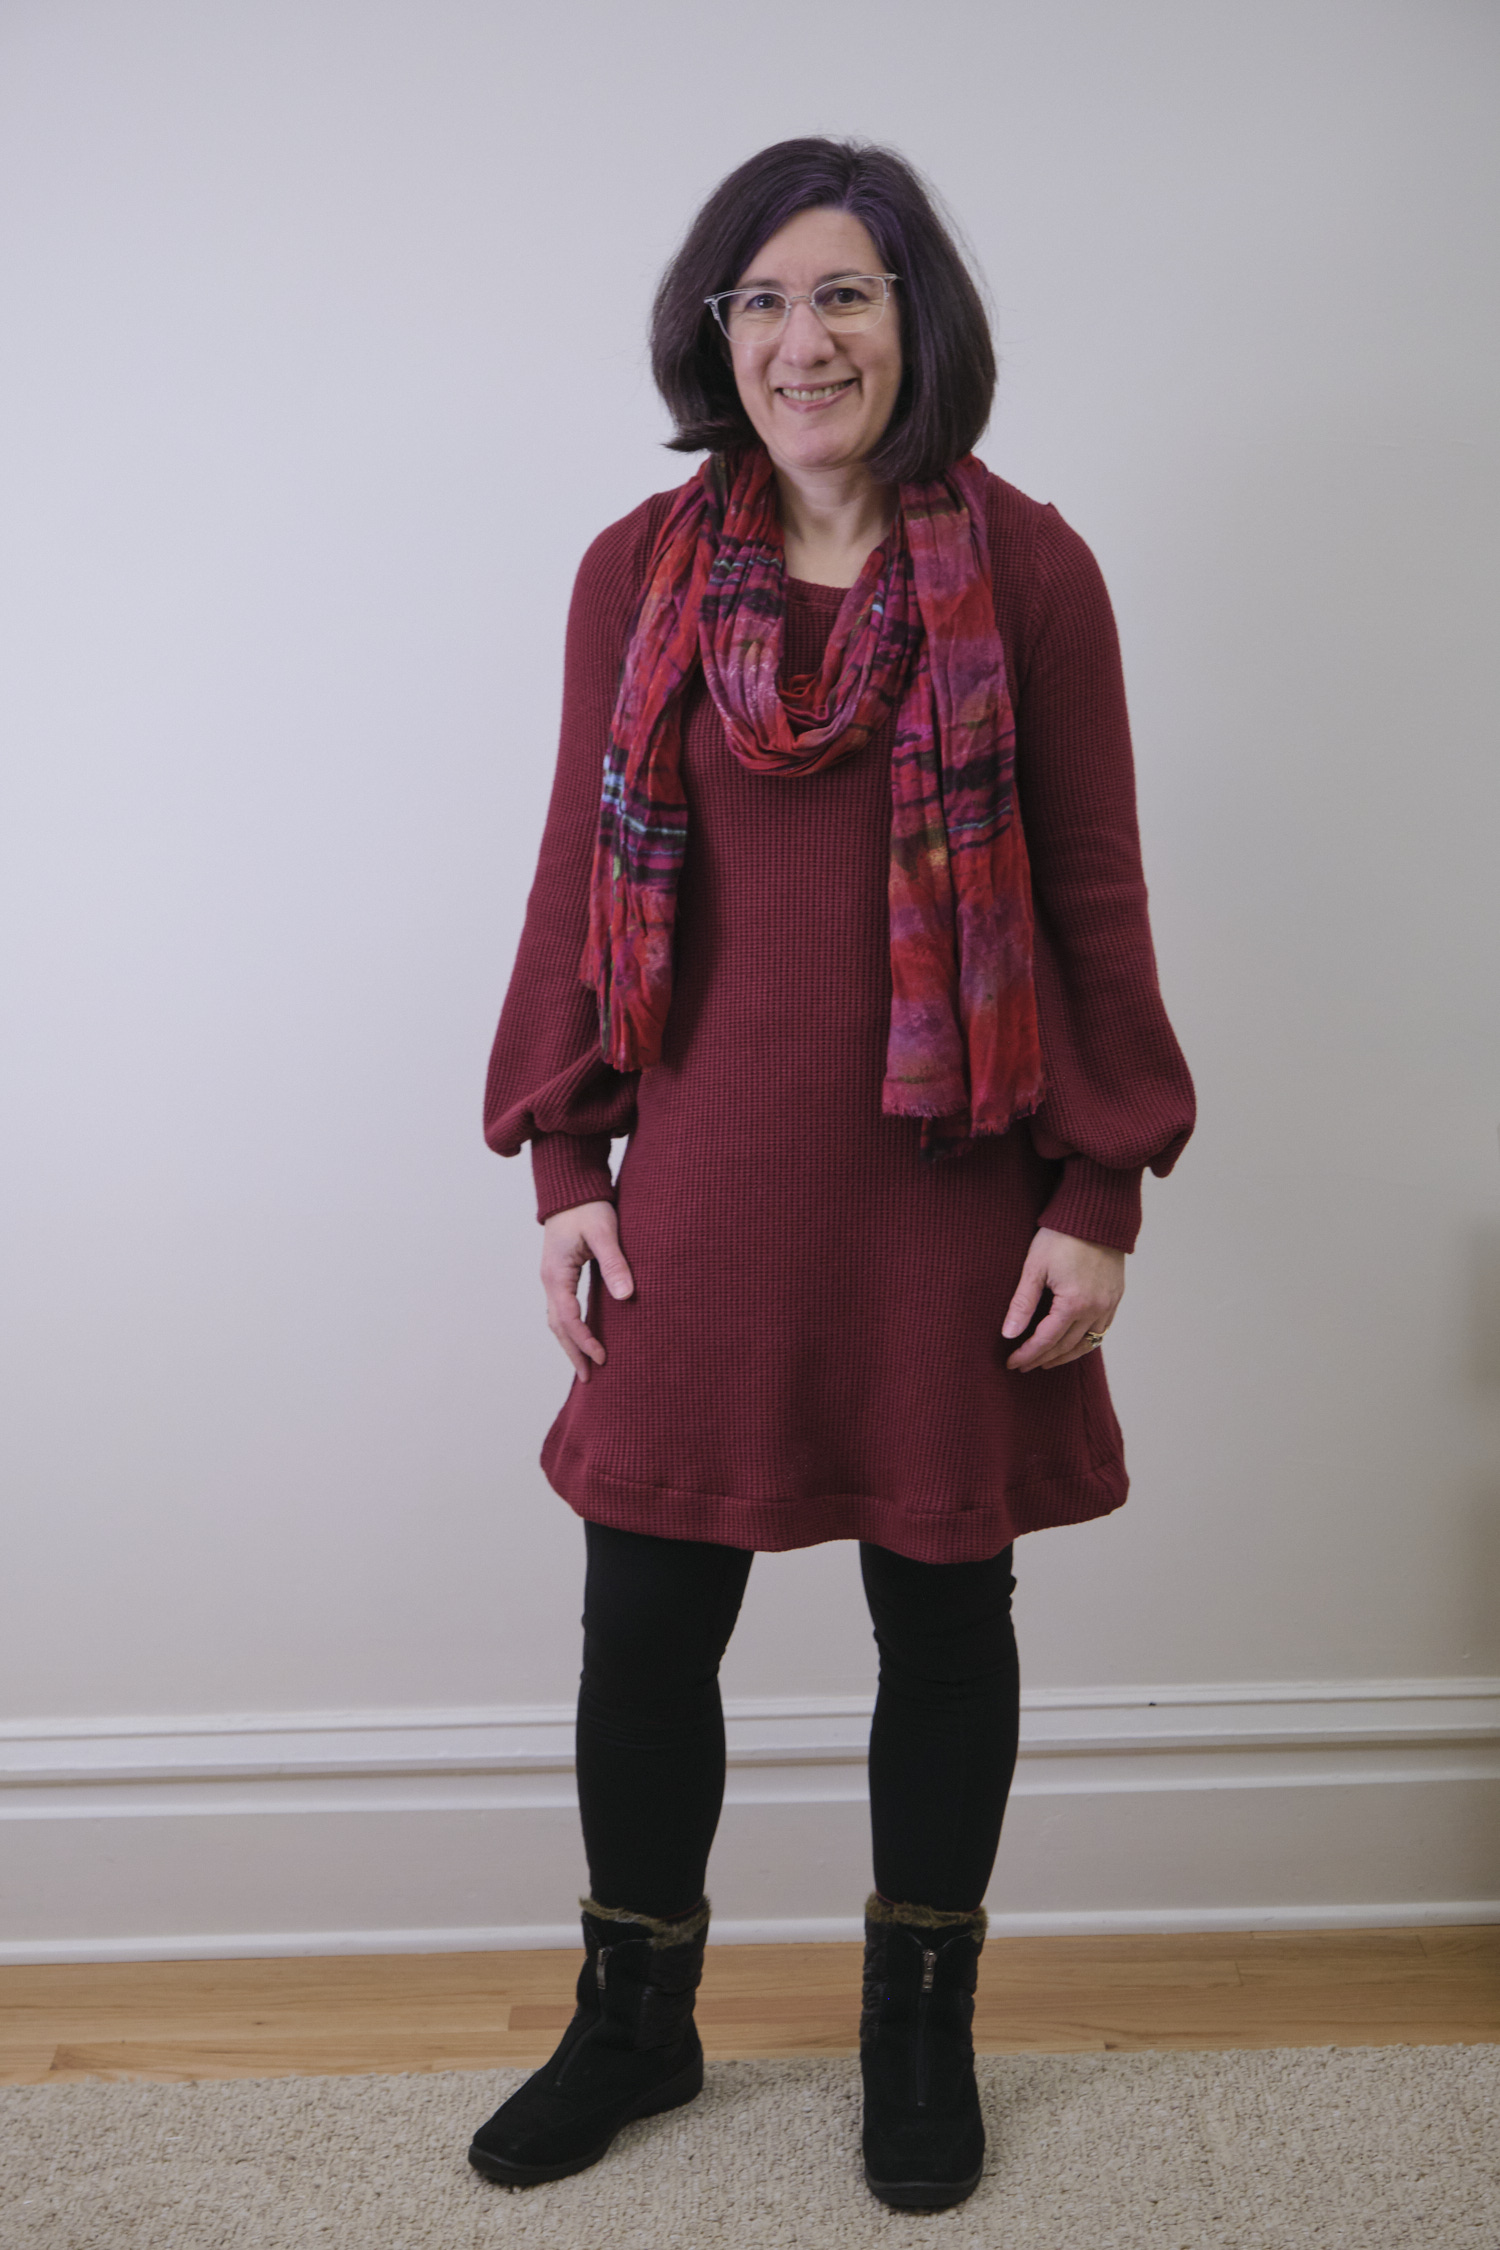
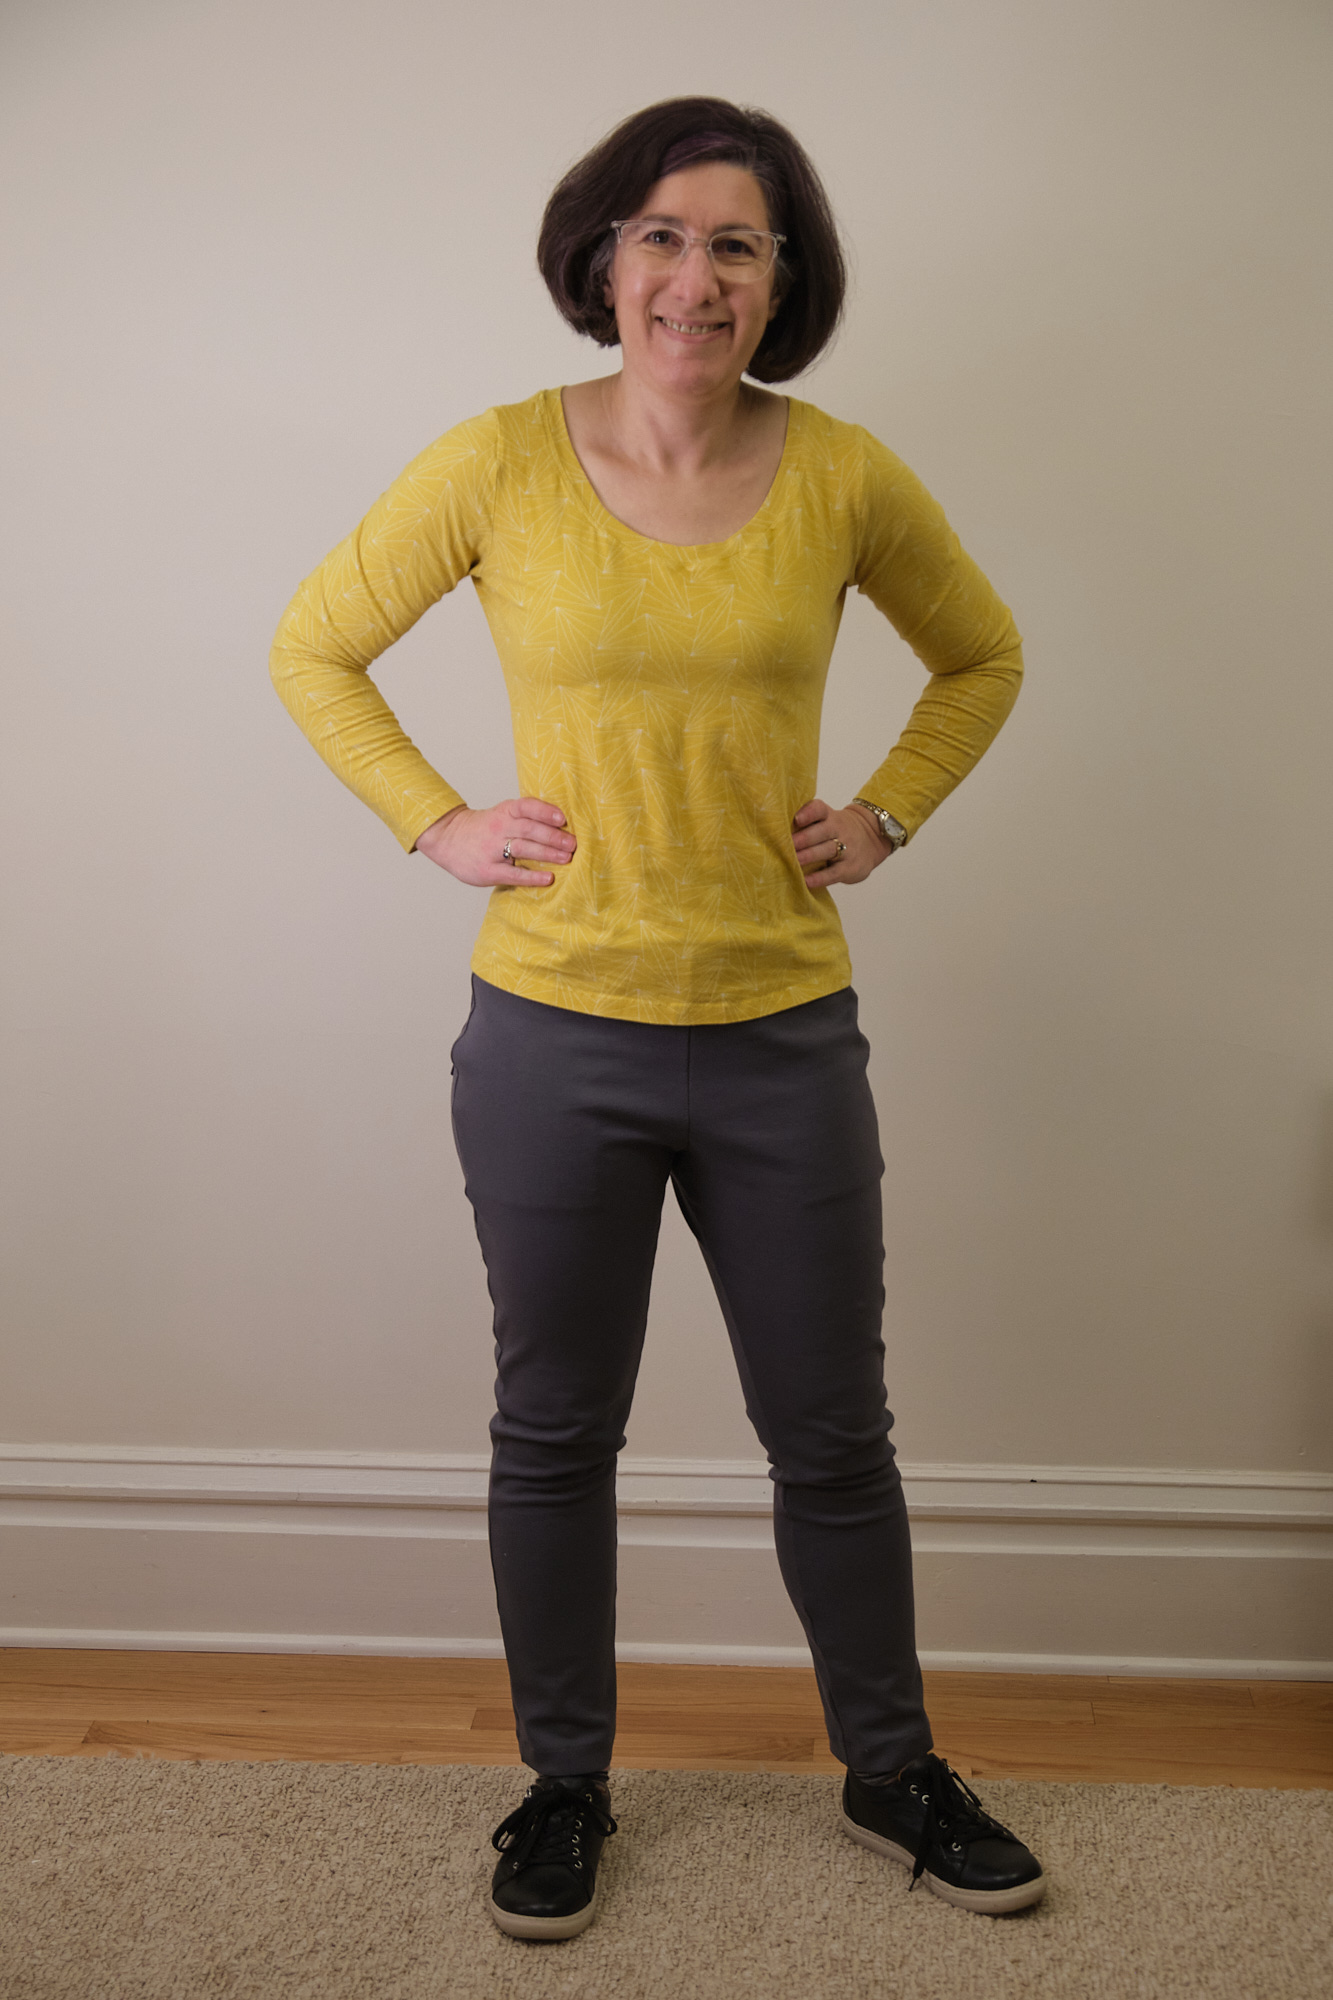
These are pants I will wear with t-shirts on weekends (or as pajamas). The grey CL fabric gives them an athletic vibe, and they look like joggers without bottom cuffs. I like the back darts and the yoga waistband (except for the unwanted puckers. I think they fit pretty well, although I think they look better when my shirt is not tucked in, so that’s how I will likely wear them most of the time.

I would like to try another pair in a dressier looking fabric that has better recovery. I’m still not sure whether these would work well in ponte. I will probably try the wide-leg version in ponte first. The wide-leg style is not as wide or high waisted as the Walk Boldly pants (and it has the same yoga waist band as the tapered style, while the Walk Boldly pants use an elastic waist band), and the Urban pants use a lot less fabric. Unlike the Walk Boldly pants, the Urban pants do not have back pockets, but I think I could borrow the pocket design from the Walk Boldly pants and add pockets to these.

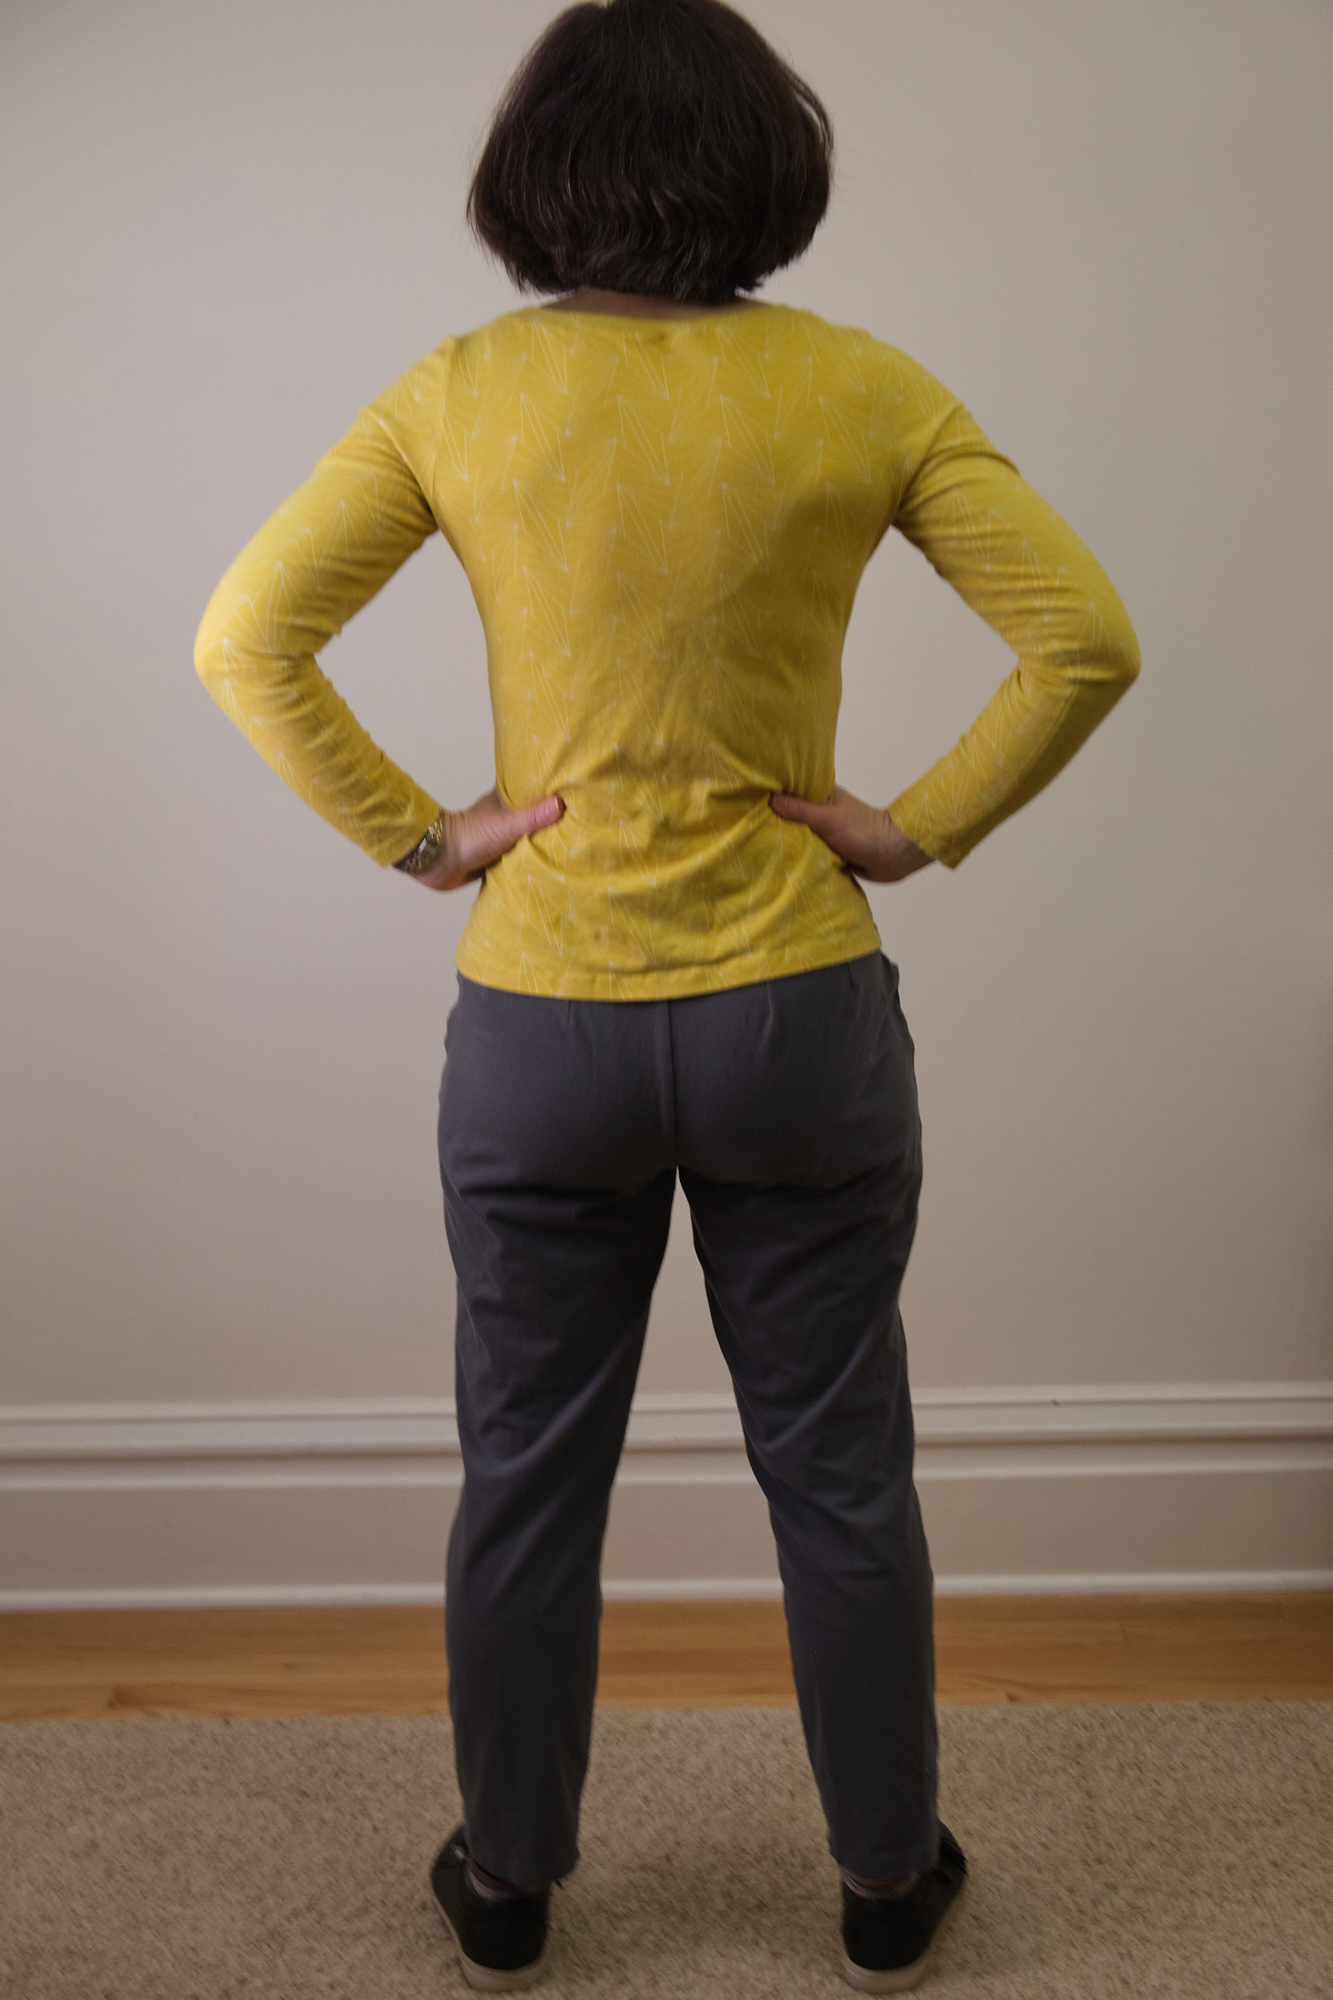
(I modeled the pants above with one of the first Sinclair Bondi shirts I made, and never blogged about, in a yellow cotton lycra print and wide scoop neck.)

Take 2: Love Notions Patterns Sabrina Slims

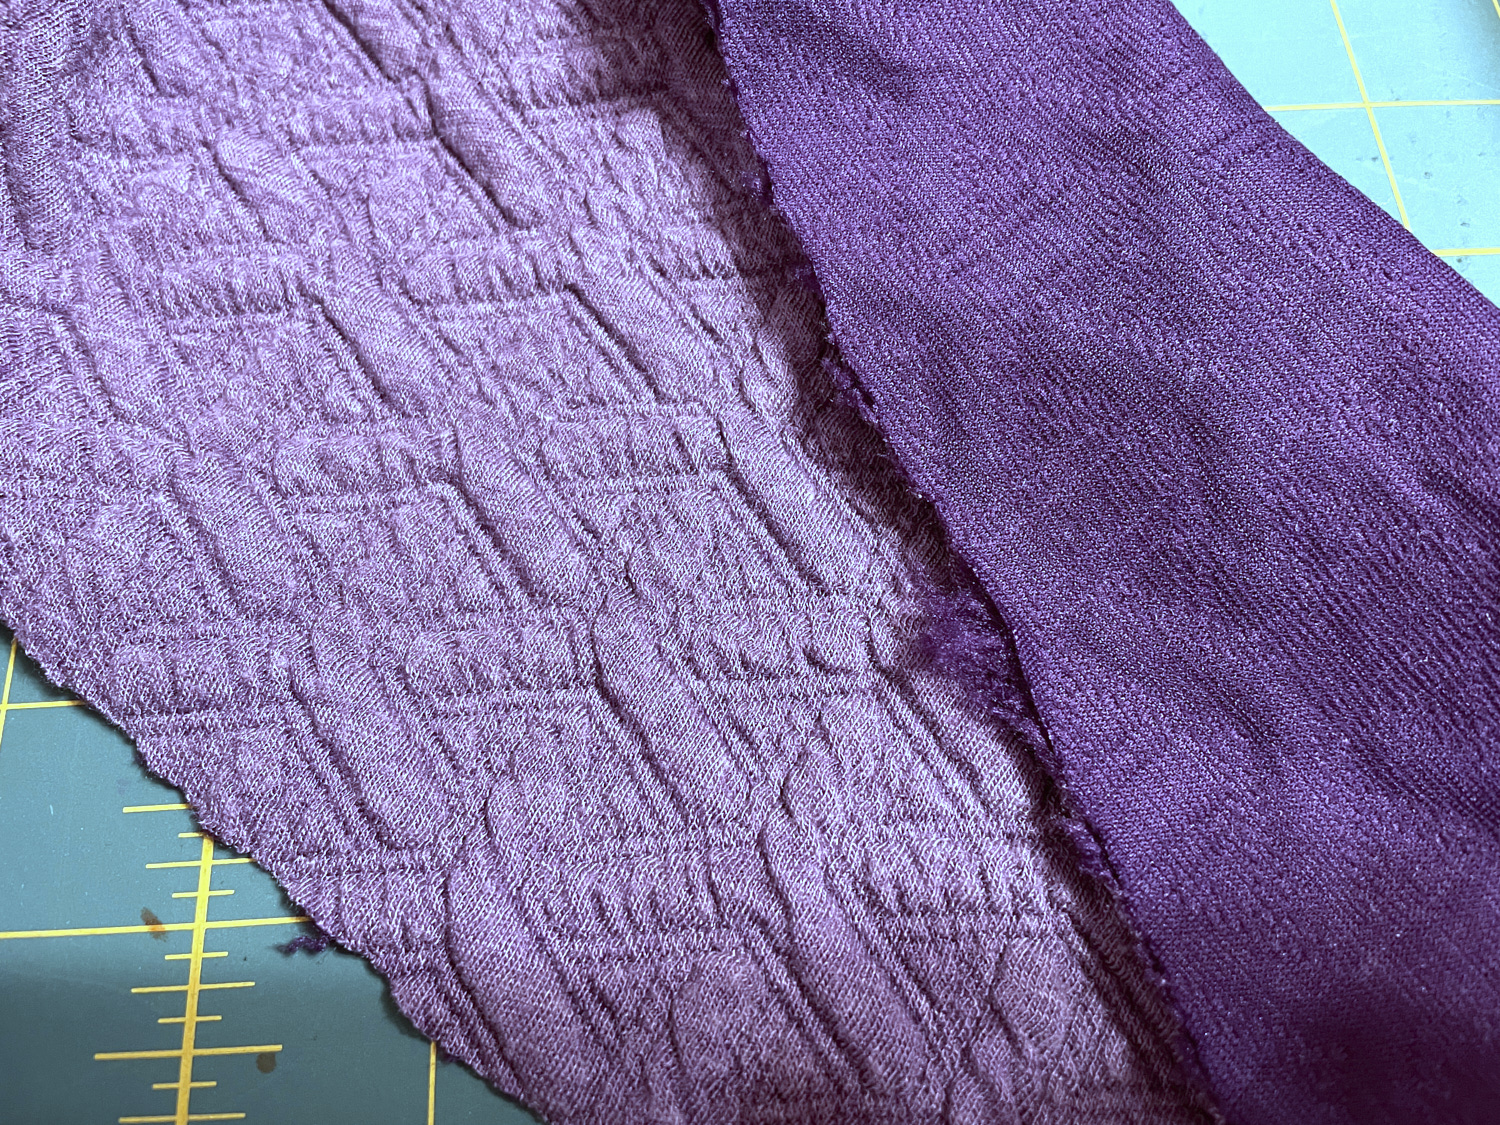
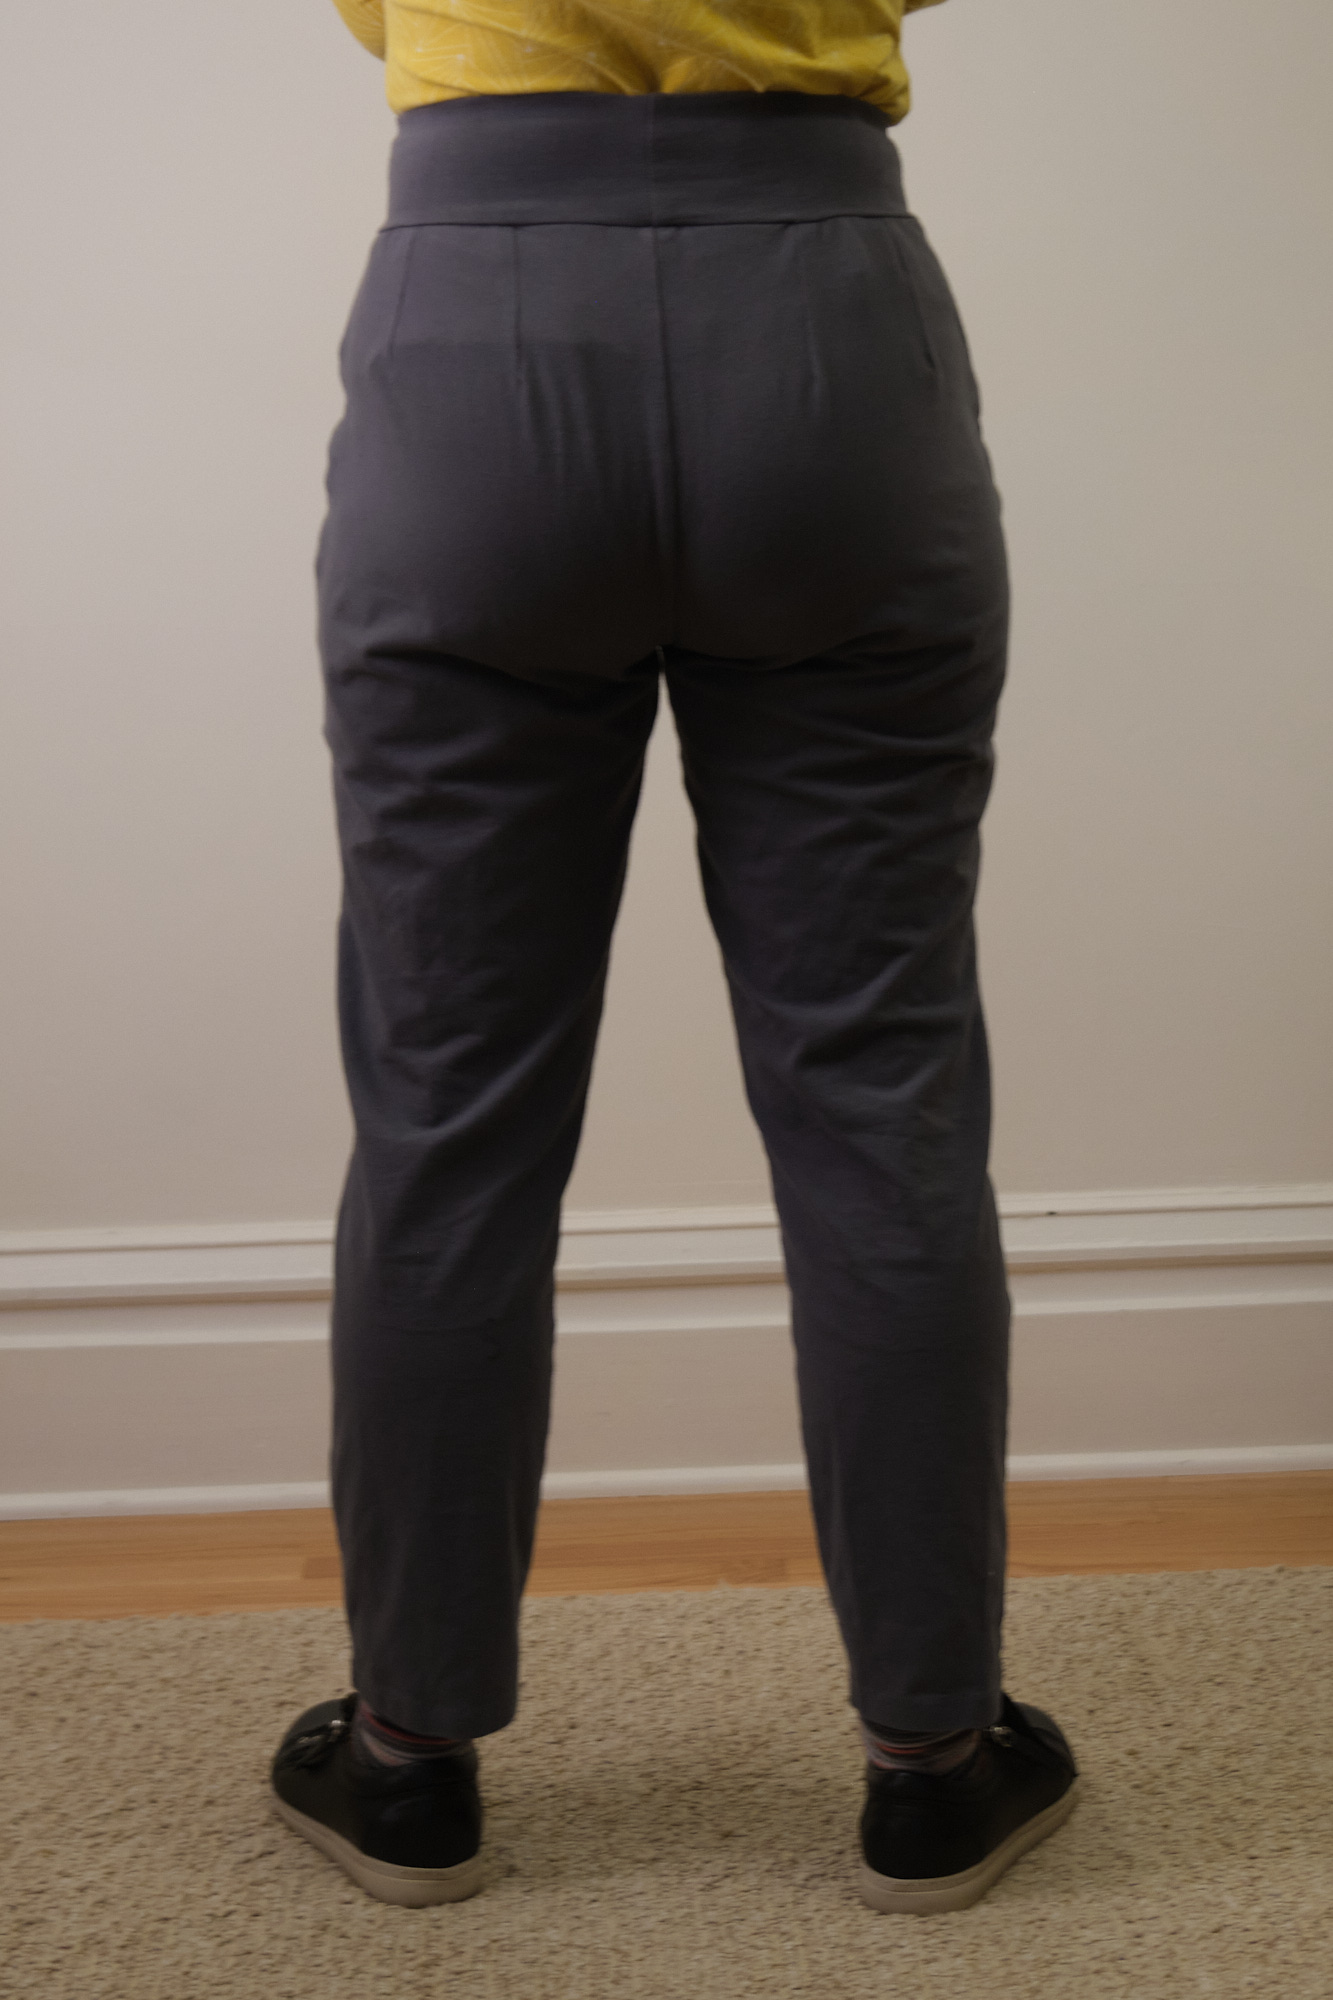
I still wanted to make a pair of slim pants with my grey ponte fabric, a stretchy 320 gsm viscose/nylon ponte in the wrought iron color from Surge Fabrics. I looked for other slim pull-on pants with high-waist options and pockets that listed ponte among their recommended fabrics. I decided to try the Sabrina Slims pants from Love Notions Sewing Patterns. This pattern is intended for stretch woven fabrics and stable knits. It has jeans pockets and patch pockets, and a 2-inch elastic contoured waist band.

This pattern instructions are a bit terse and the pattern does not come with as many explicit instructions and suggestions or diagrams as some of the other patterns I’ve been using. I have enough experience that this wasn’t a problem for me, but I think it makes this less of a beginner-friendly pattern when there’s actually not much particularly difficult about it. I followed the measurement instructions and selected a size 6 based on my hip measurement, as recommended. I noted that my thighs were size 8 and my waist and calf were size 10 (although based on the finished measurements there is a lot of extra room in the waist so a size 6 waist should be quite ample in a stretchy fabric). I graded the inseam on the front and back pieces to a size 10 but left the rest a size 6. I also extended the pocket bags to have room for my phone. I cut out a 28-inch inseam, which is longer than I expected to need but would give me room for error.

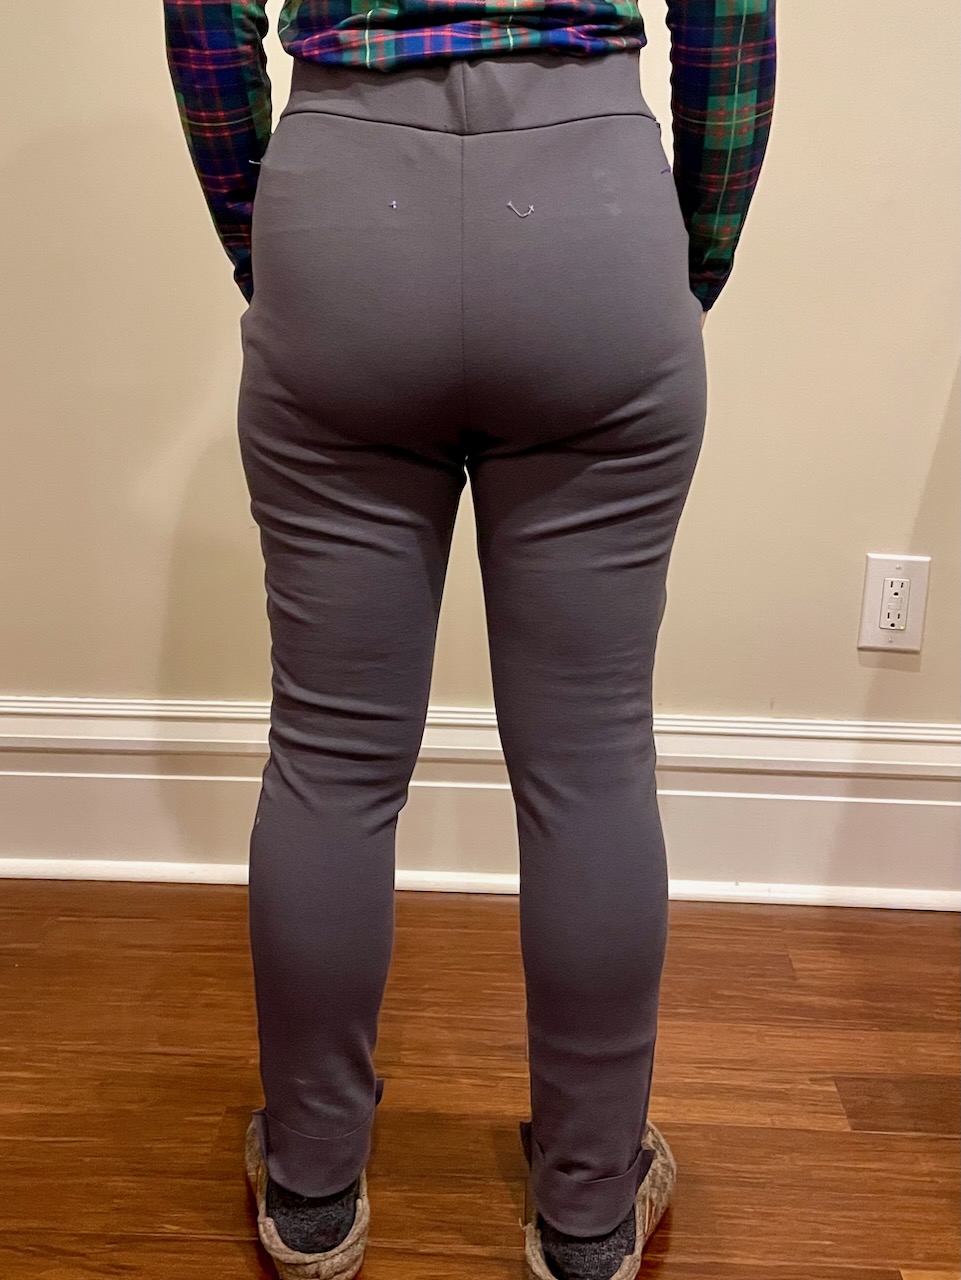
The pattern comes with a fit handbook, which was very helpful. They recommended sewing a muslin for a fit test and offered suggestions for a quick a dirty approach to basting the muslin together. I decided to take a chance and cut my muslin from my grey ponte fabric in the hope that it would be wearable by the time I got done with it. I basted it all together (using the recommended 3/8-inch seam allowance) and tried it on, and was not too happy with it. The front looked ok, but the back was too tight against my bottom, and the sides puckered where my hip crease is, and the fabric had folds around my knees. I read the fit guide but wasn’t entirely sure what to do, so I posted some photos to the Love Notions Pattern Support Facebook group and asked for help. I received a large number of responses, which was great. People pointed out that these pants were fitting me more like leggings. People suggested sizing up and sewing with a smaller seam allowance, offered tips on scooping the crotch or lengthening the crotch seam, noted that the fabric was pulling on my calves, pointed out that I have hip dips, suggested better underwear choices, and wondered whether my troubles were caused by the heavy ponte fabric. They also sent me pointers to a number of pants fitting videos. The “Lifting Pins and Needles” pants fitting video series was very informative.

From all this I learned a number of things. First, I had been oblivious to the fact that the shape of my hips has a name (hip dips). Now that I know the name I have learned that my inadvertent discoveries about selecting flattering clothes align pretty well with what people recommend: wear wide-leg pants and fit-and-flare dresses. Next I learned that I have largish calf muscles, something that had never occurred to me before – I don’t think they are enormous, but they are indeed larger than the pattern measurements for my size. Now I understand why none of the slim pants I own are smooth over the knees: they are all getting pulled by my calves. Going forward, I guess I will widen the calves of any slim pants I sew. From the videos, I learned how to measure myself for pants and adjust patterns based on this, something I will do before attempting another pair of slim pants.

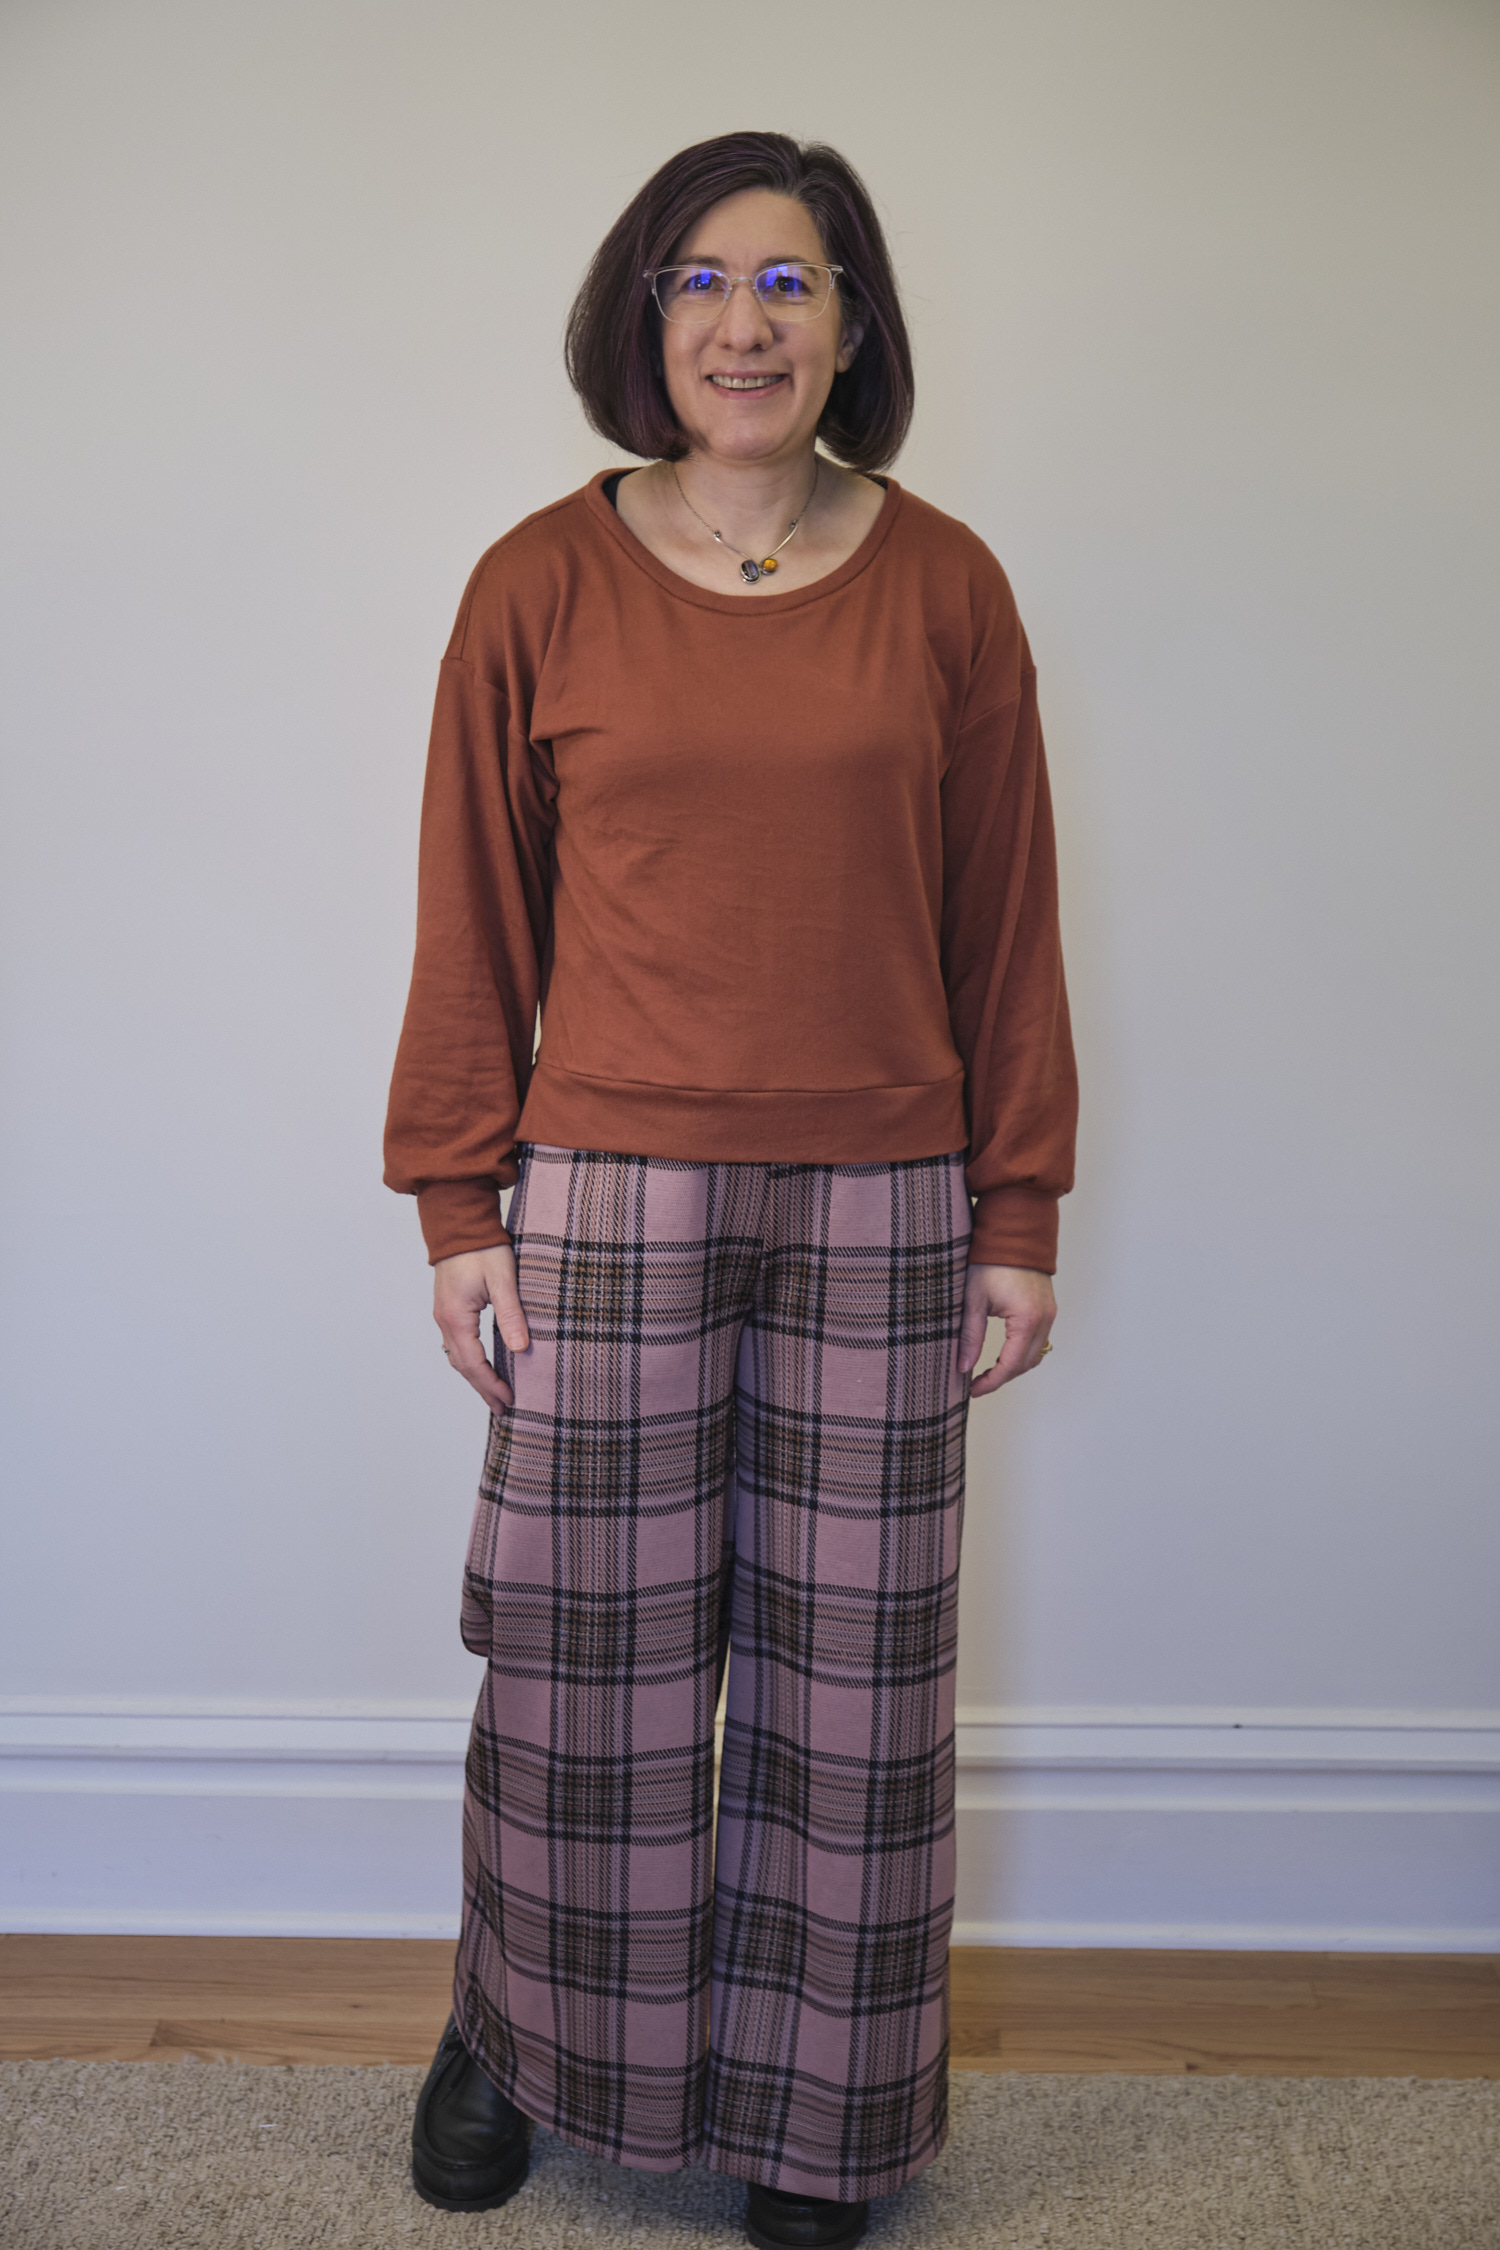
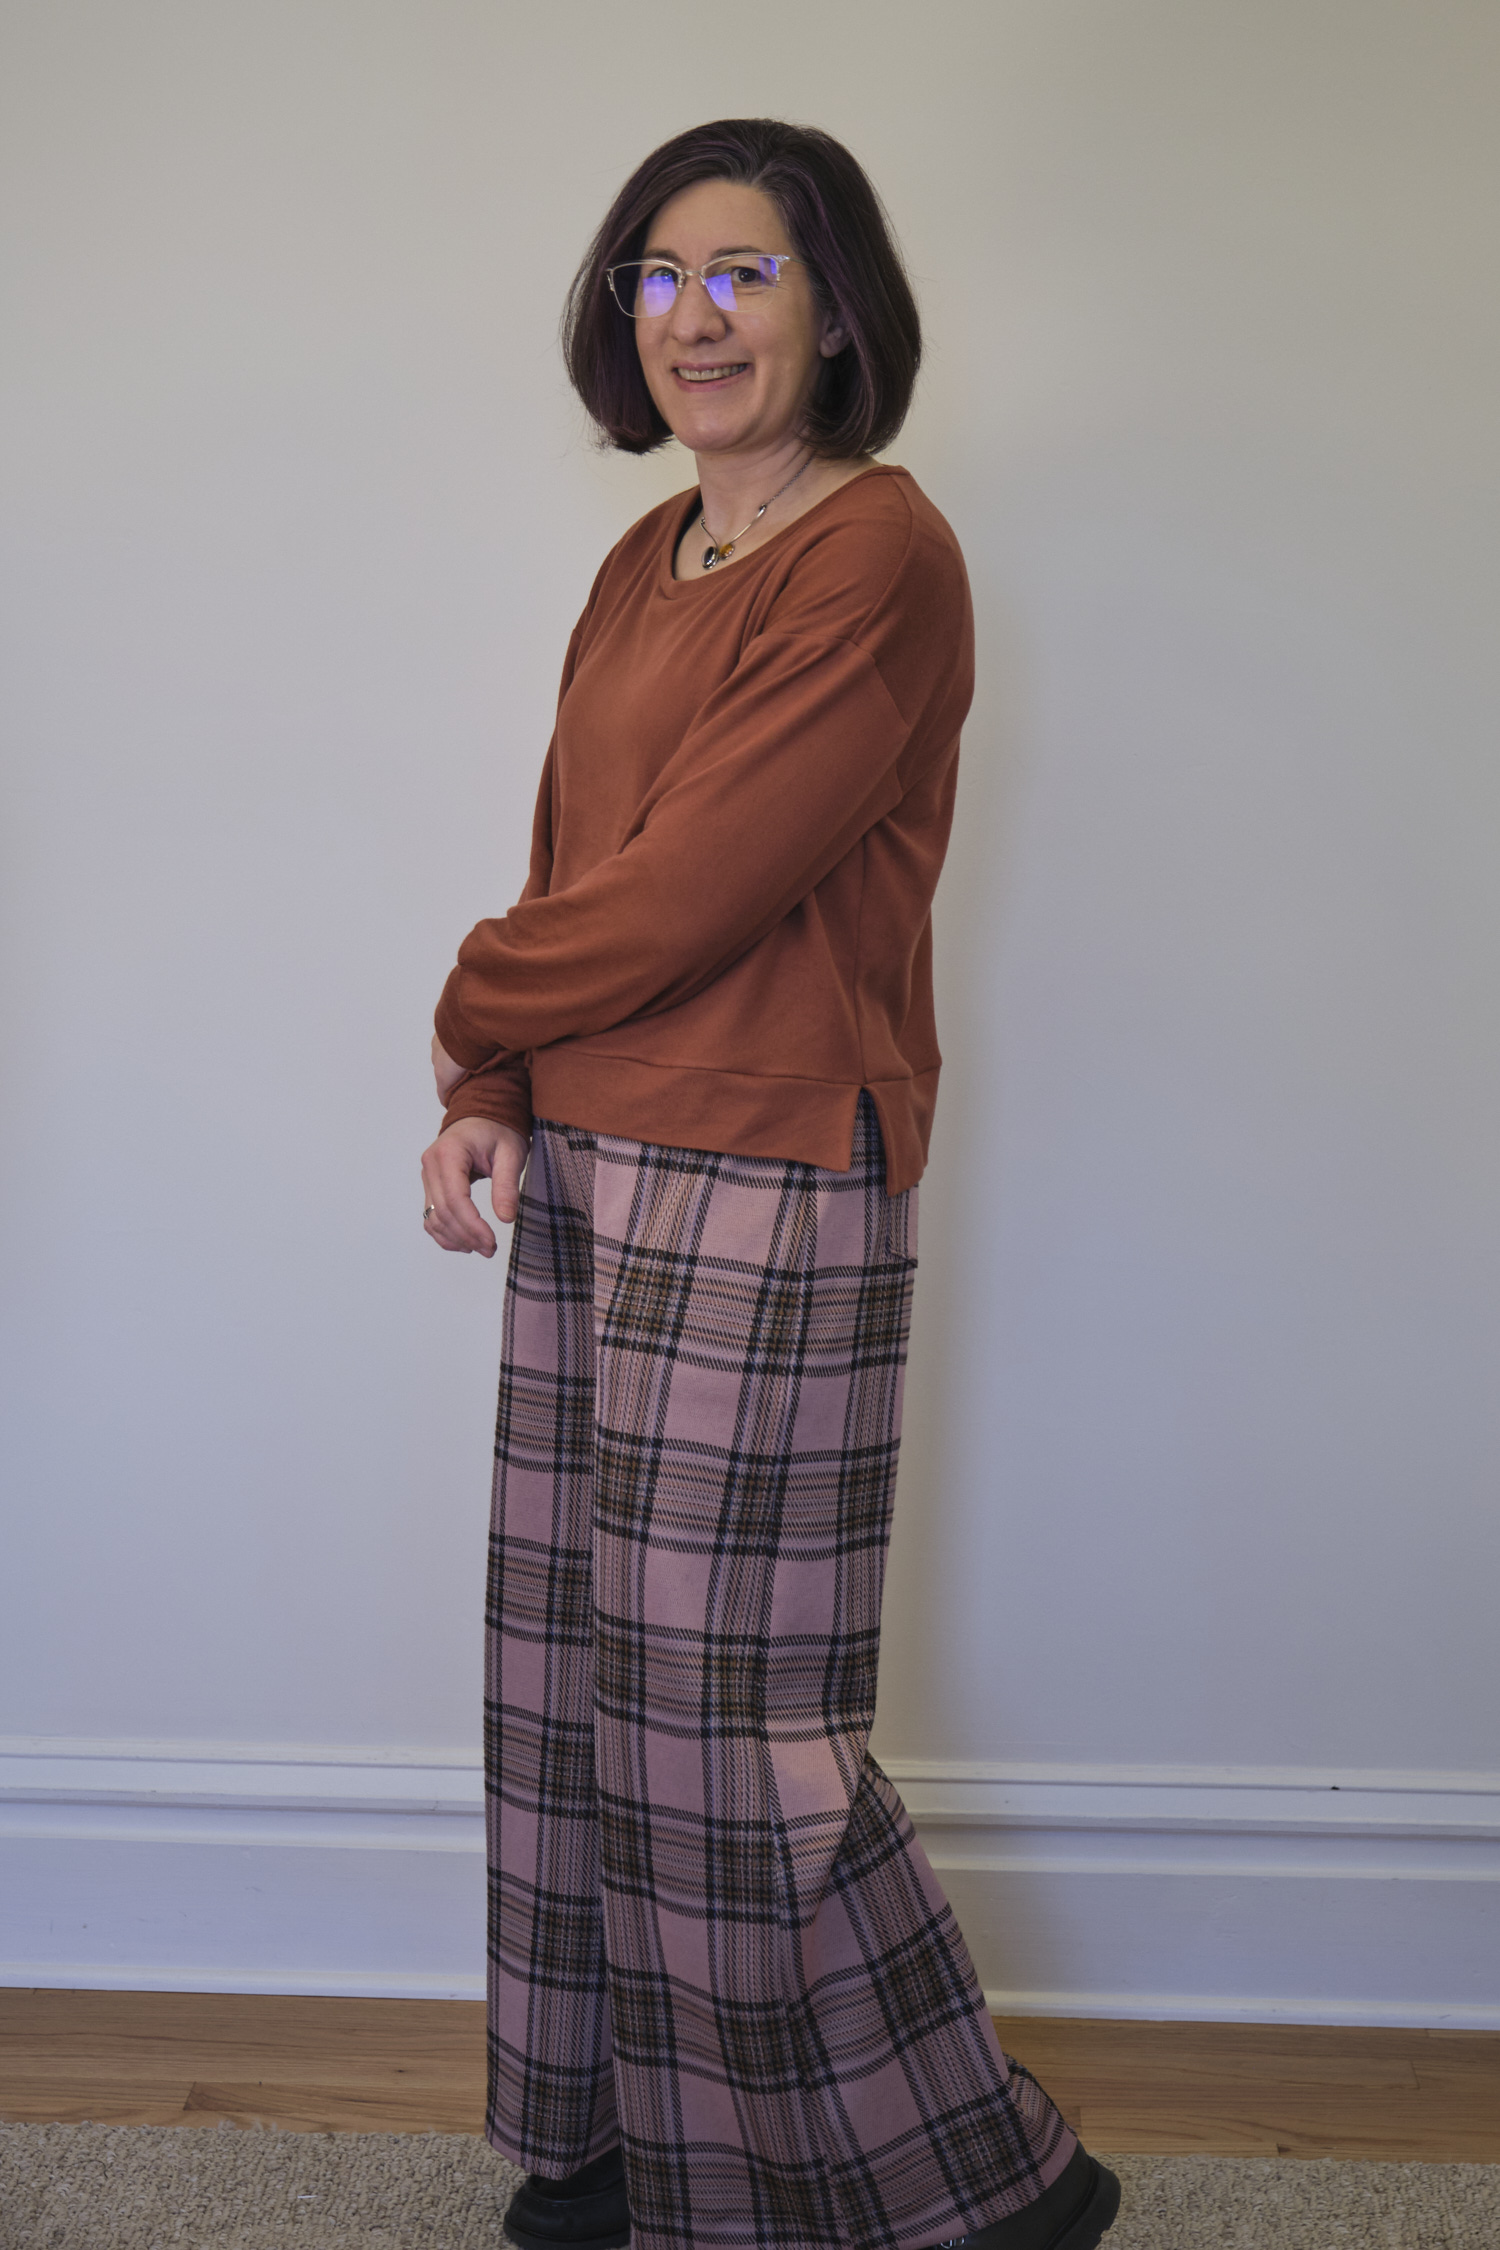
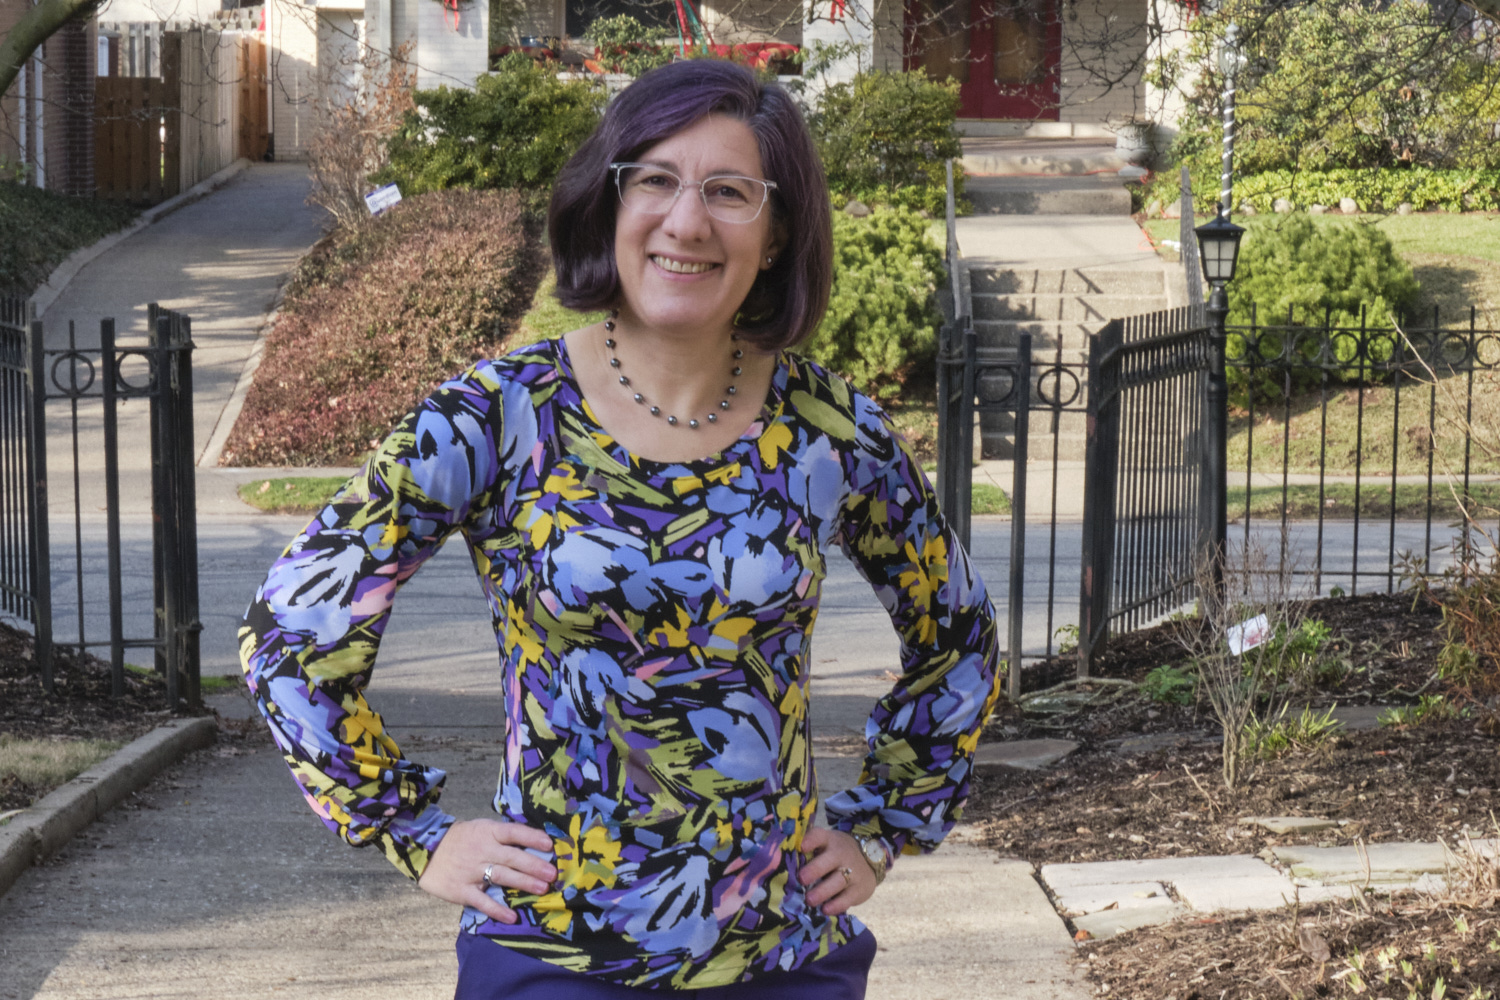
I decided to try to salvage the muslin, so I removed all the basting and sewed the pants together with my serger using a 3/16-inch seam allowance everywhere except on the waistband, which makes it closer to a size 8 instead of a size 6. I also did some scooping of the back crotch and I recut the extended pocket bag in purple ITY to reduce the bulk since the ponte is pretty thick.

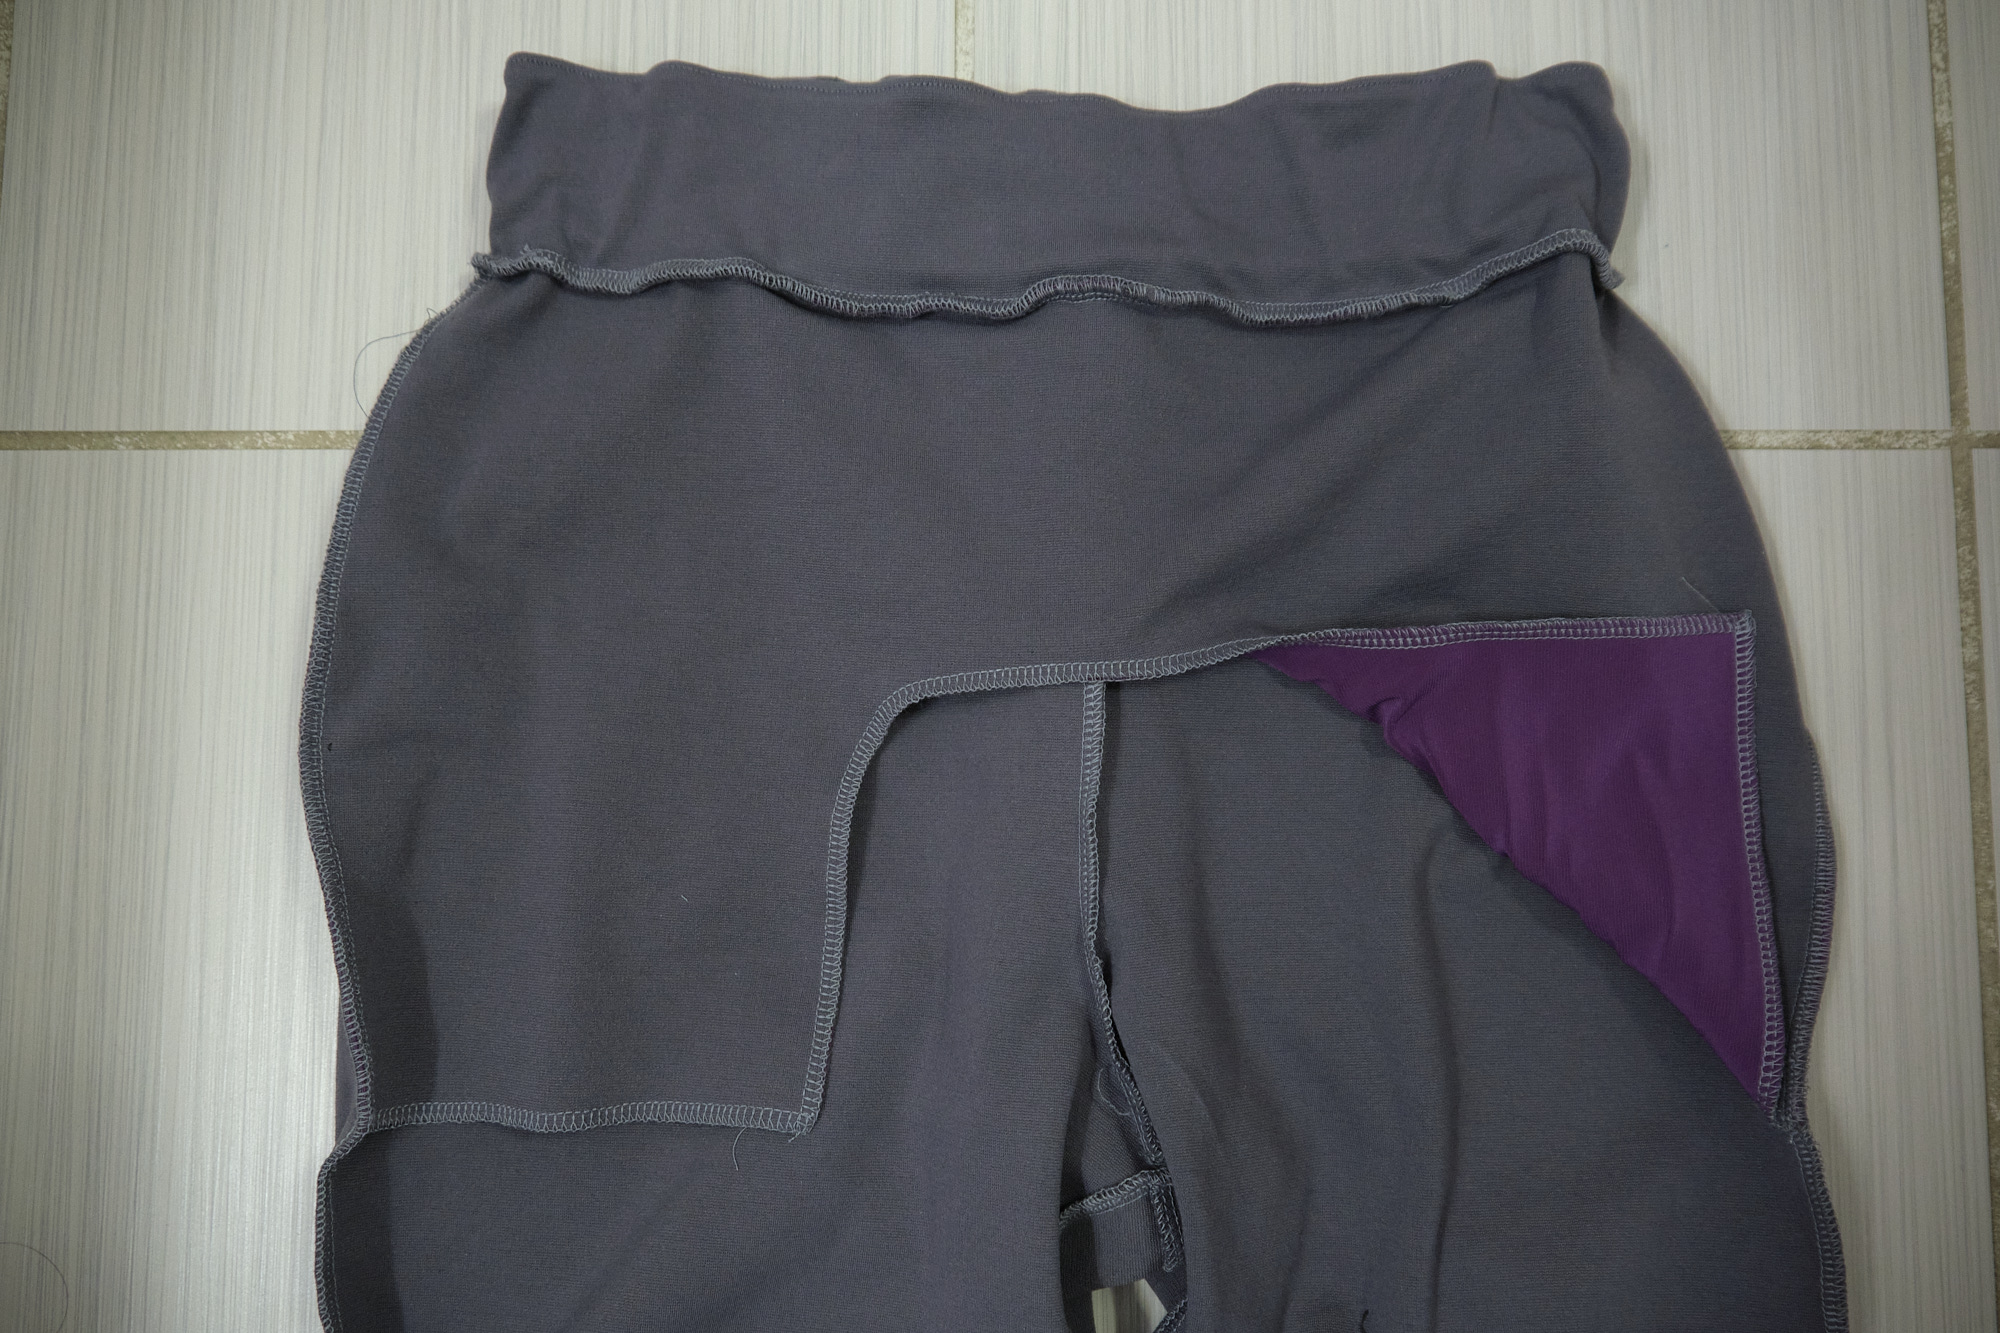
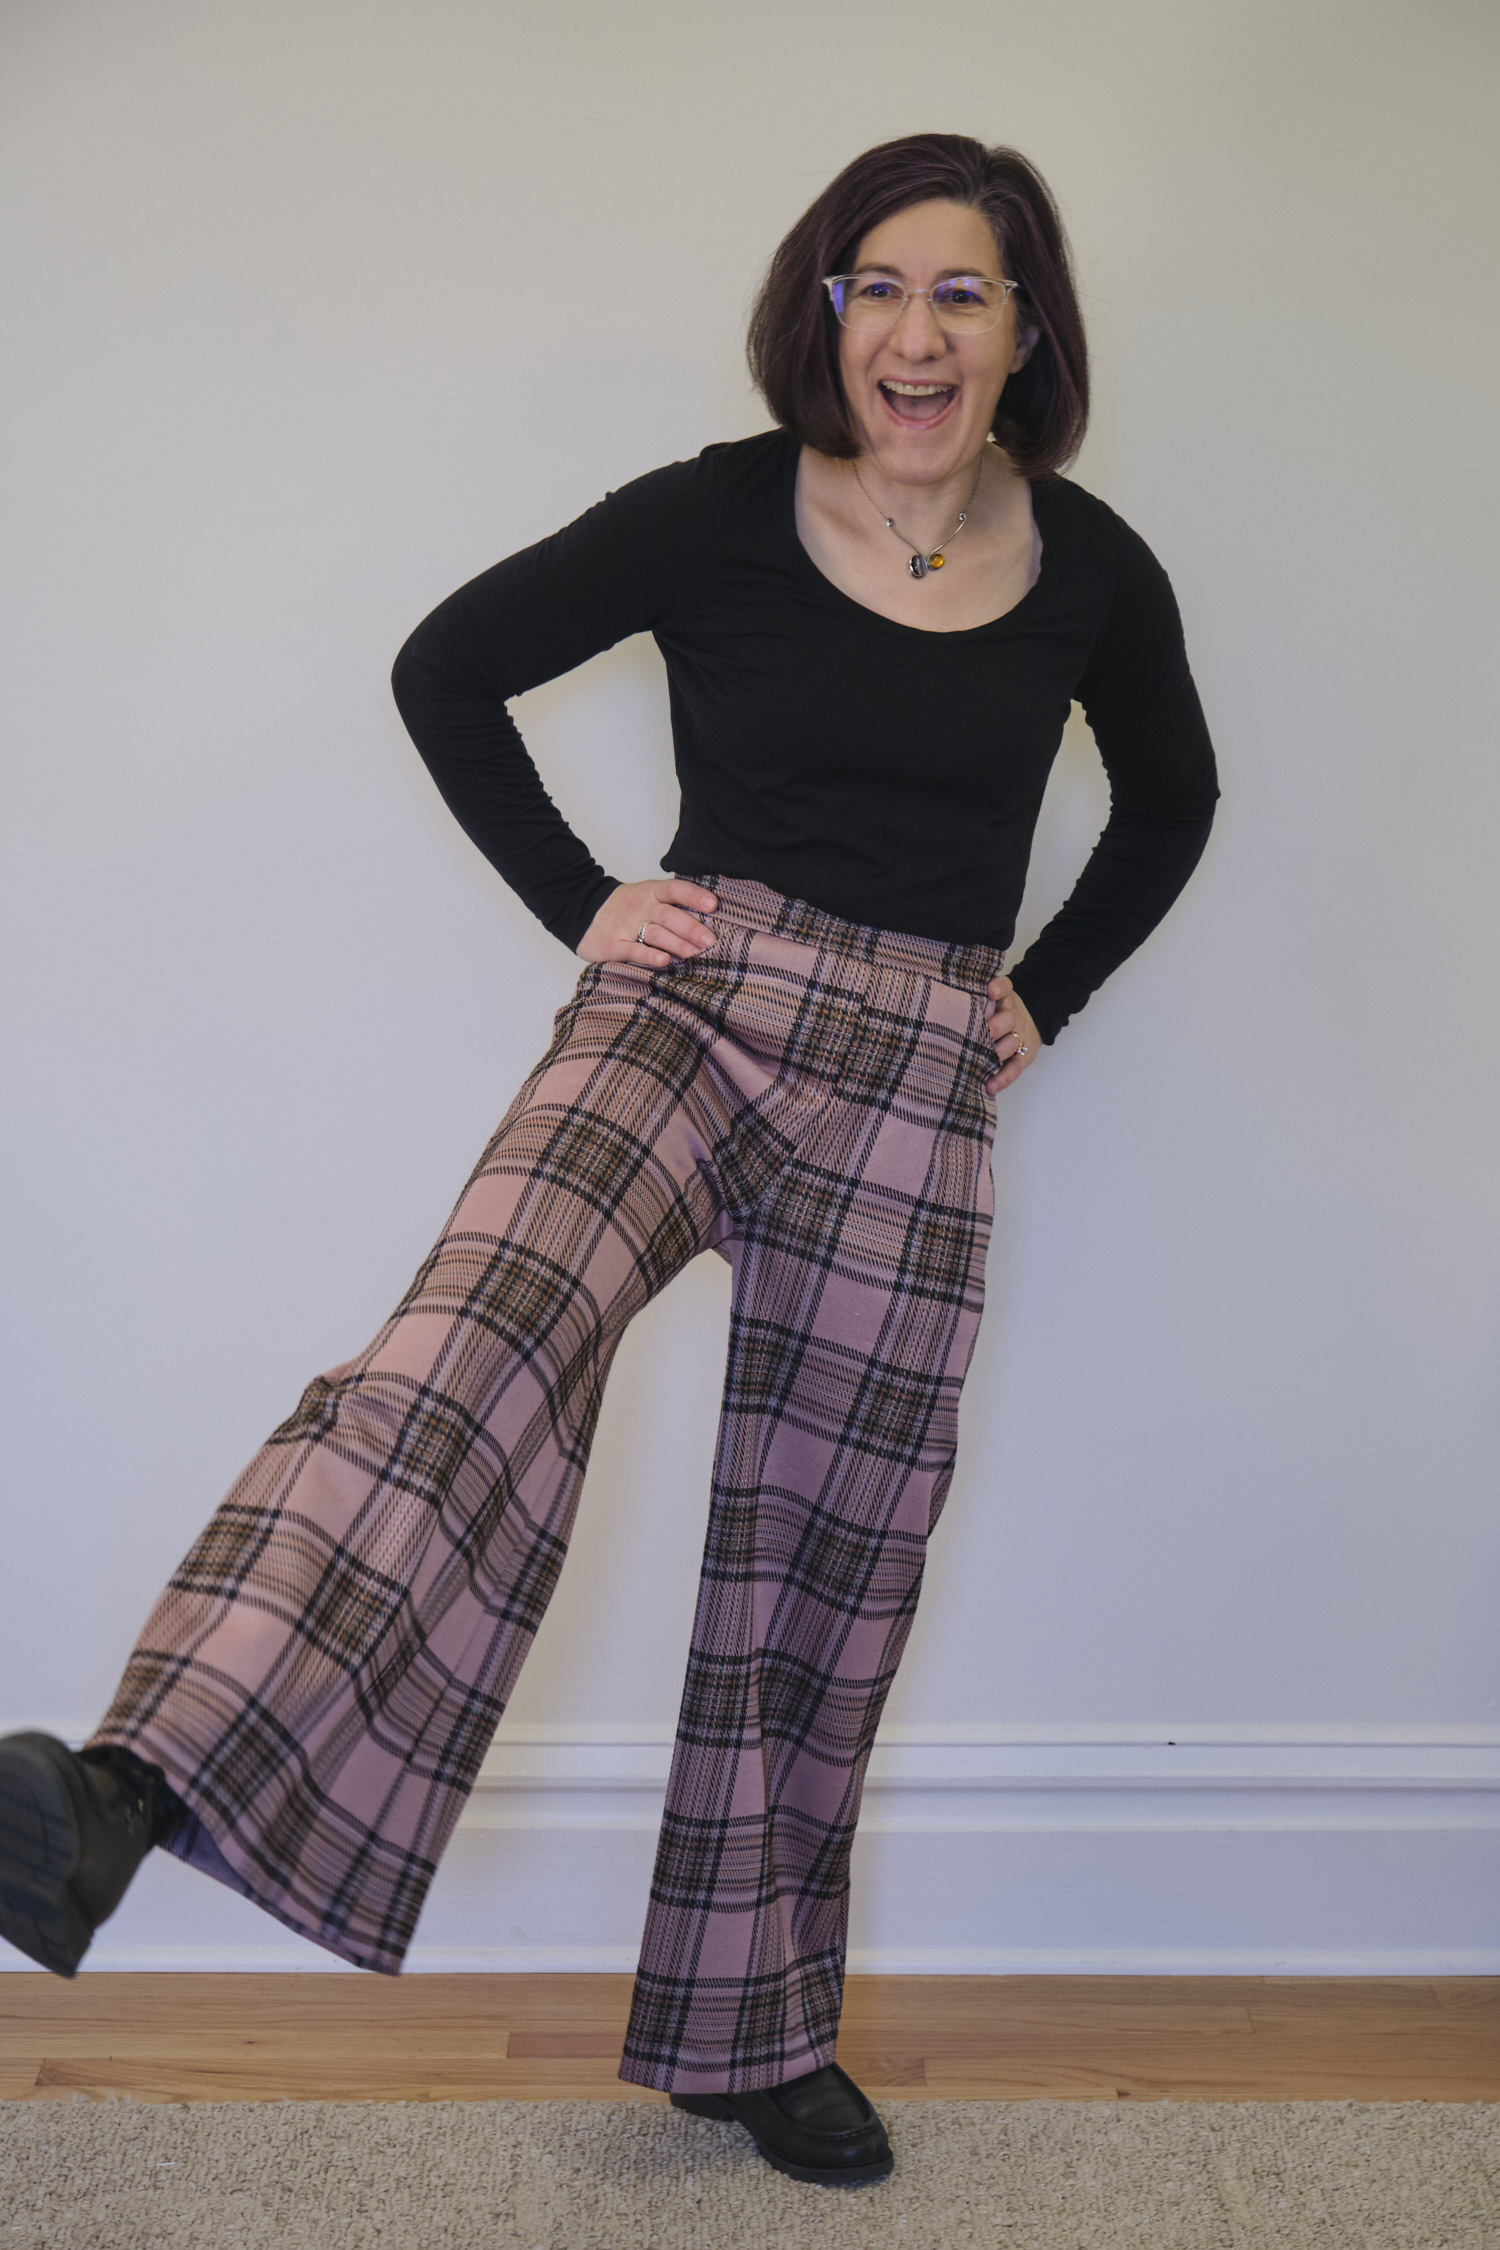
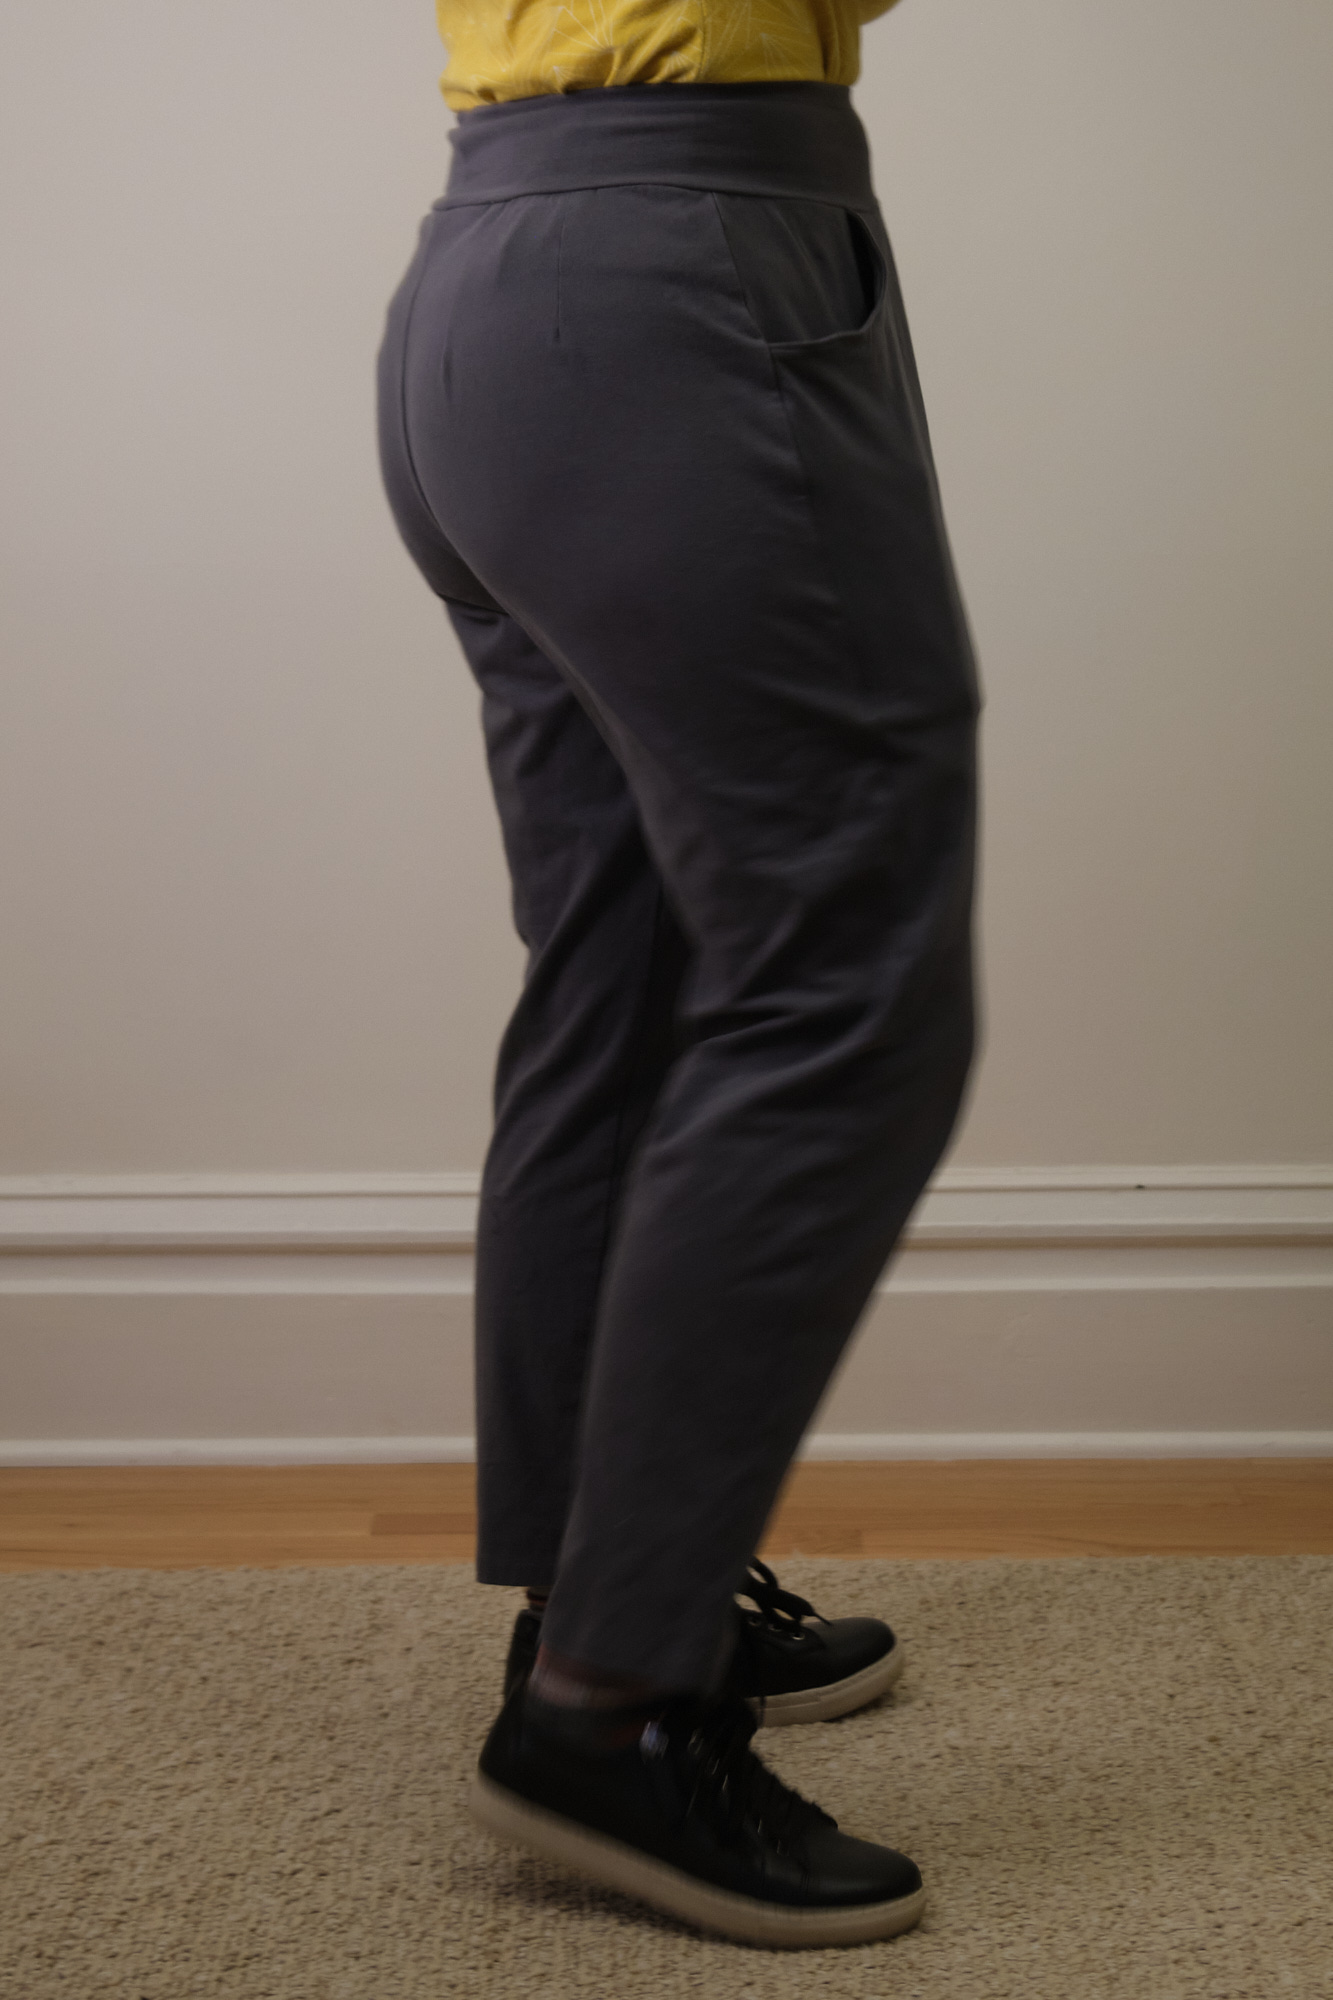
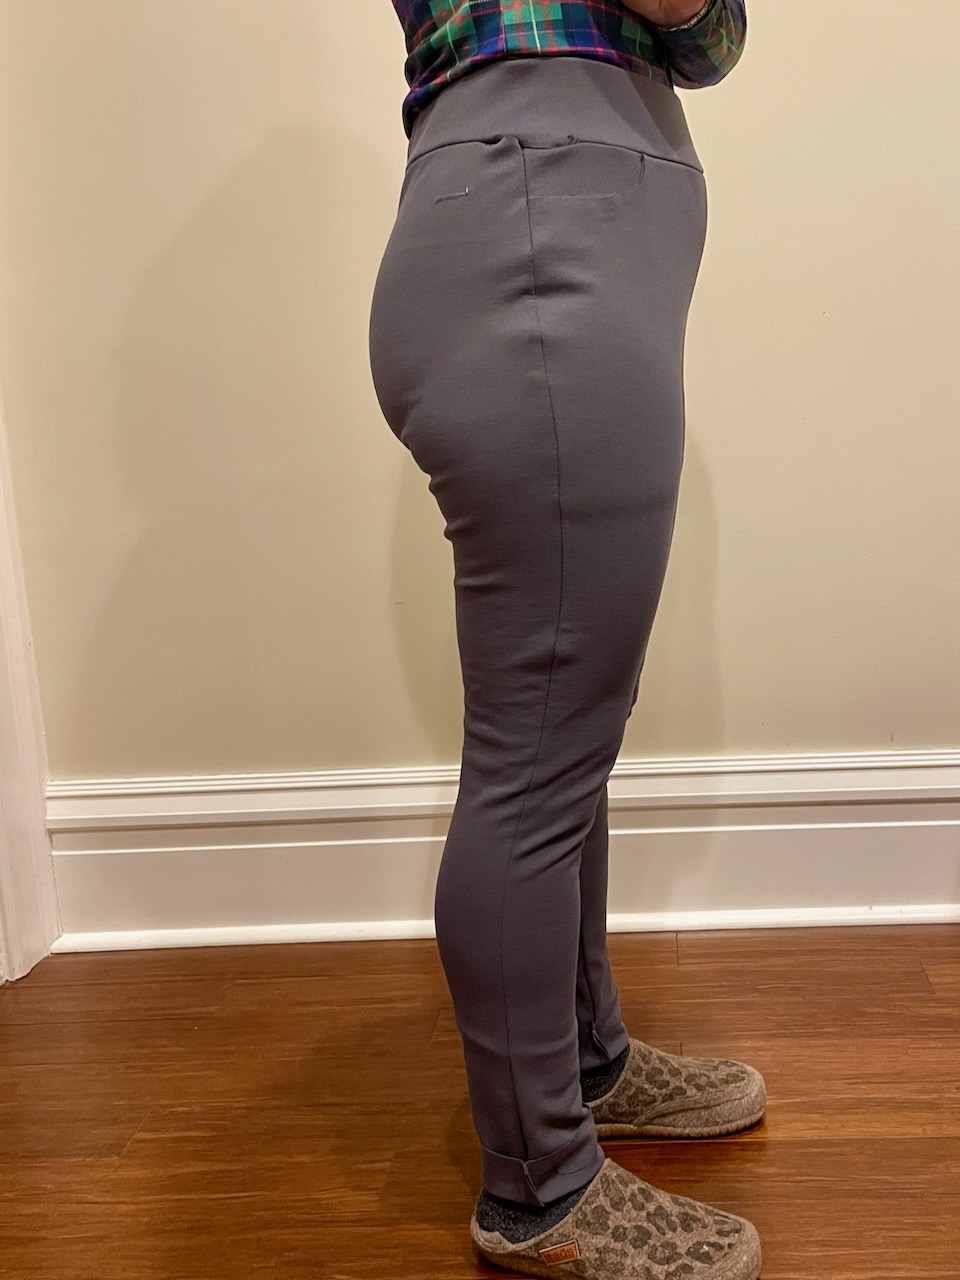
After I got it all sewed together and added the back patch pockets, I tried it on and found that my changes had helped improve the fit somewhat. The back and hips looked better, but my hip dip was still prominent. There was a bit more room in the legs, but still not enough for my calves. I think I may have inadvertently added too much to the front crotch, which you can kind of see in the side view. The patch pockets also served as a camouflage, although I’m not entirely happy with the pocket placement, and would move them closer together, lower the outer corners, and also consider slightly smaller pockets next time (the pattern offers the same size patch pockets regardless of pants size). The waistband did not sit smoothly and was a big disappointment. While I was focussing on making my butt look better I hadn’t noticed the waistband problem, and just assumed the gaps were due to the fact that I hadn’t attached it completely. But now I see that the waistband is actually too big for me and I should have either sized down or added more of a contour. With the elastic it fits and isn’t going to gap or fall down, but it isn’t as smooth as I would like. I decided that the muslin was about as good as it was going to be, so I went ahead and finished the pants, cutting 1 inch off the bottom of each leg and sewing a 1-inch hem (effectively a 27″ inseam).

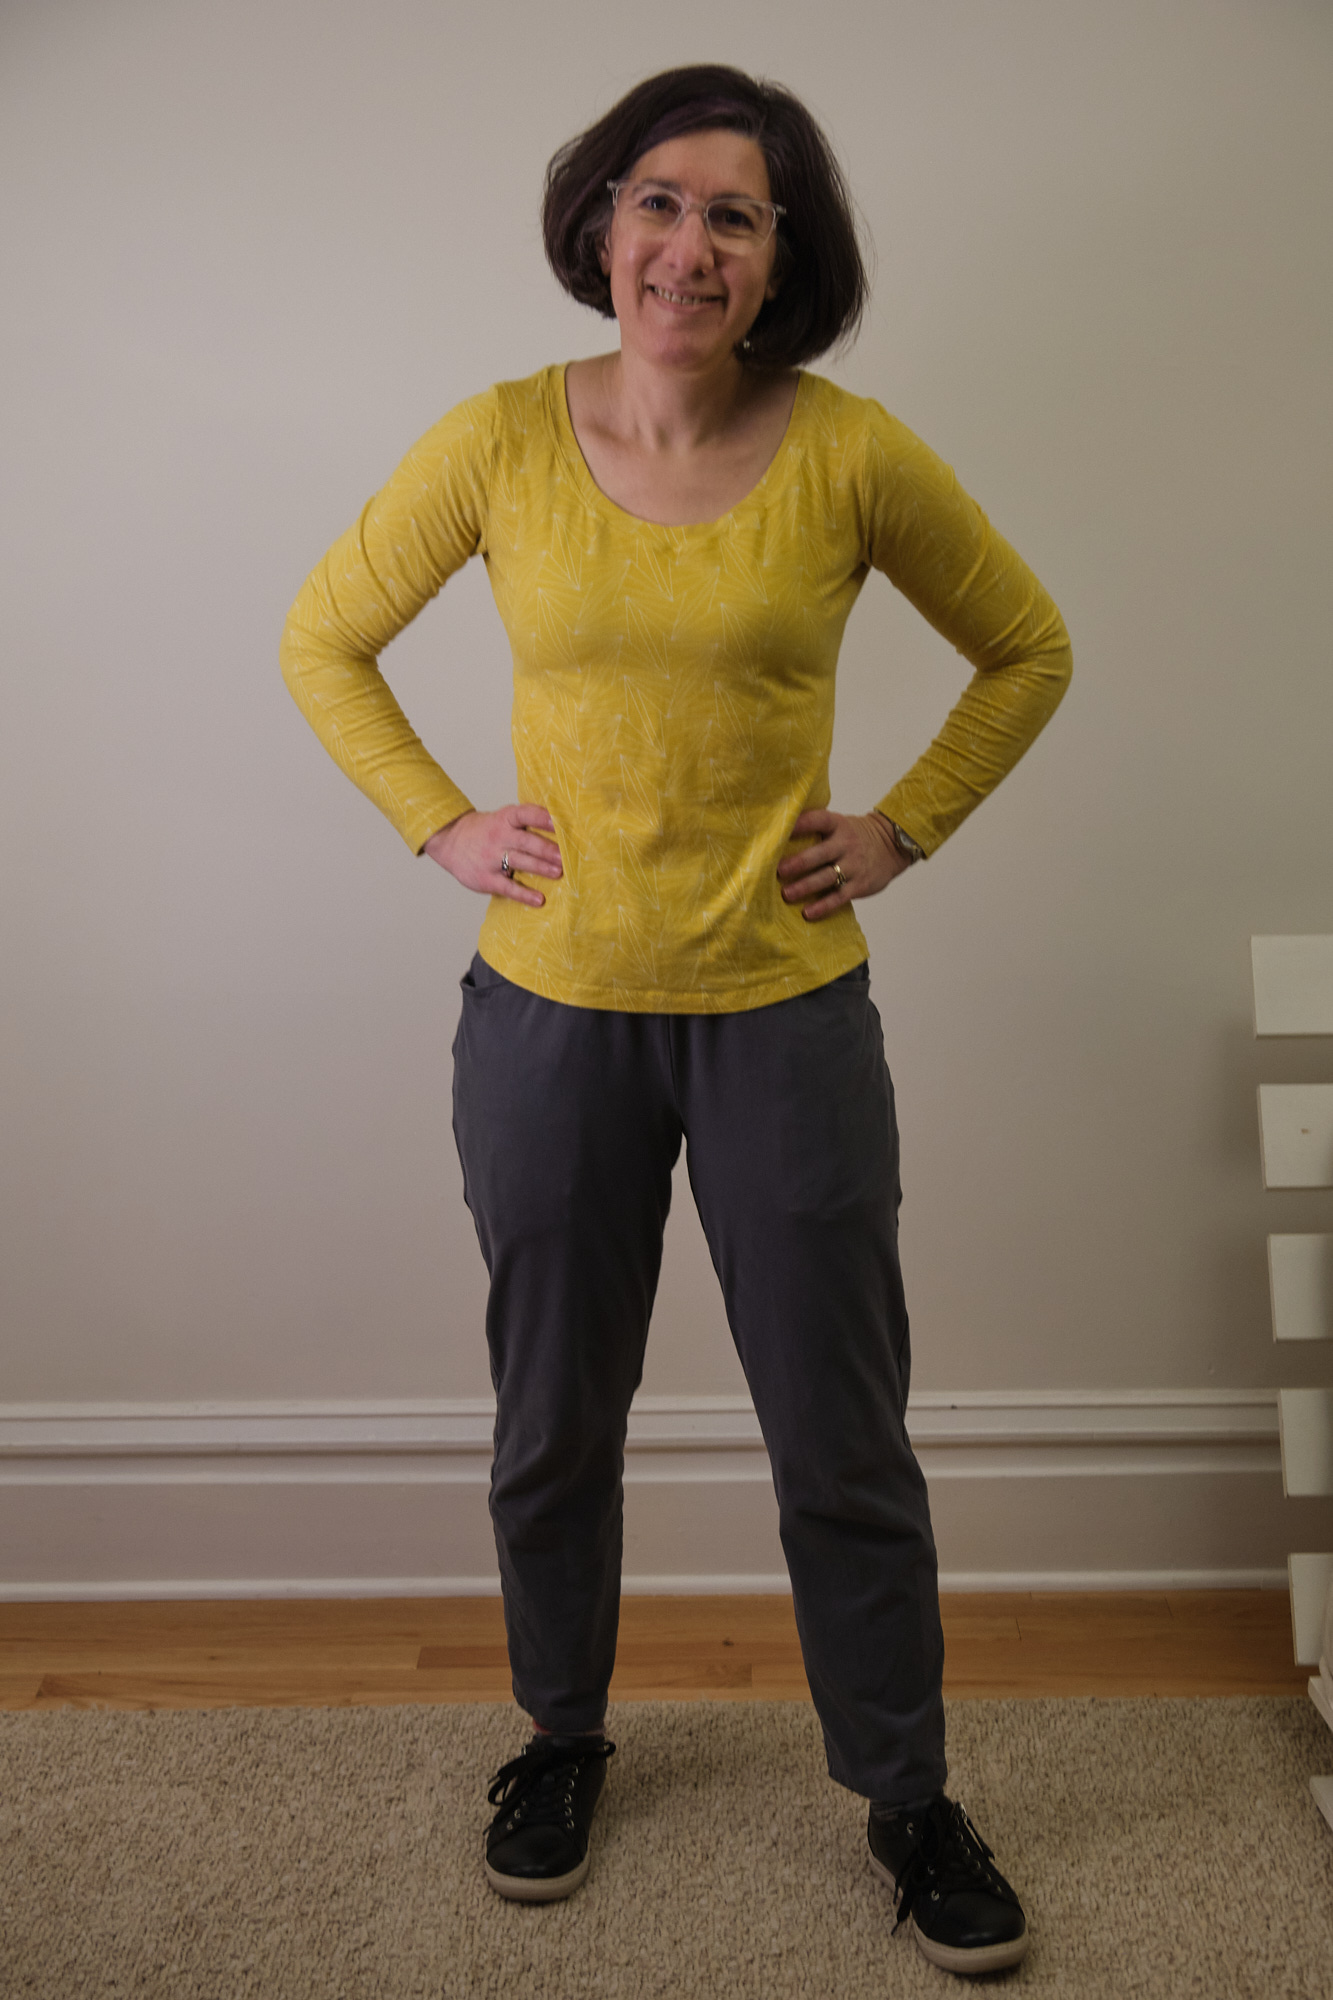
The muslin is wearable and I expect I will wear it, despite the flaws. It looks much better if I wear a longer shirt and don’t tuck it in. I expect I will likely wear these pants with a longer sweater or jacket and they will look fine. The ponte is actually super comfortable to wear and it has a somewhat dressy look.

My sense from reading the Facebook group is that other people did not have as much trouble with this pattern. The pattern states “as sizes get larger, the less negative ease there is.” With less negative ease in larger sizes, I think the pattern would be more forgiving. My choice of fabric may have played a role in my difficulties, but I’m not sure. And in the end, although these pants do not have my ideal fit, they fit similarly to most of the slim fit pants I have bought in a store. So maybe Ill make more adjustments and try again, but probably I’ll go back to wide-leg pants for a while.

Conclusions

This wasn’t a controlled experiment because I used very different fabric for the two pants. Nonetheless, I can make some comparisons. The Sabrina Slims are a slimmer style: the Urban tapered pants include a lot more ease. I expect to make the Sabrina slims look better on me would require a number of adjustments to the crotch, waistband, and calves, while the Urban tapered pants would likely need only a more minor calf and waistband adjustment and optionally the addition of back pockets. The back darts and fit with more ease are likely going to make it easer to get a good fit on the Urban pants for me and I am curious to see how they will look in ponte. However, I do like the slim look and it may be worth making more adjustments to the Sabrina Slims to get a slim pants pattern I can use for both dressier pants and pull-on jeans. Or maybe I’ll just stick with wide-leg pants for a while.

Update, 1 week later

So I wore the Sabrina Slims to work with a long jacket, and loved how comfortable they were. They feel like secret pajama pants (and after my daughter suggested it, I discovered that I could fit a water bottle in one of the back pockets). Most of the flaws I wrote about above didn’t really bother me, but I was still unhappy with the waist band. So after running through the wash, I took a pair of scissors and cut off the entire waist band. Then I cut off the bottom stitches, removed the elastic, and reduced the circumference of the waist band by about 2 inches. I carefully basted and then sewed the whole thing together. Now the waist band was smaller than the pants, so I had to stretch it as I sewed, similar to sewing a yoga waistband. Because I cut the waistband off instead of unpickiing it, I lost about 3/4-inch of rise in both the front and back. However, I realized from wearing the pants that I had more rise than I needed. Then I threaded the elastic back in and tried on the pants. I think they look a lot better now, despite a wee bit of puckering in the back. There are still some issues that I will try to address when I make this pattern again (more tweaking of the crotch and seat, more room through the thighs and calves, slightly smaller and better placed pockets), but I’m now pretty happy with these pants and I expect I will wear them frequently.

A lot of effort for an effortless hourglass sweater dress

As the temperatures dropped this week and I was preparing for the start of the new semester, I figured I had time to sew one more garment before the semester started, and I wanted something warm and cozy that I could wear to work. I purchased some Banff ultra thick 1×1 rib sweater knit in cranberry from Surge Fabrics back in November, so I got it out and looked for a sweater dress pattern to make with it. This is a 350 gsm chunky fabric in a 50% rayon/28%poly/22%nylon blend, brushed on one side.

I wanted a sweater dress with pockets, and somewhat fitted at the waist. I saw that some sewists had make the Ellie and Mac Effortless Hourglass Swing Dress in a sweater knit so thought I might give that a try. Looking through the photos and Facebook comments, I saw mixed success with the pattern. There were warnings that the pocket construction was not so effortless and I saw a number of dresses that looked more baggy than swingy. But I liked the bishop sleeves and the pockets, and was hoping I could get results similar to the red checked dress on the pattern website. The “hourglass” part of the pattern name refers to the fact that the front panel is shaped like an hourglass and if you use contrasting fabric for the pockets, you get the illusion of an hourglass figure. As I didn’t have another sweater knit that I thought would go well with my fabric, I decided to make it all one color, which also looked nice in some of the examples.

I checked the size chart and settled on size small, cut to the mid-thigh length in the hopes that it would come out above-knee length on me since this pattern does not have petite sizes. I checked for the recommended size adjustments, but all my measurements seemed to suggest the pattern did not need to be adjusted.

I projected the pattern onto my fabric and cut it out quickly, using the more-textured unbrushed side as the right side and the softer, brushed side against the skin. Then I began the pocket assembly and quickly came to realize why people said it was not effortless. Each pocket includes a pocket piece and a pocket liner. The pocket piece has a very narrow protrusion, about a half-inch wide. my first problem was sewing a quarter-inch seam in this very narrow protrusion. When I attached the pocket pieces to the dress and tried to sew it all together I found that the sweater knit had unravelled a bit in the narrow piece and got caught in the seam. Furthermore, my attempts at stretching the pocket a bit to meet the bottom of the pocket liner resulted in a seam that would not possibly lie flat. That’s when I saw the note in the pattern explaining that the bottom of the pocket liner might not match the bottom of the pocket piece and you should just trim accordingly. I don’t know why I was so far off, and after perusing the Facebook group I saw that a lot of other people had this problem too. I watched the pattern video and saw the pockets on the example dress worked perfectly. I attempted to unpick the pocket seams, but that did not go well. I finally gave up, and since I had enough leftover fabric, recut the dress front and pocket pieces. This time I cut them very carefully and made sure my fabric did not stretch while I was cutting. I also added about 3/8 inch to the narrow protrusion (it would probably be easier if the pattern had a wider protrusion to begin with and instructed people to trim it later).

I repeated the pocket assembly process, careful not to catch the frayed edge or stretch anything while I sewed. It went much better the second time, but the pocket liner ended up about two inches longer than the pocket. I considered cutting off two inches from the bottom of the liner, but realized that my pocket would be two small for my cell phone. So instead I added a pocket extension by sewing on a piece of lighter weight knit fabric. Having extended the pocket, I proceeded to sew together the rest of the pattern. I used my sewing machine for the pocket and then used my serger for most of the rest.

All went fairly well until I got to the bishop sleeves. I gathered the heavy sweater fabric for the bishop sleeves, basted it to the cuffs, and then attempted to sew it in place with my serger. This did not go well, and now I need to untangle the mess and rethread my serger. I ended up finishing everything else on my sewing machine and will figure out how to rehabilitate my serger later.

I finally got the dress put together, tried it on, and was fairly disappointed. While the big bishop sleeves were fun, the dress was not swingy at all and the neck opening had stretched out quite a bit. My husband said it looked like a sack, which is true.

But the dress was warm and had pockets, and after all the time I had already invested in it, I decided to try to fix it. To make it less baggy, I pinched in the top of the back seam about 2 inches and graded it down to the waist. I basted that in place and tried it on and like the fit better so I sewed it in place. The neck was still too wide so I cut the neck band open at the center back and threaded 3/8-inch elastic through it and tightened it until I was happy with it. This approach worked pretty well, but even after a lot of ironing, I could not get the neck band to like completely flat. (The pattern should have offered multiple neck heights and some advice on adding interfacing to the neck and pockets for some types of fabric.) Finally, I turned under the bottom edge of the dress and sewed a chunky 2-inch hem to raise it above my knees and give it some more swing.

The alterations were a big improvement. The dress has more of an hourglass fit now and is almost even swingy. And with a strategically placed scarf, you don’t see the wavy neckline. It is warm and has functional pockets and fun sleeves, so I will actually wear it now. However, I don’t think I’ll be using this pattern again. It looks great on some people but doesn’t seem well-suited for me. I also don’t think it was a good choice for a chunky sweater knit (which I love, and choose a more suitable pattern in the future).

Walking Boldly

I’m loving the wide leg pant trend, so when I found the Walk Boldly Wide Leg Pants Pattern from Pattern Emporium, and saw that it was designed for knits, had no zipper, and a high-waist option with darts, I knew I had to give it a try. This is my first time using a PE pattern, and it was a great experience. The pattern was well illustrated and included a number of useful tips, including a good tip on sewing darts.

I used a premium black 12 oz rayon/nylon ponte fabric from KnitFabric.com. The ponte has about 30% stretch across the width. Although the website said it only had 2-way stretch, I think it has about 20% stretch in the length as well. It is a hefty fabric with a nicer drape than the other ponte fabrics in my stash. It is sold out in most colors now, but I may grab more in whatever color they have left (mustard perhaps?).

The pattern comes with two waist heights and multiple pocket options. I made the high-waist version, which hits right above my navel. I made the jeans-style front pockets and added an extra two inches to their length to make sure my phone would fit comfortably when I’m seated. I also made the back patch pockets, because I can always use more pockets and I think they’re cute. The pattern uses AU sizing, I normally would select a 4P or 6P for pants, but the size chart said I should go with a 10. The pattern doesn’t come in petite or tall sizes, but it does offer short, regular, and tall pants lengths (which means the only thing that adjusts is the length of the leg, but I often prefer the fit of short pants rather than petite pants so this works for me). I cut out the size 10 in the short length, which is meant for those who are 5’3″ tall. I’m closer to 5’2″ and the pants would have been about 1 inch too long (which makes sense) if I used the recommended 3/4-inch hem. So I did a chunky 1 3/4-inch hem instead. The size 10 fit perfectly, as you can see in the photos below (modeled with a bishop-sleeved Bondi from Sinclair Patterns).

I’m very happy with these pants. I’ve seen similar pants from major retailers this season, only most of them don’t have the back darts or the back pockets, which take these pants up a level. These are stylish, practical, and so comfortable to wear! I did have to add seams to the sides of the waistband to prevent the elastic from rolling.

My young adult daughter told me she loved the high waist and said I should tuck my shirt in to make my (short) legs look longer. She also recommended I try the Walk Boldly pants in a bolder fabric. So I selected a polyester/spandex “haute pink and umber plaid yarn dyed jacquard knit” from my stash (purchased from Surge) for bolder Walk Boldly pants. These are indeed a much bolder statement (although the haute pink is tastefully muted). Even one of my male co-workers yelled out “nice plaid pants” as I walked by his office.

Every time I use plaid fabric I get a frustrated because I want my plaid to match perfectly and it never quite does. Knit plaid fabric is particularly difficult to match because if it stretches just a little bit when you cut it or sew it, the plaid won’t match. There are some spots on these pants with fabulous matching that I am very proud of. The back pockets cannot geometrically have a perfect match due to the darts, and yet they match about as well as they could. The outside seam of the right leg is magnificent! The other seams are not as closely matched, and the matching in the front crotch area is particularly disappointing. But I’m not going to let that stop me from walking boldly and without worry (More on plaid coming soon!) Now I’m looking forward to making more of these pants (but probably not in plaid) in a lighter weight fabric for spring and summer.

The pink plaid pants look great with a black top, but I happen to have some cuddly versailles brushed hacci sweater knit (also from Surge) in my stash in something that seems pretty close to me to umber (officially the color is “sienna”), so I decided to make a trendy cropped sweater to match. This hacci is brushed on the inside so it is super soft against your skin. I decided to try the Sweet Cheeks Sweater pattern from Pattern Emporium, which has dropped, full sleeves that are gathered and cuffed at the bottom. It comes with several neckline and length options (including an ultra crop), and a super cute split banded bottom. The size chart suggested I should cut a size 8, but also suggested sizing down for less of a closer fit. So I sized down two sizes and cut a size 4 in the cropped length with the mid neck. This was another great PE pattern. I especially like the tips for gathering the sleeve and attaching the cuff. I will probably make more of these sweaters too in other fabrics with exactly this configuration, but may also try a longer length and the V-neck.

Bishop Sleeves

I’ve been seeing lots of bishop sleeves tops so I decided to make some using the Sinclair puffed sleeve add-on pack and the Sinclair Bondi classic fitted t-shirt patterns.

First I made bishop Bondi for myself using sangria microsuede jersey knit from Surge Fabrics. This is a soft polyester-spandex jersey knit with 50% horizontal and vertical stretch. It is not very thick, but it still has a warm, cozy feel to it on the inside. It was easy to work with a drapes very nicely but has a terrible tendency to be clingy. It behaved a little bit better after I sprayed it with anti-static spray, but it was still more clingy than I would like.

I made the Bondi in my usual 4P size with my usual hip adjustments and screwp neck. The bishop sleeves are cut wide at the wrist and gathered before attaching cuffs. I used a long stitch on my sewing machine and pulled the threads to gather. I sewed on the cuffs to the sleeve with my serger. This is not in the instructions, but I stretched the cuffs after they were sewn on to pop the gathering stitches and then pulled out the loose threads. I figured that would inevitably happen when I wore it so I might as well do it now and keep the cuffs nice and stretchy. I love both the look and the feel while wearing of bishop sleeve cuffs made from a folded piece of knit fabric.

I made the second bishop Bondi for my mother. I had extra ITY fabric from a Joanne dress I made last year with a beautiful blue swirly pattern that I love. My mother has commented multiple times how much she likes that fabric so I decided to use it to make her a top. This was the first top I sewed for her and I sewed it based on her measurements. She doesn’t live near me so I wasn’t able to check the fit until she tried it on later. She reports that it is very comfortable and the fit is perfect!

I was so happy with the way my mother’s bishop Bondi came out in ITY fabric that I decided to make myself one. I have a purple suit (I didn’t make it, but I bought it on sale from Banana Republic Factory and tailored the pants myself to fit better) and have been looking for a print blouse to wear with it. I scoured lots of online fabric stores for a nice ITY print with royal purple in it. I found this print at StylishFabric.com, an online fabric store I had not previously noticed. My bishop Bondi goes perfectly with my purple suit and is much more comfortable wear with a suit than a traditional woven, button-down blouse.

I love these bishop-sleeve tops and I’m sure there will be more! See also the Lakeisha top I made for my daughter, which has bishop sleeves too.

Cozy Quilted Soho Tunic With Pockets

A few weeks ago I made a Sinclair Soho dolman v-neck sweater from a marled dark green sweater knit. It was easy to make and super cozy. I’m wearing it a lot, but I have one complaint: I feel the sleeves attach at a rather awkward spot, which on me is too close to the elbow. I think the sleeves would look better and be more comfortable if they seam were moved up closer to the top or eliminated completely. So for my latest Soho I hacked the pattern a bit and extended the front and back bodice to include the sleeves. I basically just took the sleeve pattern piece, (digitally, in Affinity Designer) cut it in two and attached part of it to the front bodice and part to the back. I shortened the sleeves by .5 inch to account for not needing the seam allowance, and then I shortened them by another full inch because the Soho sleeves are a bit too long for me. I ended up cutting the two bodice pieces with attached sleeves on the fold, which I can do because I was using 58″ fabric and I’m a size 4p. So I just had a top-length front, back, neck band, bottom band, and pockets to cut. I cut the whole thing out of 1.5 yards of fabric.

I made a few other minor modifications to the pattern, including grading out the lower few inches of the bodice and extending the bottom band to be the same size as the bottom edge of the bodice so that the bottom of the sweater would be looser and not cling to my hips. I made the pockets about an inch deeper to make sure they would be deep enough for my phone and so that I could anchor the pockets in the seam attaching the bodice to the bottom band. (I usually don’t pass up any pocket opportunity and often add or enlarge pockets, but I didn’t include any pockets or bottom band on the green soho as I made that as a regular knit sweater top.)

I used the interwoven squares quilted knit fabric in the clematis color from Surge Fabric Shop. This is a 60% cotton, 35% polyester, 5% spandex knit with a cool pattern, reminiscent of the tumbling blocks quilting pattern, that looks like interwoven 3D cubes (or just a bunch of upside-down or right-side Ys depending on how you orient it). I love the fabric, but it wasn’t quite what I expected when I ordered it online. Based on the photos on the Surge website, I was expecting a brighter, pinker purple, similar to the boots I’m wearing in the photo. In reality, the color is more of a dusty violet. In fact, it almost exactly matches the grape brushed sweater knit I also bought from Surge. (To be fair, this is a tricky color to photograph in indoor light. My initial indoor iphone photos of this fabric looked very pink and I had to futz with the color in my photo editor to get an accurate representation. The color looks more accurate in my outdoor photos, which I did not color correct at all.)

I also didn’t fully understand that the fabric is actually quilted. I was assuming it was a quilted look, but actually it is three layers of fabric joined together. The top layer is where all or most of the cotton is, and it feels very soft. The bottom layer is a smooth polyester, and the middle layer is a fluffy polyester that looks dark purple like quilt batting. The result is a very warm and snuggly fabric on the outside that is fairly smooth on the inside. However, I did not realize that when I cut it, purple fuzz would start to seep out of all the cut edges. It’s not a huge problem, but it does mean you should be prepared to cut away fuzz balls as you sew and fold under or overcast all of the raw edges.

The end result is soft and cozy and looks great. The v-neck looks awesome and the pockets and band look pretty good. The fabric is heavy enough that there is no way to make the pockets completely invisible, but with the understitching, they tuck in pretty well and don’t look bulky, even when I put stuff in them. I felt pretty warm wearing this outside over a cotton t-shirt on a chilly winter day while my photographer was bundled up in a parka.