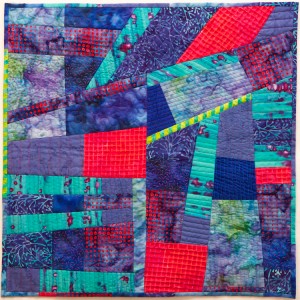
Finished! While waiting for the storm to pass this afternoon I put the last few stitches into my first sabbatical quilt, and called it done. “Improv Quilt #2” is (obviously) the second in my series of quilts that take more of an improvisational approach than I’m used to.
 I have experimented with a lot of quilting techniques, but most of the quilts I have made were fairly well planned out before I ever started cutting any fabric. Indeed, many of my quilts have been drawn out in great detail in PowerPoint (because it is fast and easy to change color schemes), or sketched in pencil and all the pieces enlarged and traced onto fabric. I like having the ability to experiment with color and design before I “commit,” but it does make the sewing process less interesting because most of the design decisions have already been made. Piecing becomes just a mechanical process, and I start fixating on all the flaws: the corners that don’t quite meet, the squares that aren’t quite square, all the ways the finished quilt deviates from the plan. I’m not quite patient enough to take the time necessary to get everything perfectly lined up, although sometimes I rip out the flawed seams and try again.
So two years ago I decided to try being more improvisational in my quilting. In “2hip 2b square” I made freezer paper templates from an enlarged pencil sketch. But I selected the fabric as I went and pieced it without a guide before trimming it to match the templates. It was a transition piece for me: I was able to hold onto my templates, but still save many design decisions to be made while piecing.
Last year I decided to take improvising a step further when I started the improv quilt series with “Improv Quilt #1.” For this quilt, the only planning I did in advance was selecting the 10 “sunset-colored” fabrics. I made up the rules that all shapes had to be convex quadrilaterals and two shapes from the same fabric could not touch each other. So, basically all the shapes had to be four-sided boxes, but the sides did not have to be parallel. I cut and sewed, and cut up what I sewed, and sewed more things to it. And eventually the pieces got to about the right size so I trimmed them a bit so I could sew them together and the whole thing would fit into a square.
I enjoyed the improv technique and decided to try it again in a different color scheme. This quilt was designed around the blue batik fabric with the red dots. I selected 7 other fabrics from my stash that would collectively complement the red dot fabric. As it turns out, I selected all batiks except for some blue silk, which adds a bit of actual texture (the batiks all have a lot of visual texture). And I used the same rules as before and started sewing and cutting, but this time on the old Pfaff sewing machine I borrowed for the STUDIO. This project also served as a warm-up to get used to sewing on the Pfaff. Part way through I decided I needed more contrast so I added just one little strip of the yellow and green striped fabric.
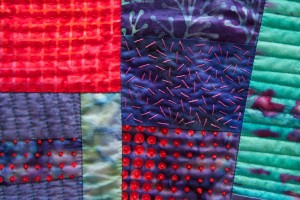
Once the quilt top was pieced I started machine quilting lots of parallel lines on the Pfaff. While it is inferior to my Bernina in many ways, the Pfaff’s dual feed foot is actually a really nice feature, and perhaps better than the walking feet used on most other sewing machines to sew multiple thick layers without the layers shifting or bunching up. But as much fun as I was having sewing straight lines, the red dot fabric was posing a dilemma. I didn’t really want to sew lines through those dots.
 I went to a lecture by fiber artist Susan Brandeis, and was intrigued by her non-traditional techniques. She had brought several small pieces that were quilted with embroidery stitches. So the next day I watched a Youtube video on how to make French knots and then made a few rows of French knots in red perl cotton in the center of the red dots. My original plan was to make some French knots here and there, but I really liked to effect and making knots was somehow kind of addicting. So I started making more knots, and more, and more. And eventually every red dot in that quilt had a knot in its center. It creates a beautiful texture, and everyone who sees it seems to want to touch it. I used more red perl cotton to add texture to the red shapes with running stitches, placed strategically to match the grid design in the fabric. And I used purple perl cotton to add a stippled pattern to some of the blue shapes. I took the quilt home and did some free motion quilting on my Bernina before finishing off the last few shapes with more parallel lines. There a couple of shapes left unquilted to provide some contrast. This quilt has lots of texture, both visual and physical.
Usually I select one fabric for a double-fold French binding. But I couldn’t decide which fabric to use for the binding. I wanted more yellow/green, but thought outlining the whole quilt in it would be too much. So I opted for a binding pieced from leftover scraps of the fabrics in the quilt. I had a slight mishap when one of the seams ended up exactly in one of the corners, rendering it impossible to achieve a smooth mitered corner. I had to undo a couple of inches on either side of the corner and surgically splice in another piece of fabric after the rest of the binding was already attached (yes, this must be why I usually don’t piece bindings). Once the binding was attached I added hanging sleeves to the back, and then done! Another successful improv quilt.
As I was working on this quilt, I also realized how well it goes with the tiles I recently picked out for my kitchen renovation… perhaps I will hang it in the kitchen.
