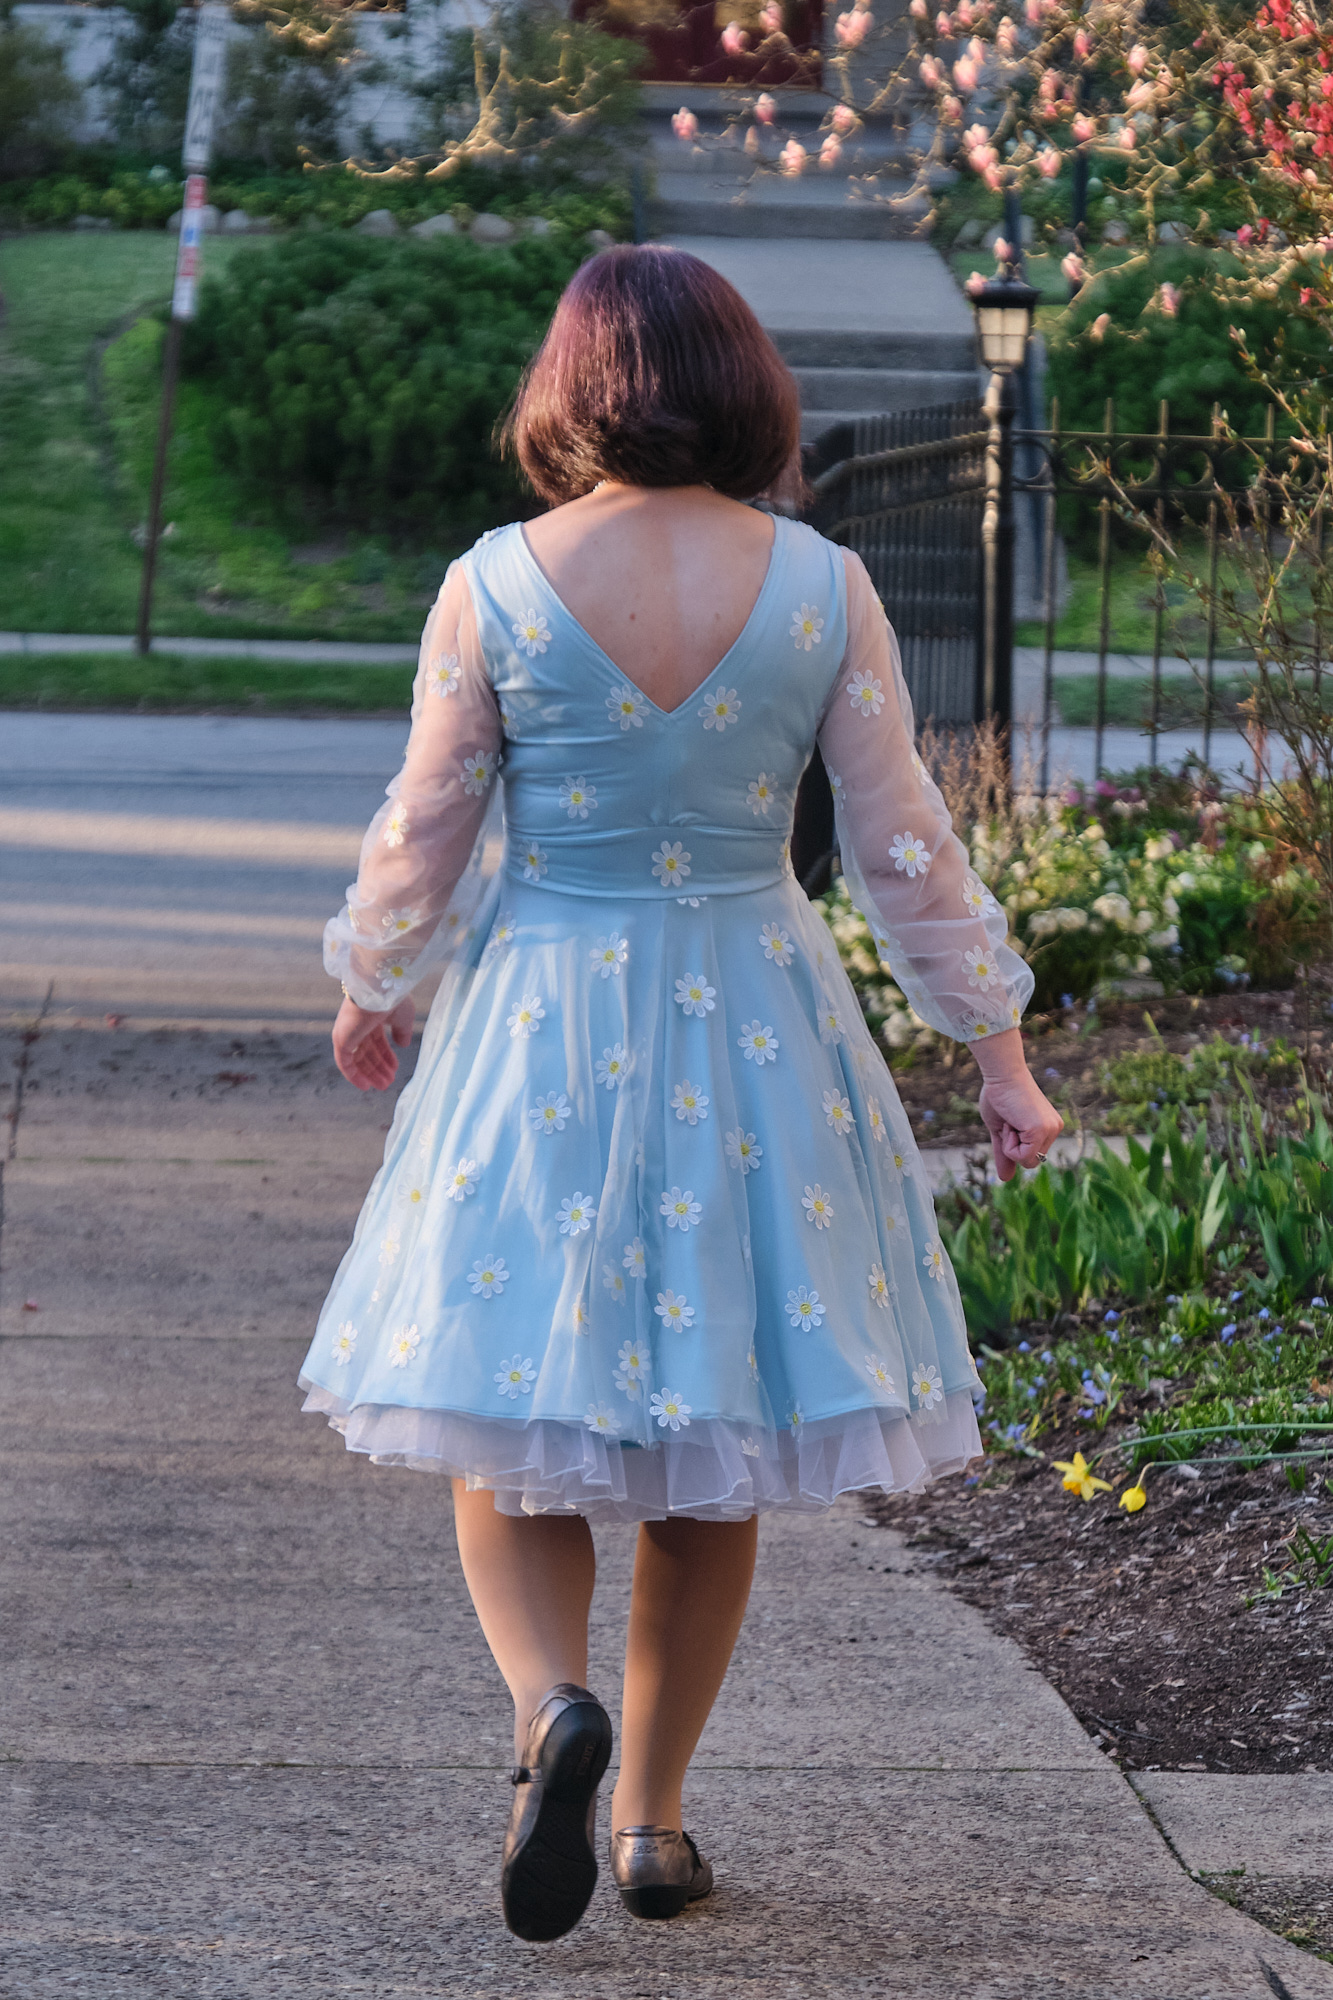
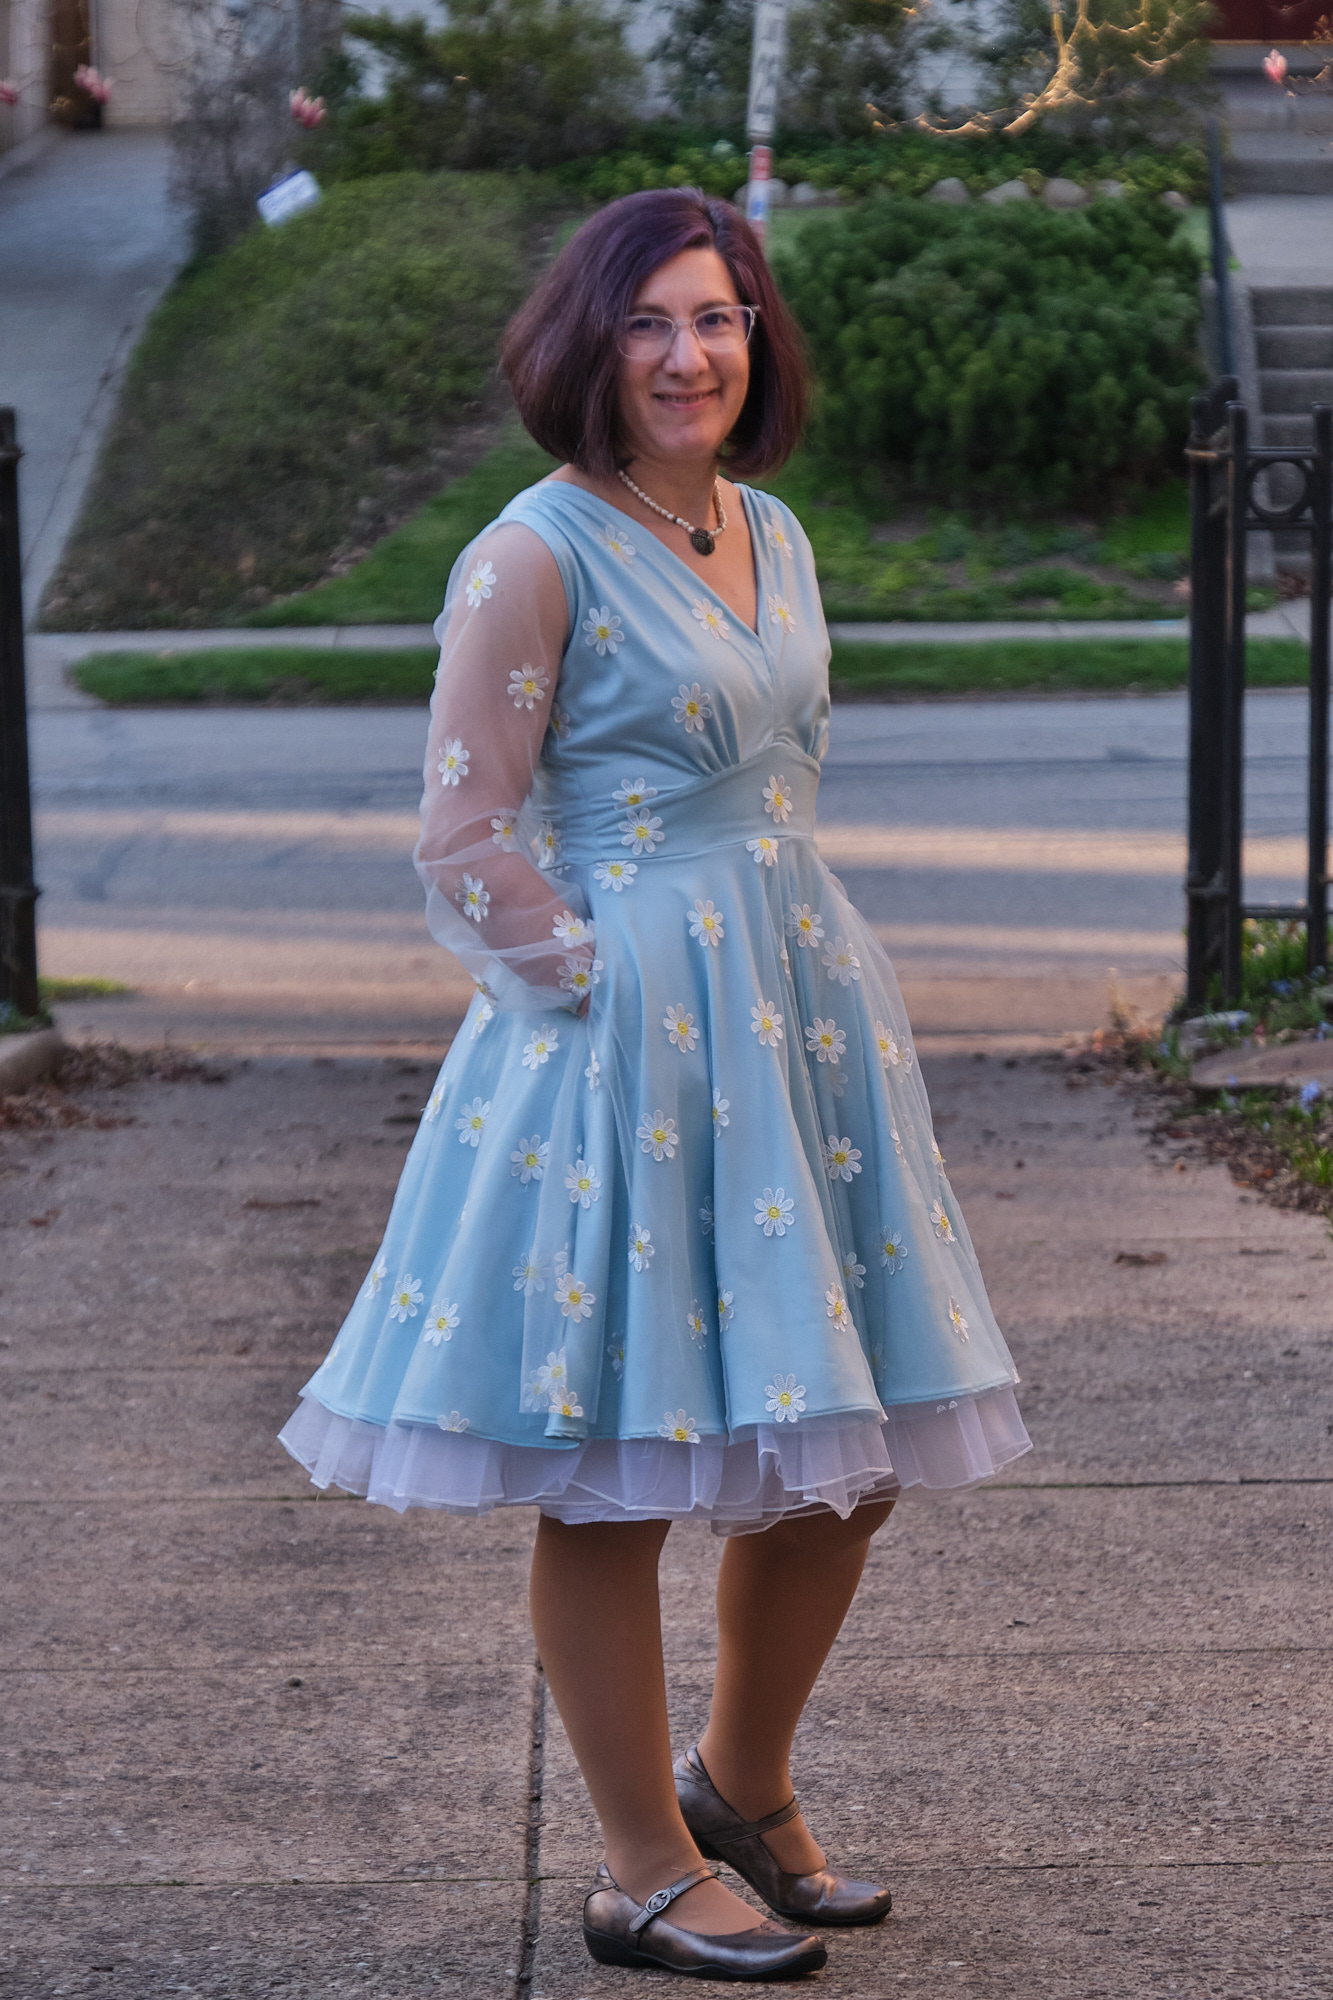
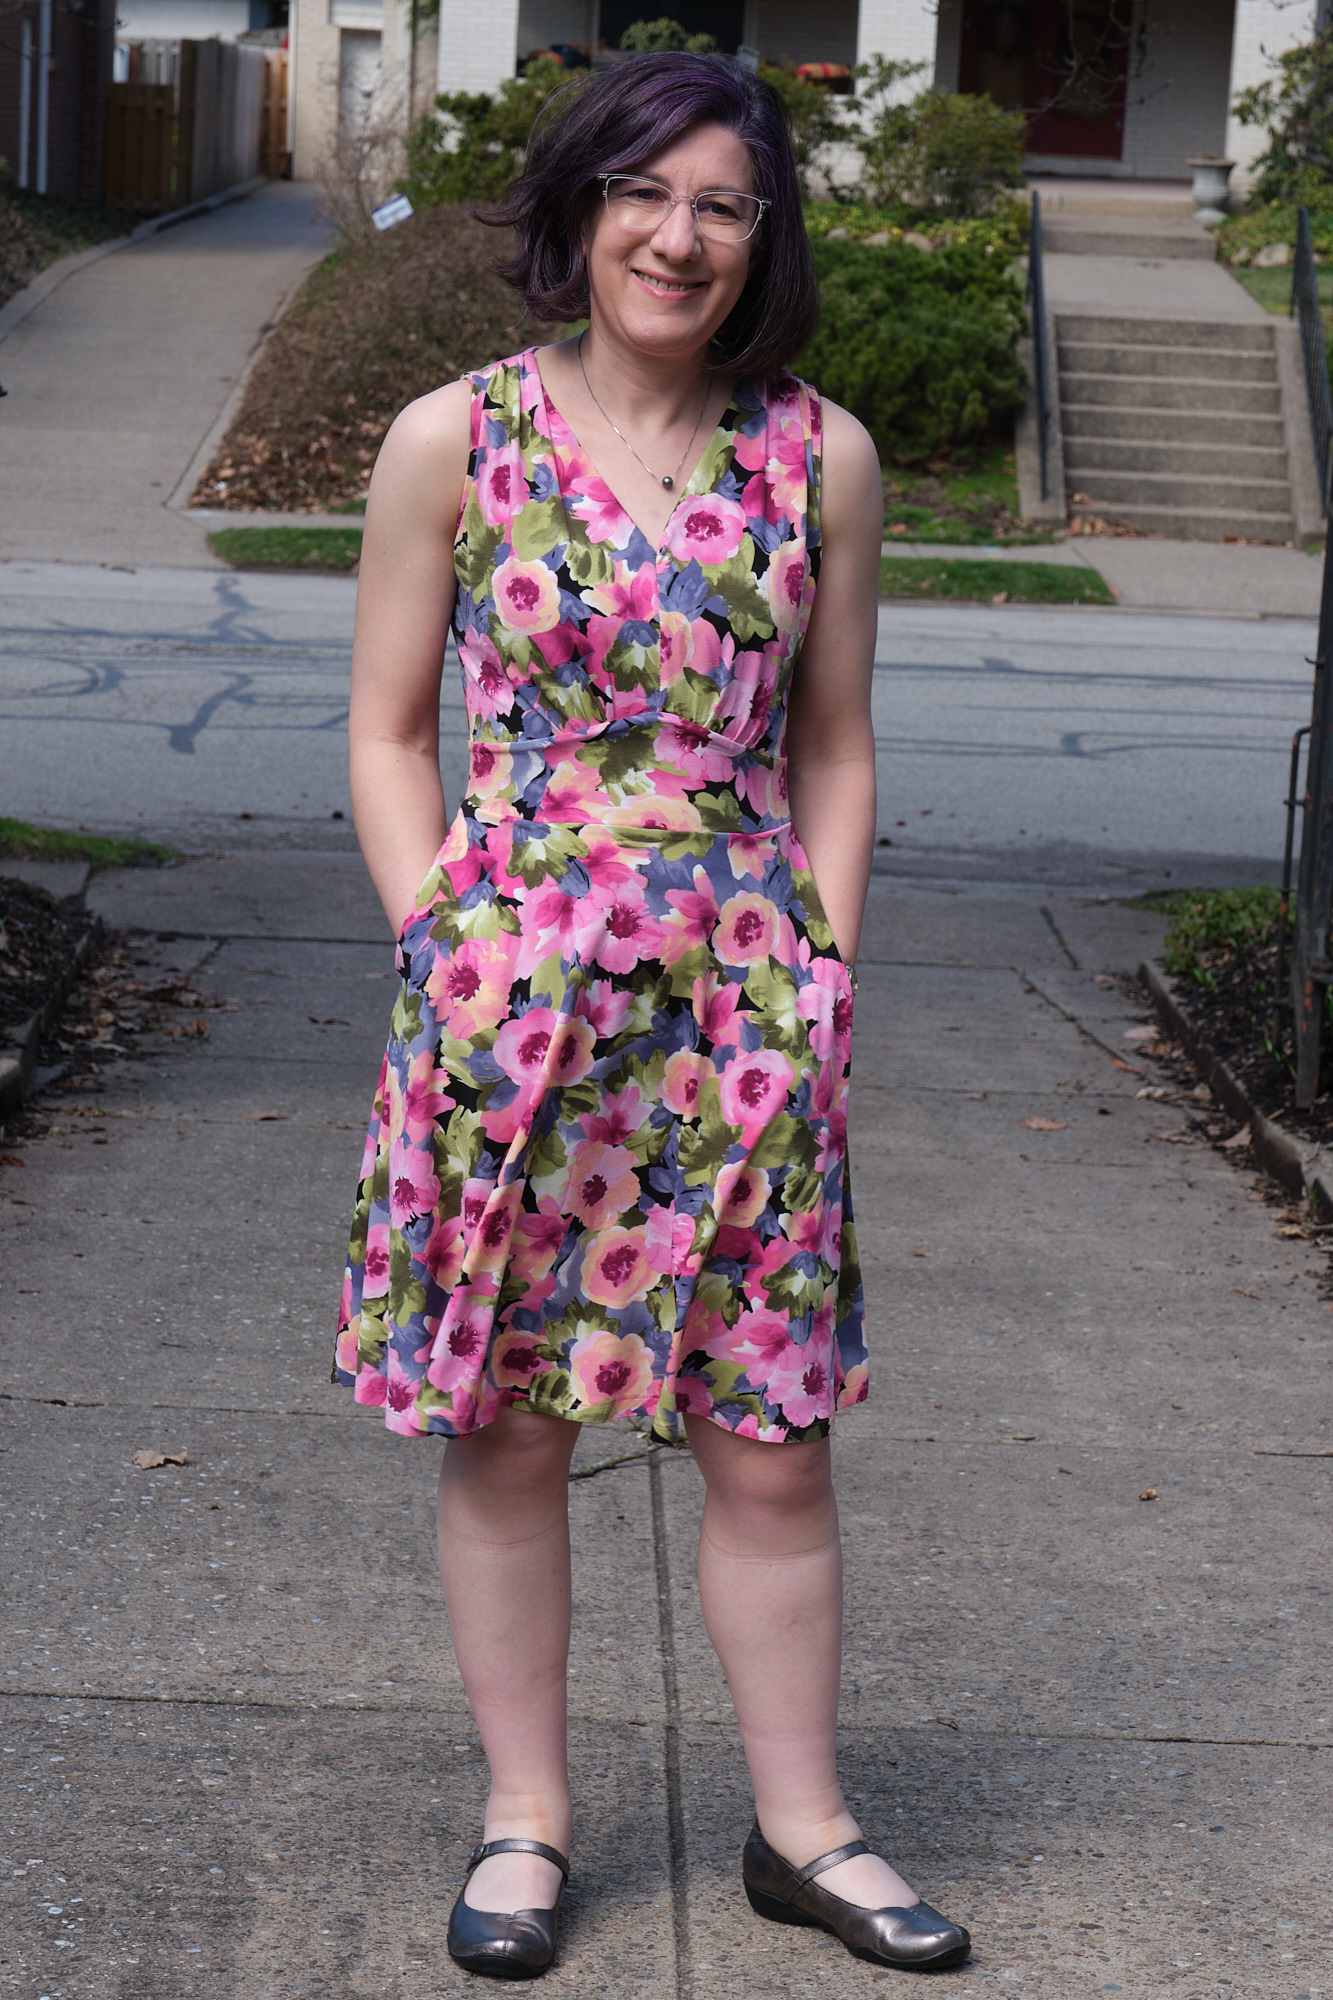
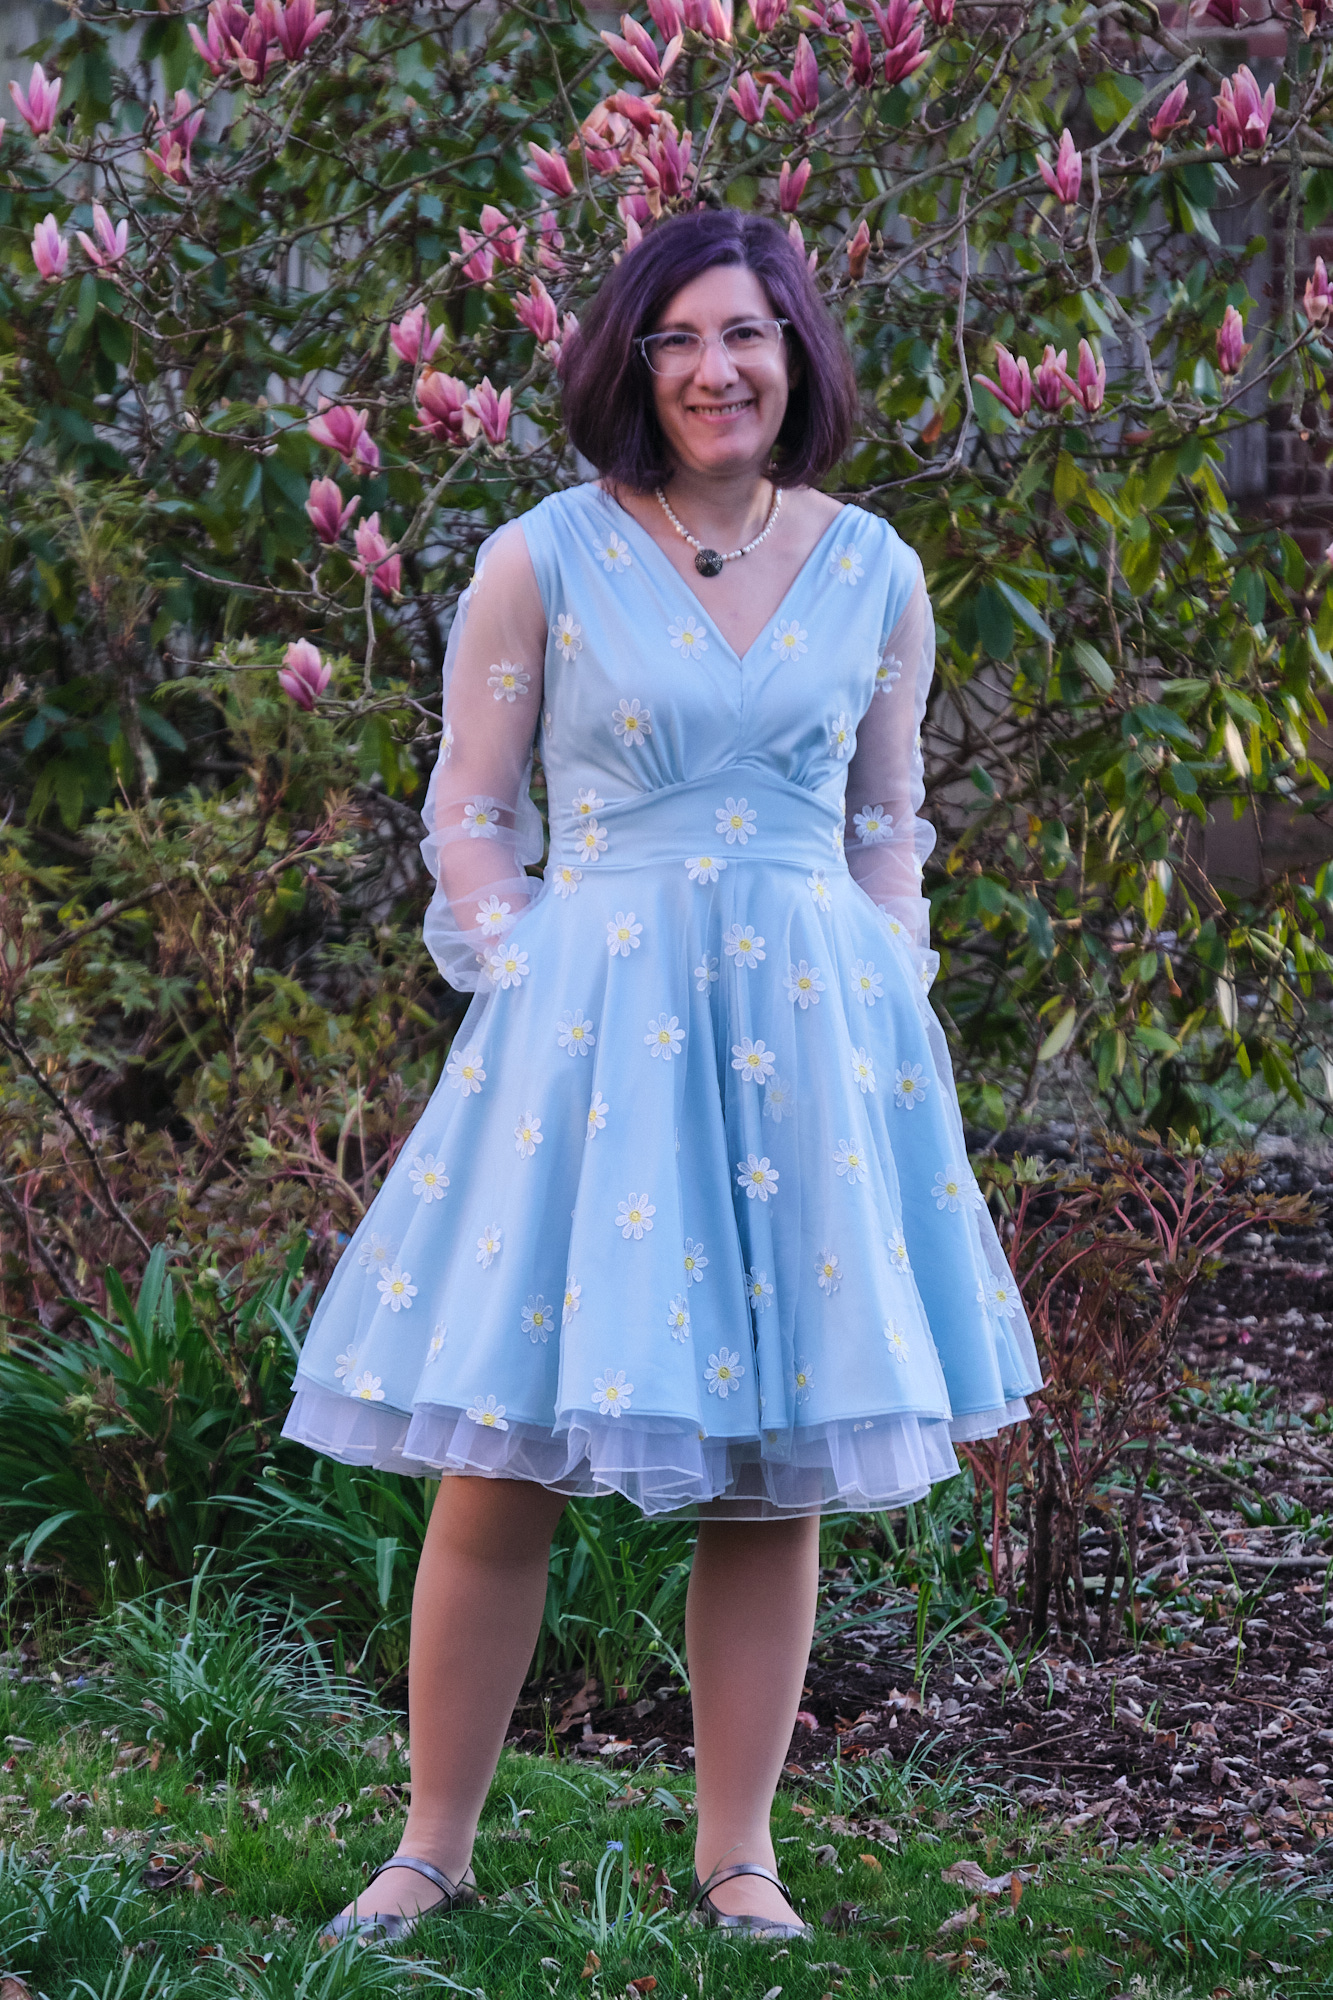
Having selected the Sinclair Yasmin pattern to modify for the prom dress and prototyped bodice modifications, my next step was to prototype with a tulle overlay and sleeves, and a full circle skirt. Since the floor-length gown version will require a lot of fabric and I fear I won’t get it right the first time, I decided to prototype a knee-length dress with some inexpensive blue daisy embroidered tulle on Etsy and matching blue nylon spandex for the lining (tranquil aqua 82% nylon, 18% spandex, 210 GSM stretch bodycon satin from Zelouf Fabrics).
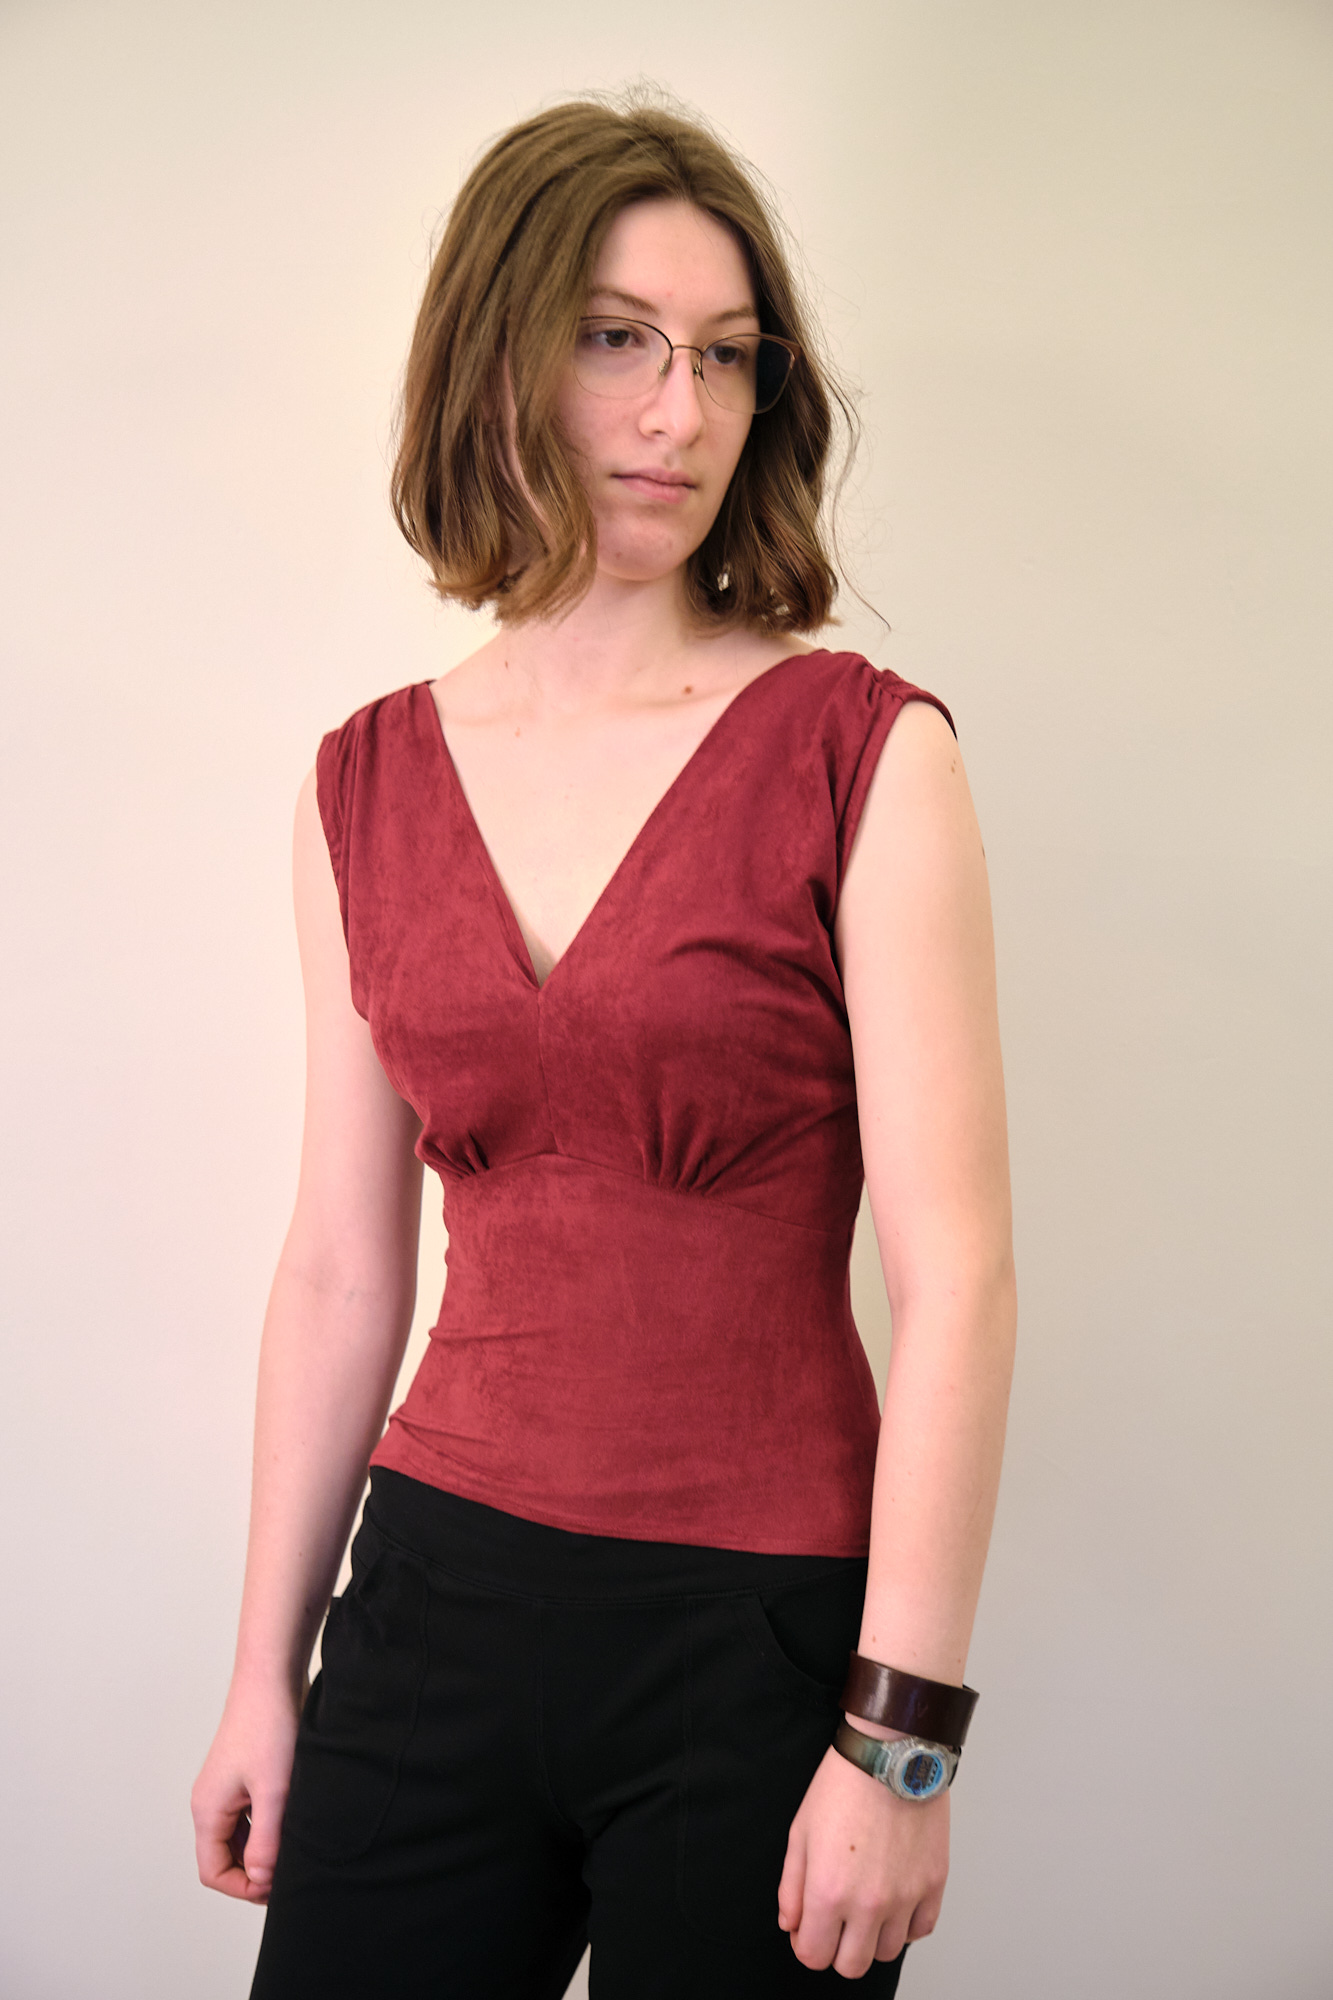
I modified the bodice pattern using the same approach I used for my daughter’s top to add deep front and back Vs. Then I mashed the Yasmin sleeve with the bishop sleeve pattern from the Sinclair puffed sleeve add-on pack so that the puffed sleeves would fit the Yasmin armscye. I used the full skirt pattern (with pockets!) from the Sinclair flared skirt add-on pack for the Valley Skater Dress. I prepared all the pattern pieces in Affinity Designer and projected them onto the tulle and lining fabric. In total I cut 16 pieces from the lining fabric and 12 pieces from the tulle fabric (but who’s counting?).
I wanted to attach the tulle to the corresponding lining pieces for all the bodice pieces so I could treat them each as one unit. My original plan was to do this with my serger (and I even rethreaded it with a suitable light grey thread), but I found the serger stitching a bit bulky for this purpose. Instead I used a zigzag stitch on my regular sewing machine to prepare the lining-tulle units. In the end I sewed the whole dress with my sewing machine and did not use my serger at all. I think I could have used it to join the 4 pieces of the lining for the circle skirt, and when I sew the full-length skirt for the prom dress I may go ahead and do that.
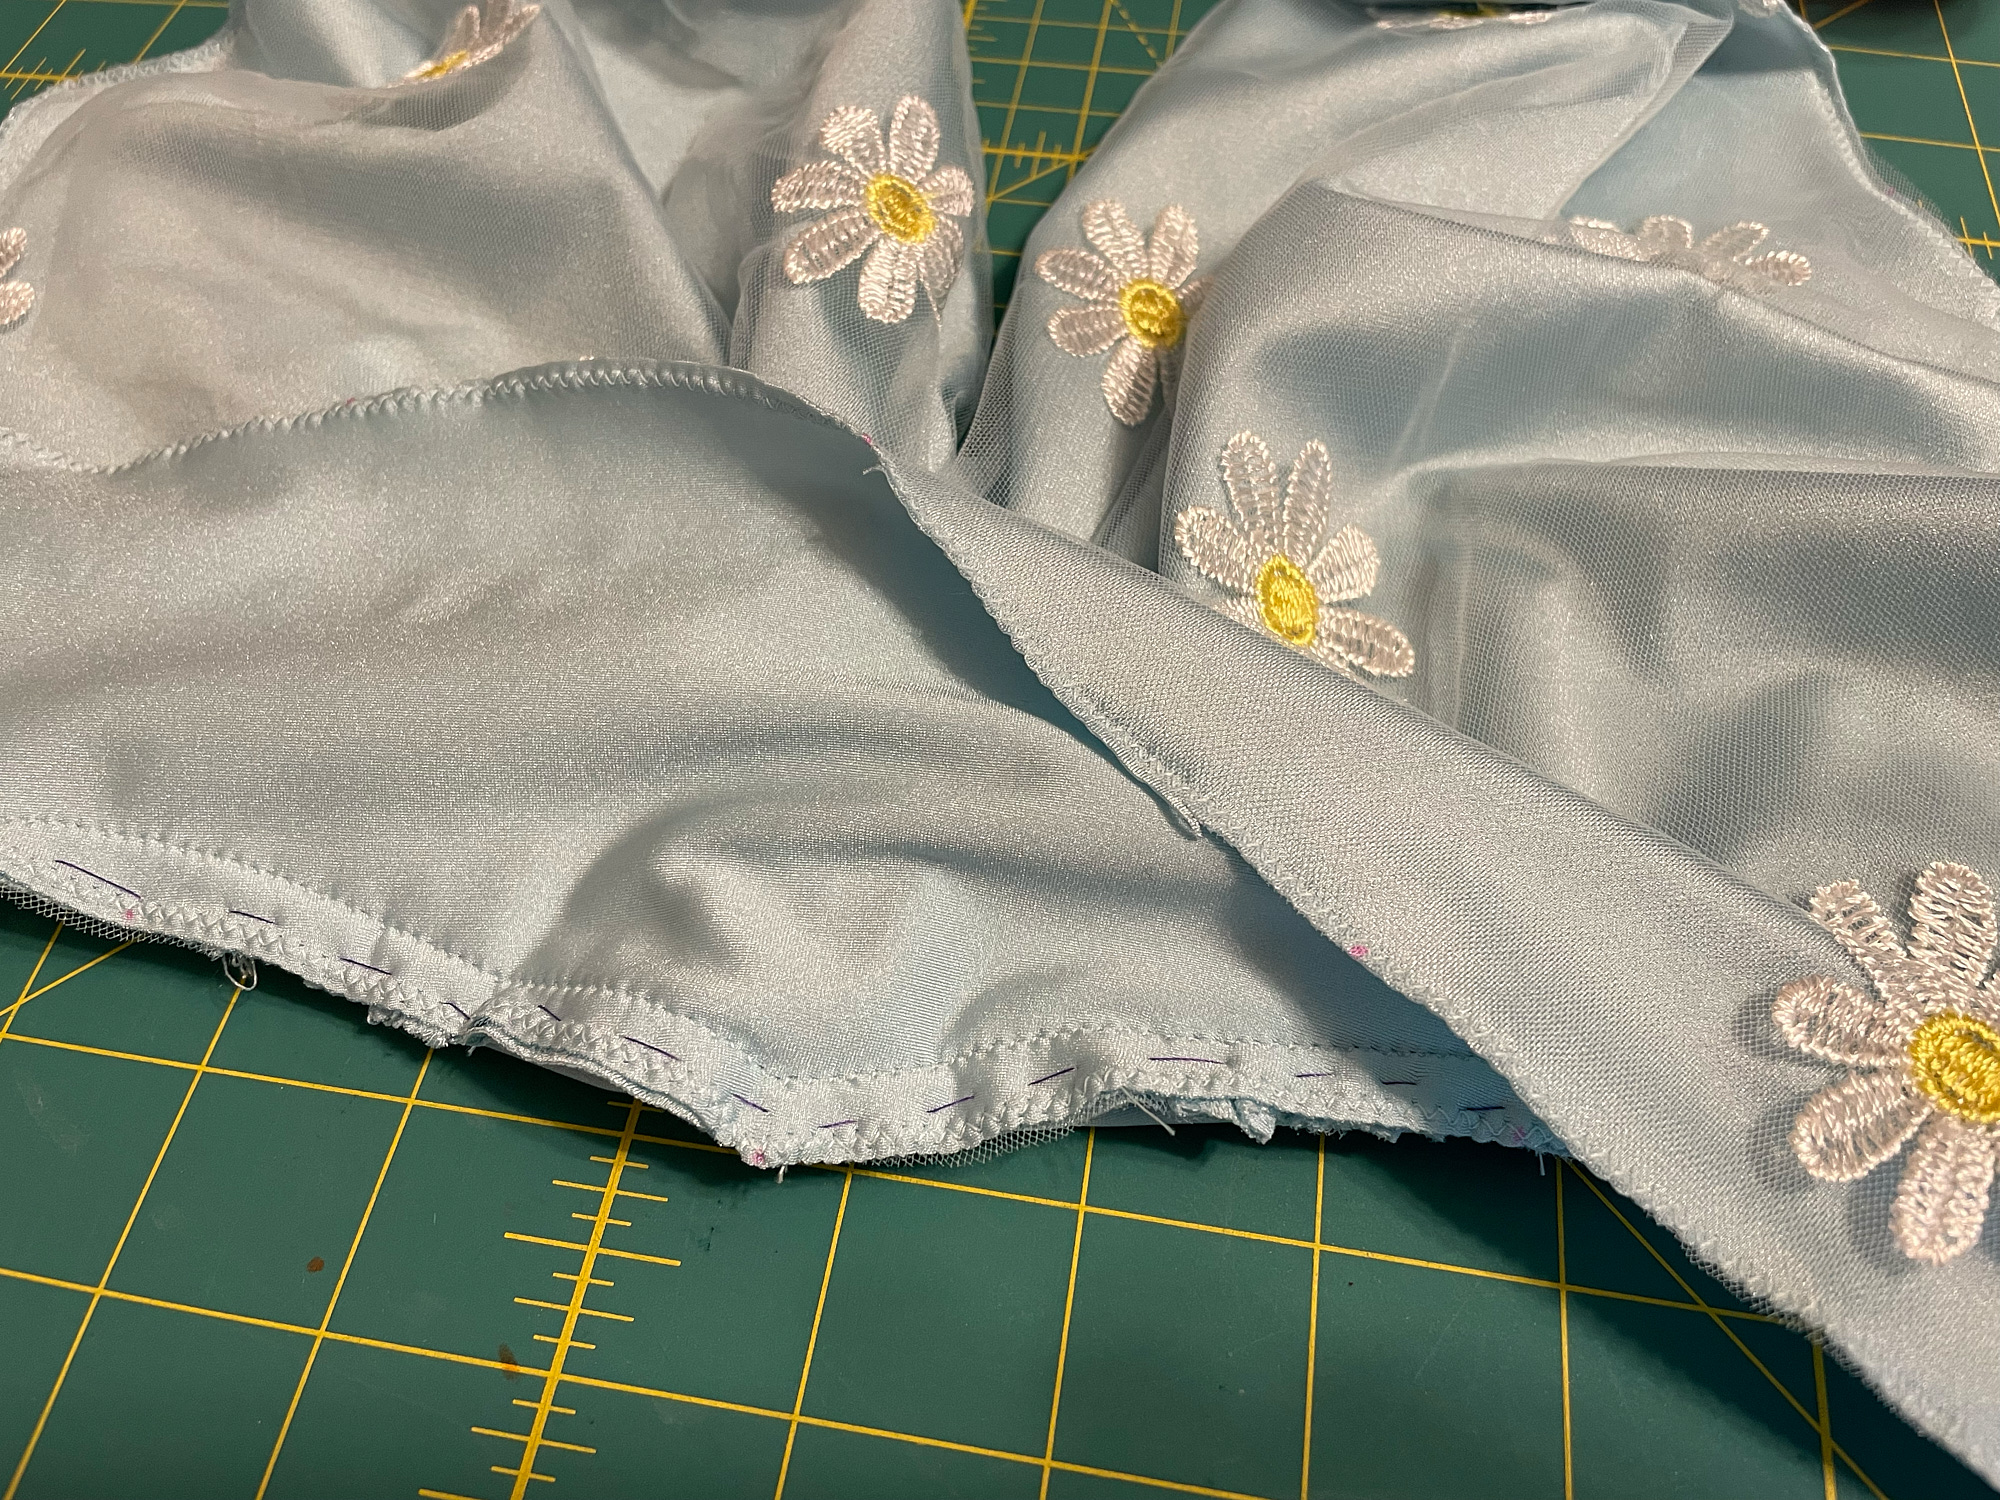
Once I had the lining-tulle units prepared, I worked on creating the micro pleats in the bodice. It wasn’t as hard as I thought it might be with the units properly joined. I did use scotch tape to hold down both sides of the pleats. I had marked the dots for pleating with a pink washable Crayola marker, and some of them are just barely still visible on the finished dress. Next time I will mark them closer to the edge to avoid that problem.
Next I sewed the bodice together, carefully wrapping both sides of the shoulder seams. I hand basted the waistband to the bodice to keep all the pieces aligned. Even so, the point in the center front did not come out very sharp and I ended up redoing it. Actually, that point did not come out particularly sharp in my previous practice pieces either. I found that if I sewed one side of the V all the way to the edge and then sewed the other side, it was easier to get a sharp point than if I sewed it all in one line with a pivot at the point. Someone probably has pointers on how to do this better than I did.
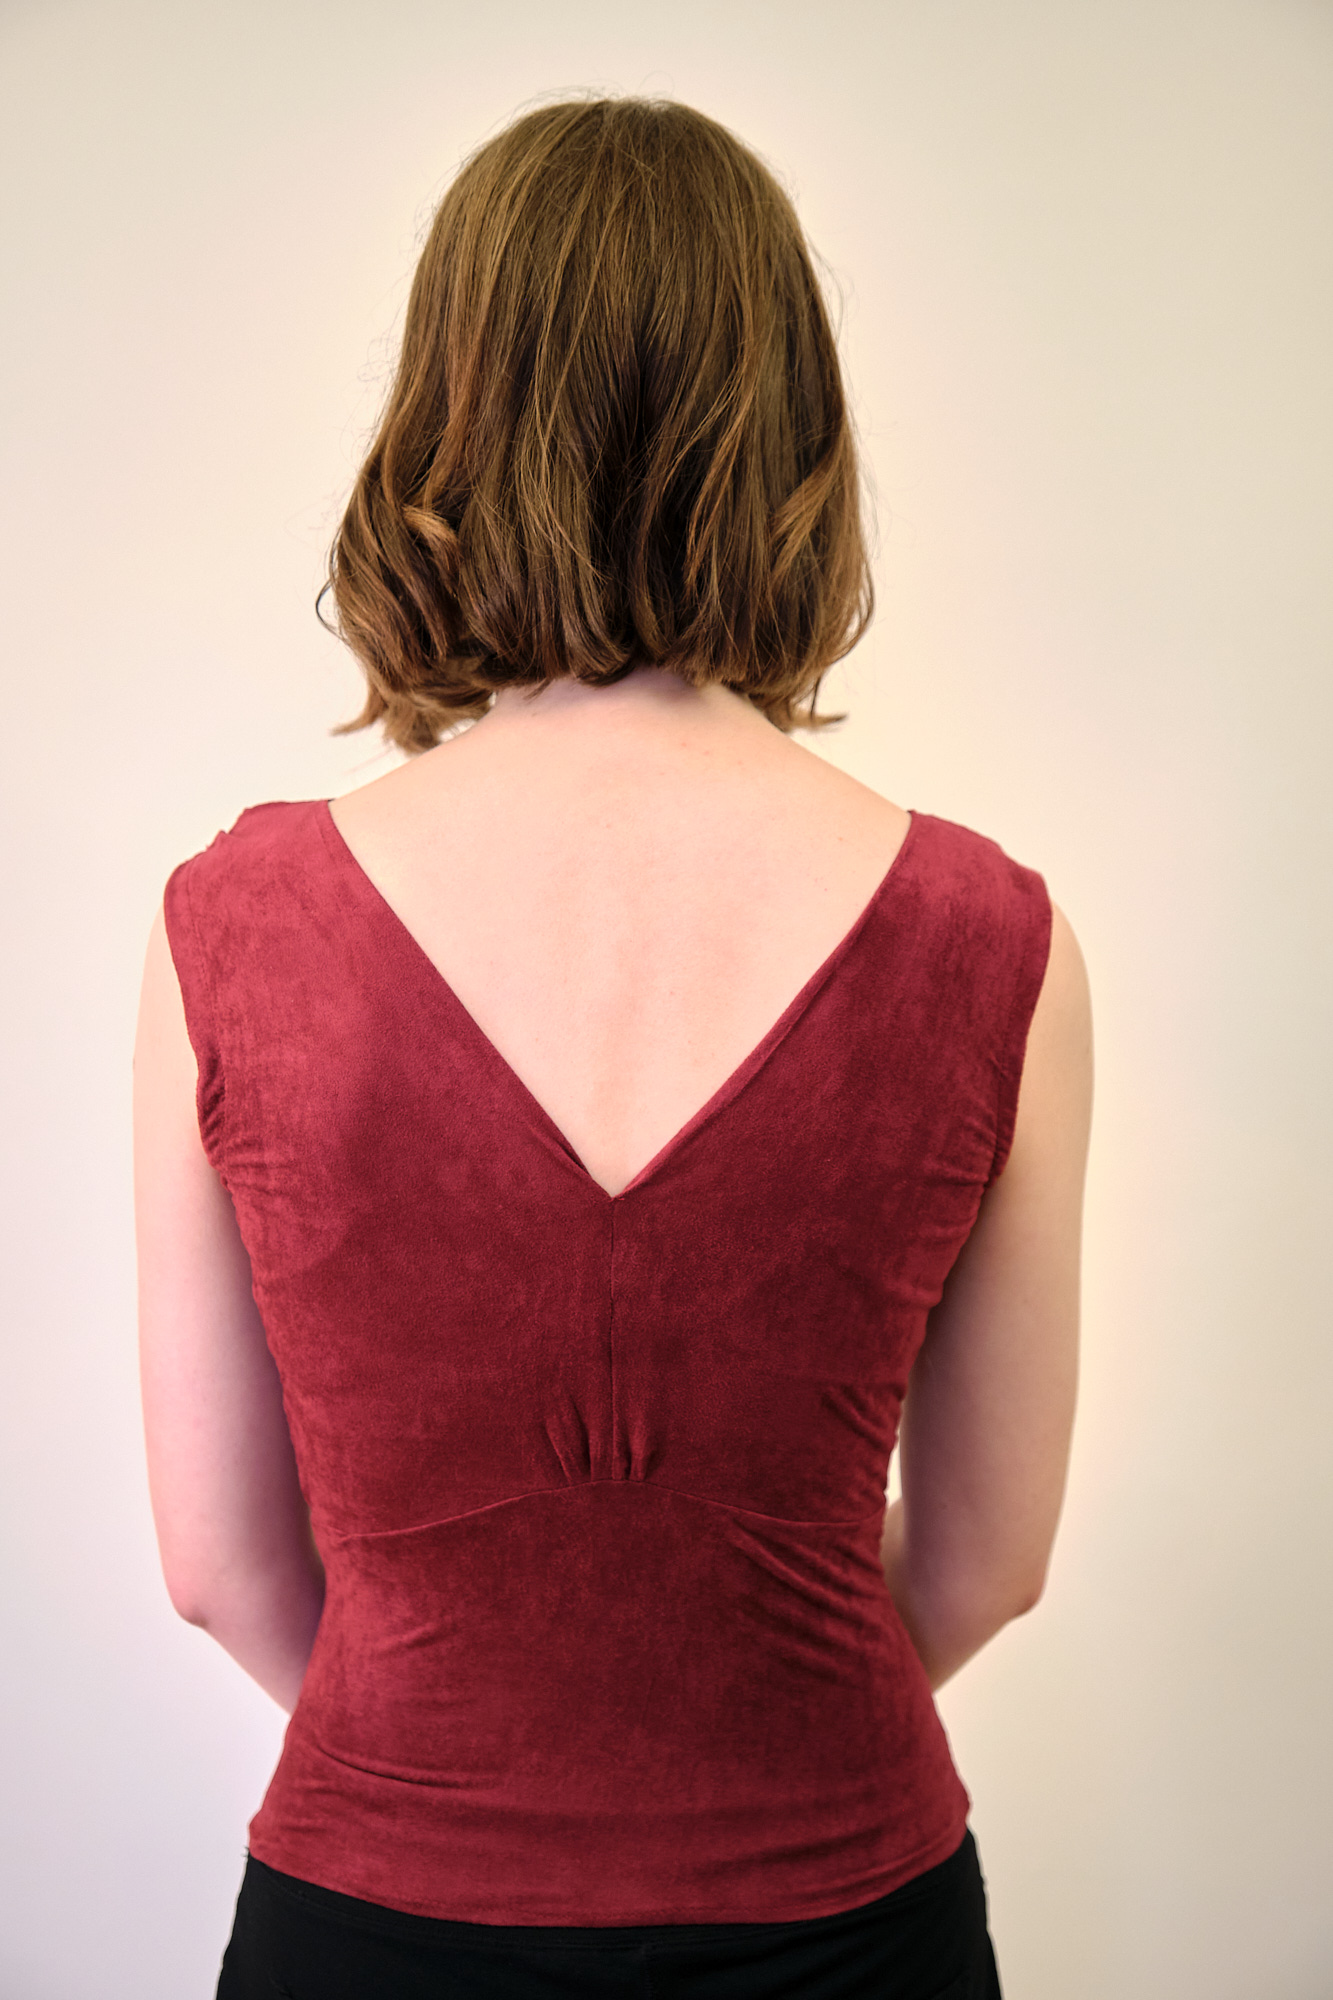
Once the bodice was fully assembled, I tried it on with some trepidation, as I wasn’t entirely sure it would fit. While the lining is a nice 4-way stretch fabric, the tulle only stretches side-to-side (horizontally the way I cut the bodice), and not nearly as much as the lining. Thankfully, I was able to get the bodice on (and off), but it was a bit tight and suffered a bit from not having any real vertical give. This wasn’t so noticeable in the front due to all the pleating, but the back had numerous creases and pulled against the back of my bra in an undesirable way. I also wasn’t entirely happy with the way the back V folded under without quite laying flat; again, the front V worked fine.
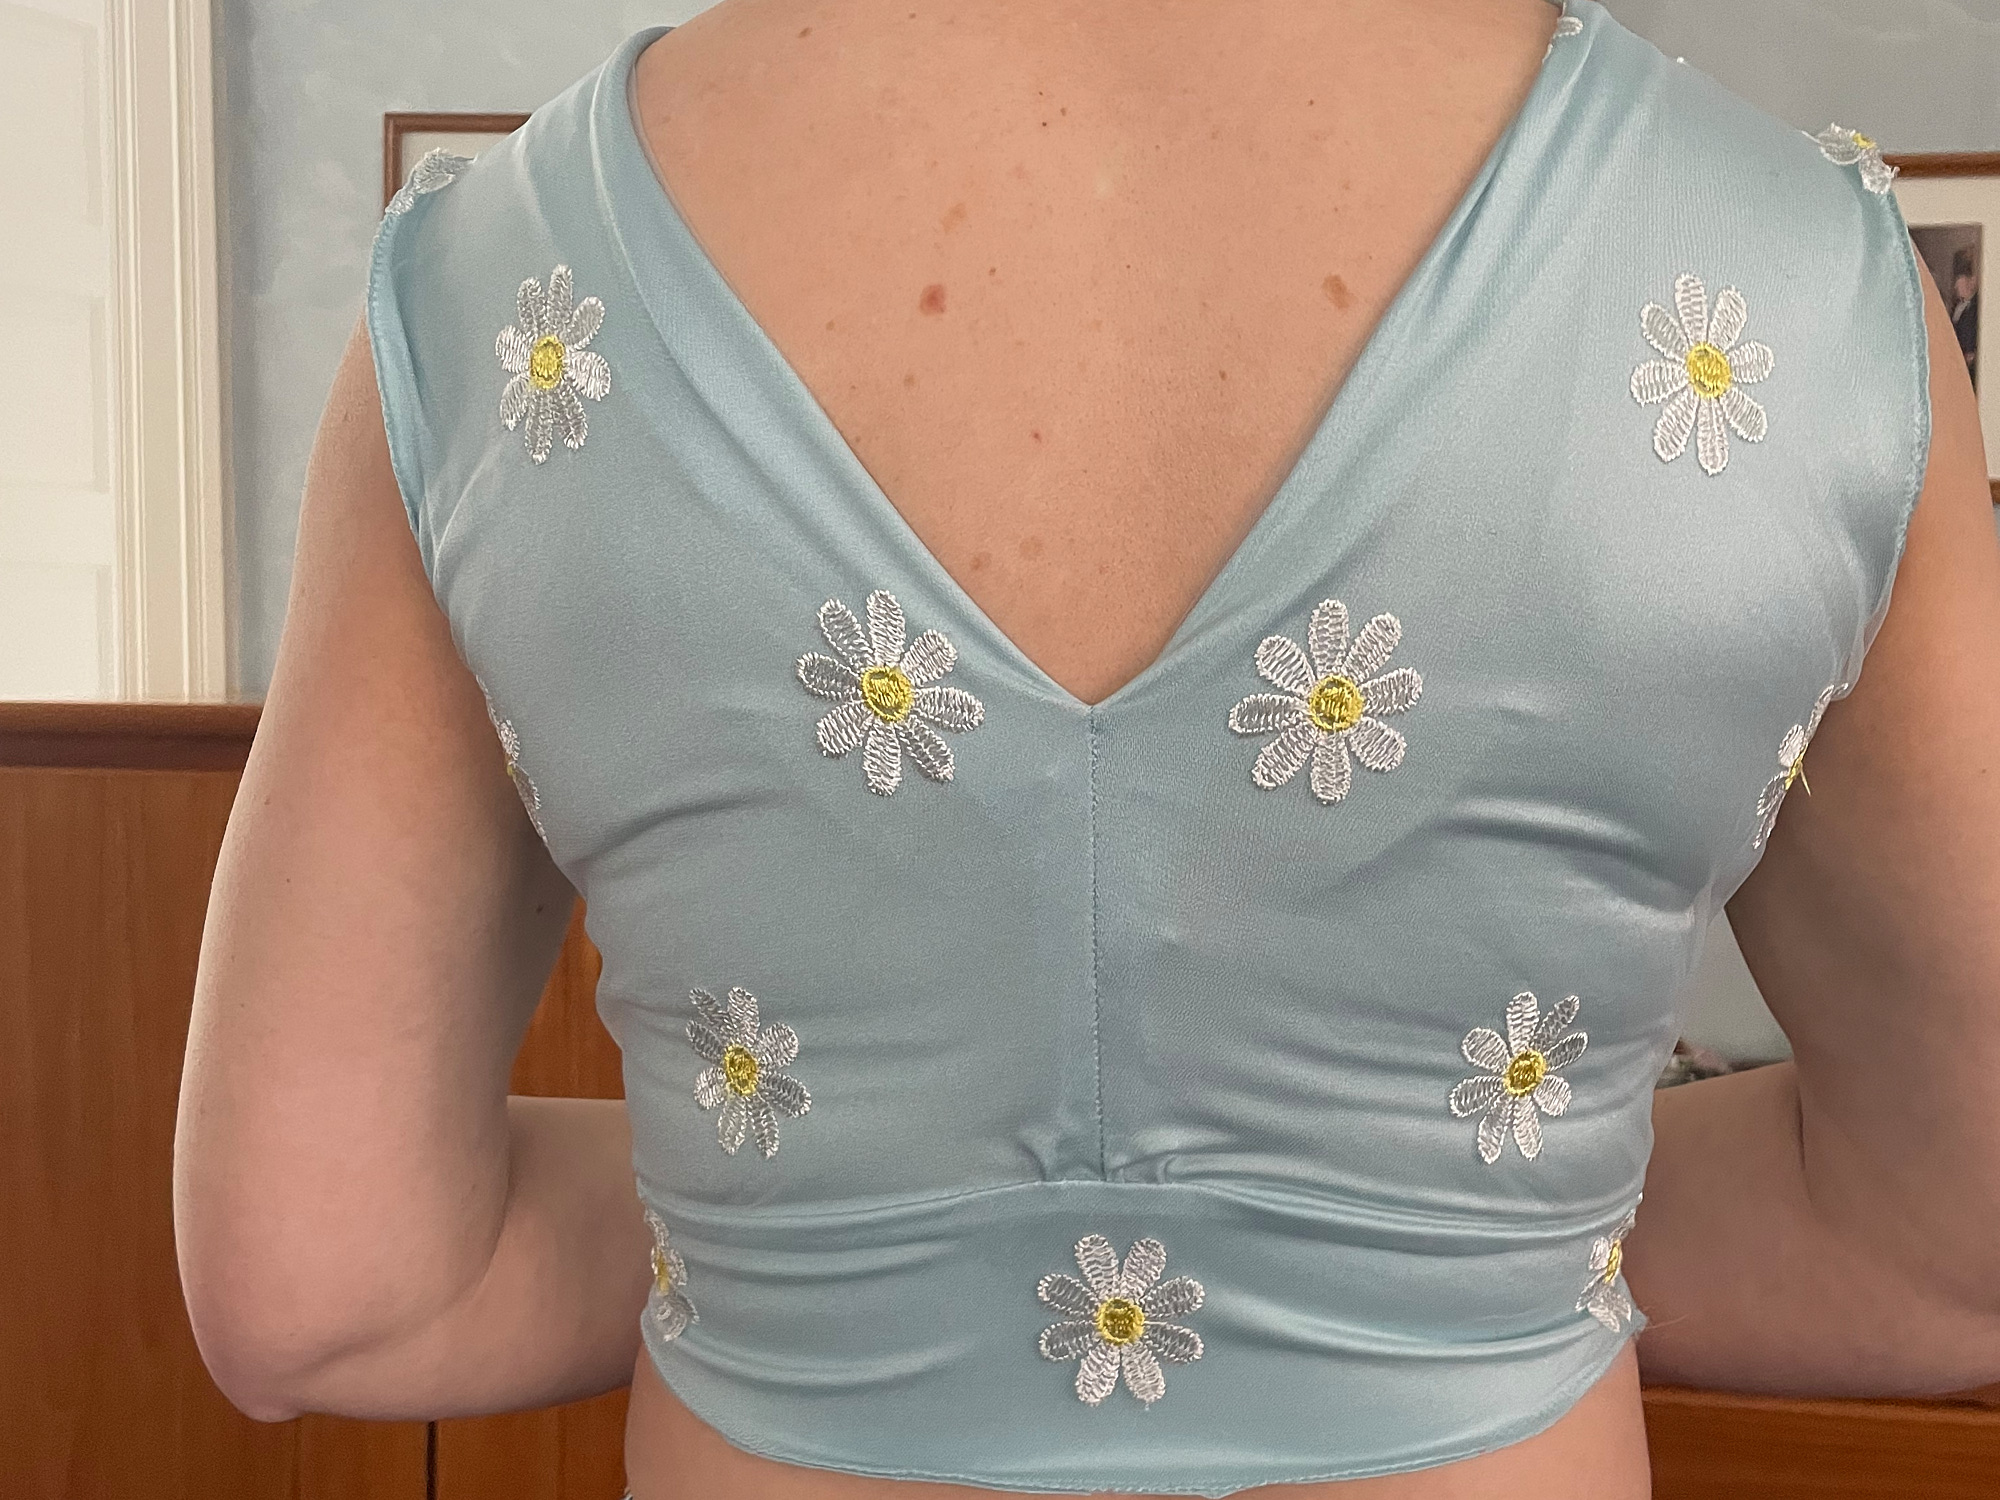
I decided to unpick the side seams and add a resew with a wedge of fabric inserted. I experimented with different size and shapes of fabric based in. Eventually I settled on adding about a 1.25 inch wedge on each side at the bottom of the waistband that tapered to nothing when it reached the armscye. I cut the wedges from the lining, layered them with the tulle, and reassembled the bodice (you can see the wedge below the armpit in the finished dress). I will add a bit extra to the side seam of the front and back bodice on my daughter’s dress, baste the side seams, and adjust until I get it right. Even after adding the wedge, I still wasn’t fully happy with the when the back V was folded, but decided to hold off on further modifications until I attached the skirt, as I expected the weight of the skirt to pull the bodice down a bit.
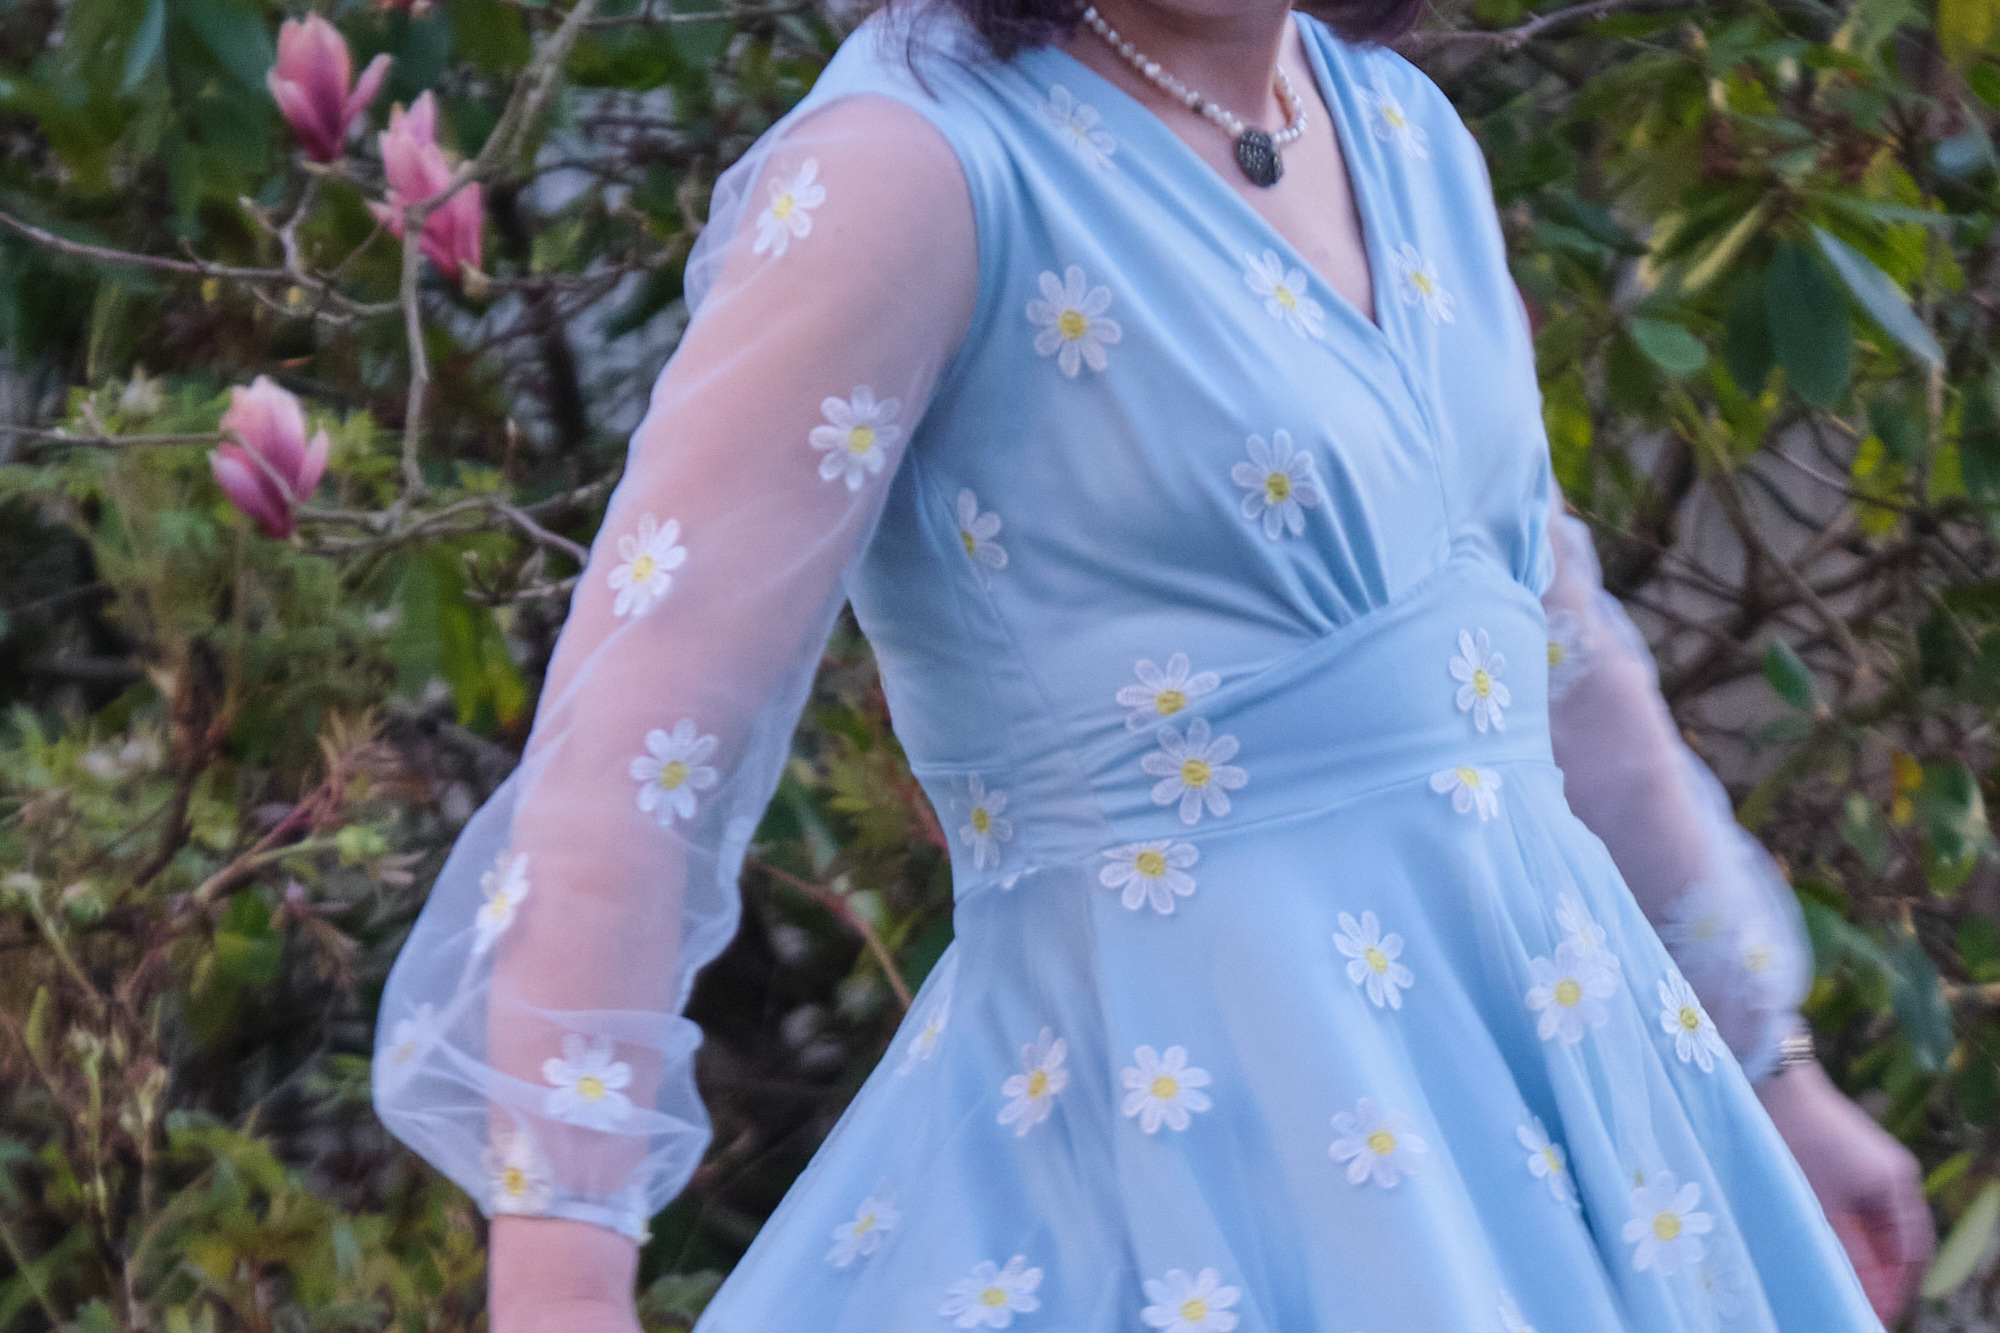
I moved on to the sleeves. I sewed the long seam of the tulle sleeves and then basted and sewed the sleeves to the armscyes. I then folded the sleeve wrists under about half an inch and stitched down a casing, leaving a small opening to add 1/4-inch elastic. It all worked out fine, but as soon as I finished the sleeves I could see that they were not as big and puffy as my daughter wanted. I’m happy with them on my dress, but I will need to go much bigger on my daughter’s dress. I tried on the bodice to confirm that the sleeves fit and that I could still get the bodice on and off without ripping anything. This was not too difficult as long as I took it off by slipping my arms out of the sleeves and then dropping the bodice past my hips rather than trying to pull it over my head.
Next I worked on the skirt. I had cut the full-circle skirt in four sections with pockets in the lining. I attached the pockets flush with the top of the skirt, understitched the pockets and stitched the top and bottom of the pockets into the side seam with pocket openings from 1.5 inch to 7 inches. Once the lining was assembled into a complete skirt, I assembled the four tulle sections, stitching with a narrow zigzag stitch. I did not add tulle pockets, but left slits to match the pocket openings in the lining, as I have seen with some ready-to-wear dresses. Next I machine basted the tulle to the lining at the top of the skirt, and then hand basted the skirt to the waistband. I tried it on and everything seemed to have worked, so I went ahead and sewed the skirt to the waistband with a zigzag stitch.
The moment of truth: I tried on the whole dress… and it fit! And it mostly looked good, but I still wasn’t happy with the back V. I futzed with the folds on the back V a bit and top-stitched the V along the edge. I still wasn’t entirely happy with it so I trimmed the underfold of the V down to about half an inch and then added another row of top stitching at 3/8 inch. This resulted in a much cleaner finish. I plan to modify the pattern for my daughter’s dress to use this approach from the beginning.
The last step was the hem. A full-circle skirt involves a lot of hemming (and usually a lot of hem tape). There are multiple techniques for doing this, which all require multiple passes with a sewing machine or iron. The lining fabric doesn’t unravel or roll so I could have left it unhemmed but hemming gives a nicer finish. I decided to invest in a folded hem foot (Bernina 66 foot) to do the hem in just one pass. It took some practice to learn how to use my new foot, but once I got going I did the whole hem in about 45 minutes without using any hem tape. I expect without the hem foot it would have taken a couple of hours. As the full-length skirt on the prom dress has an even bigger circumference, this approach will save even more time. I did not hem the tulle as that seemed completely unnecessary.
The dress looked great on, and with its 50s vintage vibe, I decided it totally needed a crinoline. (I also love that I achieved a vintage look with modern spandex fabric and thus no need for a zipper or fasteners of any sort). I tried it with my daughter’s short crinoline, but it was too puffy, so I found an inexpensive 50s crinoline available for next-day delivery on Amazon with a smooth waist and puffs that start a bit further down. I can wear it sticking out the bottom of the dress or pull it up further to hide it. The dress is totally wearable without the crinoline but so much more fun with it! I don’t really have an occasion to wear this dress, but I will find one.