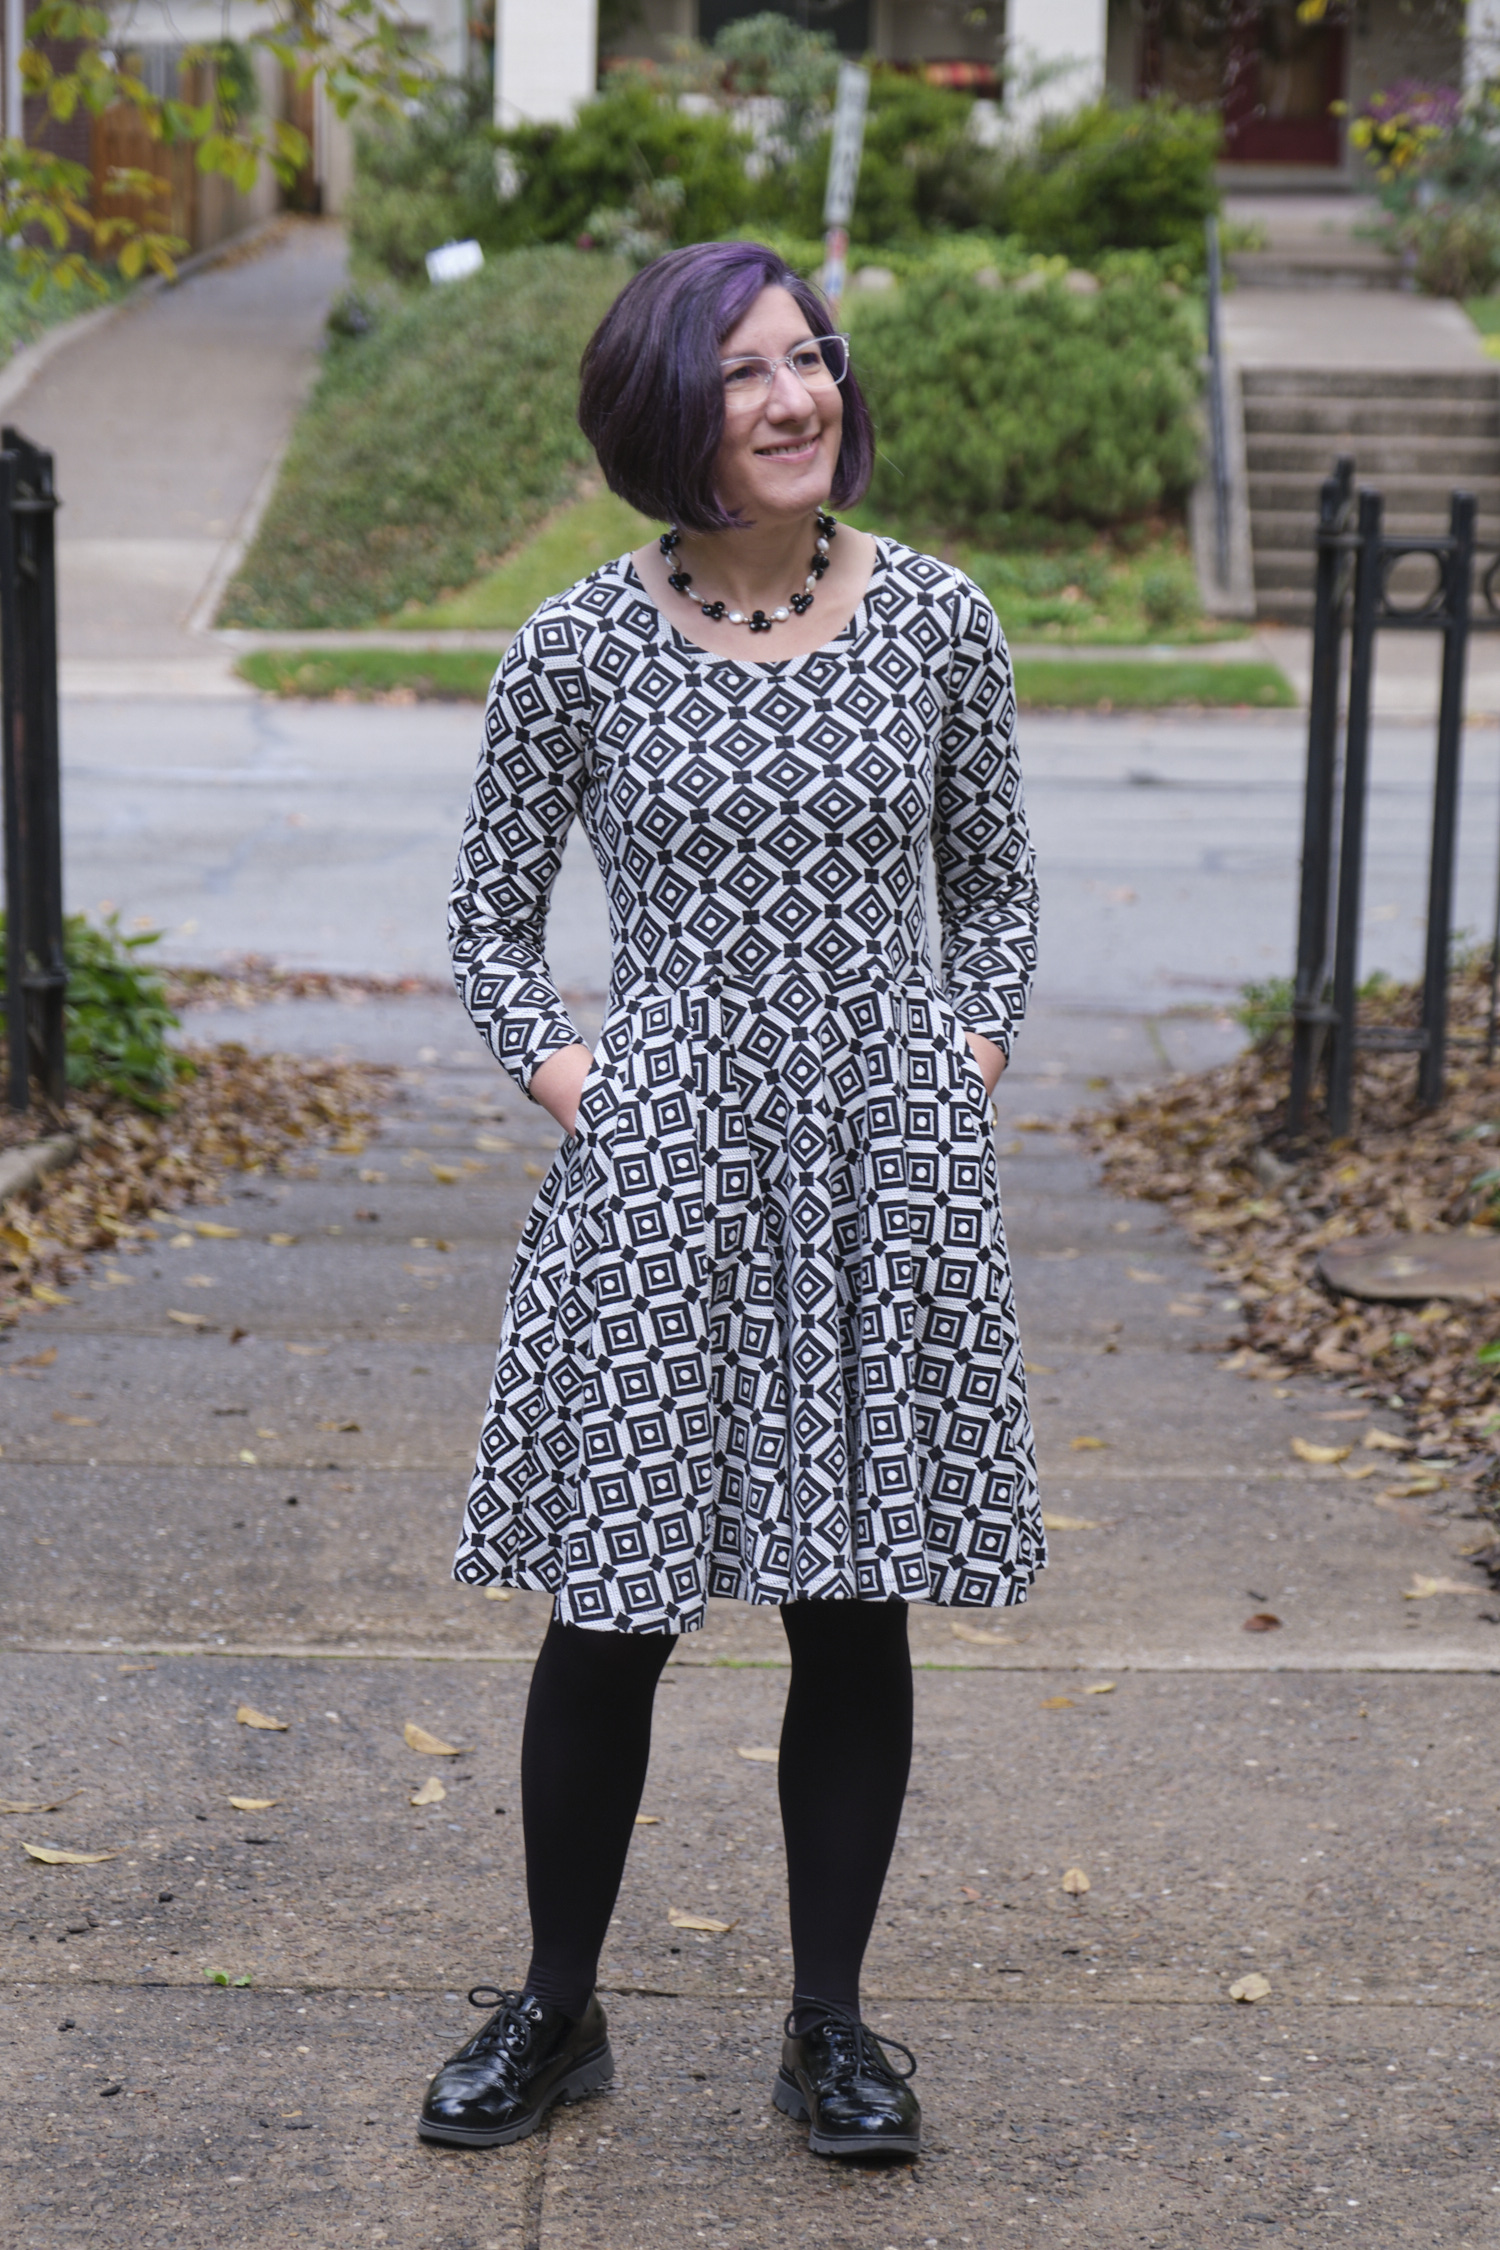
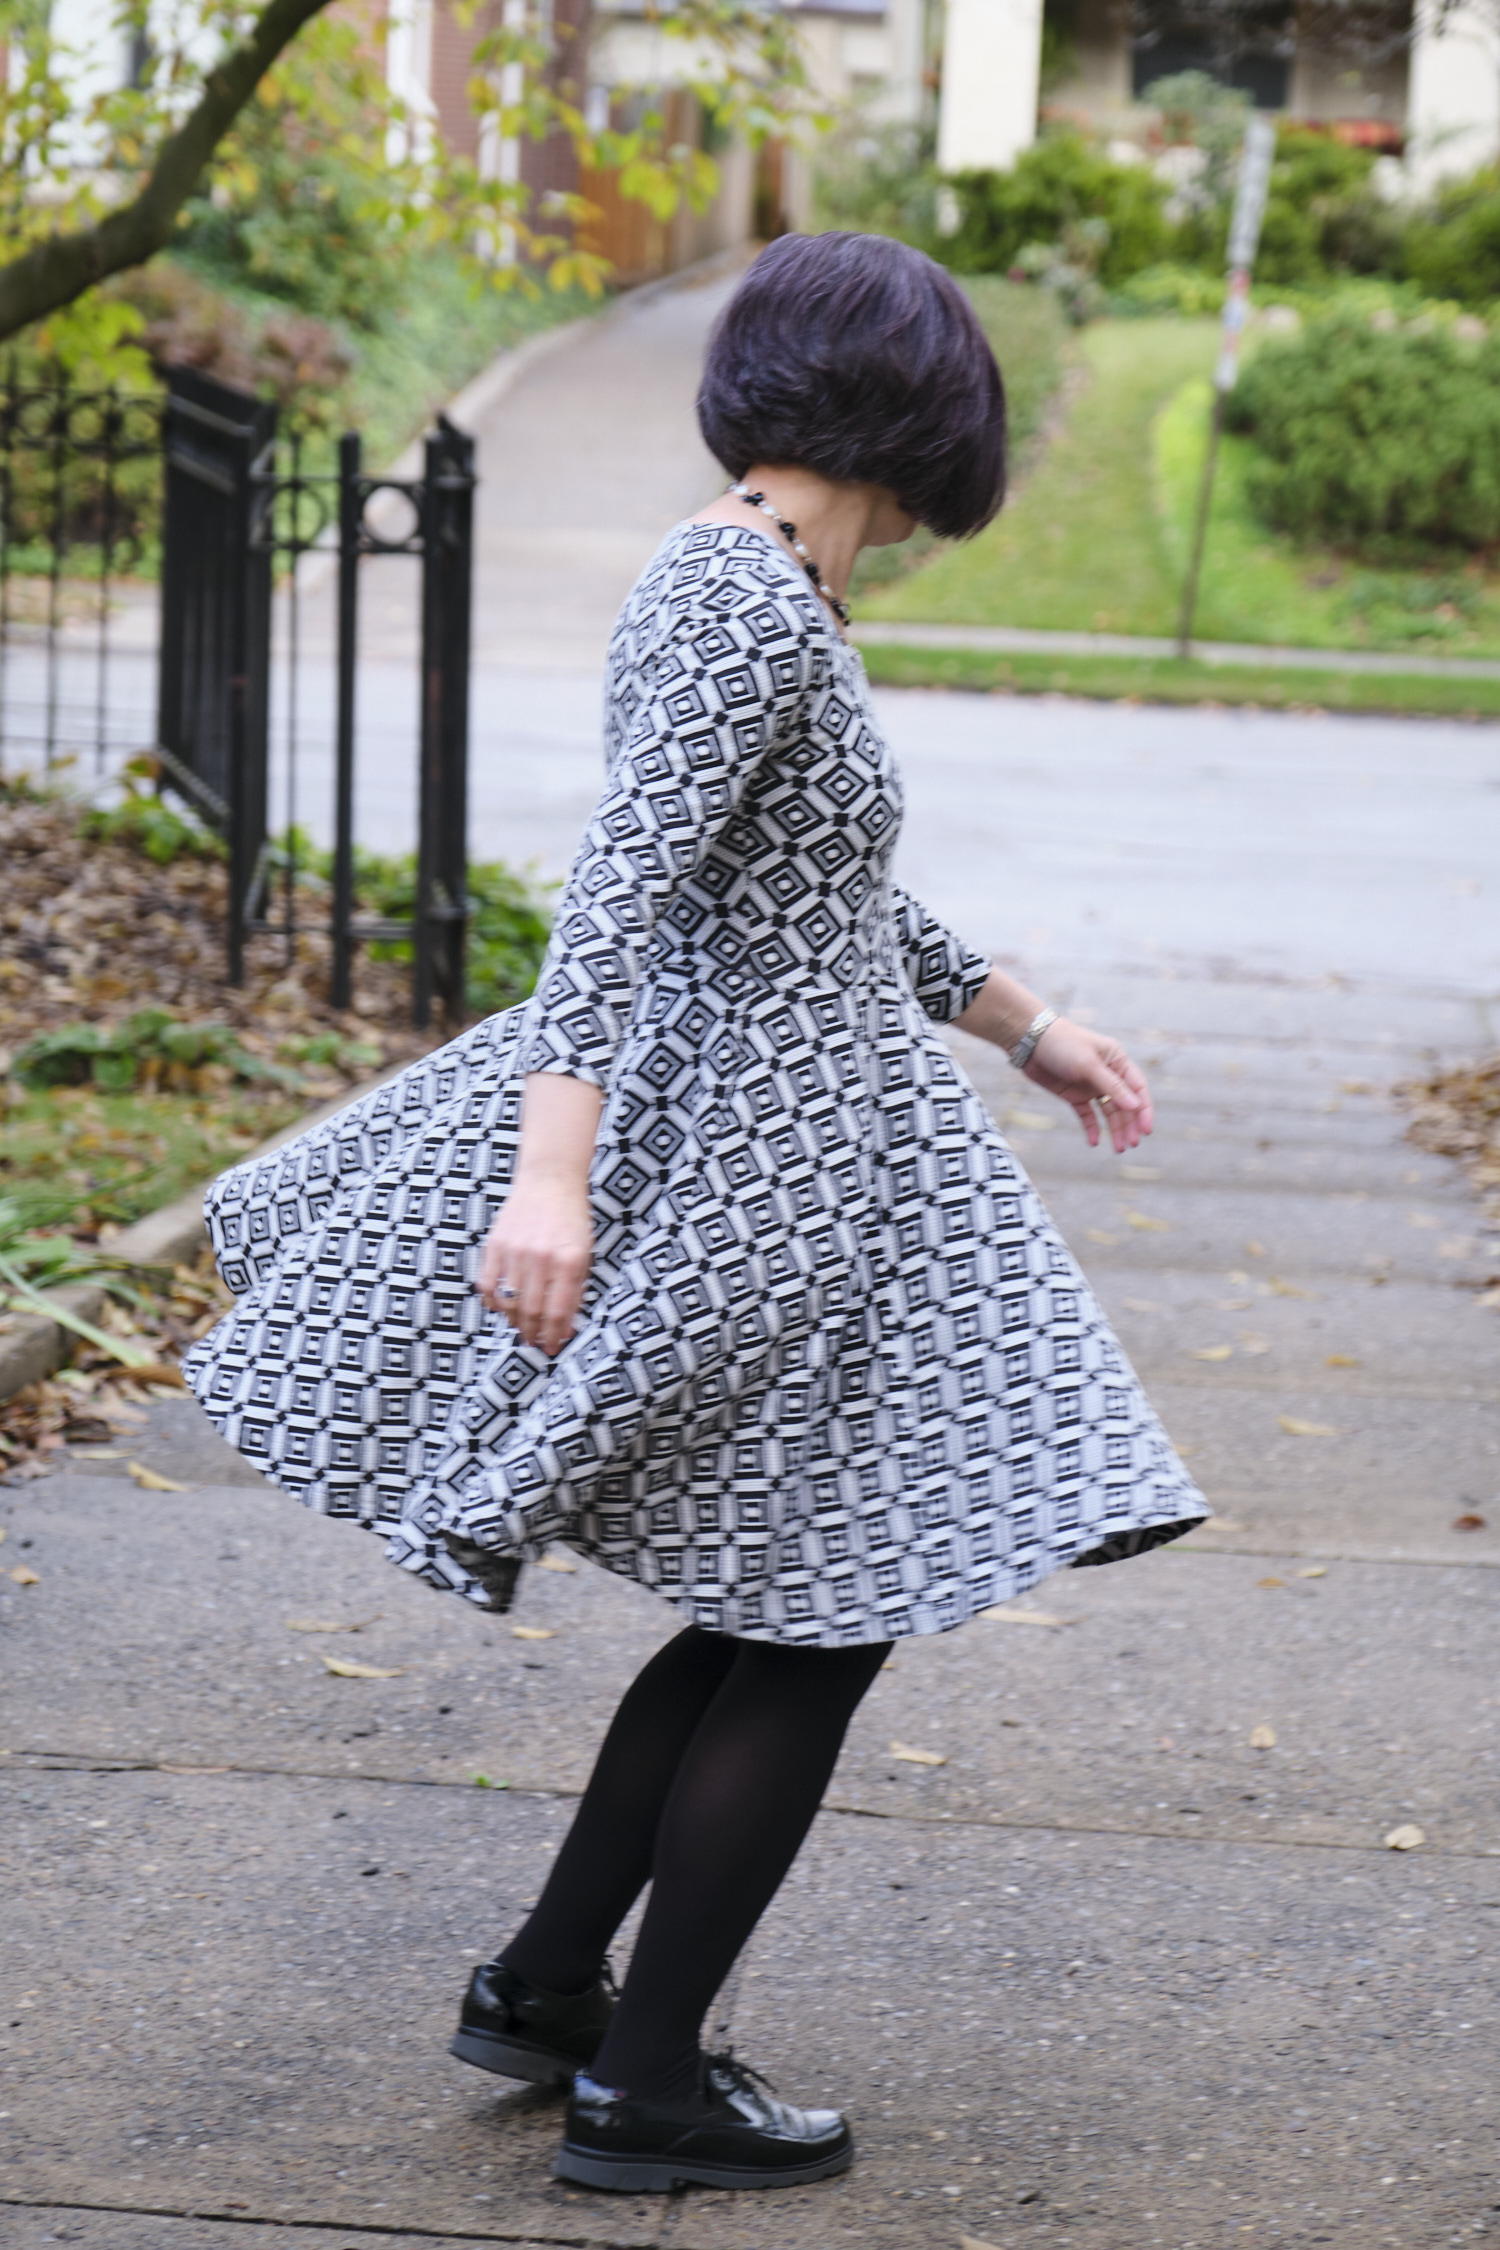
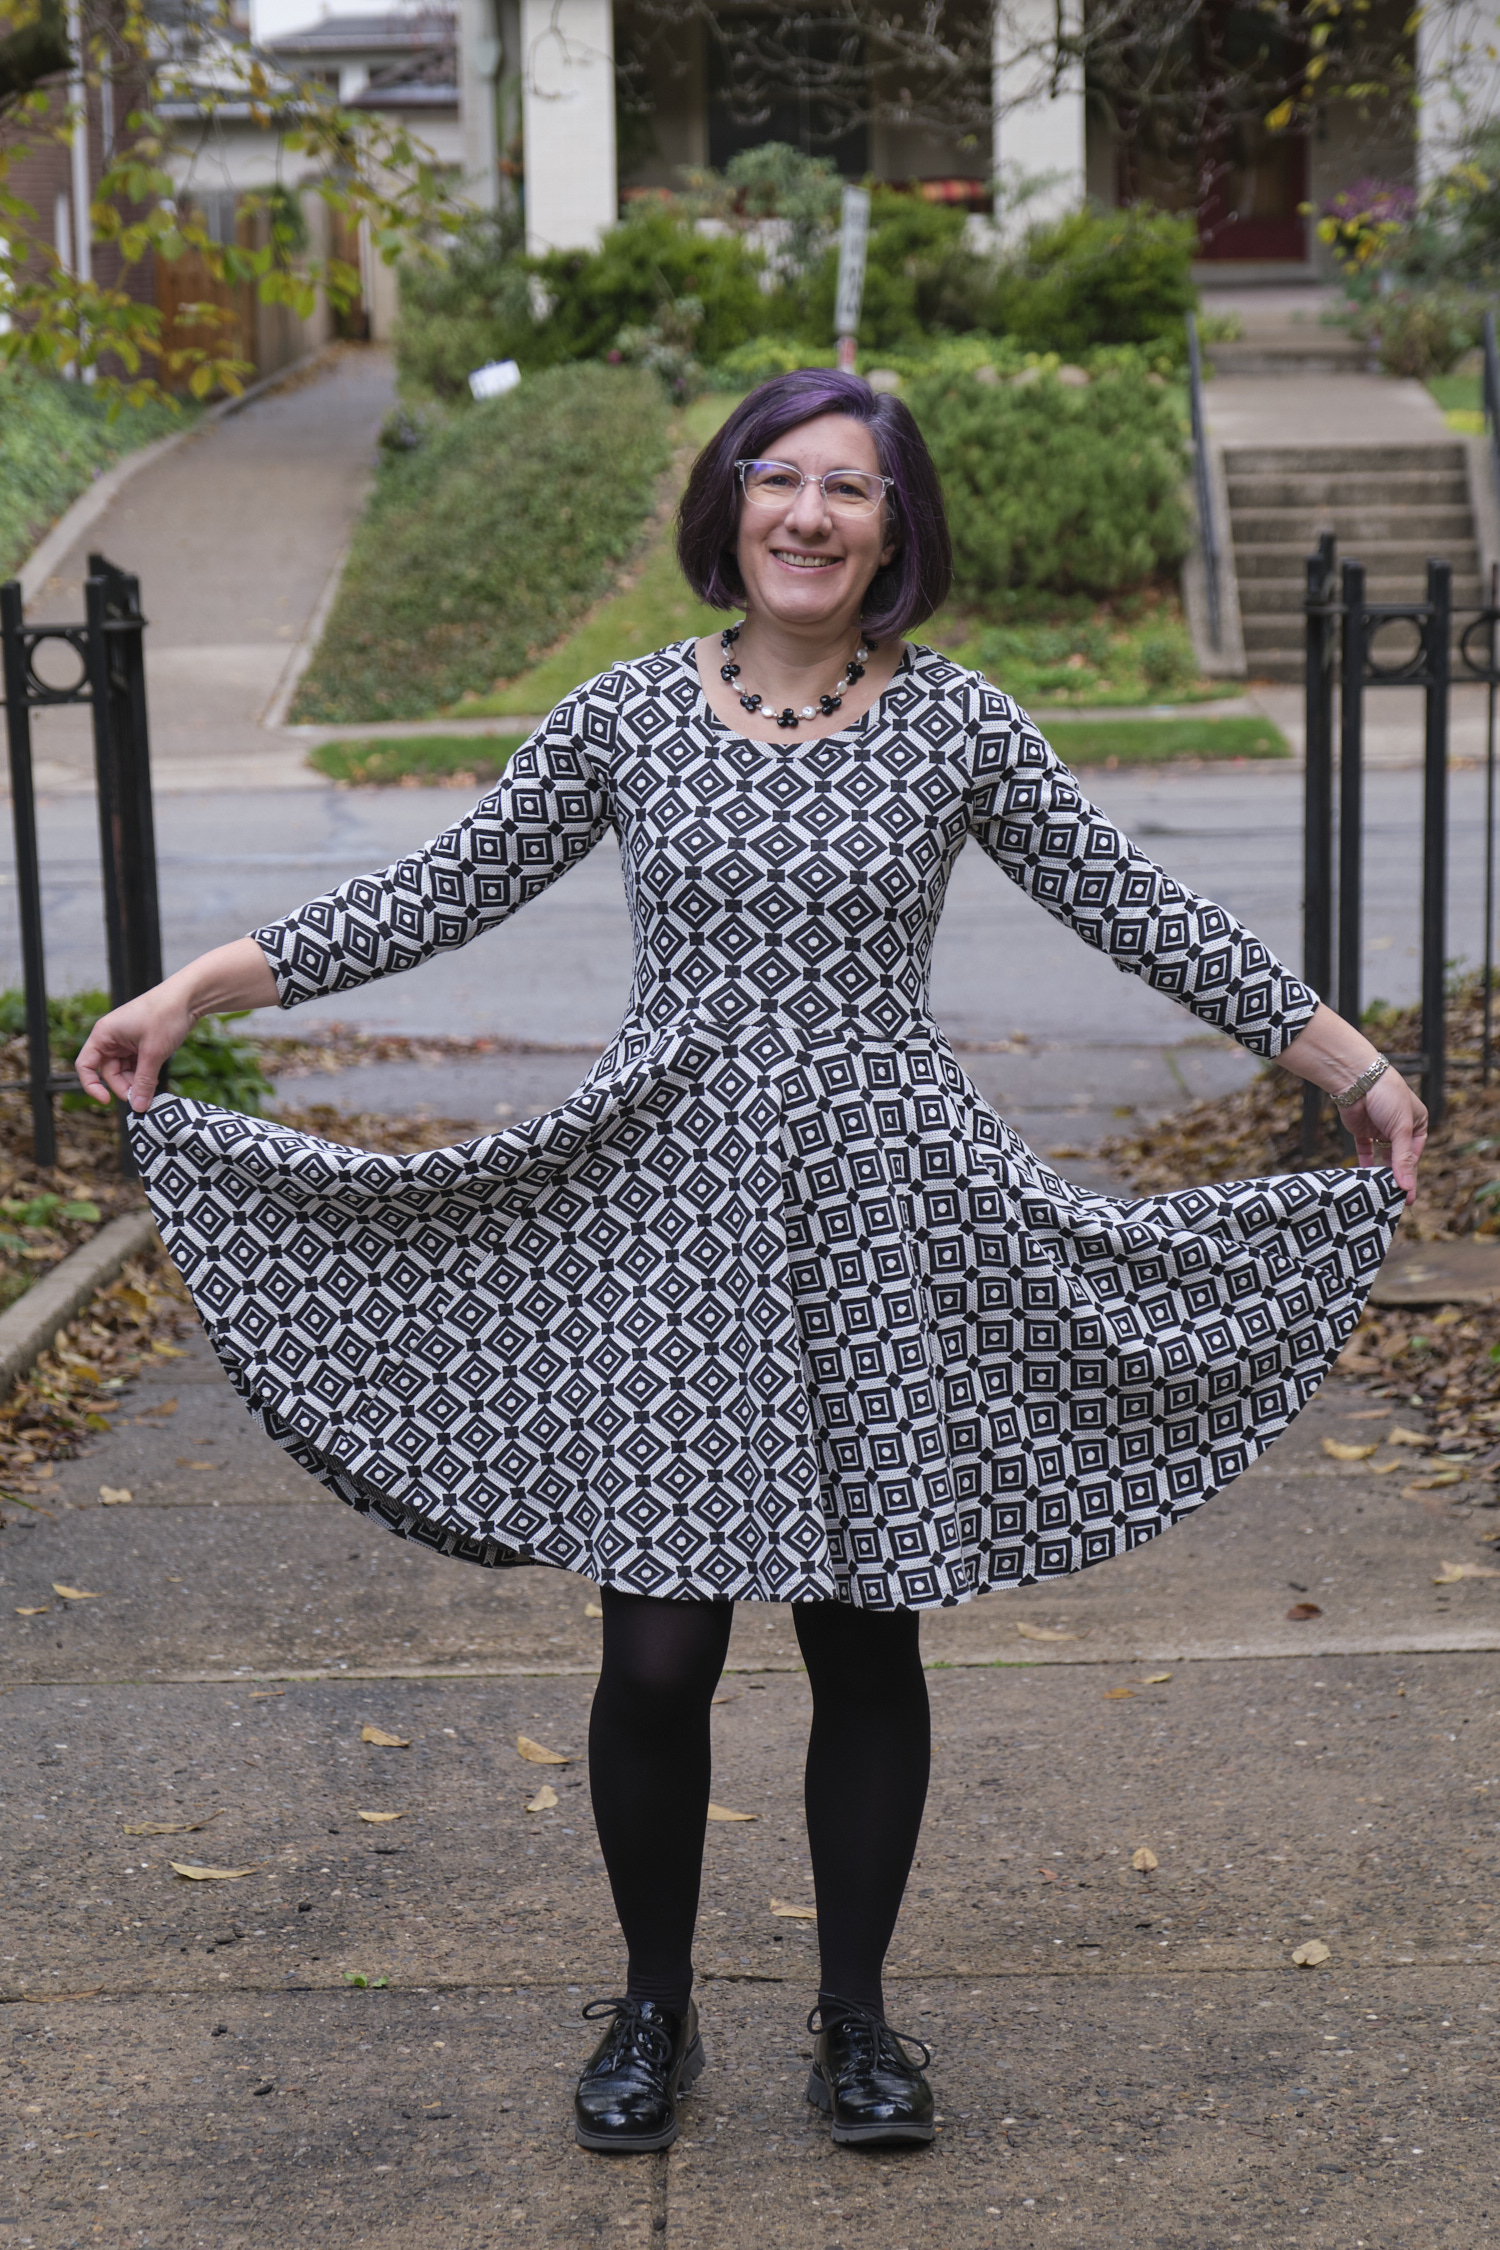
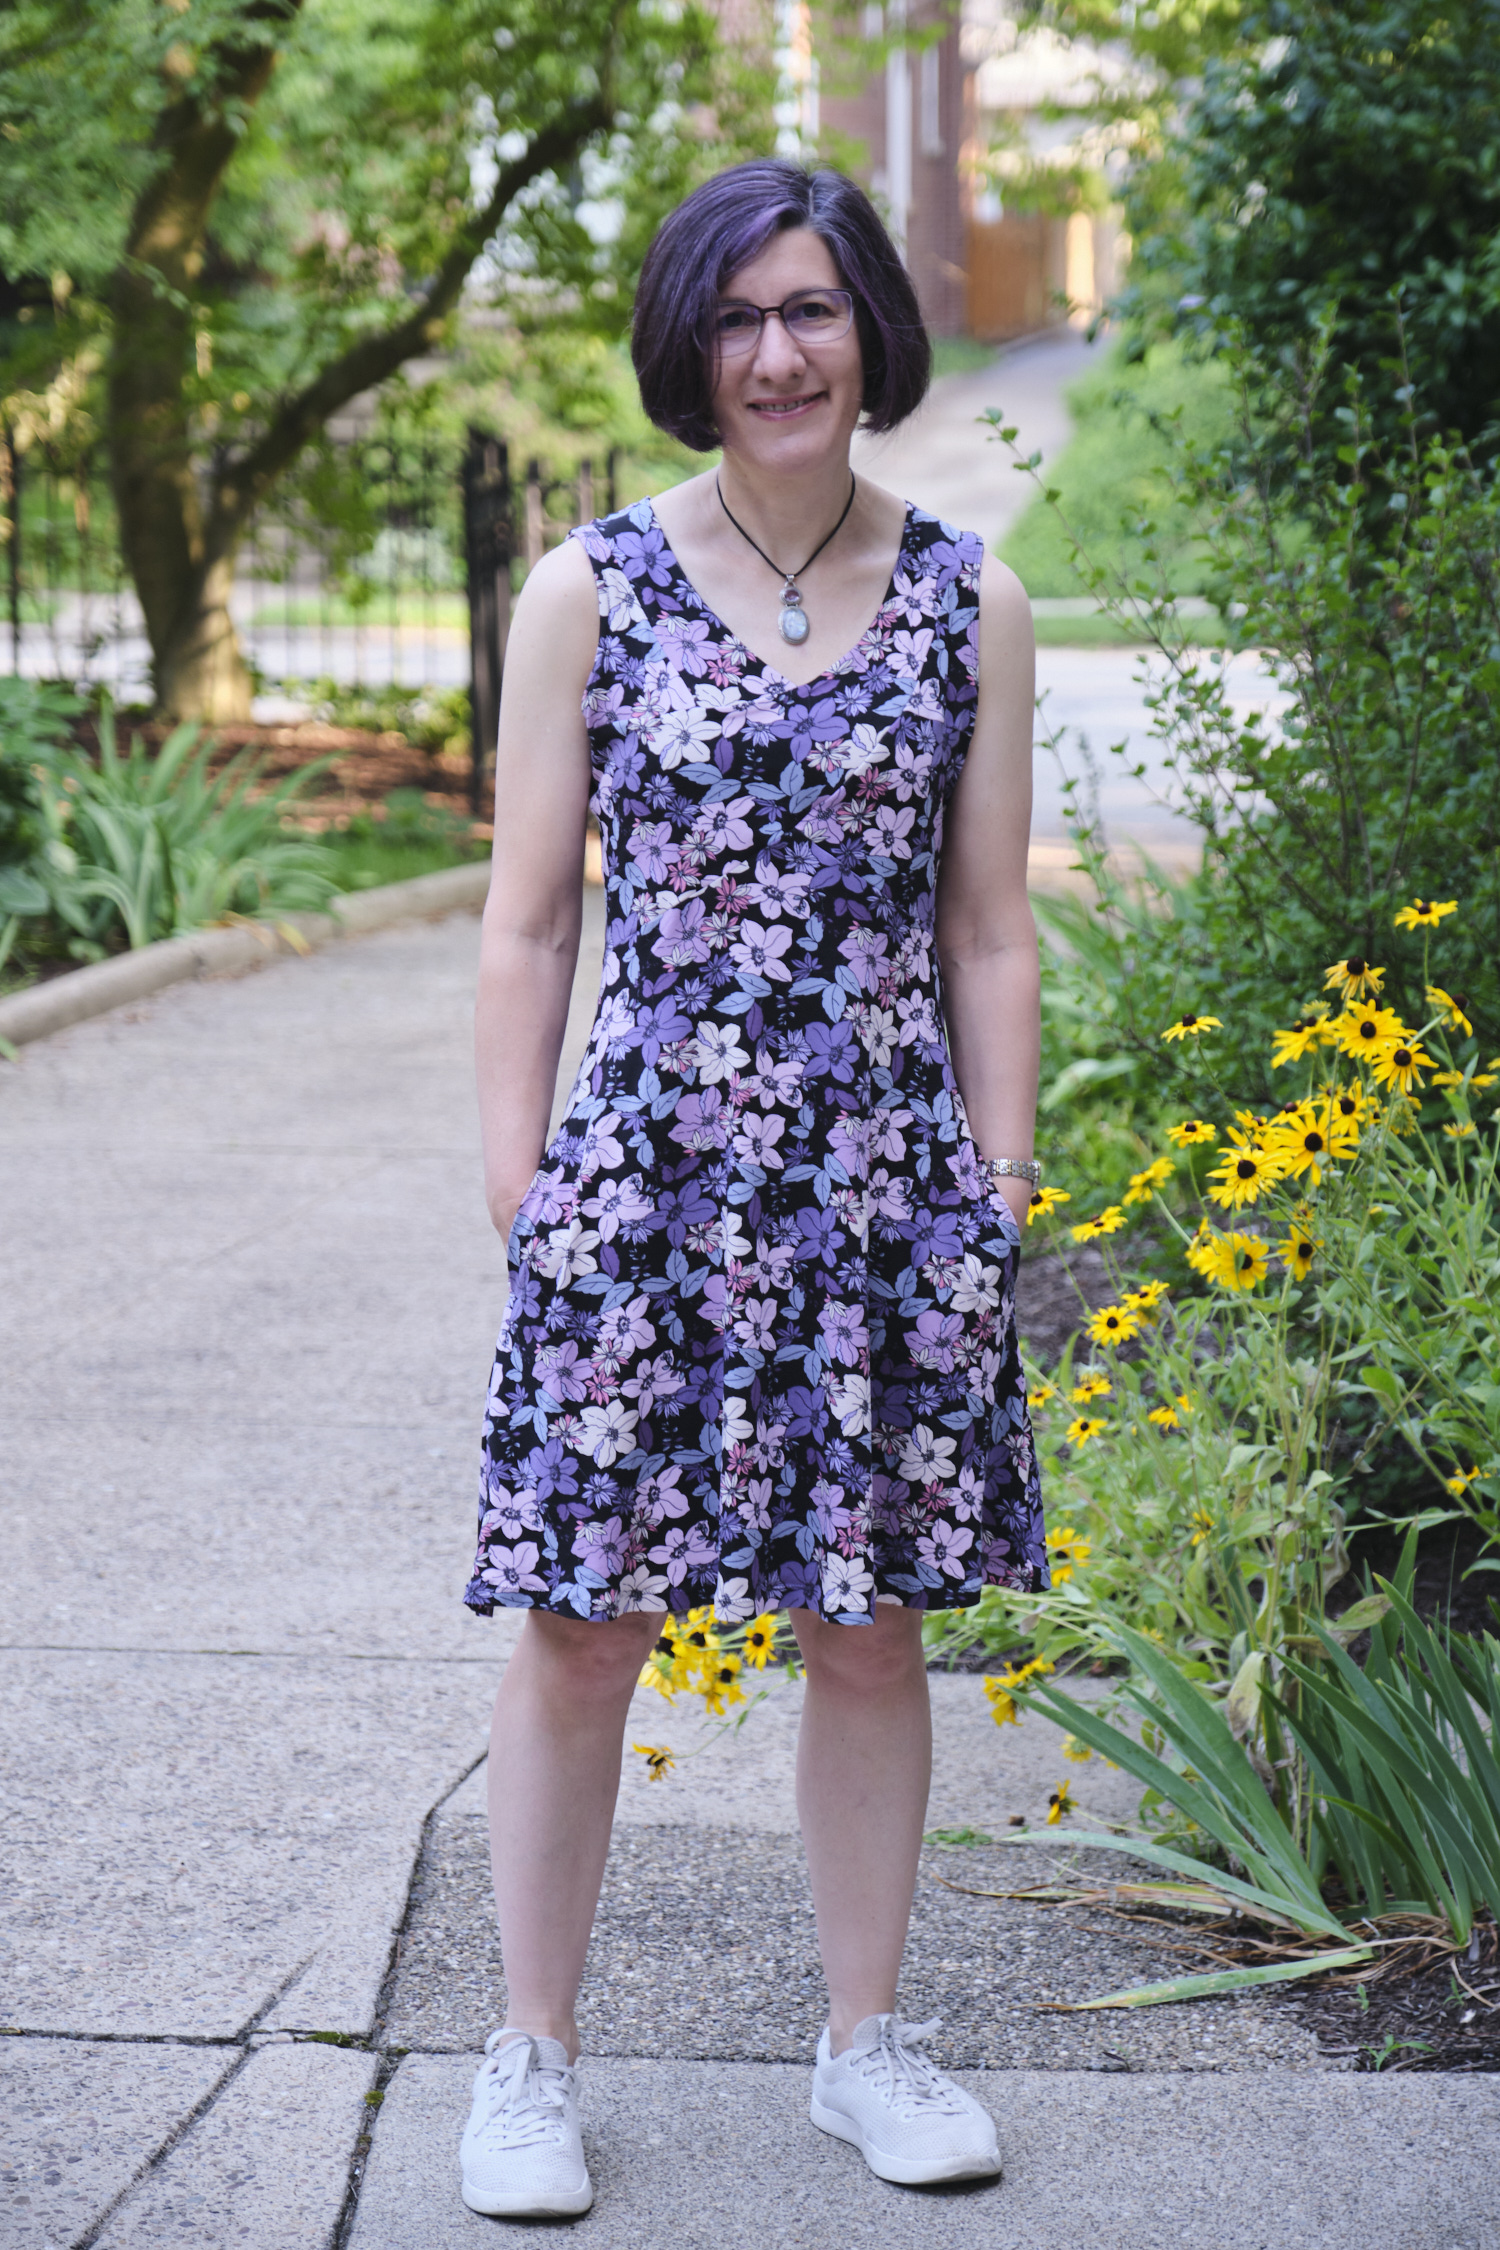
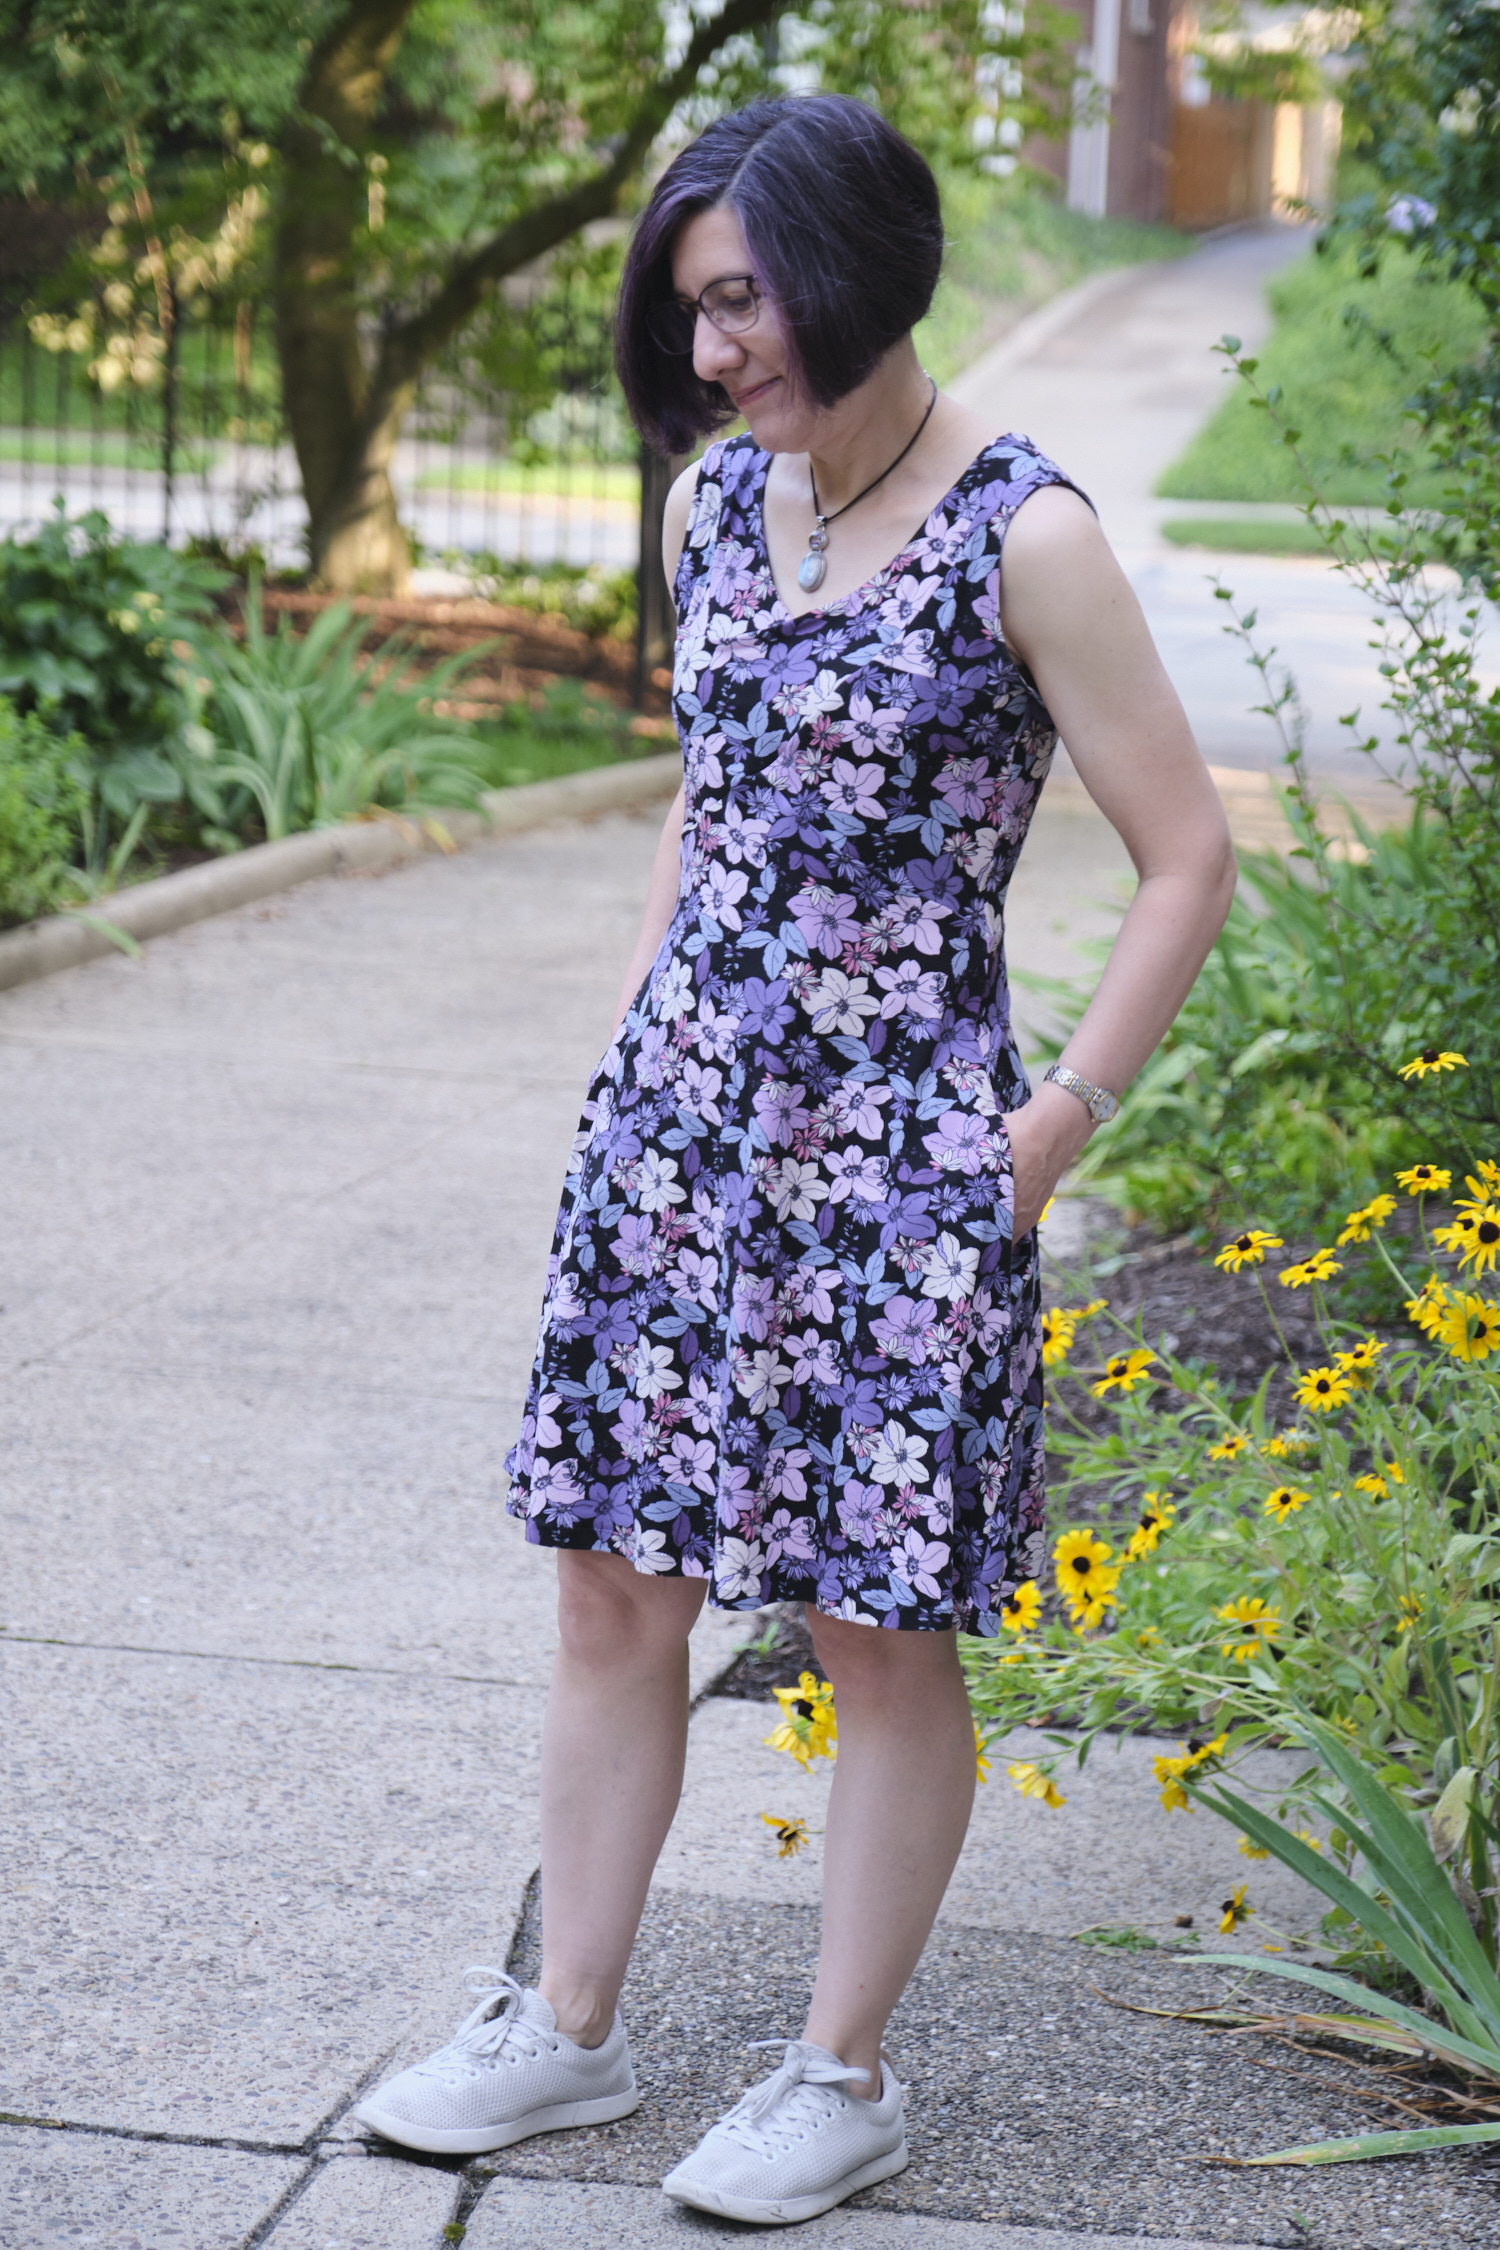
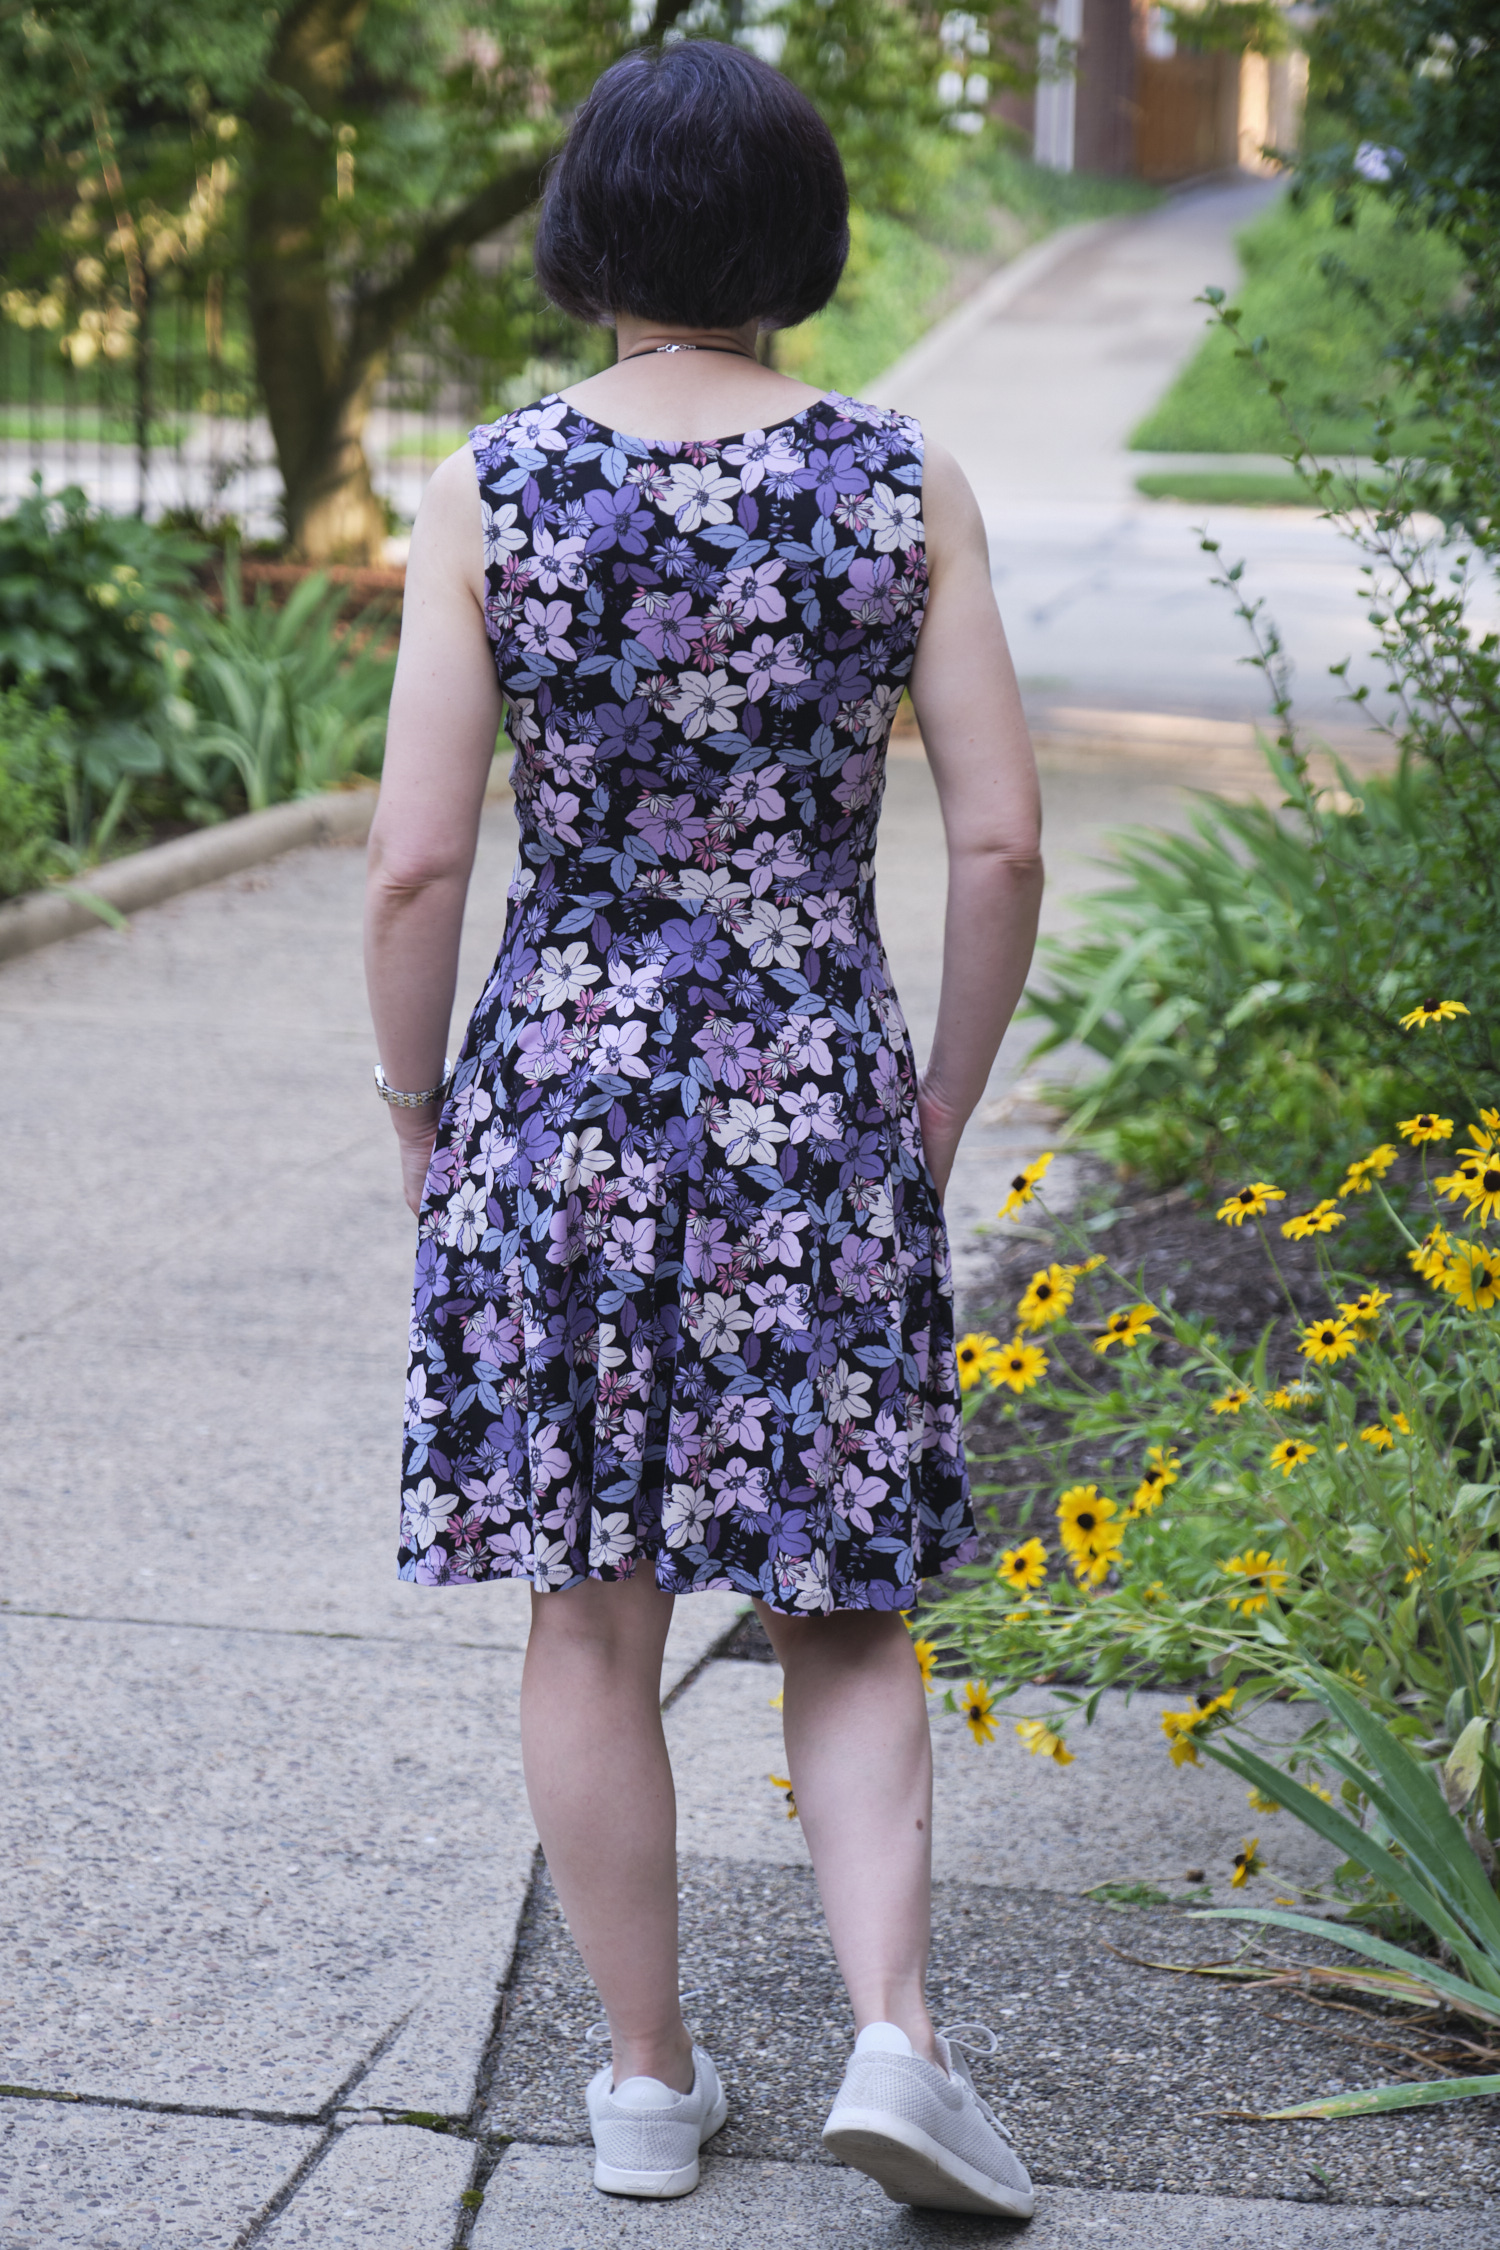
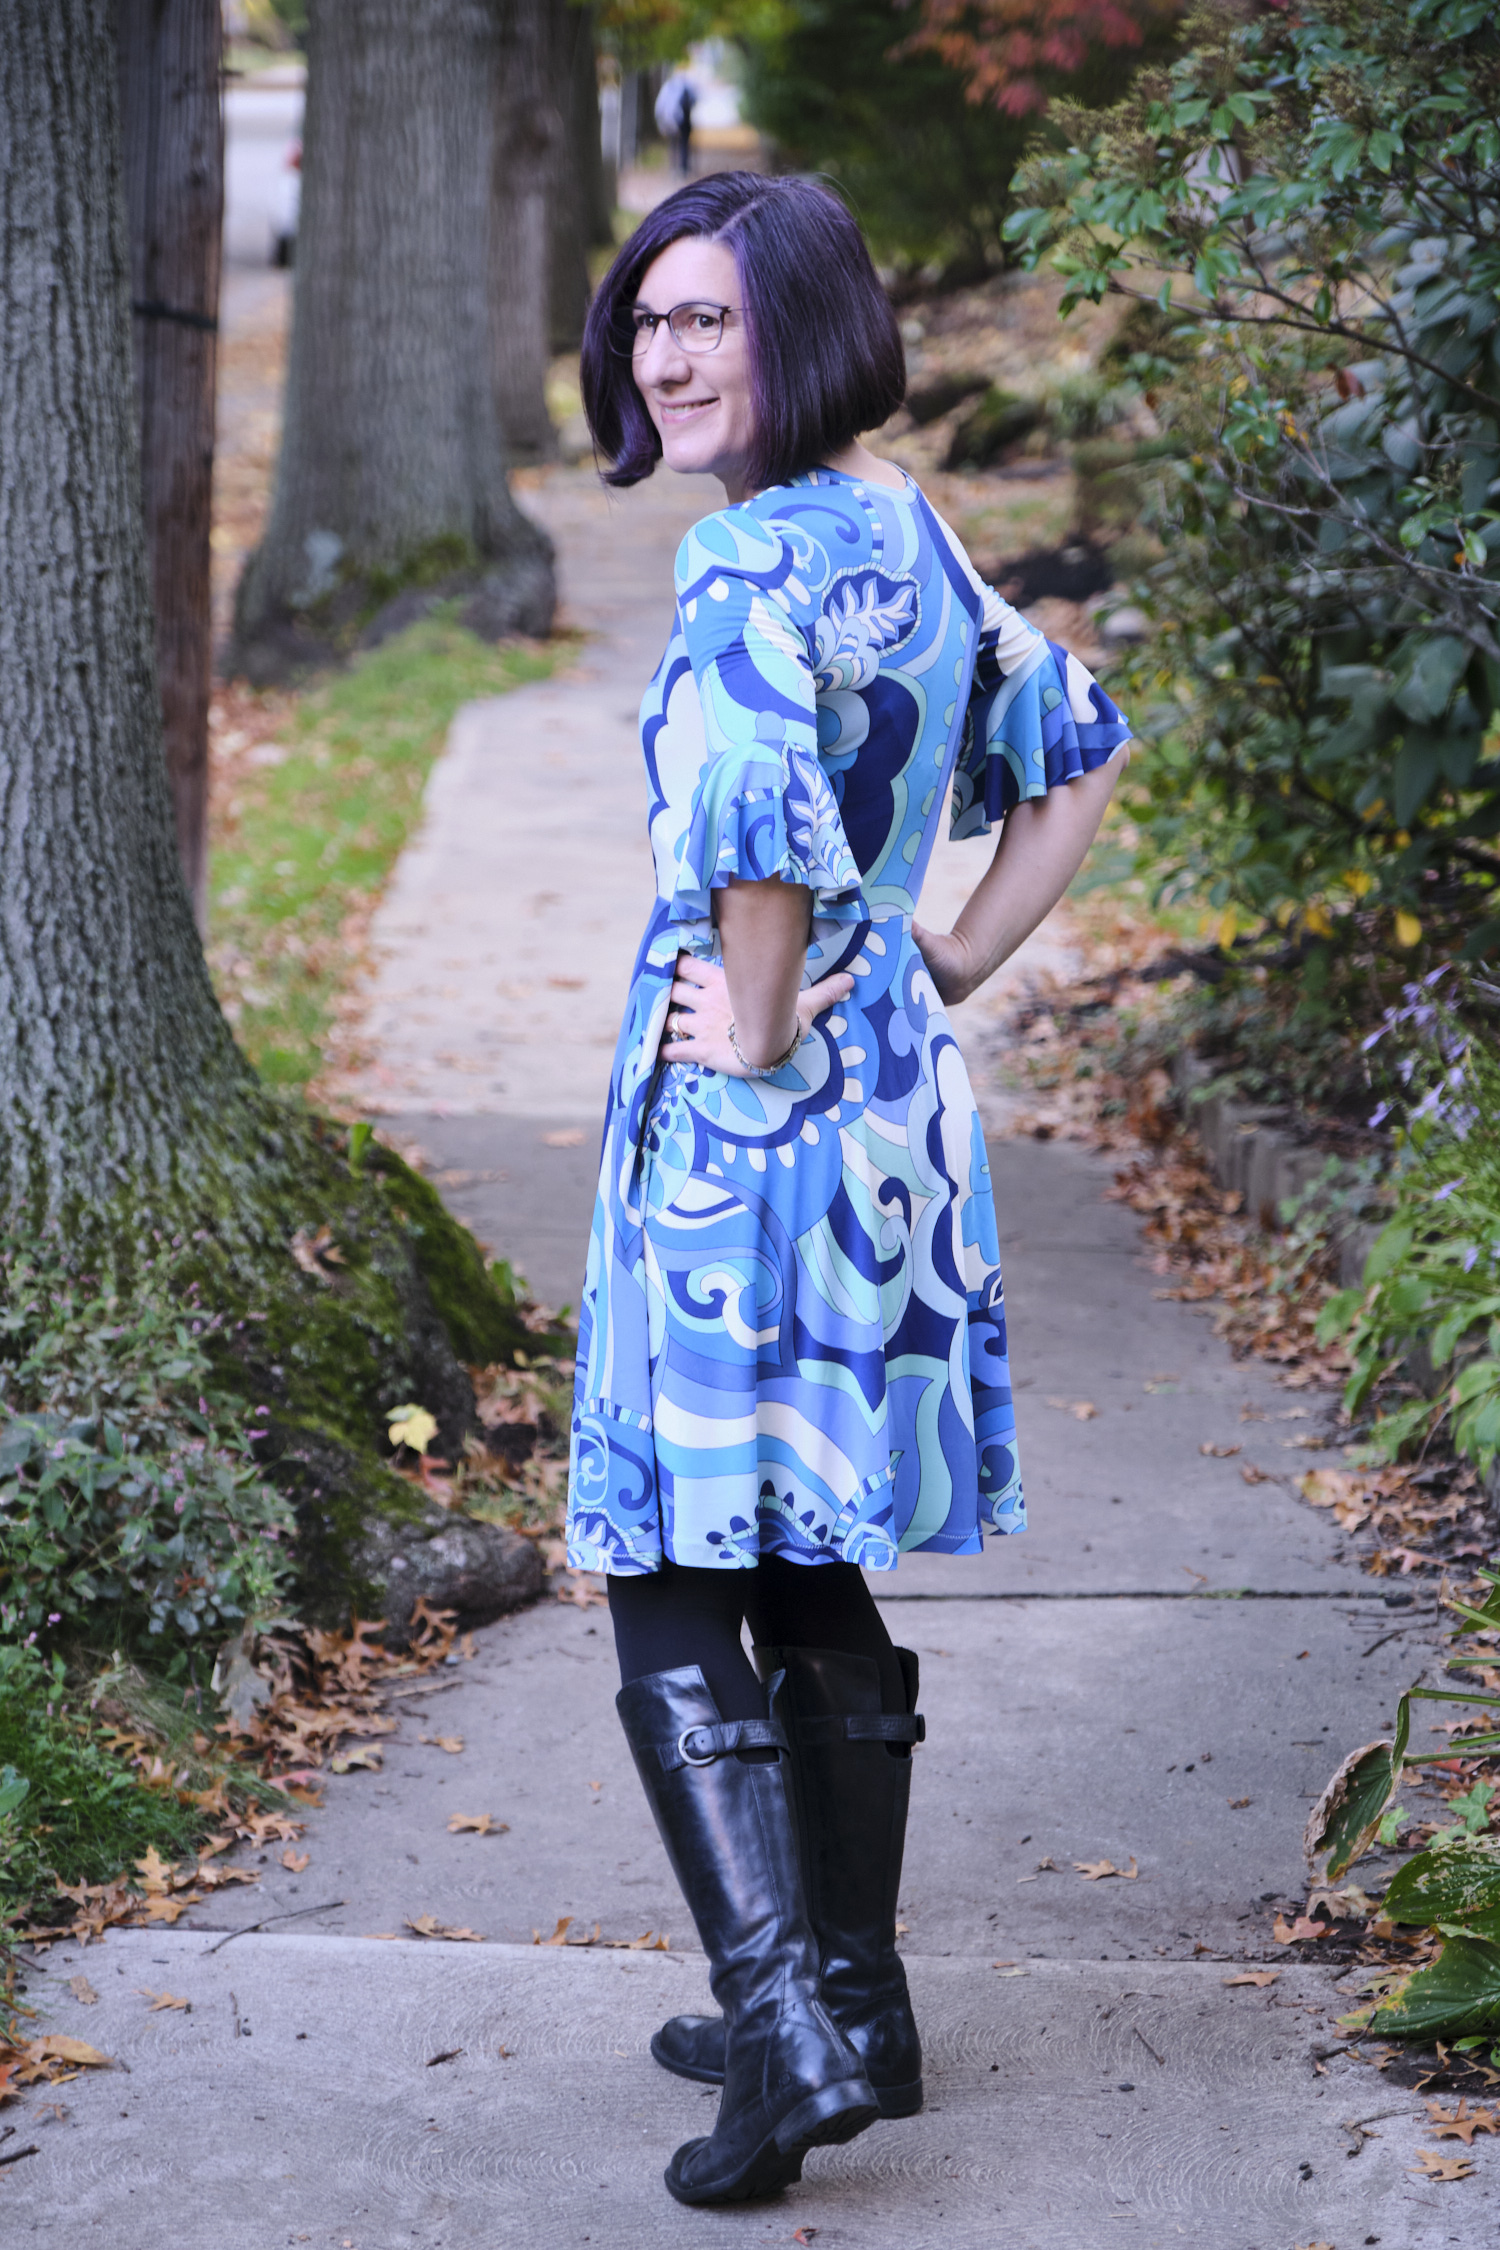
I’ve been holding onto this fabulous ivory and black geometric polyester double-knit fabric since last spring, with the plan to turn it into a long-sleeve Sinclair Valley Knit Skater Dress. The fabric has some body (and just barely enough stretch for this pattern) and a nice drape, so I decided to use the full-circle skirt from the add-on pack for a skirt that would naturally poof out. Unfortunately, I didn’t have quite enough fabric, so it took some tetrising to cut it all out (with my projector), and I ended up having to split two of the skirt panels in half and turn the long sleeves into 3/4 sleeves. But by splitting the skirt panels I was able to avoid a seam in the center front of the dress. I probably should have gone up to a P6 for a bit more ease as the P4 is snug, but it still looks great.
Sinclair Valley Knit Skater Dress with full circle skirt in black and white geometric double knit
I made the pattern mostly as written, lengthening the bodice as recommended when omitting the waistband. I also used my Bondi screwp neck modification, as I have done for my previous Valley dresses. This time I sewed the pockets to the waistband as the pattern suggests, since this is a pretty stable knit and I wasn’t worried about the pockets getting pulled down. I did lengthen the pockets by about an inch to reduce the risk of my phone falling out. The pockets on the finished dress are great and with the full skirt they are nearly invisible, even when full.
This is the first Valley I sewed with a serger, and it went very quickly. It only took about 3 hours to sew after cutting the fabric. Of course, it took a while to hem the 13-foot circumference full-circle skirt. But my teen daughter approves and says the full-circle skirt was definitely worth the effort. Indeed, this is a dress that really is fun to wear.
Sinclair Valley Knit Skater Dress with full circle skirt in black and white geometric double knit. A perfect fall dress?Such nice pockets!Fun to twirl!The circle skirt has a 13-foot circumference.
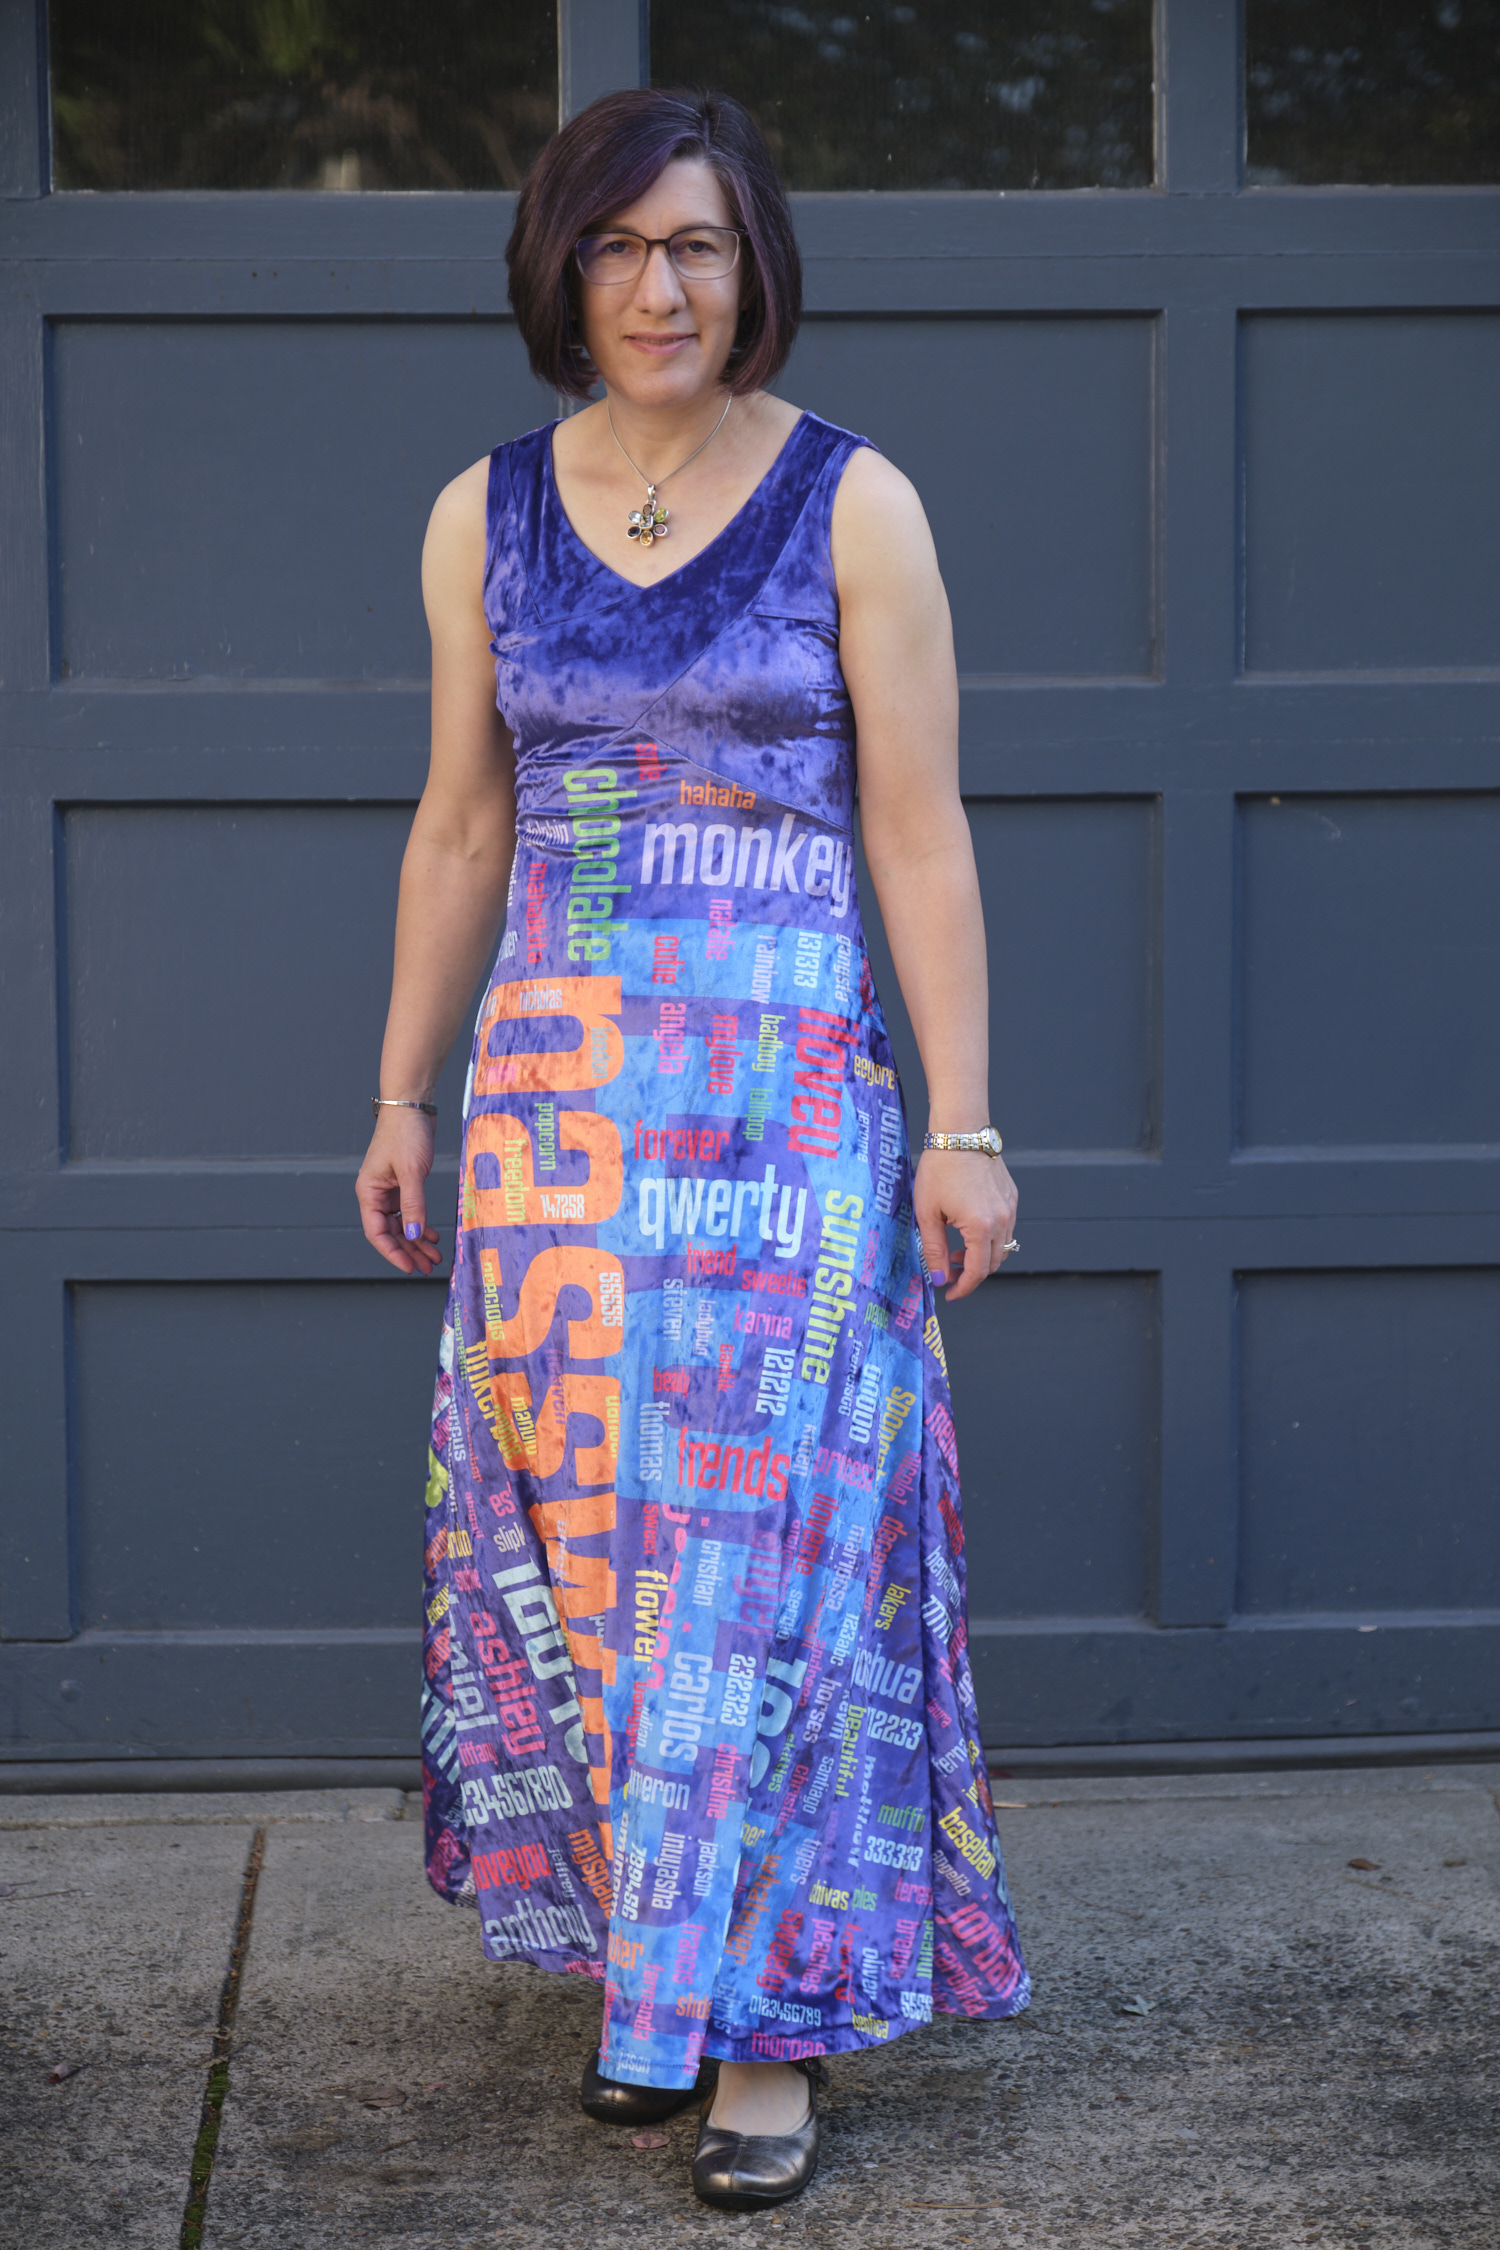
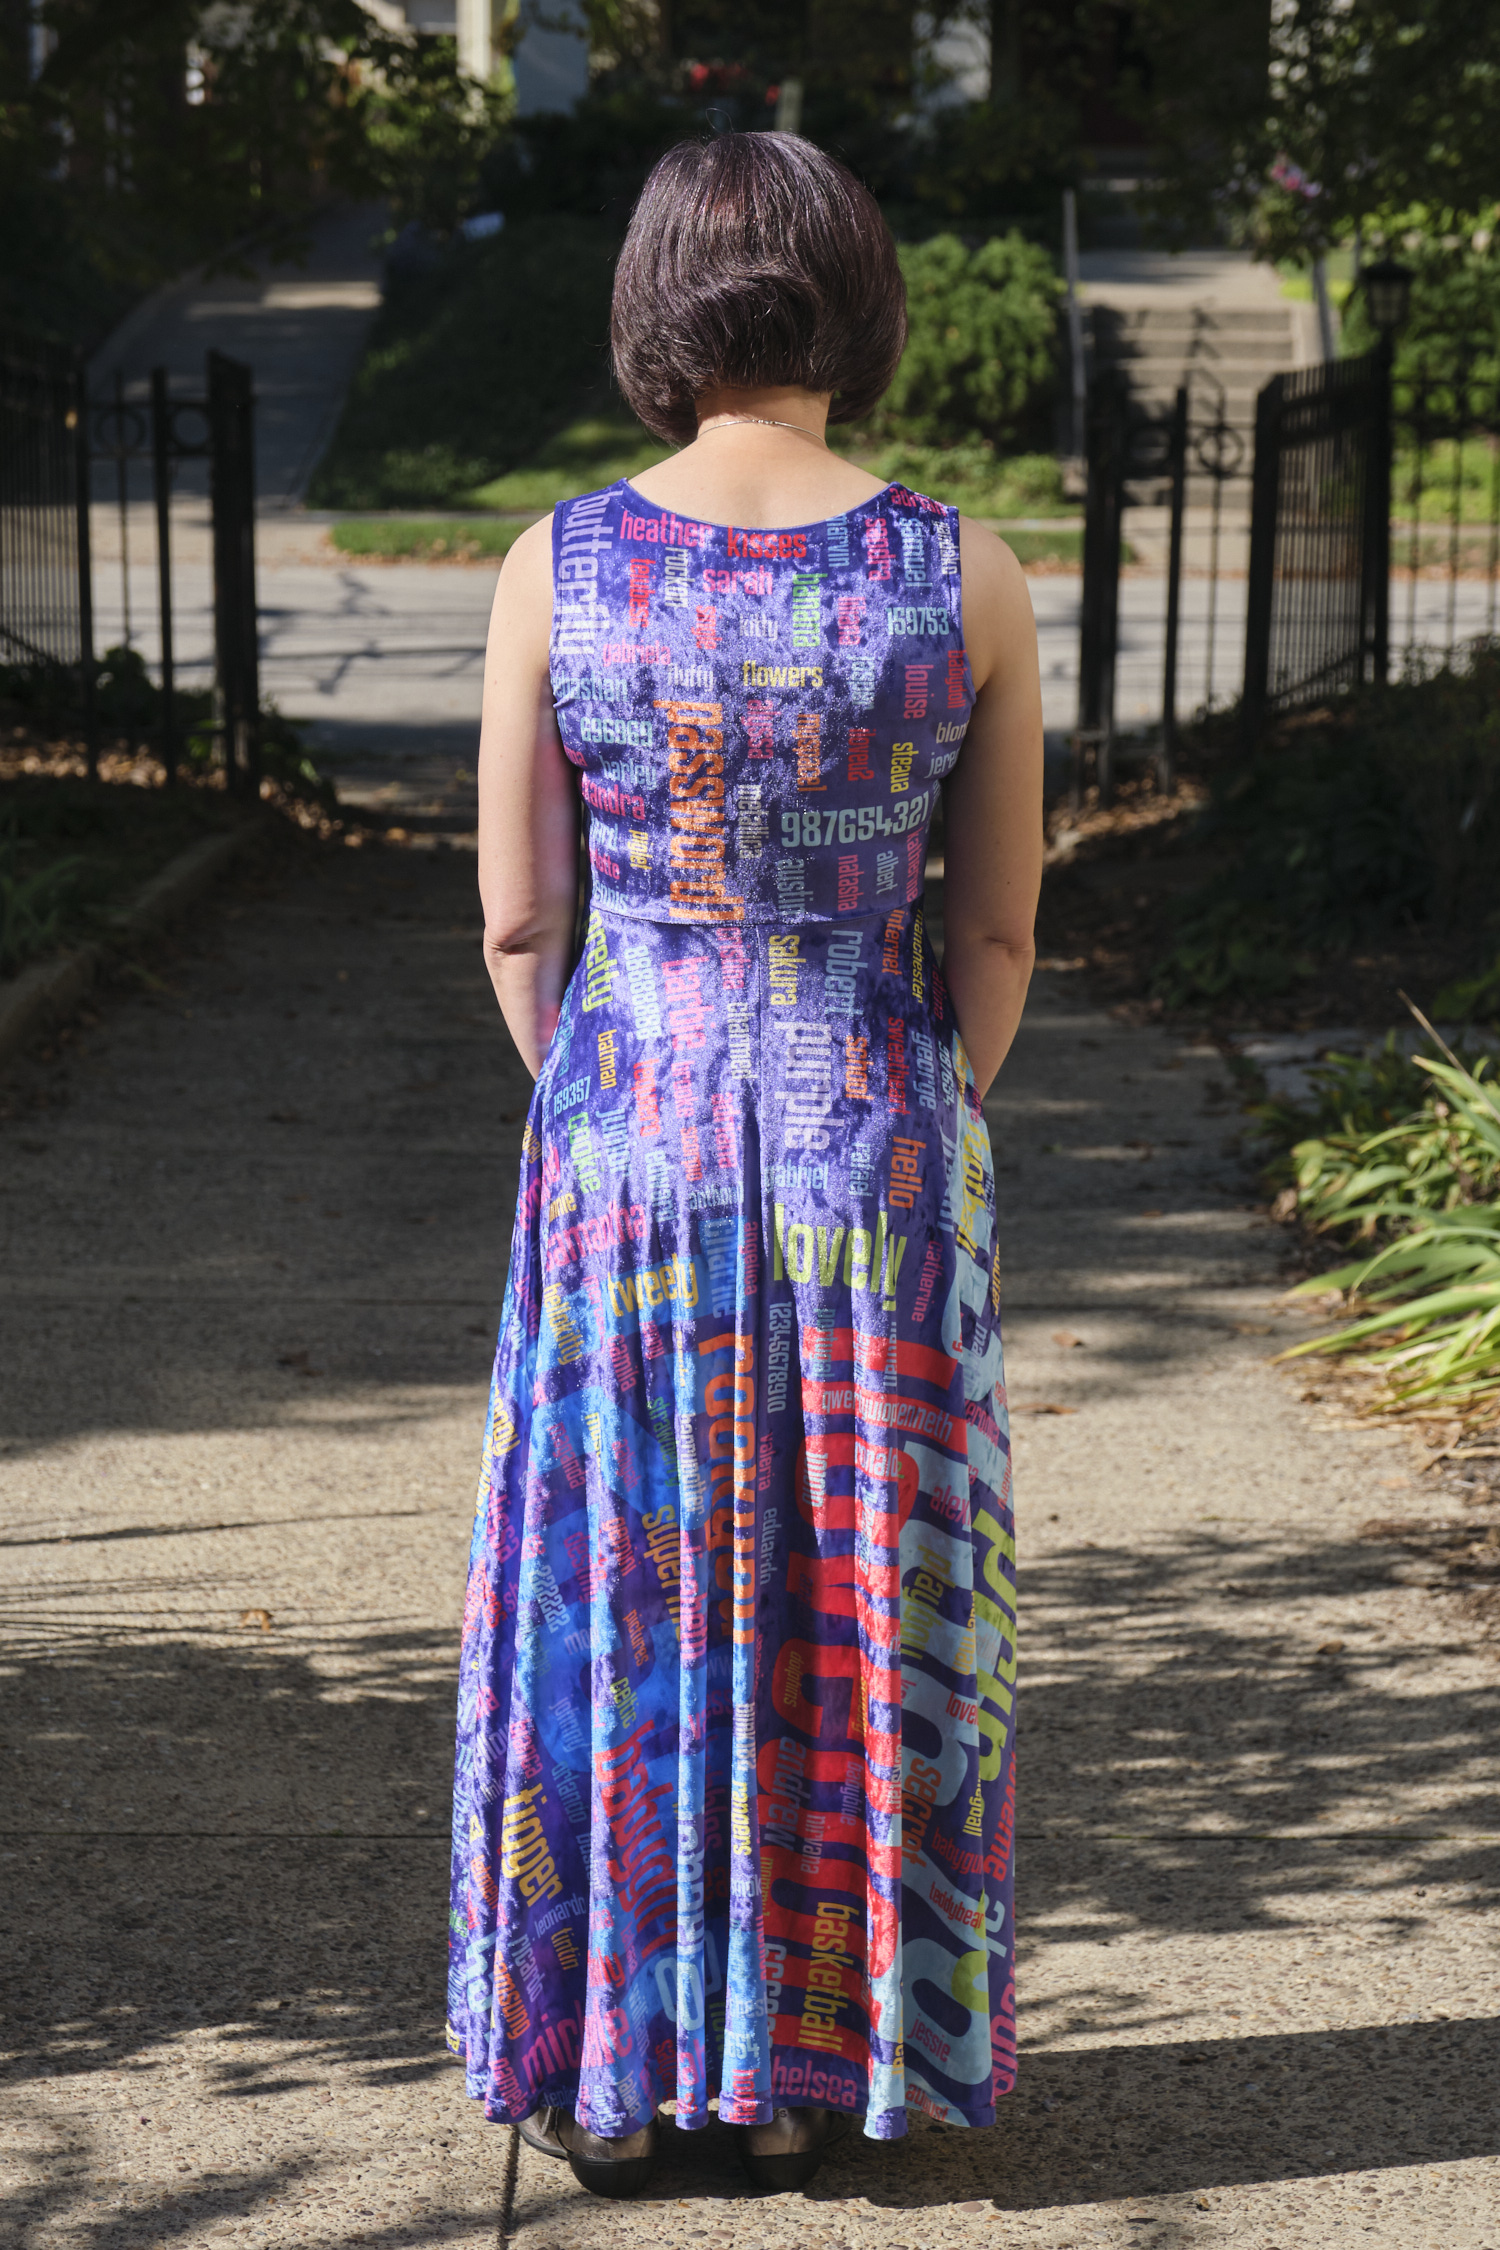
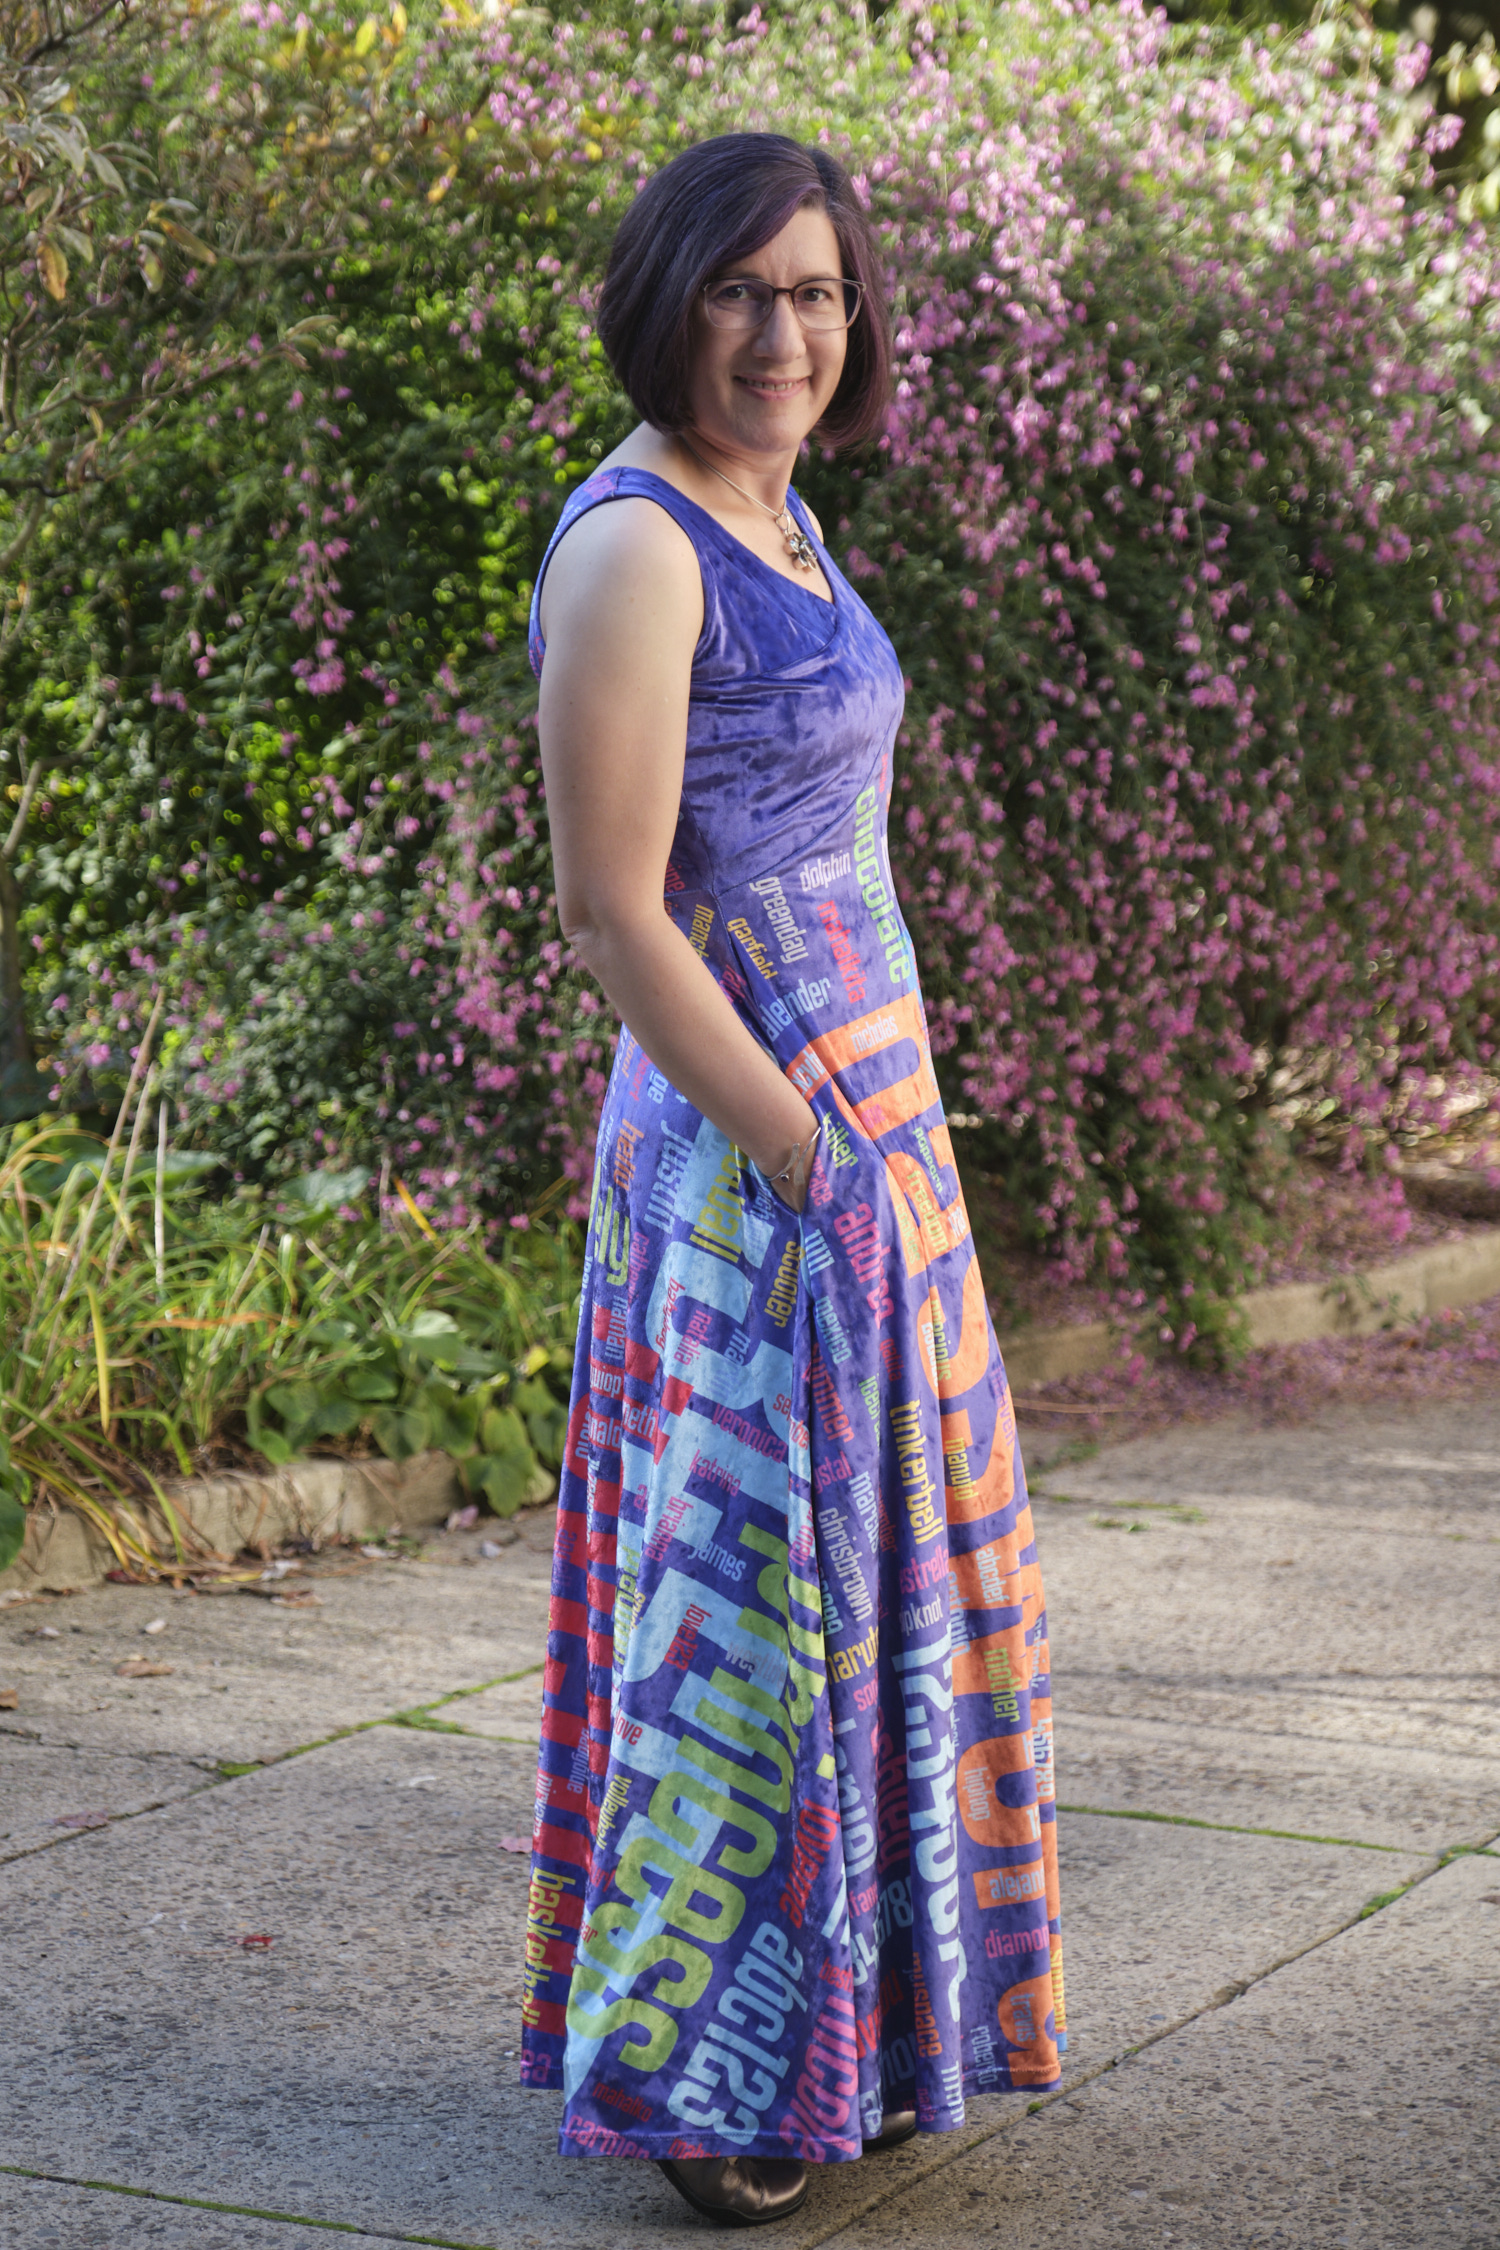
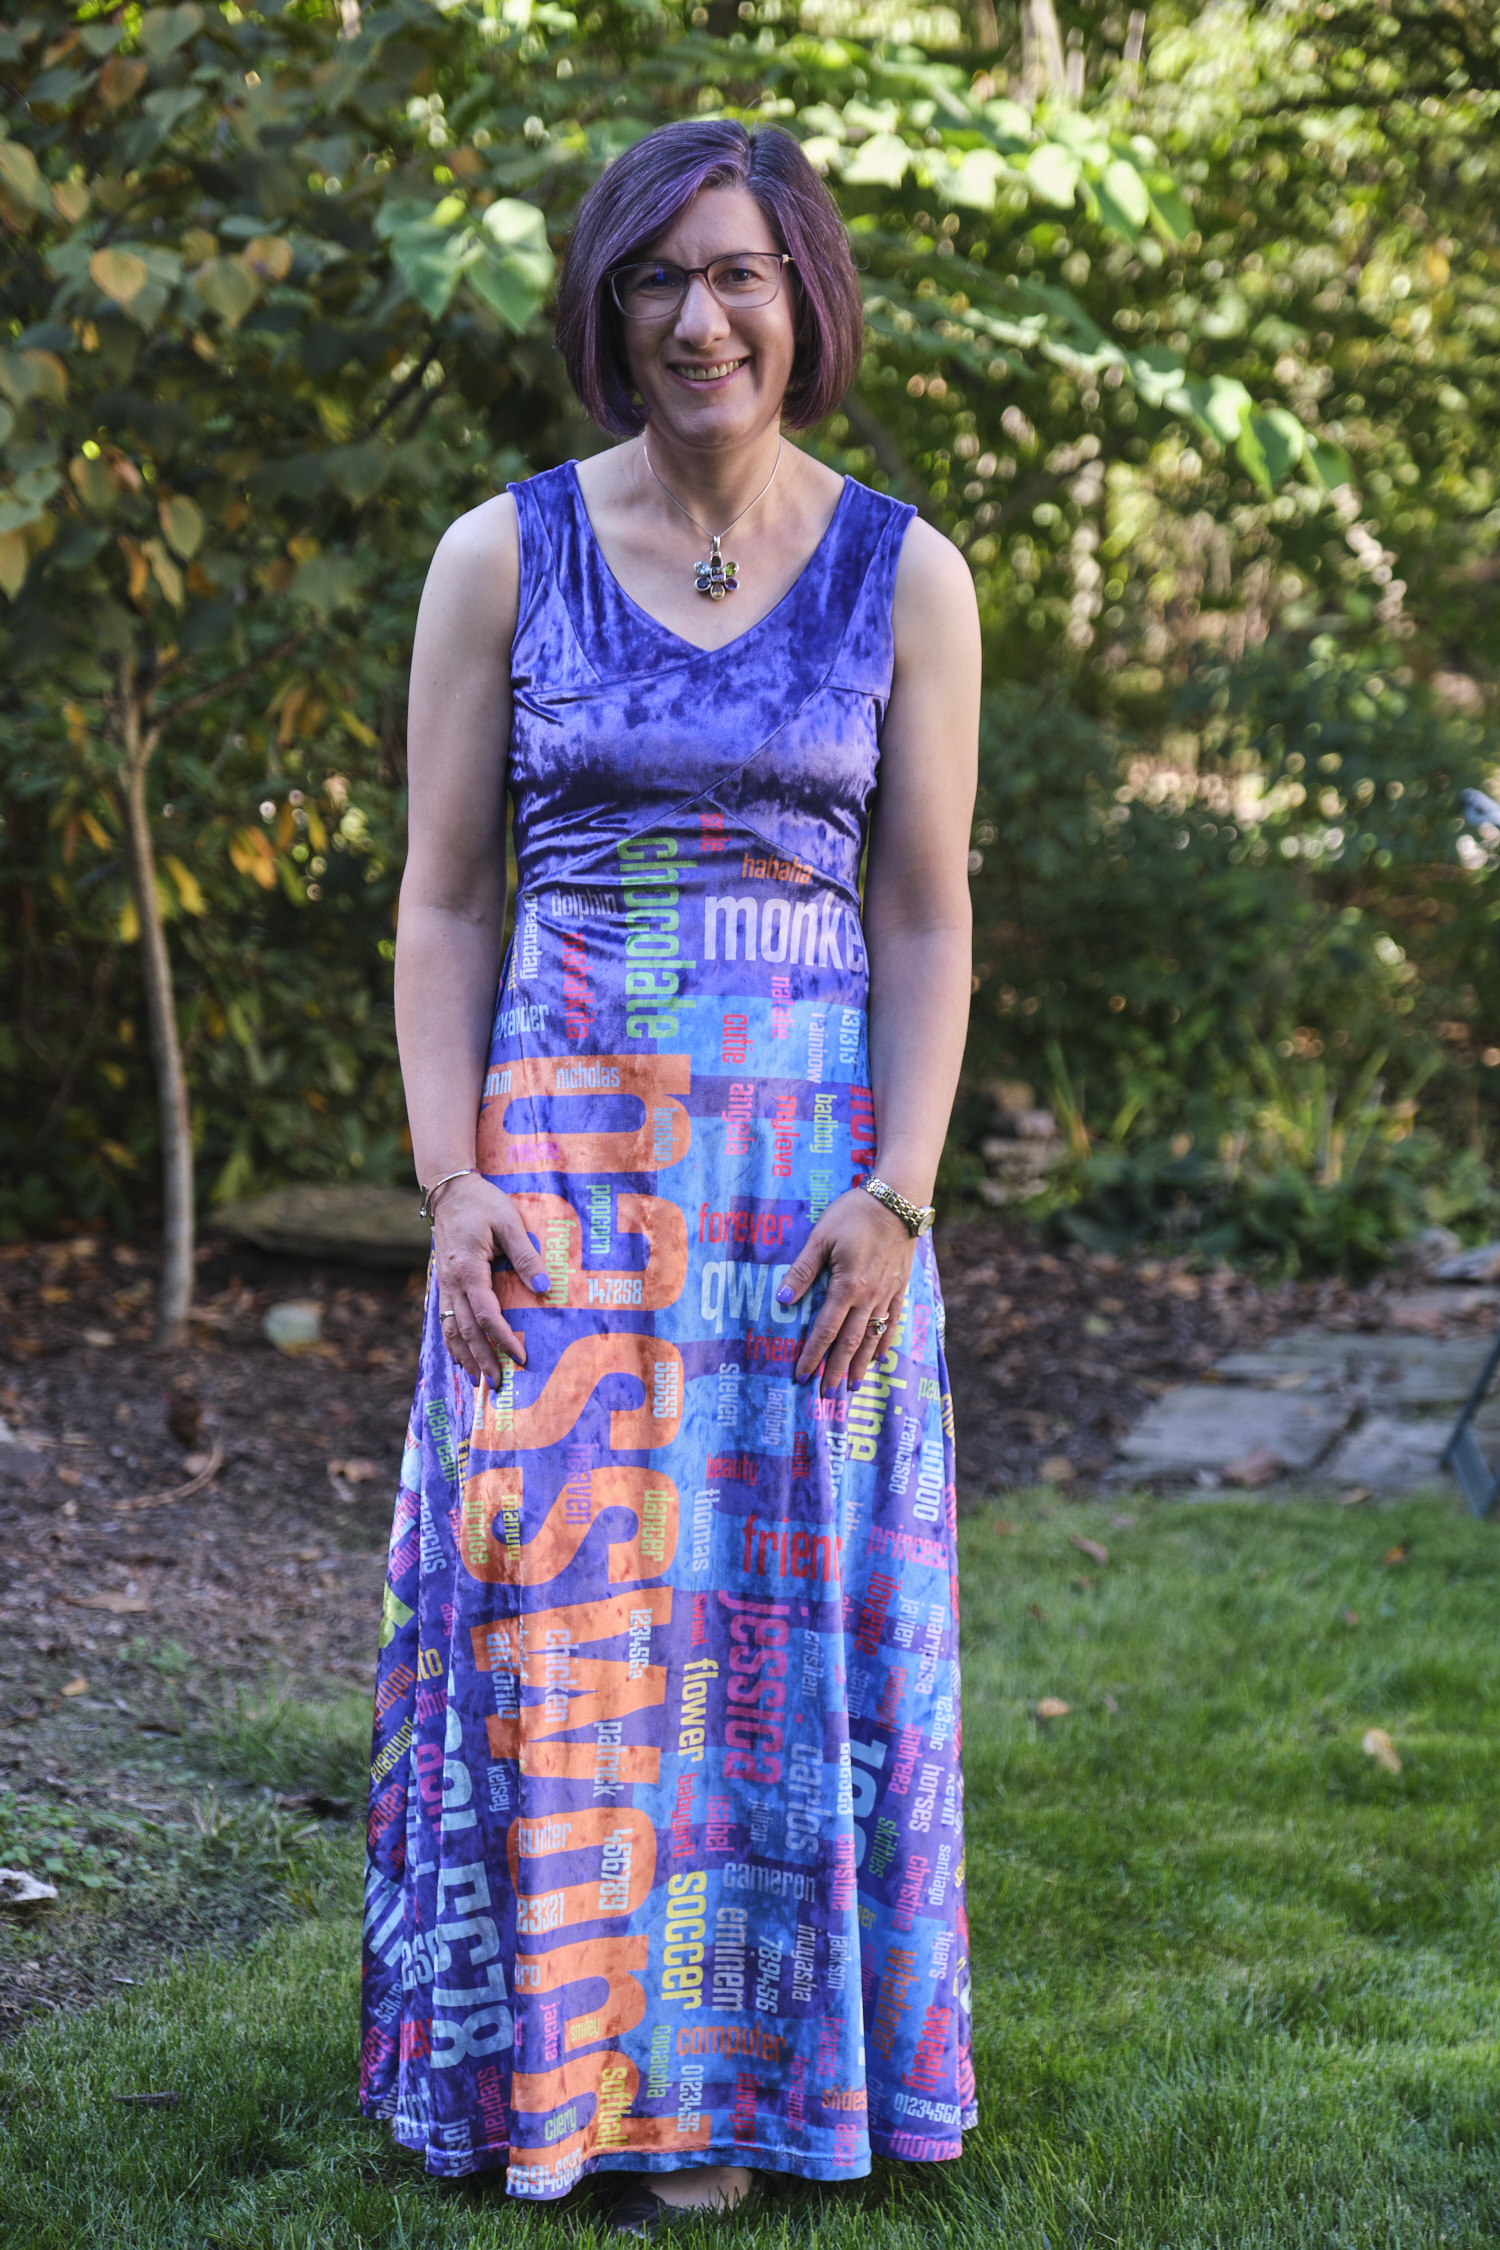
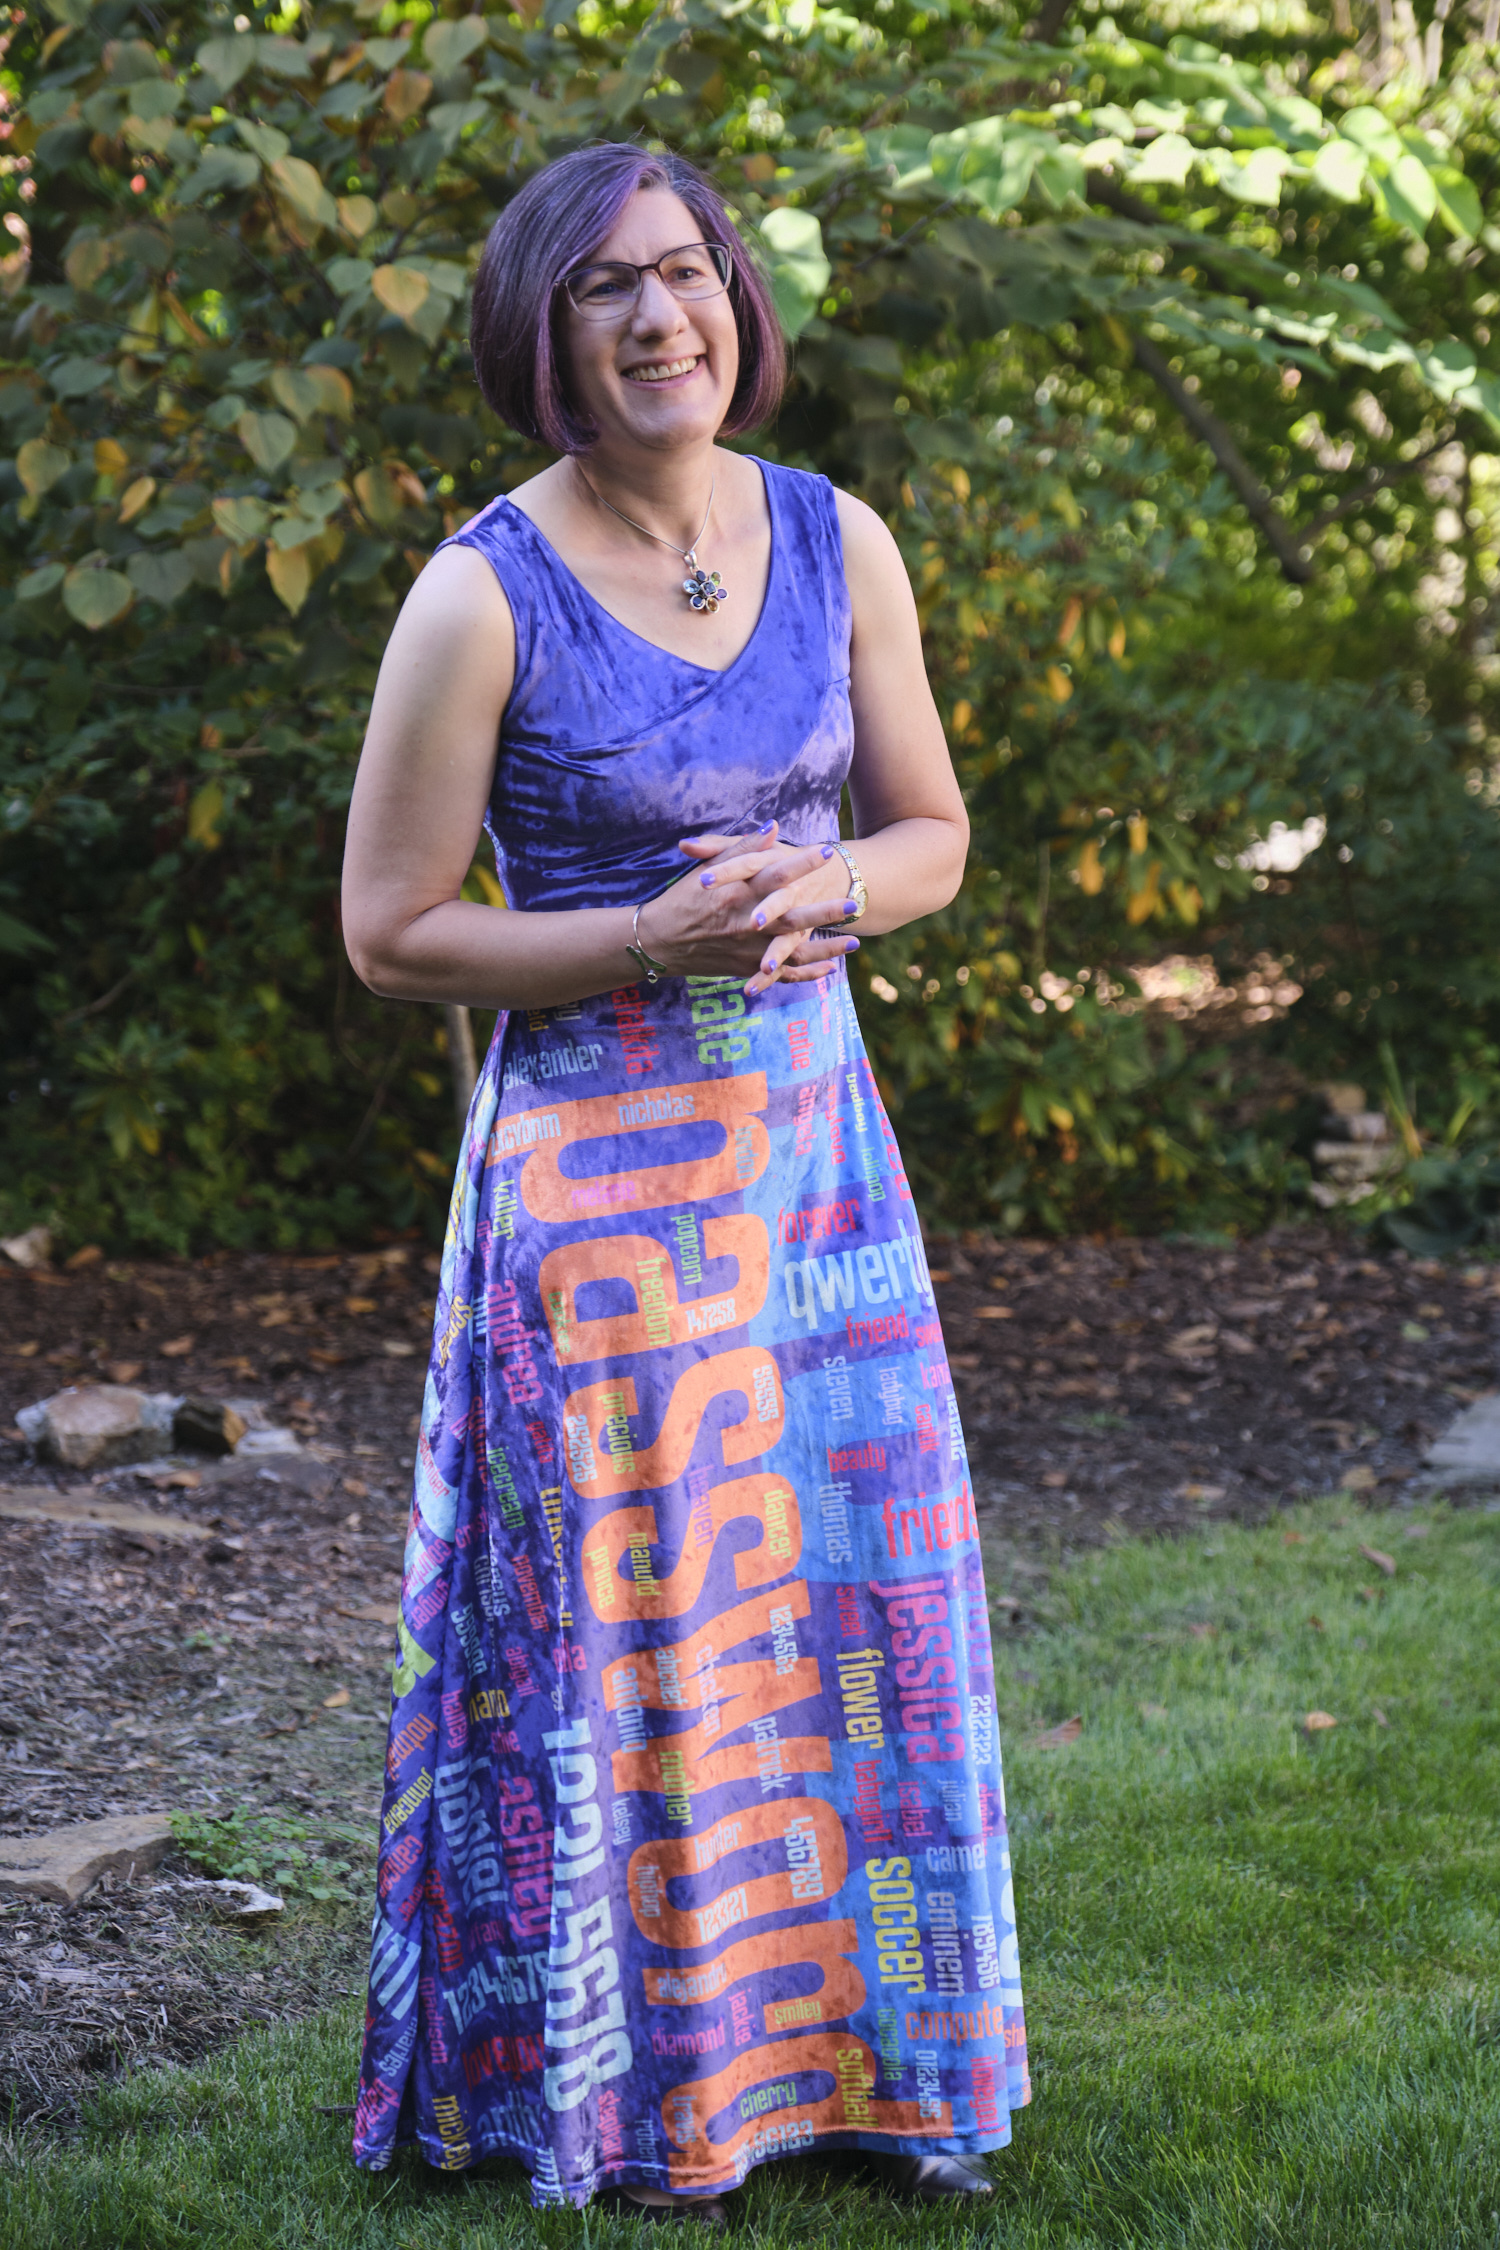
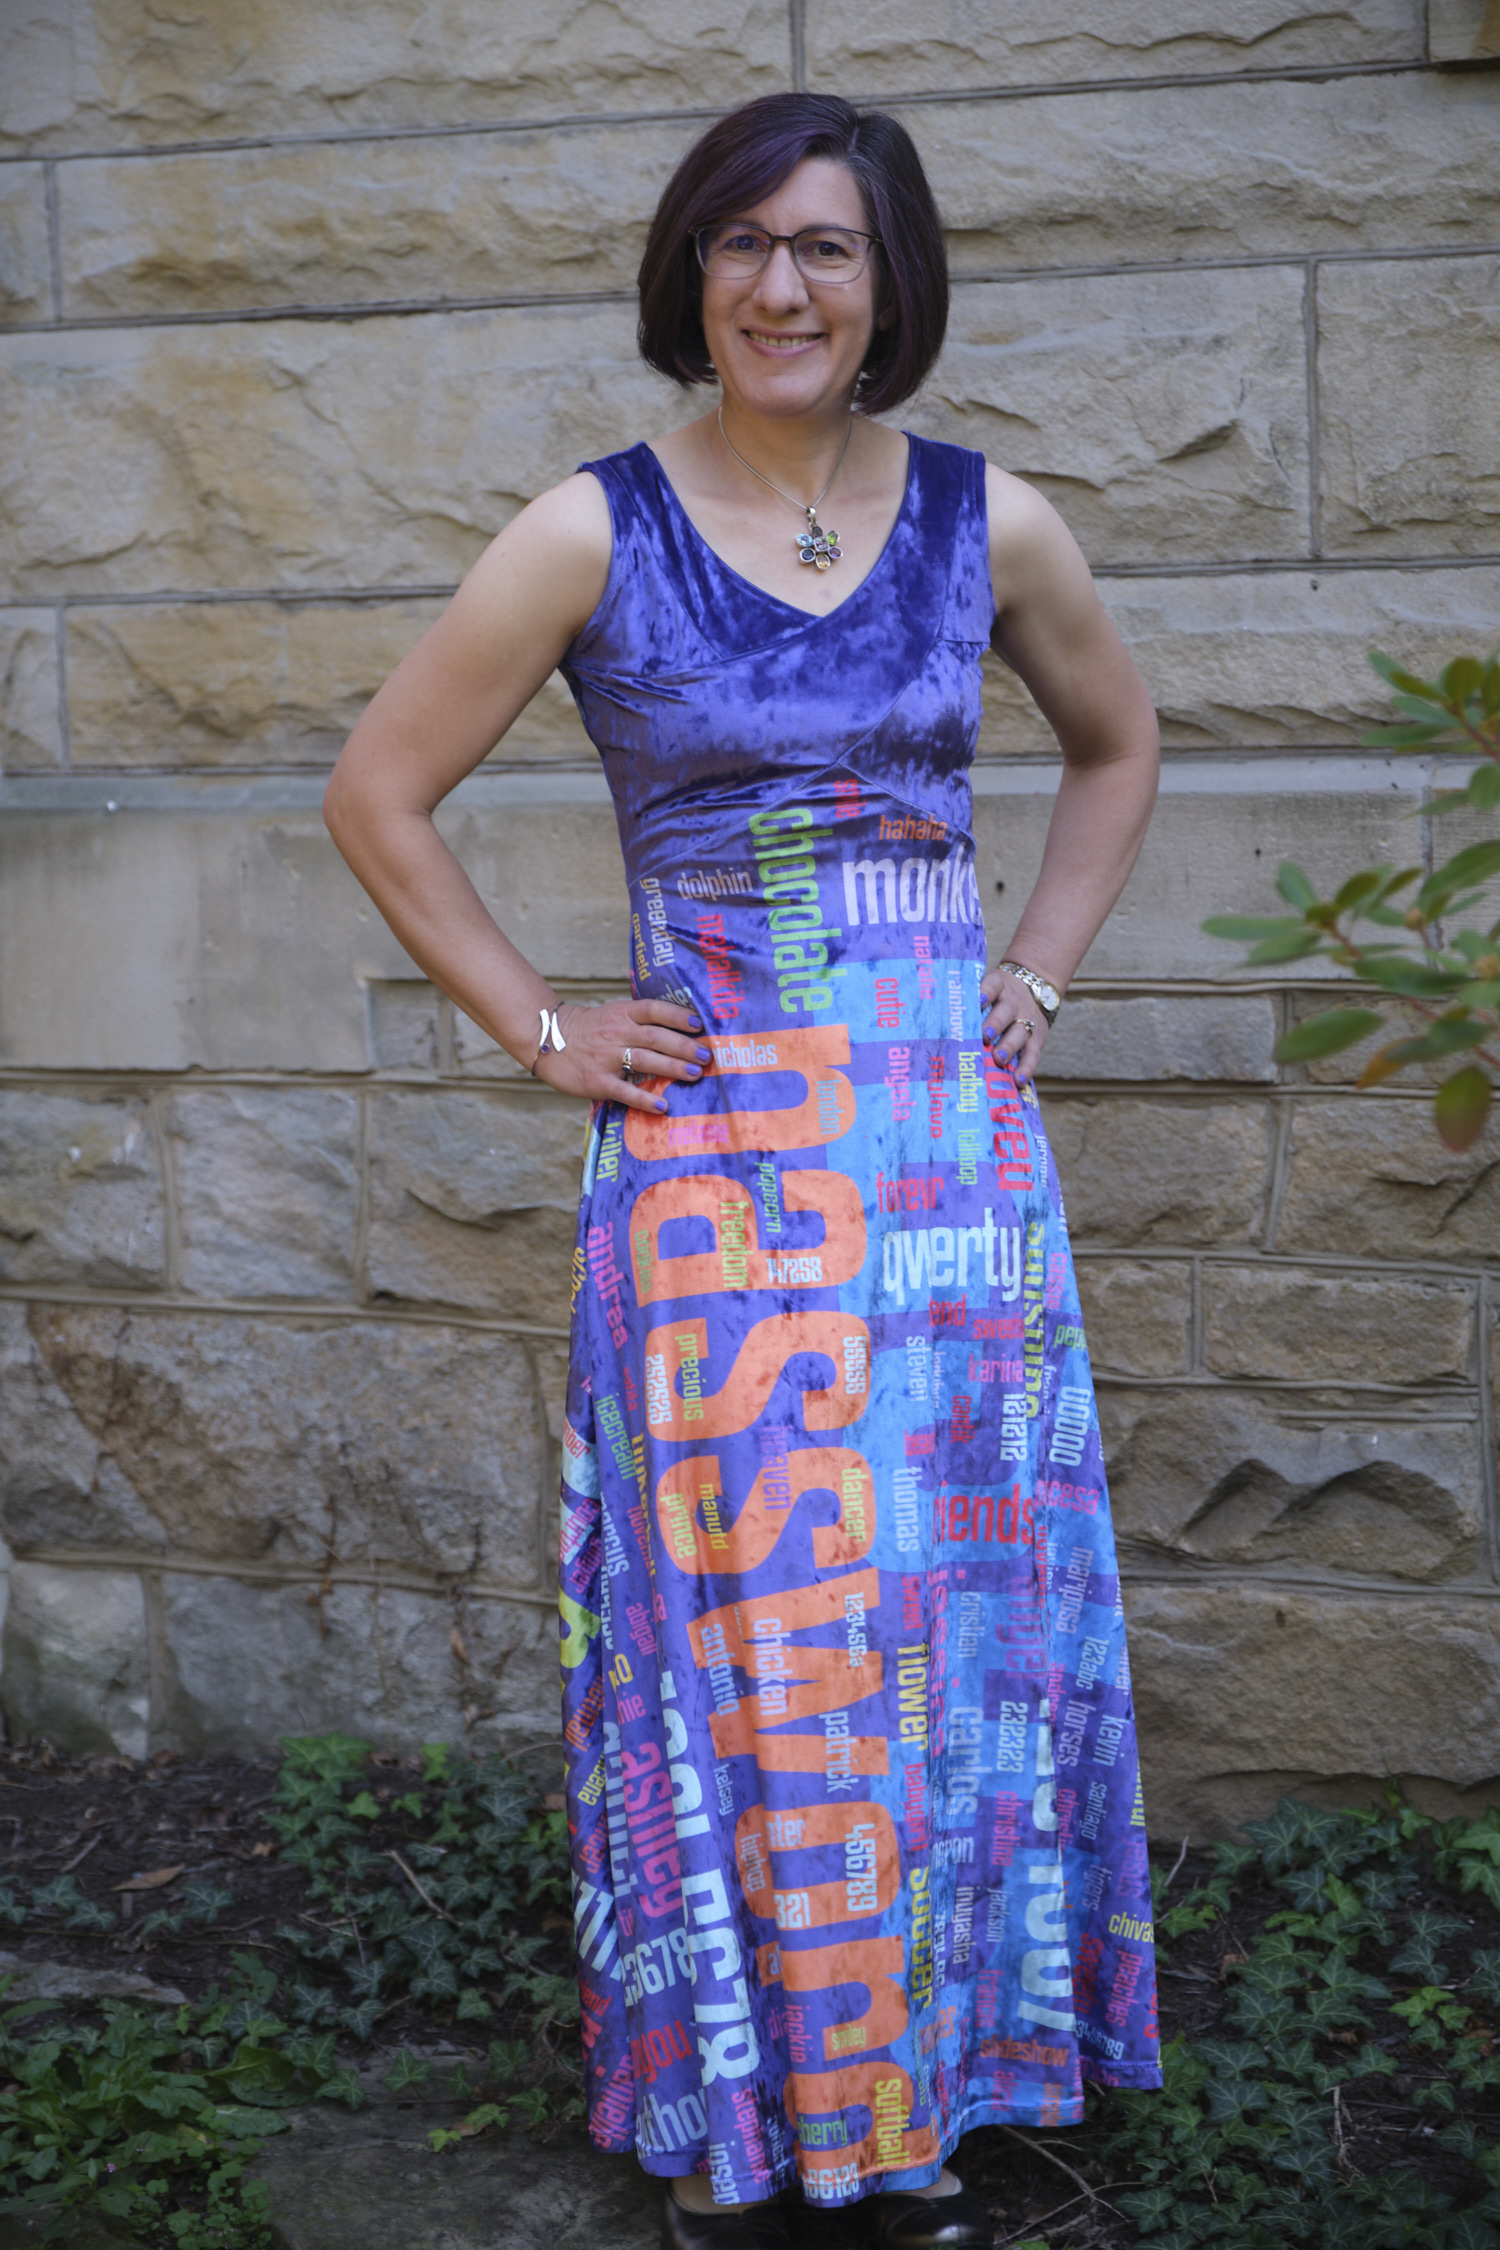
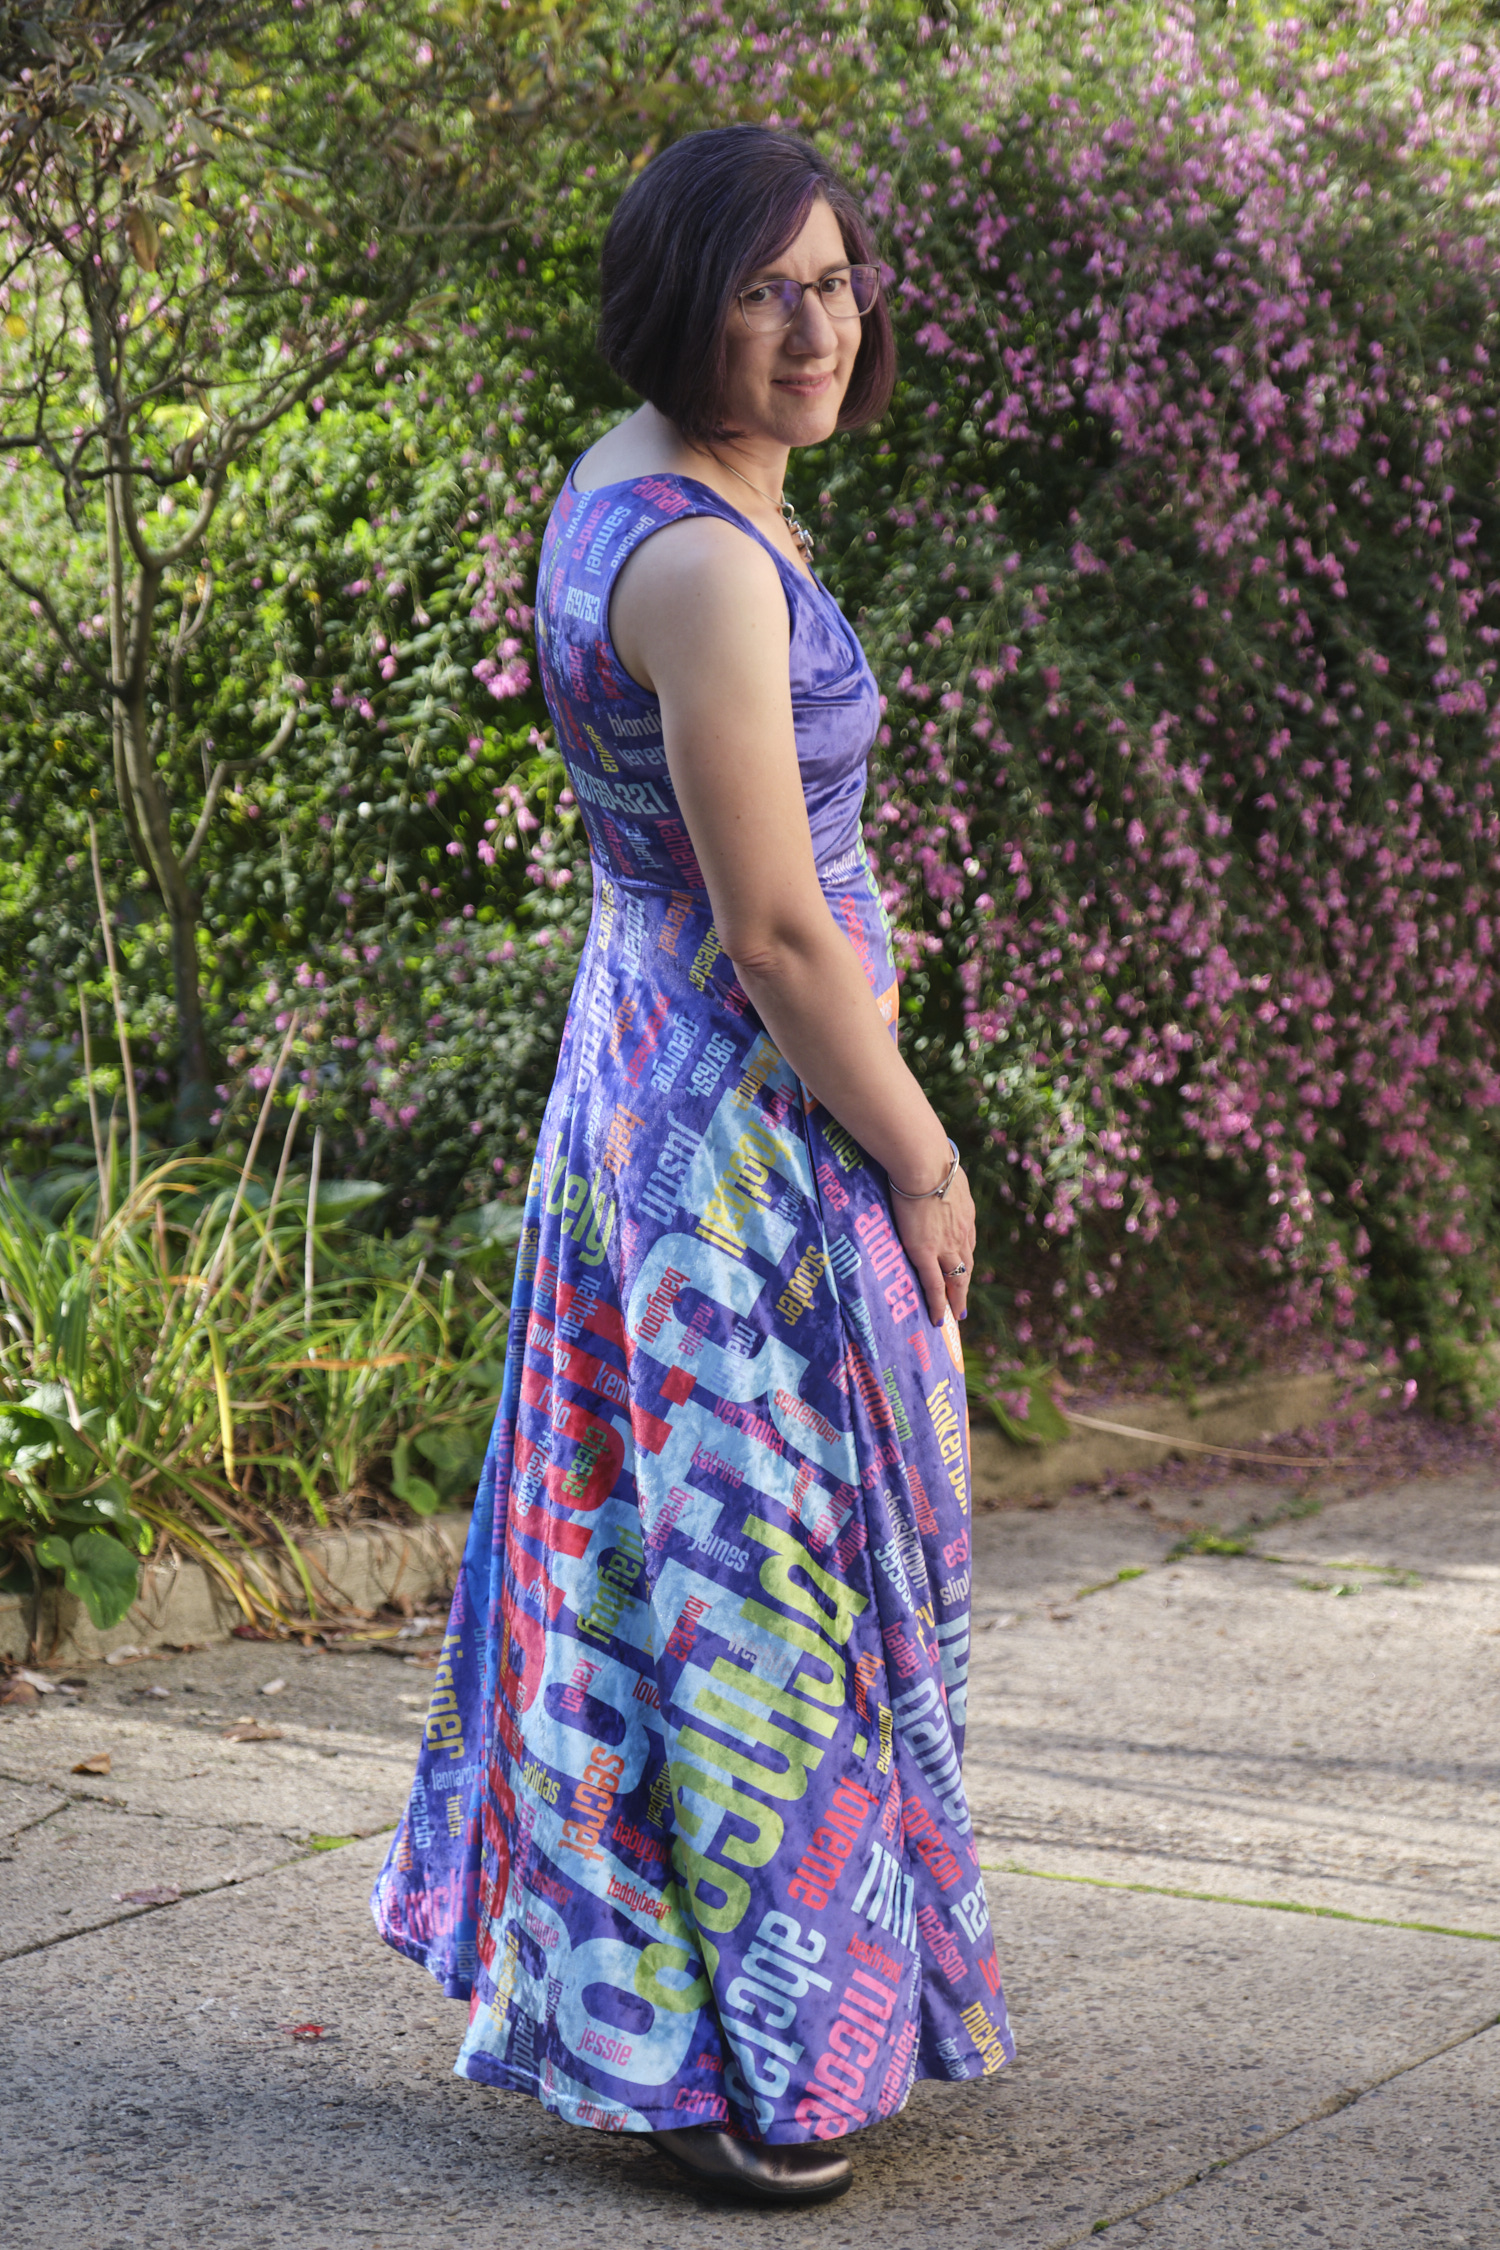
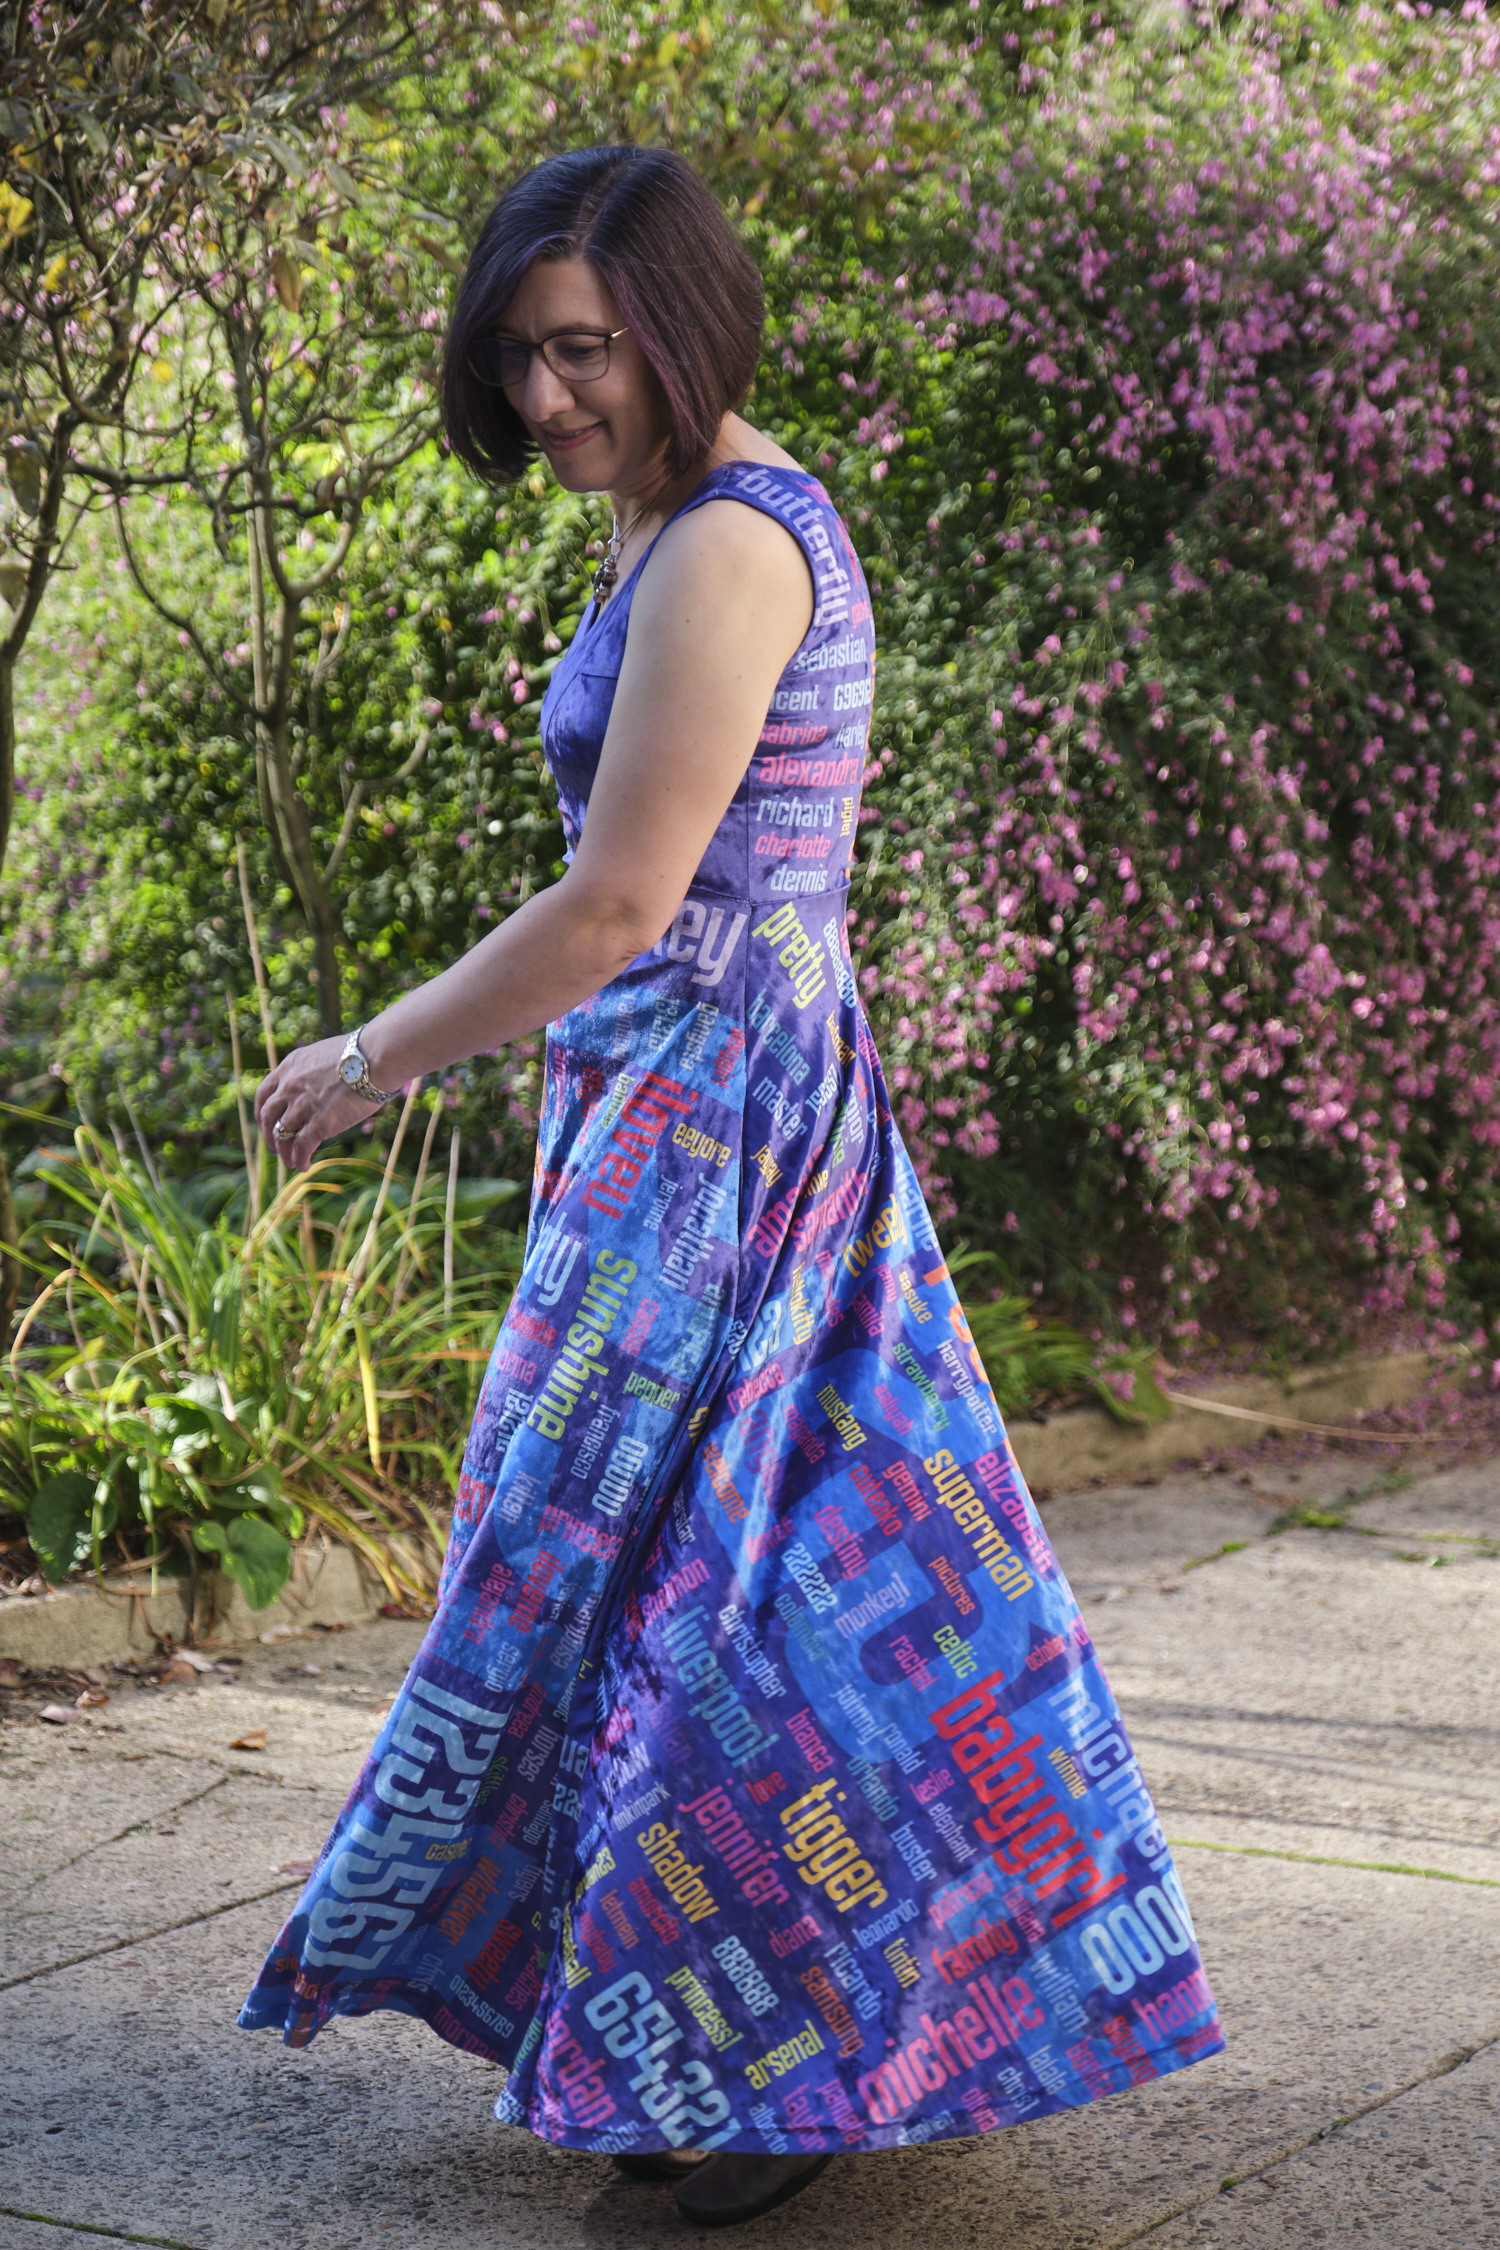
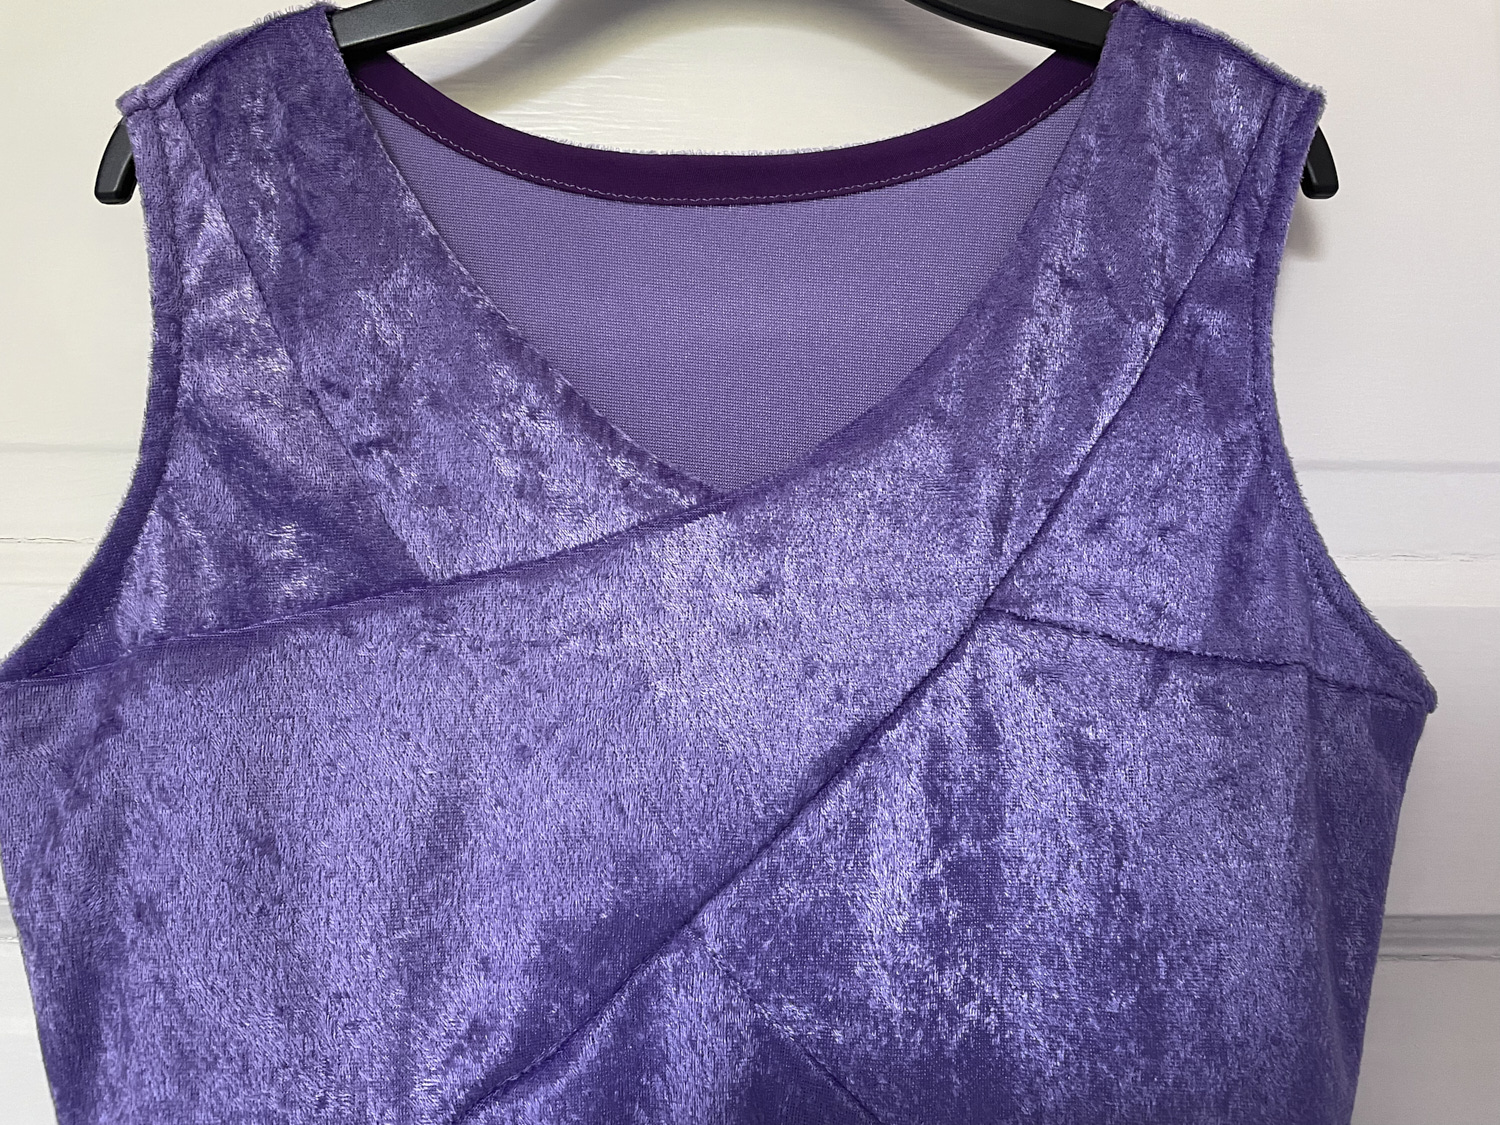
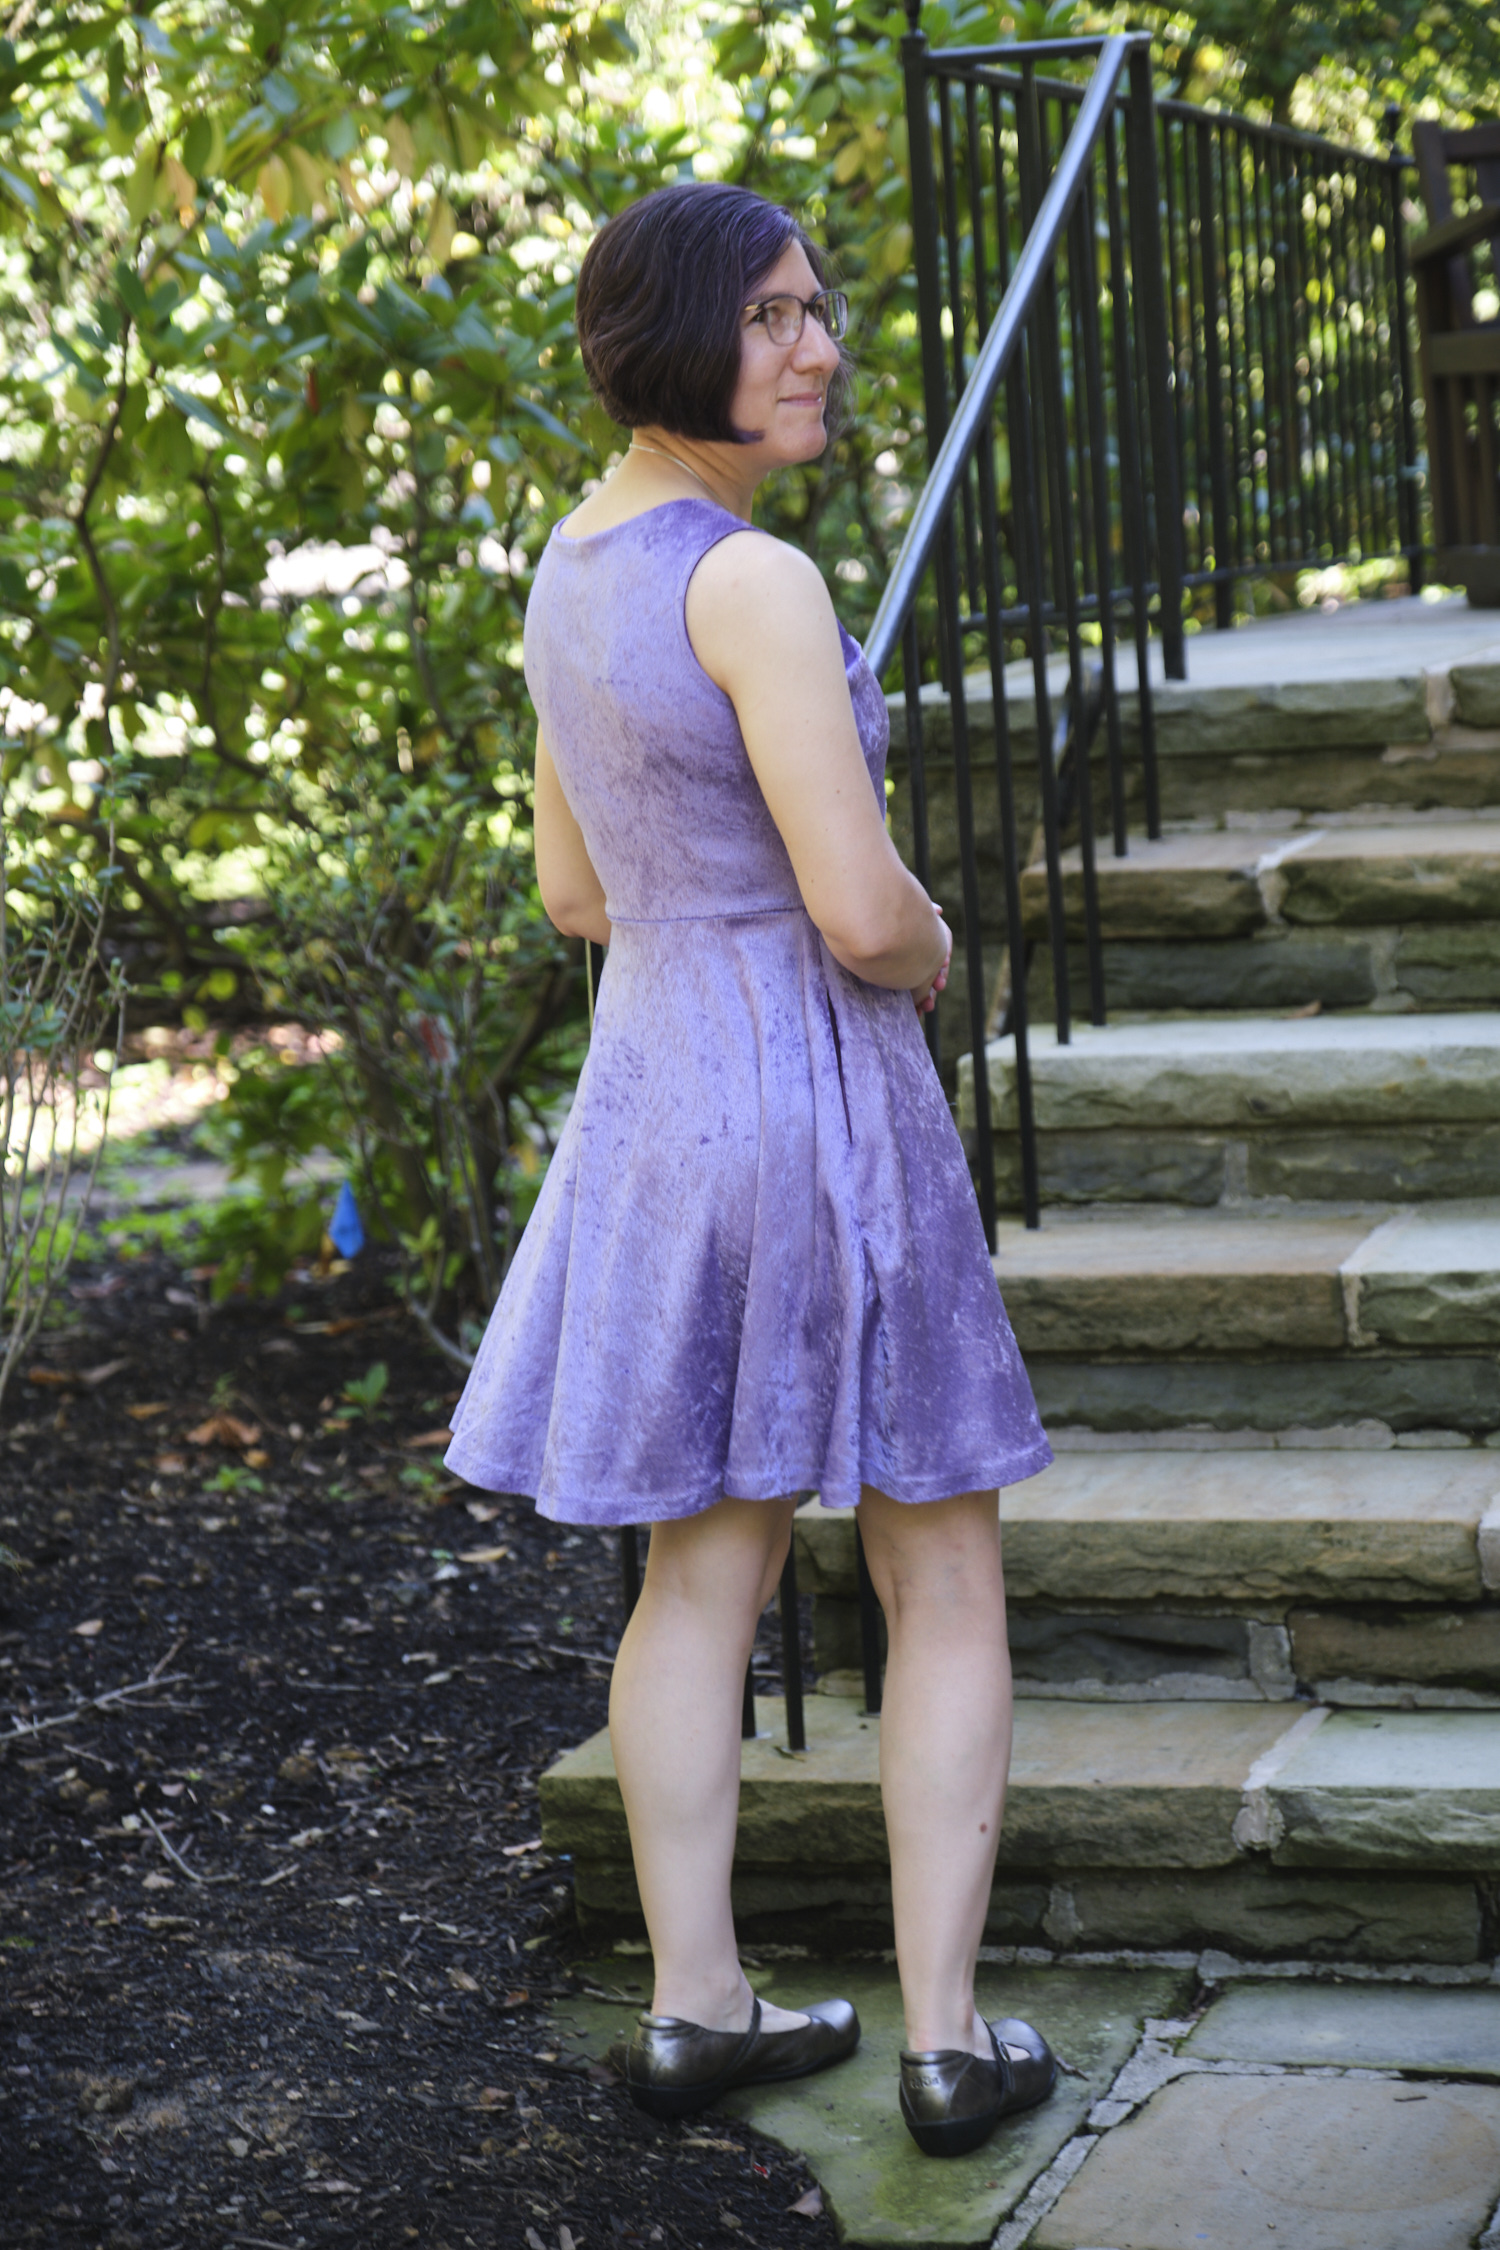
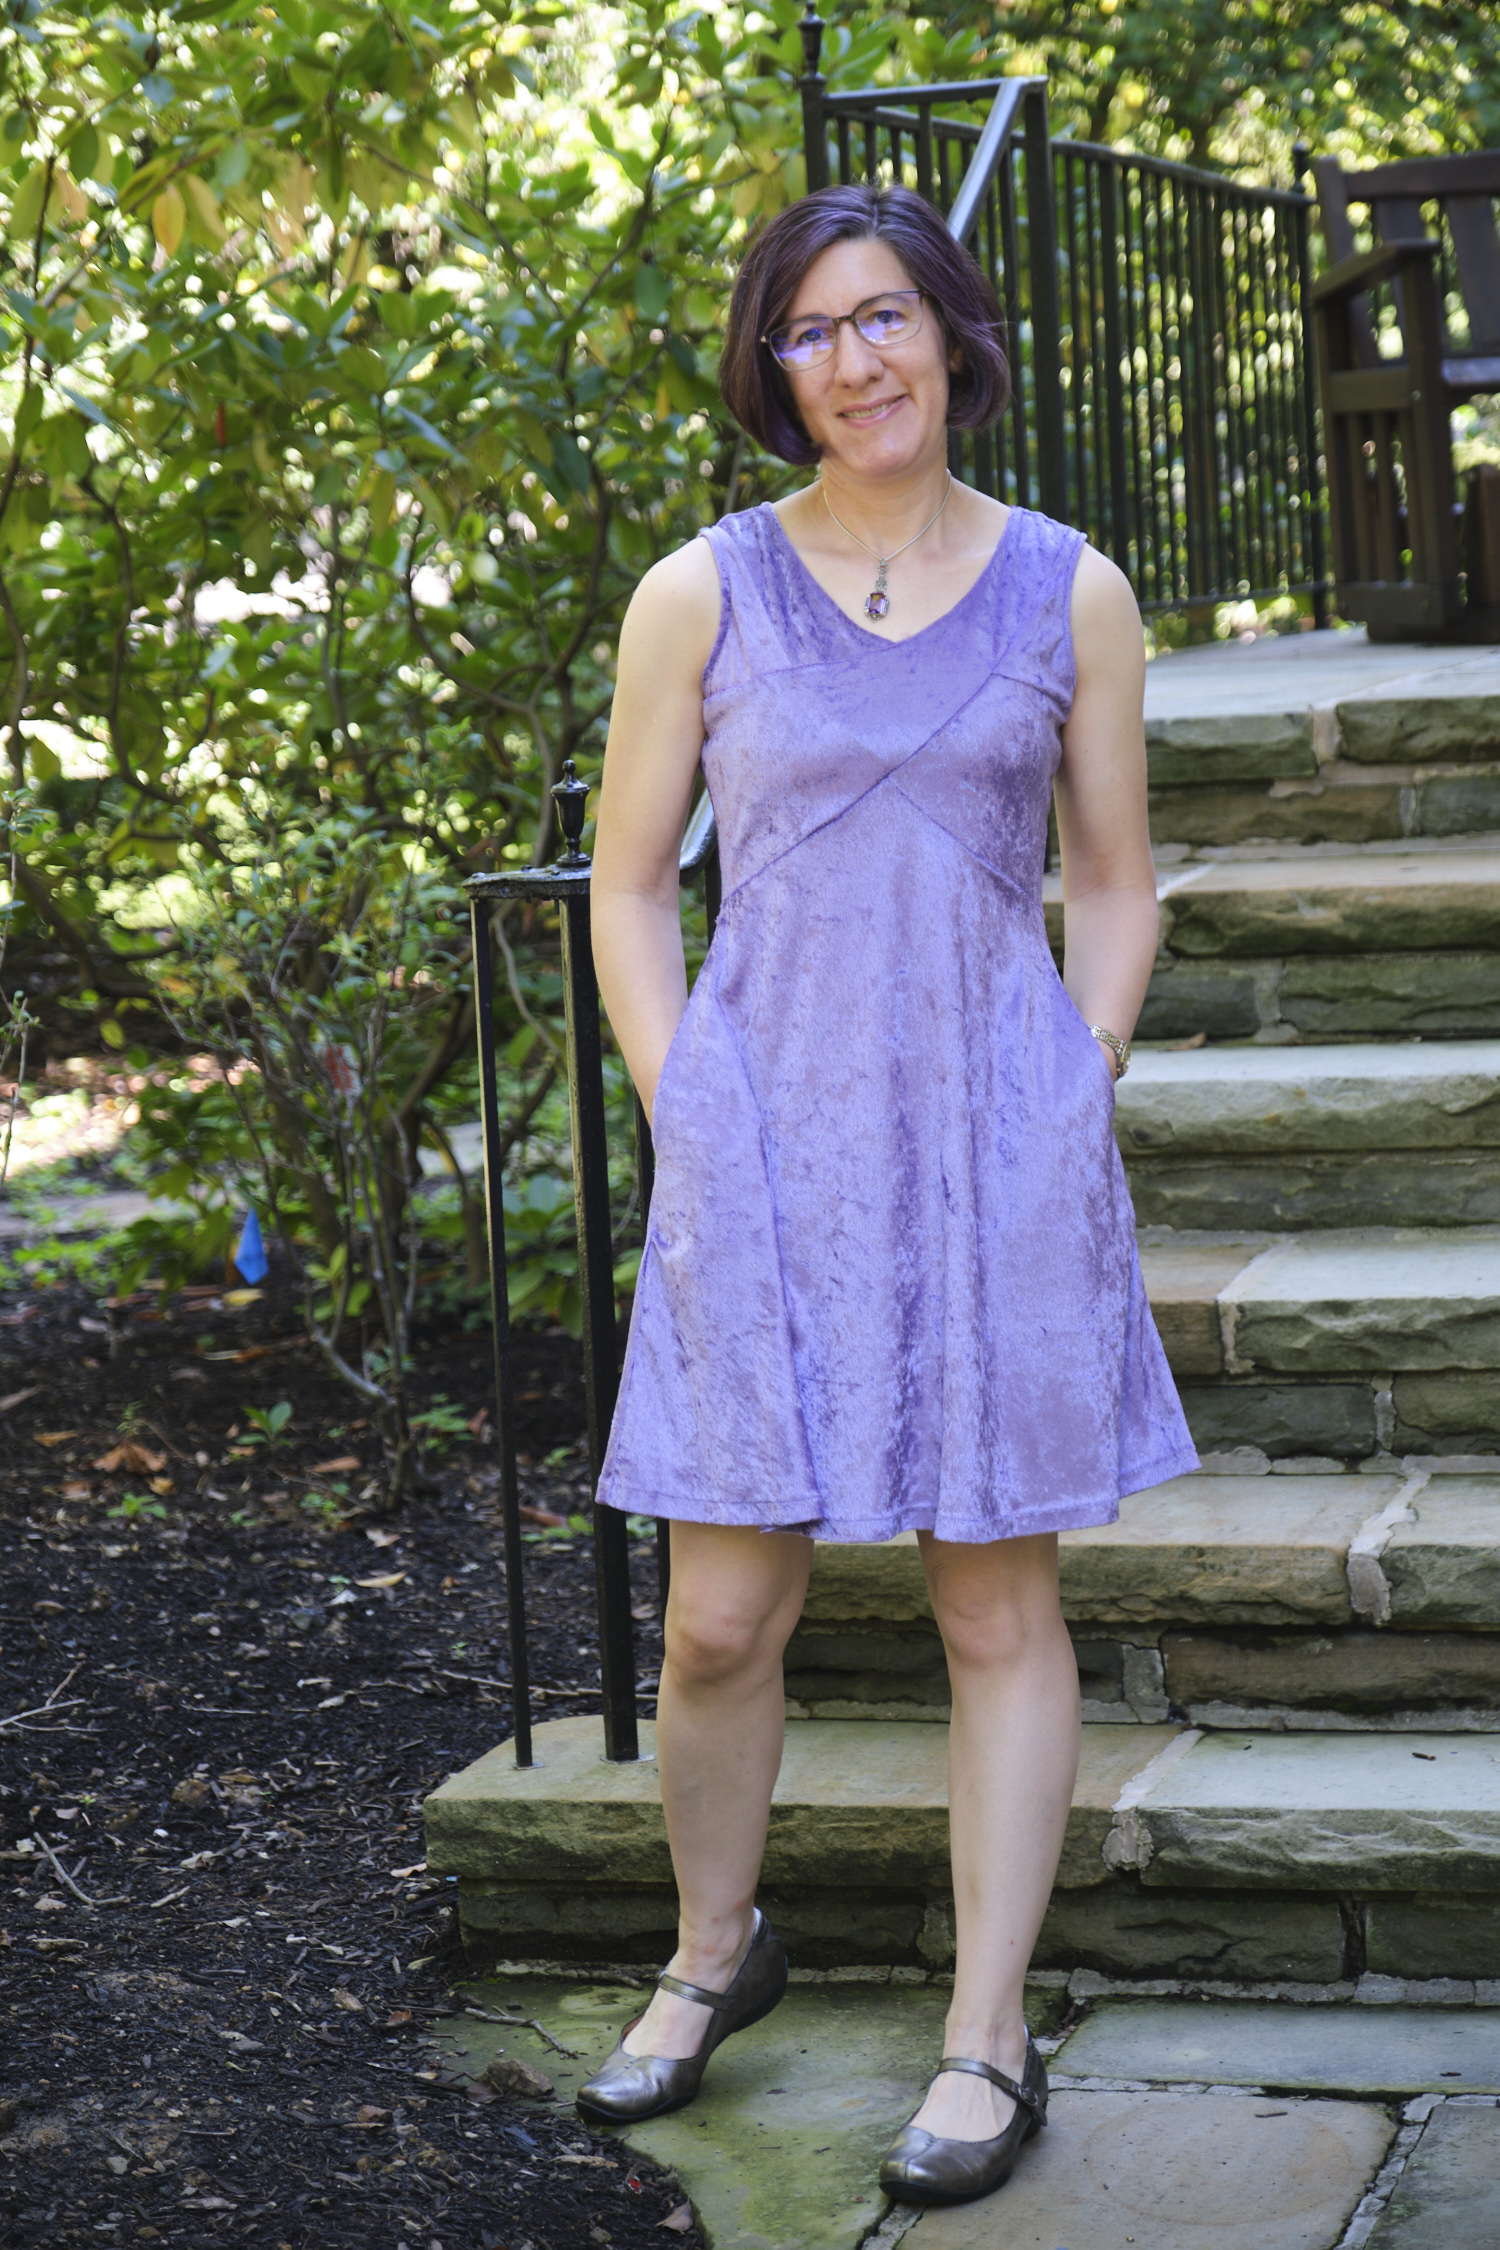
It’s made from a luxurious custom printed crushed velour fabric from Contrado. It’s vibrant and shiny, especially in the sun. And it feels stretchy and soft and is the most comfortable ball gown ever. All of my past custom password fabric orders have been from spoonflower.com. But they didn’t offer a suitable fabric that was both dressy and stretchy, so I started looking for other custom fabric vendors. Contrado is based in the UK so I was a little bit uncertain about placing an international order, but they offer a ton of fabric options so I ordered a fabric swatch kit. A few days later I opened an envelope with more fabric swatches than I knew what to do with. I didn’t count them, but I think there were over 100. So many fabric choices! I dumped them out on the floor and tested each one for light weight, softness, and stretchability, narrowing down the pile to a short list of scuba variants and crushed velour. They were all nice, but I loved the feel of the crushed velour and the way it catches the light. So with that in mind I ordered some cheap crushed velour to make a muslin of the pattern I intended to make (Sinclair Serena), but at a shorter length. The cheap crushed velour did not feel luxurious at all, but it made a nice dressy summer dress that I have worn several times this summer.
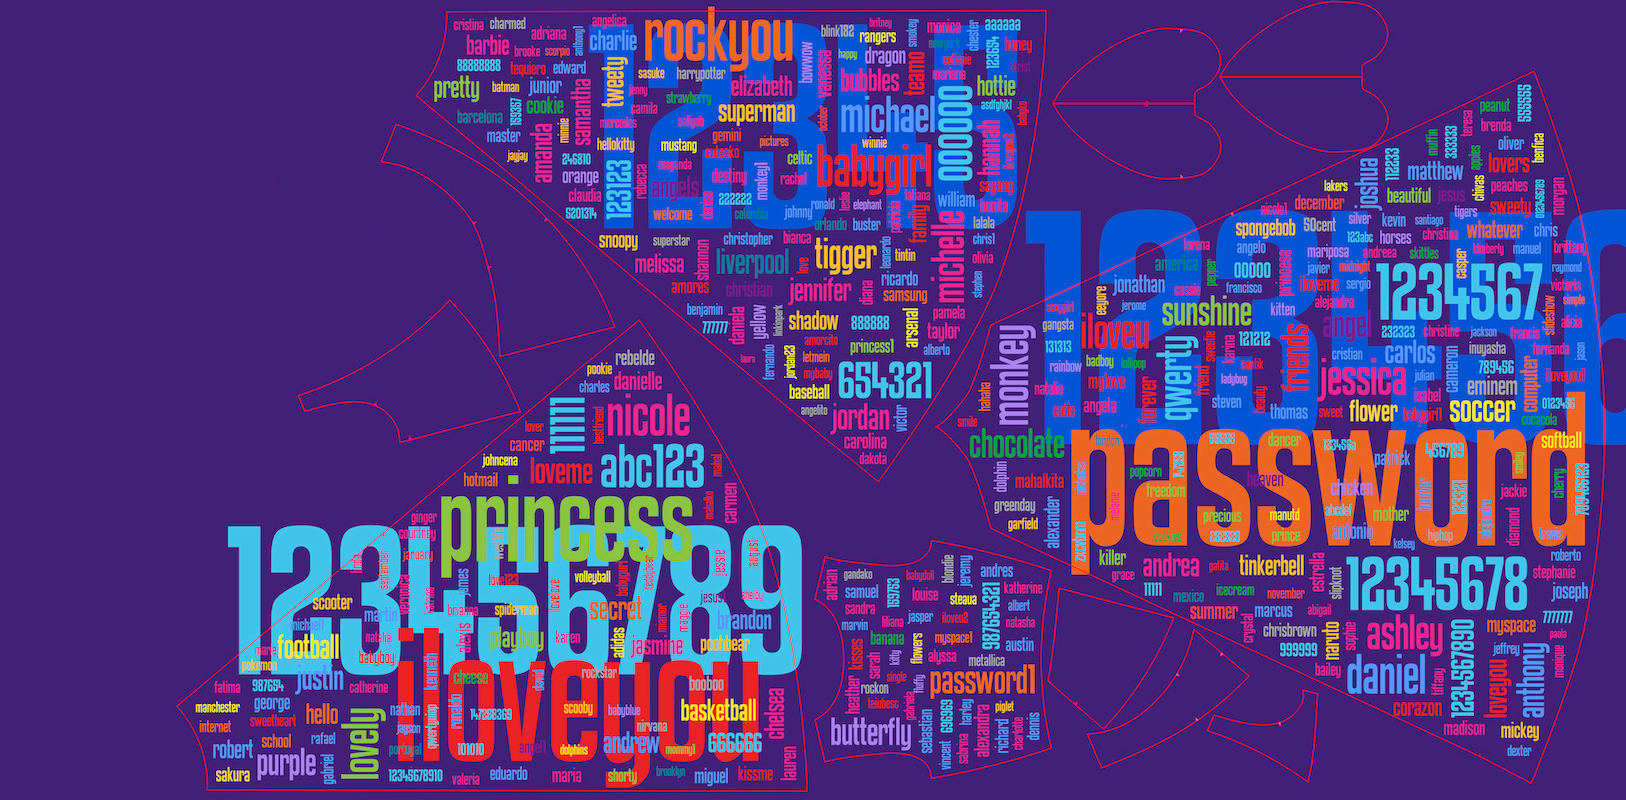
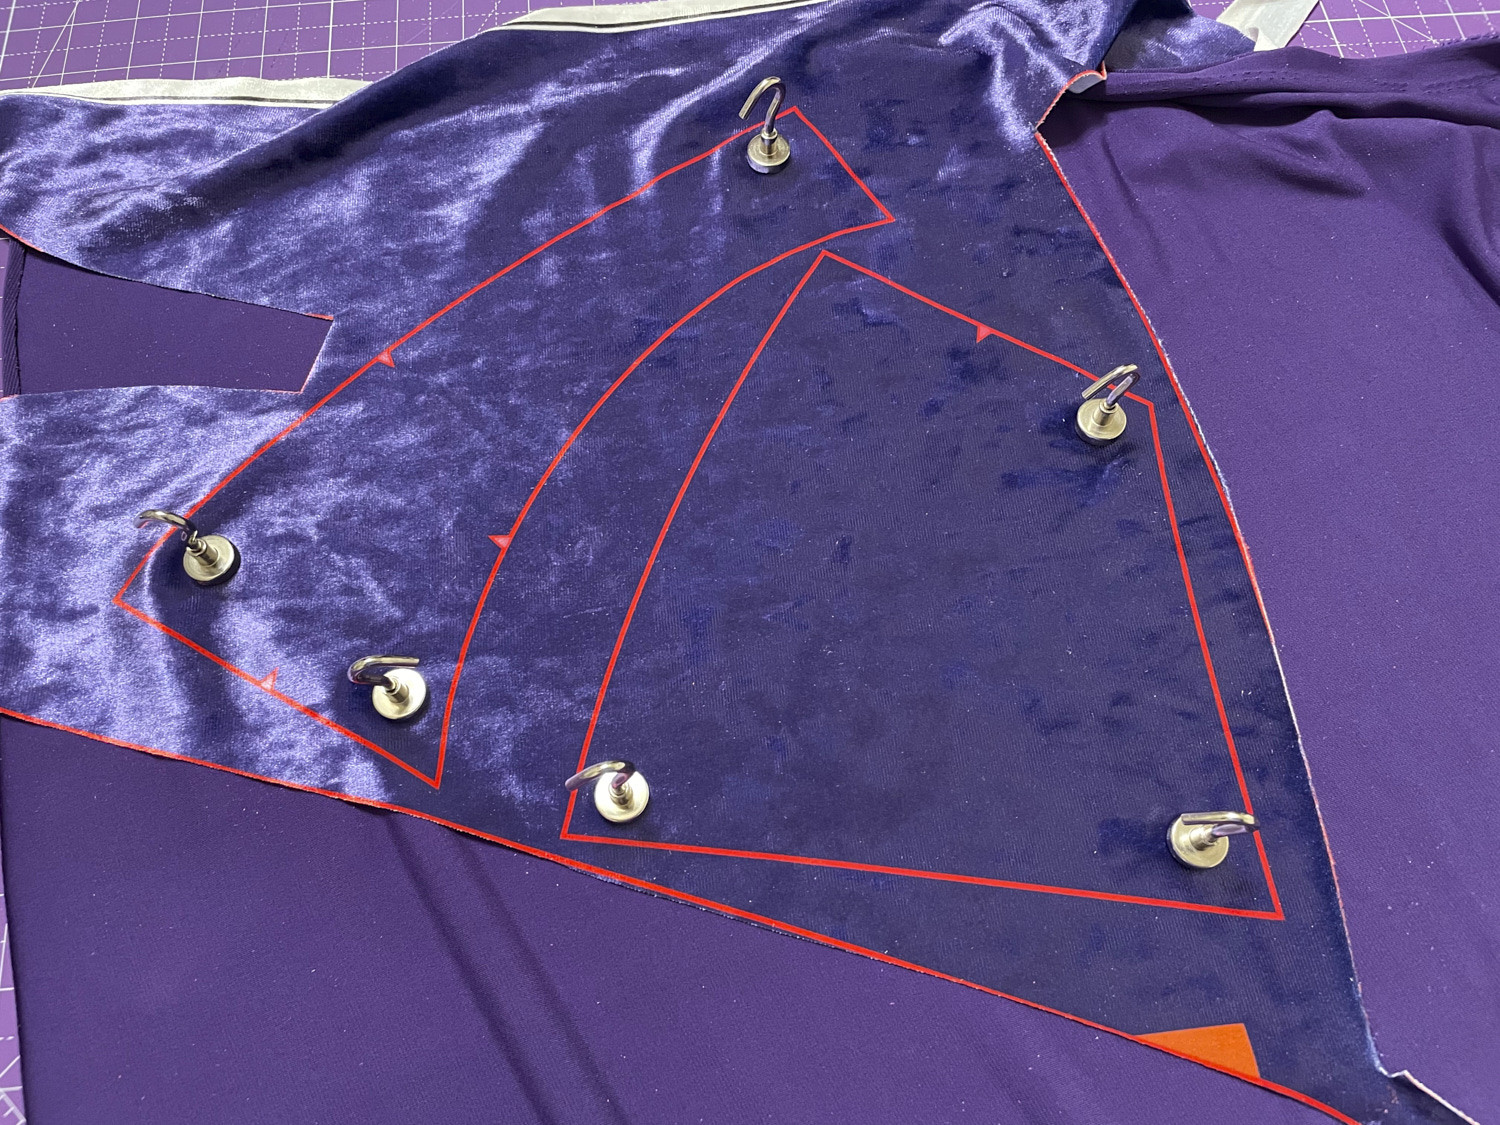
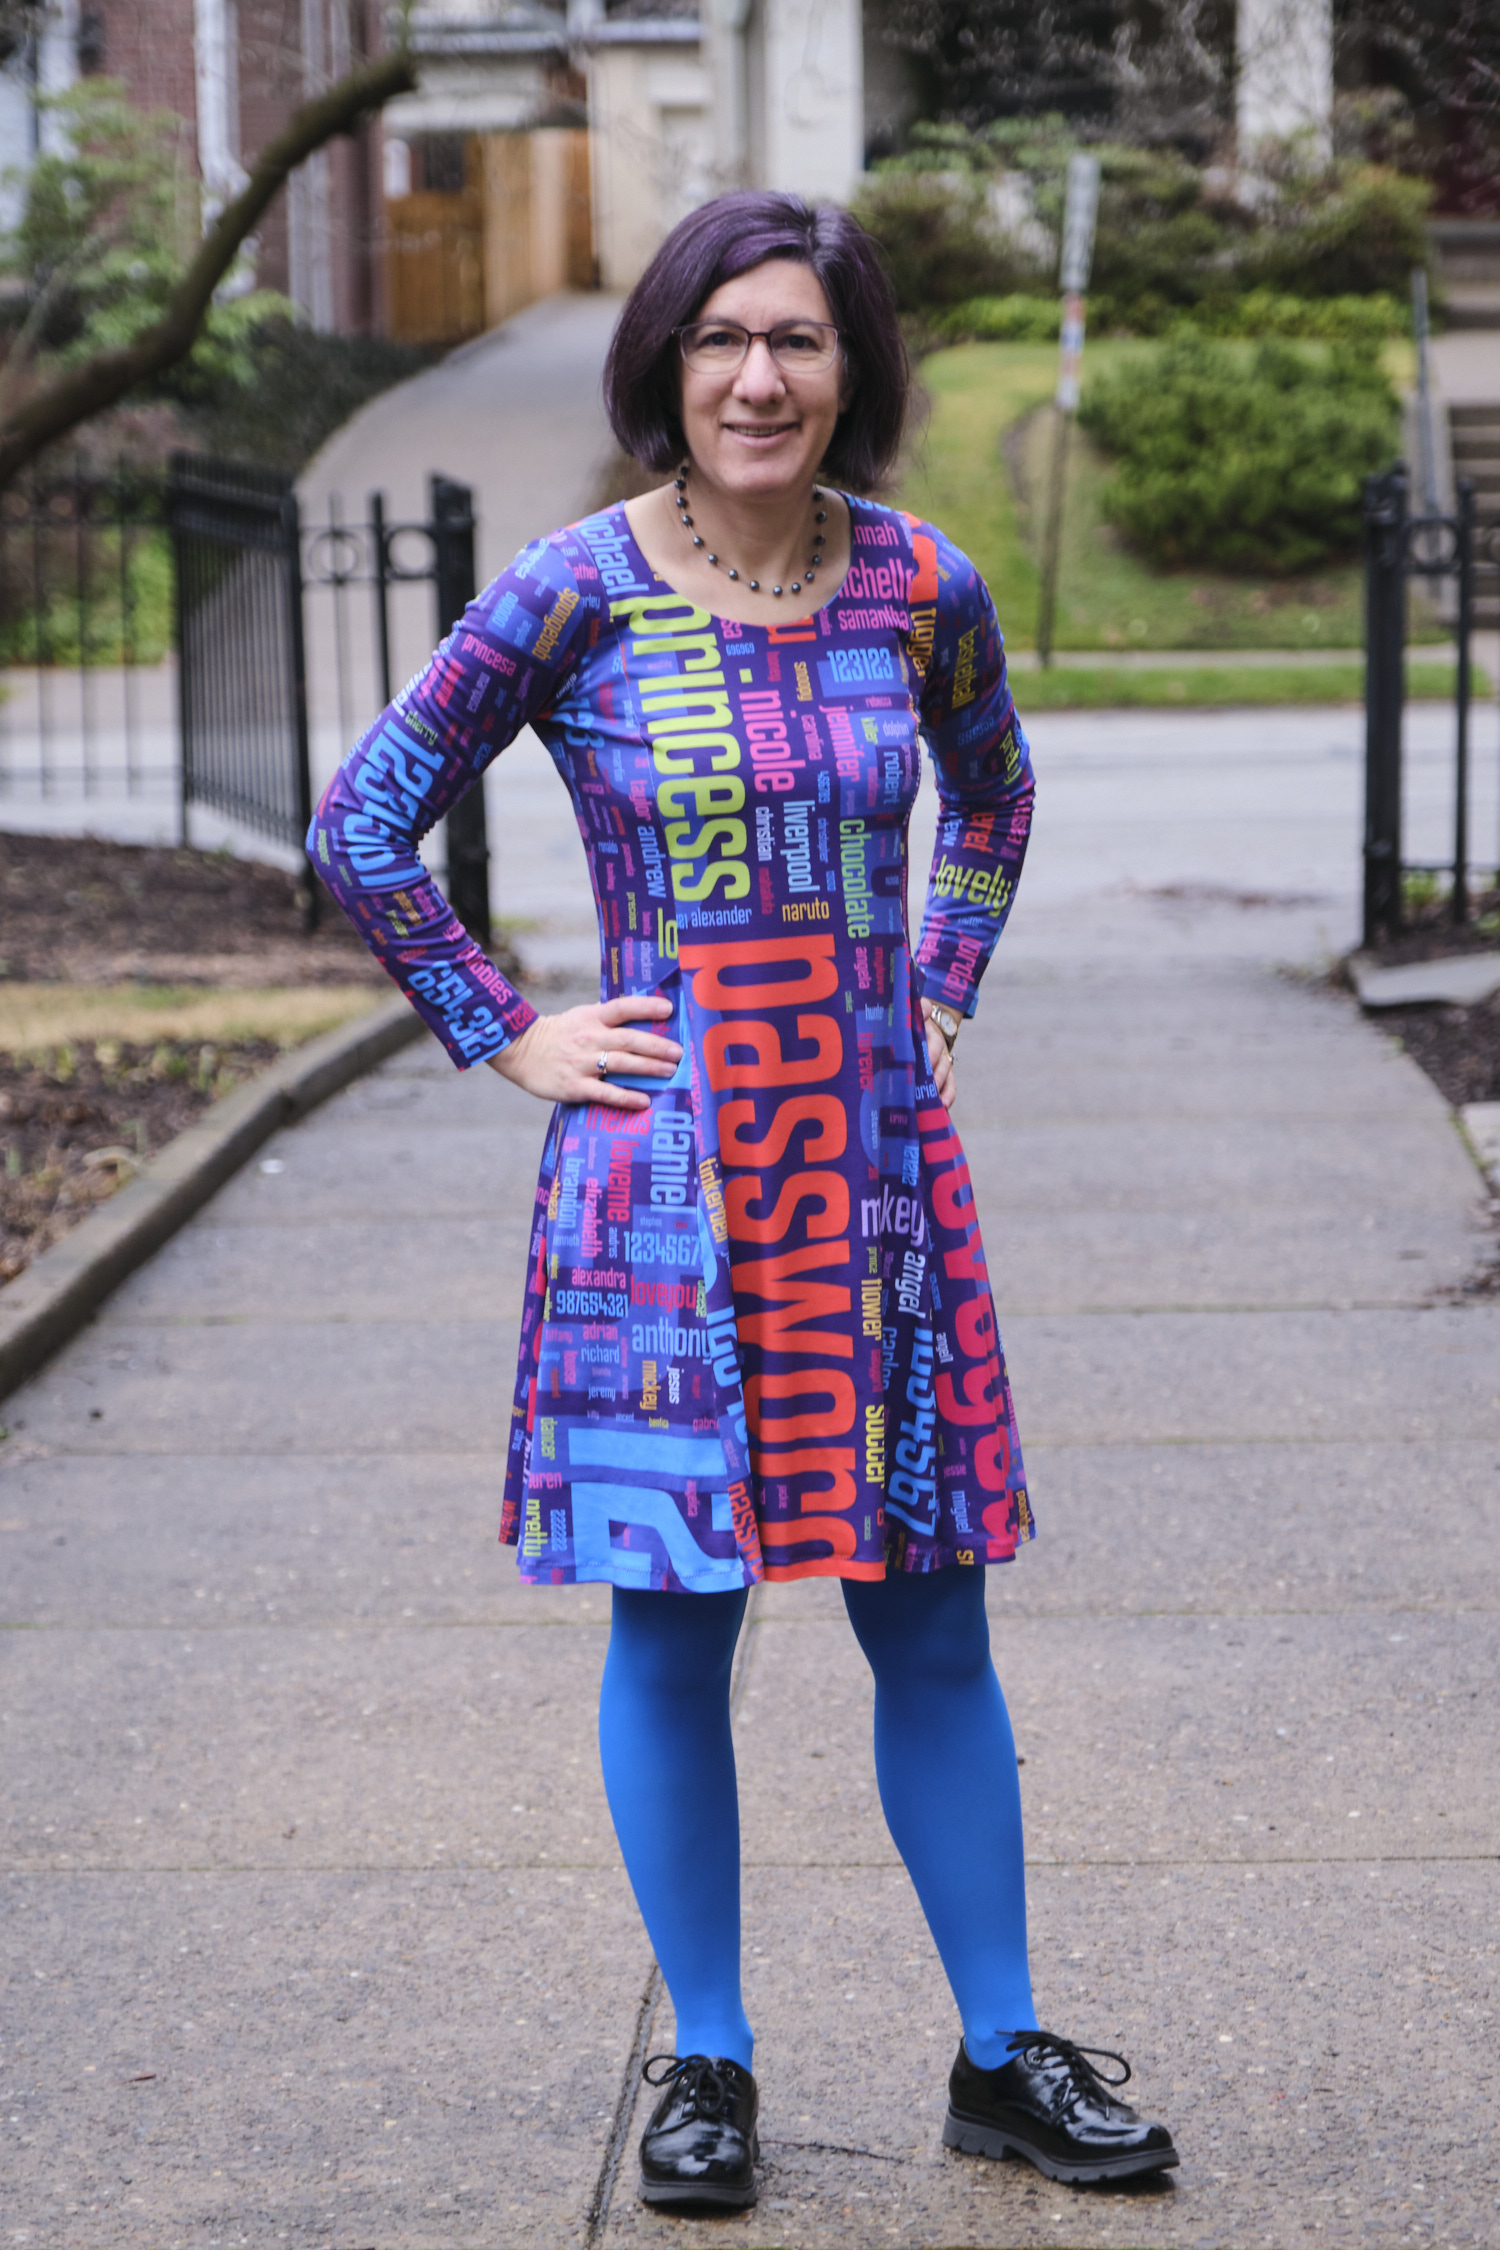
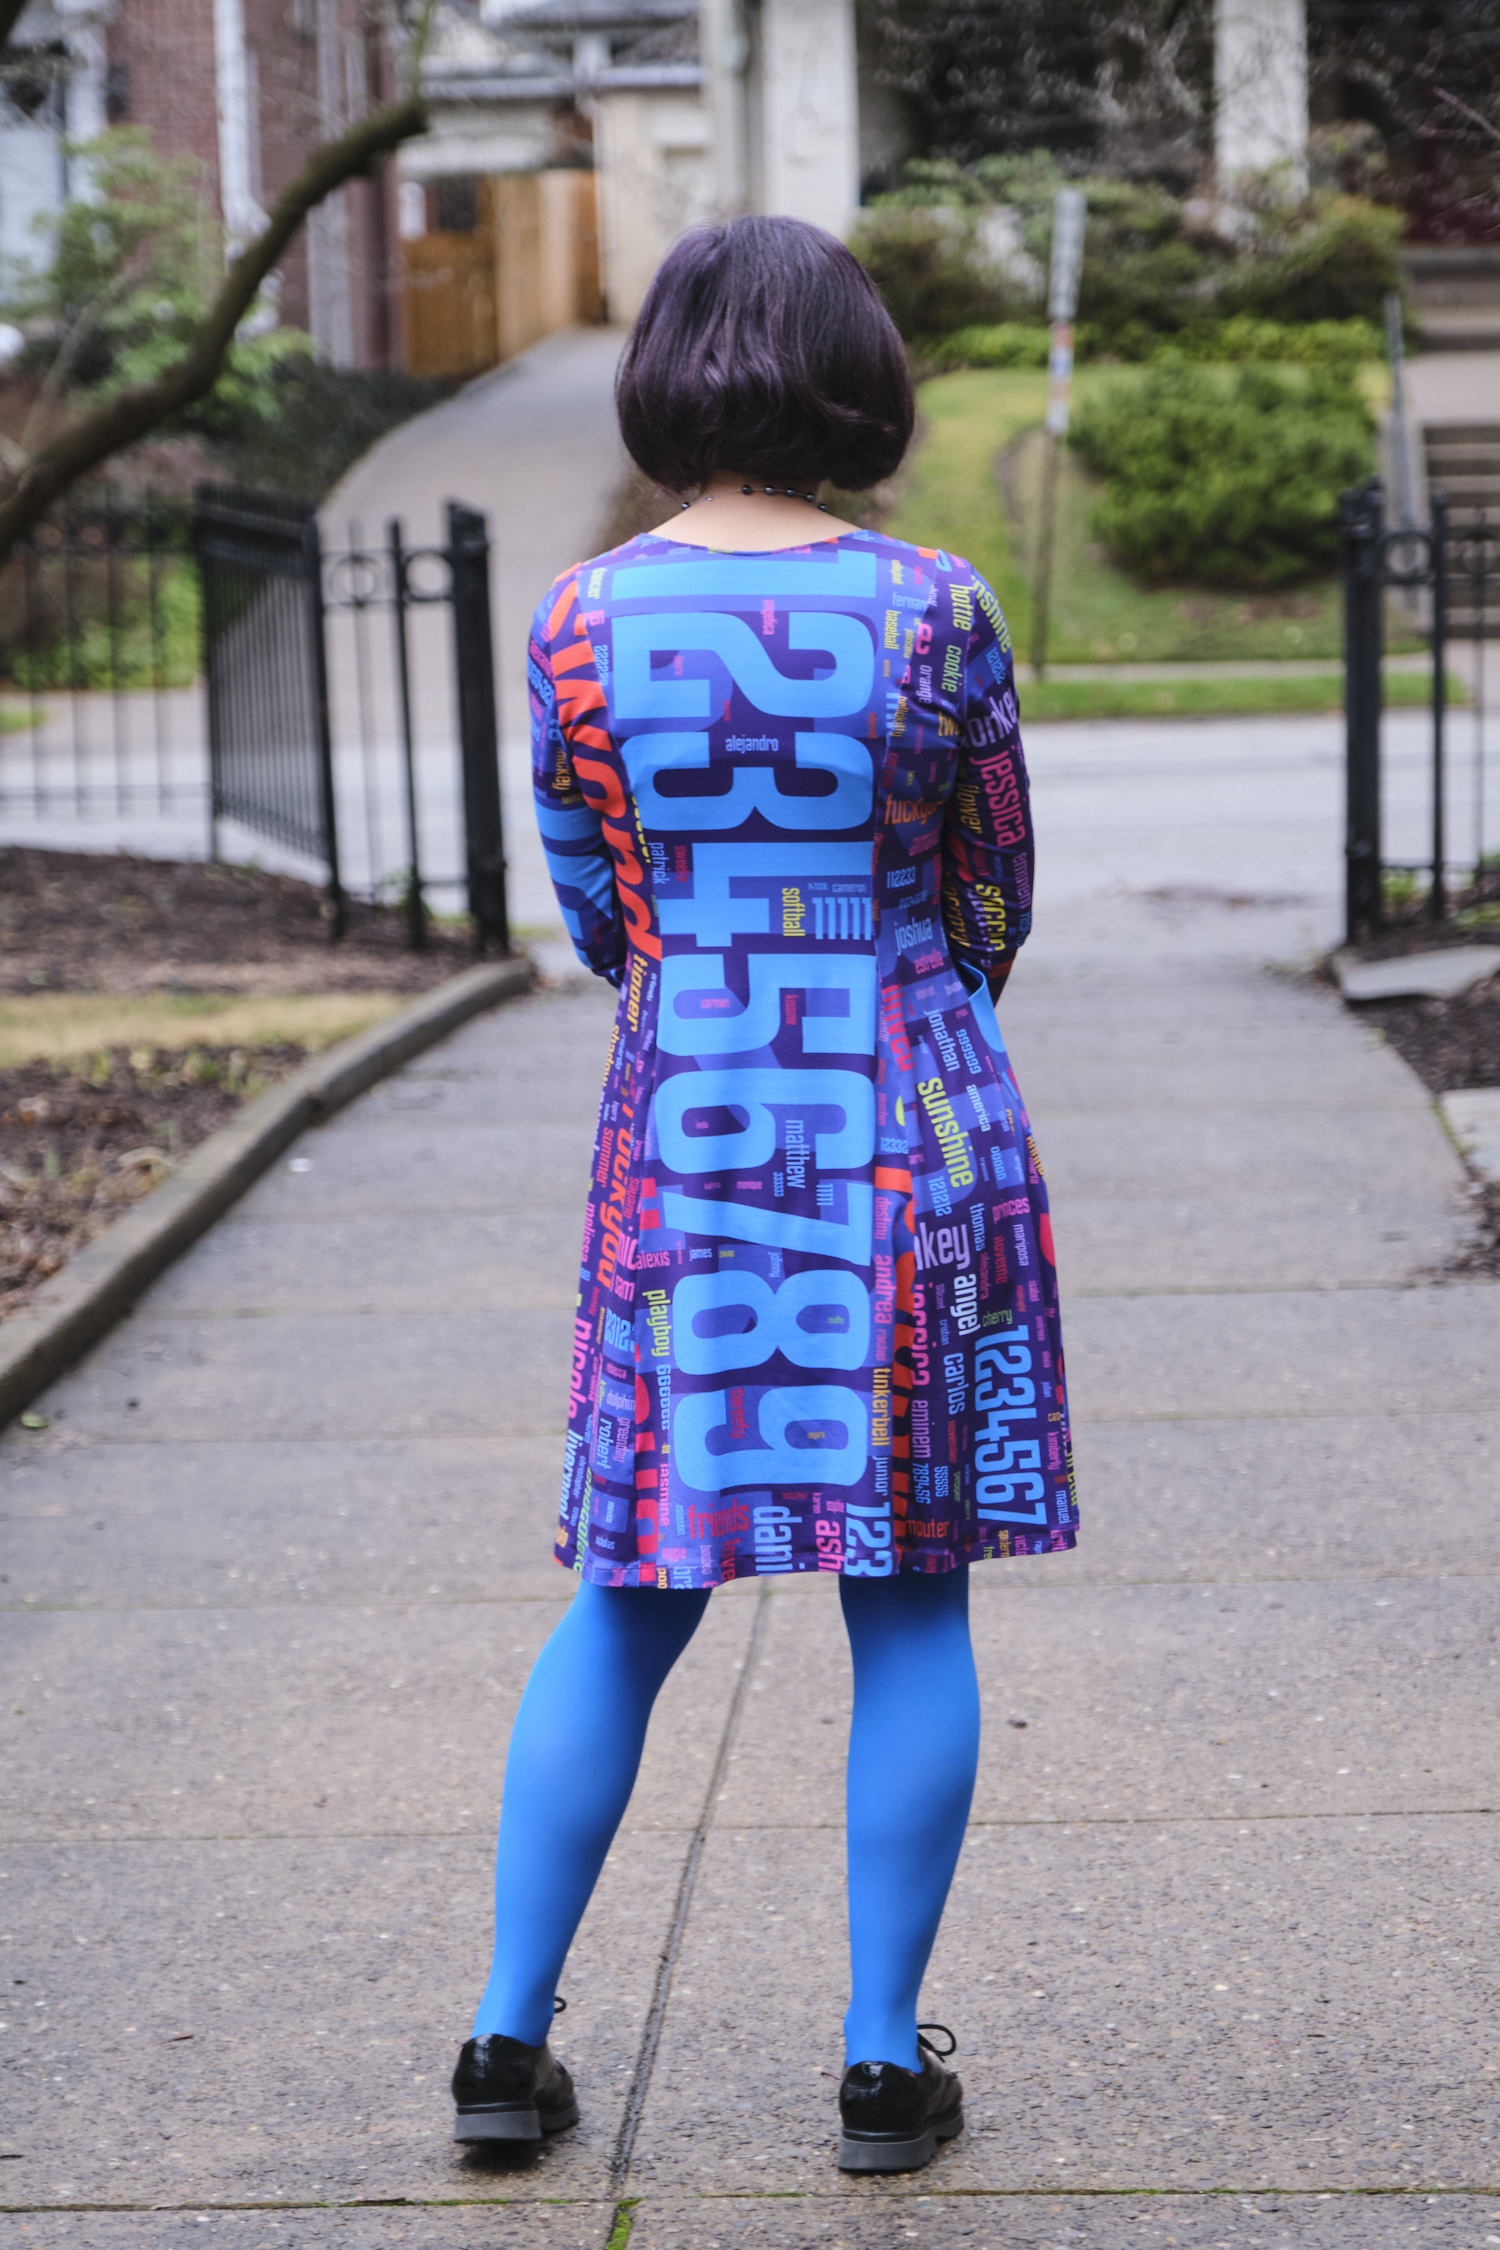
Once I had picked out the fabric and settled on the pattern, I worked on the fabric design. I took the PDF file for the Serena dress in the size 4 petite, and extended the skirt length to be long enough to graze the tops of my feet after hemming. I then created a PDF file the width of the fabric (53.15 inches) by 108 inches long in Affinity Designer. I pasted the Serena pattern pieces into the file, mirroring those that needed to be mirrored. The skirt back at that length was wider than 53 inches, so I decided to add a back seam and print the skirt back in two pieces. I split the skirt back and added a seam allowance to the center back seam. The skirt front is not as full so it fit the fabric width without a problem. I made all the pattern lines red and deleted all of the internal pattern markings, keeping only the outlines. Then I added a solid purple layer under the pattern pieces. The next step was to add all the passwords to the dress. I started with my previous password dress fabric and cut and pasted the passwords inside the pattern pieces (removing the naughty words this time). In some cases I rotated them or scaled them slightly from the previous design. I spent a lot of time rearranging the passwords to fit them all into the puzzle. I also chose some of my favorites for prominent placement. I decided to cover the entire skirt and back of the bodice with passwords but leave the bodice front solid purple.
I could have continued futzing with the password layout for quite some time, but I was not sure how long it would take for my order to be delivered and I had a deadline for finishing the dress, so I saved a giant jpg file and called it done. (I subsequently spotted several small glitches but hopefully nobody else will notice.) I went ahead and placed the order on a Sunday morning in August. Much to my amazement, the fabric was printed in the UK, shipped across the ocean, and was delivered via FedEx to my doorstep in Pittsburgh, PA just TWO DAYS LATER on Tuesday! The custom fabric is expensive. Even with a discount coupon it was $42 per yard. But I paid only $9.95 for standard international shipping.
The Contrado website said the fabric would be machine washable, but was a little vague on whether to expect shrinkage. Given that it was 100% polyester fabric I took a chance that there would be minimal shrinkage (definitely a risk if you print your pattern pieces directly on the fabric) and I was right.
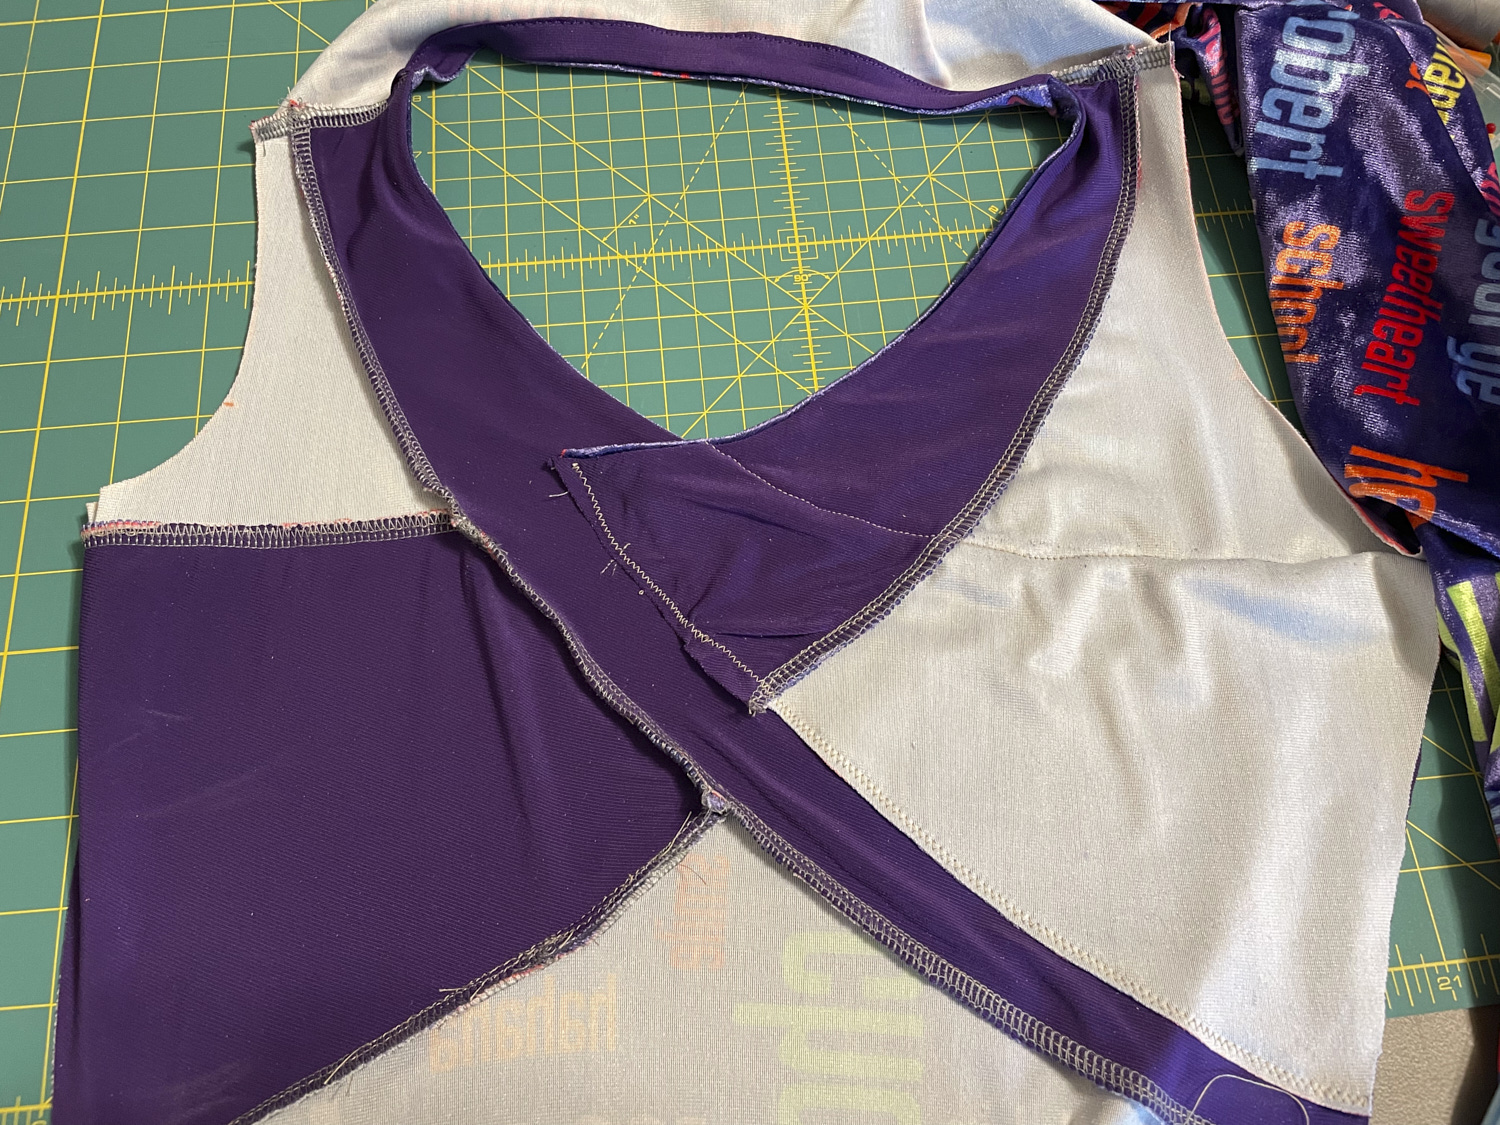
I laid the fabric out on my magnetized cutting mat and cut it out along the red lines with my rotary cutter. I knew from sewing the muslin that crushed velour is slippery and hard to pin in place, so I did a lot of hand basting and then serged most of it, leaving the cutting knife retracted so I wouldn’t accidentally cut anything I didn’t want to cut (since the pattern had 1/4-inch seam allowances there wasn’t really any need to trim as I sewed). The first few steps of the bodice assembly went pretty well, until it came time to join the F1 piece to the F2/F5 piece of the bodice. There are multiple points to line up and after basting and unbasting multiple times I realized that there was no possible way to get everything simultaneously lined up. After about three hours of this I finally gave up and sewed it together so the outside looked good, but the inner lining (purple ITY) looked like a train wreck. But nobody will ever see it, except for the fact that I am showing you this photo right here so that you can see that the inside is a complete disaster but the outside still looks really good. You will see there is a diagonal piece that goes from the top left to the bottom right. There is another diagonal piece that starts in the middle and goes to the bottom right. Those two pieces are supposed to be sewn together on top of each other, but yet there is a bout a 1 inch gap between them. So that nothing would be flapping in the breeze, I sewed the loose edge to the inner lining. I believe the problem has to do with the fact that my fabric stretches only in the horizontal direction and has almost no vertical stretch (going against the advice of the pattern maker). The fabric I used for my muslin was similar, yet somehow I did not end up with this particular problem. I’m perplexed, but it all worked out in the end.
Of course, I chose the pocket option, since Cinderella and I always need pockets, even when we go to a ball. I decided to make the pocket bags out of the purple stretch velour so that they would not show if they fell open. Stretch velour is not really ideal pocket bag material, especially since I stitched the pocket openings up a bit to prevent things from falling out. Sticking my hand in a pocket tends to cause the pocket bag to come out with my hand, but it works well enough for holding my phone and a small wallet. From past experience with this pattern, I know that I prefer the pockets to sit a bit higher than the pattern calls for so they don’t jiggle around when I walk, so I ignored the marks and just tried on the partially completed dress and pinned the pockets where I wanted them to go.
I’m really happy with the end result. It is exactly what I wanted. I was so excited that I put it on and made my husband follow me around my yard with my DXLR camera while I played fashion model and posed for photos. He has no formal photography training but he is starting to get the hang of fashion photography as I explain to him that there is a difference between zooming in and moving closer to the subject.
Did I mention that this dress has some twirlability?
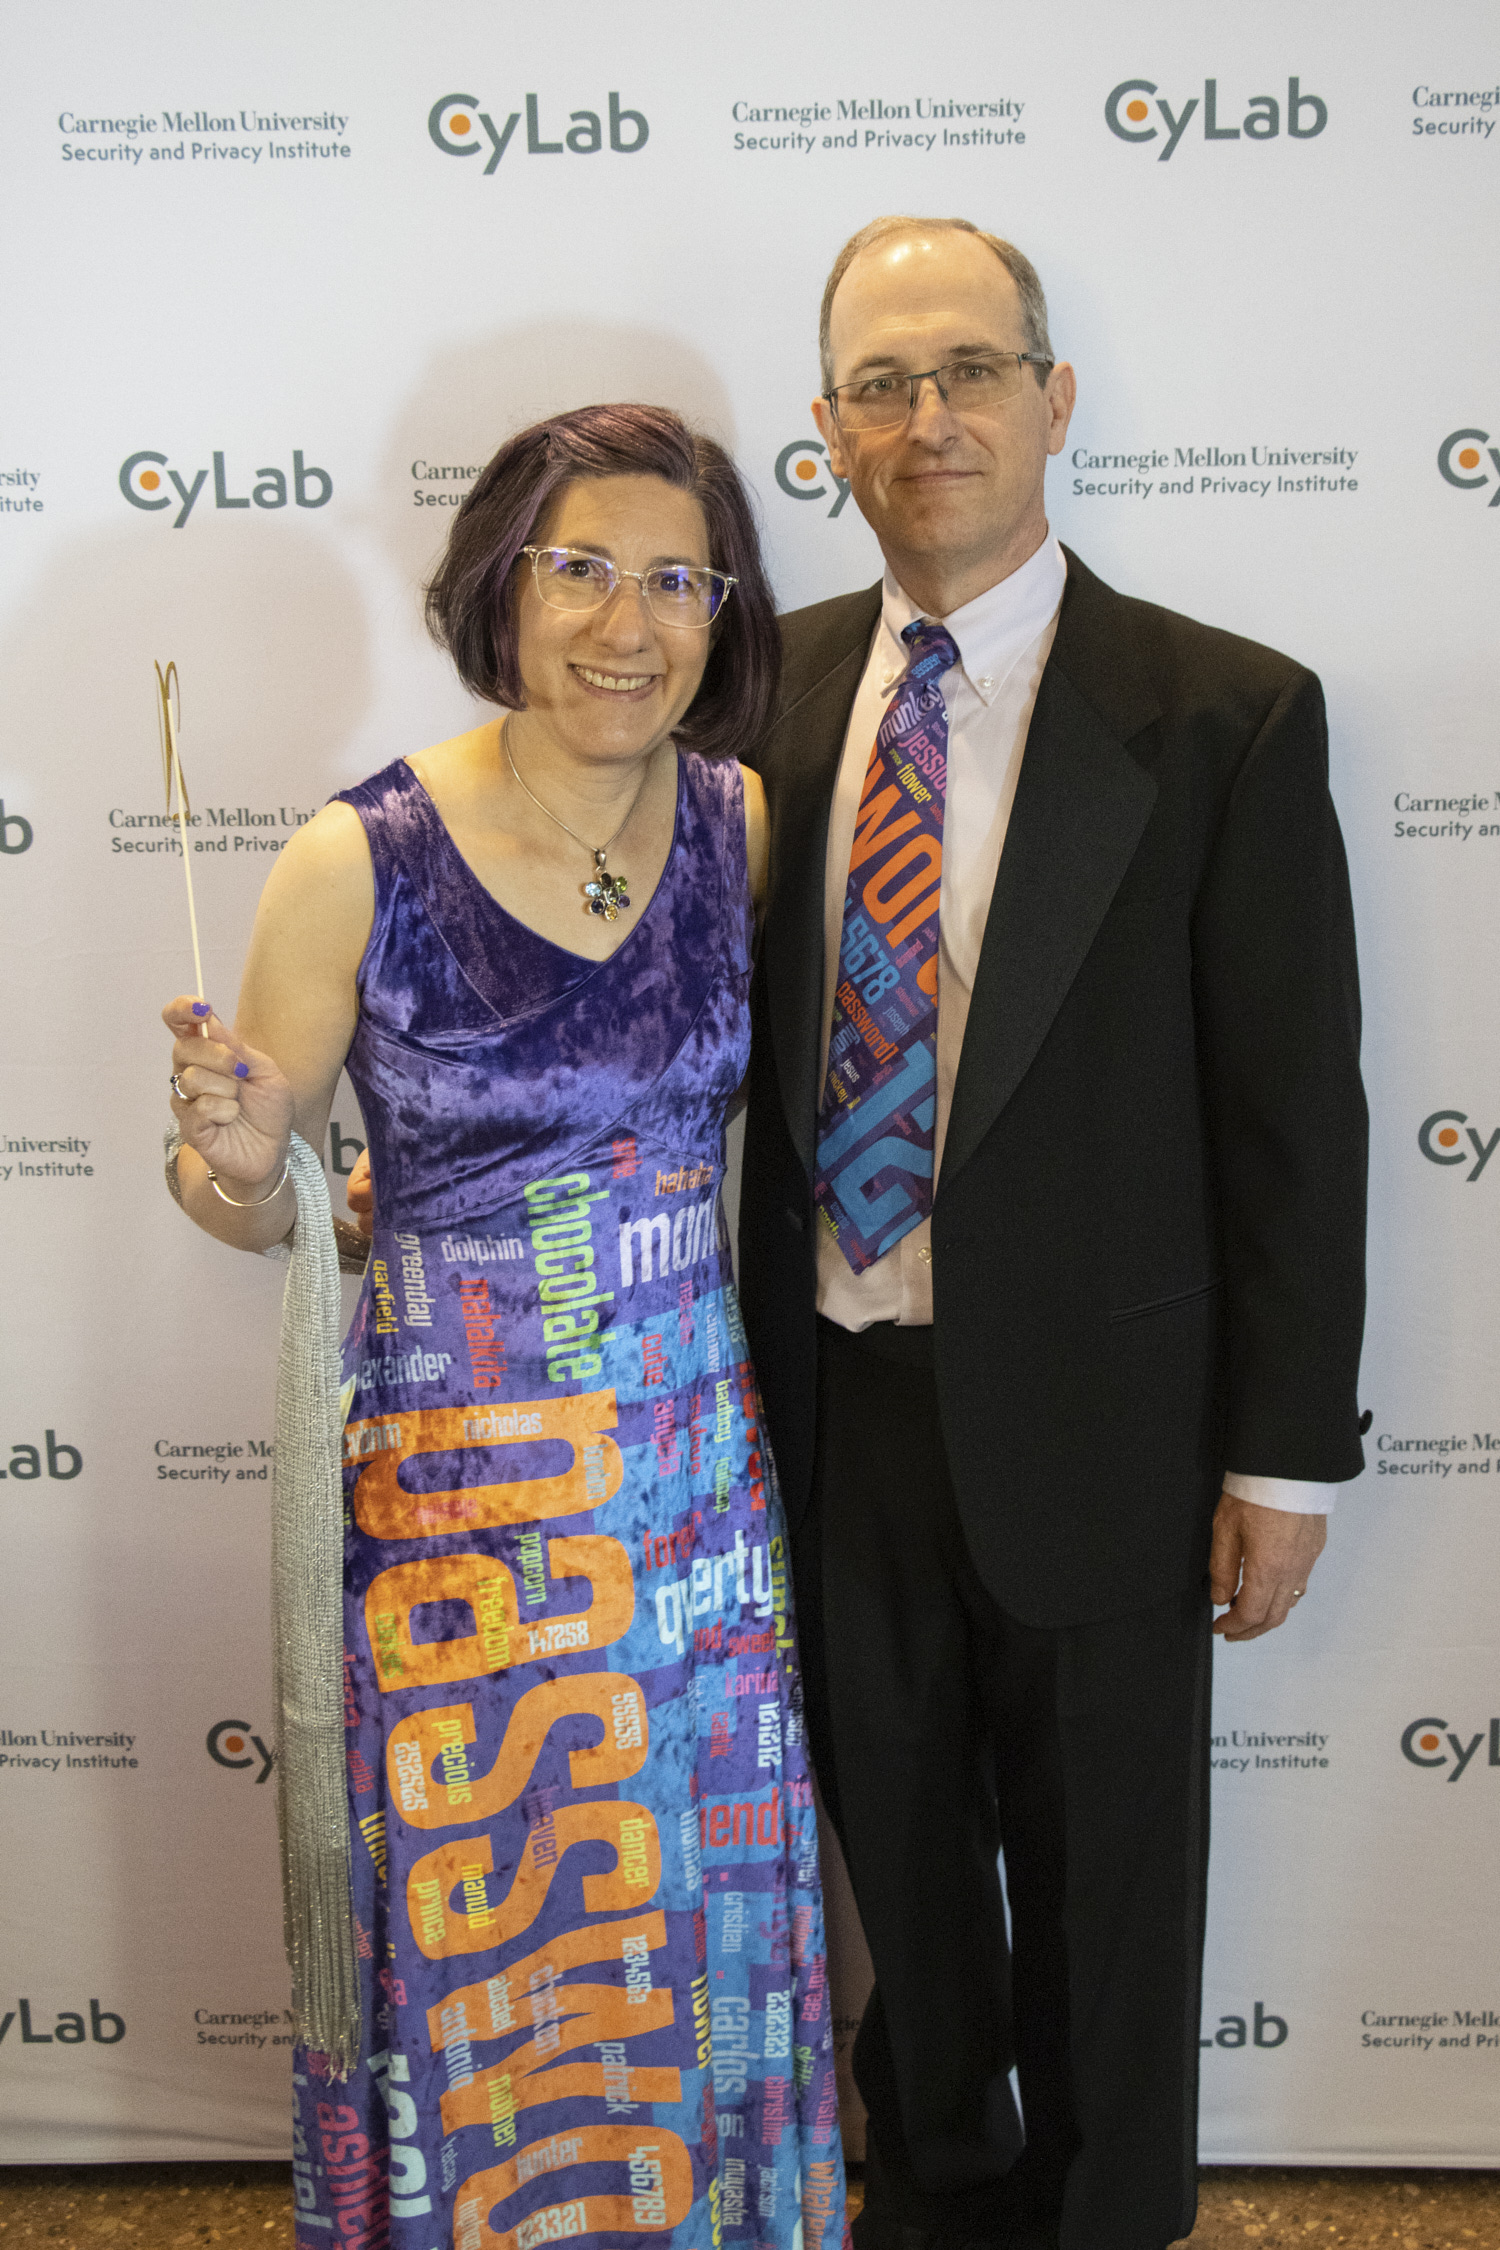
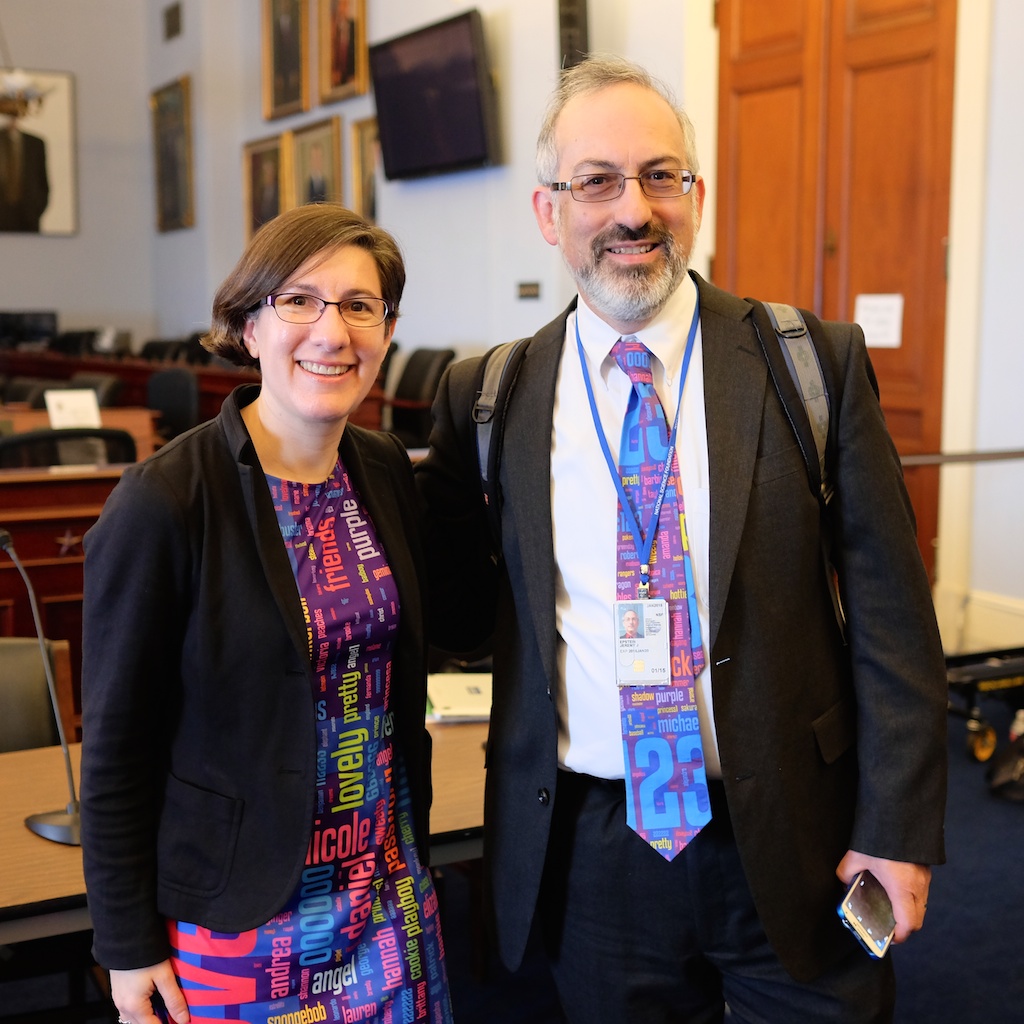
Ok, so why did I make this dress? Well I’m the director of the CyLab Security and Privacy Institute at Carnegie Mellon University. This is our 20th anniversary year and we held a gala to celebrate on Tuesday. Obviously, I need a password ball gown to wear to the gala. (And of course my husband needed a matching tie.)
CyLab 20th Anniversary Gala
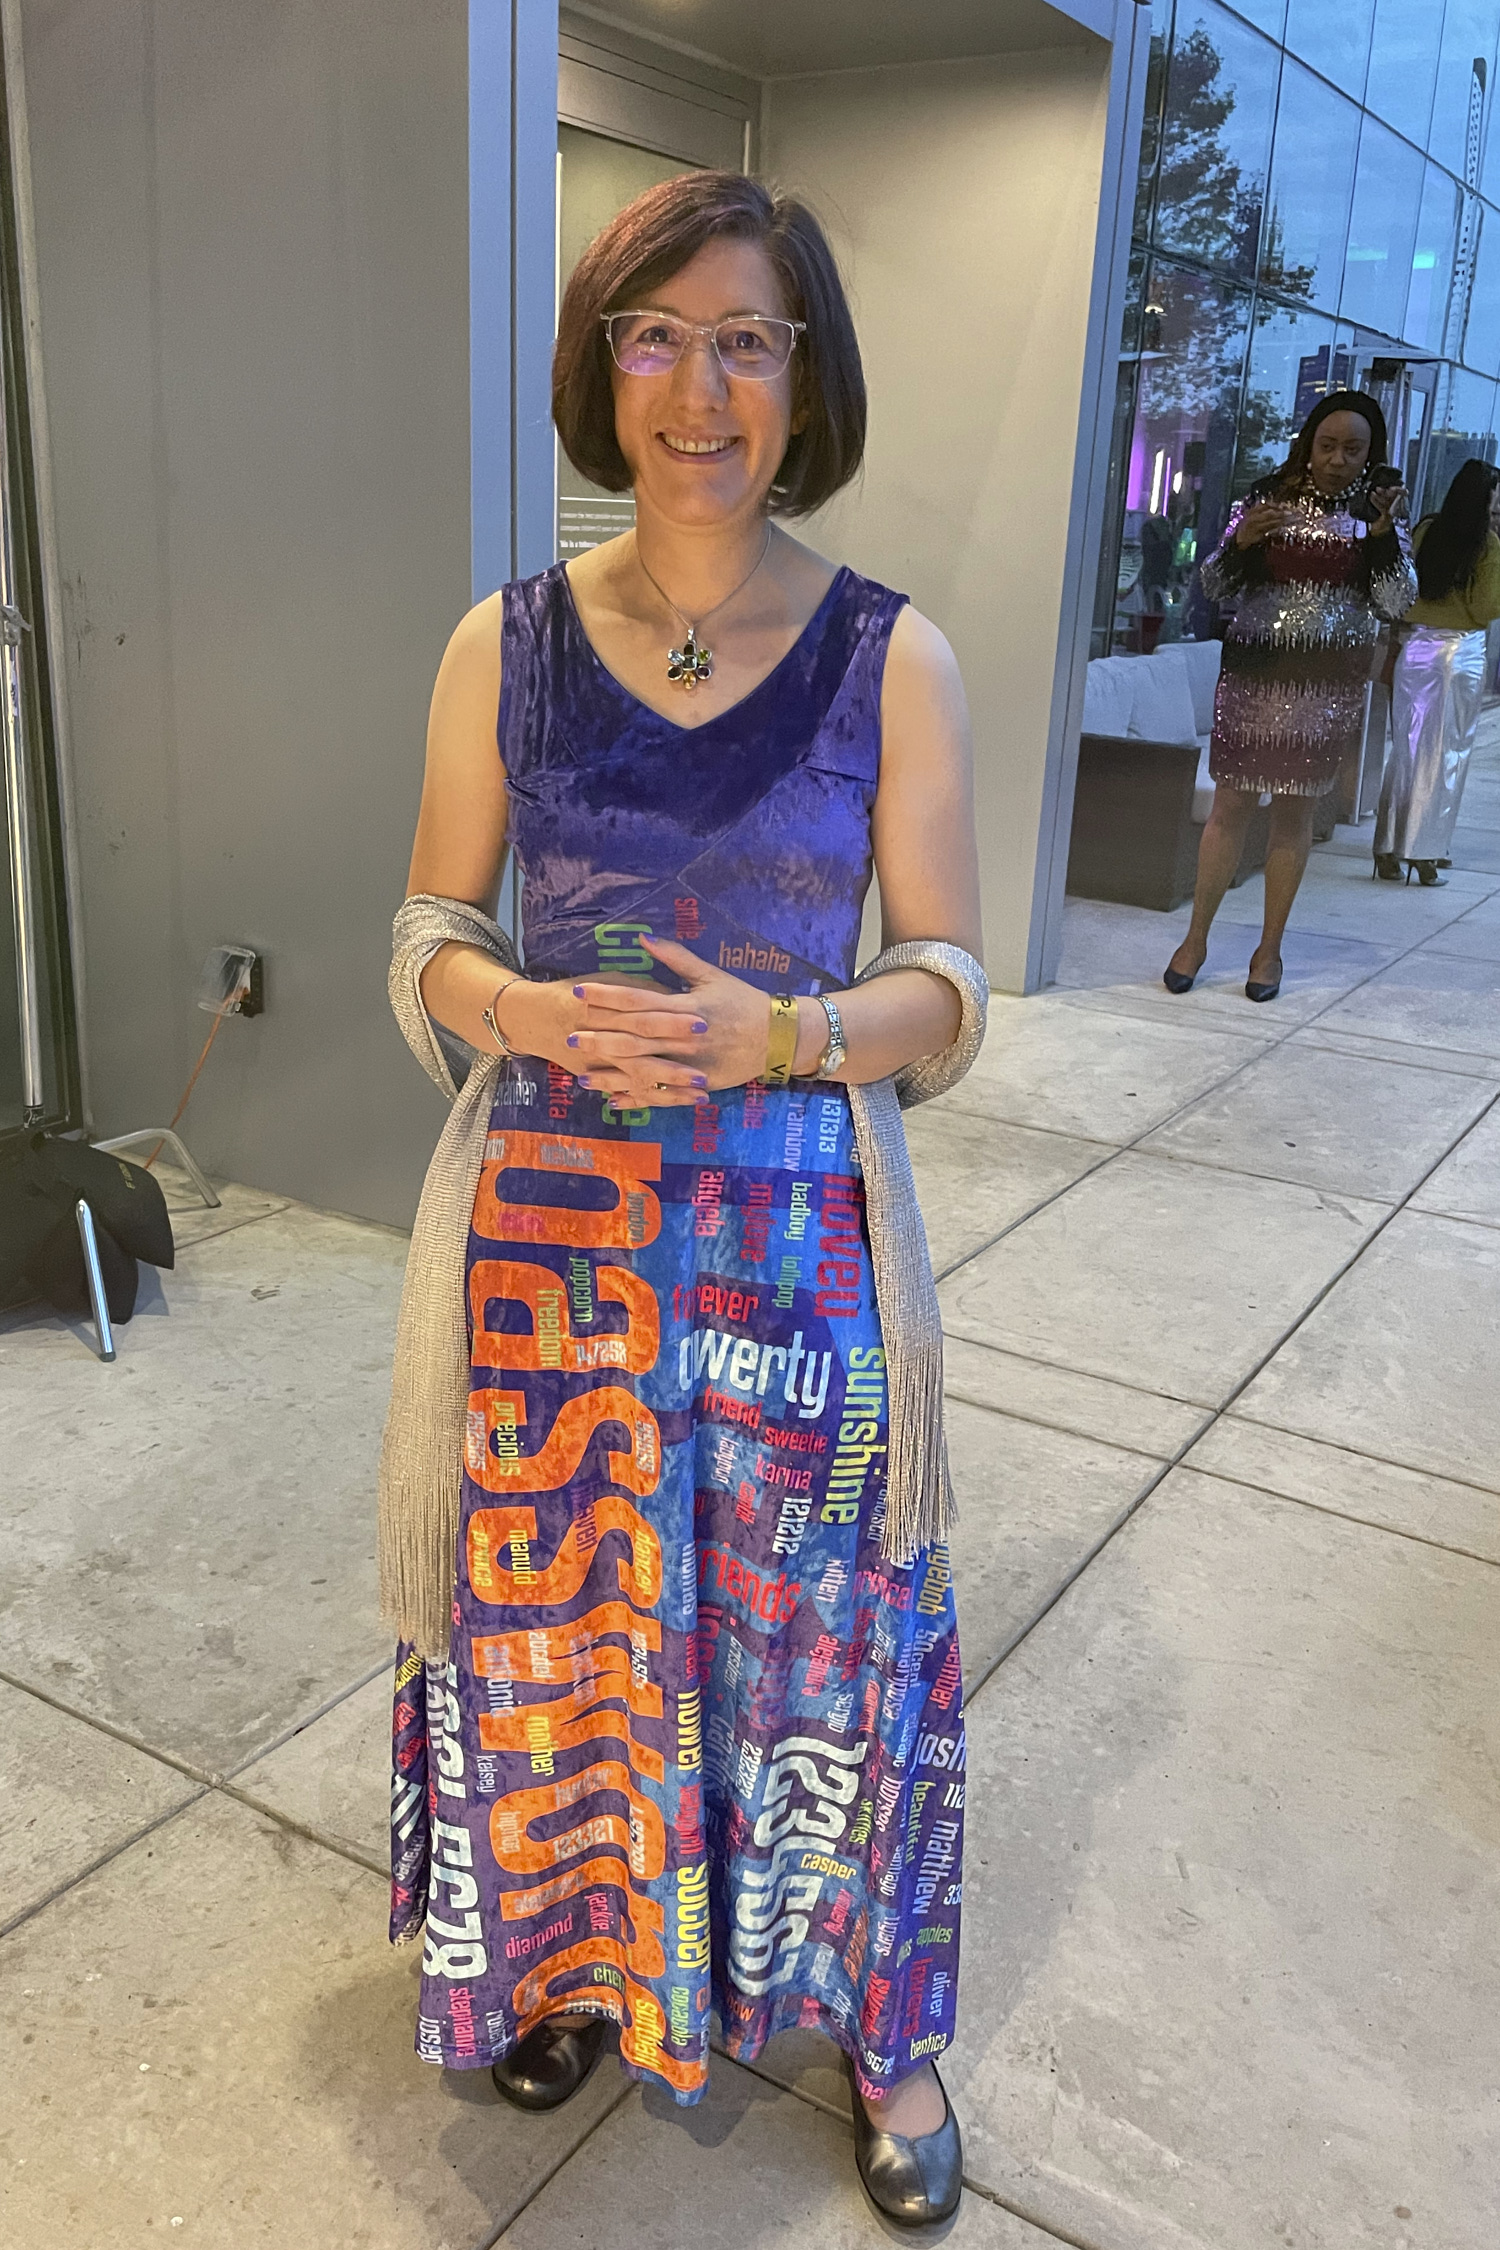
As an added bonus, the Carnegie Science Center held their Geek Out Gala on Thursday, and this was the perfect outfit! So many people I didn’t know came up to me to talk with me about my dress.
A few weeks ago I made a Sinclair Serena dress to try out the pattern, which I plan to use to make a fancy gown. The pattern worked out pretty well in double-brushed polyester, but I’m planning to use a fancy (expensive) custom-printed crushed stretch velour fabric for the gown, so I decided to make the pattern again with some cheap velour. I bought two yards of purple crushed panne velour from Cali fabrics for $4.99 a yard. This fabric is pretty and has similar stretch as the fabric I plan to use, but it is not as soft and doesn’t feel quite as nice. It is also not really purple – I would call it lavender, but it is not the royal purple shown on the website. This is not meant as a high-end fabric, but it is fine for a muslin.
I projected the pattern and cut out the velour. I decided to use a purple ITY fabric for the lining pieces. Then, throwing caution to the wind, I decided to sew the dress together using my brand new Serger, having never serged before. It actually wasn’t that hard, except for the fact that velour is a super slippery fabric and no amount of pinning could get it to hold still. The slippery ITY lining just made it worse. There are parts of this pattern that call for two layers of regular fabric and 2 layers of lining, and getting them all lined up to complete the jigsaw puzzle bodice was a real challenge. I eventually basted together the layers before sewing, and it was fine. But parts of it that I sewed early on are not quite lined up right, although I managed to mostly hide them. Note to self when I make the gown, plan to do a lot of basting.
Besides being very slippery, the velour as almost no vertical stretch. That doesn’t seem to be a problem with this pattern, other than reducing the ability to ease out mistakes. Somehow the back ended up being and inch longer than the front when all was said and done (I’m pretty sure it was cut correctly, but there were numerous sewing errors), and I ended up just trimming it before hemming.
I did make a few mistakes that are mostly attributable to learning how to use my serger while making this dress. I now have a full understanding of the knife function and how not to use it when turning a corner. Repairing some of these mistakes might be one of the reasons the back ended up longer than the front.
I did manage to fix some problems from my last Serena dress. This time I added clear elastic to the neckline for good measure, and I sewed the crossover all the way to the edge. With both of these improvements, there is no possibility of drooping. I also did a better job stretching the armhole bands around the curves, so they look better than last time. In order to reduce pocket flapping,I made the pocket bags a little slimmer and attached them to the skirt a bit higher than the pattern calls for – about 1 inch below the point where the skirt meets the bodice. I made the pocket openings a bit smaller to keep my phone from falling out. I used the velour for the back pocket bags and the lining for the front to reduce bulk. But the lining still peaks out a bit so I may just use the velour for both sides next time.
The good news is that the whole dress did end up coming together nicely. The proof of concept worked and the muslin is a dress I would actually wear in public. In fact I wore it to an outdoor theater production this evening and can report it was both stylish and confortable.
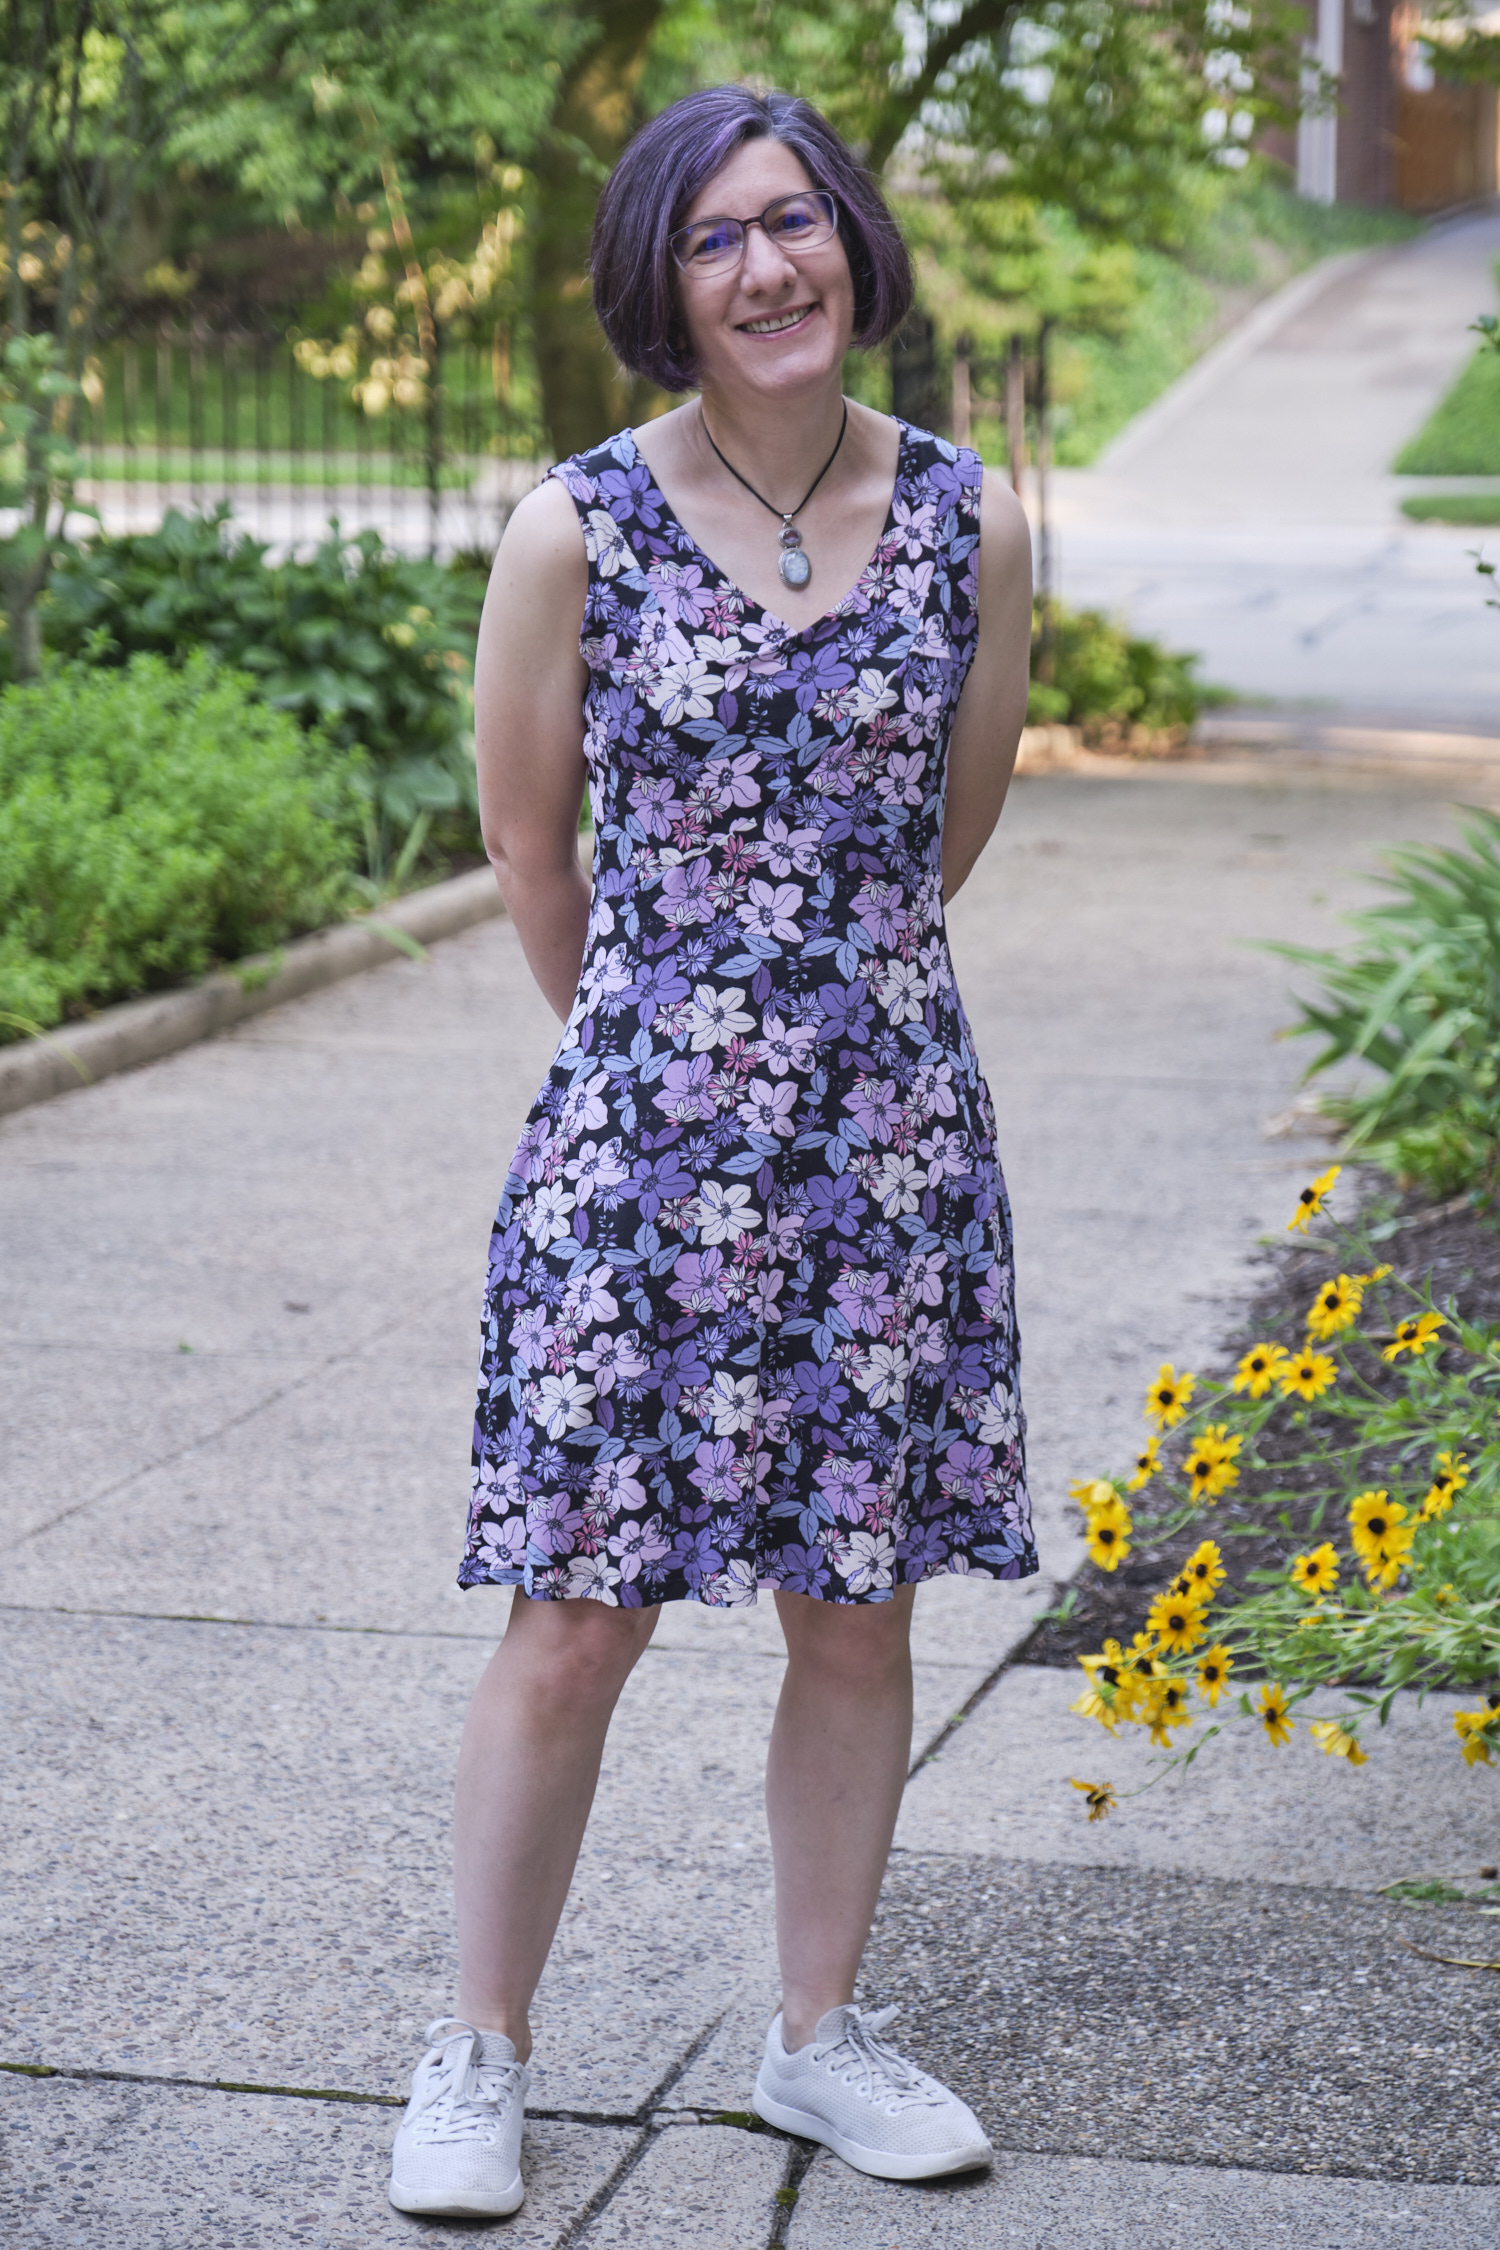
I saw the Sinclair Serena crossover knit dress pattern a while ago and was a bit intimidated about sewing the crossover part, which is a bit of a jigsaw puzzle. But I recently was looking for a knit dress pattern that would look great in a full length formal gown, and Serena looked like it could be adapted for this purpose. The gown project will be another story for later, but in the mean time I thought it prudent to sew a short version of this dress with inexpensive fabric to make sure this was going to work. So earlier this month I projected, cut, and sewed Serena in one weekend. Serena is an old pattern without projector files, but I was able to create projector files with pdfstitcher. [Correction: There are projector files, I just some how missed them!]
I used the 4 petite pattern and cut the skirt 1 inch below the above-the-knee length, making it sit exactly at the knee on me. I selected a floral double-brushed polyester for this dress. This is a light-weight, stretchy, and inexpensive fabric that’s very comfortable to wear. I looked at photos from others who have made Serena and saw some interesting approaches to color blocking this dress that really highlight the crossover (and/or the bust) and the jigsaw puzzling involved, but my favorites were all made from a single fabric print without any color blocking. Without the color blocking, you an hardly see the crossover, but you still get a lovely fitted top with a skirt that hangs from a point that I think will work really well for a gown.
Of course I made it with the pocket option (and added about an inch to the bottom of the pocket bags to make sure my phone doesn’t fall out of my pockets)! The pockets are great, but I think the openings sit a little low so in the next dress I will probably raise them about 2 inches higher. The pockets flop around when filled since they aren’t attached to anything except the side seams since there is no waistband to attach them too (and even if there was I probably wouldn’t attach them because I don’t like it when pockets distort the waist band), but I think they would flop less if they were attached higher. My favorite dress pockets are still the Alana dress pockets — no flopping or distorting — but that style of pocket only works with princess seams, alas.
The jigsaw puzzle was not actually too difficult to solve, although I do recommend reading the pattern tutorial very carefully and watching that you don’t try to assemble any of the pieces upside down or backwards (I had a couple of close calls). The pattern suggests optionally adding some elastic to the top edge of the v-neck if it doesn’t recover well from a stretch. I tested the recovery as suggested and it seemed fine, so I did not add the elastic. I have a very slight droop in the top layer of the crossover that might have benefited from adding the elastic, or at least a bit of fusible knit interfacing (maybe next time!), but it is subtle. (Later I realized that I actually ended the seam that holds the crossover down too early. Had I brought the same all the way to the center of the crossover it might not have drooped.) There is also optional top stitching that I opted out of, with no regrets. The arm holes are finished with a binding that I didn’t do a great job of attaching, especially on the left side, so the bottom of the armhole flops out a tad. Next time I will need to take more care with positioning and stretching the band. Most of these are issues that probably nobody would notice except me.
Anyway, I’m quite pleased with Serena, and am already planning to make another one soon.
In October 2022 I ordered some funky paisley ITY fabric I found on Amazon and used it to make a Sinclair Joanne dress. I sewed it according to the pattern as written in size 4p with the knee length option and used clear elastic to stabilize the waist. I used my go-to HeatNBond Soft Stretch for hemming and zigzagged over the edge. I was planning to make it three-quarter sleeves but after looking at some lovely examples of the flounce sleeve on other sewist’s dresses I decided to give flounces a try. I was worried that the flounces would be difficult to implement and would get in the way when wearing. However, the flounces were very straightforward to sew, and I was able to omit hemming the ITY. Positioned at the elbow they don’t tend to get in the way either. And they look awesome with this particular fabric design.
This was my first time sewing ITY and I was worried that it would be slippery and hard to sew, but it actually wasn’t bad at all. I also wondered whether I would need to line it as it has a lot of white areas that are not 100% opaque. It seems fine without linking. Sewing the bodice with the faux wrap looks tricky as it relies on proper stretch for it all to work out. But I found if you follow the instructions it all comes together pretty easily.
One minor complaint is that the clear elastic at the waist can sometimes be uncomfortable since you can end up with plastic elastic rubbing against your skin. I think I might use braided elastic or forgo the elastic in the future.
My biggest complaint was that my phone kept falling out of the pockets, which aren’t deep enough, especially with slippery ITY fabric. I ended up grafting another two inches to the bottom of the pockets after the fact to solve the problem. If I make this dress again (I’m sure I will!) I will definitely make the pockets deeper.
This dress has been great to wear in fall and spring weather, and with a sweater or jacket on chilly days. The print I used is fairly eye catching and regularly brings complements.
Last September I bought my first Sinclair pattern and sewed an Alana dress. I have since sewn two more (and there will probably be more) and several other Sinclair patterns. I’ve found the Sinclair patterns to be well drafted and pretty straightforward to understand. They can be downloaded as PDFs and printed on a home printer, printed in large format at a copy shop, or projected.
I chose Alana as my first pattern mostly because I liked the pockets. I continue to love the pocket style, where the pockets are anchored by two princess seams. I also liked the neckline that used a facing instead of a binding or band.
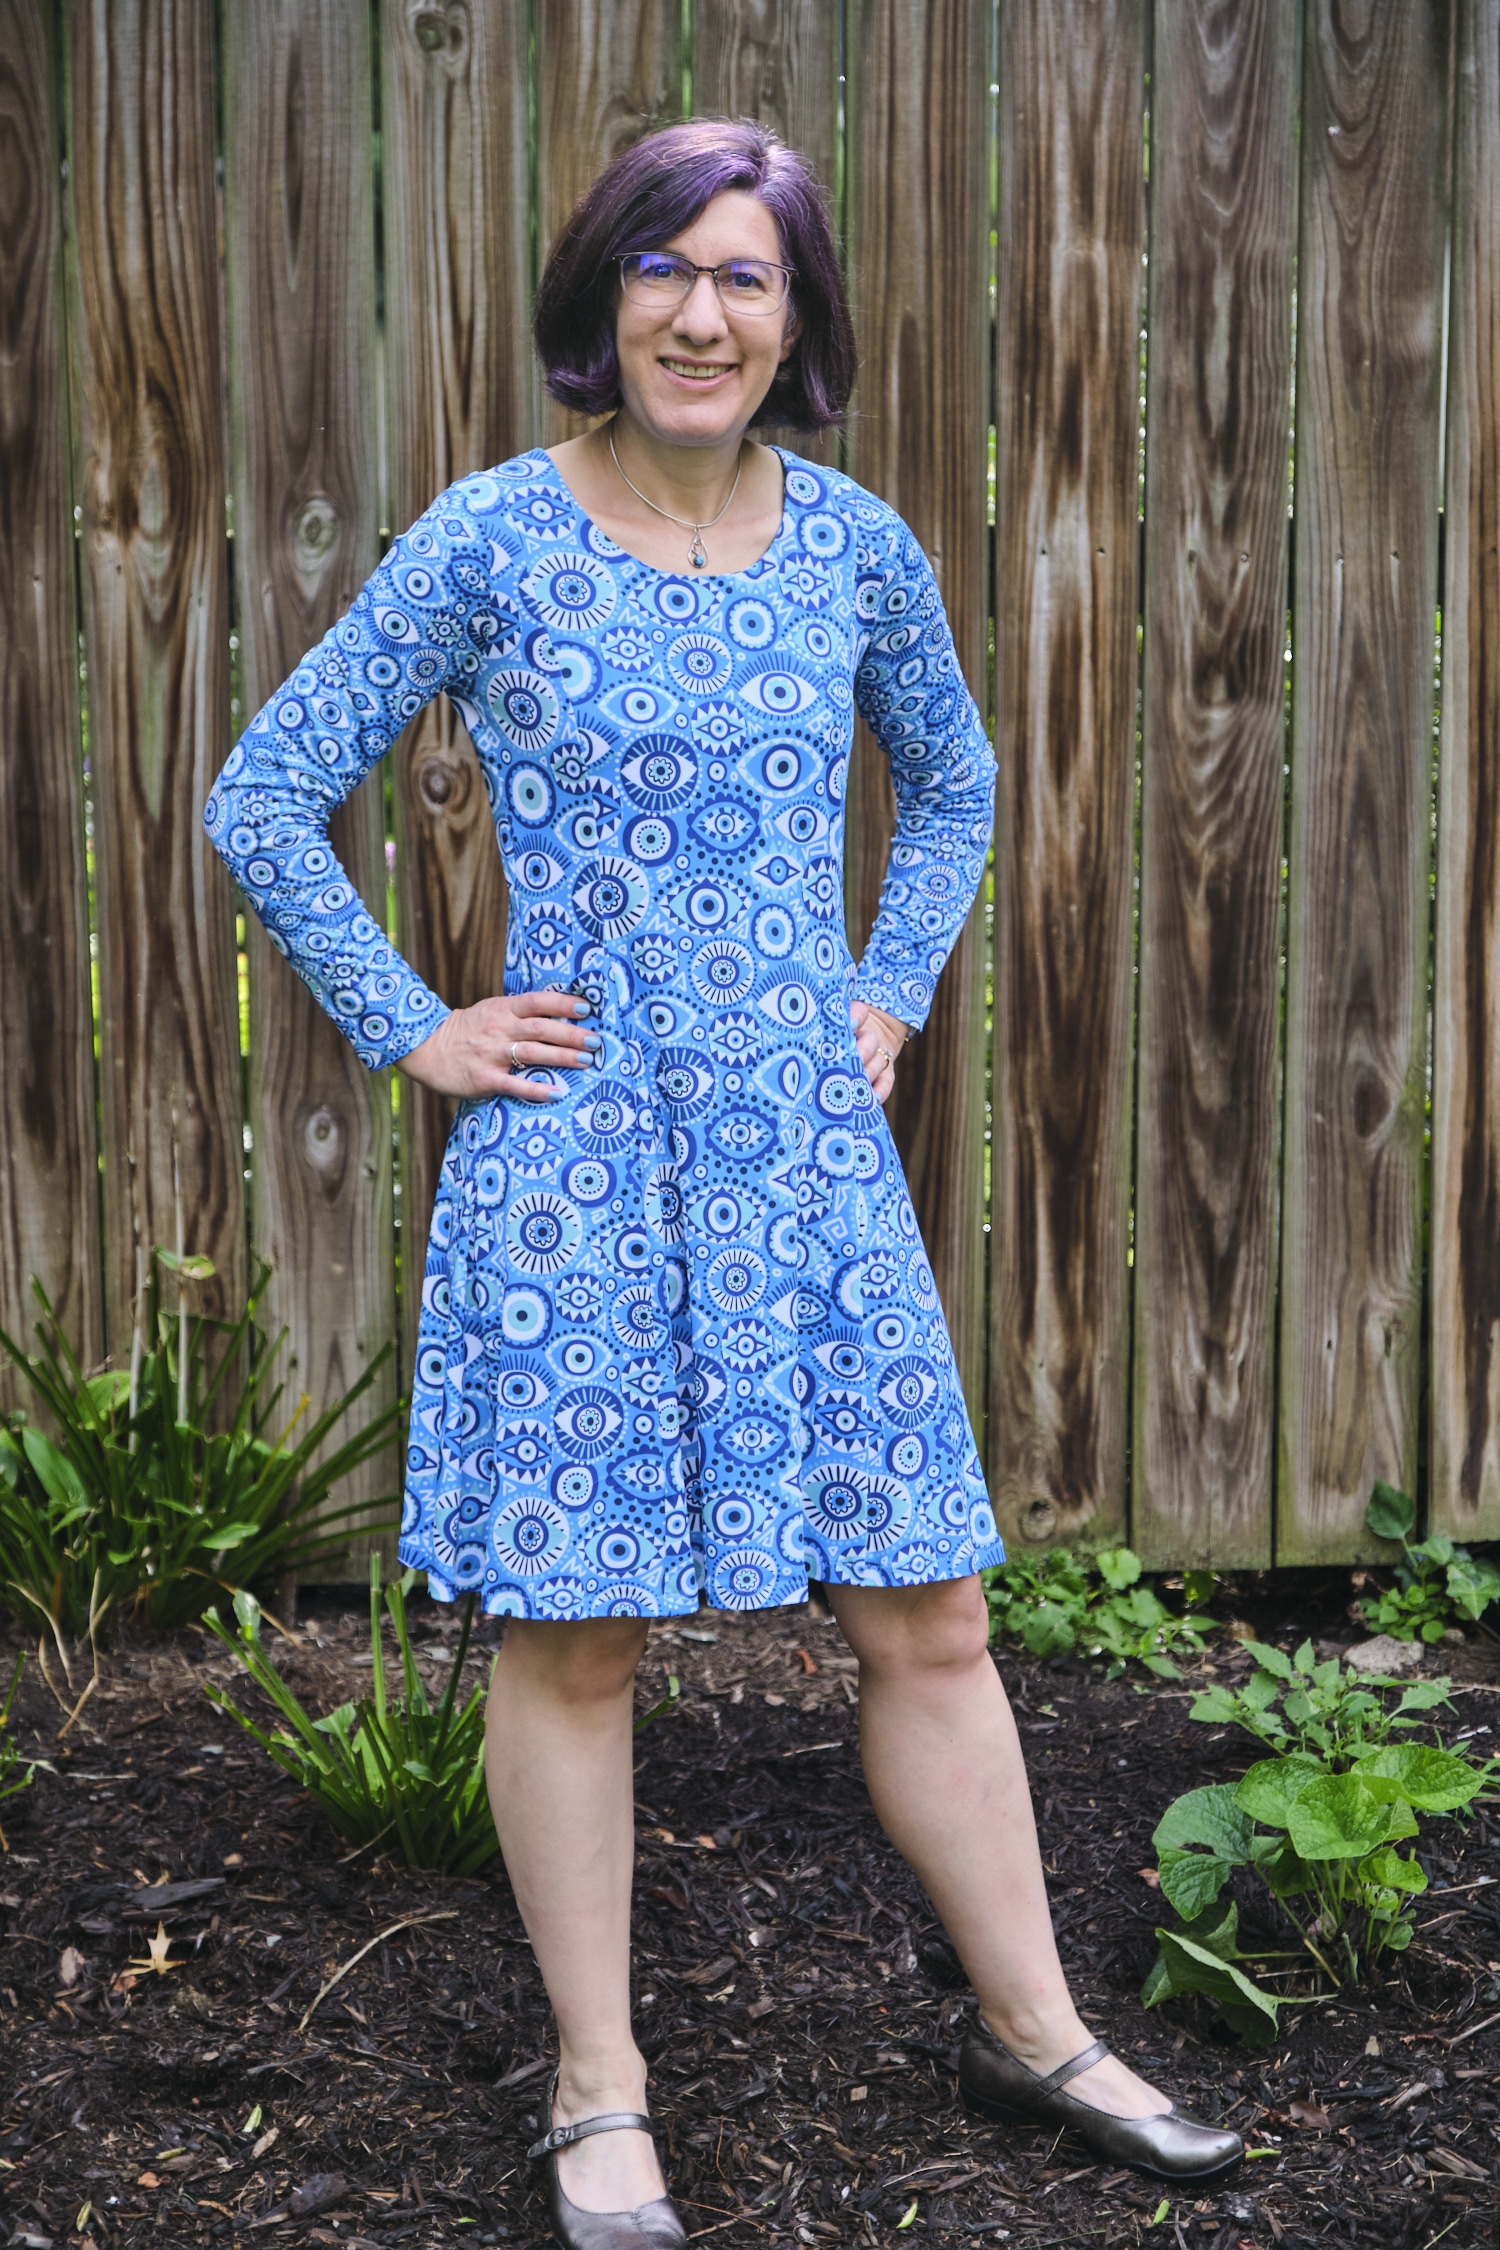
I obsessed over what fabric to use, and continuing with my privacy research related theme, I selected fabric with eyes on it — evil eye blue by Laura May. I got the same fabric in the small size for the sleeves. I had both printed on Spooflower modern jersey.
Then I printed out the PDF layer for the size 4 petite pattern on the laser printer at work and spent about an hour taping it together and cutting out all the paper pattern pieces. Then I laid all my cutting mats out on the hallway floor and laid out the fabric as shown in the pattern instructions. I quickly realized that I didn’t have enough fabric for that sort of layout. Puzzled, I looked on the Sinclair website for where to ask questions, and discovered the Sinclair Patterns Group on Facebook. This FB group is a great resource for sewing Sinclair patterns. I found you can easily search for the name of a pattern and find lots of photos of garments other people have made with that pattern, including tips on fabric selection and alterations. You can also post questions or show off your own makes. In any case I soon learned that the layout in the instructions is just a suggestion and may not work depending on the fabric width, garment size, etc. I figured out how to fold the fabric to cut it and get it all in. I also learned from the FB group about a YouTube video tutorial for making the Alana dress.
I used large washers as fabric weights and used my rotary cutter to cut out the fabric. Then I followed the instructions to sew the dress. I selected the regular neckline, long sleeves, and knee-length options. On the advice of the video tutorial I extended the length of the front facing so that it would fall below the bust line. I used a very narrow zigzag stitch for all of the seams and a medium zigzag to finish the seam edges. I finished the sleeve and bottom hems with HeatNBond Soft Stretch and zigzagged over the edges.
When I tried on the dress it looked OK, but the waist is not designed to be fitted, and it looked a little baggy on me. Indeed, the pattern explains that there is about three inches of ease at the waist. So I decided to take the dress in at the sides and the back princess seams to remove most of that ease. The dress looked much better on me without the ease.
I made my second Alana dress in December using a rich purple scuba suede fabric. The fabric is soft, stretchy, washable, and pretty easy to sew. I used a lighter ITY fabric for the front and back facings and extended both of them below the bust. I thought about using a lighter fabric for the inside of the pockets but decided to try the pockets entirely in scuba suede, and they worked out fine. A line of top stitching across the top of the pockets might have been helpful, but it is ok without. I did not bother stitching over the seam edges. Once again I ended up removing the ease. Months later the fabric is holding up pretty well after many wearings and washings, although it is showing some slight signs of pilling.
My third Alana dress was another dress in Spoonflower modern jersey. This time I removed the ease in the pattern when I cut it. Cutting out this one took a while because I obsessed over the fabric placement. This was the third version of my bad passwords dress (there’s a whole story behind it), and this time I wanted to have long sleeves and pockets.
New password dress with sleeves and pockets
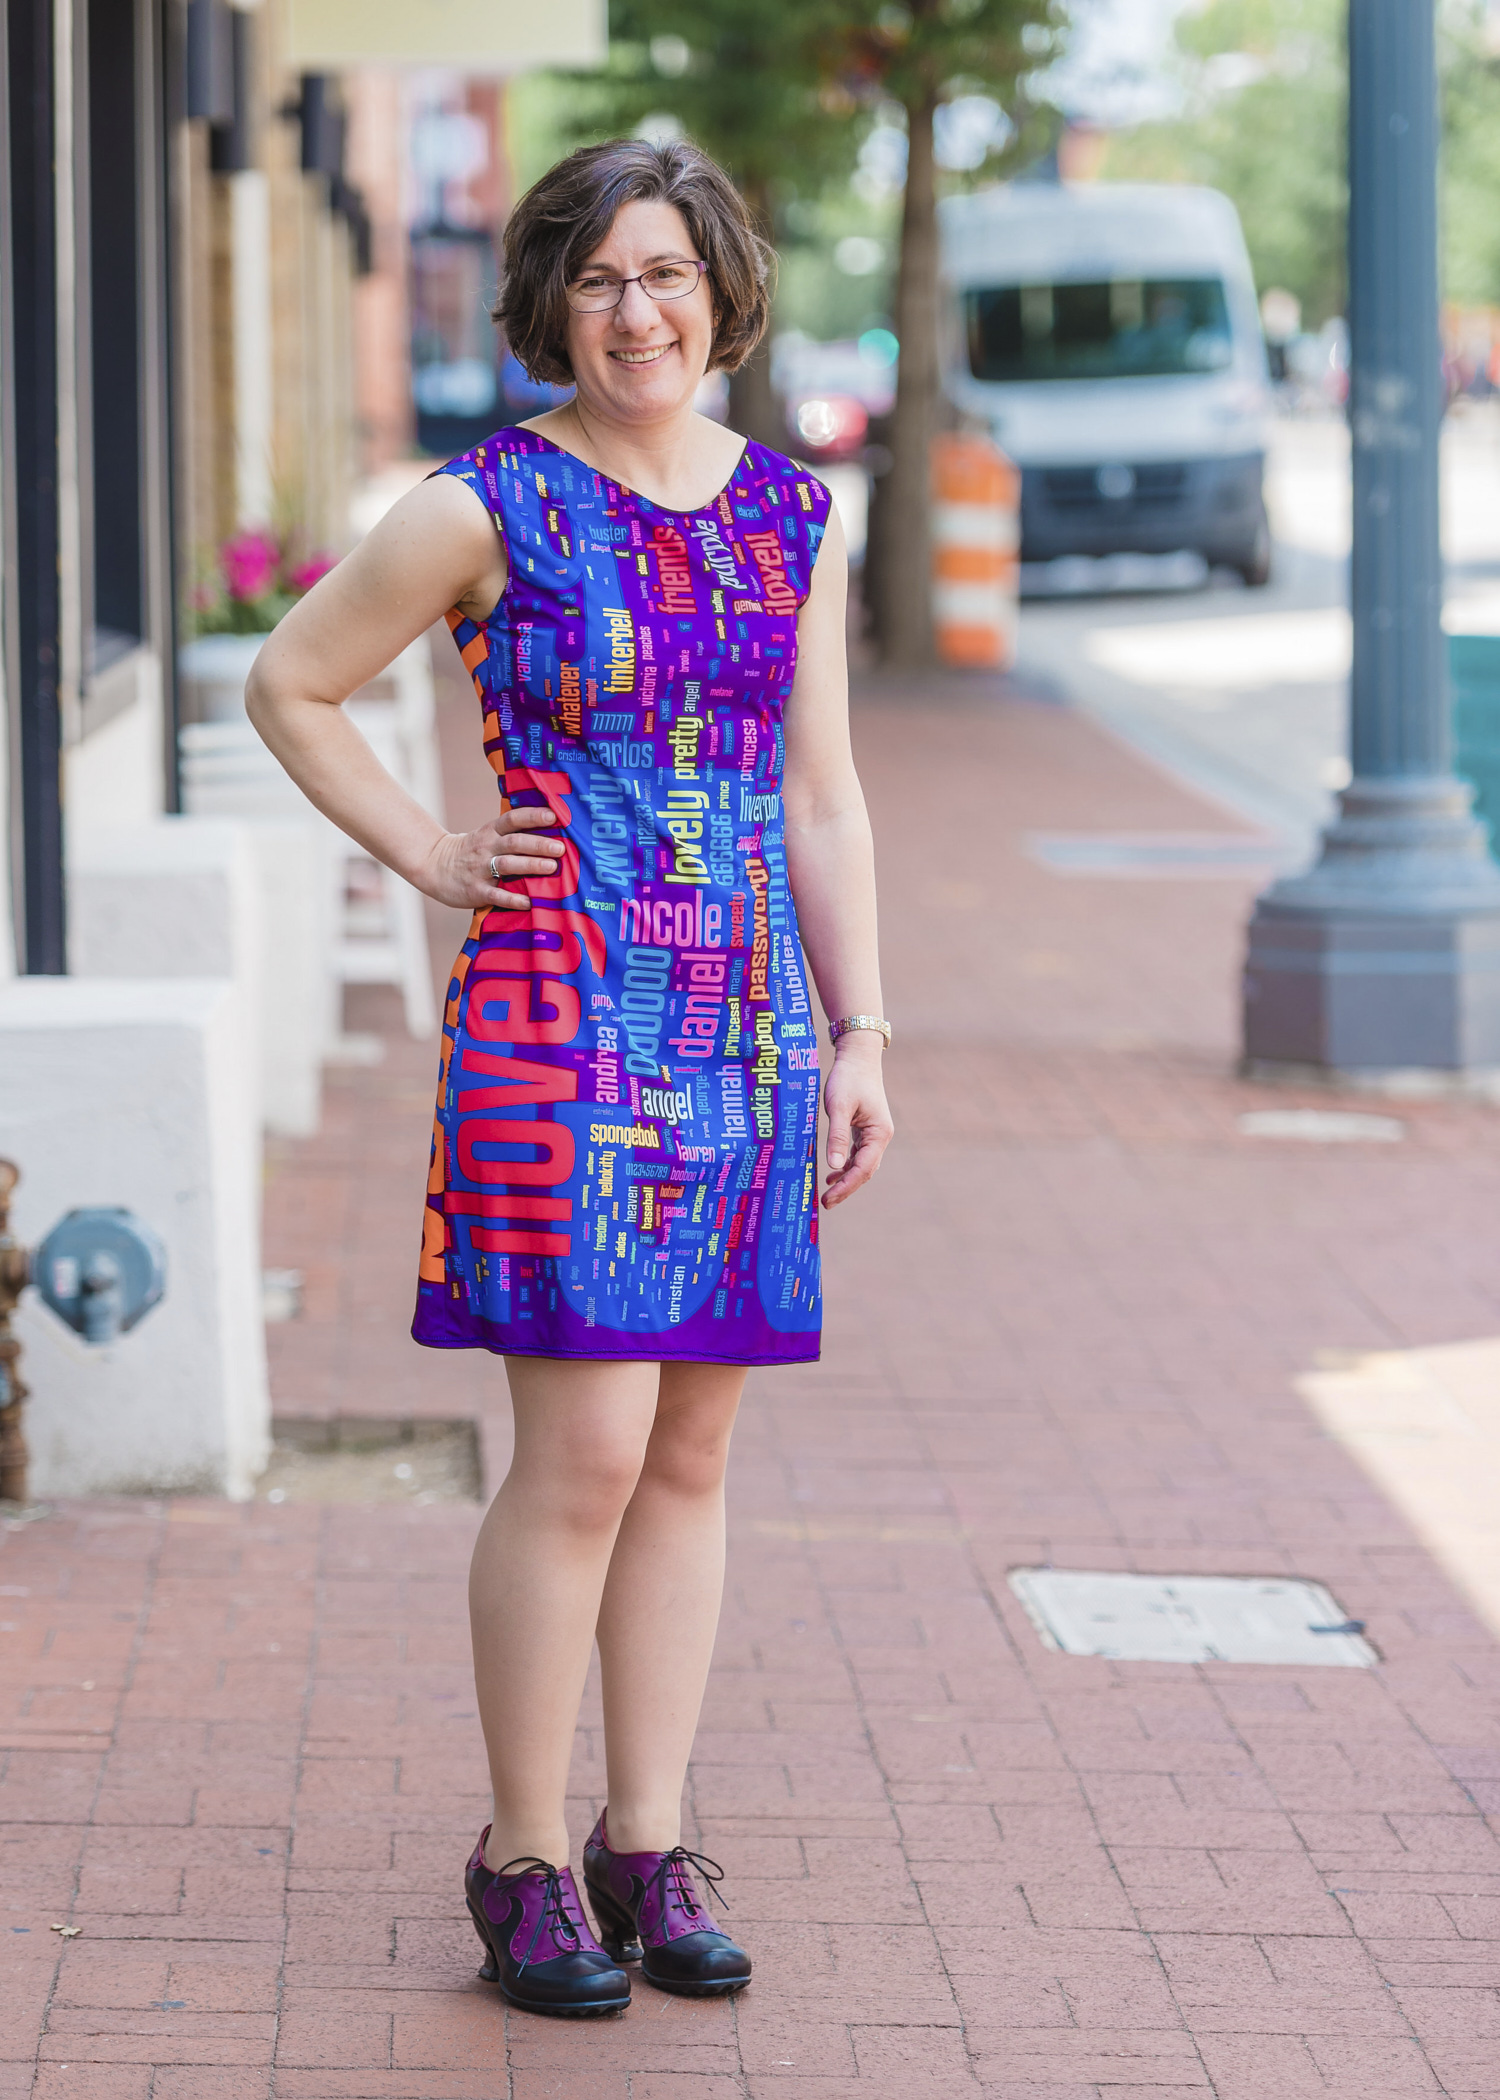
And see the original passwords dress below
Lorrie wearing password dress at Privacy@Scale, photo by Adam Mason
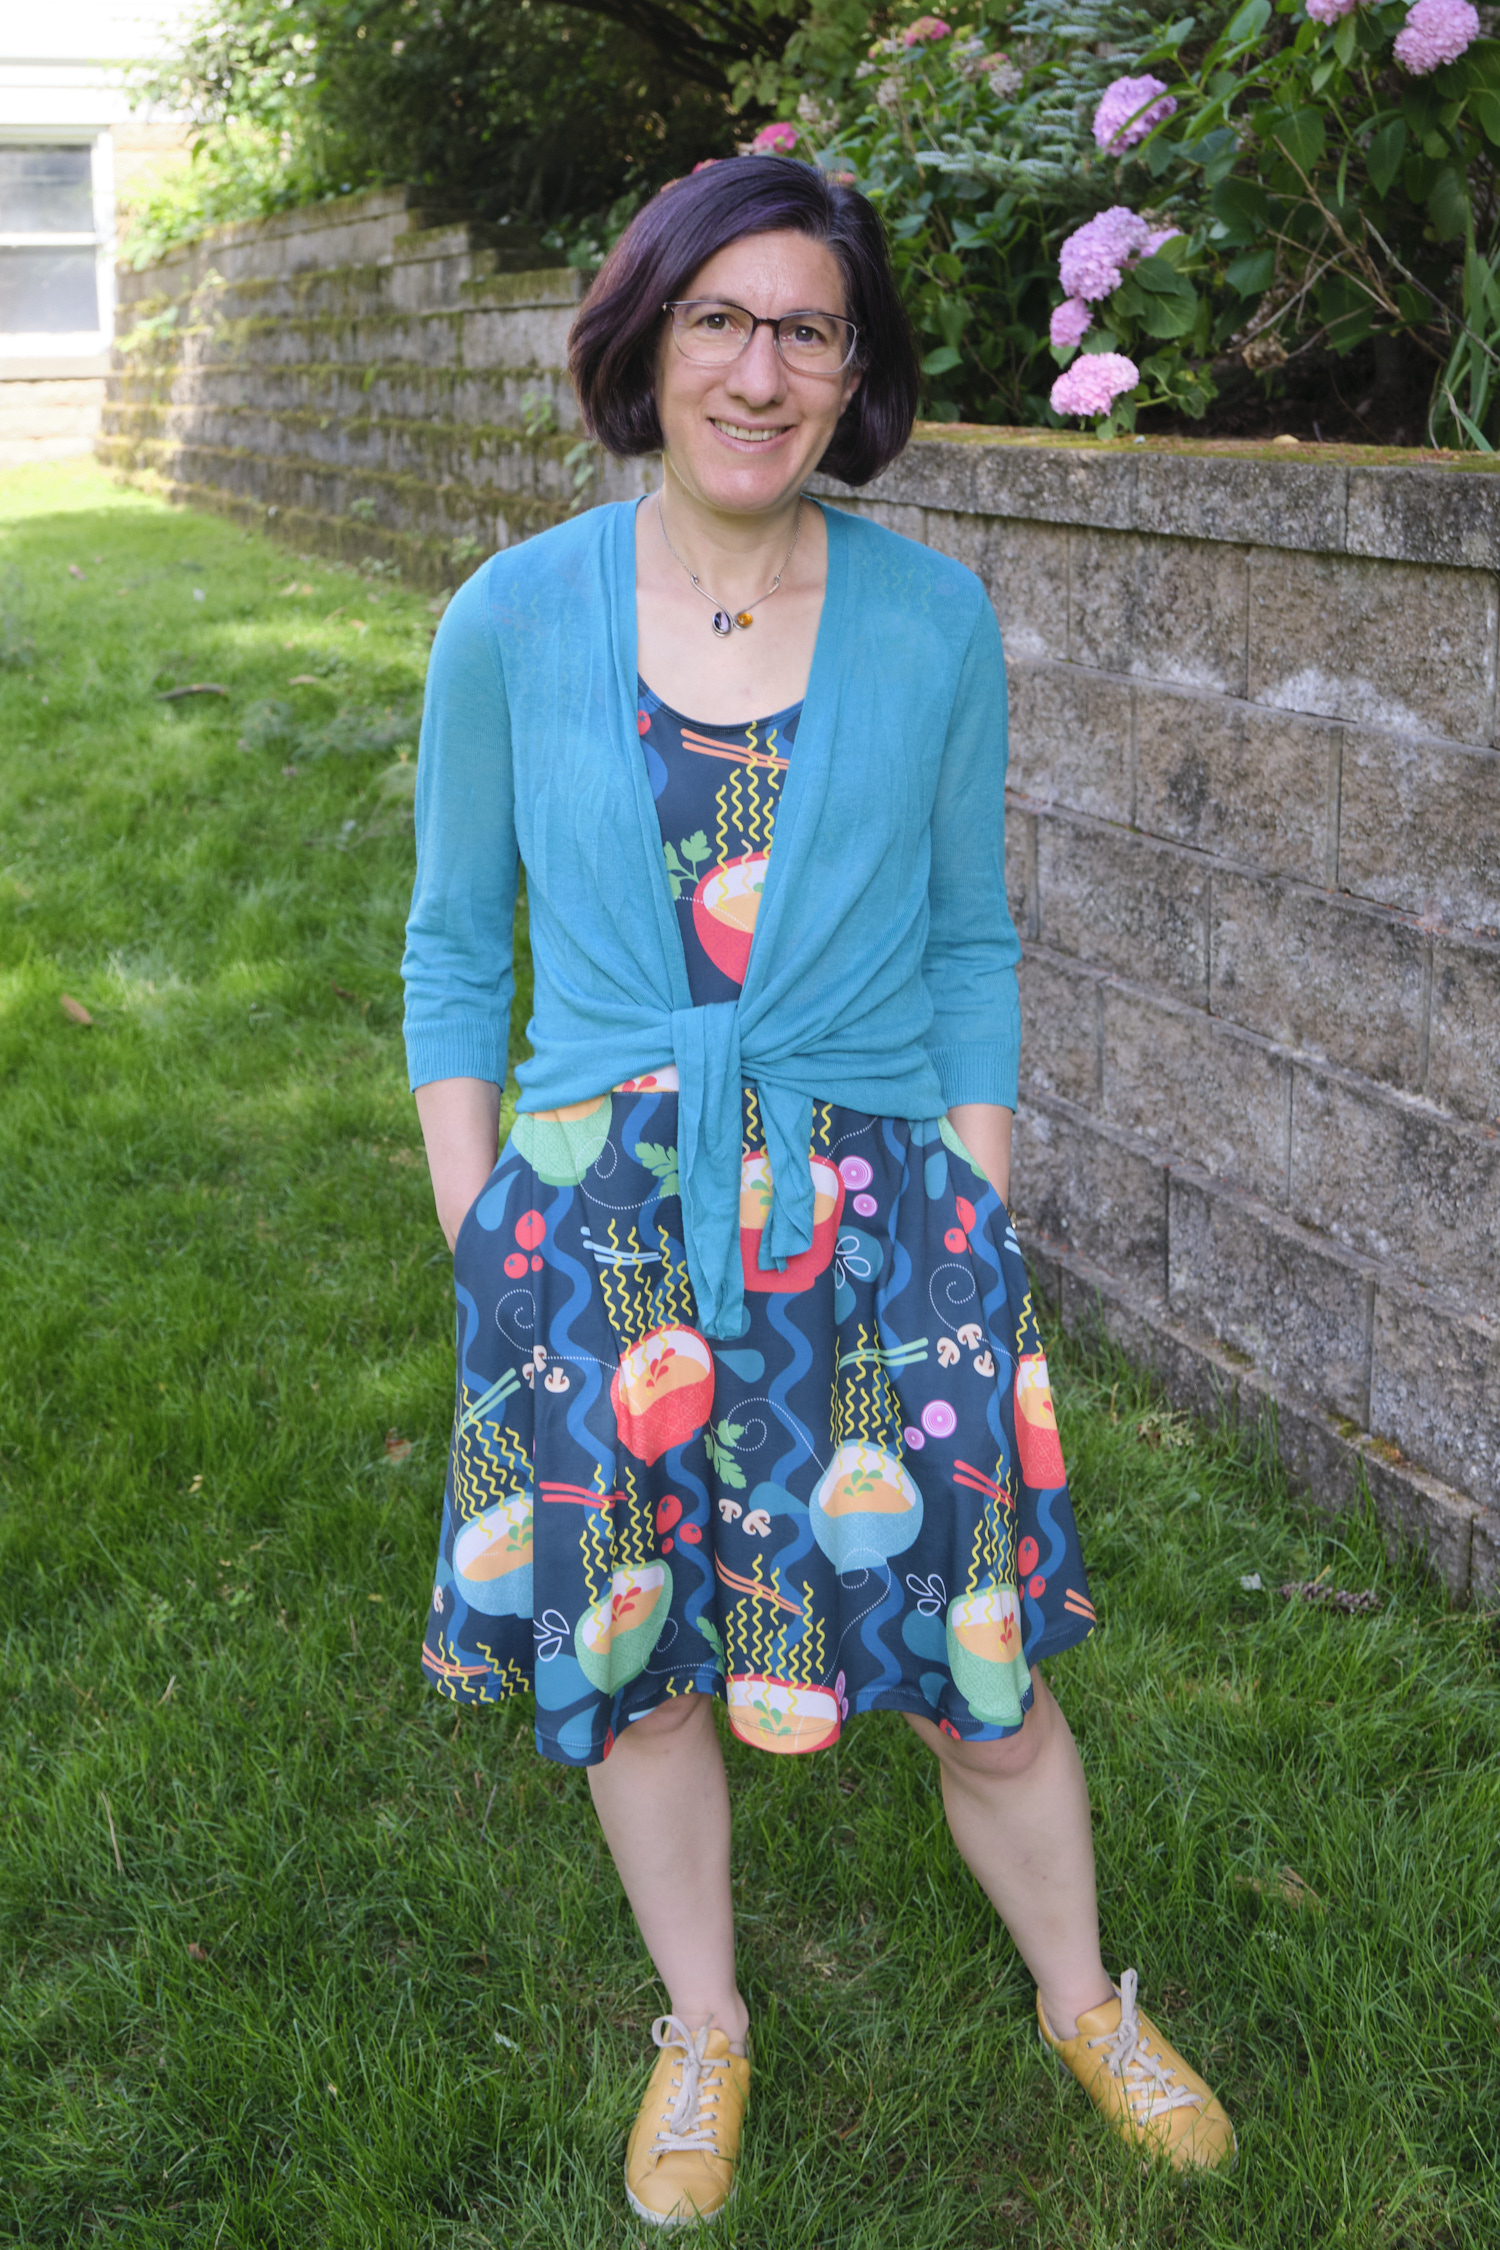
After sewing mostly quilts for a while, I was inspired to sew a dress again last summer (2022) because I wanted a dress to wear to the Symposium On Usable Privacy and Security (SOUPS) 2022, a conference that I started in 2005 and is still going strong. I thought it would be fun to have a dress that had soup on it. I thought about a soup-can dress channeling Andy Warhol, but eventually settled on a bright noodle soup pattern called grandma’s recipe, designed by Daniela Friedenthal and available at spooflower.com. I had the fabric printed on modern jersey, and then tried to figure out how to sew it.
Sidebar 1: I love Spoonflower modern jersey! It is one of the best polyester jersey’s I have found with a feel similar to cotton, but brighter colors. It is similar to double-brushed polyester (DBP) but has a little bit more body than most of the DPBs I’ve used. The main downside is it is about 4 or 5 times more expensive than DBP and only available for custom printing, not colored solids.
My previous me-made dresses were very simple, sewn from two pieces of fabric with no pockets. This time I wanted a half-circle skater dress with pockets and some better finishing details. I started reading sewing blogs and learned how to sew side-seam pockets and create neck bands and bindings and make smooth knit hems with Soft Stretch hem tape. I reverse engineered some dresses from my closet and drafted a pattern, trying to include enough ease so I wouldn’t need a zipper.
Sidebar 2: I also love Heatnbond Softstretch for knit hems of all sorts. I fuse the tape to the edge of the hem, turn under the hem and press using the paper backing edge as a guide, then peel back the paper and fuse the hem in place, then zigzag over the edge. I’ve used this on dress, shirt, sleeve, and cardigan hems with great results. It even works on curves — you just have to nudge the paper backing around the curve as you press it. I now keep a couple of rolls around at all times so I don’t run out in the middle of a project!
The finished dress worked pretty well. The waist ended up a bit looser than I wanted and the pockets pulled the waist down a bit when I put stuff in them. But a sweater easily hides the imperfections. It is a fairly striking looking dress because of the unique fabric, and I have had total strangers comment on it.
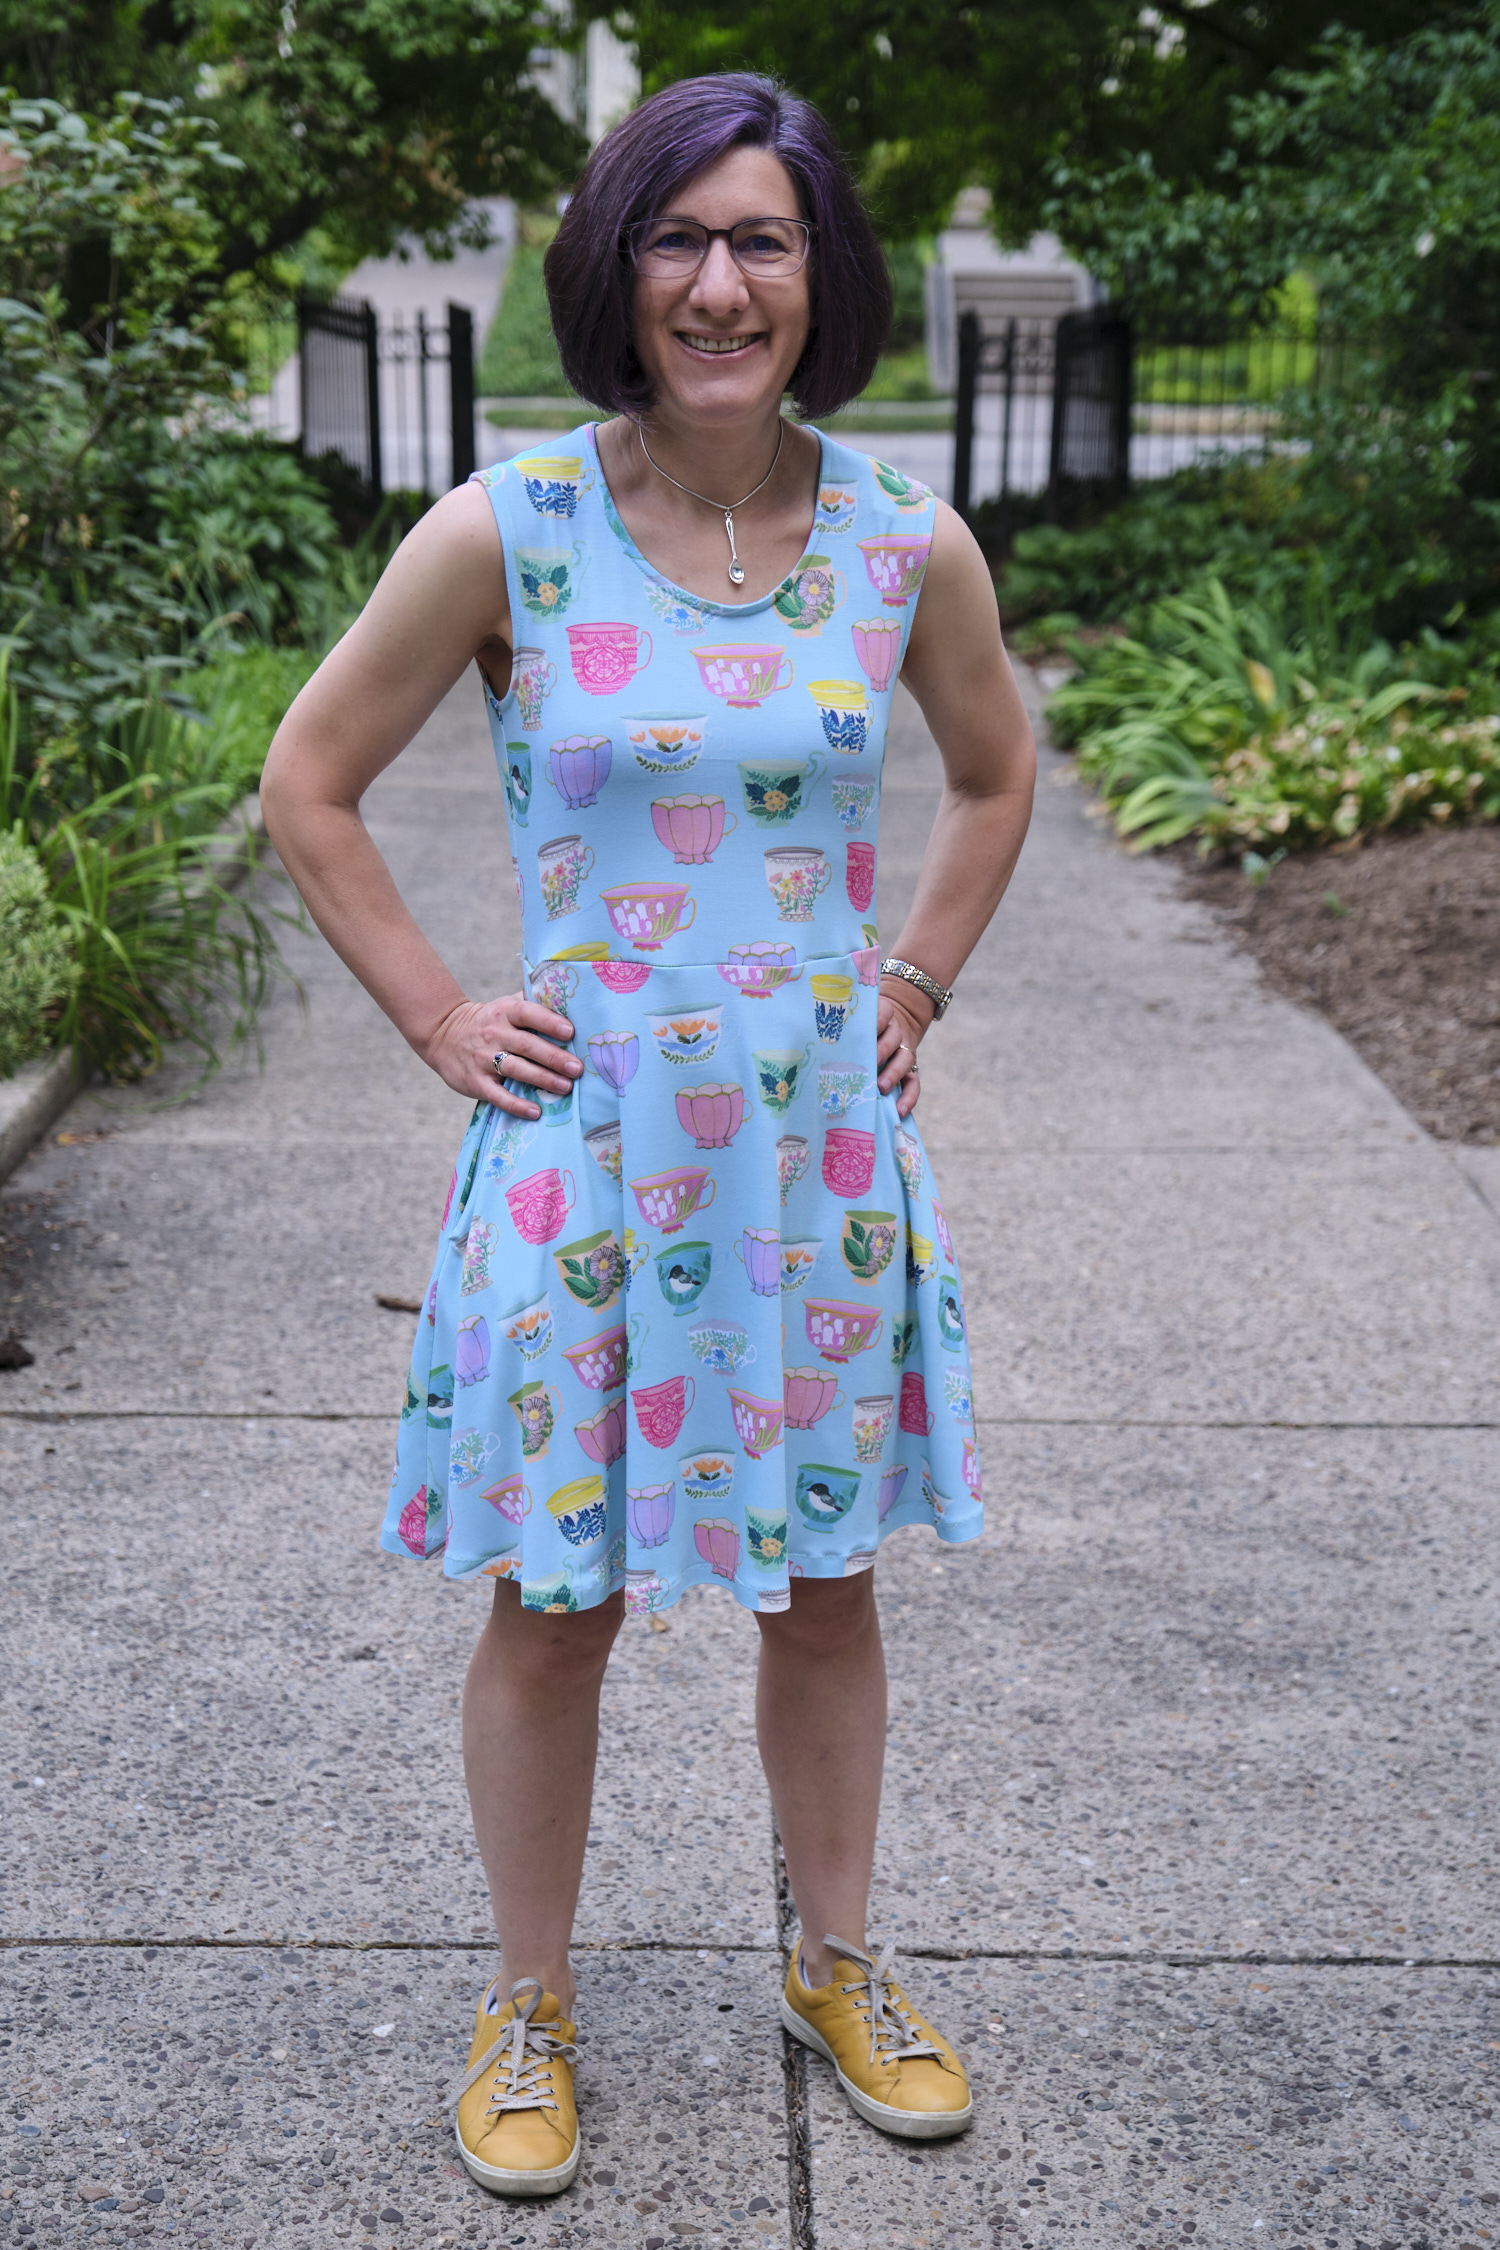
While I wasn’t 100% satisfied with the SOUPS dress, I decided it was good enough that I wasn’t going to remake it. But I wanted to improve my pattern and give it another go. So adjusted the fit of the waist and the pockets a bit and sewed the dress again, this time in soft blue vintage tea cups fabric designed by Cecilia Mok on spoonflower.com. I chose cups because the name of my lab at CMU is the CyLab Usable Privacy and Security (CUPS) Laboratory. I also went on a quest to find a spoon pendant I could wear with both dresses. Most of the spoons I could find online were either too tiny or too big, or were designed for functional use as drug paraphernalia. I eventually bought a 25 pack of spoon charms for less than $10.
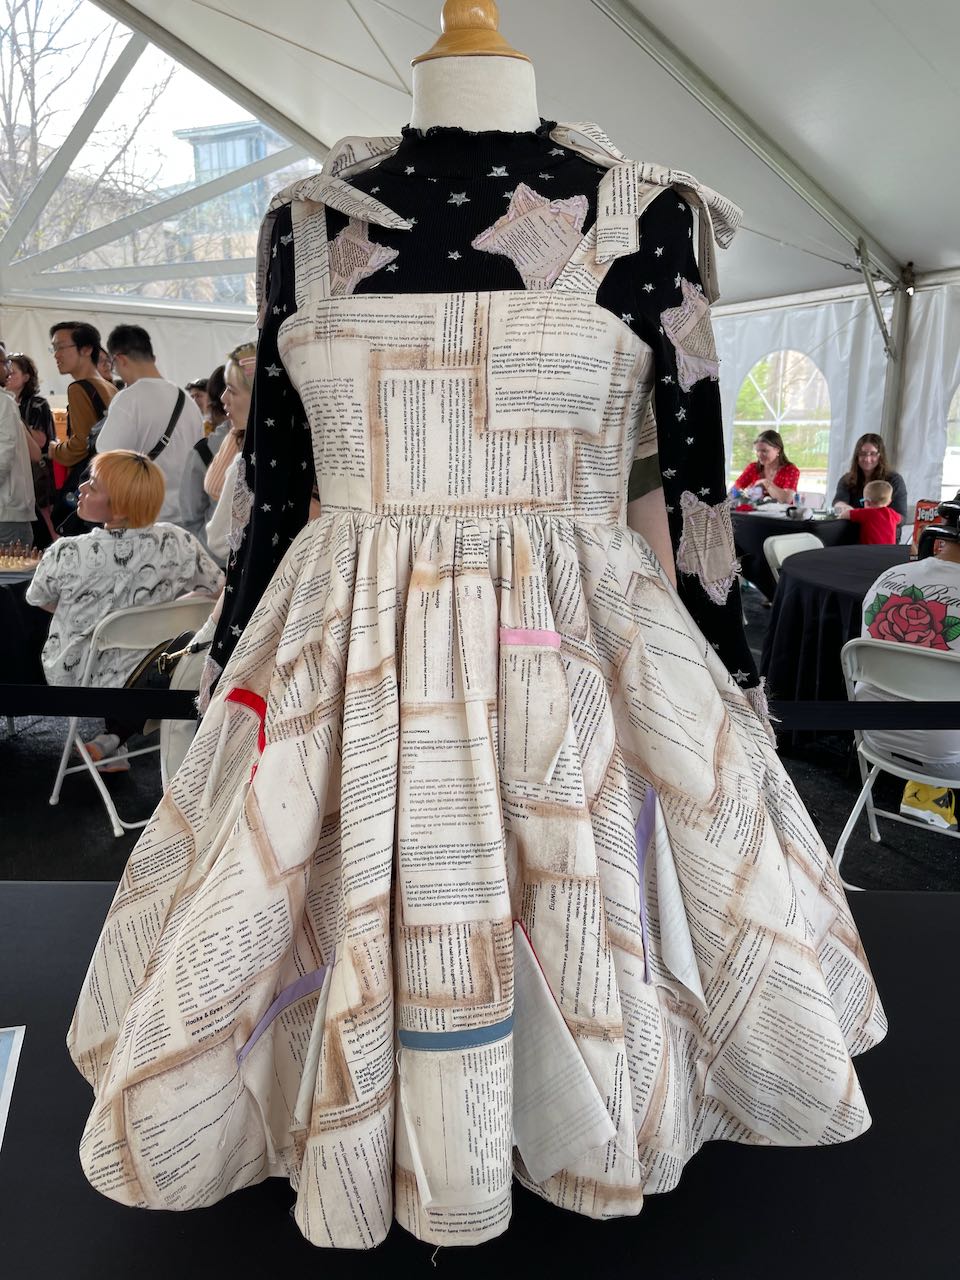
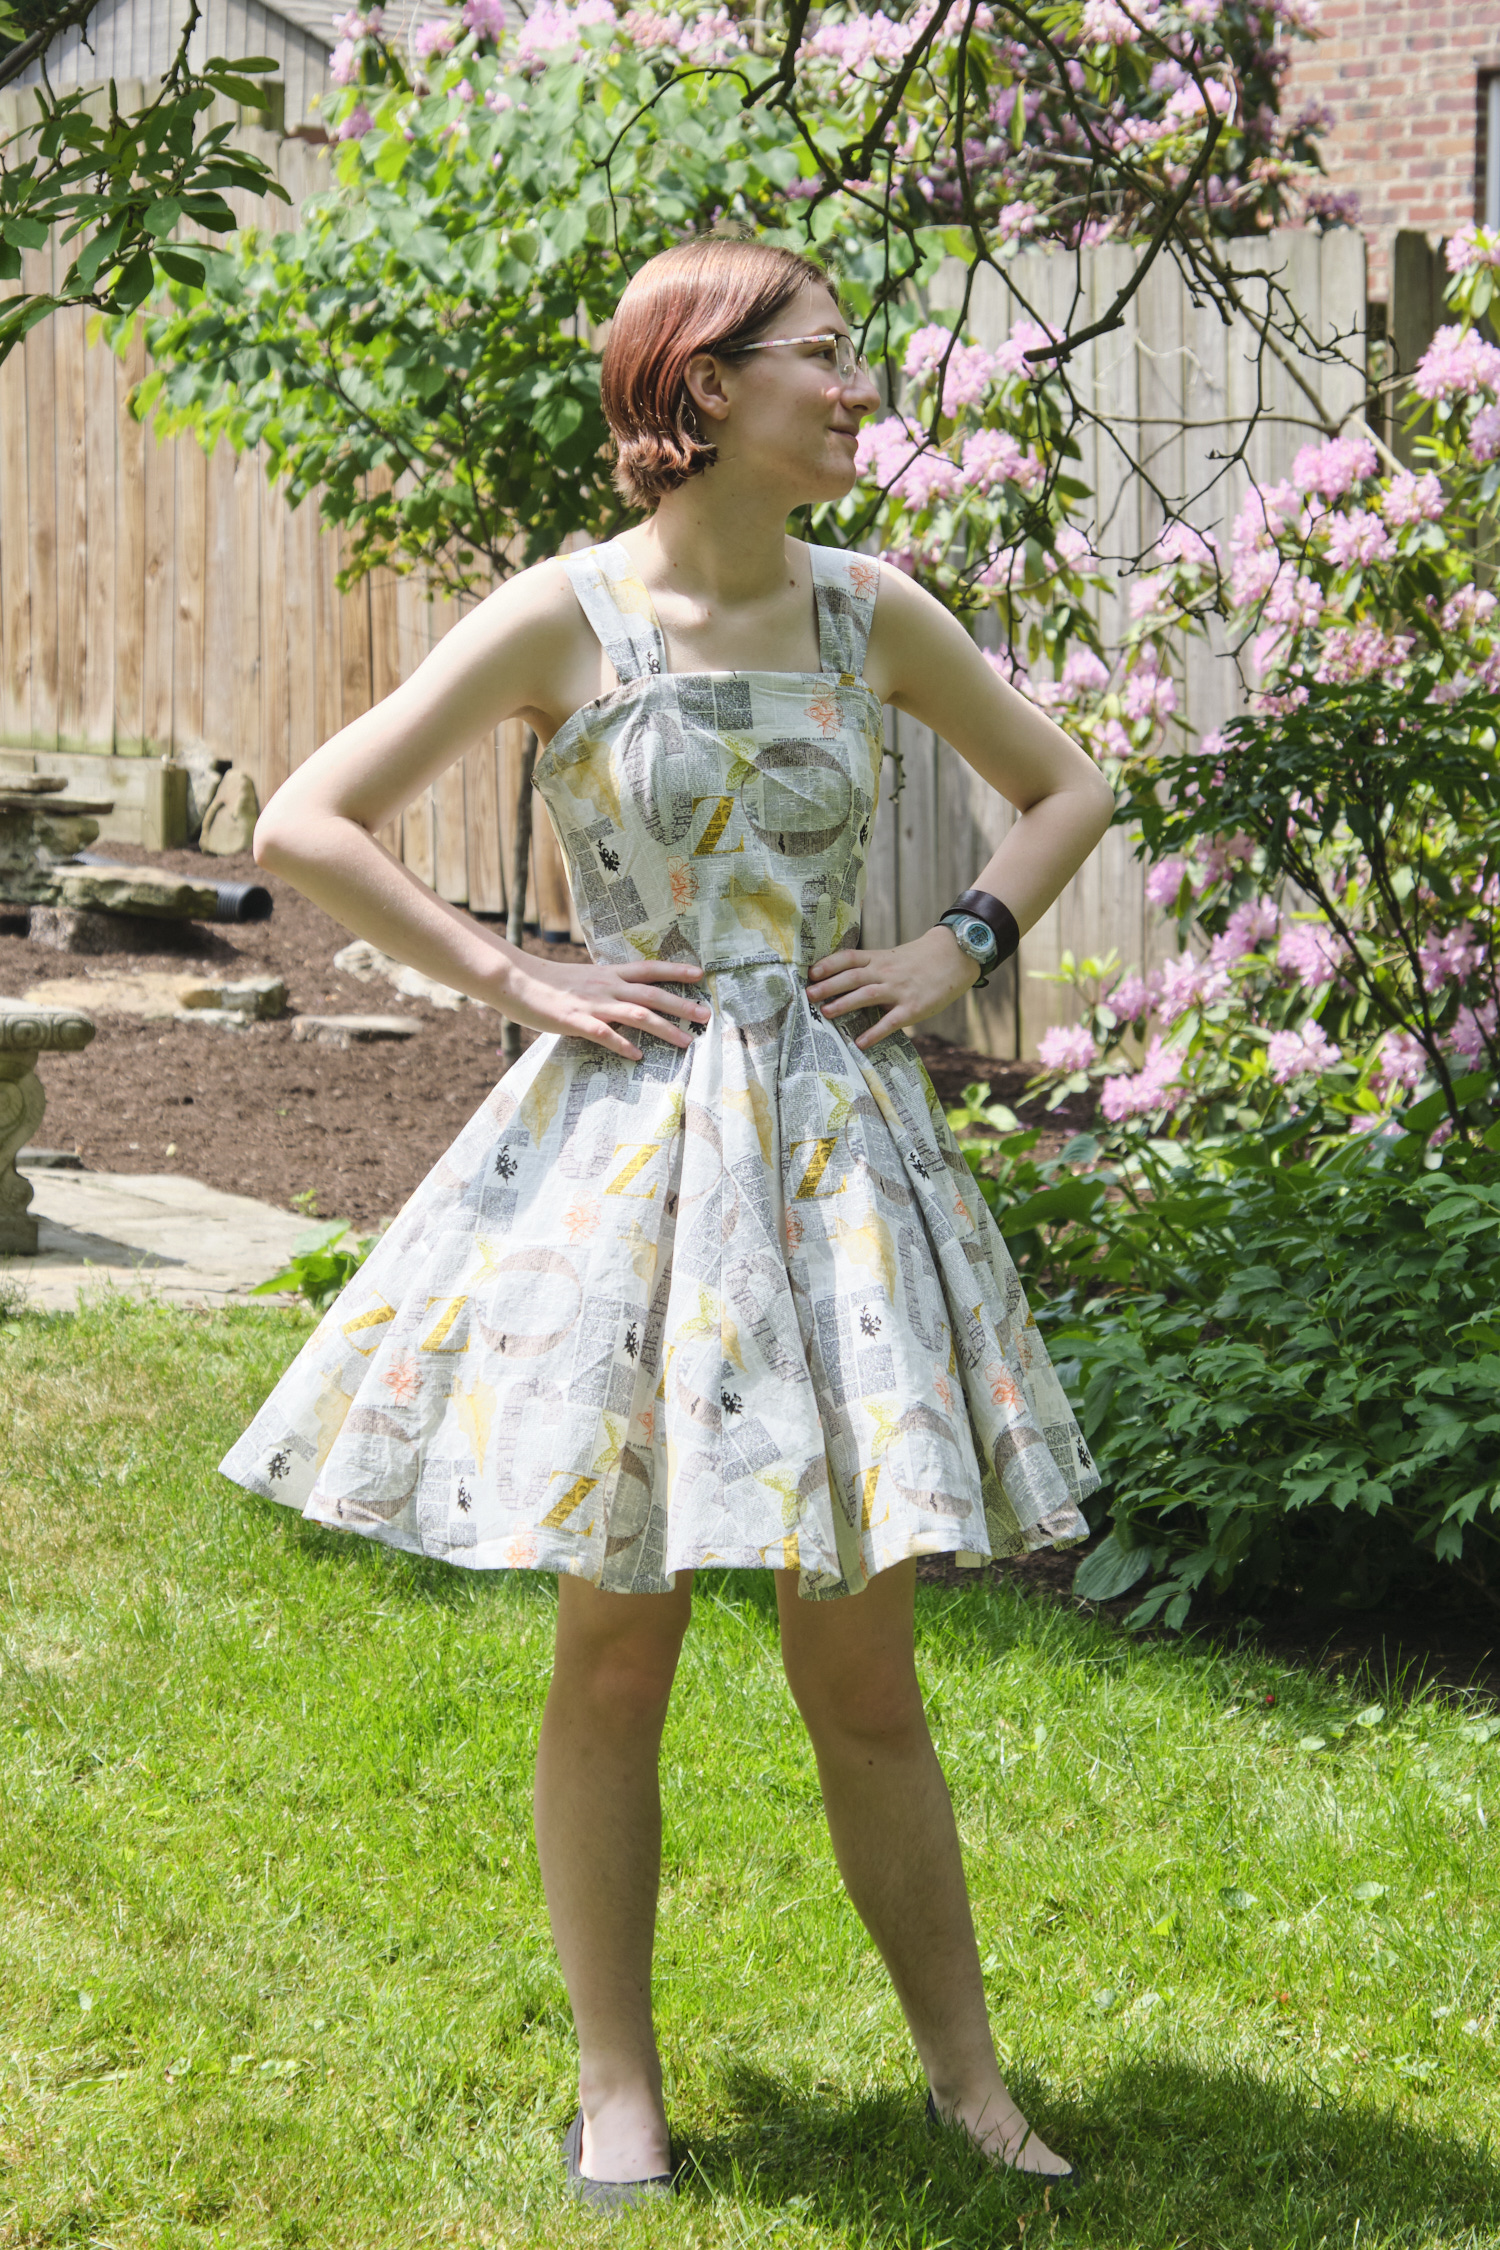
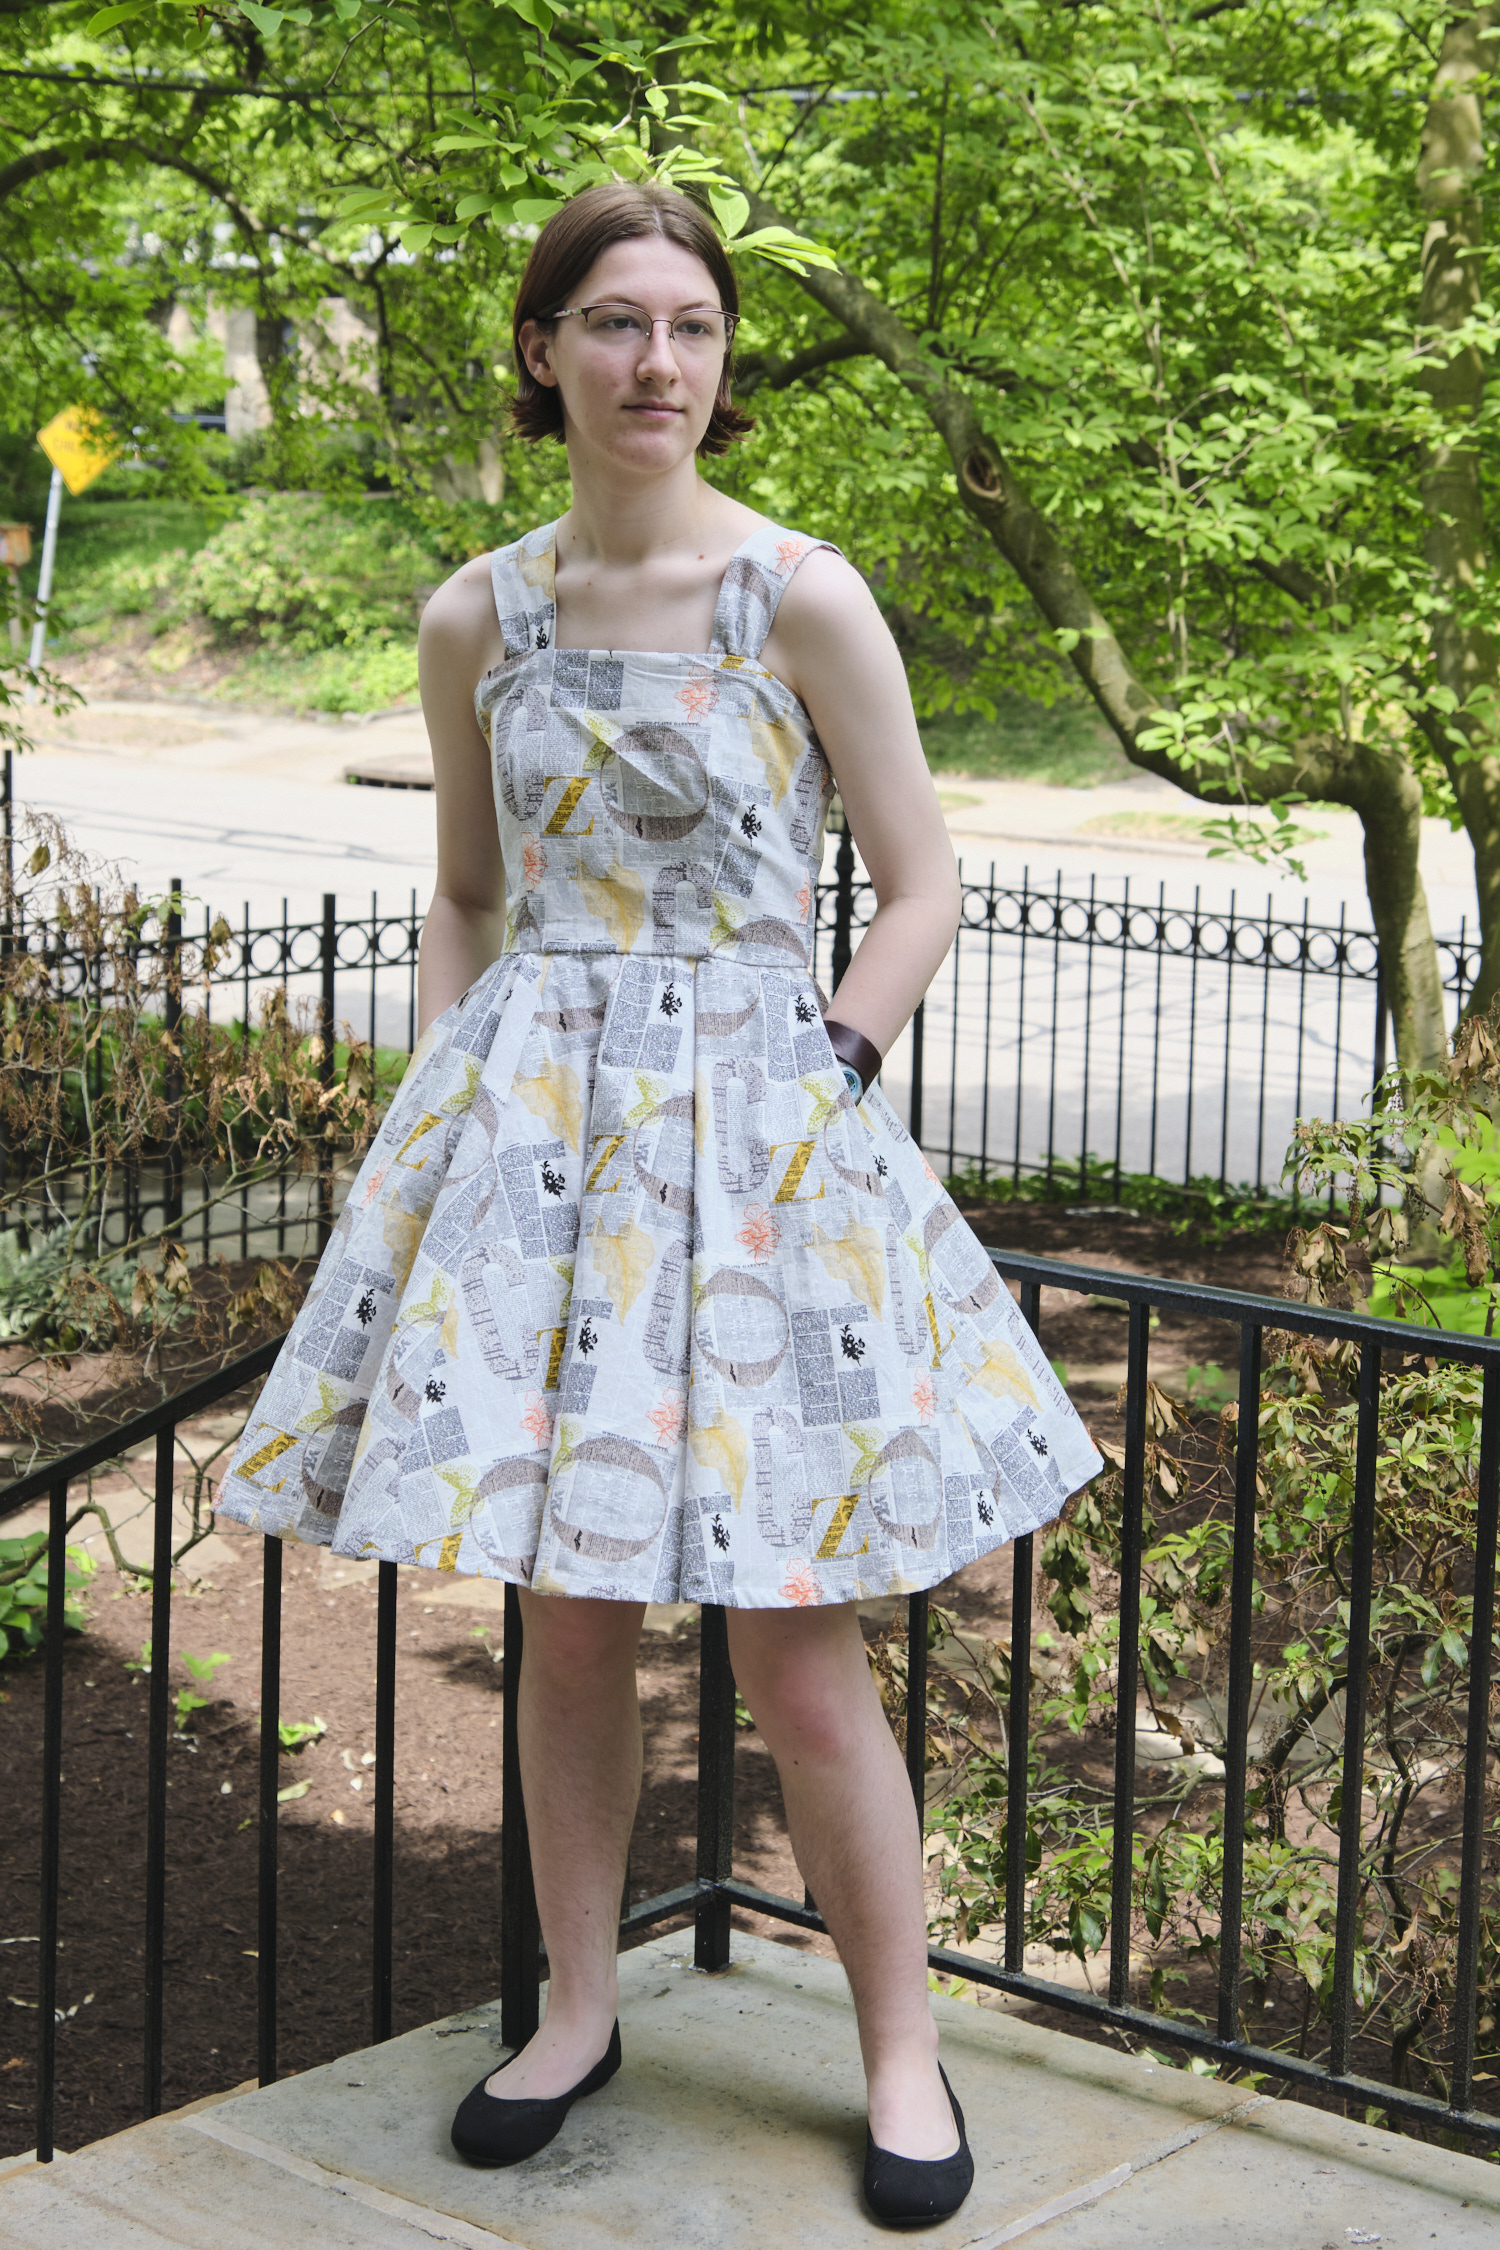
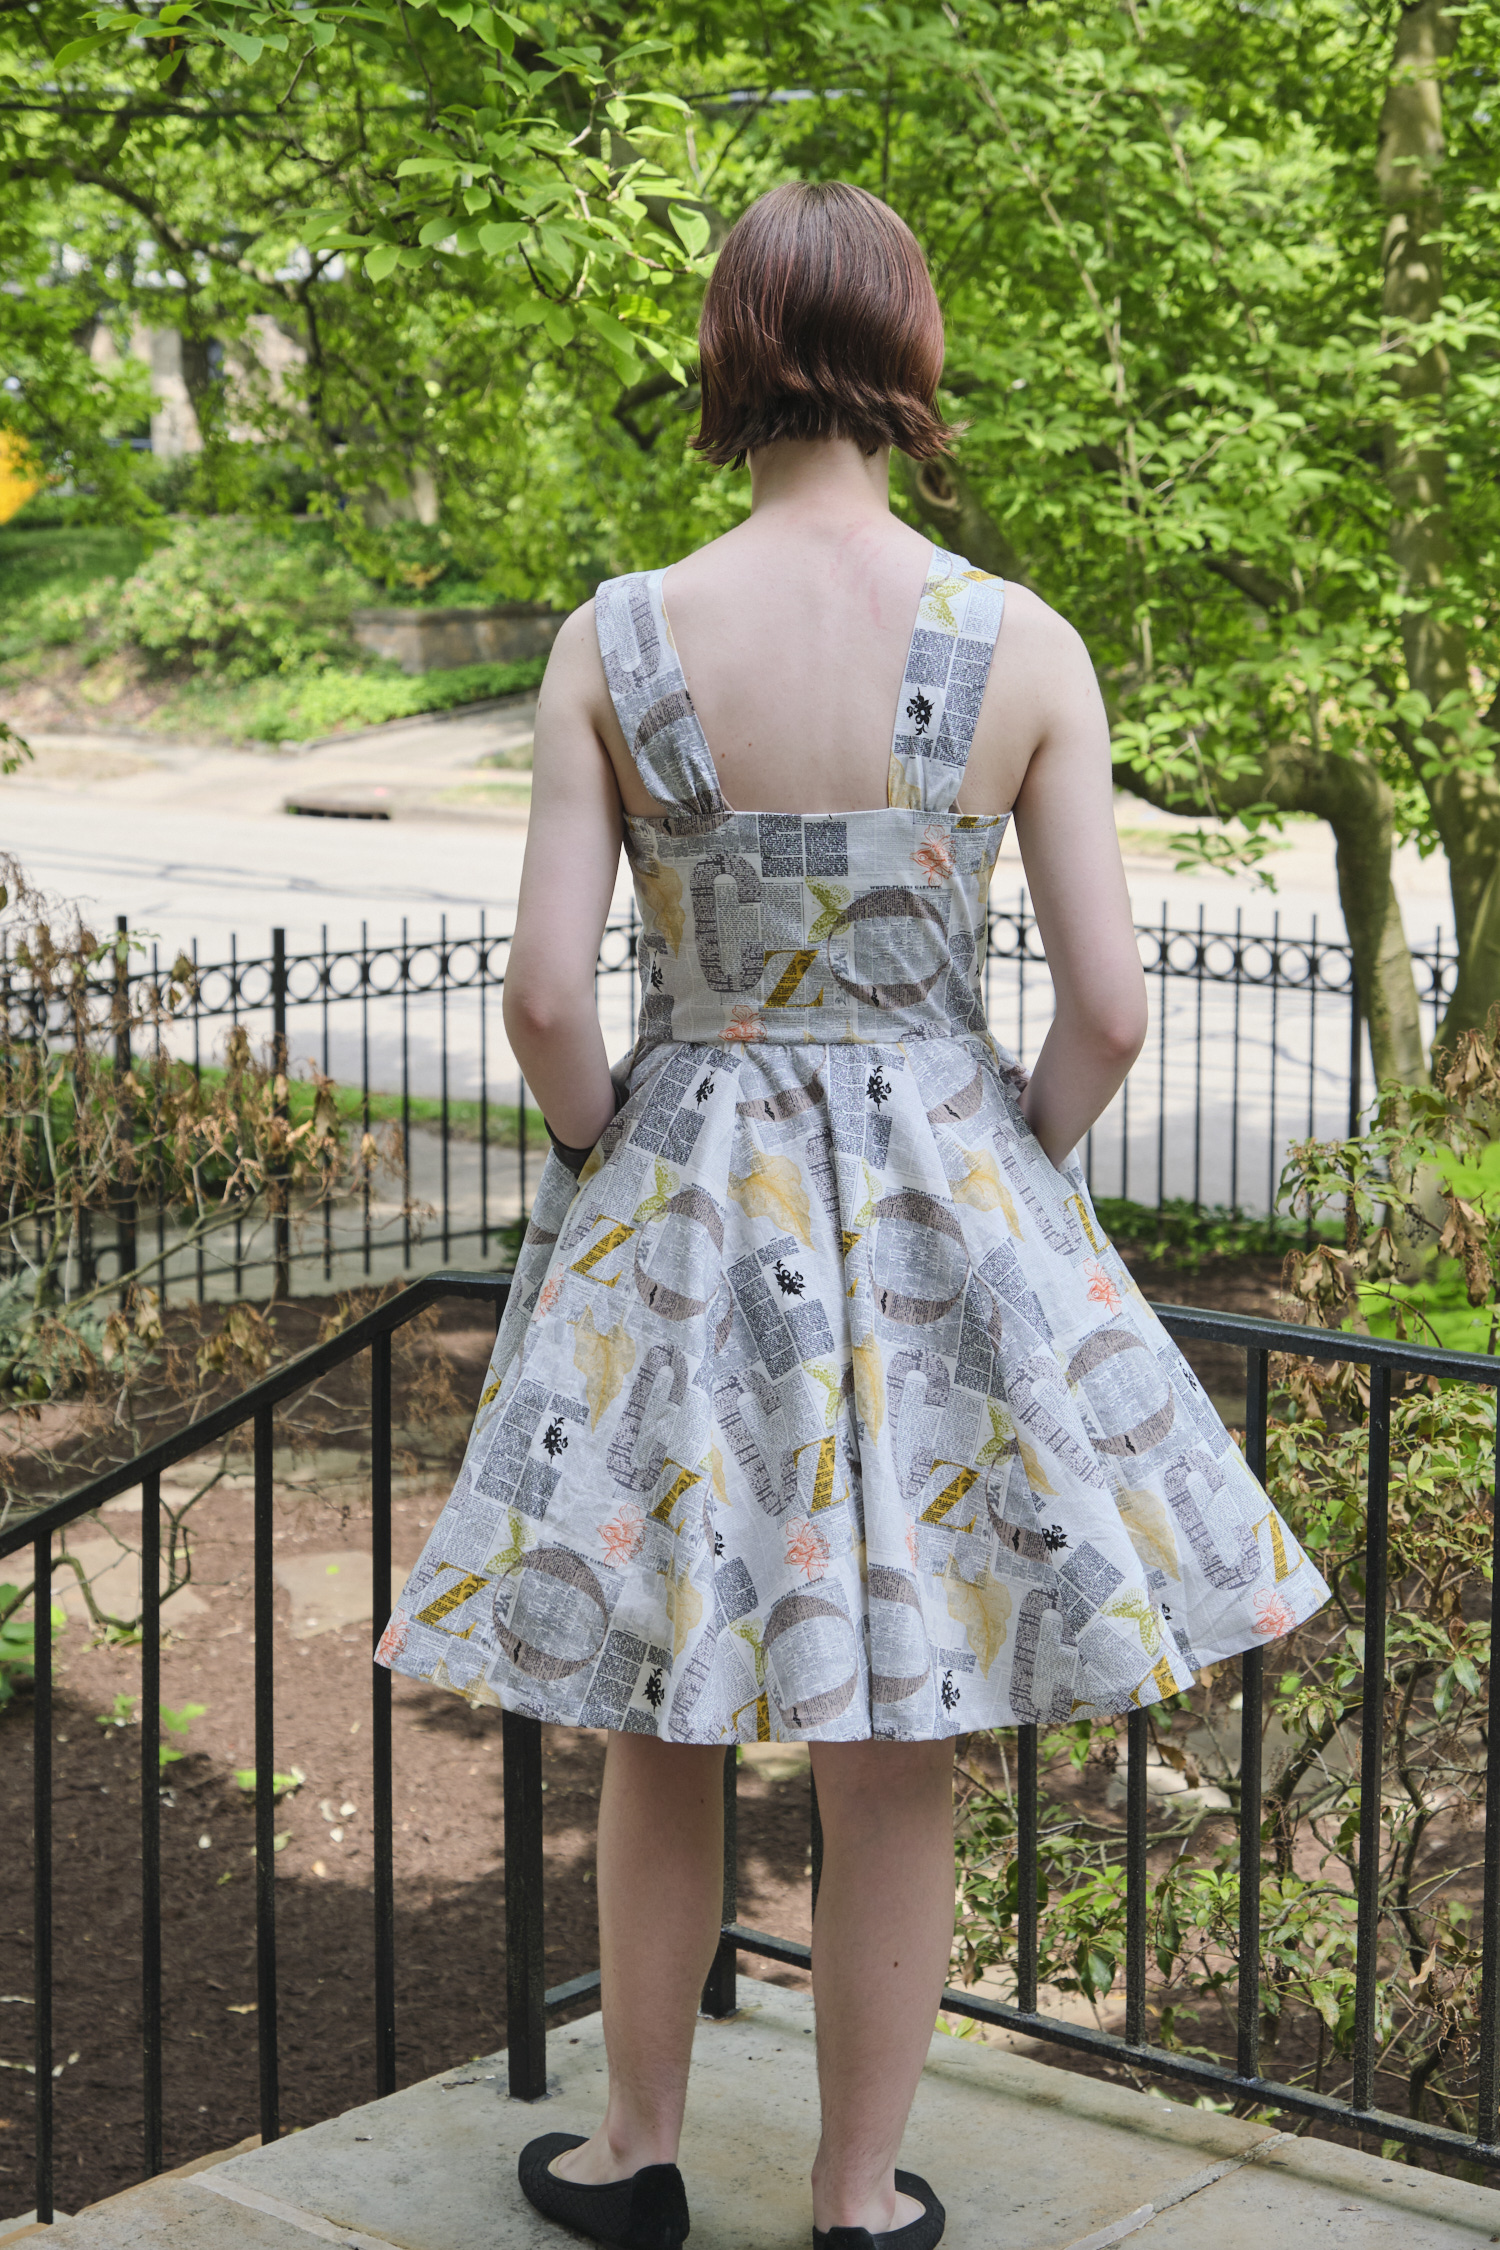
I asked my 17-year-old daughter what she would like me to sew for her. After perusing some patterns I suggested she told me what she really wanted was a vintage sundress in a woven fabric with a full-circle poofy, twirly skirt, perhaps like the one she had recently seen worn as a costume in Carnegie Mellon’s student production of Godspell. (See photo below of said costume on display at the CMU carnival.)
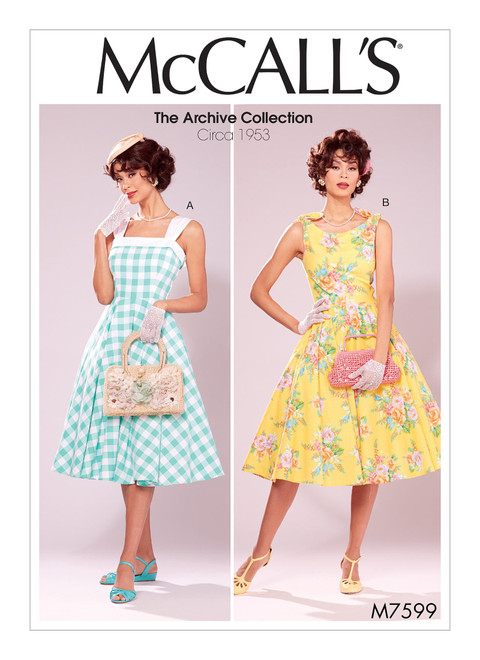
So I visited all my favorite PDF pattern websites and found some candidate patterns, but none were quite what she was looking for. I searched the Internet for vintage sundress patters with circle skirts and found a number of patterns from the 1950s that were available from resellers as classic paper patterns. And then I stumbled upon McCall’s M7599, which has been reissued as a PDF pattern. I found some reviews of the pattern, and even a how-to video (and I found another video after I finished sewing that might have been useful to watch too). My daughter examined M7599 and decided that view A was almost perfect. Except she wanted it without the contrast band, above knee length, and, of course, with pockets. These seemed like doable modifications, so I bought the pattern and downloaded the PDF.
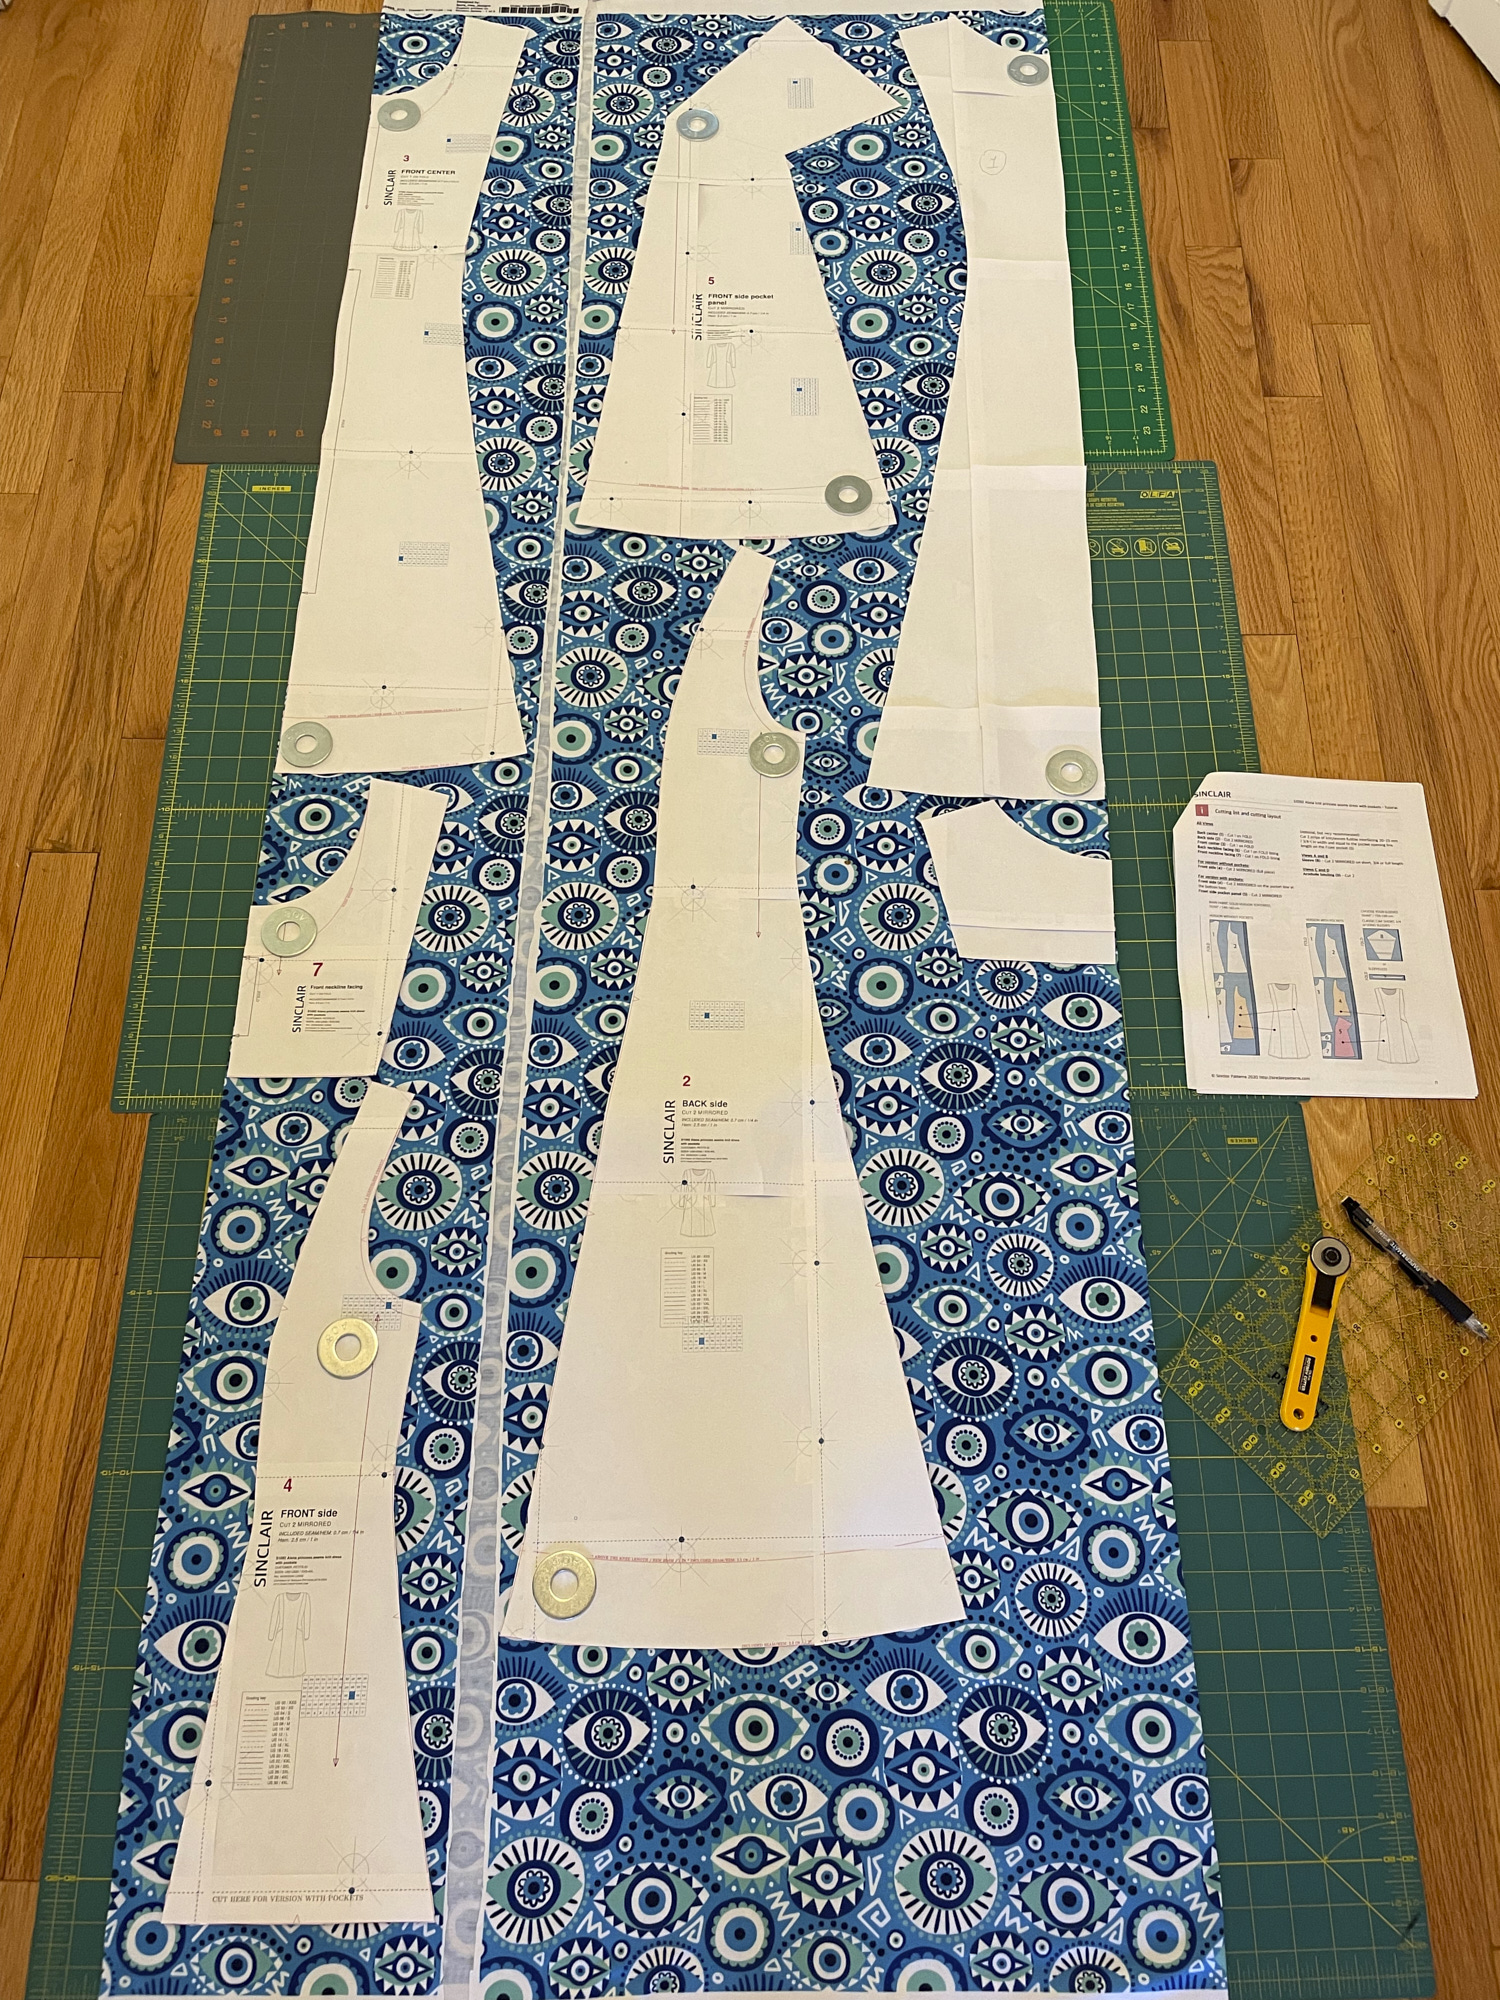
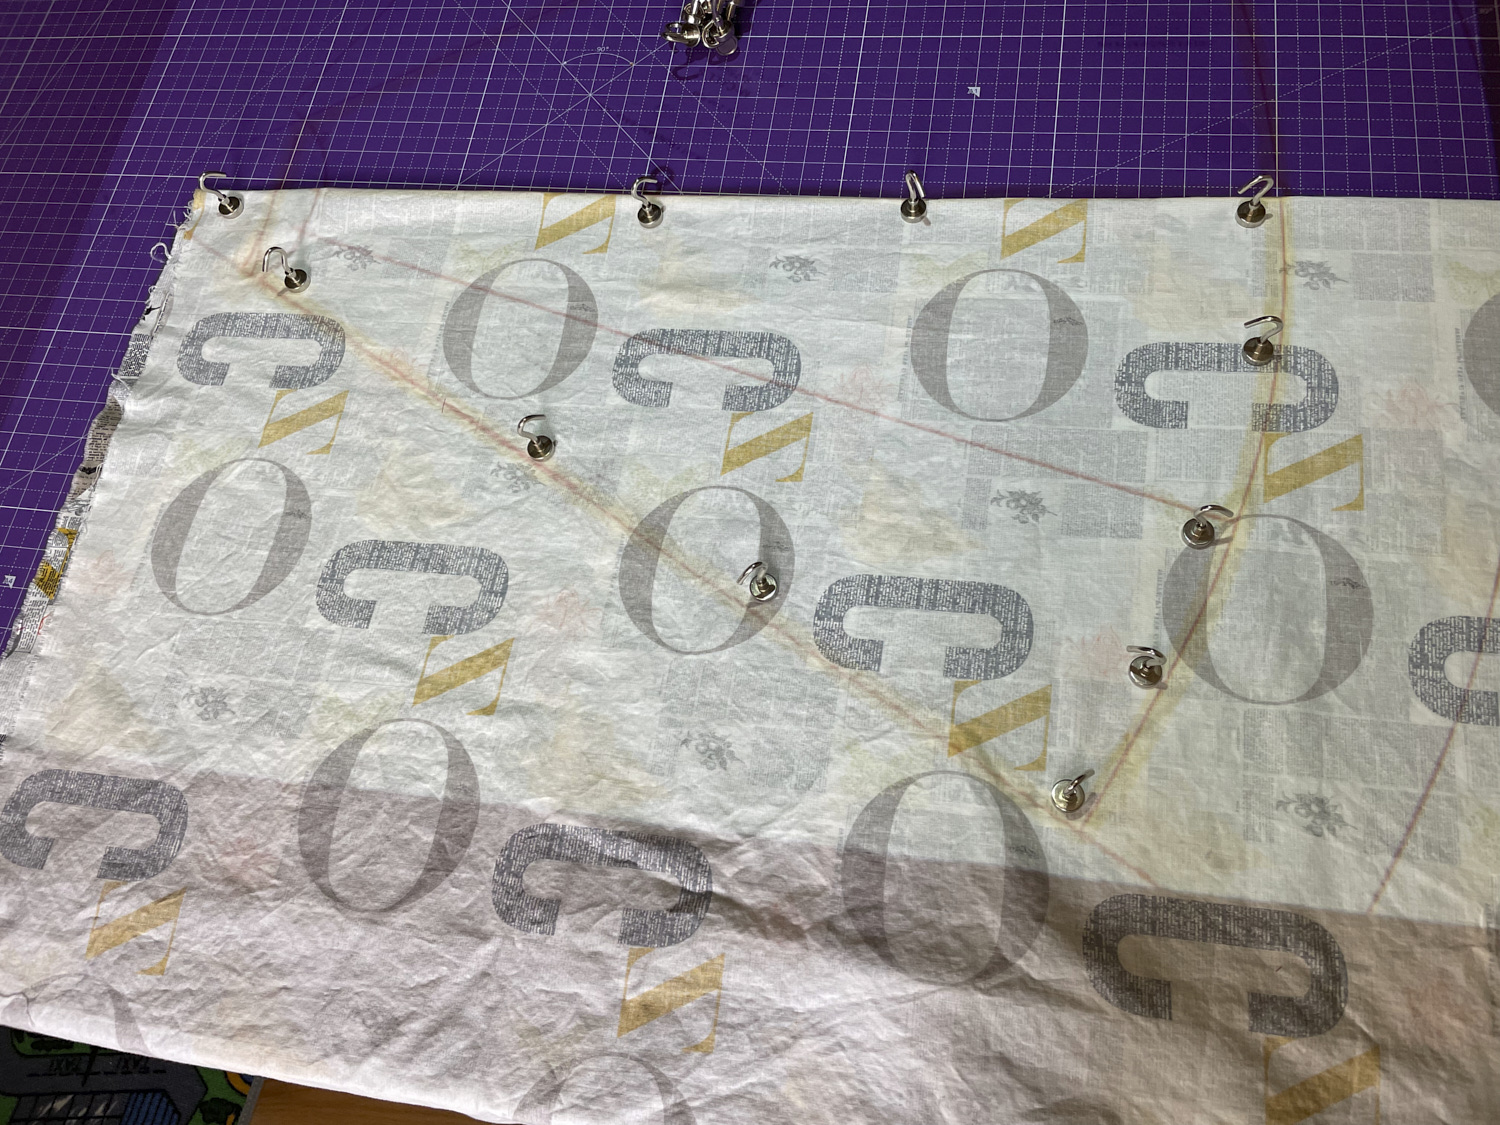
The PDF pattern came with a fairly terse set of instructions and was basically a scan of the original pattern with all the layers on one sheet, tiled into 8.5×11 pages, not a convenient modern PDF layered pattern. I was able to assemble the pages into one giant PDF using PDFStitcher, an awesome free tool developed by a sewist. Then I loaded the resulting PDF into Affinity Designer (AD) on my iPad and traced the pattern pieces I was going to use in the correct sizes with a nice thick red line that would show up well when projected onto fabric (see photo below of skirt gores projected on fabric, held in place with magnets, ready for cutting with rotary cutter).
The sizing of vintage patterns is strange. My daughter normally wears a 2 or 4 dress size but according to the size chart she needed a 12. Ultimately after making a muslin and futzing with the pattern I ended up making a size 10 with parts graded to a size 8.
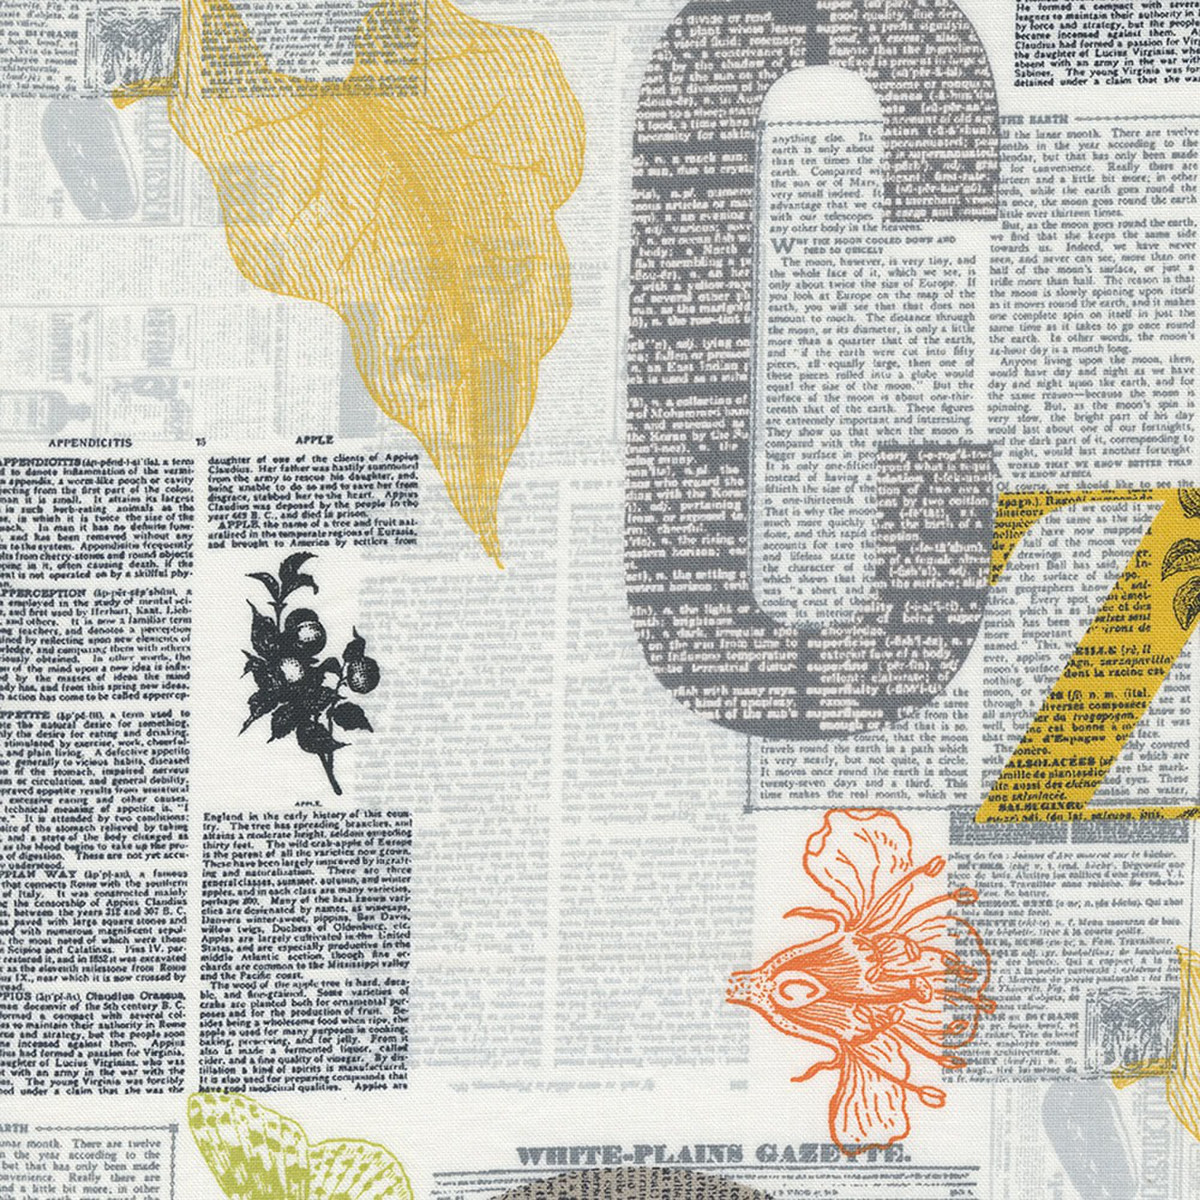
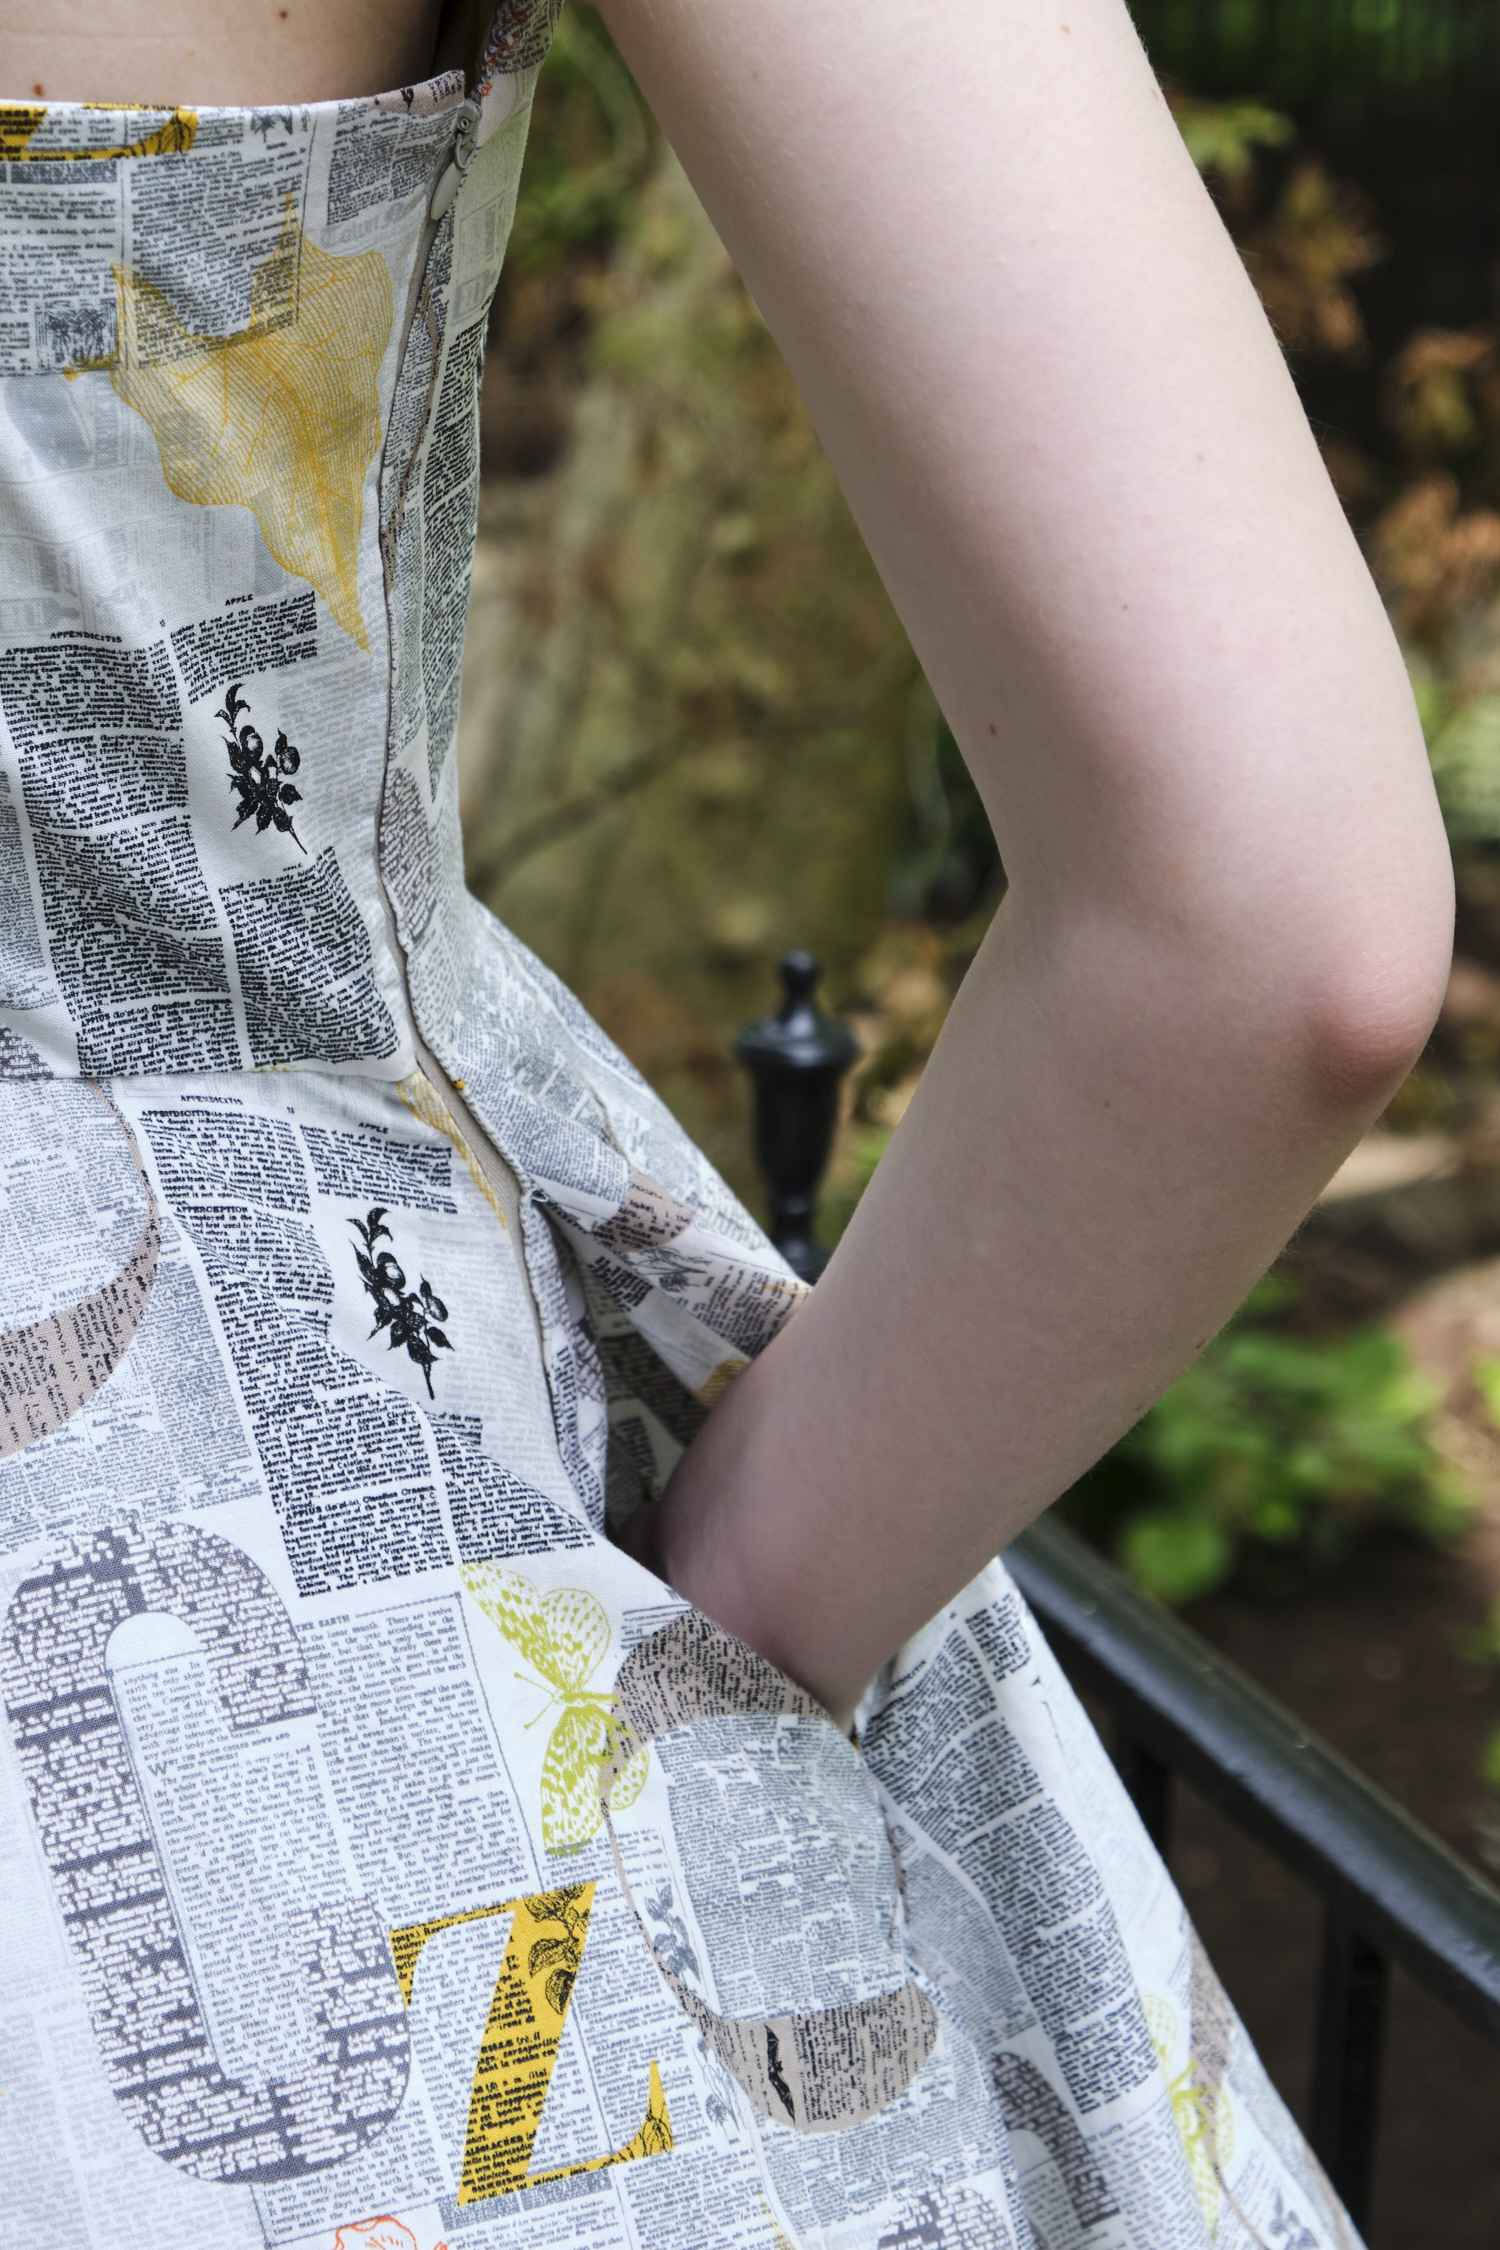
Inspired by the Godspell costume, my daughter searched online for fabric with pages of text, and ultimately settled on the Filigree Zen Chic Newsprint Text and Words fabric from Moda Fabrics in the white colorway. It is a lovely quilter’s cotton fabric, but it occurred to me that it is quite directional and the circle skirt would result in some of the design being upside down. To compensate I divided the full circle into six gores so that I could cut them each right-side up. I drafted the gores directly on the PDF pattern in AD. Of course, this increased the amount of fabric I would need — I ended up using six yards!
Removing the band from the bodice was straightforward — I basically just sewed the pattern as written but without attaching a band. I decided to also leave off the petticoat so that my daughter would have the option of wearing the dress either with or without a petticoat (she can wear a separate petticoat). Since I wasn’t attaching a petticoat I decided the yoke under the petticoat wasn’t needed either so I left that out as well.
I made a muslin of just the bodice so I could adjust the fit. I reduced the size of the bust darts, and brought the straps in a bit. It was also a good opportunity to practice using my zipper foot, which I haven’t used in many years (and zippers kind of scare me). It turned out to be a nice enough crop top that my daughter decided to wear the muslin outside in public. In fact she even wore it to perform with her rock band. She requested thinner straps for the dress and I decided to continue futzing with the bust darts, and ultimately just removed them altogether for the dress.
Figuring out how to implement side-seam pockets was another challenge, as the pattern includes a side zipper, which means the zipper has to attach to the pocket. Fortunately I have a RTW dress with pockets sewn this way so I used it as a model. I drafted pockets in AD and then reverse engineered how to sew it all together. (There are actually instructions online for sewing a pocket in a zipper and a nice video that I will probably watch if I ever attempt something like this again.) This isn’t the most beautiful invisible zipper job, but it doesn’t look terrible, and both the zipper and the pockets are fully functional so I consider it a win.
The penultimate step in the pattern involved slip stitching the bodice lining to the zipper and then to the skirt. Until I reached that step I didn’t fully comprehend how that final finishing would be done or realize how much hand sewing was involved, but I got through it and it turned out fine. The final step was the hem. I knew my daughter wanted the skirt quite a bit shorter than the pattern called for so I had cut it shorter in anticipation. But I hadn’t cut it short enough and it would have required a 2.5 inch hem, which was going to be hard to sew on a circle. So I folded the skirt into quarters and carefully lopped off 1.5 inches with my rotary cutter. Then I sewed a line .5 inch from the edge of the circle all the way round. This allowed me to easily fold the skirt on the stitch line and then fold it again and press to form a 1-inch hem. I stitched the hem down with a straight stitch about 1/8 inch from the edge of the hem. All this was reasonably straight forward but I would like to point out that the circumference of this skirt was about 12 feet, which means that each step (stitching, folding, folding, pressing, stitching again) has to be done over a distance of 12 feet, so it takes a while.
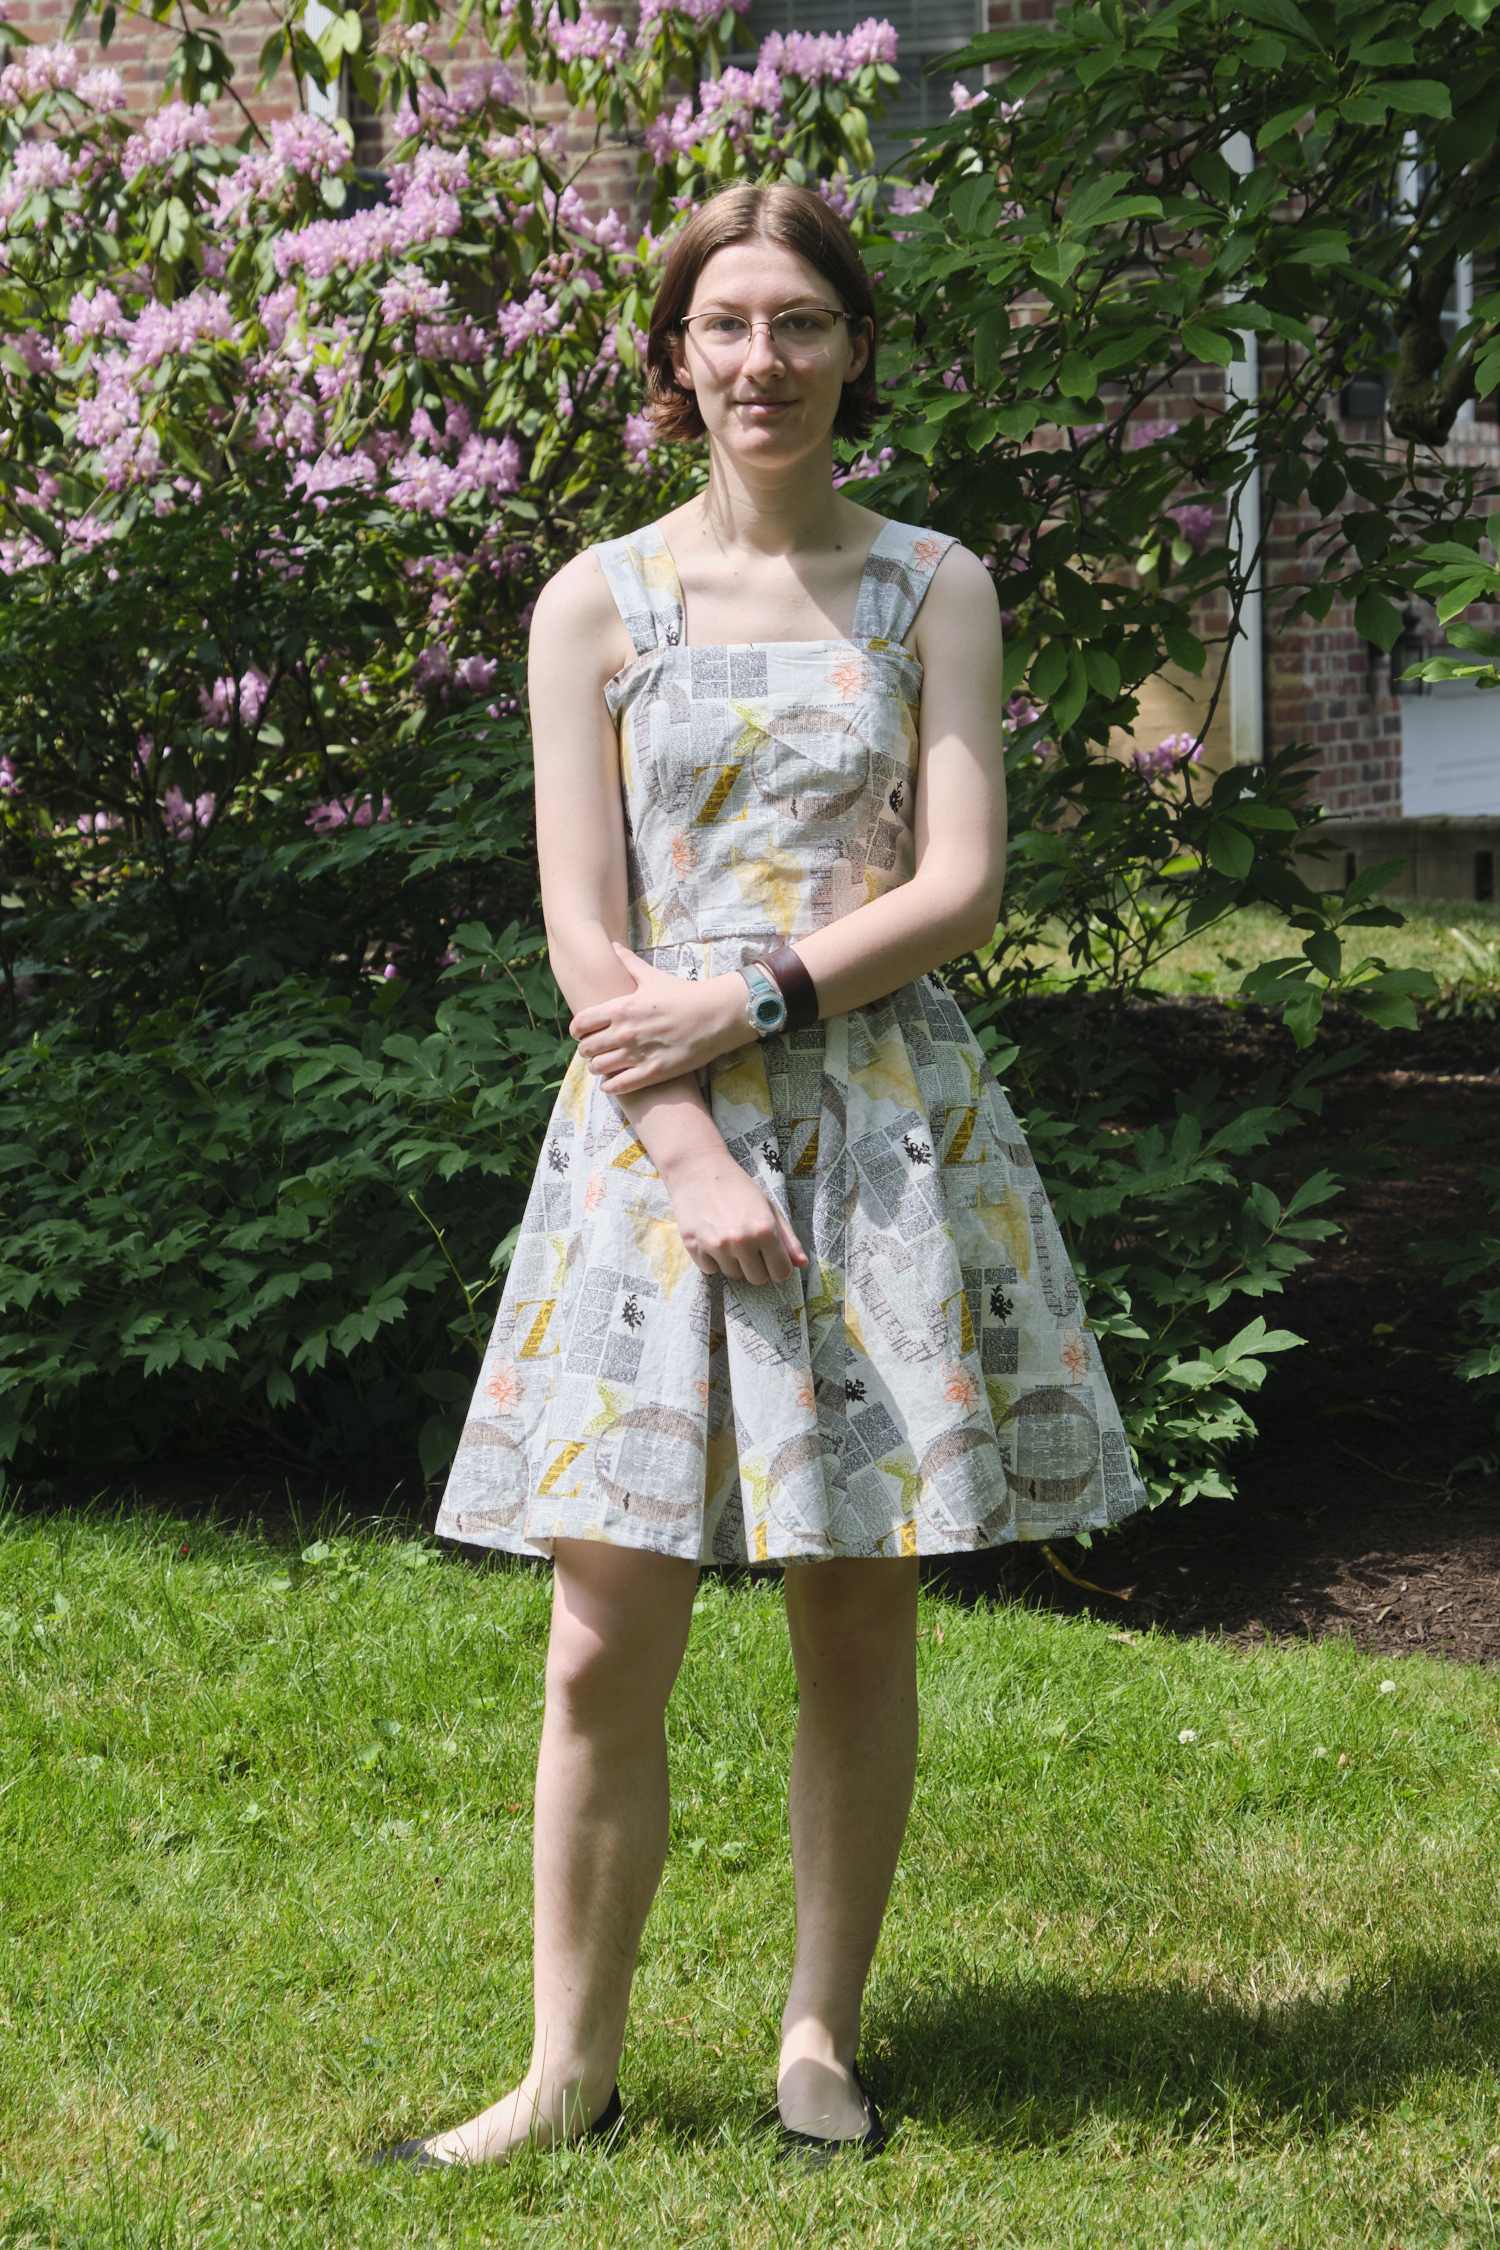
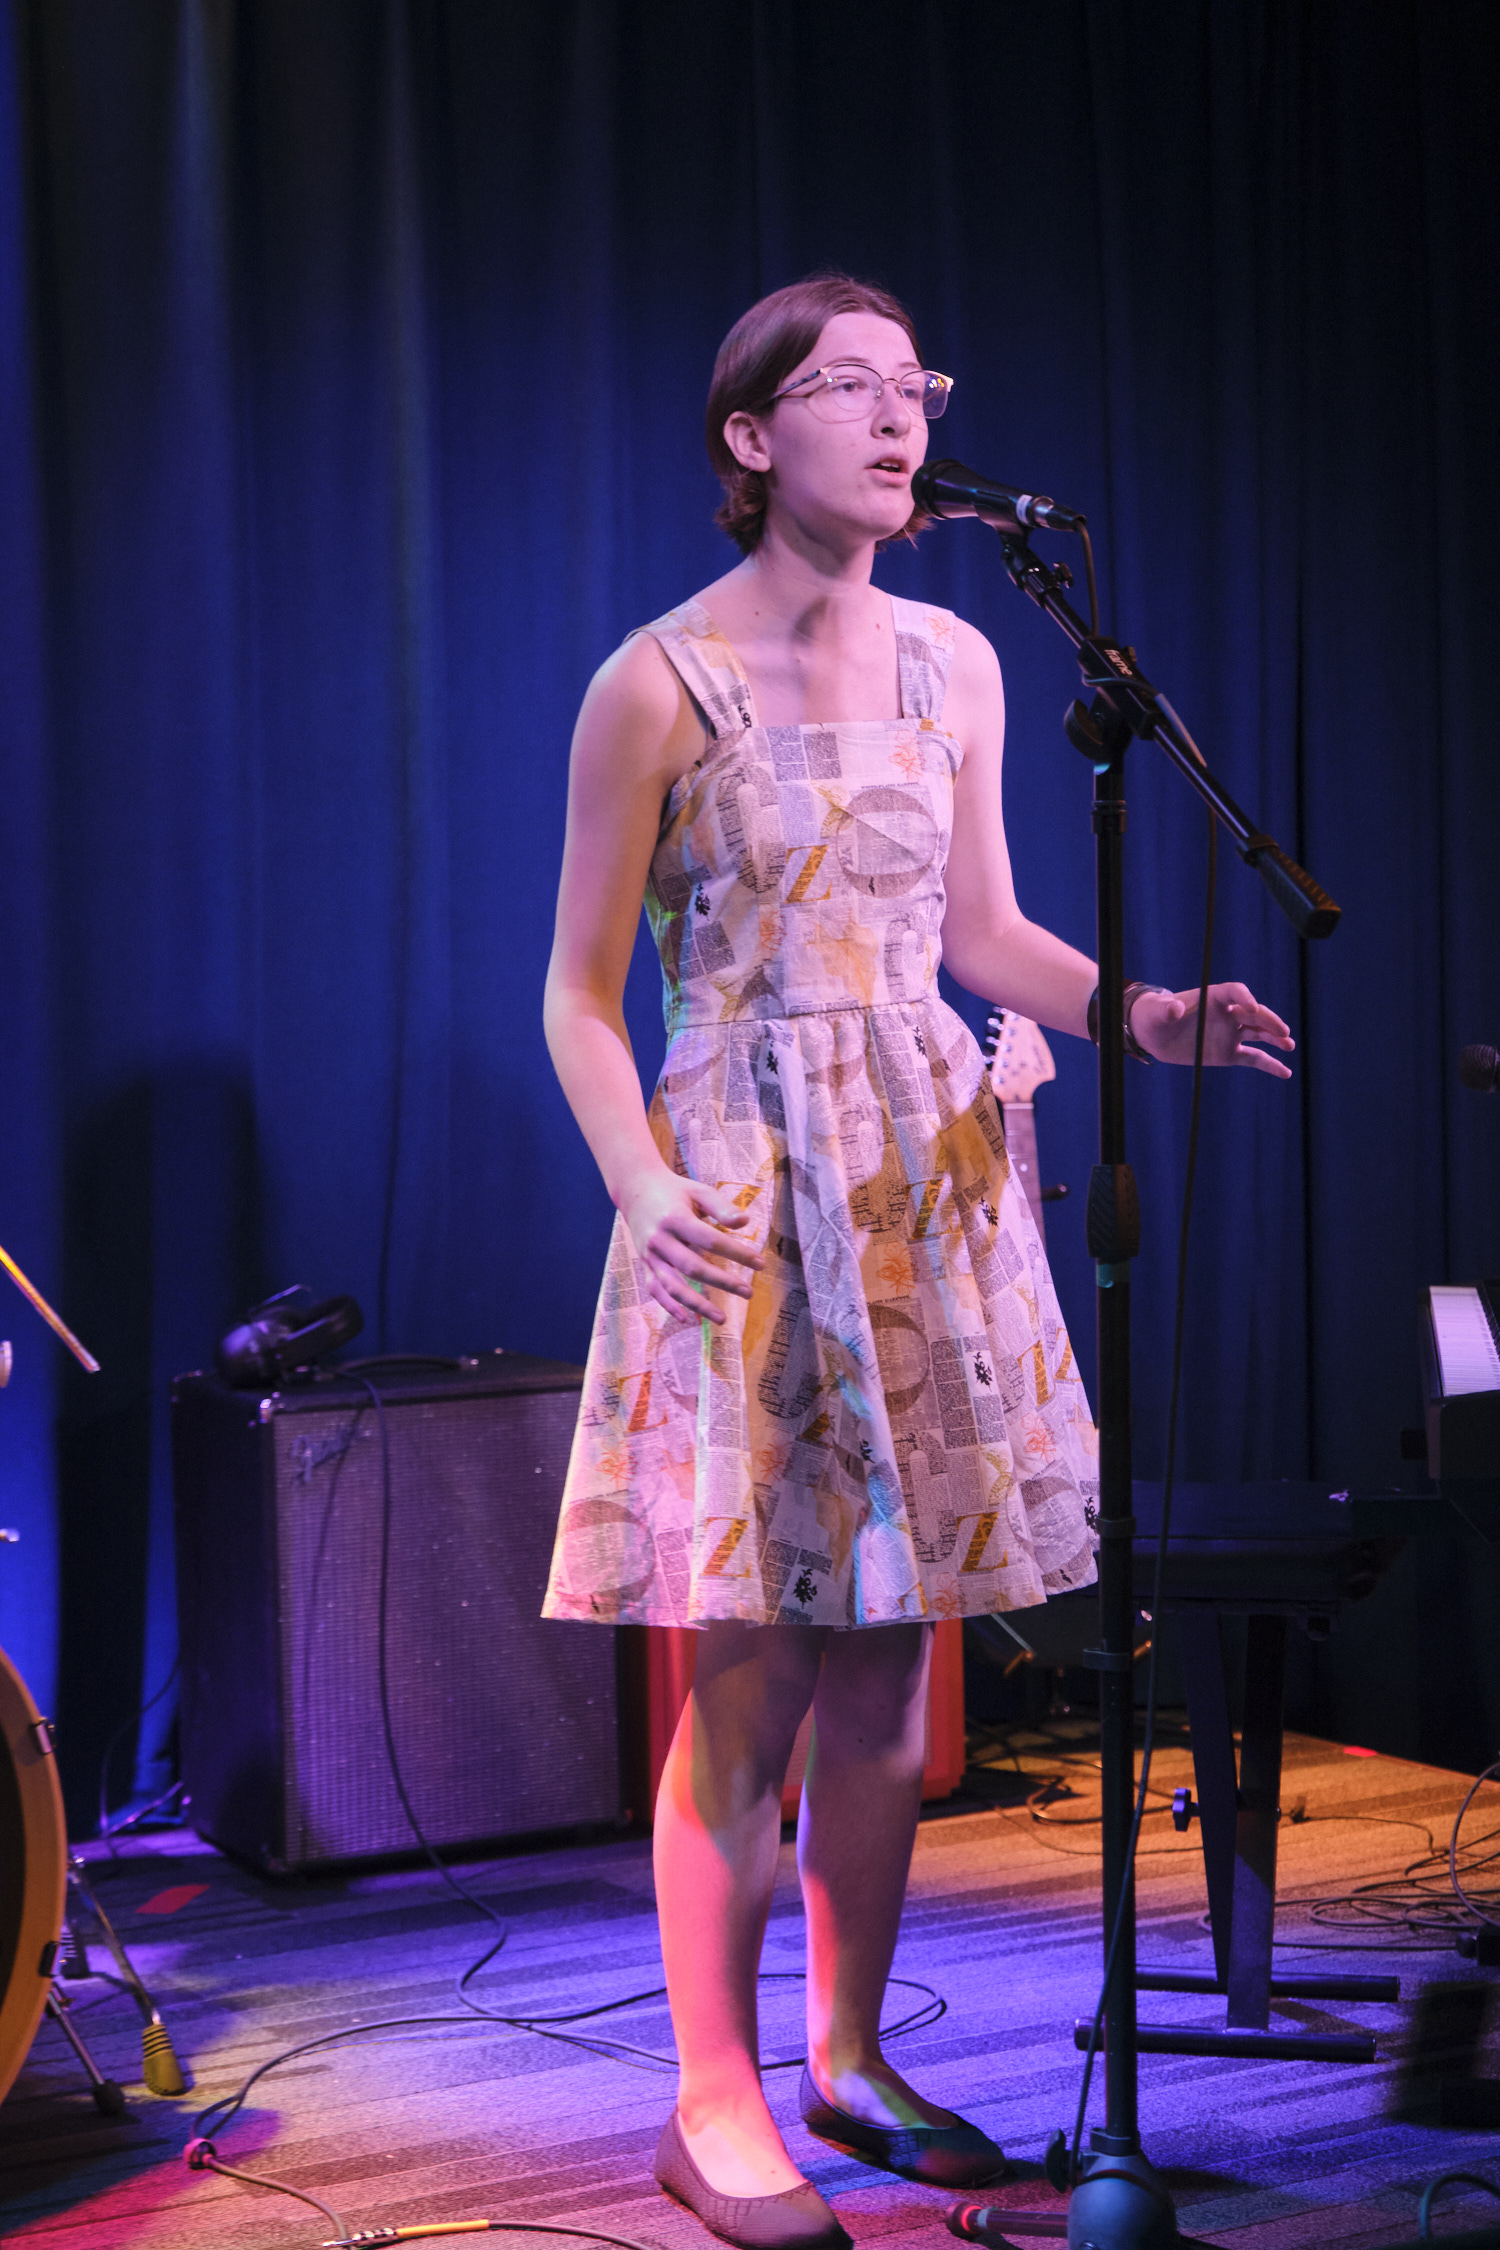
Other than figuring out the bodice fit adjustments, sewing the zipper pocket, and all that hemming, the dress actually came together pretty quickly and wasn’t that difficult to make. And the results are pretty nice. Here it is modeled without a petticoat. (And below that, while performing at her music recital.)
And here it is with petticoat, in full 1950s glory!
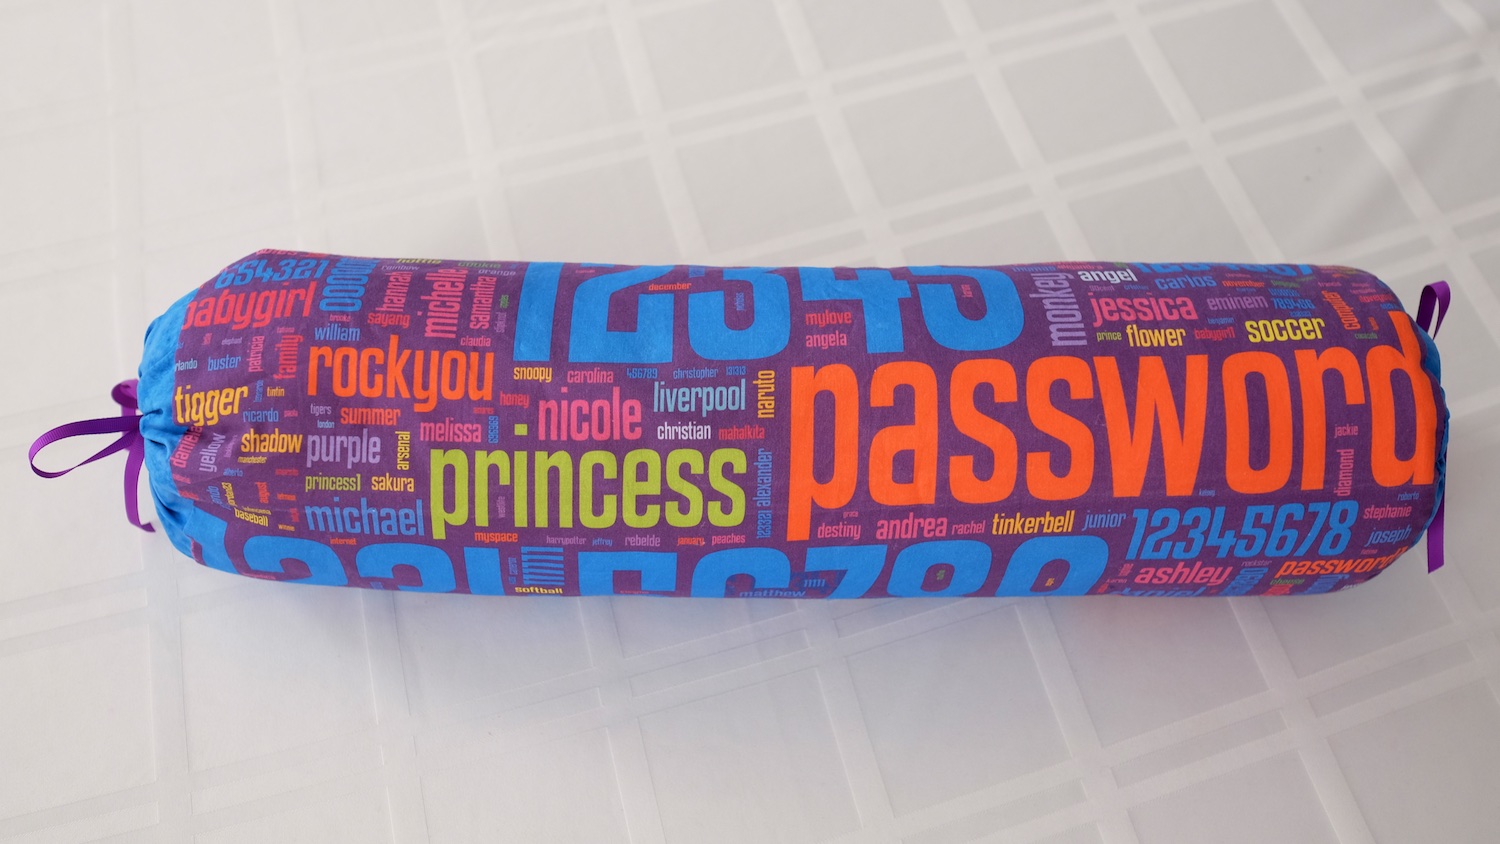
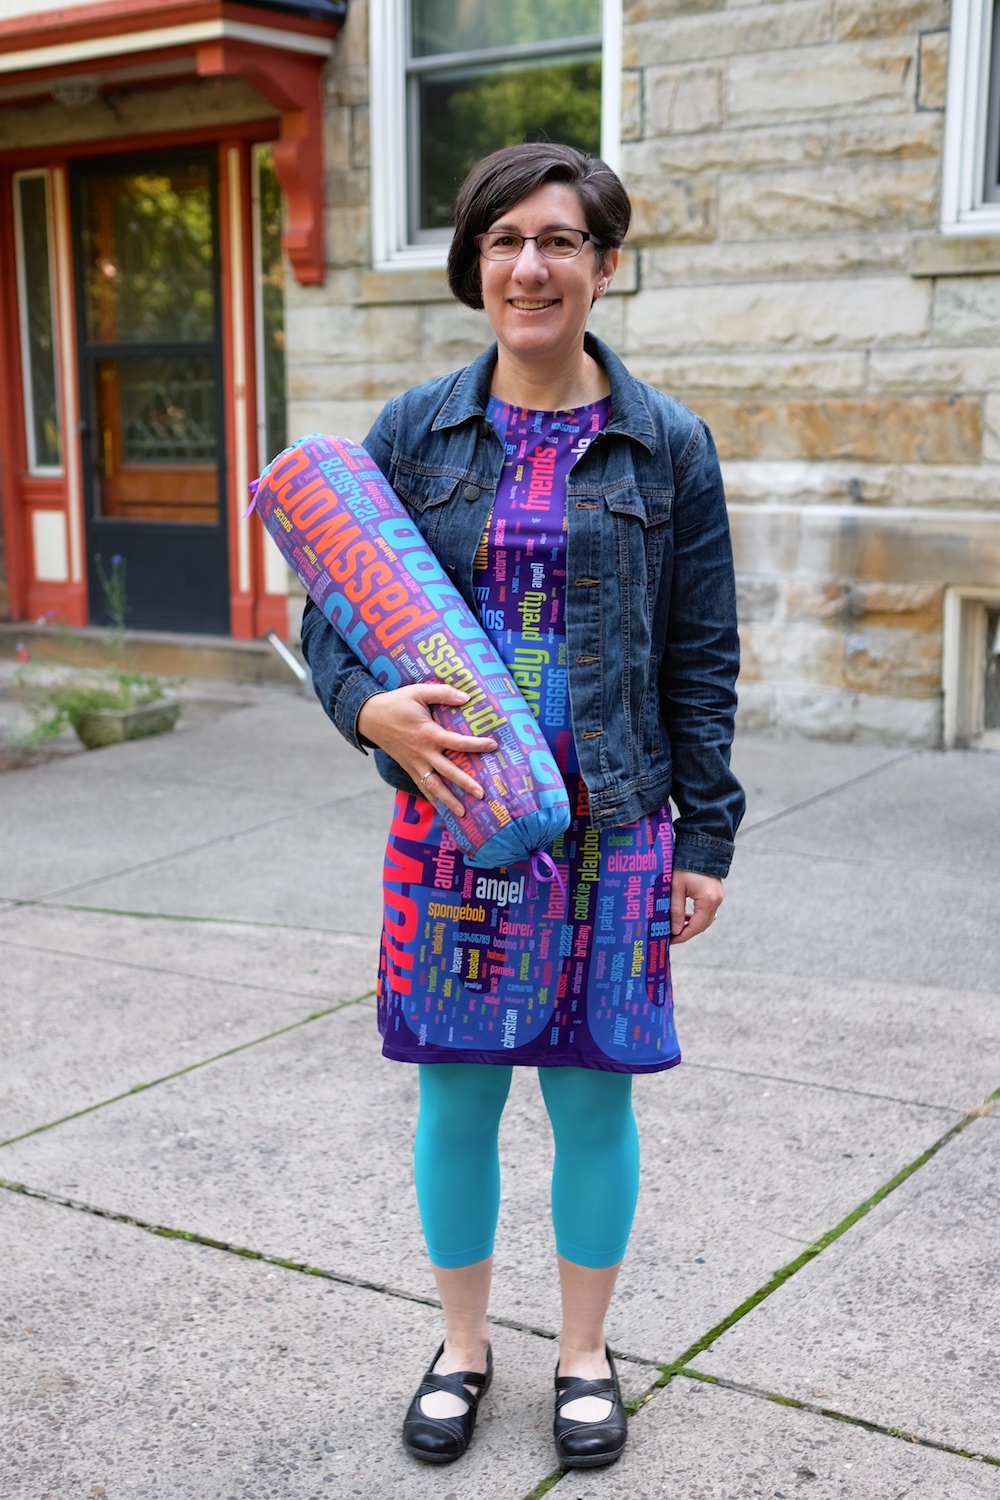
I’ve been collecting images of all the cool things that I and others have made with my bad password fabric. The fabric is available from Spoonflower in three size and both with and without the naughty words. It has a purple background and includes 501 passwords. Spoonflower offers a variety of different kinds of fabrics, including a performance knit, basic cotton, and faux suede. They also will print this design on wrapping paper and wall paper.
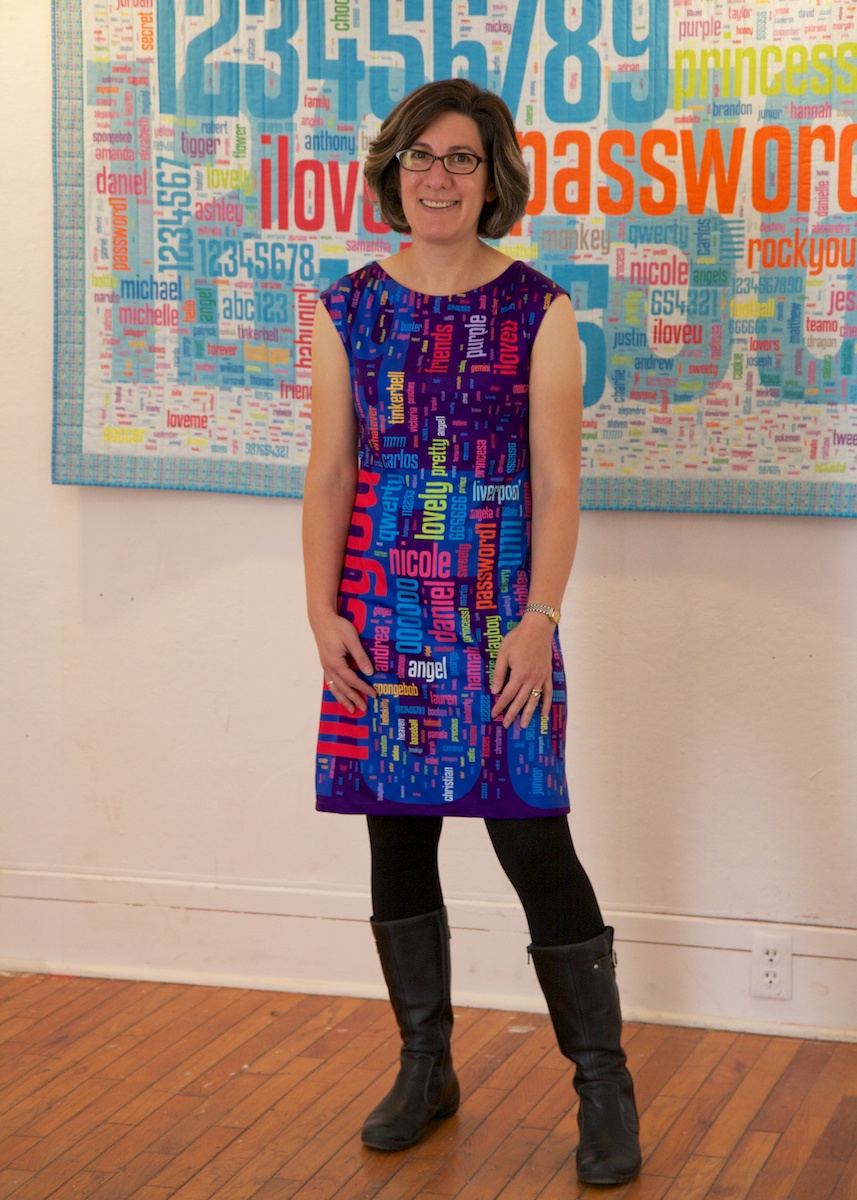
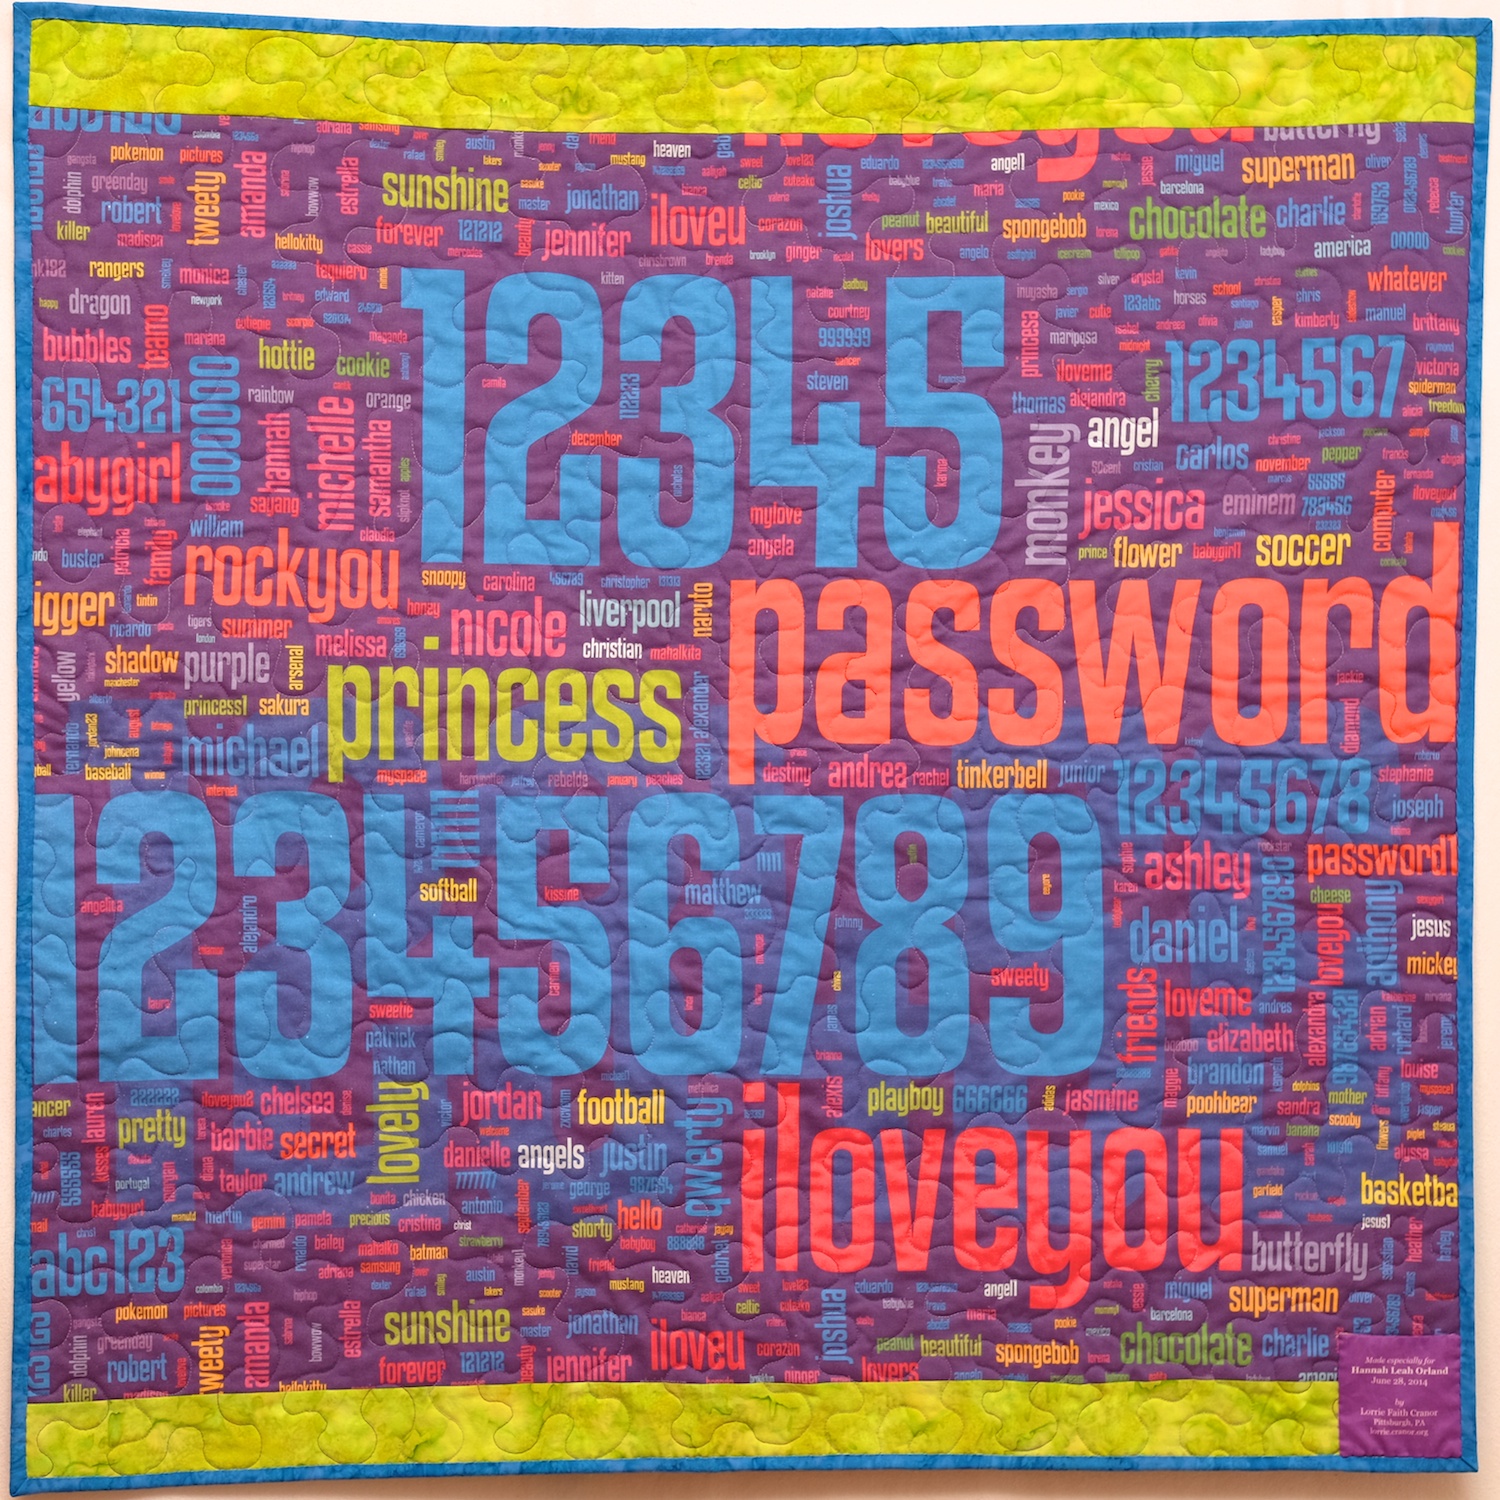
Recapping for those who are just seeing this, I designed a series of bad password fabrics based on the most popular passwords stolen in a Rockyou.com data breach. First I made a “Security Blanket” quilt printed on basic cotton fabric in pastel colors. This quilt appeared in Science Magazine and was on display at the residence of the Carnegie Mellon University president for most of last year. Then I designed a purple version of the fabric and made a password dress with performance knit fabric. The dress has gotten some nice press on CNET, the Trib, and the Women you should know blog.
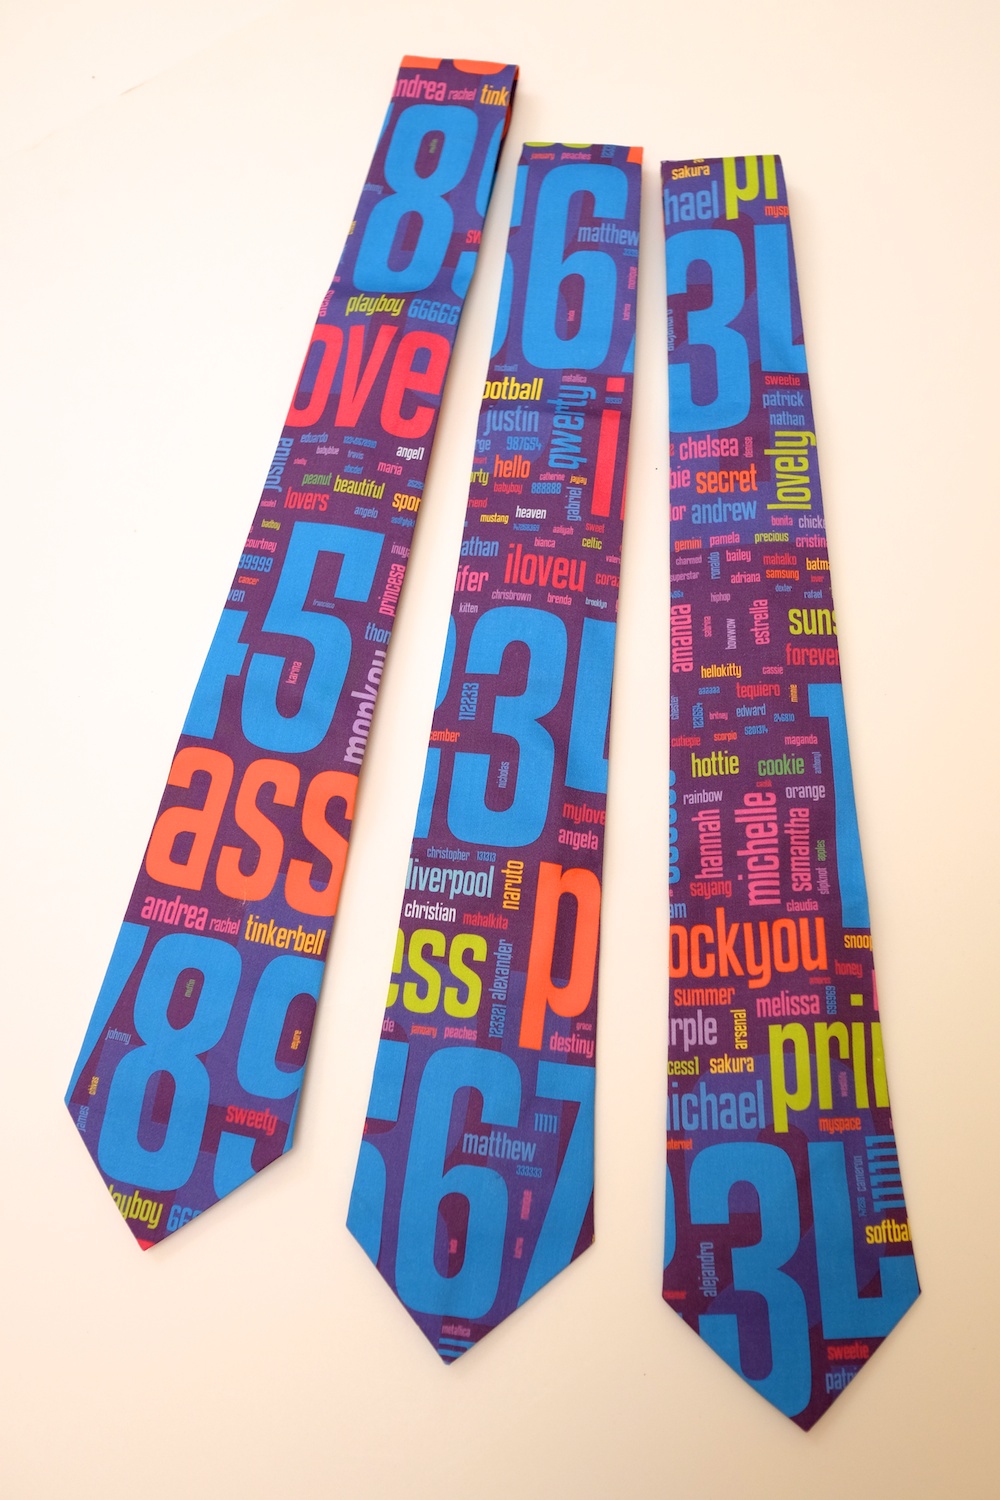
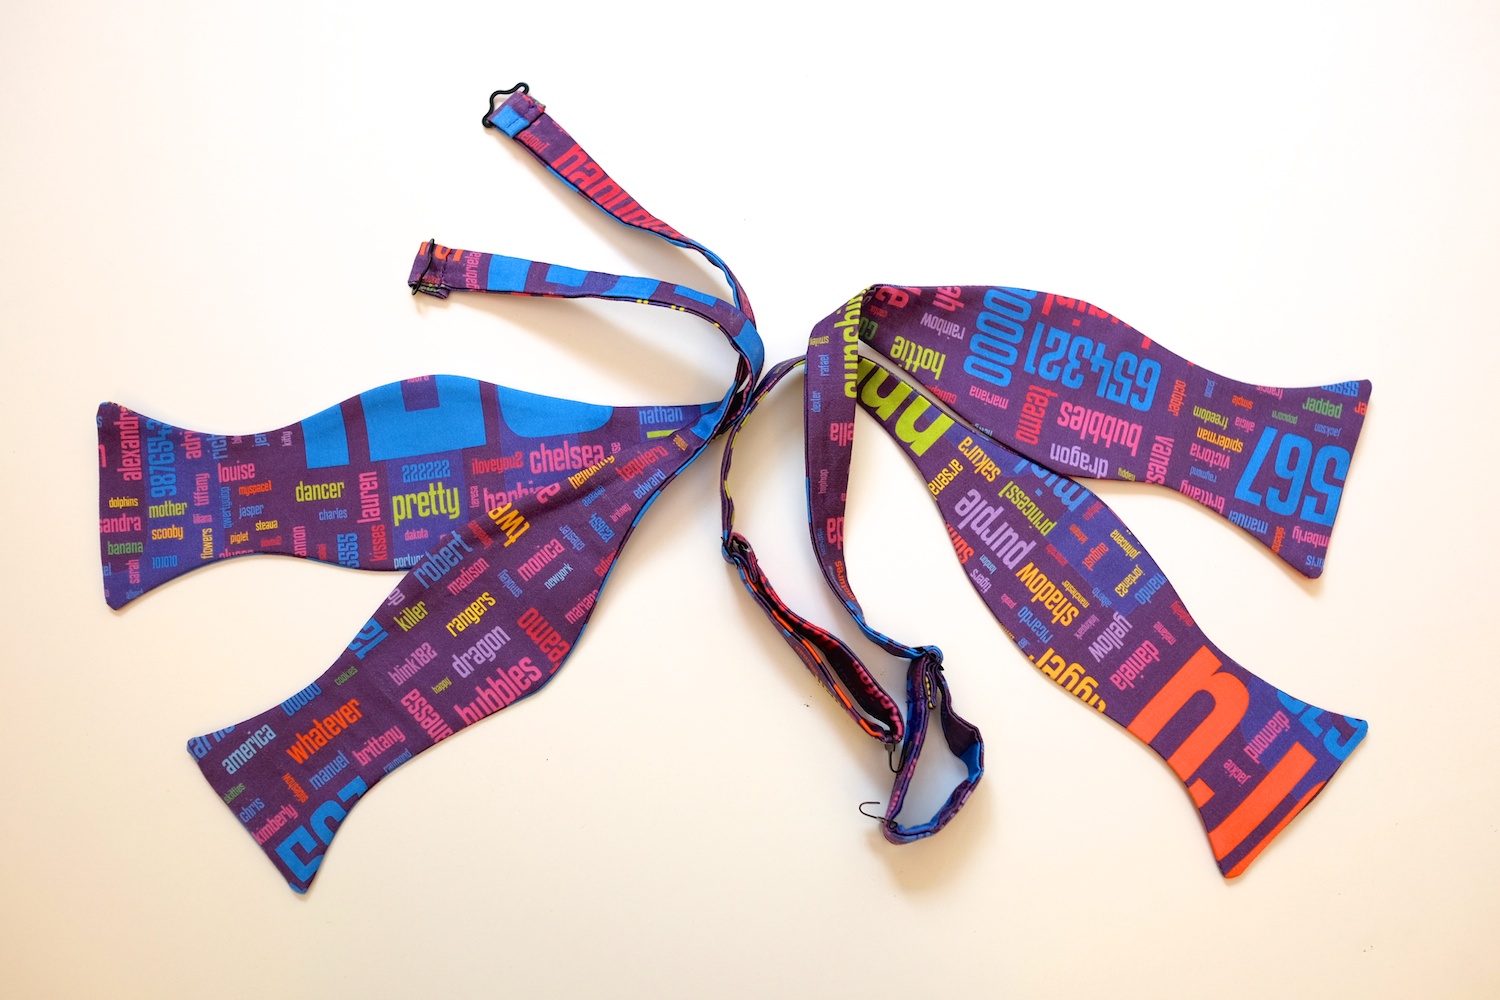
Then my friends started requesting other password apparel. Mary Ellen Zurko commissioned my friend Jen Primack of Upcycled Designs to make her a t-shirt from cotton knit fabric. Then Jeremy Epstein asked for ties, and we found Jen Knickerbocker of LoveCrushDresses and got her to offer regular ties and bow ties in her Etsy shop. The ties are made from cotton sateen.
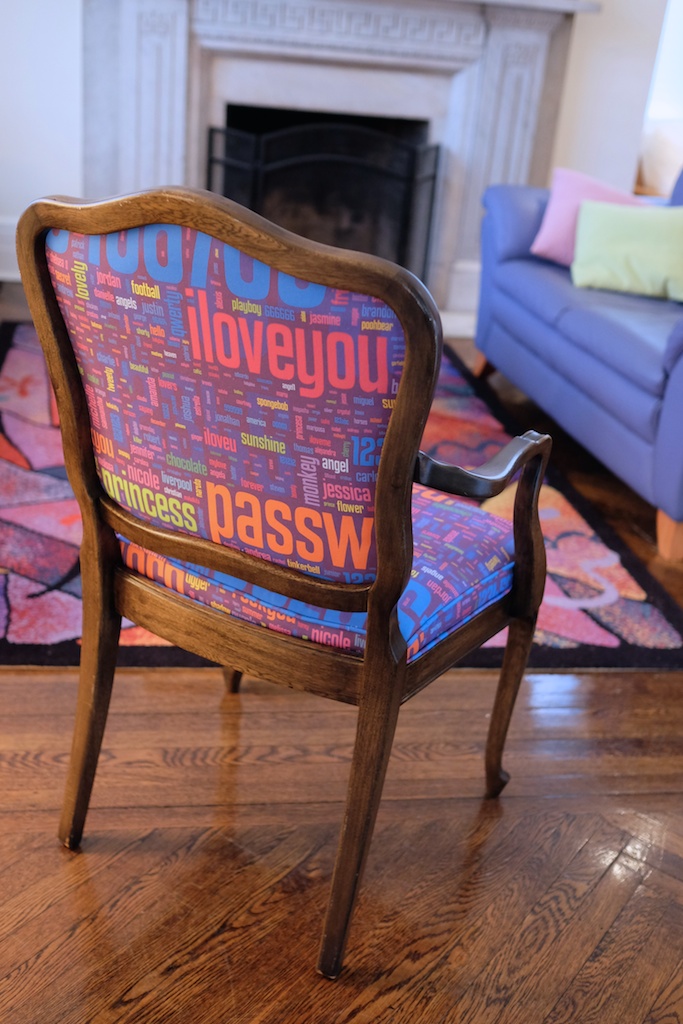
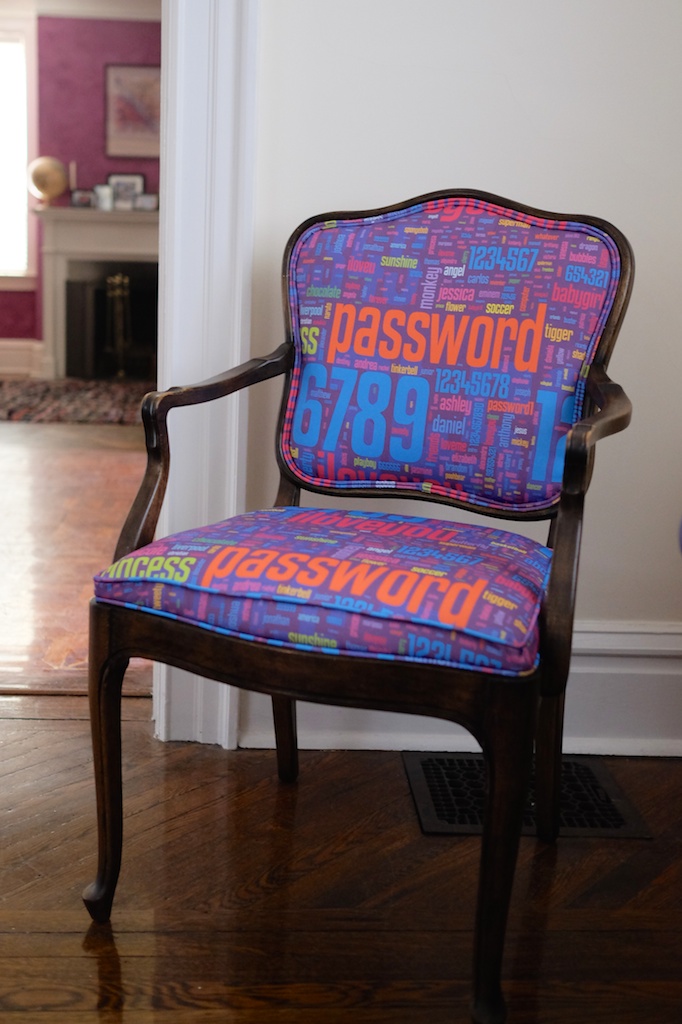
Then Jen Primack bought an old chair and reupholstered it with my passwords fabric in heavy cotton twill. Doesn’t it look great in my living room?
Kristin Briney emailed me to tell me she had made a password dress from cotton poplin. And I just made a password infinity scarf from silky faille (a woven polyester).
Password baby quilts and couch throws made out of kona cotton are coming soon….
In the mean time, I’ve gotten many requests to wear the password dress to events. I wore it to give an invited talk at the 2014 Grace Hopper Celebration of Women in Computing (where I was referred to as a “password researcher and fashion idol“). I also wore it to a couple of briefings I gave to Congressional staff on Capitol Hill.
And for those wondering about the different types of fabric. The polyester fabrics are much brighter than the cottons. They are all fairly consistently bright with nice saturated colors. My favorite is the performance polyester, which doesn’t wrinkle and has a little bit of stretch and a nice drape. But it’s not really what you want to use for a quilt or a tie. The kona cotton is a little disappointing because the colors print a little dull. The basic cotton (which is similar to the kona but slightly lighter weight and less expensive), cotton sateen, and the heavy cotton twill produce brighter colors. They aren’t as bright as the polyester, but they are noticeably brighter than the kona cotton. The cotton silk also does not produce bright colors. I think the polyester silky faille might work well for ties and some other applications where you might otherwise use a woven cotton but want brighter colors. It’s a little slippery and harder to work with than cotton though. I got samples of the polyester faux suede and polyester eco canvas. They are both lovely bright fabrics, but I haven’t made anything out of them yet.
1/22/15 update: Von Welch, Director of the Center for Applied Cyber Security at Indiana University Bloomington wore his Password tie for a local TV interview. The reporters loved the tie and commented on it at the end of the interview.
2/6/15 update: Baby quilt in kona cotton finished!
7/16/15 update: I made a password bolster pillow for the CMU ECE department head’s conference room.
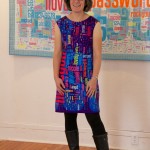
This is old news, but just now getting around to posting it. I made a password dress to go with the password quilt. I wore it to the opening of the Computers, Quilts & Privacy show and to give my artist’s talk. I also wore it to a faculty meeting and disrupted the meeting.
As with the Security Blanket quilt, I generated a Wordle from the RockYou password set, and then edited it in Adobe Illustrator. I selected brighter colors for the dress and had it printed at spoonflower.com on performance knit polyester fabric (UPDATE: You can purchase similar fabric on spoon flower that I created and ties made from this fabric on Easy…. and read about lots of other passwords stuff made by me and other people) I made my own pattern by tracing a store-bought dress I own that fits me well. It is just two pieces of fabric. The only tricky part was finishing the neckline and arm holes. I bought a double needle and used it to do the hem. This was my first foray into sewing with knit fabric.
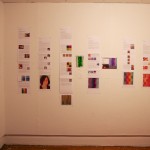
And here are some more photos from the Computers, Quilts & Privacy show at the Frame. There is also a video of my talk that I will post after it is edited.