Ruffles and Flutters

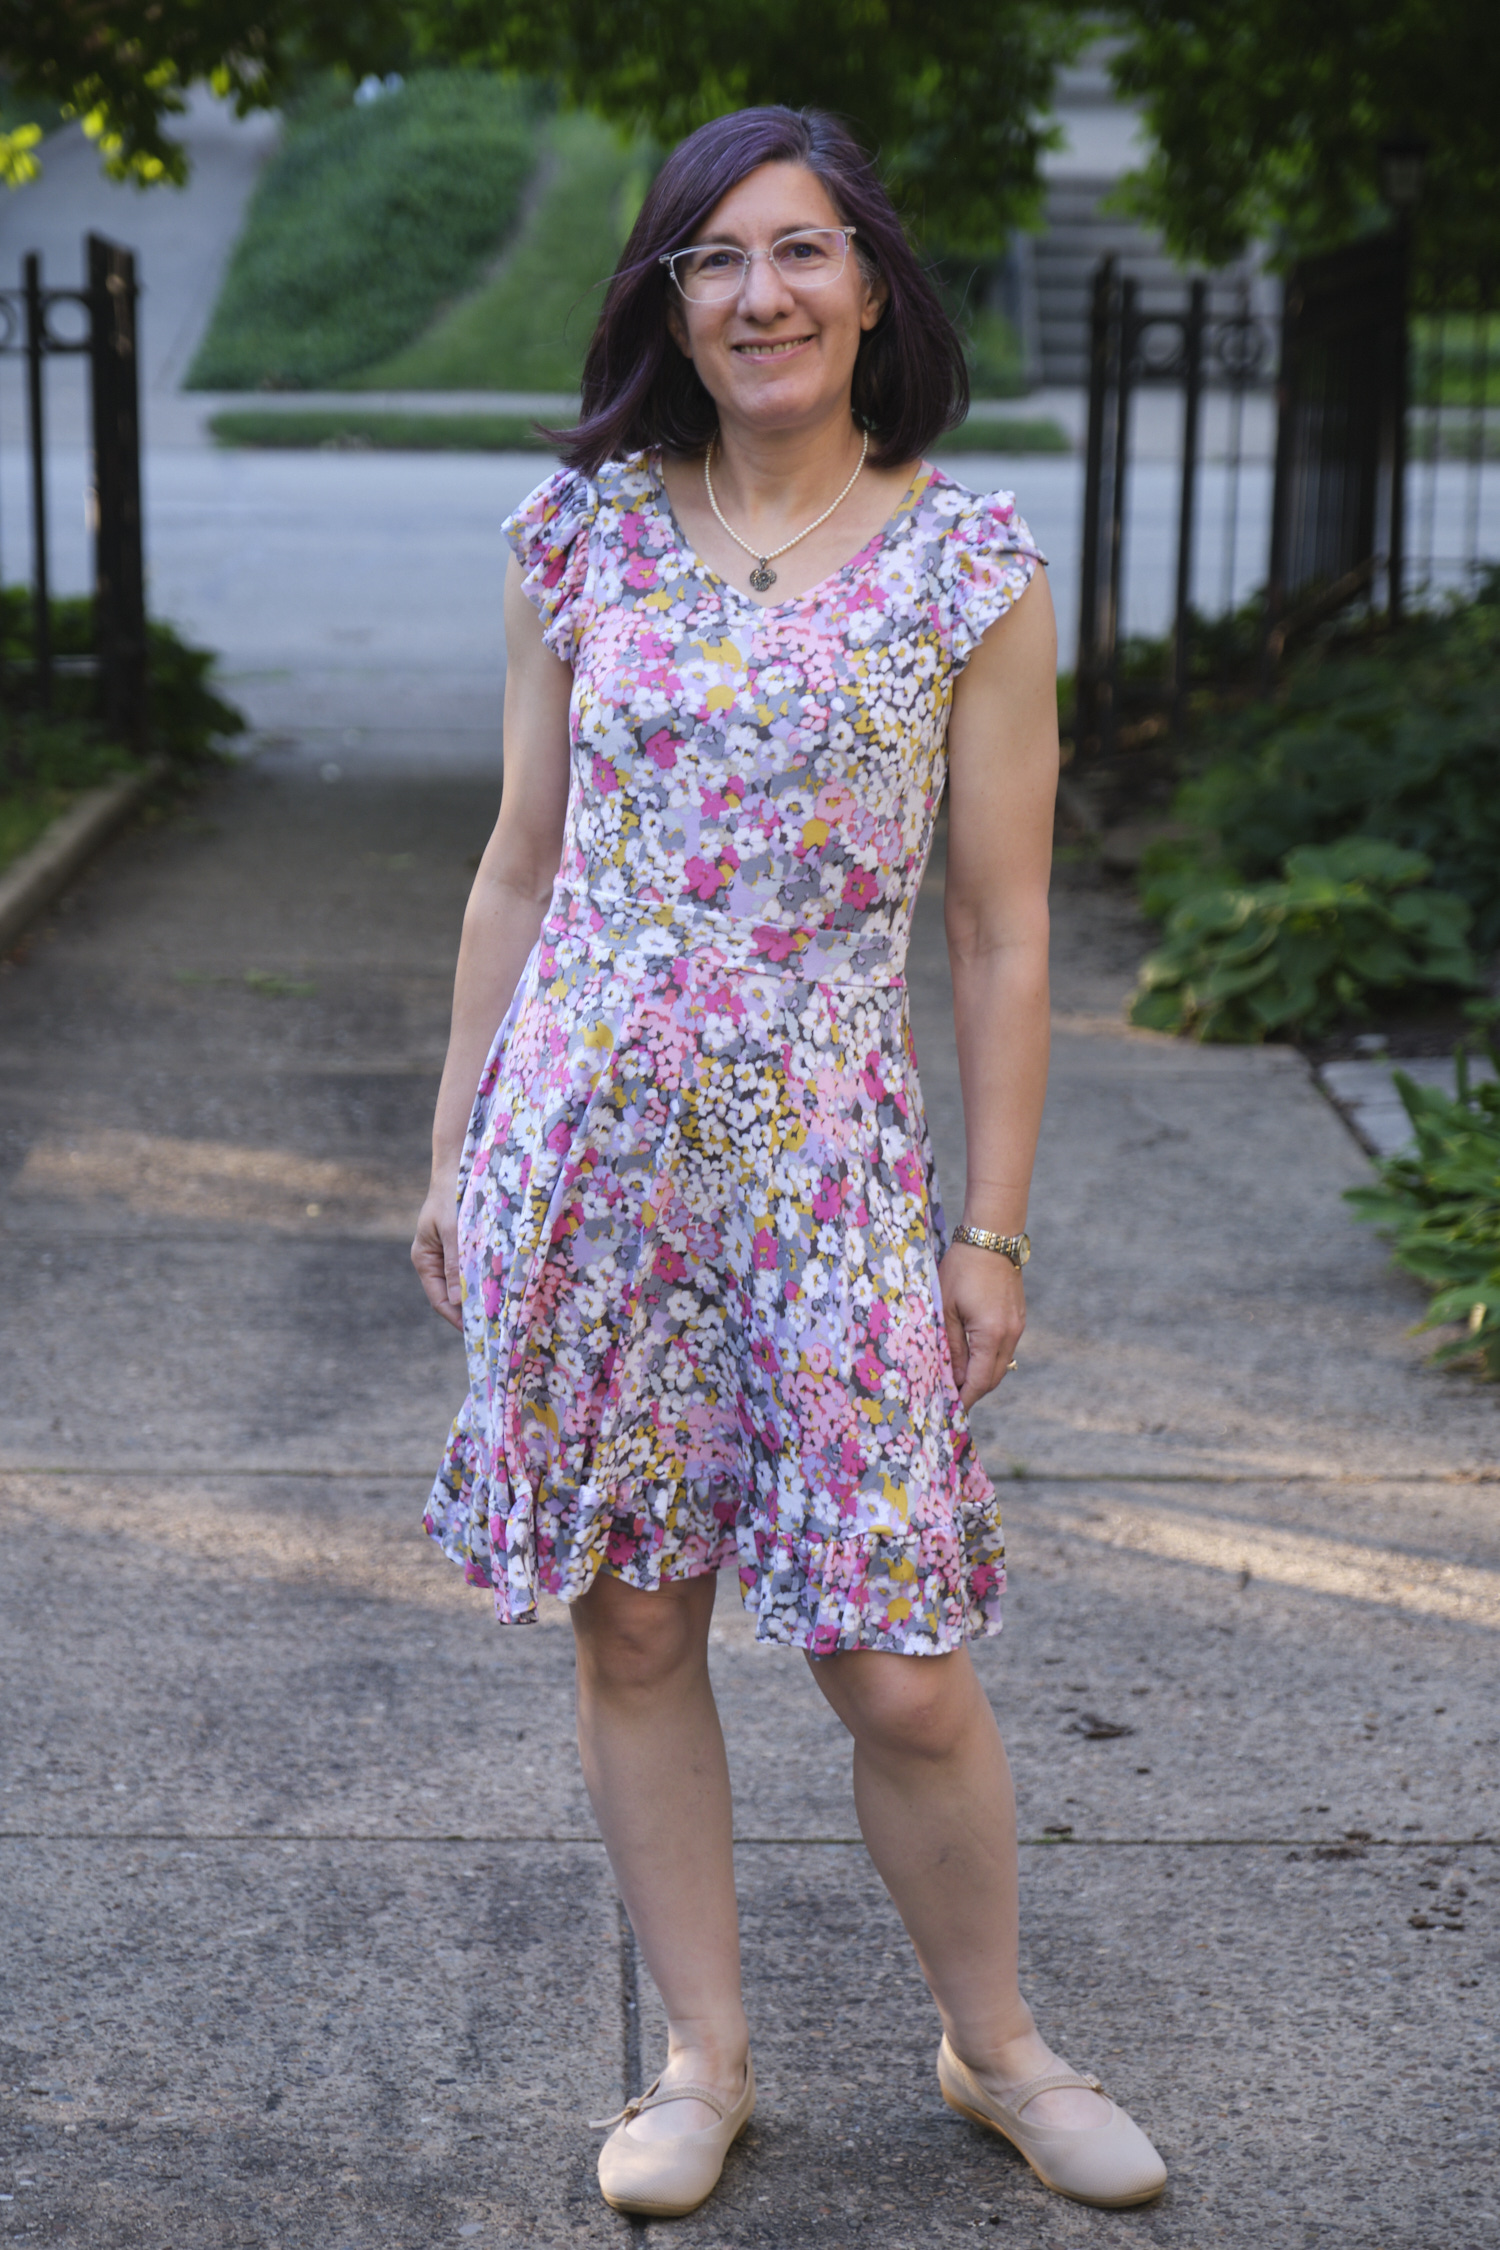
The Ellie & Mac Felicia Custom-Fit Cup Size Dress Pattern is super cute, but takes some time to make, especially if you include the flutter and ruffle options. It offers a nice custom fit by providing cup-size options and bodice darts. This isn’t all that critical for those with my proportions, especially when I sew with light, stretchy fabrics. However, I do think the bodice pattern will be nice for sewing heavier knits. I sewed my dress with a lightweight and drapey rayon spandex deadstock fabric form Califabrics.com. The lightweight fabric drapes quite nicely for ruffles and flutters, so I took advantage of that.

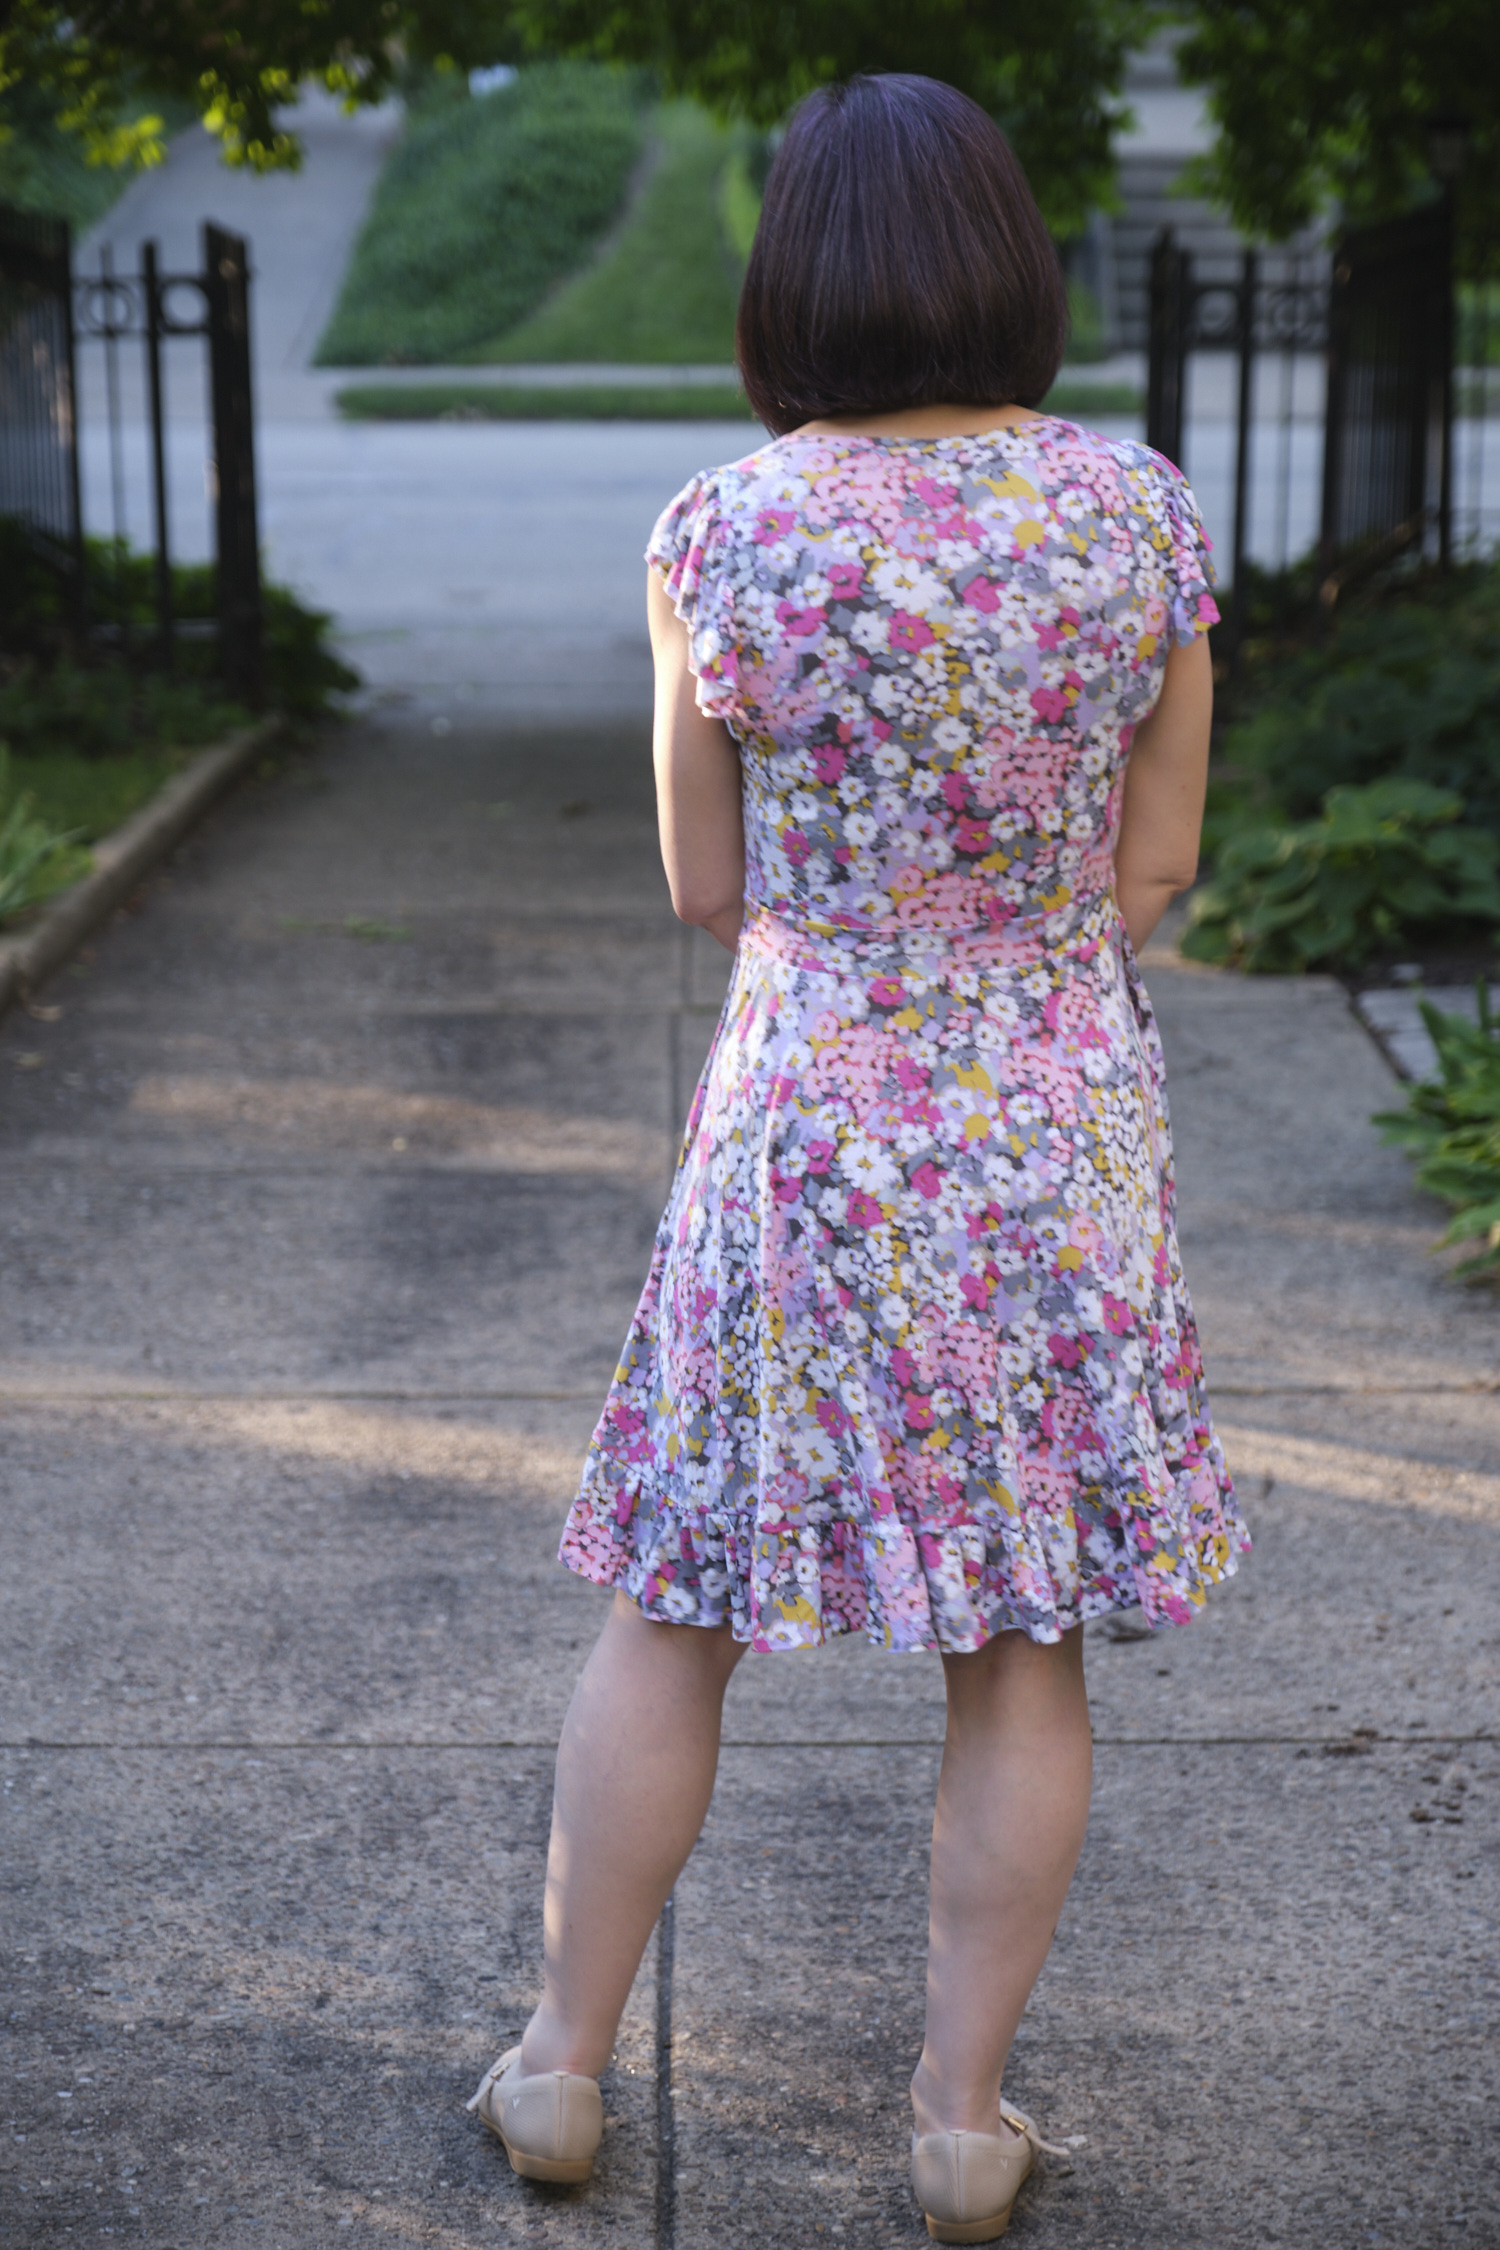
I made the high v-neck option with the long flutter sleeve. I made a couple of deviations from the pattern for both the neck and the sleeve. When I started basting together the v-neck, following the pattern instructions, I found that the acute angle that is marked for the v-neck back is too sharp an angle to smoothly match the high v-neck in the bodice. After trying unsuccessfully to make it work a couple of times, I cut a new neck band and cut the angle at 90 degrees. This lined up with the bodice perfectly and lies very smooth. (From looking at photos others have posted, it looks like others may have had this problem too and would benefit from a 90 degree cut.) The other change I made was to fold the arm facings in half so that I when I top stitched them down they have a finished edge and do not need to be trimmed. This might not work with heavier fabric but worked really well with my light-weight fabric.

I added work for myself by adding a ruffle to the bottom of the skirt. I cut the skirt mini-skirt length and cut a 4.25″ x 140″ ruffle, as suggested in the add-on ruffle tutorial. (I’m 5’2″ so miniskirt plus ruffle comes to just above my knee.)I hemmed the ruffle and gathered the ruffle in four sections before attaching it to the bottom of the skirt. The ruffle looks really nice, but it was time consuming to do all that gathering and get it even, especially using such stretchy fabric.

Because I refuse to sew dresses without pockets, I added inseam pockets to the sides of the skirt and secured them at the waist. I view this step as critical, but it did add to the time needed to complete this project. In addition, once I had the whole thing sewn together I realized that the fabric was so stretchy that the bodice had “grown” a bit from the weight of the skirt — and that was before I put anything into the pockets. The clear elastic didn’t help, and was a bit itchy around my waist. I ended up cutting off the skirt removing about an inch of fabric from both the bottom of the bodice and the top of the skirt, and then reattaching them with a 1.5-inch waistband in between, cut with a smaller diameter than the bodice so that it would stretch around my waist. I lined the waistband with athletic knit to add some stability to the waistband. This looks and feels a lot better, and I can actually put things in my pockets now too.

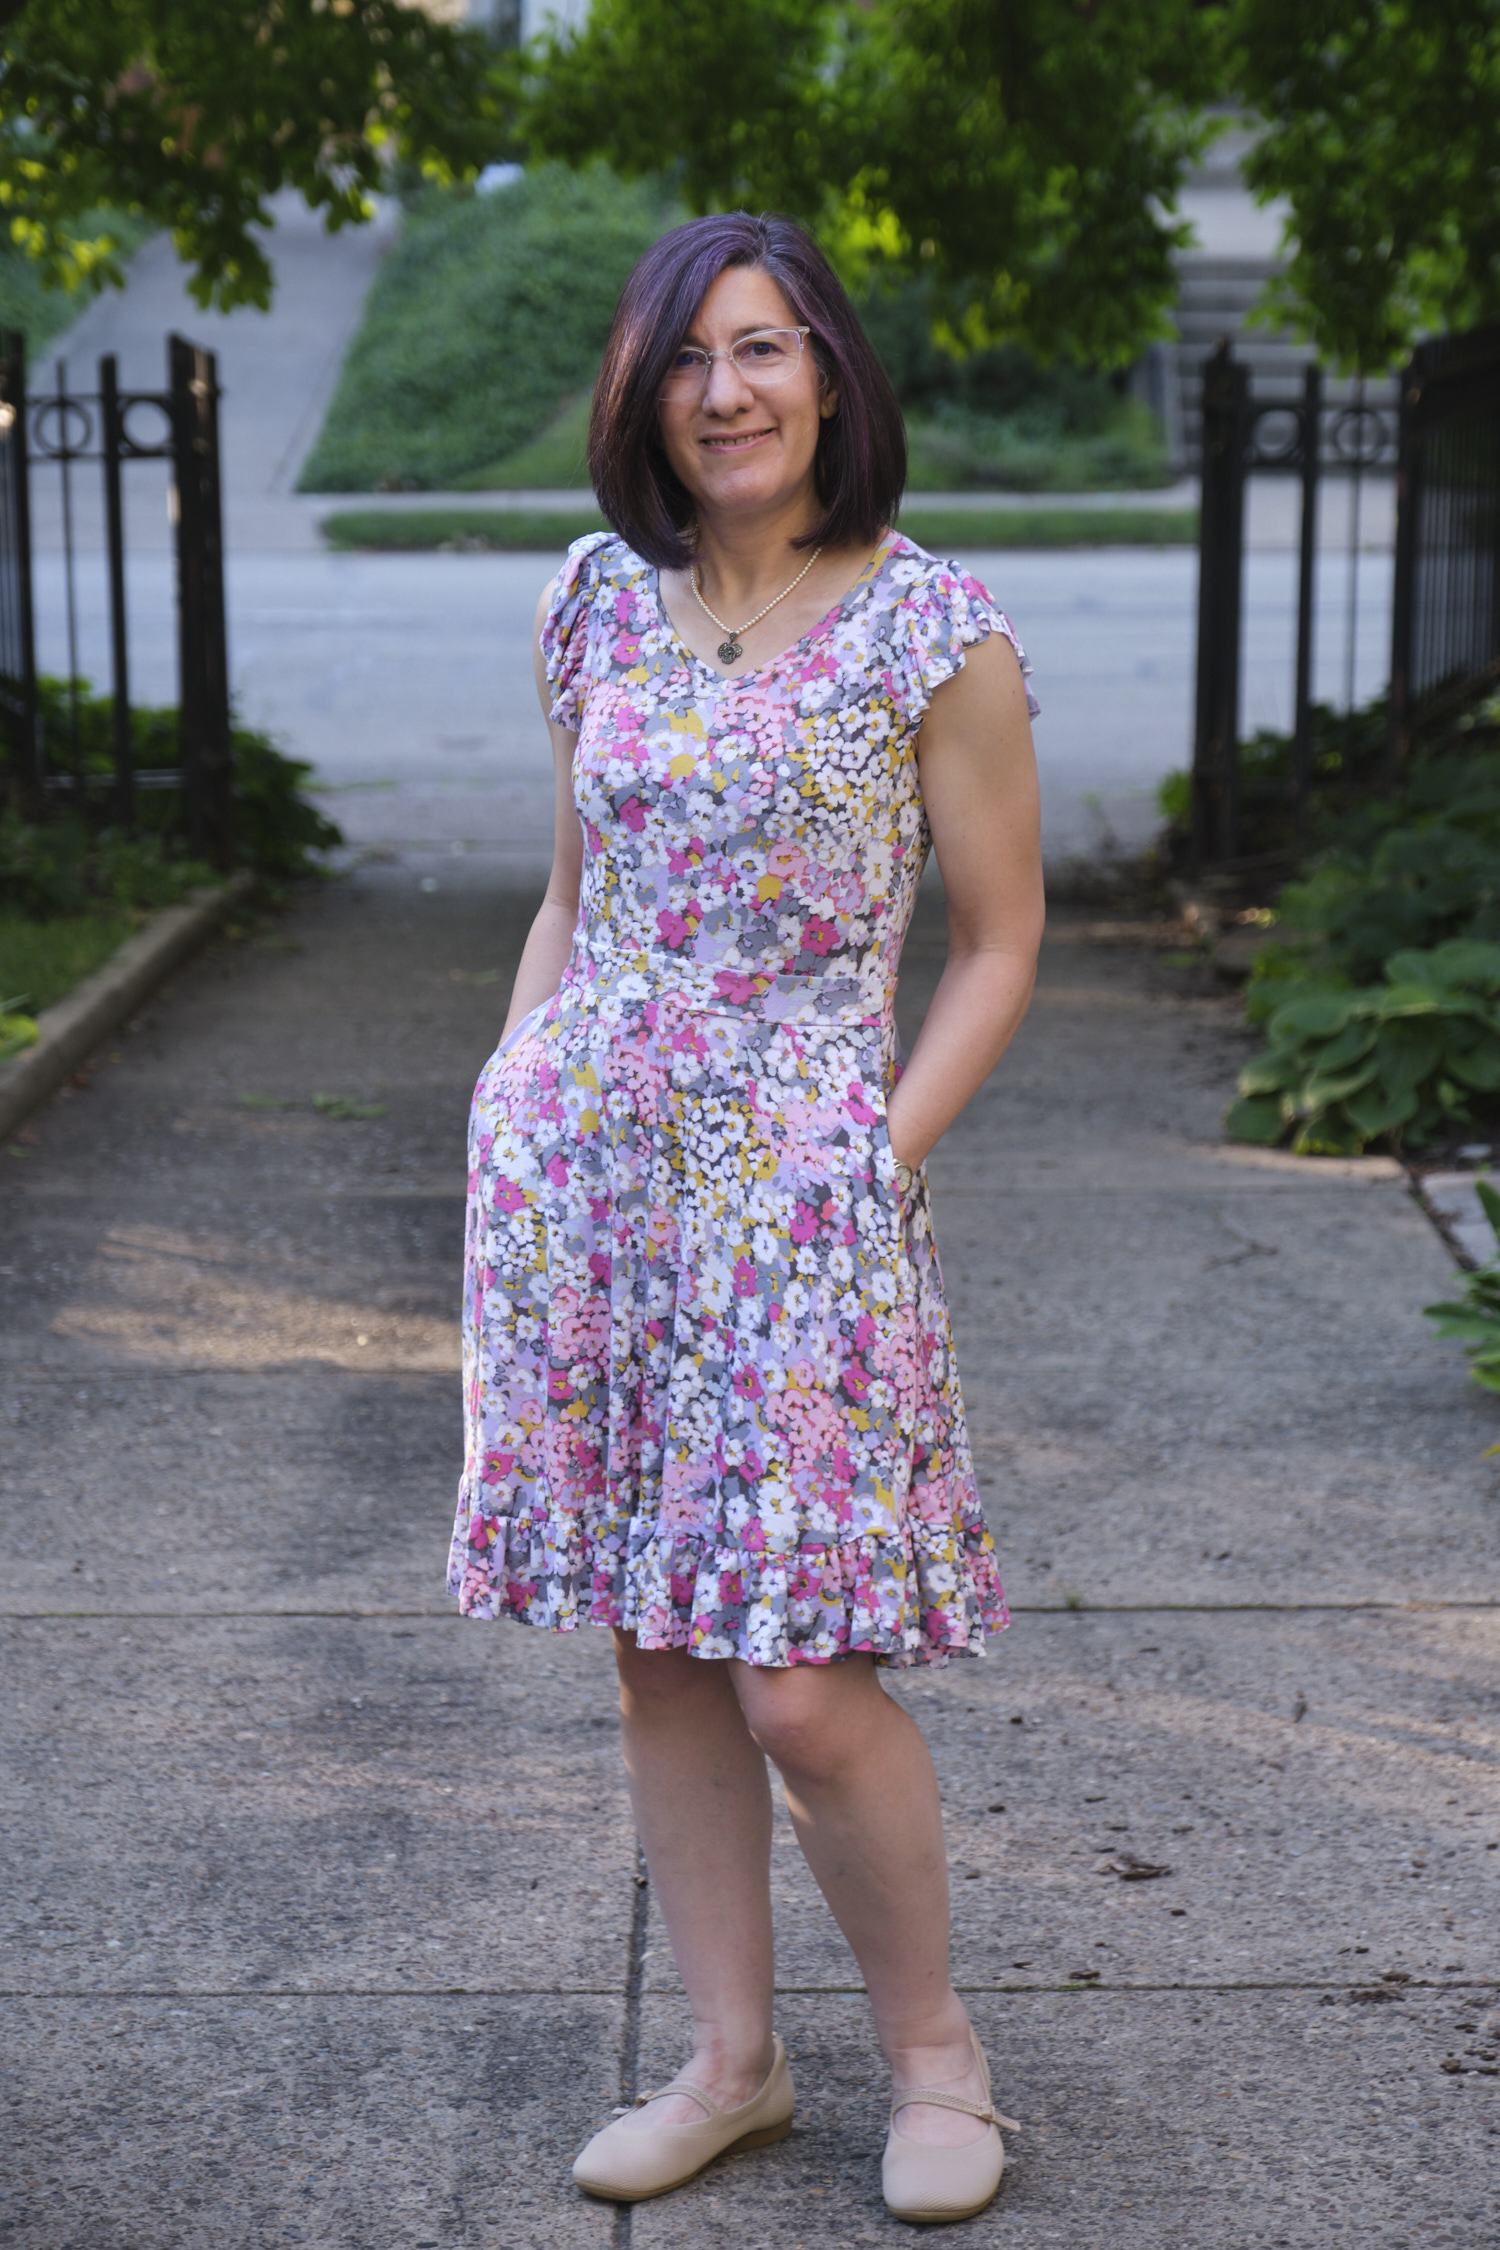
Overall, I’m pleased with the results, even if annoyed by the process. The ruffle at the bottom looks great with the flutter sleeves. The rayon spandex is soft and breathable and very comfortable to wear, but given my feelings about pockets, I will think twice before using it for anything other than a top in the future. I was very happy to figure out how to get the v-neck to lie flat and to recover from the growing fabric problem by adding a lined waistband.

A bunch of Bondis

I love the Sinclair Bondi tshirt pattern, and have previously used it to make long-sleeve scoop neck and screwp neck versions, as well as bishop-sleeve versions, and even a wool sweater. I think I’ve made at least nine Bondi’s previously. It’s summer, so I’m mixing it up now with some short sleeve variations.

I ordered a few colors of cotton Lycra to have on hand, and my daughter spotted the sage fabric and requested a cropped short-sleeve tee. I made this one in a size 4R but graded the waist to a size 0 and cut the bottom at the horizontal waist line shown on the pattern. In hindsight I probably should have cut it a half-inch longer, so I ended up sewing about a 3/8-inch hem rather than my usual 5/8-inch t-shirt hem. Actually, she probably wouldn’t have cared if I hemmed it shorter, as it does seem to be what everyone her age is wearing. I used the crew neck and cut the sleeves about an inch shorter than the short-sleeve length marked on the pattern. It seems to be exactly what she wanted.

I didn’t have enough black Pylos Liknit fabric for another pair of palazzo pants (my daughter is wearing the last pair of black LiKnit pants I made in the photo above and would desperately like me to make her another pair when it restocks), but I had enough for a Bondi. I made this one with a screwp neck and elbow sleeves in a size 6P. The Liknit has only horizontal stretch so you can see some lines at the side of the bust, but it still fits pretty well and is very lightweight and comfortable to wear. It looks great with my black LiKnit pants and also these LiKnit pants in the linen colorway.

Finally, I used some light-weight, wide-rib poly-spandex in a groovy print that I bought on $3/yard clearance from Mily Mae Fabrics last year to make a short-sleeve screwp-neck Bondi in size 6p that pairs perfectly with my seafoam LiKnit pants.

So now I’m up to 12 Bondis and I’m sure there will be more! I still need to try the V-neck version… perhaps I will try that next.

Join the Chorus

In the end, my Love Notions Chorus drape-neck blouse looks pretty nice, but I found it to be a rather frustrating pattern to sew, in part because the pattern doesn’t include very detailed instructions, and in part because it seems to be especially problematic for small sizes. The pattern has a variety of options, including shallow and deep drapes in the front and back or a plain back, plus it can be a top or a dress and have a variety of sleeves or not. I decided to make a plain back, deep drape front sleeveless blouse in size small out of a yard of slate blue ITY from my stash. I initially cut out the pattern as drafted, except I shortened the front by 2.5 inches and removed the side vents.

I had read the Love Notions Facebook group and had seen some complaints about the deep drape being too deep in small sizes and for short people (I’m 5’2″), so I cut the deep drape and basted it together just enough to be able to test it. Sure enough, the drape was too deep on me. If I positioned it just right it looked great, but if I moved the drape shifted and revealed my bra. I took a photo of the problem and posted it to the Facebook group, and within minutes I received suggestions for fixing the problem. Some suggested workarounds such as taping the drape to my bra or adding boning to keep the drape centered. However, there were also some marked up diagrams of how to adjust the pattern.

Inspired by those diagrams, I looked at the pattern again and realized that I could align the shallow and deep drape and see where they differed. I then drew a new cut line between the shallow and deep drape lines. While I was at it, I fixed another problem I had observed: the seam where the back facing and front drape line up at the shoulder didn’t quite match because the back facing edge was slightly longer. I thought it might be easier to get the shoulder and back facing to lie flat if everything lined up. So I adjusted my new cut line to be the right length to match the shoulder seam. You can see here the outline of the deep-drape front in blue, the shallow-drape front in green, and my new cut line in red.

I unpicked the shoulder seams, recut the top of the drape based on the new red line I drew on the pattern, and sewed it back together. This time the drape was just right. Although the pattern doesn’t call for it, I put a few stitches in the outer shoulder edges to hold the facing in place.

Next I started working on the arm hole binding. This is a point in the instructions were more details and a photo or two would be helpful. I wasn’t sure whether to sew the binding on with a stretch stitch, straight stitch, or surger. After consulting with the Facebook group, I used a stretch stitch to sew one of the bindings, but was not happy with it so I unpicked it and tried again. After much futzing I ended up flipping the binding to the inside instead of using the wrap around binding the pattern calls for. I did not execute it all that well on the first side, but it came out better on the second, but still more puckered than I would like. I suspect my binding might be a bit too short for the size of the arm holes.

Once the arm holes were bound I tried the blouse on and found that the back facing kept rolling up and sticking out the back of the neck, despite being understitched. I tried top stitching close to the edge, which helped some, but not enough. I added another row of top stitching 5/8-inch from the edge and pressed, the seam, which ended up being a lot better.

Finally, I hemmed the top and here it is! Overall I like it and if I make another one it should be a pretty quick project. I might try one with sleeves instead of arm bindings, or if I try another one with bindings I will probably try adding about half an inch to the length of the bindings so the bindings do not have to stretch as much. I might also try adding some shaping to the waist. I think a shorter facing, and possibly even a binding for the back neck would work better too. You can see in the back photo that the outline of the ITY facing.

Photos above with Pattern Emporium Urban Boldly mashup pants in seafoam LiKnit.

Ruffled Harper cardigan hack

When I saw the Sinclair Harper cardigan hack on the SewYouThinkYouCanSew blog about a year ago I knew I wanted to give it a try. This hack is based on an Anthropologie Cardigan. I loved the look so much that I bought the same fabric, Impressionist Double Sweater Knit in eucalyptus from Serge Fabrics. Then I got busy with other projects, including a Sinclair Laura cardigan in the tea leaf color of the Impressionist Double Sweater Knit. When I bought Pylos LiKinit in seafoam and discovered it was exactly the same color as eucalyptus, I knew it was time to make a seafoam/eucalyptus outfit (see my post on my Pattern Emporium Urban Boldly mashup pants).

I followed the instructions for the Harper cardigan hack on the blog with a few modifications. I started with a size 6p. Since I prefer not to have neckbands that creep up my neck, I lowered the back neck band and narrowed the whole band, just as I had done for a previous Harper sweater I made. I used patch pockets (but without the top band) but still split the front pieces as was done in the hack. I also added a slight flare to the outside seam of the lower front pieces. I omitted the sleeve cuffs and lengthened the sleeves slightly to compensate. I was able to cut all the pieces from 1.5 yards of fabric in my size. I’m very happy with how the ruffled harper came out! It is a jacket I can wear to work and look professional, with a fun ruffle in back. This one is a light-weight sweater knit good for spring and fall or keeping warm in overly air-conditioned buildings. I might make a warmer one for winter in French terry or a cozy sweater knit.

Since I had fabric leftover I made a Sinclair Cache top to go with the cardigan. I followed the cache pattern but added a scoop neck and cut the back hem to match the front. I actually don’t love how the Cache came out in this fabric with the scoop neck as it doesn’t lie flat under the cardigan, but I’ll wear it anyway.

Urban Boldly mashup pants

Pattern Emporium offers two different wide leg knit pants patterns that are fairly similar but have some important differences. Walk Boldly has the widest legs, the highest rise, lots of pocket options, and an elastic waist. The wide leg option in the Urban Pants Collection is not quite as wide, doesn’t have as many pocket choices, and has a yoga waist band. Both pants are pretty much the same from the crotch up to the bottom of the waistband, with the same back pleats that I love so much. I have seen a number of questions in the PE Facebook group about whether these two patterns can be mashed, and of course the answer is yes!

I like both patterns a lot, but I like the comfort and fit of a yoga waistband, especially one that has been modified to fit me perfectly. But sometimes I want the look and swooshy feel of extra wide-leg pants. So I started with my wide-leg urban pants modifications (laid out in Affinity designer) and digitally traced the Walk Boldly legs onto the front and back urban wide-leg pants leg pieces. Since the crotch lines up perfectly, this is easy to do. I shortened the leg pattern pieces by 2 inches and was able to cut all the pieces in size AU 10 from 2 yards of 58″-wide fabric.

I used seafoam Pylos LiKnit fabric for these pants — not the first time I’ve made summer pants out of LiKnit, but the first time with this pattern. LiKnit is a rayon/nylon lightweight knit that looks and feels somewhat like linen. It has horizontal, but not vertical stretch. I realized the lack of vertical stretch might be a problem when making these pants, but I decided to give it a try. it turned out not to be a problem at all for me except for the waistband, which I lined with athletic knit. I basted it on and realized immediately that I would need it to be bigger to comfortably get this low-stretch fabric over my hips. So I removed the initial waistband and cut out a new one. I added about a half inch vertically and an inch horizontally from the yoga contour waistband I had customized for my grey ponte wide-leg urban pants. This one worked perfectly. These pants looks and feel great to wear!

Pants modeled with Sinclair Harper cardigan with ruffle hack and Sinclair Cache top in eucalyptus Impressionist Double Sweater Knit