 At the beginning of October I started a quilt project, inspired by the oh-so-colorful paintings of Loretta Grayson. I happened upon a photo of her gorgeous colorful crocheting on Facebook, and then went to her blog and finally to photos of her paintings. After a few days of being mesmerized by all that wonderful color I sorted through my fabrics and found the 40 or so brightest, most saturated, near-solid fabrics in my collection. Then I began cutting them up into piles of 4.5-inch squares. The original plan was to assemble the squares into a colorful 8×8 grid, and then superimpose some dark spirals. I started with the warm colors. Then I thought maybe I would make two 8×8 grids (one warm colors, one cool colors), cut away some shapes from one, and reverse applique it to the other. Once the two 8×8 grids were assembled, they looked quite striking sitting next to each other, taking up half my table at the STUDIO. But imagine how more striking they would look if the whole table was filled with color. So I made two more grids, and sewed them together. And then I had a 16×16, 64″ grid, and no more room on the table.
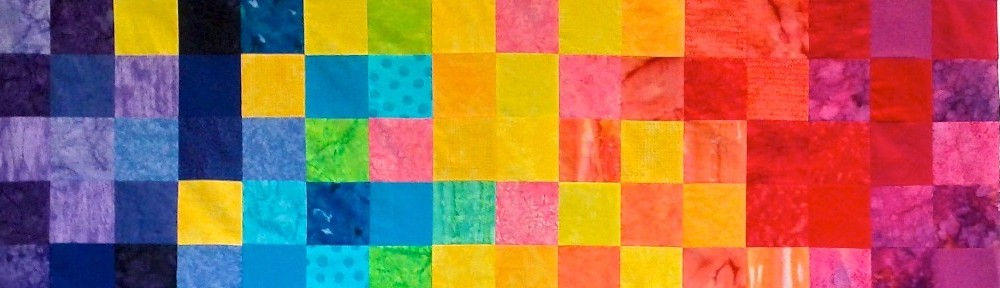
 Several people have asked me how I decided which colors to put where. And why are there yellow squares and green squares off where they seem not to belong? I started with a warm quadrant and a cool quadrant. I had sorted my squares chromatically and I formed each quadrant row by row by introducing several adjacent colors into a row and then carrying them through with less frequency into the next several rows. That sounds confusing, but I had an algorithm in mind as I laid out the squares. The quadrants emerged as rough gradients, somewhat in order by hue, with some variation so as to provide more visual interest and some contrast between adjacent squares. I positioned those quadrants diagonally opposite of each other, and then constructed the remaining two quadrants to blend the warm and cool colors. But again, I wanted some contrast and I added some of those unexpected squares to help move the viewer’s eye around the quilt.
I’ve also been asked how I sewed all those squares into rows with the corners all matching up. Actually, not all the corners match up exactly, but many of them do. I do not have the patience to cut everything as exactly as I should, and I’m all for fast piecing techniques that minimize the need for pinning. I chain pieced each row of eight, first in groups of two, then sewed them into groups of four, and then finally the row of eight. The hard part was keeping the squares in order. I solved this problem by marking small numbers in the bottom right corner of each square with a ball point pen. I pressed the seam allowances all in the same direction, reversing the direction on alternating rows. Then I pinned two rows together, butting the seams together, and sewed. I added on rows until I had a quadrant. After all four quadrants were done, joining them together was just more of the same.
 When you step back from the quilt, it looks large, bright, and pixelated. Was I thinking pixels when I created it? Not specifically. But I have been ruminating on some privacy-related ideas that involve pixelating faces, so maybe my subconscious was thinking about pixels. There is no hidden meaning in this one (maybe I shouldn’t tell you that, it will spoil the fun!); it is really just about color.
The STUDIO is a large room, but you can’t miss a 64″ square blast of intense, saturated color. So the quilt-in-progress started to attract attention from the various people who wandered into the room. I have had some lovely conversations with various musicians and artists who wandered by. But I was at a loss for how to quilt it. I took a photo of the quilt top, pasted it into a Powerpoint file, and auditioned various quilt patters by drawing lines over the photo. I also brought the quilt top to a Pittsburgh Fiberarts Guild meeting and asked for advice. The guild members suggested circles, swirls, anything to contrast with the regular grid. But in the end I disregarded their advice and decided to quilt straight lines. Lots of straight lines, running in every direction and in different colors. And by hand.
I do know my limits, and hand quilting little itty bitty stitches on anything larger than a handkerchief is probably not something I would have the patience to attempt. But big stitch quilting is less intimidating. I estimated I would need about 2,500 inches of quilting, which I could probably complete in 10-15 hours. So, I made plans for how to tackle this task.

But first I needed to assemble the quilt into a quilt sandwich. For a 64-inch quilt, this requires about 4 yards of fabric for the back. I hate wasting expensive fabric for the back of a wall quilt that will never be seen, so I buy clearance fabric for this purpose — the bolder and gaudier the better. My stock of backing fabric was running low so I ordered some lovely bright fabrics from Hancocks of Peducah at $3.99 a yard. It took a week or so for the fabric to arrive, and I was away for the STUDIO for much of that time anyway.
 Finally back at the STUDIO I cut two 66-inch pieces of my wonderful citrus clearance fabric and sewed them together to get a wide enough piece for the quilt backing. Then I unrolled my largest piece of batting and discovered I had previously taken a big chunk out of it and now it was only about 50 inches wide. But I had just pieced the backing, so why not piece the batting as well? I dunno… never tried it, will it work? The Internet came to the rescue and I learned that piecing batting is actually pretty easy, thanks GirlReaction Crafts for a very clear photo and explanation!
Having assembled the quilt sandwich I’ve now begun quilting. Each 64-plus-inch line of stitching is taking me about 15 minutes to execute, using blue painters tape as a guide. After a few lines I switched to wider, two-inch painters tape, which was easier to lay down straight. Twelve lines in, I think this plan is going to work.
Next problem, what to call the quilt. I’m taking suggestions (if Marissa Mayer can crowd source her baby’s name, why not crowdsource naming my quilt?).

