I’m excited to finally reveal Interleave #6: Porto, which was presented to Ed Frank and Sarah Ratchye at a reception before the Grand Finale dinner of the Carnegie Mellon Inspire Innovation! fundraising campaign last night. I was commissioned to make this quilt to thank Ed for serving as chair of the Inspire Innovation! campaign. (The campaign was incredibly successful, raising well over the $1 billion goal. As a faculty member at a terrific university that has a much smaller endowment than most of our peer institutions, I really appreciate how this infusion of funds will benefit the university.)
I felt truly honored to be asked to make this gift, and somewhat nervous about whether I could produce something that would live up to expectations. Ed and Sarah are art collectors, and Sarah is herself an accomplished artist. The folks who approached me about making the gift were hoping for a piece that would represent the interplay of art and technology, consistent with the mission of the STUDIO. Having spent a good part of the past year working in the STUDIO, I am personally grateful to Ed and Sarah for their financial support of the STUDIO as well.
I did not have a lot of time to produce this quilt, and it involved a number of new techniques I hasn’t tried before. It all came together fairly well until the end. Last weekend I finished the binding, and when I put it up on my design wall for a photograph I realized the corners were not square. Really not square. It was a lovely rhomboid parallelogram. Because I have different prescriptions in each lens of my glasses, when I take my glasses off the world looks a bit un-square (which drives my OCD side nuts). But my glasses were on. I checked the quilt corners against the grid on my cutting mat, and there was no denying it. The quilt was not square. This was the widest Interleave quilt in the series and I realized that the longer the strips, the more room there is for the fabric to stretch as I sew – and I hadn’t noticed until that point that there was actually quite a bit of skew. I pondered the problem over night and the next day ended up removing the binding and vertical borders so I could square it up. Fortunately, I had used Aurifil 50 weight thread for piecing, which made the un-piecing a snap (my new favorite (un)piecing thread – really nice thin thread with low lint that doesn’t break while sewing but so easy to rip out without tearing your fabric when the situation calls for it). I reattached the borders and the binding and finally could declare it finished.
I already wrote up a little artist’s statement, which the CMU advancement folks had a designer incorporate into a little booklet to accompany the quilt. I will just include the statement here for those of you who want to learn more about the quilt. I’ve also included some bonus images so you can see how it was made.
Artist’s Statement
At first glance the Frank-Ratchye STUDIO for Creative Inquiry at Carnegie Mellon University appears like a good place for a computer science professor, but an odd place for a quilter. I am both a quilter and a CMU computer science and engineering professor who is spending my sabbatical as a fellow at the STUDIO.
While other faculty and students in the STUDIO spend the day creating new concepts from behind computer screens, I set up shop with an old sewing machine, an ironing blanket, a cutting mat and a huge pile of colorful fabric. At the beginning of my fellowship, I smiled politely every time someone suggested ways of attaching the old sewing machine to a robotic arm, and spent days with needle and thread hand quilting colorful lines.
Hand quilting is a process that offers one a lot of time to think, and I did spend a lot of time thinking about the art and craft of quilting, and how I might use technology in my work. For most of my piecing and quilting, I use a sewing machine, which was fairly sophisticated technology when it was invented about 200 years ago. My most recently purchased sewing machine is actually called a “sewing computer” by its manufacturer, and it has some innovative features such as a sensor that can detect the speed at which the operator is moving a piece of fabric so that the machine can automatically adjust the speed at which the needle goes up and down.
I appreciate the added value that technology can bring to my art, enabling me to create in ways that would be difficult or impossible for me unassisted. But it is not my goal to use technology to eliminate the need for me to participate in the fabrication process. Part of my attraction to quilting and fiber arts is the tactile nature of the medium. For me, part of the fun is manipulating fabric and thread with my hands. I want to use technology to enhance my skills – let me sew straighter, faster, better – or, better yet, to let me create in ways I otherwise could not.
STUDIO director Golan Levin suggested the use of digital technology that was necessary for me to create this quilt. When I started my Interleave series of quilts, I sketched the quilt designs in pencil and did some design experimentation with scissors and paper. As I started to design the third quilt in the series, I began using Microsoft PowerPoint to sketch out some ideas involving sine waves. It was a tedious process as PowerPoint was really not the right tool for the job.
Golan saw what I was doing and suggested I write a program using an arts engineering toolkit called Processing to draw my design. As a computer scientist, I wasn’t previously familiar with Processing, which was developed by artists, for artists, and is taught in CMU’s undergraduate art classes. The program I wrote allowed me to generate the sorts of designs I had been struggling with, and it included sliders to allow me to experiment with sine waves of different frequencies and amplitudes. Using this program, I was able to rapidly iterate through large numbers of design possibilities before selecting one to actually fabricate. I did some engineering to figure out how to actually construct the quilt I designed, and then adapted my program to produce full-scale templates that I could print on paper and use to cut out my fabric.
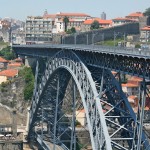 Each quilt in the Interleave series uses a variation on the technique I described, but each includes a new twist on the approach. For Interleave #6, the new twist was the inclusion of a photograph digitally printed on fabric. After considering a variety of photo ideas, I chose a photo I took in Porto, Portugal in 2009 while on a short trip with some of my colleagues to attend a meeting for the Carnegie Mellon Portugal program. Although I was there for less than three days, I managed to meet the Prime Minister José Sócrates as well as experience the city’s São João festival. Walking around the city, I took lots of pictures with my DSLR camera.
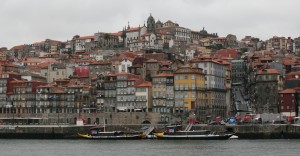 Porto is a wonderfully photogenic city, full of hundreds-of-years-old apartments with bright red-orange roofs. The city also has amazing staircases, some of which appear on maps as roads. The Duoro River runs through the city, with tall bridges stretching across it. The view of the Ribeira district from across the river is particularly spectacular, and affords a view of layer upon layer of buildings built into the steep hillside. It is a photo of this view that I selected for the Interleave #6 quilt.
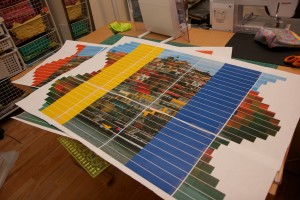
Before printing the photo on fabric, I manipulated it in several ways, including increasing the color vibrancy and saturation. Additionally, I created three versions of the photo at varying degrees of pixilation. Then I used my Processing program to interleave the three versions in a sine wave formation and to leave space for splicing in batik fabrics. Next, I adjusted the end result so it could be printed on fabric complete with guides for cutting and splicing. Since I wasn’t entirely sure I had calculated everything properly, before having the fabric printed at spoonflower.com, I did a trial run with paper to reassure myself that it would work as I envisioned. When the fabric finally arrived in the mail I cut it up and sewed it back together, layered with a foundation grid, batting and backing fabric. The final touch was some hand embroidery for added texture and emphasis.
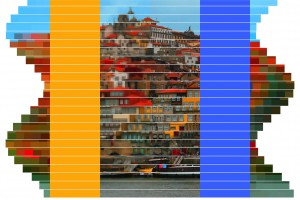
This was one of the two fabric panels I had printed to make this quilt. I removed the wide yellow and blue stripes and replaced them with batik fabric before making one-inch slices along the white lines.
The quilt is designed to show a view of Porto at various levels of focus, granularity, and abstraction. If you look at the quilt up close the pixelated sections appear mostly as abstract regions of color. On the other hand, you can see the un-pixelated sections most clearly, although they are rippled, as if reflected off water. The ripples are both a design choice, and an artifact of the medium – fabric stretches as it is sewn, so perfect alignment is difficult to achieve.
Step back from the quilt until you are too far away to see the un-pixelated sections clearly, and now the pixelated sections start coming into focus. Step back further and the larger pixelated sections convey meaning. The batik fabric sections appear as regions of color taken from the scene: the most abstract representation, color without meaningful shape. I began playing with pixelated images in my earlier quilts as I explored visual representations of privacy, and have continued to use this technique, even when privacy is not the main focus of a piece.
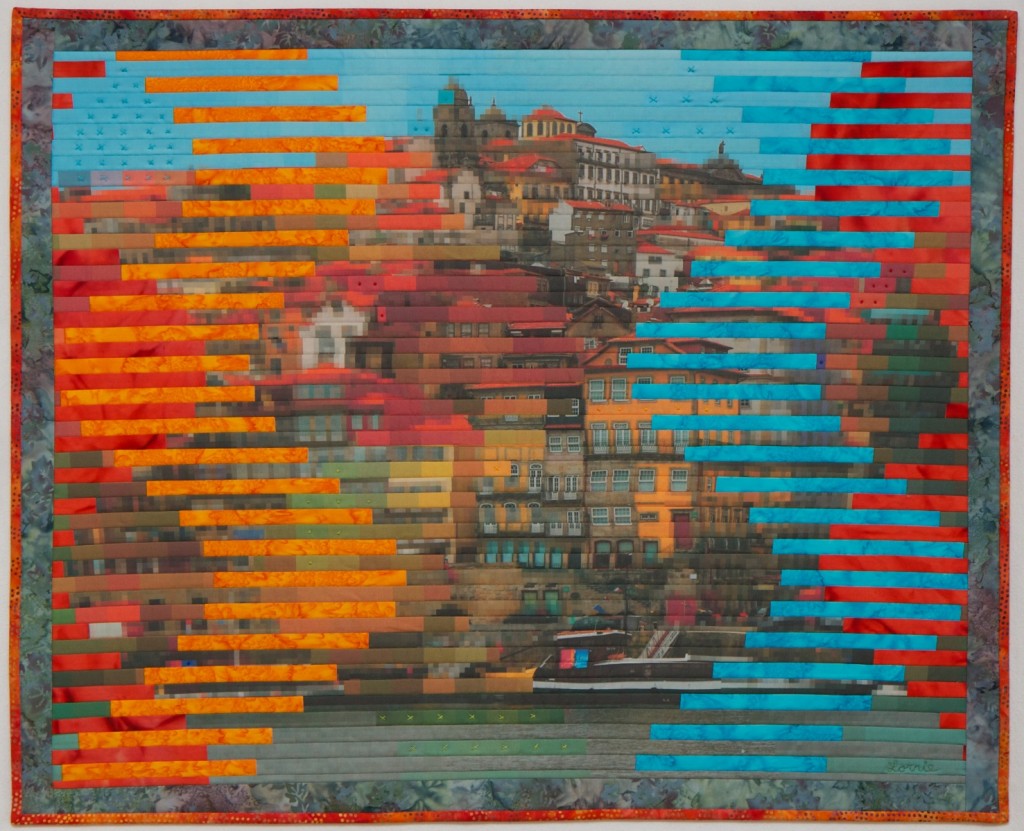
Interleave #6: Porto
25.5″x31.5″ digitally printed cotton and commercial batik fabric, machine pieced and quilted, hand embroidered with pearl cotton

