The Making of "Thesis (in color)"

I started this quilt in March 1998 as my husband was writing his doctoral
thesis. This quilt took me about 6 months to complete. It was my first
really big quilt, so I decided to document how it was made.
 I designed the quilt using MS PowerPoint. First I designed a square
"block" that I could piece using the paper foundation piecing method.
This method involves drawing your design on a piece of paper (or
in this case printing it with a laser printer), and sewing fabric
pieces to the paper. You sew with the fabric side down and the paper
side up so you can just sew along the printed lines and get nice
precise points. After the quilt is pieced, the paper is removed.
Anyway, I wanted to design an asymmetrical block that I could piece this
way. I did some initial sketches and then drew the design in PowerPoint.
I call this block "Crazy 5" because it uses five patches and is in the
style of a crazy quilt.
I designed the quilt using MS PowerPoint. First I designed a square
"block" that I could piece using the paper foundation piecing method.
This method involves drawing your design on a piece of paper (or
in this case printing it with a laser printer), and sewing fabric
pieces to the paper. You sew with the fabric side down and the paper
side up so you can just sew along the printed lines and get nice
precise points. After the quilt is pieced, the paper is removed.
Anyway, I wanted to design an asymmetrical block that I could piece this
way. I did some initial sketches and then drew the design in PowerPoint.
I call this block "Crazy 5" because it uses five patches and is in the
style of a crazy quilt.
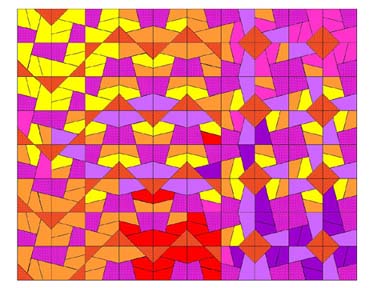
Once I designed the block, I used PowerPoint to experiment with different
ways of arranging the blocks into a quilt. Here are several examples
of the designs I came up with; they all use the same block rotated and
flipped in different directions.


I also used PowerPoint to experiment with the colors. This is easy using
the "slide color scheme" controls.
Finally, I decided to combine patters rather than using the same
pattern over the entire quilt. I printed out the various arrangements
I had come up with and cut them up with scissors so I could easily
rearrange them. When I found an arrangement I liked I went back to
PowerPoint and continued to adjust it. In the mean time I had found
some pink and orange fabric that I liked, so I colored the design
with that fabric in mind. This fabric appears in every square of the
finished quilt. The triangles in the blocks are a different fabric, also
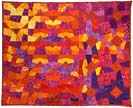
the same in every block. Here is the PowerPoint design shown with the
finished quilt next to it.

I printed out the PowerPoint design in color and began looking for
more fabric to use in the quilt. I was initially thinking about
using 4-inch or 6-inch blocks, but eventually settled on 8-inch
blocks because with the bright fabrics I was selecting, the quilt just
wanted to be big. I started with the pink and orange fabric, and the
red-stripped fabric I had already selected. I added to it all the
yellow, red and purple fabric I already had in my fabric collection.
I still needed more orange and pink, and some more varieties of yellow.
A few trips to various fabric stores later I had what I needed to
get started.
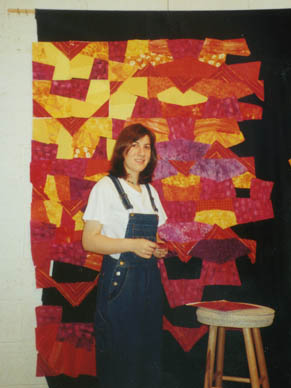
 I printed out about 80 copies of the block design at full scale.
(I had to print some of them as mirror images.) I also printed a
few extra blocks to cut up and use as templates. Then I began
cutting out the fabric. The PowerPoint design provided me with basic
color placement, but I still had to make decisions about which of the
six shades of yellow to use for a yellow patch. I cut out the patches
for a few blocks and stuck them up on my design wall (a big piece
of black flannel fabric to which other fabric easily sticks). There
I rearranged them and tried different colors until I found an
arrangement I liked. Once I was happy with a few blocks I sewed them
to the paper and pinned the paper to the design wall.
I printed out about 80 copies of the block design at full scale.
(I had to print some of them as mirror images.) I also printed a
few extra blocks to cut up and use as templates. Then I began
cutting out the fabric. The PowerPoint design provided me with basic
color placement, but I still had to make decisions about which of the
six shades of yellow to use for a yellow patch. I cut out the patches
for a few blocks and stuck them up on my design wall (a big piece
of black flannel fabric to which other fabric easily sticks). There
I rearranged them and tried different colors until I found an
arrangement I liked. Once I was happy with a few blocks I sewed them
to the paper and pinned the paper to the design wall.

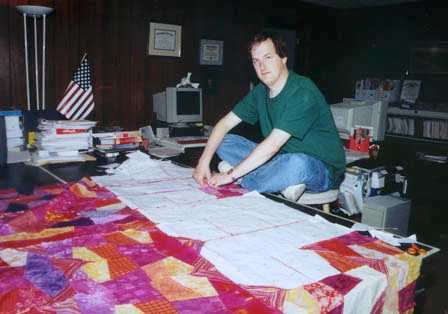
 Eventually I finished all 80 blocks (400 patches!). I then sewed the
blocks into columns, and then sewed the columns together. Finally I
had one huge paper-backed quilt top. The next step was to remove all
the paper. The paper had become perforated from being stitched (and
I had creased it after I sewed each seam), so it wasn't too difficult
to remove -- but there was a lot of it to remove. Chuck took a break
from his work to help.
Eventually I finished all 80 blocks (400 patches!). I then sewed the
blocks into columns, and then sewed the columns together. Finally I
had one huge paper-backed quilt top. The next step was to remove all
the paper. The paper had become perforated from being stitched (and
I had creased it after I sewed each seam), so it wasn't too difficult
to remove -- but there was a lot of it to remove. Chuck took a break
from his work to help.
 Now it was time to turn a quilt top into a quilt. First I stitched two
pieces of the pink backing fabric into one large sheet. I ironed it
carefully and spread it out on our ping pong table. Then I layered
low loft cotton batting on top of it (that's the fluffy stuff in the
middle of a quilt). Finally I layered the quilt top on top. At this
point a quilt frame would have come in really handy for stretching the
layers out while I pinned them in place. But I had to make do with what
I have, so I stretched the layers on the ping pong table and used large
binder clips to hold them in place. Then I used about 100 number 1 safety
pins to pin the three layers together, forming a quilt sandwich. I removed
the binder clips and was ready to quilt.
Now it was time to turn a quilt top into a quilt. First I stitched two
pieces of the pink backing fabric into one large sheet. I ironed it
carefully and spread it out on our ping pong table. Then I layered
low loft cotton batting on top of it (that's the fluffy stuff in the
middle of a quilt). Finally I layered the quilt top on top. At this
point a quilt frame would have come in really handy for stretching the
layers out while I pinned them in place. But I had to make do with what
I have, so I stretched the layers on the ping pong table and used large
binder clips to hold them in place. Then I used about 100 number 1 safety
pins to pin the three layers together, forming a quilt sandwich. I removed
the binder clips and was ready to quilt.
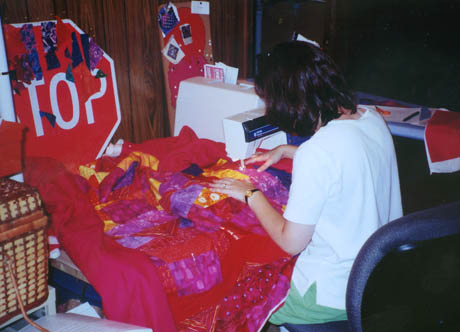
 A quilt doesn't become a quilt unless it's been quilted, so I began
the somewhat daunting task of quilting the quilt sandwich. It probably
would have taken me about a year to hand quilt it, so I decided to give
machine quilting a try. I've done machine quilting before, but only
on small pieces. To avoid having to constantly turn such a large
quilt on the sewing machine, and to give the quilt more of a playful look,
I decided to do free machine quilting. To do this, you drop the
feed dogs (the part of the sewing machine that moves the fabric along
and controls the stitch length), set the stitch length to zero, and
use a darning foot (a sewing machine foot with a spring in it so
that it bounces across the fabric as you sew). Then all you have to do
is move the big unruly quilt sandwich in dainty little swirls and
curls and stitch as you go! Needless to say, this takes practice. It
helps to role the parts of the quilt that are not being stitched. I had
the quilt draped over the sewing machine table and my lap as I
wrestled it into position. I could only work on it for an hour or
two at a time because my arms got tired.
A quilt doesn't become a quilt unless it's been quilted, so I began
the somewhat daunting task of quilting the quilt sandwich. It probably
would have taken me about a year to hand quilt it, so I decided to give
machine quilting a try. I've done machine quilting before, but only
on small pieces. To avoid having to constantly turn such a large
quilt on the sewing machine, and to give the quilt more of a playful look,
I decided to do free machine quilting. To do this, you drop the
feed dogs (the part of the sewing machine that moves the fabric along
and controls the stitch length), set the stitch length to zero, and
use a darning foot (a sewing machine foot with a spring in it so
that it bounces across the fabric as you sew). Then all you have to do
is move the big unruly quilt sandwich in dainty little swirls and
curls and stitch as you go! Needless to say, this takes practice. It
helps to role the parts of the quilt that are not being stitched. I had
the quilt draped over the sewing machine table and my lap as I
wrestled it into position. I could only work on it for an hour or
two at a time because my arms got tired.
The final steps were to add binding around the edges of the quilt, sew
a fabric "hanging sleeve" on the back, and sign the quilt. At last
the quilt was done (about two weeks after my husband defended his thesis).
The finished quilt measures 81 inches by 65 inches. It is made mostly
of woven cotton fabric, however there are a few patches of silk brocade,
corduroy, rayon, and waffle-weave. I used two complete spools of fuchsia
thread and partial spools of pale pink, yellow, orange, red, and purple
thread.
In November 1998 Thesis (in color) won first place in the
large machine pieced/machine quilted category of the Garden State Quilters
Quilts VI Show.
...See my other quilts ....
Lorrie Faith Cranor