To infinity… and beyond!

While I often imagine myself making homemade gifts for everyone on my list, that doesn’t actually ever happen. This year I got a fun idea for one special gift, and liked it so much that I decided to make several more on a similar theme. This year was the year of the infinity scarf (a scarf with the ends sewn together in a loop). But not just any old infinity scarf…. this year I designed three original fabrics, had them digitally printed at spoonflower.com, and turned them into infinity scarves.

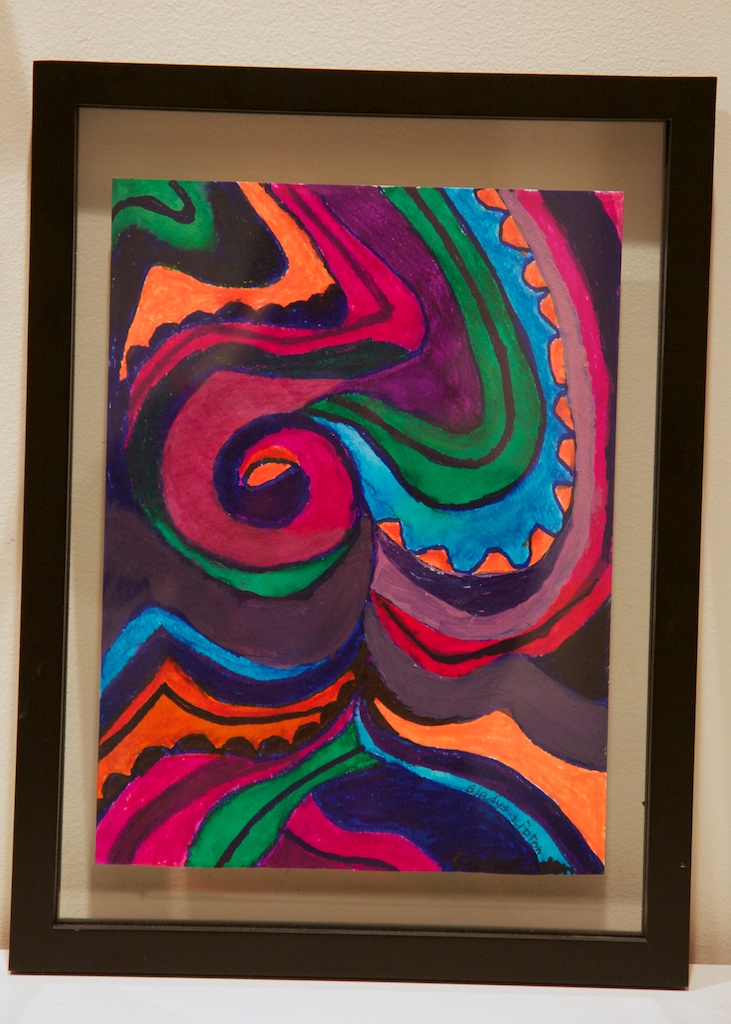
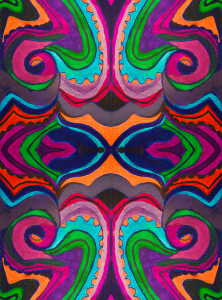
The first scarf was inspired by a colorful painting that my grandmother made earlier this year in her art class. The painting is framed and on display on a shelf in my kitchen. I love the bright-colored swirls and spirals, reminiscent of my own doodles, and thought it would look lovely on a scarf. I took a digital photo of the painting and loaded it into Photoshop. I played with it a bit and realized that all I needed to do was tile it in a mirror-image pattern to create an absolutely stunning design. The shapes in the painting combined with their mirror images to form new shapes and an intriguing pattern.

Painting by Gladys Lipton 2013   gladys-668x900    gladys-tile1


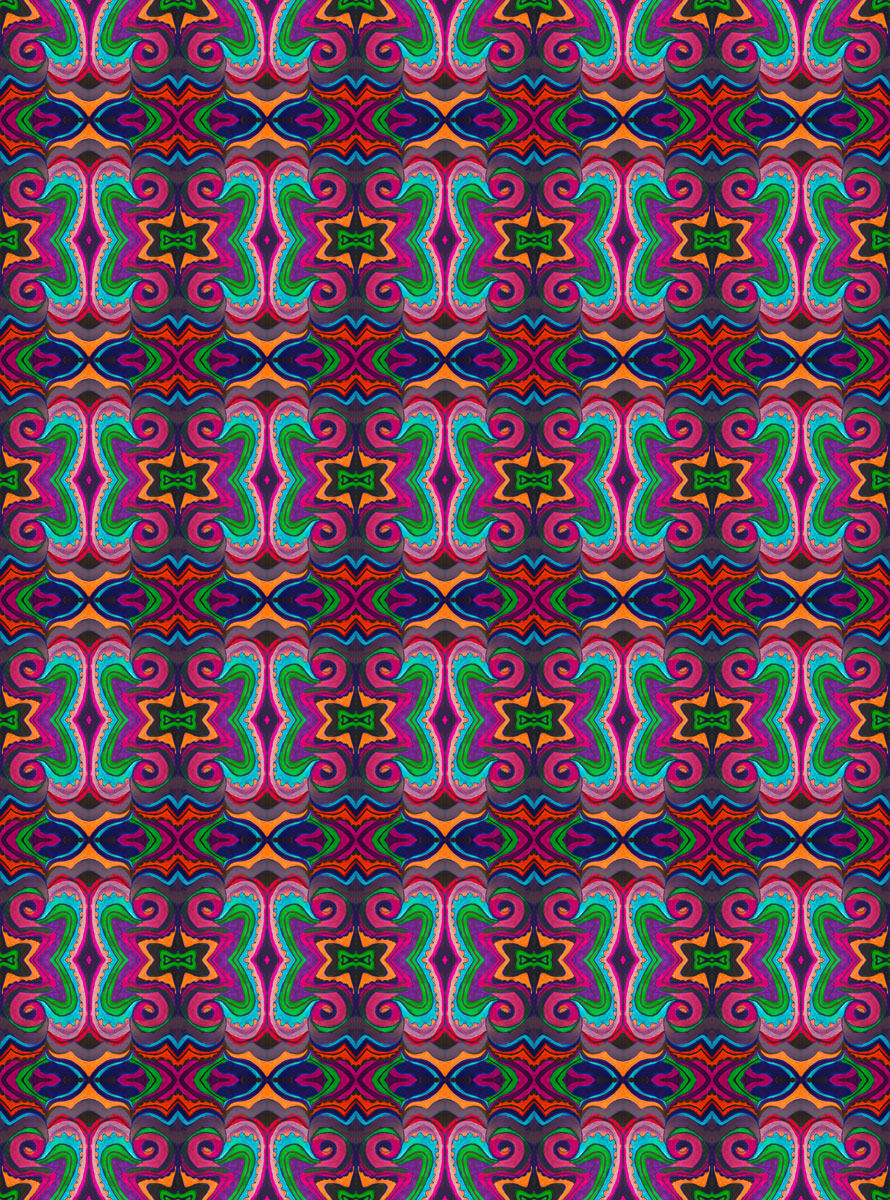
I uploaded the design to spoonflower and ordered two yards of performance knit fabric, a washable polyester knit. Then I waited about a week for my custom fabric to arrive in the mail (the worst part of using spoonflower is the wait!).

IMG_5589

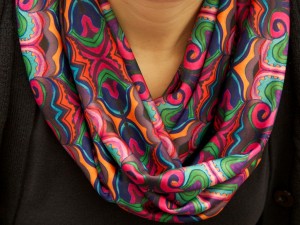
Two yards is enough fabric to make three infinity scarves using the free pattern from Sewn Studio’s Jersey Infinity Scarf Tutorial. The tutorial was super easy to follow. The hardest part is cutting two yards of this slippery fabric into three 24-inch pieces. I made my first scarf in less than an hour and was quite pleased with the results. The scarf can be worn long, or looped around twice. It can also be knotted in various ways for a different sort of look – although one of the great features of infinity scarves is that you don’t have to mess around with tying them. I made three scarves – one for Grandma Gladys, one for my mother, and one I kept for myself.

output_19_45_15

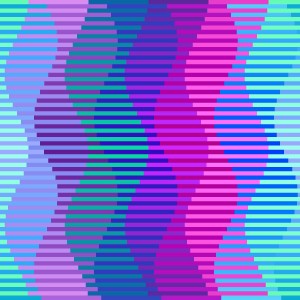
I decided to try my hand at some more fabric design. I went back to the Processing computer program I had used to design my Interleave quilts and adapt it for fabric design. My first design is based on my Interleave #3 quilt. I used the same pattern and color scheme, but added gradients so each bar is a lightly different color. The addition of the gradients adds dimension to an otherwise flat design, and makes it almost appear to glow.

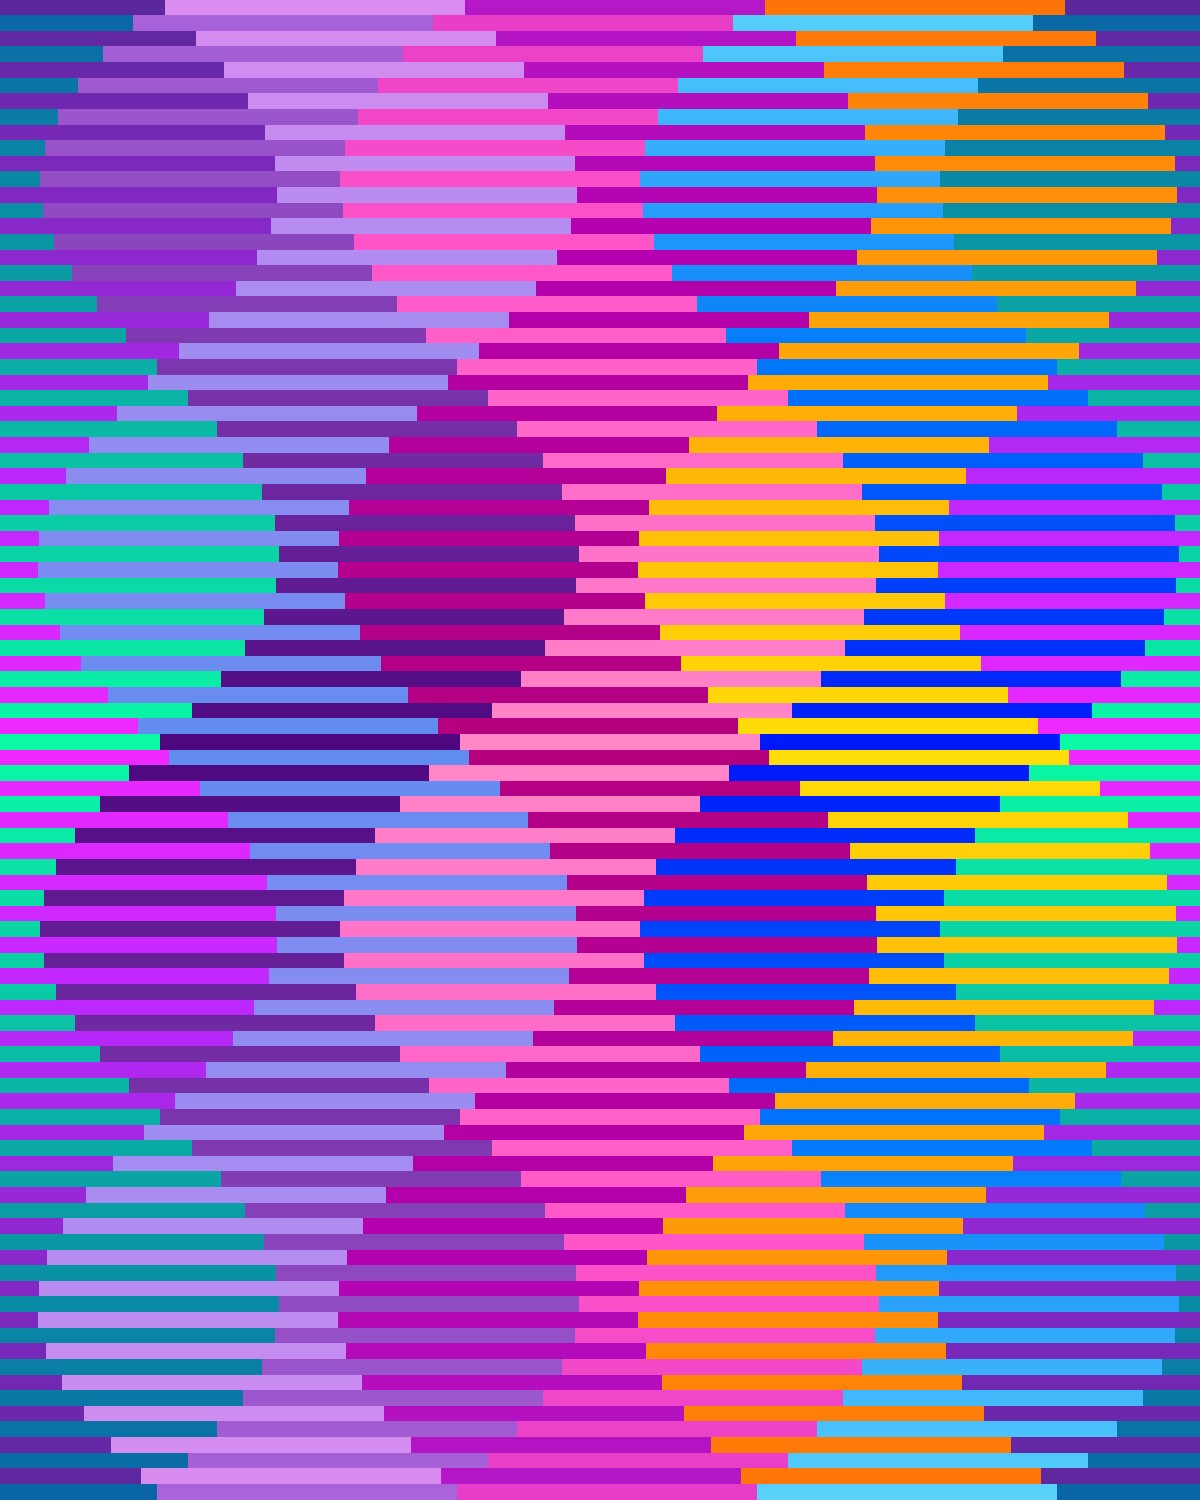
My second design was based on my Interleave #4 quilt. Here I completely changed the colors and used gradients to not only add dimension, but also to introduce more colors. I love the way the colored stripes mix to produce the illusion of additional colors. Here you can see the fabric pattern, as well as the scarf being modeled by me as well as by my mother-in-law.

output_20_22_17  Lorrie with interleave infinity scarf 

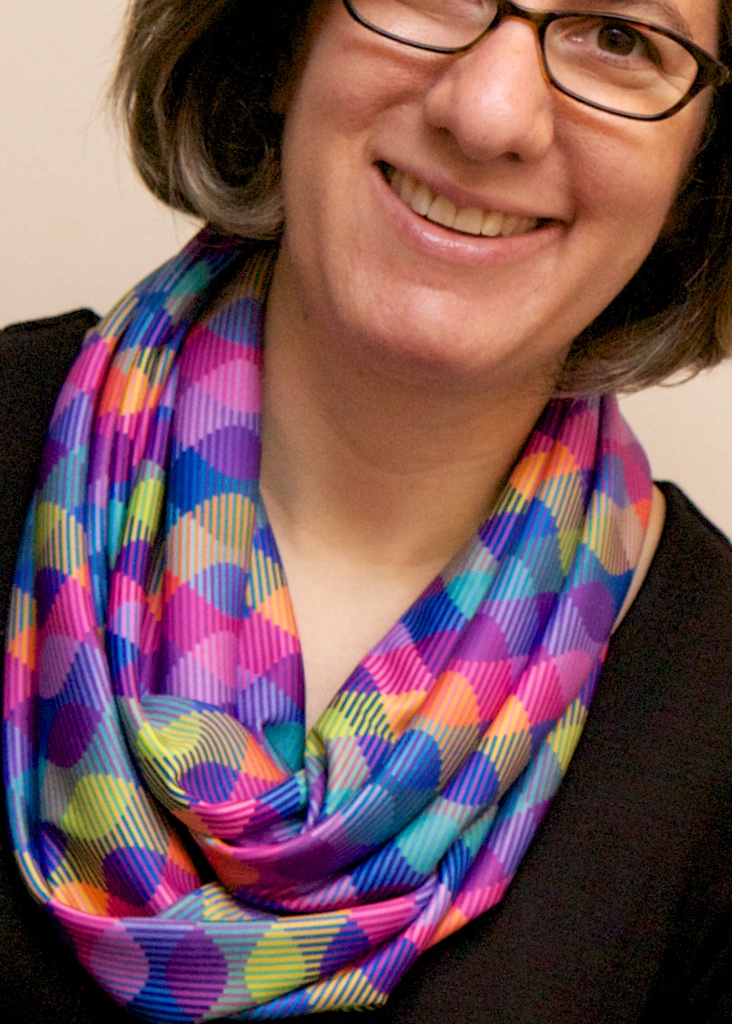
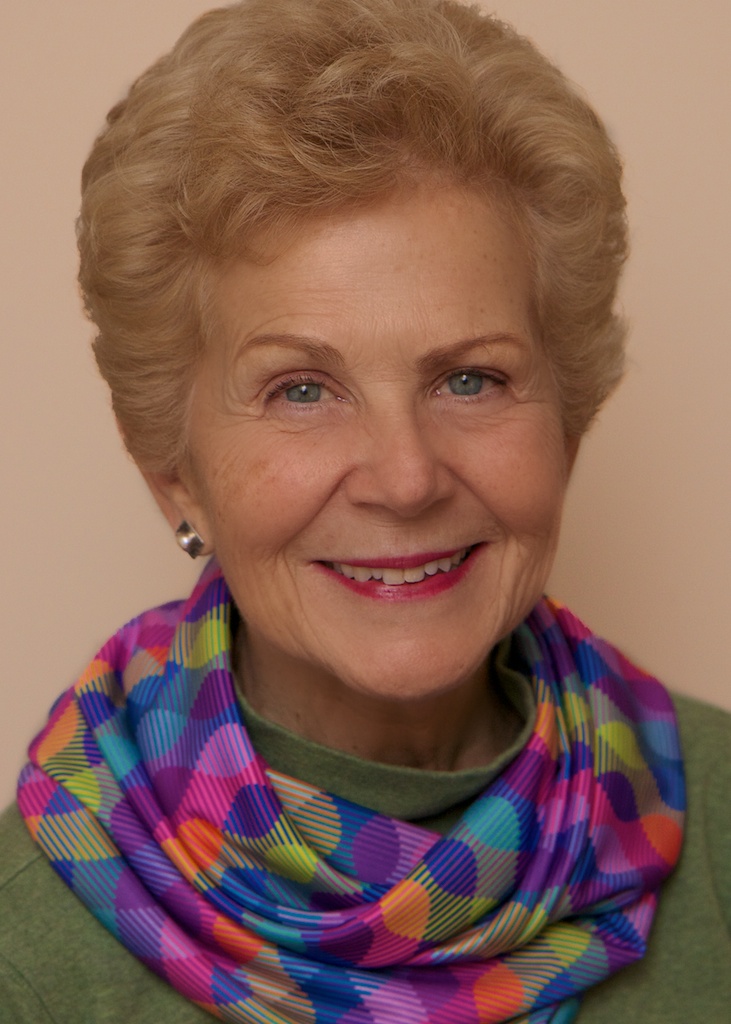
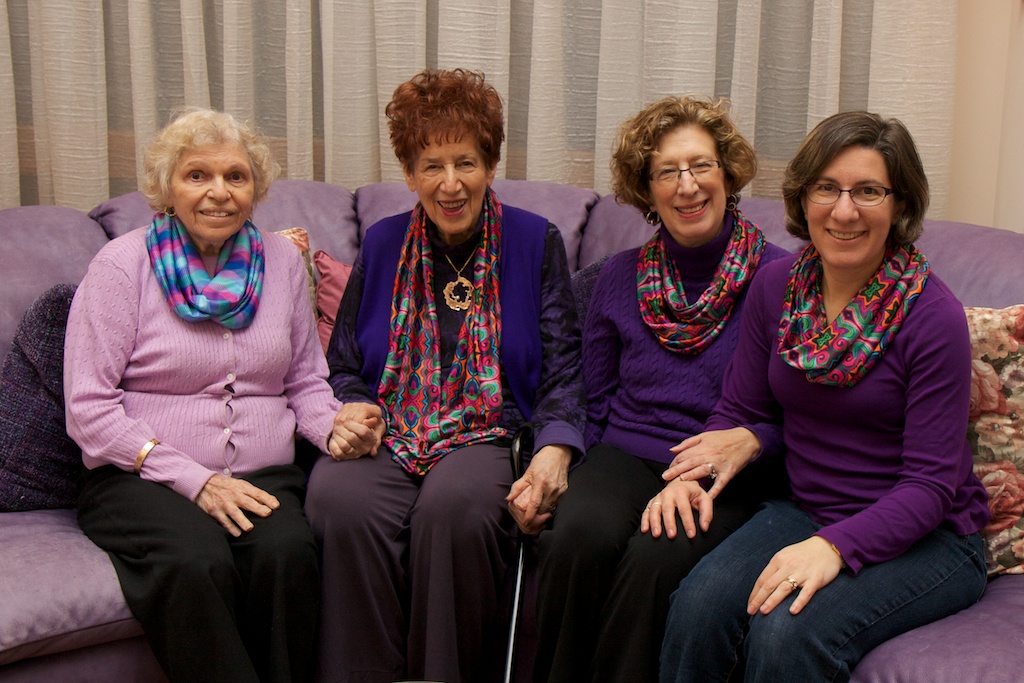
The infinity scarves were big hits. Here you can see them modeled by my grandmothers and by my mother. Grandma Gladys, second from the left below, made the painting that is featured on the fabric. (Did you guess that we all like purple?)

Gertie, Gladys, Judy, and Lorrie

These fabrics are all available for sale from my shop at spoonflower. You can have them printed on your choice of fabrics (or even wallpaper or gift wrap).


Sine of Spring

I was so pleased with the results of Interleave #3, that I decided to continue the series and see what else I could do to facilitate my quilt design with Processing. This time I started with some of the fabrics I wanted to use — a wonderful, colorful wavy batik fabric seemed perfect for a sine wave quilt. I matched the colors in this fabric with other fabrics in my collection, and not finding exactly the right shades, it was a good excuse to go fabric shopping.  I worked on the quilt design in Processing, but couldn’t figure out how to represent the multi-colored wavy fabric in a single hue. So I enhanced my Processing program so that I could input digital images and use them to create my interleaved designs. I took digital photographs of a bunch of my fabrics with a ruler next to them (for scale). I then experimented with using these digital images in my computer-generated designs.

The addition of digital images of fabric made my computer-generated interleave designs much more vibrant, and also allowed me to visualize the placement of fabric patterns. I had lots of fun playing with different designs.

I eventually selected a design and began the process of rendering it in fabric. I used a very similar approach as I used in Interleave #3, except this time I drew 64 pencil lines spaced a half-inch apart on a piece of white fabric and layered that foundation fabric over the batting. I then sewed the colored strips to the sandwich of white fabric, batting, and backing, aligning each strip to a pencil line. I was able to use just one pin as I positioned each strip. Not having to line up each strip with a ruler and pin it in place along the whole length of the strip saved a lot of time. By the time I finished this quilt I was able to position, piece, and press each strip within about four minutes. I did run into a few problems with some of my pencil lines that were not completely straight — the fabric stretches a bit when you draw on it with a pencil if you are not careful, causing some of the lines to curve. This inspired a not-yet-successful mission to find a commercial cotton fabric with precise half-inch or quarter-inch stripes that I could use as the foundation.

I enjoyed watching the pattern unfold as I worked on this quilt, and I love these colors, which remind me of spring flowers. This quilt celebrates Spring, which after several false starts, seems finally to have come to Pittsburgh.

Interleave #4: Sine of Spring
24″x31″ machine pieced and quilted commercial batik cotton fabric

Self Portrait

As part of my sabbatical project, I  have been continuing to contemplate ways to visualize privacy. My De-identificaiton quilt featured digitally-printed photos de-identified by their extreme magnification and by splicing them together with other fabric. Another approach to visual de-identification is pixelation. To pixelate an image, we superimpose a grid on the image and replace each cell with a color representing the average of all the pixels in that grid cell. Although pixelation has been shown to be highly vulnerable to automated re-identification, it is a widely used method of obscuring images to make them more difficult for humans to recognize.

I have long been intrigued by the Salvador Dali paintings, Lincoln in Dalivision (1977) and Gala Contemplating the Mediterranean Sea which at Twenty Meters Becomes the Portrait of Abraham Lincoln (Homage to Rothko) (1976), which in turn were inspired by Leon Harmon’s grey photomoasic of Abraham Lincoln (1973).

Recently, Ray J released the single “I Hit it First” with a pixelated photo on the album cover. The photo was quickly recognized as a 2010 photo of bikini-clad Kim Kardashian.

Original portrait

While working on my Big Bright Pixels quilt, people kept asking me whether there was a hidden picture or message. There wasn’t. But that did get me thinking about doing a pixel quilt with a hidden image. But what image should I pixelate? I had recently used a pixelated face in the logo I designed for the Privacy Engineering masters program, and a face seemed a natural choice given that faces are commonly pixelated to protect privacy in news photos. (Other body parts are also frequently pixelated, and I love the censorship towel, but I digress.) I settled on pixelating a face, and briefly considered using a face of a famous person before deciding to use my own face. I selected a blue-haired portrait, photographed by Chuck Cranor.

Pixelated portrait

Pixelated portrait

Pixelation can be done trivially with a computer using standard image processing software packages or by rolling your own. I started working on my pixelated quilt before I started programing in Processing, so I used Photoshop to pixelate a headshot of myself. The initial pixelation was nice, but I wanted something more colorful and also higher contrast so that the differences between colors would show up better when printed on fabric (digital printing on fabric tends to dull colors). I experimented with adjusting the contrast, brightness, and color settings in Photoshop until I came up with a brighter and more colorful pixelated image. This was the image I sent to Spoonflower for digital printing.

Pixelated portrait with high contrast and color manipulation

Pixelated portrait with high contrast and color manipulation

By the time the fabric arrived I had gotten busy with other quilts, and I was also a little disappointed in how the printed fabric looked, so I left the fabric sitting out on my table in the STUDIO for a while. I decided that the dulled digital print needed some more punch, so periodically I cut a fabric square to match a pixel in the fabric and pinned it in place. I cut some of these squares from translucent polyester organza, adding some vibrancy and shimmer to the pixels over which I layered them. I cut other squares from lace, commercial batiks, and printed fabrics that were more intense versions of the hues in the digital print. I ended up covering about 20% of the pixels with other fabric.

Back of quilt top with vertical lines sewed

Back of quilt top with vertical lines sewed

After a few months of staring at the pixels I finally decided to sew the quilt together. I used a shortcut technique to sew the quilt together without actually cutting apart the squares in the digital print. I folded the fabric along one of the vertical lines, catching the pinned squares in the fold, and stitched along the line with a quarter-inch seam allowance. I repeated this approach to sew all the vertical lines and pressed all the seam allowances to the side. Then I folded the fabric along one of the horizontal lines and repeated this process. The end result was a pieced quilt top that appeared to have been pieced out of 130 2.25″ squares (2.75″ with seam allowances). Theoretically this approach should have resulted in precisely pieced seams; however, some of the lines are actually slightly off and the rows and columns did not come out quite as square as I had hoped they would.

Pieced quilt top

Pieced quilt top

I layered the quilt top over batting and backing and used a spiral free-motion machine quilting pattern to quilt the whole thing free hand. I did the quilting in several sessions as I had time, doodling spirals until my hands got tired. I used several different thread colors to roughly match the color of the thread with the pixels I was quilting. I decided not to bind this quilt, and instead made an envelope and quilted all the way to the edge. There is a little bit of stippled hand quilting done with perl cotton surrounding my signature in the lower right corner.

So now the quilt is done and I’m pretty happy with this self portrait. Most people who have seen it do not recognize it as a self portrait, which is ok, and sort of the point. On the other hand, Golan said the blue and purple hair was a dead give away for him. I had not actually started out with the intention to make a self portrait, but ultimately I think the piece works better for me as a self portrait than any more accurate likeness would.


Self Portrait, machine pieced and quilted 23×30.75″


Big Bright Pixels

This post is long over due. I actually finished this quilt around Thanksgiving, but I didn’t get around to sewing a hanging sleeve onto the back until a couple of weeks ago — so I couldn’t hang it up and take a photo until recently. But I got distracted with other projects, including some not-so-sabbatical-related projects. But now it is done, and photographed and posted.

I already blogged about this quilt while I was working on it, so just a brief update here. After my first blog post on this quilt, Aleecia McDonald pointed me towards Gerhard Richter’s Cologne Cathedral stained glass windows. My quilt takes a very similar approach to Richter — similar sized squares, similar colors. But besides the difference in medium (glass vs. fabric), the algorithm for selecting colors is rather different. Richter used a computer program to execute an algorithm designed to produce something that would resemble random static. My algorithm was less precise, and just executed in my head. My goal was to create something more like a color gradient with random variations. Nonetheless, these pieces strike me as rather similar. I love the scale of Richter’s windows as well as the use of glass as a medium.

So there you have it… Big Bright Pixels.


Auction Quilt

For the past several years I’ve donated a small quilt for the fundraising auction at the local public elementary school that my kids attend. I’ve just finished this year’s auction quilt, a small 24-inch square wall quilt called “Interleave #2: Sunset over water.” This is the second in my series of Interleave art quilts, and it seems likely there will be more. (See my last post for Interleave #1’s story.)  The quilt will be auctioned off on February 16. Contact me for details if you are interested in bidding.

Interleave #1 had a lot going on, with primary-colored improv-pieced panels spliced together before being sliced into 24 pieces and sewn back together again. For Interleave #2 I made the panels out of only six pieces of fabric each, and I sliced them into only 12 pieces. But there is still a lot of texture here, as most of the fabrics I used are multi-colored commercial batiks. I cut the slices 1.5-inches wide so that they would end up 1-inch after accounting for seam allowances. In order to keep everything lined up nicely with proper spacing, I had to cut a .5-inch strip after cutting every 1.5-inch strip. These narrow strips are not actually used in the quilt, but they do make for some colorful ribbons that are too nice to throw away.

This time I used Fairfield Soft Touch Cotton Batting. I found it made the quilt-as-you-go quilting a little bit easier than the Thermore I used last time because the fibers don’t puff up as much. I also marked the ends of each row directly on the batting with a fabric marker and used my new 36″ clear plastic ruler to make it easier to keep everything lined up. Unfortunately, I made a mistake while marking that I didn’t notice until I was almost done, so gave myself a bit of an extra challenge and wondered why I had to keep correcting things that weren’t lining up. The fact that the strips were cut on the bias (and thus fairly stretchy) added to the challenge of keeping everything lined up.

This quilt is finished with some meandering free motion machine quilting in a colorful variegated thread. I debated whether or not to add the quilting to this one. I think it looked fine without it, but the quilting pulls the whole thing together nicely.

Interleave#2: Sunset over water, 24×24″ machine pieced and quilted

Winter break projects

In between family activities I worked on some artsy activities over winter break. My mother taught me how to crochet (but I haven’t made anything other than practice pieces), and I worked on some Spoonflower fabric for a couple of future projects (stay tuned!).  I spent most of my time on a small wall quilt that involved cutting fabric into lots of small pieces, sewing those pieces together, cutting them up, and sewing them back together again.

My inspiration came from some images of quilts by Kent Williams in the January 2013 issue of American Quilter. I like the way Kent creates the illusion of shape by sewing together thin strips of fabric and I wanted to try the technique. But thin strips of fabric are hard to sew precisely. I also recently read an article in the December 2012 Quilting Arts Magazine by Ann Brauer in which she explained her quilt-as-you-go approach for making quilts out of thin strips of fabric. It occurred to me that Ann’s method might simplify the construction of the quilt I envisioned. (I’m actually not entirely sure about Kent’s method. I’ve only found tiny photos of his quilts – not enough detail to reverse engineer his process. I did observe that the short edges of his strips are all butted up against the next strip at 90 degree angles, suggesting his technique for cutting the strips is different than the one I describe below.) I worked out that with 1/4 inch seam allowances, if I cut the fabric into 1-inch strips, half of each strip would be lost to seam allowances. Thus 1-inch strips from two panels of fabric could be interleaved, allowing the designs from the two panels to be superimposed without distortion. I decided to add improvisational piecing to the mix to add an extra layer of interest to the design, and because improv piecing is fun.

This quilt was a lot of fun to make but it required some courage to keep cutting up what looked like a perfectly good composition with the expectation that when I sewed it back together according to a vision I had in my mind, the result would be even better.

The first step was to make four 26-inch single-color square panels, each improvisationally pieced from about a half-dozen fabrics. The panels were each beautiful on their own, and lovely when placed together. I hesitated to cut them up.

I did some paper prototyping to convince myself that my slicing plan was going to work, and also to experiment with some of the details. I cut up photos of the single-color panels and reassembled them into red/blue and yellow/green panels. Then I tried positioning the red/blue panel perpendicular to the yellow/green panel, and sliced them both into 24 strips. I wasn’t entirely pleased with the results – the red/blue panel didn’t show strongly because the lines separating the colors got lost between the slices (left image). I cut up another red/blue paper panel, this time rotated 90 degrees. I liked the result (center image), but now the shapes in the two panels were superimposed and didn’t interact in interesting ways. In my third attempt (right image) I shifted the red/blue strips until they created an interesting overlapping pattern (and indeed this is the effect I love in Kent Williams’ quilts).


My next challenge was figuring out exactly where to slice the single-color panels to make the red/blue and yellow/green panels. Originally I was going to slice them at somewhat random angles, but my paper prototyping convinced me that I would get better results if I selected the angles purposefully and made the panels mirror images of each other. I figured out the ratios I wanted and actually did a bit of algebra to work out exactly where to make the cuts. I did the slicing and reassembly and had four striking bi-color panels. This time I was really hesitant to slice them up again, but I sauntered on and prepared to begin cutting up two of the bi-color panels.

But before I started slicing, I needed one more prototype to test out the quilt-as-you go technique. I grabbed some scrap fabric and sliced it into one-inch strips. But what kind of batting to use? I decided I wanted a fairly light batting, and nothing fusible (lately I’ve been enjoying the convenience of Hobbs Heirloom Fusible Cotton/Poly Batting). I had some pieces of Fairfield Soft Touch Cotton Batting and Thermore Ultra Thin Polyester Batting, which both seemed like reasonable choices for the project. I cut a small sample of each and tried both. The results were fine either way. The Thermore (on the left of the above sample) resulted in a lighter weight quilt that felt less stiff than the cotton (on the right). But both looked about the same once they were inside the quilt.

I decided to use the Thermore in my quilt, mostly because I had a piece already cut that was about the right size. I cut out some backing fabric for my quilt (blue fabric with primary-colored fish that I bought years ago to make baby quilts) a little bit larger than the batting and layered the batting on top of it. I had been planning to use the edge of each previous fabric strip sewed as a guide for sewing the next strip, but my prototype revealed that would likely lead to skewed  lines after a few strips. So I used a fabric pen to mark guide lines along the left and right edges of the backing fabric every half inch.

Then I setup an assembly line. I layered a red/blue panel over a yellow-green panel on my gridded cutting mat and made a one-inch slice. I then placed one fabric slice on the batting, used a straight edge to align the slice with the guide lines, and pinned it in place. For the first strip only, I did not immediately sew it, but placed the second strip in place and sewed them together. I pressed open the second strip, cut more strips, aligned the next strip, sewed, and repeated over and over again. I waited in suspense until I had sewn enough strips that the pattern started to emerge, and I could see the quilt in my mind take form in fabric. But it wasn’t until many, many hours later after all 48 strips were cut and sewn in place that I had confidence that this quilt was going to “work.”

Now, the quilt is finished and bound. Overall I’m pleased with the result. I like the interweaving images. I like the third layer of images from the improv piecing. I like the fact that it looks like you are looking through Venetian blinds. Sometimes when I look at it I think the contrast between the adjacent interleaved strips is too much and creates some visual dissonance. I would like to try this technique again with lower-contrast fabrics. I wish I had cut and sewn some of the strips straighter. Would a bigger rotary cutter, longer ruler, or different batting help? I wonder how it would look with fatter strips. What if they were cut diagonally? I’m contemplating a more purposeful placement of fabrics in the single-color panels. I’m pondering doing this with curves and with photos printed on fabric. So many ideas…. But first I have to decide what to do with the other two bi-colored panels.

Interleave #1: Venetian Lines – 23.75″x23.75″ Machine pieced and quilted cotton fabric.


Big, colorful quilt with no name

At the beginning of October I started a quilt project, inspired by the oh-so-colorful paintings of Loretta Grayson. I happened upon a photo of her gorgeous colorful crocheting on Facebook, and then went to her blog and finally to photos of her paintings. After a few days of being mesmerized by all that wonderful color I sorted through my fabrics and found the 40 or so brightest, most saturated, near-solid fabrics in my collection. Then I began cutting them up into piles of 4.5-inch squares. The original plan was to assemble the squares into a colorful 8×8 grid, and then superimpose some dark spirals. I started with the warm colors. Then I thought maybe I would make two 8×8 grids (one warm colors, one cool colors), cut away some shapes from one, and reverse applique it to the other. Once the two 8×8 grids were assembled, they looked quite striking sitting next to each other, taking up half my table at the STUDIO. But imagine how more striking they would look if the whole table was filled with color. So I made two more grids, and sewed them together. And then I had a 16×16, 64″ grid, and no more room on the table.

Several people have asked me how I decided which colors to put where. And why are there yellow squares and green squares off where they seem not to belong? I started with a warm quadrant and a cool quadrant. I had sorted my squares chromatically and I formed each quadrant row by row by introducing several adjacent colors into a row and then carrying them through with less frequency into the next several rows. That sounds confusing, but I had an algorithm in mind as I laid out the squares. The quadrants emerged as rough gradients, somewhat in order by hue, with some variation so as to provide more visual interest and some contrast between adjacent squares. I positioned those quadrants diagonally opposite of each other, and then constructed the remaining two quadrants to blend the warm and cool colors. But again, I wanted some contrast and I added some of those unexpected squares to help move the viewer’s eye around the quilt.

I’ve also been asked how I sewed all those squares into rows with the corners all matching up. Actually, not all the corners match up exactly, but many of them do. I do not have the patience to cut everything as exactly as I should, and I’m all for fast piecing techniques that minimize the need for pinning. I chain pieced each row of eight, first in groups of two, then sewed them into groups of four, and then finally the row of eight. The hard part was keeping the squares in order. I solved this problem by marking small numbers in the bottom right corner of each square with a ball point pen. I pressed the seam allowances all in the same direction, reversing the direction on alternating rows.Then I pinned two rows together, butting the seams together, and sewed. I added on rows until I had a quadrant. After all four quadrants were done, joining them together was just more of the same.

When you step back from the quilt, it looks large, bright, and pixelated. Was I thinking pixels when I created it? Not specifically. But I have been ruminating on some privacy-related ideas that involve pixelating faces, so maybe my subconscious was thinking about pixels. There is no hidden meaning in this one (maybe I shouldn’t tell you that, it will spoil the fun!); it is really just about color.

The STUDIO is a large room, but you can’t miss a 64″ square blast of intense, saturated color. So the quilt-in-progress started to attract attention from the various people who wandered into the room. I have had some lovely conversations with various musicians and artists who wandered by. But I was at a loss for how to quilt it. I took a photo of the quilt top, pasted it into a Powerpoint file, and auditioned various quilt patters by drawing lines over the photo. I also brought the quilt top to a Pittsburgh Fiberarts Guild meeting and asked for advice. The guild members suggested circles, swirls, anything to contrast with the regular grid. But in the end I disregarded their advice and decided to quilt straight lines. Lots of straight lines, running in every direction and in different colors. And by hand.

I do know my limits, and hand quilting little itty bitty stitches on anything larger than a handkerchief is probably not something I would have the patience to attempt. But big stitch quilting is less intimidating. I estimated I would need about 2,500 inches of quilting, which I could probably complete in 10-15 hours. So, I made plans for how to tackle this task.

But first I needed to assemble the quilt into a quilt sandwich. For a 64-inch quilt, this requires about 4 yards of fabric for the back. I hate wasting expensive fabric for the back of a wall quilt that will never be seen, so I buy clearance fabric for this purpose — the bolder and gaudier the better. My stock of backing fabric was running low so I ordered some lovely bright fabrics from Hancocks of Peducah at $3.99 a yard. It took a week or so for the fabric to arrive, and I was away for the STUDIO for much of that time anyway.

Finally back at the STUDIO I cut two 66-inch pieces of my wonderful citrus clearance fabric and sewed them together to get a wide enough piece for the quilt backing. Then I unrolled my largest piece of batting and discovered I had previously taken a big chunk out of it and now it was only about 50 inches wide. But I had just pieced the backing, so why not piece the batting as well? I dunno… never tried it, will it work? The Internet came to the rescue and I learned that piecing batting is actually pretty easy, thanks GirlReaction Crafts for a very clear photo and explanation!

Having assembled the quilt sandwich I’ve now begun quilting. Each 64-plus-inch line of stitching is taking me about 15 minutes to execute, using blue painters tape as a guide. After a few lines I switched to wider, two-inch painters tape, which was easier to lay down straight. Twelve lines in, I think this plan is going to work.

Next problem, what to call the quilt. I’m taking suggestions (if Marissa Mayer can crowd source her baby’s name, why not crowdsource naming my quilt?).